HealthyDiet RecipeWorld
Ginger-Lemon Wellness Tonic
They call it natural morphine because it removes muscle, joint, rheumatic pain To keep getting my recipes, you just have to say…
Thank you!
“Natural Morphine” Ginger-Lemon Wellness Tonic
This is a highly concentrated, zero-sugar, fiery tonic designed to be taken as daily wellness shots or diluted into warm water as a soothing tea.
Prep time: 15 minutes
Cook time: 10 minutes (for the infusion step)
Yields: Approx. 1 Liter (about 16 servings of 60ml shots)
🛒 Ingredients
200g Fresh Ginger Root (washed, unpeeled if organic, and roughly chopped)
50g Fresh Turmeric Root (optional, but highly recommended for joint pain; roughly chopped)
3 Large Lemons (juiced; save the peeled skins for boiling)
1 Large Bunch of Fresh Mint Leaves
¼ tsp Black Pepper (crucial for activating the bioavailability of turmeric)
4 cups (1 Liter) Filtered Water
Sweetener (Optional): A few drops of pure liquid stevia or monk fruit to balance the intense spice.
👩🍳 Step-by-Step Instructions
Blend the Base: Place the chopped ginger, turmeric (if using), mint leaves, and 2 cups of the water into a high-speed blender. Blend until completely pulverized into a thick, vibrant green-gold pulp.
Simmer to Infuse: Pour the blended mixture into a medium saucepan. Add the remaining 2 cups of water, the black pepper, and the leftover lemon skins (the oils in the rind carry massive anti-inflammatory benefits). Bring to a gentle simmer over medium heat, then reduce the heat to low, cover, and let it infuse for 10 minutes. Do not let it boil rapidly.
Cool and Strain: Turn off the heat and let the mixture cool to room temperature. Once cool, strain the liquid through a fine-mesh sieve or a nut milk bag into a large bowl, squeezing firmly to extract every last drop of potent juice. Discard the dry pulp.
Finish with Citrus: Stir the fresh lemon juice and your sugar-free sweetener (if using) into the strained liquid.
Bottle It: Pour the tonic into clean glass mason jars (just like the image) and secure the lids. Store in the refrigerator.
💡 Recipe Notes & Pro-Tips
The Air Fryer Quick-Dry Tip: If you want to intensely concentrate the flavors or make a dry powder batch in the future, you can actually thinly slice your ginger and turmeric and dehydrate them in your air fryer at its lowest setting (usually around 70°C–80°C) for 2 to 3 hours before grinding.
Spice Control: This recipe has a massive kick due to the raw ginger and black pepper. If it is too fiery for your throat, dilute a 60ml shot into a mug of hot water to create a comforting wellness tea.
Sediment is Gold: A layer of fine powder will settle at the bottom of your jar. This is where the concentrated gingerols and curcumin live! Always shake the jar vigorously before pouring.
Cucumber Bites with Herbed Cream Cheese
Description
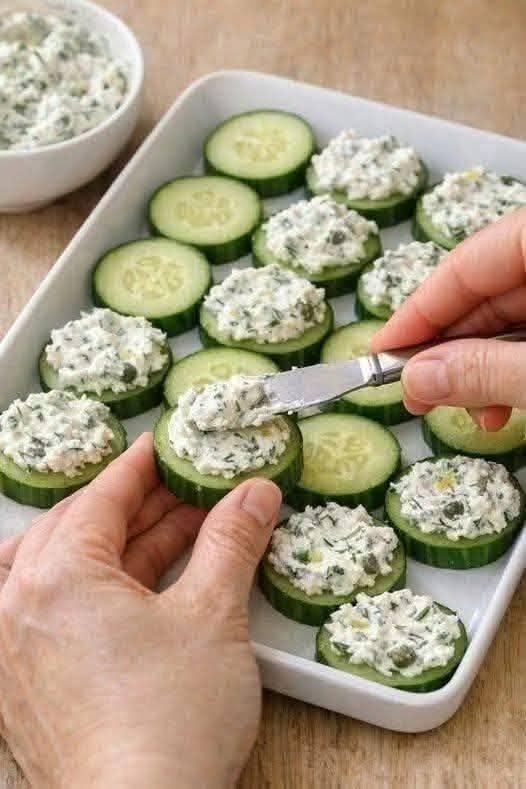
Cucumber Bites with Herbed Cream Cheese are a fresh, crisp, creamy, and elegant no-cook appetizer. Cool cucumber slices are topped with a flavorful cream cheese mixture blended with fresh herbs, lemon, and garlic. They are perfect for parties, brunches, afternoon tea, holidays, potlucks, or a light snack.
Recipe Notes
- Prep Time: 15 minutes
- Cook Time: 0 minutes
- Total Time: 15 minutes
- Servings: 24 cucumber bites
- Difficulty: Easy
- Cuisine: American/Contemporary
- Category: Appetizer / Snack
Ingredients
For the Cucumber Bites
- 2 large English cucumbers
- 8 oz (225 g) cream cheese, softened
- 2 tablespoons sour cream or Greek yogurt
- 1 tablespoon fresh lemon juice
- 1 tablespoon fresh dill, finely chopped
- 1 tablespoon fresh parsley, finely chopped
- 1 tablespoon fresh chives, finely chopped
- 1 small garlic clove, finely minced or grated
- ¼ teaspoon salt
- ⅛ teaspoon black pepper
Optional Garnishes
- Fresh dill sprigs
- Chopped chives
- Fresh parsley
- A little lemon zest
- Paprika or cracked black pepper
Instructions
- Prepare the cucumbers: Wash and dry the cucumbers thoroughly. Cut them into approximately ½-inch (1–1.5 cm) thick slices.
- Reduce excess moisture: If the cucumbers are particularly juicy, gently pat the slices dry with paper towels. This helps the cream cheese stay in place.
- Make the herbed cream cheese: In a bowl, combine softened cream cheese, sour cream or Greek yogurt, lemon juice, dill, parsley, chives, garlic, salt, and black pepper.
- Mix until smooth: Stir or beat the mixture until creamy and well combined. Taste and adjust the seasoning if needed.
- Add the topping: Spoon a small amount of herbed cream cheese onto each cucumber slice. For a prettier presentation, transfer the cream cheese to a piping bag or zip-top bag with the corner snipped off and pipe it onto the cucumber.
- Garnish: Top each bite with a small piece of dill, chopped chives, parsley, lemon zest, or a sprinkle of black pepper.
- Chill: Refrigerate for about 15–30 minutes before serving for the best flavor and texture.
- Serve: Arrange on a serving platter and serve chilled.
Tips for the Best Cucumber Bites
- Use English cucumbers when possible because they have thin skins, fewer seeds, and a crisp texture.
- Soften the cream cheese before mixing so the herb mixture becomes smooth.
- Dry the cucumber slices before topping them to prevent watery appetizers.
- For a more luxurious presentation, pipe the cream cheese rather than spooning it.
- Make sure the herbs are fresh and finely chopped for the best flavor.
- Don’t add too much topping; a small mound keeps each bite balanced and easy to eat.
- For a stronger flavor, let the cream cheese mixture rest in the refrigerator for 30–60 minutes before assembling.
- Assemble relatively close to serving time for the crispest cucumbers.
Make-Ahead Notes
The herbed cream cheese can be prepared up to 1–2 days ahead and stored covered in the refrigerator. For the freshest cucumber texture, slice the cucumbers and assemble the bites a few hours before serving.
Variations
Smoked Salmon Cucumber Bites
Add a small piece of smoked salmon and a sprig of dill to each bite.
Everything Bagel Style
Sprinkle the finished bites with everything bagel seasoning.
Mediterranean Style
Add crumbled feta, oregano, and a tiny piece of roasted red pepper.
Spicy Version
Add a pinch of cayenne pepper or red pepper flakes to the cream cheese.
Extra-Lemony
Add additional lemon zest and a little more lemon juice for a brighter flavor.
Approximate Nutritional Information
Per serving, assuming 24 cucumber bites and standard full-fat cream cheese. Values are estimates and will vary according to ingredients and portion size.
| Nutrient | Approx. Amount |
|---|---|
| Calories | 35 kcal |
| Carbohydrates | 1.5 g |
| Protein | 1 g |
| Fat | 3 g |
| Saturated Fat | 1.7 g |
| Fiber | 0.2 g |
| Sugar | 0.7 g |
| Sodium | 45 mg |
Benefits
- Hydrating: Cucumbers have a high water content, making these bites refreshing.
- Provides vitamin K: Cucumbers contribute vitamin K, which supports normal blood clotting and bone health.
- Fresh herbs add micronutrients: Dill, parsley, and chives provide small amounts of vitamins, minerals, and plant compounds.
- Protein and calcium: Cream cheese contributes some protein and calcium, although amounts depend on the brand.
- Light appetizer option: The cucumber base keeps the bites relatively light compared with many fried or pastry-based appetizers.
These nutritional benefits are general food information and aren’t intended as medical advice.
Frequently Asked Questions
Q: Can I make cucumber bites ahead of time?
Yes. For the best texture, prepare the cream cheese mixture ahead and assemble the bites a few hours before serving.
Q: How do I stop cucumber bites from becoming watery?
Pat the cucumber slices dry before adding the topping. Avoid adding the cream cheese too far in advance.
Q: Can I use regular cucumbers instead of English cucumbers?
Absolutely. Regular cucumbers work well, although they may have more seeds and thicker skin.
Q: Can I use flavored cream cheese?
Yes. Garlic-and-herb, chive, or vegetable cream cheese can be used to simplify the recipe.
Q: Can I use Greek yogurt instead of sour cream?
Yes. Greek yogurt gives the cream cheese mixture a slightly lighter and tangier flavor.
Q: How long do cucumber bites last in the refrigerator?
They are best enjoyed the same day. If necessary, refrigerate leftovers in an airtight container and consume within about 24 hours, keeping in mind that the cucumbers may soften.
Q: Can I make these dairy-free?
Yes. Use a dairy-free cream cheese alternative and dairy-free yogurt if desired.
Q: What can I serve with cucumber bites?
They pair especially well with tea sandwiches, crackers, fresh fruit, vegetable platters, sparkling drinks, and other light appetizers.
Q: Are cucumber bites suitable for a party?
Definitely. They’re easy to assemble, require no cooking, and can be arranged attractively on a platter.
Serving Suggestion
For an elegant appetizer platter, arrange the cucumber bites in a circular pattern and garnish with fresh dill, parsley, and thin lemon slices. They are particularly attractive for brunches, baby showers, afternoon tea, holiday gatherings, and summer parties.
Blueberry Raspberry Oat Crumble Bars
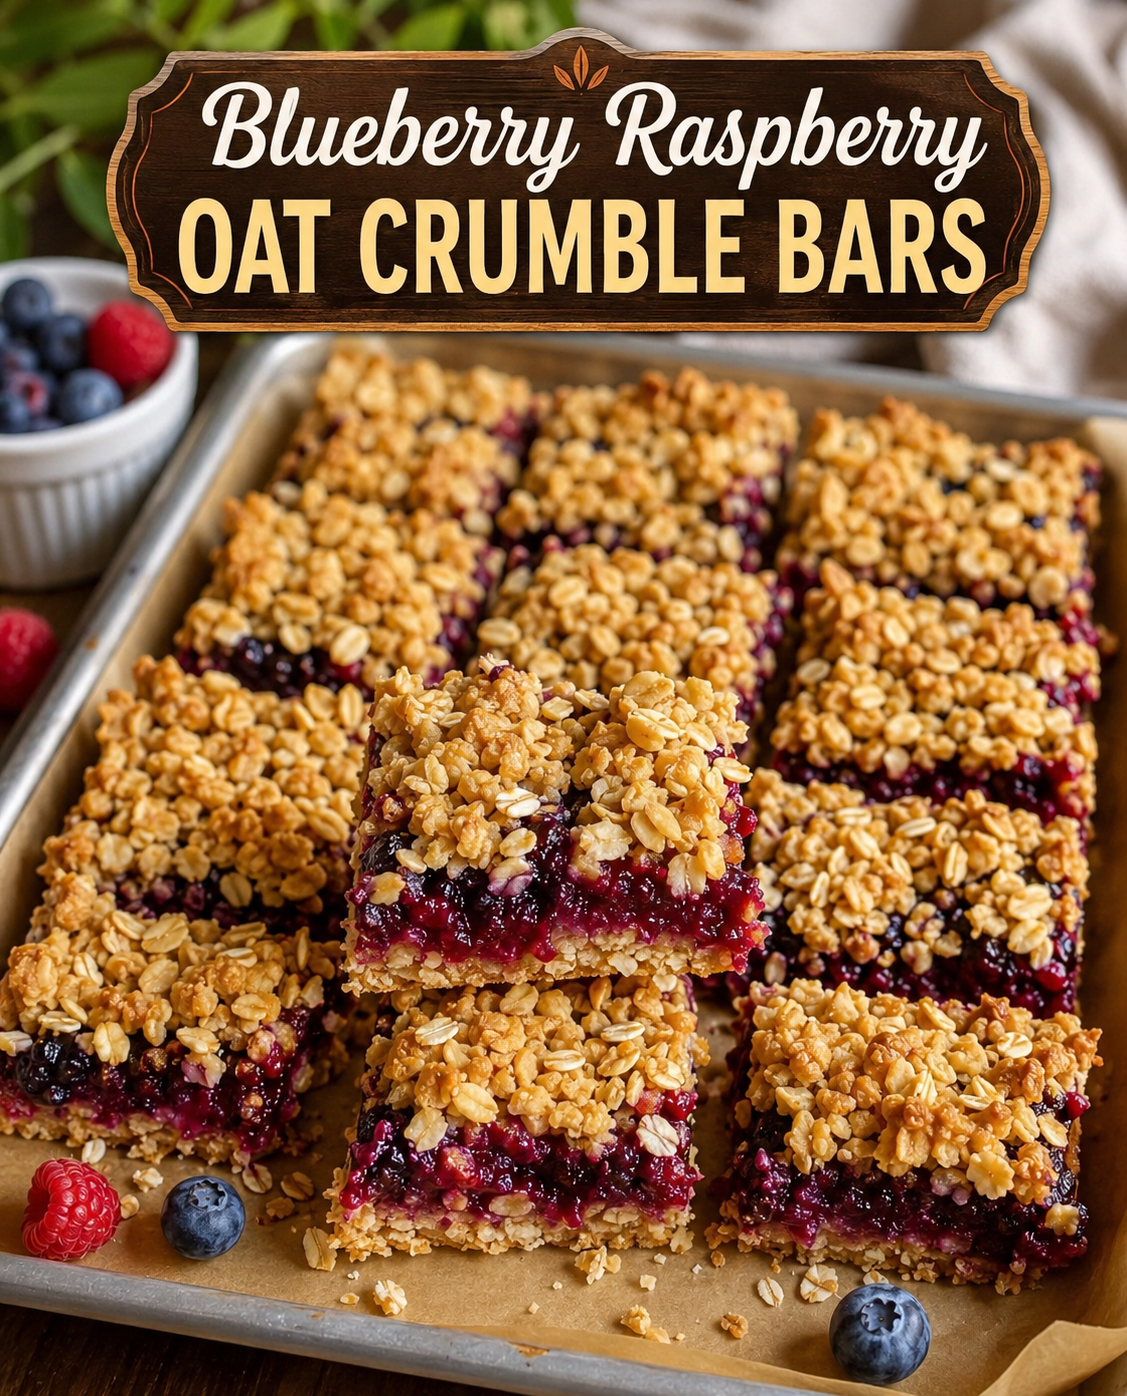
These Blueberry Raspberry Oat Crumble Bars are the perfect combination of buttery oat crumble, sweet-tart berries, and a soft, jammy fruit center. They’re simple enough for a weekday treat but beautiful enough to serve at brunch, afternoon tea, or a family gathering.
The bottom crust is made from a golden oat mixture that becomes tender and slightly crisp around the edges. A thick layer of blueberry and raspberry filling goes in the middle, followed by more buttery crumble on top. As the bars bake, the berries become rich and jammy while the oat topping turns beautifully golden and crunchy.
They’re delicious warm, but they become even easier to slice once completely cooled.
Ingredients
For the oat crumble
- 1½ cups old-fashioned rolled oats
- 1½ cups all-purpose flour
- ¾ cup packed light brown sugar
- ½ cup granulated sugar
- ½ teaspoon baking powder
- ½ teaspoon salt
- 1 teaspoon ground cinnamon
- ¾ cup unsalted butter, melted
- 1 teaspoon vanilla extract
For the berry filling
- 1½ cups fresh or frozen blueberries
- 1½ cups fresh or frozen raspberries
- ½ cup granulated sugar
- 2 tablespoons cornstarch
- 1 tablespoon fresh lemon juice
- 1 teaspoon lemon zest
- 1 teaspoon vanilla extract
- Pinch of salt
Optional finishing
- Powdered sugar, for dusting
- Fresh blueberries and raspberries
- A little extra rolled oats
- Vanilla ice cream or whipped cream for serving
Instructions
1. Prepare the baking pan
Preheat your oven to 350°F (175°C).
Line an 8×8-inch or 9×9-inch baking pan with parchment paper, leaving some parchment hanging over the sides. This makes it much easier to lift the finished bars from the pan.
Lightly grease the parchment and the exposed sides of the pan.
2. Make the crumble mixture
In a large mixing bowl, combine the rolled oats, flour, brown sugar, granulated sugar, baking powder, salt, and cinnamon.
Stir everything together until evenly distributed.
Pour in the melted butter and vanilla extract. Mix with a fork or spatula until the ingredients are thoroughly combined. The mixture should look crumbly but hold together when pressed between your fingers.
Set aside about 1 cup of the crumble mixture for the topping.
3. Make the berry filling
Place the blueberries and raspberries in a medium saucepan.
Add the granulated sugar, cornstarch, lemon juice, lemon zest, vanilla extract, and a small pinch of salt.
Stir gently so the berries become coated.
Place the saucepan over medium heat and cook for approximately 5–8 minutes, stirring occasionally. The berries will begin releasing their juices and the mixture will gradually become thick and glossy.
If using frozen berries, you may need an additional couple of minutes.
You don’t want to completely break down all of the berries. A few whole or partially whole berries will give the finished bars a wonderful texture.
Once thickened, remove the filling from the heat and allow it to cool for a few minutes.
4. Form the bottom crust
Take the larger portion of the oat crumble mixture and press it firmly into the bottom of the prepared pan.
Use the back of a measuring cup or the bottom of a glass to create an even layer.
Pressing the crust firmly is important because it gives the bars a sturdy base that won’t fall apart when sliced.
Bake the crust for 10–12 minutes, just until it begins to look lightly golden around the edges.
Remove the pan from the oven.
5. Add the berry layer
Carefully spoon the warm berry mixture over the partially baked oat crust.
Spread it gently with a spatula so the berries cover the entire surface.
Try not to press too hard, as you don’t want to disturb the crust underneath.
The berry layer should be thick, glossy, and evenly distributed.
6. Add the crumble topping
Take the reserved crumble mixture and sprinkle it evenly over the berry filling.
You can leave some larger pieces of crumble intact. These create those delicious golden, crunchy pieces visible on top of the bars.
For an extra oat-filled texture, sprinkle a tablespoon or two of additional rolled oats over the top.
7. Bake
Return the pan to the oven and bake for approximately 30–38 minutes.
The bars are ready when the crumble topping is golden brown and the berry filling is bubbling around the edges.
Don’t worry if the center still looks slightly soft. The filling will continue to set as the bars cool.
If the top begins browning too quickly, loosely cover the pan with aluminum foil during the final few minutes of
Salted Caramel Pecan Cracker Bites
🍯 Salted Caramel Pecan Cracker Bites
These Salted Caramel Pecan Cracker Bites are buttery, crunchy, sweet, salty, and incredibly addictive. Buttery crackers are coated in a homemade brown-sugar caramel, topped with crunchy pecans, and finished with flaky sea salt.
Ingredients
For the bites:
- 2 cups buttery round crackers, such as Ritz-style crackers
- 1 cup pecans, roughly chopped
- 1 cup unsalted butter
- 1 cup packed light brown sugar
- ½ cup granulated sugar
- ¼ cup heavy cream
- 1 teaspoon vanilla extract
- ½ teaspoon salt
- ½ teaspoon ground cinnamon, optional
- ½ teaspoon baking soda
- Flaky sea salt, for topping
Instructions
1. Prepare the oven:
Preheat your oven to 350°F (175°C). Line a large baking sheet with parchment paper or a silicone baking mat.
2. Arrange the crackers:
Place the crackers in a single layer on the prepared baking sheet. Try to keep them close together so the caramel coats them evenly.
3. Make the caramel:
Add the butter, brown sugar, granulated sugar, heavy cream, and salt to a saucepan over medium heat.
4. Boil:
Stir until the butter melts and the mixture becomes smooth. Bring it to a gentle boil and cook for 3–4 minutes, stirring frequently.
5. Finish the caramel:
Remove the saucepan from the heat. Stir in the vanilla, cinnamon if using, and baking soda. The mixture will become light and foamy.
6. Coat the crackers:
Immediately pour the hot caramel over the crackers. Use a spatula to spread it as evenly as possible.
7. Add pecans:
Sprinkle the chopped pecans generously over the caramel-coated crackers. Gently press them into the caramel.
8. Bake:
Bake for 8–10 minutes, until the caramel is bubbling and golden brown. Watch carefully toward the end so it doesn’t burn.
9. Add sea salt:
Remove from the oven and immediately sprinkle with flaky sea salt.
10. Cool completely:
Let the cracker bites cool on the baking sheet for at least 30–45 minutes, or until the caramel has completely hardened.
11. Break apart:
Once cool, break or cut the pieces apart into bite-sized clusters.
⭐ Tips for Perfect Cracker Bites
Use real butter for the best caramel flavor.
Don’t boil the caramel for too long or it can become hard and bitter.
Spread the caramel quickly because it thickens as it cools.
Toasted pecans give an especially delicious flavor.
For extra caramel flavor, add ½ teaspoon caramel extract along with the vanilla.
Storage
Store the cooled cracker bites in an airtight container at room temperature for up to 1 week. Place parchment paper between layers to prevent them from sticking together.
Yield: About 8–10 servings
Prep Time: 10 minutes
Bake Time: 8–10 minutes
Total Time: About 45 minutes
Simple and Delicious Lentil and Zucchini Recipe
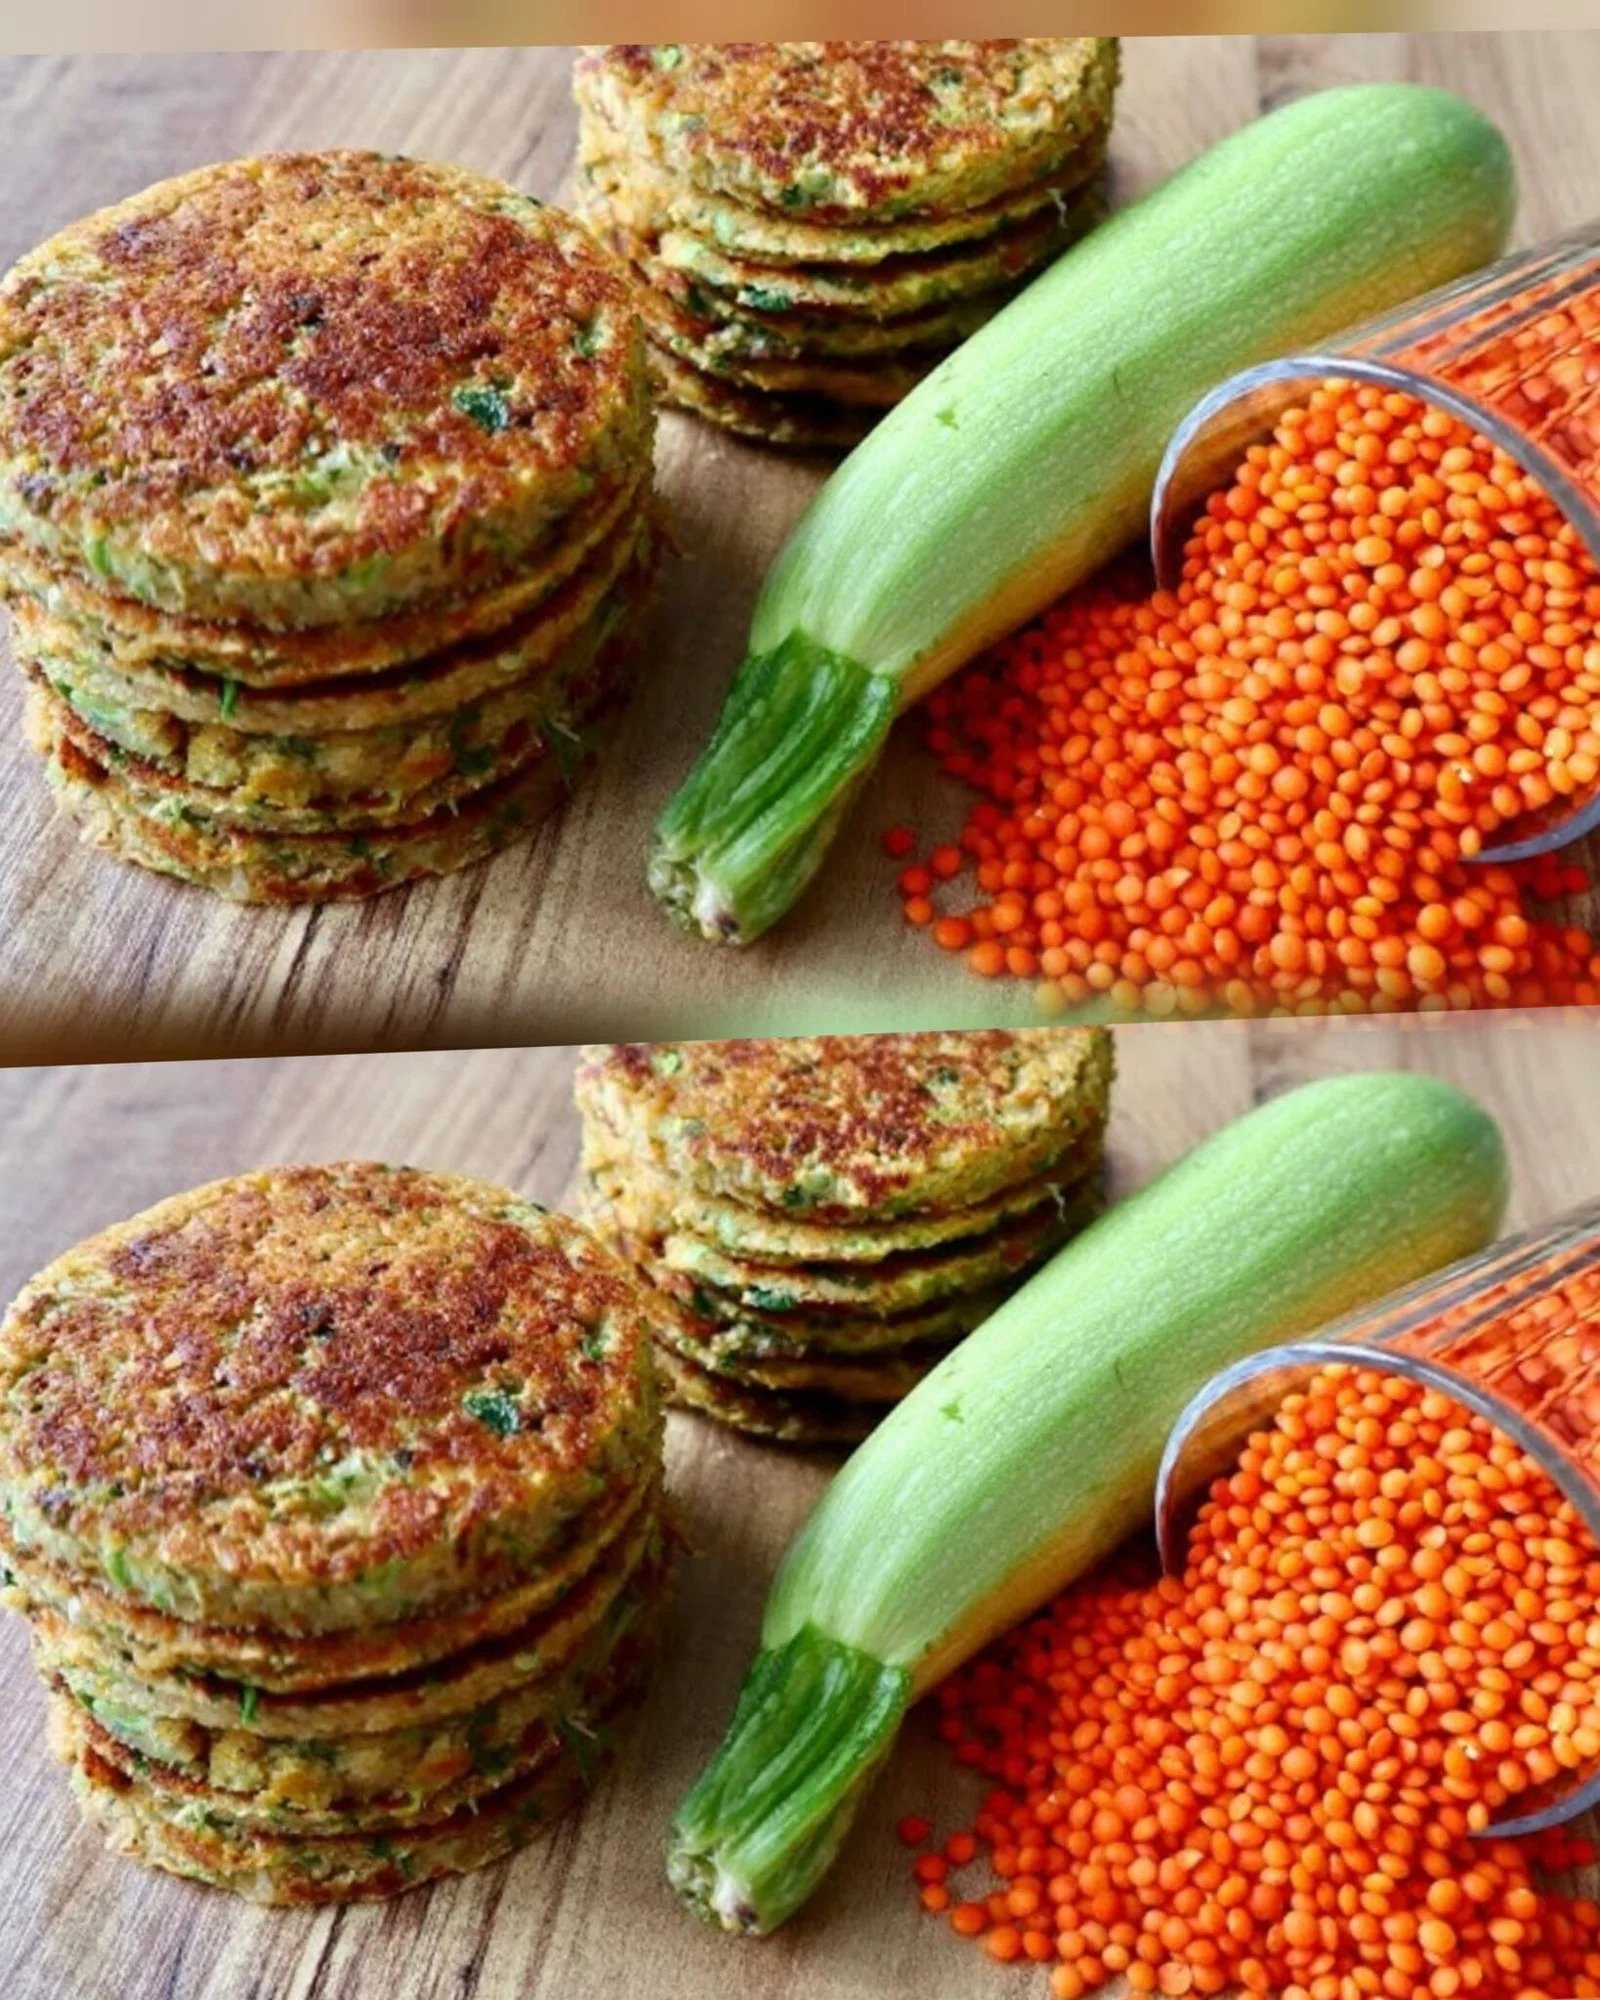
This lentil and zucchini recipe is not only simple and delicious but also packed with nutrients. It’s a perfect dish for a quick, healthy meal that you can enjoy almost every day. The combination of lentils and zucchini makes for a hearty and satisfying dish that’s rich in protein, fiber, and vitamins. Here’s how to make it.
Ingredients:
200g lentils (any variety, but green or brown work best)
1 medium zucchini, chopped
1 small onion, finely chopped
2 cloves of garlic, minced
1 medium tomato, chopped (optional)
2 tablespoons olive oil
1 teaspoon cumin powder
1/2 teaspoon paprika
1/2 teaspoon turmeric powder (optional)
Salt and pepper to taste
Fresh herbs for garnish (like parsley or cilantro)
Water or vegetable broth (for cooking lentils)
Instructions:
1. Cook the Lentils
Rinse the Lentils: Start by rinsing the lentils under cold water to remove any debris or dust.
Cook the Lentils: In a medium saucepan, add the rinsed lentils and cover with water or vegetable broth (about 2-3 cups). Bring to a boil, then reduce the heat and let it simmer for about 20-25 minutes, or until the lentils are tender but not mushy. Drain any excess liquid and set aside.
2. Prepare the Vegetables
Chop the Zucchini: While the lentils are cooking, chop the zucchini into bite-sized pieces.
Sauté the Vegetables: In a large skillet or saucepan, heat the olive oil over medium heat. Add the chopped onion and sauté until it becomes soft and translucent, about 3-4 minutes.
Add Garlic and Spices: Add the minced garlic to the pan and cook for another minute until fragrant. Then, stir in the cumin, paprika, and turmeric (if using). Cook for another minute to toast the spices.
3. Combine and Cook
Add Zucchini: Add the chopped zucchini to the skillet and sauté for about 5-7 minutes, or until the zucchini is tender and slightly golden. If you’re using a tomato, add it now and cook until it softens.
Add Cooked Lentils: Once the zucchini is cooked, add the cooked lentils to the skillet. Stir everything together to combine the flavors. Season with salt and pepper to taste.
4. Simmer and Serve
Simmer: Let the mixture simmer for a few minutes to allow the flavors to meld together. If the mixture seems too dry, you can add a splash of water or broth to reach your desired consistency.
Serve: Once everything is heated through, remove from heat. Garnish with fresh herbs like parsley or cilantro.
5. Enjoy:
Serve this lentil and zucchini dish warm, either on its own or over a bed of rice or quinoa for a more substantial meal. It also pairs well with a side of crusty bread.
Tips for Best Results
Cook Lentils Al Dente: Make sure the lentils are cooked but still have a bit of a bite to them. Overcooked lentils can become mushy and may lose their texture in the dish.
Experiment with Spices: Feel free to add other spices or herbs that you enjoy, such as thyme, rosemary, or chili flakes for a bit of heat.
Add More Vegetables: This recipe is versatile, so you can easily add other vegetables you have on hand, such as carrots, bell peppers, or spinach.
Nutritional Benefits
Lentils: Lentils are an excellent source of plant-based protein and fiber, which help keep you full and support digestive health. They’re also rich in iron, folate, and other essential nutrients.
Zucchini: Zucchini is low in calories but high in vitamins A and C, potassium, and antioxidants. It adds a light, fresh flavor to the dish and boosts its nutritional content.
This simple lentil and zucchini recipe is a quick, healthy, and delicious meal that you can enjoy any day of the week. Whether you’re looking for a satisfying vegetarian dish or just want to add more plant-based meals to your diet, this recipe is a fantastic option. With minimal ingredients and easy preparation, it’s a dish you’ll want to make over and over again!
For more Zucchini Recipes:
Weight Watchers Zucchini & Chicken Skillet
Baked Tuscan Garlic Chicken & Zucchini Bake
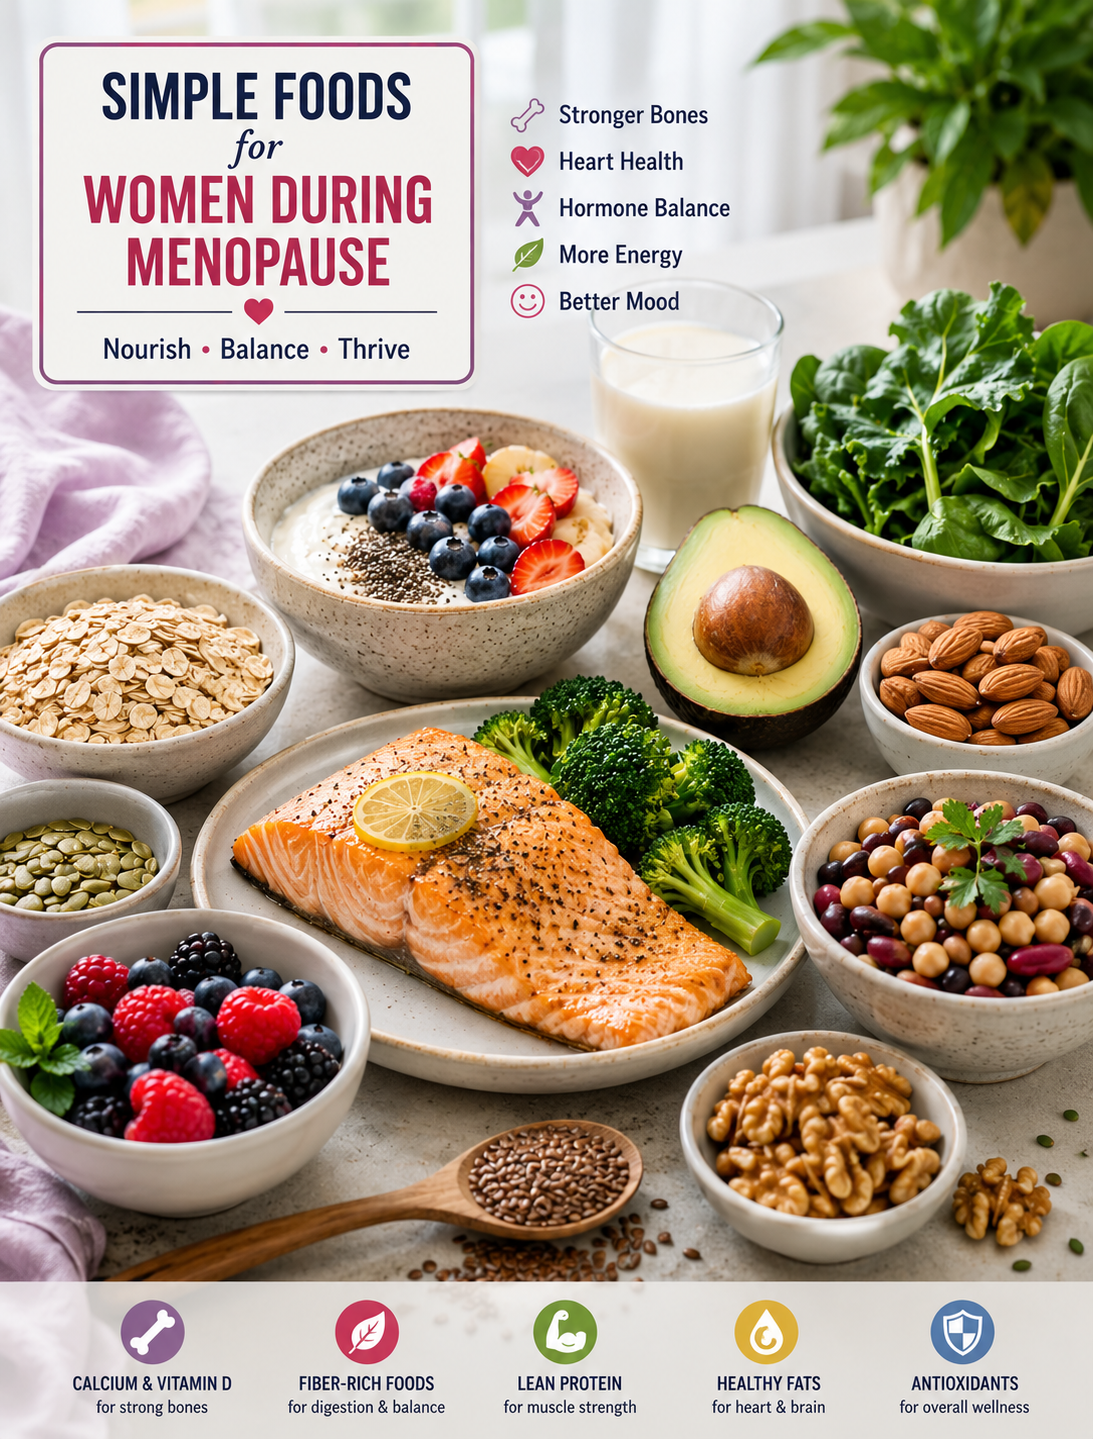
Simple Foods for Women During Menopause: 10 Healthy Choices
Simple Foods for Women During Menopause
10 Healthy Choices
Menopause is a normal stage of life, but the changes that come with it can affect how you feel and how your body uses energy. Hormone changes can also increase the long-term risk of conditions such as heart disease and osteoporosis. A balanced diet can help support your bones, muscles, heart, and overall health during this transition.
There is no single food that can prevent every menopause symptom. However, choosing nutrient-rich foods can help you meet your changing nutritional needs while supporting healthy aging.
The best approach is simple: eat more whole foods, include enough protein and fiber, choose healthy fats, and pay special attention to calcium and vitamin D. These habits can become part of an everyday eating pattern without requiring expensive supplements or complicated meal plans.
Why Nutrition Matters During Menopause
Estrogen levels decline during menopause, and this change can affect several areas of health. Bone loss can become a greater concern, while heart health, muscle mass, body weight, and blood sugar also deserve attention.
Women may also need fewer calories as they age because muscle mass and activity levels can change. This makes food quality especially important because each meal should provide useful nutrients without relying heavily on added sugar or highly processed foods.
A practical menopause diet does not need to be restrictive. Build meals around vegetables, fruits, whole grains, lean proteins, beans, nuts, seeds, and healthy fats.
1. Greek Yogurt for Protein and Calcium
Plain Greek yogurt is an easy food to add to breakfast or snacks. It provides protein and calcium, two nutrients that become especially important for maintaining strength and bone health.
Choose plain yogurt instead of heavily sweetened varieties to keep added sugar lower. Add berries, sliced fruit, chia seeds, or walnuts for extra fiber and healthy fats.
Greek yogurt can also replace sour cream in some recipes, making it a simple way to add more protein to everyday meals.
Women over 50 generally need more calcium than younger adult women. The Office on Women’s Health recommends 1,200 milligrams of calcium daily for women ages 51 and older.
2. Salmon for Vitamin D and Healthy Fats
Salmon provides high-quality protein and is also a source of vitamin D. It contains omega-3 fatty acids, which are part of a heart-conscious eating pattern.
Try baked or grilled salmon with roasted vegetables and a whole grain such as quinoa or brown rice. This creates a balanced meal without needing a heavy sauce.
Other seafood options can also add protein and nutrients to your diet. Choosing different types of seafood throughout the week can help keep meals varied.
Vitamin D is important because it helps the body absorb calcium and supports bone health. Fatty fish such as salmon are among the food sources of vitamin D.
3. Leafy Greens for Fiber and Minerals
Spinach, kale, collard greens, and other dark leafy vegetables can add fiber and important nutrients to meals.
Try adding spinach to scrambled eggs, kale to a grain bowl, or cooked greens to a bean-based dinner. You can also blend spinach into a smoothie with fruit and plain yogurt.
Leafy greens can contribute to your daily calcium intake, although the amount absorbed varies by the type of vegetable. They are also useful sources of fiber and other nutrients.
4. Berries for a Fiber-Rich Sweet Option
Strawberries, blueberries, raspberries, and blackberries can satisfy a sweet craving while adding fiber and nutrients.
Add berries to oatmeal, plain yogurt, or whole-grain cereal. Frozen berries are also a convenient choice when fresh fruit is expensive or unavailable.
Fiber is important for digestive health and is part of a heart-healthy eating pattern. The Office on Women’s Health notes that many women do not get enough fiber and recommends foods such as berries, beans, whole grains, vegetables, and nuts.
5. Beans and Lentils for Plant Protein
Beans and lentils are affordable sources of plant protein and fiber. They can help make meals more filling without relying on large portions of meat.
Add black beans to tacos, chickpeas to salads, or lentils to soups. You can also use beans as the base for a simple grain bowl with vegetables and avocado.
Increasing fiber gradually can help reduce digestive discomfort. Drink enough fluids as you increase high-fiber foods.
6. Nuts and Seeds for Healthy Fats
Walnuts, almonds, chia seeds, flaxseeds, and pumpkin seeds are easy additions to a menopause-friendly eating pattern.
Sprinkle chia or ground flaxseed over oatmeal and yogurt. Add walnuts or almonds to salads for crunch and flavor.
Nuts and seeds provide unsaturated fats along with other nutrients. They can also make meals more satisfying, which may help you avoid reaching for highly processed snacks between meals.
Because nuts and seeds are calorie-dense, a small serving is usually enough.
7. Oats for Fiber and a Filling Breakfast
Oats are a simple whole-grain option for breakfast. They provide fiber and can be combined with several other nutrient-rich foods.
Try oatmeal topped with berries, walnuts, chia seeds, and cinnamon. Avoid making the bowl mostly sugar by limiting large amounts of syrup, brown sugar, or sweetened creamers.
Oats can also provide soluble fiber, which is useful as part of a heart-conscious eating pattern. This makes them a practical breakfast choice for women concerned about cholesterol as they age.
8. Calcium-Fortified Foods
Milk, yogurt, cheese, calcium-fortified soy beverages, tofu made with calcium, and some fortified cereals can help women meet their calcium needs.
If you do not consume dairy, check food labels for calcium-fortified alternatives. Fortified soy beverages can provide calcium while also contributing protein.
Calcium supports bones, muscles, nerves, and several other body functions. After menopause, adequate calcium becomes particularly important because bone loss can increase.
Food is often the best place to start. If you are unsure whether your diet provides enough calcium, discuss your needs with a healthcare professional before starting a supplement.
9. Avocado for Healthy Fats
Avocado provides unsaturated fats, fiber, and several vitamins and minerals. Its creamy texture makes it easy to use in place of foods higher in saturated fat.
Spread avocado on whole-grain toast, add it to a salad, or use it as a topping for beans and vegetables.
A balanced diet should include healthy sources of fat rather than trying to eliminate dietary fat completely.
10. Water-Rich Foods and Fluids
Hydration remains important during every stage of life. Water, unsweetened beverages, fruits, and vegetables can all contribute to daily fluid intake.
Keep a reusable water bottle nearby and drink throughout the day rather than waiting until you feel very thirsty.
If hot flashes make you uncomfortable, some women find that limiting individual triggers such as caffeine or alcohol may help, but triggers vary from person to person. Menopause symptoms can differ widely between women.
Foods to Limit During Menopause
You do not need to completely remove your favorite foods. Instead, make highly processed foods and sugary drinks occasional choices.
Limit foods that are consistently high in added sugar, saturated fat, and sodium. Examples include sugary sodas, candy, pastries, heavily processed meats, and many packaged snack foods.
Alcohol is another item worth limiting. The National Institute on Aging recommends limiting or avoiding alcohol and not smoking as part of staying healthy during and after menopause.
Replacing these foods with vegetables, fruits, whole grains, beans, nuts, seeds, seafood, and lean protein can improve the overall quality of your diet.
A Simple Menopause-Friendly Day of Eating
Breakfast can be oatmeal with berries, chia seeds, and plain Greek yogurt.
Lunch can include a large salad with chickpeas, leafy greens, avocado, tomatoes, and grilled chicken.
For a snack, choose plain yogurt with berries or a small handful of walnuts and fresh fruit.
Dinner can include baked salmon, roasted broccoli, and quinoa.
This type of meal pattern provides protein, fiber, healthy fats, whole grains, fruits, vegetables, calcium, and other nutrients without requiring complicated recipes.
A Few Healthy Habits to Pair With Your Diet
Food is only one part of healthy aging. Staying physically active is also important during and after menopause.
Walking, strength training, balance exercises, and other activities can support physical function and help maintain muscle and bone health. The National Institute on Aging recommends being physically active as part of a healthy lifestyle during and after menopause.
Good sleep habits also matter. Try to keep a regular sleep schedule and make your bedroom comfortable and cool if night sweats disturb your sleep.
If menopause symptoms are severe, persistent, or affecting your daily life, speak with a healthcare professional. Diet can support overall health, but it is not a replacement for appropriate medical care.
The Bottom Line
The best foods for women during menopause are not exotic or complicated. Greek yogurt, salmon, leafy greens, berries, beans, oats, nuts, seeds, avocado, and calcium-fortified foods can all fit into a balanced eating pattern.
Focus on variety instead of searching for one “menopause superfood.” Include protein at meals, choose fiber-rich foods, use healthier fats, and make calcium and vitamin D a regular part of your nutrition plan.
Small changes can add up. A bowl of oatmeal instead of a sugary pastry, berries instead of candy, or beans instead of processed meat can make an everyday meal more nutrient-dense.
Menopause is a natural life stage, and your food choices can help support your health through the transition and beyond.
Frequently Asked Questions
What are the best foods for women during menopause?
Foods rich in protein, fiber, calcium, vitamin D, healthy fats, fruits, vegetables, and whole grains are useful choices during menopause.
What foods are good for menopause symptoms?
There is no single food that treats all symptoms, but a balanced diet with vegetables, fruits, whole grains, protein, and healthy fats supports overall health.
Should women eat more calcium after menopause?
Yes. Women age 51 and older generally need 1,200 mg of calcium daily to support bone health.
What foods contain vitamin D?
Salmon and other fatty fish, fortified milk, fortified soy beverages, some cereals, and fortified orange juice can provide vitamin D.
Are berries good during menopause?
Yes. Berries provide fiber and nutrients and can add natural sweetness to yogurt, oatmeal, and other meals.
Is Greek yogurt good for menopause?
Plain Greek yogurt can provide protein and calcium, making it a convenient option for breakfast or snacks.
Are oats good for women during menopause?
Yes. Oats provide whole-grain carbohydrates and fiber and can be paired with fruit, seeds, nuts, or yogurt.
What foods support bone health after menopause?
Calcium-rich foods, vitamin-D sources, adequate protein, and a balanced diet can help support bone health after menopause.
Should women avoid dairy during menopause?
No. Dairy can be a useful source of calcium and protein unless you have an allergy, intolerance, or another reason to avoid it.
Can diet help with menopause weight gain?
A nutrient-dense diet with appropriate portions, adequate protein, fiber-rich foods, and regular physical activity can support healthy weight management.
How much fiber do women need after age 50?
The Office on Women’s Health lists 22 grams of fiber per day for women age 51 and older.
Should I take calcium or vitamin D supplements?
Not everyone needs supplements, so discuss your diet, health history, medications, and nutritional needs with your healthcare professional before taking them.
Air Fryer Cheesy Vegetable Fritters
Crispy on the outside, tender on the inside, and loaded with colorful vegetables and melty cheese, these Air Fryer Cheesy Vegetable Fritters are an easy way to turn everyday vegetables into a delicious family-friendly meal or side dish.Instead of deep-frying, these fritters are cooked in the air fryer with just a light coating of oil, giving them beautifully crisp edges while keeping the inside soft and cheesy. They are perfect for breakfast, lunch, dinner, or even a quick snack.The best part? You can customize them with almost any vegetables you have in your refrigerator. Zucchini, carrots, corn, bell peppers, spinach, and green onions all work beautifully together.
Prep Time: 15 minutes
Cook Time: 12–16 minutes
Total Time: 27–31 minutes
Servings: 4
Difficulty: Easy
Why You’ll Love This Recipe
These cheesy vegetable fritters are one of those recipes you’ll want to make whenever you have leftover vegetables.
Air fryer friendly: You get crispy fritters without deep-frying.
Cheesy and flavorful: Melted cheese adds richness and helps bring the vegetables together.
Easy to customize: Use whatever vegetables you already have available.
Family-friendly: Even picky eaters may be more interested in vegetables when they’re mixed with cheese and cooked until golden.
Great for meal prep: The fritters can be refrigerated and reheated for a quick snack or lunch.
Ingredients For Air Fryer Cheesy Vegetable Fritters
1 medium zucchini, grated
1 medium carrot, grated
½ cup finely chopped bell pepper
½ cup corn kernels
2 green onions, finely chopped
1 cup shredded cheddar cheese
2 large eggs
½ cup all-purpose flour
¼ cup grated Parmesan cheese
½ teaspoon garlic powder
½ teaspoon onion powder
paprika ½ teaspoon
black pepper ¼ teaspoon
salt ½ teaspoon
1 tablespoon olive oil or avocado oil
Fresh parsley, optional
Optional Additions
For extra flavor, add:
½ teaspoon dried Italian herbs
A pinch of chili flakes
¼ cup chopped spinach
1 tablespoon chopped fresh cilantro
¼ cup finely chopped mushrooms
Instructions For Air Fryer Cheesy Vegetable Fritters
Prepare the Zucchini
Grate the zucchini using the large holes of a box grater.
Place the grated zucchini in a clean kitchen towel or several layers of paper towel.
Squeeze firmly to remove as much liquid as possible.
This step is extremely important because zucchini contains a lot of water. Excess moisture can make your fritters soft and difficult to crisp.
Prepare the Vegetables
Grate the carrot and finely chop the bell pepper and green onions.
If you’re using fresh corn, remove the kernels from the cob. If using frozen corn, thaw it and drain it well.
Place all the prepared vegetables in a large mixing bowl.
Add the Cheese
Add the shredded cheddar and Parmesan cheese to the vegetables.
Stir gently until everything is evenly distributed.
Add the Eggs and Dry Ingredients
Crack the eggs into the bowl.
Add the flour, garlic powder, onion powder, paprika, black pepper, and salt.
Mix until a thick, scoopable mixture forms.
The mixture should hold together when pressed with a spoon. If it seems too wet, add another tablespoon of flour.
Preheat the Air Fryer
Preheat your air fryer to 375°F (190°C) for about 3 minutes if your model requires preheating.
Lightly brush or spray the air fryer basket with oil.
Shape the Fritters
Scoop approximately 2 tablespoons of mixture for each fritter.
Place the portions into the air fryer basket, leaving space between each one.
Gently flatten each fritter with the back of a spoon.
Avoid making them too thick, as thinner fritters cook more evenly and become crispier.
Air Fry
Lightly brush or spray the tops with oil.
Air fry at 375°F (190°C) for 6–8 minutes.
Carefully flip the fritters and continue cooking for another 5–7 minutes, or until golden brown and crisp around the edges.
Because air fryers vary, begin checking them a little early.
Serve
Remove the fritters from the air fryer and allow them to cool for 2–3 minutes.
Garnish with fresh parsley or green onions.
Serve warm with your favorite dipping sauce.
Tips for Perfect Vegetable Fritters
Squeeze the zucchini well: This is the most important step for crispy fritters.
Don’t overcrowd the basket: Arrange the fritters in a single layer with space between them so hot air can circulate.
Make them similar in size: Evenly sized fritters cook at the same rate.
Use freshly shredded cheese: It generally melts better and gives the fritters a delicious texture.
Adjust the flour: Different vegetables contain different amounts of moisture. Add a little extra flour if your mixture is too wet.
Don’t flip too early: Let the first side become firm and golden before turning.
Watch the final minutes: Cheese can brown quickly in an air fryer.
Make them spicy: Add chili flakes, cayenne, or finely chopped jalapeño.
Benefits For Air Fryer Cheesy Vegetable Fritters
These fritters are a delicious way to include several vegetables in one meal.
Zucchini and carrots contribute fiber, vitamins, minerals, and naturally occurring plant compounds. Bell peppers add additional vitamins and color, while corn contributes carbohydrates and fiber.
Eggs and cheese provide protein, helping make the fritters more satisfying than vegetables alone.
Air frying also means you can achieve a crisp texture with significantly less oil than traditional deep-frying.
Keep in mind that cheese, eggs, and flour add calories and carbohydrates, so these fritters are best enjoyed as part of a balanced meal.
Serving Suggestions For Air Fryer Cheesy Vegetable Fritters
These fritters are incredibly versatile.
Breakfast
Serve them with scrambled eggs, avocado, and fresh tomatoes for a savory breakfast.
Lunch
Pair two or three fritters with a fresh green salad and Greek yogurt dip.
Dinner
Serve them alongside grilled chicken, baked fish, or roasted meat.
Snack
Enjoy one or two fritters with homemade yogurt-garlic sauce, hummus, or salsa.
Dipping Sauce Ideas For Air Fryer Cheesy Vegetable Fritters
Try serving them with:
Garlic yogurt sauce
Tzatziki
Ranch dressing
Tomato salsa
Avocado dip
Spicy mayonnaise
Nutrition Facts For Air Fryer Cheesy Vegetable Fritters
Approximate nutrition per serving (¼ of recipe):
Calories: 280–310
Protein: 14–16 g
Carbohydrates: 24–27 g
Fat: 15–17 g
Saturated Fat: 7–8 g
Fiber: 3–4 g
Sugar: 5–6 g
Sodium: 500–650 mg
Calcium: Approximately 250–300 mg
Nutrition information is an estimate and can vary depending on the vegetables, cheese, flour, and brands used.
Frequently Asked Questions
Can I make these fritters without zucchini?
Yes. You can replace zucchini with additional carrots, shredded sweet potato, cauliflower rice, or finely chopped broccoli. Remember that vegetables have different moisture levels, so you may need to adjust the flour.
Why are my fritters falling apart?
The mixture may contain too much moisture or not enough binding ingredients. Make sure the zucchini is squeezed very dry and that the mixture is thick enough to hold its shape.
Can I use frozen vegetables?
Yes, but thaw and drain them thoroughly first. Excess water can make the fritters difficult to crisp.
Can I make these gluten-free?
Yes. Replace the regular flour with a gluten-free all-purpose flour blend. You can also experiment with almond flour, although the texture will be different.
Can I make them without eggs?
Eggs help bind the ingredients. You can experiment with an egg substitute, but you may need to adjust the amount of flour to achieve the right consistency.
What cheese is best?
Cheddar and Parmesan provide a flavorful combination. You can also use mozzarella, Monterey Jack, Colby, or a Mexican cheese blend.
Can I prepare them ahead of time?
Yes. Shape the uncooked fritters and refrigerate them covered for several hours before air frying. Alternatively, cook them ahead and reheat when needed.
How do I store leftovers?
Allow the fritters to cool, then place them in an airtight container and refrigerate. For the best texture, reheat them in the air fryer rather than the microwave.
How do I make them extra crispy?
Squeeze the vegetables thoroughly, avoid overcrowding the basket, flatten the fritters moderately thin, and lightly spray or brush them with oil before cooking.
Final Thoughts For Air Fryer Cheesy Vegetable Fritters
These Air Fryer Cheesy Vegetable Fritters are a delicious example of how simple vegetables can become something truly satisfying. With crispy golden edges, a tender vegetable-filled center, and plenty of melted cheese, they make an easy addition to almost any meal.The recipe is flexible enough to accommodate whatever vegetables you have in your refrigerator, making it perfect for reducing food waste and creating quick homemade meals.For the crispiest results, remember to remove excess moisture from the vegetables, leave space between the fritters, and cook them until deeply golden around the edges.Serve them with a creamy dipping sauce, fresh salad, or your favorite protein, and enjoy a simple air-fryer recipe that’s packed with color, texture, and flavor.
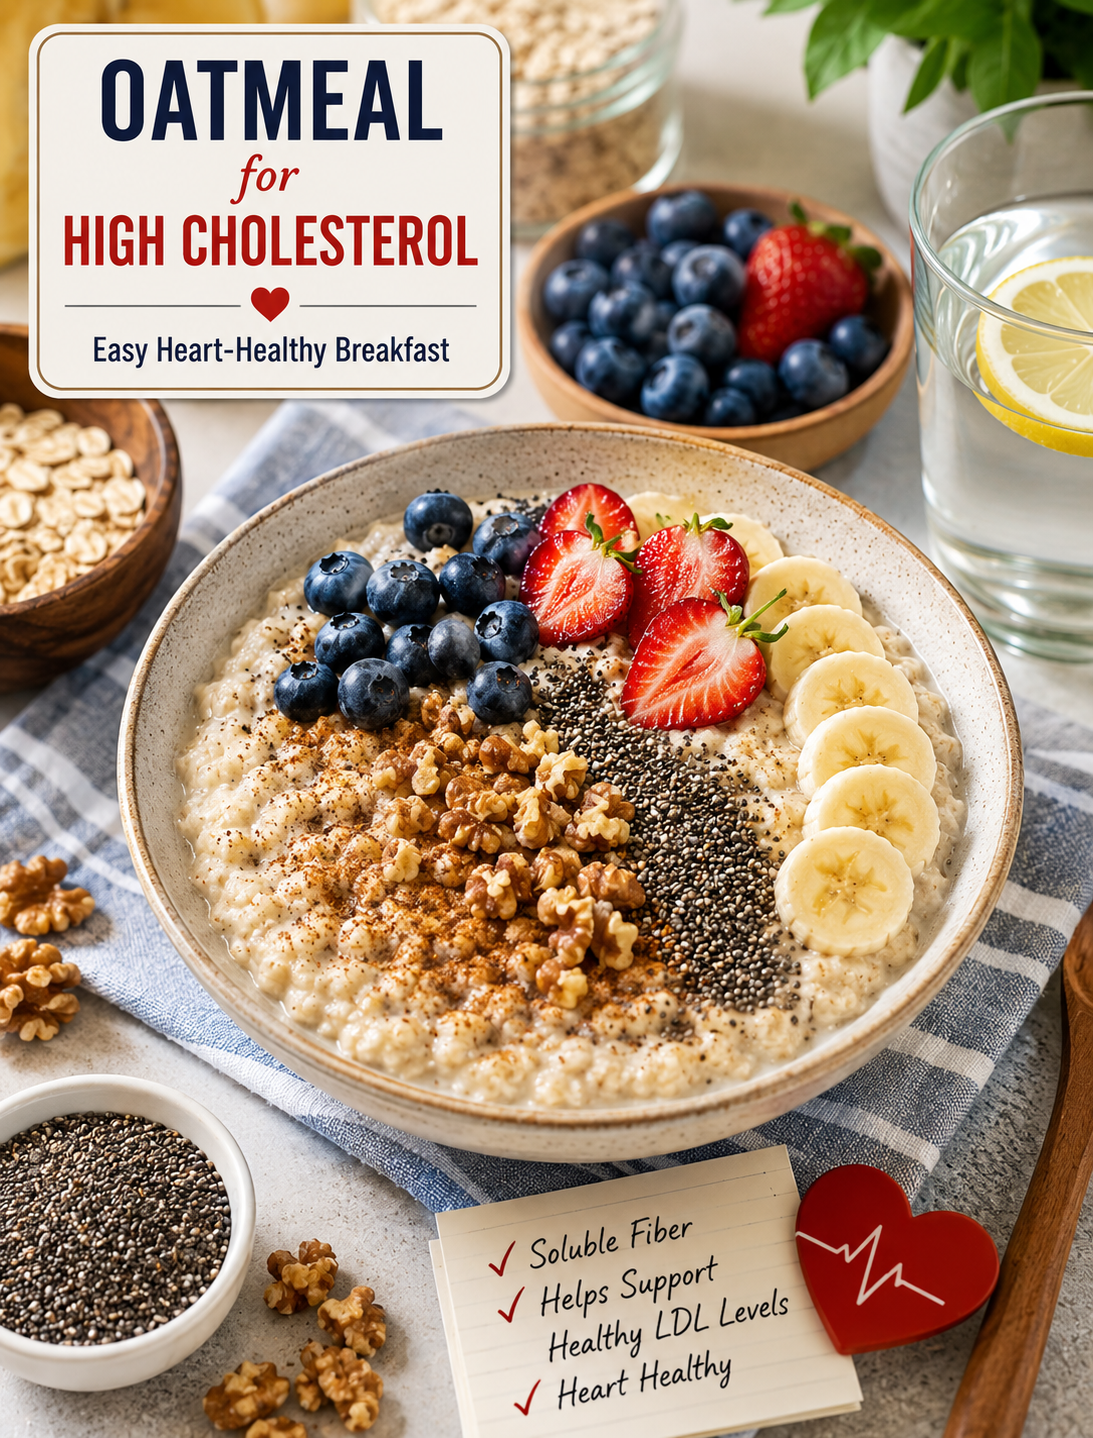
Oatmeal for high cholesterol
Try This Easy Heart-Healthy Food
High cholesterol can be easy to overlook because it usually does not cause noticeable symptoms. Yet high levels of LDL cholesterol can increase the risk of heart disease and stroke over time. One simple way to improve your daily eating pattern is to choose more foods that provide soluble fiber, including oats.
Oatmeal is an affordable, filling, and versatile breakfast that can fit into a heart-conscious diet. The key ingredient is a type of soluble fiber called beta-glucan, which is naturally found in oats. Soluble fiber can help reduce the amount of cholesterol absorbed through the digestive tract.
That does not mean one bowl of oatmeal will fix high cholesterol. Your cholesterol level is influenced by your overall diet, activity level, genetics, age, and other health factors. Still, making oatmeal a regular part of a balanced eating pattern can be a practical step toward better heart health.
Why Oatmeal May Help With Cholesterol
The main reason oats stand out is their soluble fiber content. When soluble fiber mixes with water in the digestive tract, it forms a gel-like substance that can affect how cholesterol and bile acids are handled by the body.
NHLBI includes oats among the foods that can provide soluble fiber as part of its cholesterol-lowering eating approach. MedlinePlus also recommends soluble-fiber foods such as oatmeal and oat bran for people working to improve cholesterol through diet.
Oats also provide whole-grain carbohydrates, fiber, and several vitamins and minerals. A typical cup of cooked oatmeal contains about 4 grams of dietary fiber, although the exact amount varies by product and serving size.
For people concerned about LDL cholesterol, replacing less nutritious breakfast choices with plain oats can be a useful dietary change. The benefit comes from the overall food pattern rather than oatmeal acting as a medicine.
The Best Type of Oatmeal to Choose
Not all oatmeal products are equally useful for a heart-healthy breakfast. Plain rolled oats and steel-cut oats are simple choices because they contain the whole oat grain and can be prepared without large amounts of added sugar.
Old-fashioned rolled oats cook quickly and work well for everyday breakfasts. Steel-cut oats have a chewier texture and usually take longer to prepare. Both can provide soluble fiber.
Instant oats can also fit into a healthy diet. The important step is checking the Nutrition Facts label and choosing varieties with little or no added sugar and a reasonable amount of sodium.
Flavored oatmeal packets can contain added sugars that make an otherwise nutritious breakfast less balanced. If you enjoy flavored oats, compare labels and look for options with less added sugar.
Easy Heart-Healthy Oatmeal Recipe
You do not need a complicated recipe to make oatmeal more nutritious.
Ingredients
- ½ cup dry rolled oats
- 1 cup water or unsweetened milk
- ½ cup fresh or frozen berries
- 1 tablespoon chia seeds
- 1 tablespoon chopped walnuts
- Cinnamon for flavor
- Optional: a small amount of sliced banana
Directions
- Add oats and liquid to a small saucepan.
- Cook according to the package directions until creamy.
- Transfer the oatmeal to a bowl.
- Add berries, chia seeds, walnuts, and cinnamon.
- Stir gently and serve warm.
This combination adds more fiber, plant foods, and unsaturated fats without requiring a large amount of added sugar.
Why Berries, Chia Seeds, and Walnuts Make a Good Topping
Oatmeal provides the base, but the toppings can determine whether your breakfast remains heart-conscious.
Berries add natural sweetness and fiber without requiring syrup or large amounts of added sugar. Fresh and frozen berries can both work well.
Chia seeds provide fiber and plant-based nutrients. They also add texture and can make oatmeal more filling.
Walnuts provide mostly unsaturated fats, which can be a better choice than toppings high in saturated fat. Nuts and seeds are included among foods that can fit into heart-healthy eating patterns.
If you want a creamier bowl, choose plain low-fat yogurt instead of heavy cream. Another option is unsweetened soy or almond milk fortified with calcium and vitamin D.
What to Avoid Adding to Oatmeal
A healthy bowl can become less heart-friendly when it is loaded with added sugar and saturated fat.
Try to limit large amounts of brown sugar, flavored syrups, sweetened creamers, candy pieces, and high-sugar granola.
You also do not need butter to make oatmeal taste good. Cinnamon, berries, banana, chopped nuts, vanilla, or unsweetened nut butter can provide plenty of flavor.
If you use peanut or almond butter, choose a product with minimal added sugar and no partially hydrogenated oils.
The goal is not to make breakfast completely fat-free. Instead, choose more unsaturated fats and limit saturated fat as part of an overall heart-healthy eating pattern. The American Heart Association’s 2026 dietary guidance emphasizes whole grains, vegetables, fruits, healthy protein sources, unsaturated fats, and minimally processed foods.
How Much Oatmeal Should You Eat?
A practical starting point is about ½ cup of dry oats, which produces roughly one serving after cooking. Your ideal portion depends on your calorie needs and the rest of your breakfast.
Eating more oatmeal is not automatically better. A balanced meal can include oats along with fruit, seeds, nuts, or another nutritious protein source.
If you are increasing fiber quickly, start gradually and drink enough fluids. A sudden increase in fiber can cause gas, bloating, or abdominal discomfort in some people.
Oatmeal Is Part of a Bigger Cholesterol Strategy
Eating oatmeal can support a healthier diet, but it should not be your only strategy for managing LDL cholesterol.
NHLBI recommends reducing saturated fat while increasing soluble fiber and choosing foods such as whole grains, fruits, vegetables, beans, nuts, and seeds.
Regular physical activity can also support cardiovascular health. Maintaining a healthy weight, avoiding tobacco, and following your healthcare professional’s treatment plan are important parts of managing heart disease risk.
If you have been diagnosed with high cholesterol, continue taking prescribed medication unless your healthcare professional tells you otherwise. Food choices can complement treatment but should not replace medical care.
Can Oatmeal Lower LDL Cholesterol?
Research and clinical guidance support the role of oat-based soluble fiber in helping maintain healthier cholesterol levels. The FDA has an authorized health claim connecting soluble fiber from certain whole-oat foods with reduced coronary heart disease risk when specific conditions are met.
The effect depends on the amount and overall dietary pattern. Eating a small serving occasionally is unlikely to produce the same benefit as consistently choosing fiber-rich foods as part of a balanced diet.
This is why the most useful approach is to make oats one regular part of your weekly meal plan.
A Simple Breakfast Upgrade Worth Trying
If your usual breakfast is sugary cereal, pastries, or a highly processed breakfast bar, switching to plain oatmeal can be a simple improvement.
Start with rolled or steel-cut oats and add fruit for natural sweetness. Then add chia seeds or walnuts for extra texture and nutrients.
This breakfast is inexpensive, easy to customize, and suitable for busy mornings. It can also be prepared the night before as overnight oats if you prefer a cold breakfast.
Most importantly, keep the bigger picture in mind. A heart-healthy diet is built from many small choices rather than one miracle food.
Oatmeal can provide soluble fiber, but your overall eating pattern matters more than any single ingredient. Pairing oats with fruits, vegetables, legumes, nuts, seeds, whole grains, and healthier fats creates a stronger foundation for cardiovascular health.
Frequently Asked Questions
Is oatmeal good for high cholesterol?
Yes. Oatmeal provides soluble fiber, including beta-glucan, which can support healthier LDL cholesterol levels when included in a balanced diet.
What type of oatmeal is best for cholesterol?
Plain rolled oats, steel-cut oats, and unsweetened oat products are good choices because they provide soluble fiber without requiring added sugar.
How does oatmeal help lower LDL cholesterol?
The soluble fiber in oats can reduce cholesterol absorption in the digestive tract and support healthier blood cholesterol levels.
Can I eat oatmeal every day?
Yes, oatmeal can be eaten regularly as part of a varied diet that includes other whole grains, fruits, vegetables, legumes, nuts, and seeds.
Are instant oats good for cholesterol?
Plain instant oats can fit a heart-healthy diet, but check the label for added sugar and sodium before choosing flavored varieties.
What should I add to oatmeal for heart health?
Try berries, chia seeds, walnuts, sliced fruit, cinnamon, or unsweetened nut butter instead of large amounts of sugar or syrup.
Is oatmeal better than sugary cereal?
Plain oatmeal is often a better choice because it can provide more soluble fiber and allows you to control added sugar and toppings.
Can oatmeal replace cholesterol medicine?
No. Oatmeal can support a heart-healthy diet but should not replace cholesterol medication prescribed by your healthcare professional.
How much soluble fiber should I get?
MedlinePlus recommends about 10 to 25 grams of soluble fiber daily for people trying to lower cholesterol through diet, with foods such as oats, beans, and fruit contributing to that total.
Can oatmeal cause bloating?
Increasing fiber too quickly can cause gas or bloating, so gradually increase high-fiber foods and drink enough fluids.
Is oatmeal good for heart health?
Oatmeal can support heart health because it provides whole-grain nutrients and soluble fiber that can help improve blood cholesterol levels.
Can I add honey to oatmeal?
You can use a small amount, but berries or sliced fruit can add sweetness while keeping added sugar lower.
Air Fryer Cheesy Corn Casserole
Creamy, cheesy, golden, and incredibly easy to make, this Air Fryer Cheesy Corn Casserole is the perfect comfort-food side dish for busy weeknights, family dinners, potlucks, and holiday tables. It combines sweet corn with a rich, creamy mixture and plenty of melted cheese, then cooks in the air fryer until bubbling and beautifully golden on top.Unlike a traditional oven-baked casserole, the air fryer heats quickly and gives this dish a deliciously browned cheese topping without requiring a long preheating time. The center stays soft and creamy while the edges become lightly crisp and golden.Whether you’re serving roasted chicken, grilled meat, turkey, or a simple salad, this cheesy corn casserole is an easy side dish everyone will want seconds of.
Prep Time: 10 minutes
Cook Time: 18–22 minutes
Total Time: 30–32 minutes
Servings: 6
Difficulty: Easy
Why You’ll Love This Recipe
There are so many reasons to keep this recipe in your regular dinner rotation.
Quick and easy: The ingredients are mixed in one bowl, transferred to a baking dish, and cooked in the air fryer.
Cheesy and creamy: Melted cheese creates a rich topping while the corn keeps every bite naturally sweet.
Perfect for gatherings: This casserole is easy to prepare and makes a comforting side dish for family dinners and celebrations.
Air-fryer friendly: You don’t need to heat up the entire oven to make a small casserole.
Customizable: Add jalapeños, herbs, bacon, or different cheeses to create your own version.
Ingredients For Cheesy Corn Casserole
4 cups corn kernels, fresh, frozen, or canned
1 cup shredded cheddar cheese
½ cup sour cream
mayonnaise ½ cup
2 large eggs
milk ½ cup
½ cup all-purpose flour
2 tablespoons melted butter
1 teaspoon garlic powder
½ teaspoon onion powder
½ teaspoon smoked paprika
salt ½ teaspoon
black pepper ¼ teaspoon
½ cup shredded mozzarella cheese
2 tablespoons chopped fresh parsley, optional
Optional Add-Ins
For extra flavor, try adding:
1 finely chopped jalapeño
¼ cup diced green onions
½ teaspoon chili flakes
½ cup cooked and crumbled bacon
2 tablespoons chopped fresh cilantro
A pinch of cayenne pepper
Instructions For Cheesy Corn Casserole
Prepare the Corn
If you’re using frozen corn, thaw it first and drain away any excess water.
If using canned corn, drain it thoroughly and pat it dry with paper towels.
Fresh corn can be used directly after removing the kernels from the cob.
Excess moisture can make the casserole too watery, so draining the corn well is important.
Make the Creamy Mixture
In a large mixing bowl, whisk together the eggs, sour cream, mayonnaise, milk, and melted butter until smooth.
Add the flour, garlic powder, onion powder, smoked paprika, salt, and black pepper.
Whisk again until everything is evenly combined.
Add the Corn
Fold the corn kernels into the creamy mixture.
Add ½ cup shredded cheddar cheese and gently stir.
Make sure the corn is evenly coated with the mixture.
Prepare the Baking Dish
Lightly grease a small air-fryer-safe baking dish that fits comfortably inside your air fryer basket.
A 7- or 8-inch round or square baking dish works well, depending on the size of your air fryer.
Pour the corn mixture into the dish and spread it into an even layer.
Add the Cheese
Sprinkle the remaining cheddar cheese and mozzarella evenly over the top.
The combination of cheddar and mozzarella gives the casserole a flavorful, stretchy, golden topping.
Air Fry
Preheat your air fryer to 350°F (175°C) for about 3 minutes if your model recommends preheating.
Place the baking dish carefully into the air fryer basket.
Air fry at 350°F (175°C) for 18–22 minutes, or until the center is set and the cheese is melted and golden.
Air fryers vary, so begin checking around the 16-minute mark.
Rest and Garnish
Carefully remove the hot baking dish using oven mitts.
Allow the casserole to rest for 5–10 minutes before serving. This gives the creamy center time to firm up slightly.
Sprinkle with fresh parsley or green onions if desired.
Serve warm.
Tips for the Best Air Fryer Cheesy Corn Casserole
Drain the corn well: Too much liquid can make the casserole watery.
Don’t overcrowd the air fryer: Leave enough space around the baking dish for hot air to circulate.
Check early: Air fryer temperatures vary considerably. Your casserole may finish a few minutes earlier or later than the suggested cooking time.
Use freshly shredded cheese: Freshly shredded cheese generally melts more smoothly than some pre-shredded varieties.
Don’t overcook: Once the center is set and the cheese is bubbling and golden, remove it. Overcooking can make the casserole dry.
Let it rest: A short resting period helps the casserole set and makes serving easier.
Want a crispier top? Increase the temperature to 375°F (190°C) for the final 1–2 minutes, watching carefully to prevent the cheese from burning.
Benefits For Cheesy Corn Casserole
This casserole is primarily a comfort-food side dish, but it does provide useful nutrients.
Corn contributes carbohydrates for energy along with fiber and several vitamins and minerals. Eggs and dairy ingredients provide protein, while cheese contributes calcium and protein.
Because the recipe also contains mayonnaise, sour cream, butter, and cheese, it is relatively rich. For a lighter version, you can reduce the mayonnaise, use light sour cream, or replace some of the cheese with a lower-fat variety.
The biggest benefit of this recipe is its convenience: it turns simple ingredients into a satisfying homemade side dish in about 30 minutes.
Serving Suggestions For Cheesy Corn Casserole
This cheesy corn casserole pairs beautifully with many main dishes.
Serve it alongside:
Air fryer chicken
Roast turkey
Grilled chicken
Baked salmon
BBQ chicken
Grilled steak
Roasted vegetables
Green salad
Mashed potatoes
For a holiday meal, serve it alongside turkey, stuffing, cranberry sauce, and roasted vegetables.
For a casual dinner, pair it with grilled chicken and a fresh green salad.
Nutrition Facts For Cheesy Corn Casserole
Approximate nutrition per serving (1/6 of recipe):
Calories: 350–380
Protein: 12–14 g
Carbohydrates: 31–35 g
Fat: 20–23 g
Saturated Fat: 8–10 g
Fiber: 2–3 g
Sugar: 5–7 g
Sodium: 550–700 mg
Calcium: Approximately 200–250 mg
Nutrition information is an estimate and will vary depending on the brands and exact ingredients used.
Frequently Asked Questions
Can I use frozen corn?
Yes. Frozen corn works very well. Thaw it completely and drain any excess moisture before adding it to the casserole mixture.
Can I use canned corn?
Absolutely. Drain and rinse the corn if desired, then pat it dry before using.
Can I make this casserole without eggs?
Eggs help the casserole set, so removing them changes the texture. You can experiment with an egg substitute, but the final consistency may be softer.
What cheese works best?
Cheddar gives the casserole a classic sharp, cheesy flavor. Mozzarella adds extra meltiness. Monterey Jack, Colby, or a cheddar-Jack blend are also excellent choices.
Can I prepare it ahead of time?
Yes. You can mix the casserole ingredients several hours ahead and refrigerate them. Keep the mixture covered and refrigerated, then cook it when ready. If the mixture is very cold, it may require a few additional minutes in the air fryer.
Can I make it spicy?
Definitely. Add diced jalapeños, cayenne pepper, chili flakes, or diced green chiles for extra heat.
How do I store leftovers?
Allow the casserole to cool, then cover and refrigerate leftovers promptly. Store them in an airtight container and enjoy within a few days.
Can I reheat it in the air fryer?
Yes. Reheat individual portions at around 325°F (165°C) until warmed through. Keep an eye on the cheese so it doesn’t become overly browned.
Why is my casserole watery?
The most common reasons are excess moisture from the corn or undercooking. Drain frozen or canned corn thoroughly and cook until the center is properly set.
Final Thoughts For Cheesy Corn Casserole
This Air Fryer Cheesy Corn Casserole is the kind of side dish that feels special without requiring complicated preparation. Sweet corn, creamy ingredients, eggs, and two kinds of cheese come together to create a warm, satisfying casserole with a beautifully golden top.The air fryer makes the process even easier, giving you a bubbling, cheesy casserole without having to heat the entire kitchen with a full-size oven.Serve it alongside chicken, turkey, steak, fish, or your favorite vegetables, and don’t be surprised if everyone goes back for another scoop.For the best results, remember the three simple rules: drain your corn well, don’t overcook the casserole, and let it rest before serving.
Lemon-Ginger Morning Drink for a Heavy Stomach
Sometimes you wake up feeling like your stomach needs a fresh start. You may feel full, sluggish, mildly bloated, or simply uncomfortable after a late dinner or a heavy meal. Before reaching for a complicated supplement or an expensive wellness drink, try something much simpler: warm water with fresh ginger and lemon.
This easy lemon-ginger morning drink combines three basic ingredients: water, fresh ginger, and lemon juice. It is quick to prepare, naturally refreshing, and easy to fit into a daily routine.
Ginger has a long history of use for digestive discomfort, and research has found that it may help with certain types of nausea. Lemon adds fresh flavor and vitamin C while making plain water easier for some people to enjoy.
This drink is not a medical treatment or a “detox” cure. Instead, think of it as a simple morning habit that can support hydration and add ginger and lemon to your diet.
Why Your Stomach May Feel Heavy in the Morning
A heavy stomach can happen for many everyday reasons. Eating a large dinner, eating close to bedtime, drinking alcohol, or choosing rich and fatty foods may leave you feeling uncomfortable the next morning.
Eating quickly can also make you swallow more air, which may contribute to gas and bloating. Constipation is another common reason for abdominal fullness.
Your morning routine can influence how you feel, too. After several hours of sleep without fluids, drinking water can help you begin replacing the fluid your body needs. Water remains the main source of hydration, whether you drink it plain or add lemon for flavor.
If stomach heaviness happens often, becomes painful, or comes with vomiting, unexplained weight loss, blood in the stool, or difficulty swallowing, do not rely on a home drink. Talk with a healthcare professional about persistent or concerning symptoms.
How to Make a Lemon-Ginger Morning Drink
You only need a few ingredients to make this simple morning drink.
Ingredients
- 1 cup warm or room-temperature water
- 3 to 5 thin slices of fresh ginger
- 1 to 2 teaspoons fresh lemon juice
- Optional: 1 teaspoon honey for taste
Directions
- Add the ginger slices to a cup of warm water.
- Let the ginger steep for 5 to 10 minutes.
- Remove the ginger slices if you prefer a milder drink.
- Add fresh lemon juice and stir.
- Let the drink cool to a comfortable temperature before drinking.
You do not need boiling-hot water. Warm or room-temperature water works well and may make the drink easier to enjoy.
For a stronger ginger flavor, use a few extra slices or allow the ginger to steep longer. Start with a small amount if you are not used to ginger.
How This Morning Drink May Help
The main benefit of this drink is that it gives you an easy way to drink water at the beginning of your day. Adding lemon can make water more appealing, which may help some people drink more fluids.
Ginger is the ingredient with the most relevant research behind it. Studies have examined ginger for several types of nausea and vomiting, although much of the research has used ginger supplements rather than a homemade beverage.
Lemon provides vitamin C and adds a bright flavor without needing a sugary drink. Fresh lemon juice is also low in calories when used in small amounts.
The combination can therefore be a practical alternative to sweetened morning beverages. It gives you water, fresh flavor, and small amounts of nutrients from lemon without turning the drink into a high-sugar beverage.
Best Time to Drink It
There is no special hour when lemon-ginger water suddenly becomes more effective. Morning is simply a convenient time because it can become part of an established routine.
Try drinking it after waking up or alongside your normal breakfast. If drinking acidic beverages on an empty stomach causes discomfort, have it with food instead.
You also do not need to drink it every day. Your overall eating pattern, hydration, sleep, physical activity, and medical care matter much more than one morning beverage.
If you enjoy the taste and it helps you choose water instead of a sugary drink, it can be a useful habit.
Tips to Make It Taste Better
Fresh ginger has a naturally spicy flavor, while lemon adds acidity. If the combination tastes too strong, dilute it with additional water.
You can also add a few fresh mint leaves for a cooler flavor. A small amount of honey can soften the sharp taste, but keeping added sweeteners low is a better choice if you are trying to reduce sugar.
For a chilled version, prepare the drink ahead of time, refrigerate it, and serve it over ice. You can also add cucumber slices for extra freshness.
Avoid turning the drink into a sugary lemonade. The goal is to keep the recipe simple and lightly flavored.
What This Drink Cannot Do
A lemon-ginger drink cannot “flush toxins” from your body or melt belly fat overnight. Your liver and kidneys already perform the body’s major waste-processing functions.
It also cannot cure constipation, acid reflux, ulcers, food intolerance, or other digestive conditions.
Ginger may help some forms of nausea, but research does not support treating every digestive complaint with ginger. Evidence also varies depending on the condition and the form of ginger used.
That is why it is better to view this recipe as a healthy beverage option rather than a miracle remedy.
When to Be Careful With Lemon and Ginger
Although both ingredients are common foods, they may not suit everyone.
Ginger can cause side effects such as abdominal discomfort, heartburn, diarrhea, or mouth and throat irritation in some people.
Lemon juice is acidic and may worsen heartburn, acid reflux, or stomach irritation in sensitive people.
If you take medications, especially medicines that may interact with herbal products, ask your healthcare professional before using large amounts of ginger or ginger supplements. Food amounts are different from concentrated supplements.
If lemon water is part of your regular routine, remember that frequent exposure to acidic drinks can affect tooth enamel. Diluting the lemon juice and rinsing your mouth with plain water afterward can help reduce acid exposure.
Simple Ways to Support Better Digestion
A morning drink is only one small part of digestive health.
Eat meals at a comfortable pace and chew food thoroughly. Choose fiber-rich foods such as vegetables, fruits, beans, whole grains, nuts, and seeds as part of a balanced diet.
Regular movement can also support normal bowel function. A short walk after meals may be an easy habit to add to your day.
Pay attention to foods that repeatedly make you feel uncomfortable. Keeping a simple food and symptom journal can help you identify patterns to discuss with a healthcare professional.
Most importantly, do not ignore symptoms that keep returning. Frequent abdominal pain, persistent bloating, ongoing heartburn, or major changes in bowel habits deserve proper evaluation.
A Simple Morning Habit Worth Trying
If your stomach occasionally feels heavy in the morning, this warm lemon-ginger drink is an easy option to try. It takes only a few minutes to prepare and uses ingredients that are easy to find at most U.S. grocery stores.
The biggest advantage may be its simplicity. You are starting your day with water instead of a sugary beverage while adding fresh ginger and lemon to your routine.
Just keep expectations realistic. This drink is not a cure or detox treatment. It is a refreshing beverage that can support hydration and provide small nutritional benefits while ginger may be useful for certain types of nausea.
If you enjoy it, make it part of a bigger healthy routine that includes balanced meals, regular movement, enough fluids, and good sleep.
Frequently Asked Questions
Can I drink lemon-ginger water every morning?
Yes, if it agrees with you and you use normal food amounts, but you do not need it daily to maintain good health.
Is lemon-ginger water good for digestion?
It may be a refreshing hydration choice, while ginger has been studied for certain types of nausea; evidence does not support it as a cure for digestive disorders.
Can this drink reduce bloating?
It may feel soothing for some people, but there is not enough evidence to claim that a homemade lemon-ginger drink reliably eliminates bloating.
Should I drink it on an empty stomach?
You can, but eating something first may be more comfortable if lemon or ginger causes stomach irritation or heartburn.
Can I use ground ginger instead of fresh ginger?
Yes, but start with a small amount because ground ginger has a stronger, more concentrated flavor.
Can I add honey?
Yes, a small amount can improve the taste, but honey still counts as added sugar.
Is warm water better than cold water?
There is no strong reason to believe warm water provides special digestive benefits; choose the temperature that feels comfortable to you.
How much lemon should I use?
Start with 1 to 2 teaspoons of fresh lemon juice per cup of water and adjust the flavor to your preference.
Can I drink it if I have acid reflux?
Lemon may worsen reflux symptoms in some people, so avoid it if acidic drinks consistently trigger your symptoms.
Is this drink a detox?
No. The body already has organs that process and remove waste, so lemon-ginger water should not be promoted as a detox treatment.
Does ginger help with nausea?
Research suggests ginger may help with some forms of nausea, although results vary by condition and many studies have used supplements rather than beverages.
When should I see a doctor about stomach heaviness?
Seek medical advice if symptoms are persistent, severe, worsening, or accompanied by warning signs such as vomiting, bleeding, unexplained weight loss, or trouble swallowing.
Shocking Benefits of Baking Soda
The Shocking Benefits of Baking Soda: A Simple Morning Drink
Baking soda is one of those inexpensive kitchen staples that seems to have endless uses. It is commonly used in baking, cleaning, and household care, but some people also mix a small amount with water as a homemade drink.This simple Baking Soda Water recipe takes less than a minute to prepare and uses just two ingredients. Baking soda, also known as sodium bicarbonate, is an alkaline compound that can temporarily neutralize stomach acid. Because of this, it has traditionally been used as an occasional home remedy for heartburn and indigestion.However, more is not better. Baking soda contains a significant amount of sodium, and drinking too much can be harmful. This recipe is therefore designed around a small amount for occasional use, not as a daily detox or cure-all drink.
Why I Love This Recipe
I love this recipe because it is incredibly simple. There is no blender, cooking, or special equipment required.
With just water and a small amount of baking soda, you can prepare it almost instantly.
It is also inexpensive and uses an ingredient that many people already have in their kitchen.
Most importantly, this recipe highlights an important point about homemade wellness drinks: simple doesn’t always mean you should consume more of it. Baking soda can have useful properties, but because it is high in sodium, it should be used thoughtfully.
Ingredients For Shocking Benefits of Baking Soda
½ teaspoon baking soda
8–12 ounces water
Lemon slice, optional for flavor
Important Ingredient Note
Use food-grade baking soda (sodium bicarbonate) intended for culinary use.
Do not substitute baking powder. Baking powder contains additional ingredients and is not the same product.
Instructions For Shocking Benefits of Baking Soda
Add the Water
Pour 8–12 ounces of room-temperature or cool water into a glass.
Add Baking Soda
Add ½ teaspoon or less of baking soda to the water.
For anyone trying baking soda water for the first time, using a smaller amount is a sensible approach.
Stir Well
Stir thoroughly until the baking soda dissolves.
You may notice slight bubbling if you add lemon juice. This happens because baking soda reacts with acidic ingredients.
Taste
Take a small sip. Baking soda water can have a distinctly salty or alkaline taste.
If you find the flavor unpleasant, there is no need to force yourself to drink it.
Serve
Drink it slowly rather than consuming a large quantity quickly.
Because baking soda is high in sodium, this should not be treated like ordinary drinking water.
Tips for Making Baking Soda Water
Measure carefully: Don’t estimate large amounts by eye. Baking soda is concentrated, so using too much can cause problems.
Use plain baking soda: Make sure the ingredient is food-grade sodium bicarbonate.
Room-temperature or cool water works perfectly.Don’t use hot water
Don’t make it overly concentrated: Increasing the amount does not automatically increase the benefits.
Don’t use it as your main source of hydration: Plain water remains the better everyday choice for hydration.
Skip the lemon if you want: Lemon can improve the flavor, but it also reacts chemically with baking soda.
Don’t use it as a daily detox: Your body already has organs, including the liver and kidneys, that handle normal waste removal.
Potential Benefits of Baking Soda
Baking soda has a few legitimate uses, but internet claims often go far beyond the evidence.
May Temporarily Relieve Heartburn
Sodium bicarbonate can neutralize stomach acid. This is why it has historically been used as an antacid.
However, frequent heartburn should not simply be treated with baking soda at home. Recurring symptoms may need proper evaluation.
May Help Neutralize Acidity
The alkaline nature of sodium bicarbonate allows it to react with acids. This property is useful in cooking and has medical applications under appropriate supervision.
May Have Sports-Performance Applications
Sodium bicarbonate has been studied in sports nutrition, particularly for high-intensity exercise. However, research protocols often use carefully calculated doses, and these are not equivalent to casually drinking baking soda water.
An Inexpensive Household Ingredient
One of the most “shocking” things about baking soda is how versatile and inexpensive it is. The same basic ingredient can be useful in cooking and a variety of household applications.
Important Reality Check
Baking soda does not magically detox the body, melt body fat, cure chronic disease, or permanently change your body’s overall pH.
Your body tightly regulates blood pH. Drinking alkaline substances does not simply make your entire body alkaline.
Serving Suggestions For Shocking Benefits of Baking Soda
Baking soda water has a strong flavor, so there aren’t many culinary serving options. If you’re using it occasionally as an antacid-type home remedy, plain water is the simplest preparation.
For a more pleasant drink, you can add a little lemon, but remember that lemon reacts with baking soda and produces carbon dioxide.
You can also simply use baking soda in normal cooking and baking, where it is an established culinary ingredient.
Nutrition Facts For Shocking Benefits of Baking Soda
Approximate nutrition for ½ teaspoon baking soda mixed with water:
Calories: 0
Carbohydrates: 0 g
Protein: 0 g
Fat: 0 g
Sugar: 0 g
Fiber: 0 g
Sodium: Approximately 630 mg
The sodium content is the main nutritional consideration.
Because the sodium amount is substantial compared with the amount of baking soda used, this drink is not appropriate as an everyday beverage for everyone.
Frequently Asked Questions
Can I drink baking soda water every morning?
It is not recommended to make baking soda water a routine daily drink without discussing it with a healthcare professional. Baking soda contains a considerable amount of sodium, and excessive intake can cause dangerous electrolyte and acid-base disturbances.
Does baking soda water detox the body?
No. There is no good evidence that drinking baking soda water “detoxes” the body. Your liver, kidneys, lungs, and other physiological systems already perform waste removal and pH regulation.
Can baking soda help heartburn?
Sodium bicarbonate can neutralize stomach acid and may provide temporary relief from occasional heartburn. However, it should not be relied upon for frequent or persistent symptoms.
Can I drink baking soda with lemon?
You can, but the two ingredients react. The acid in lemon juice reacts with sodium bicarbonate, producing carbon dioxide, water, and sodium citrate. This causes fizzing and changes the mixture’s composition.
Is baking soda the same as baking powder?
No. Baking soda is sodium bicarbonate. Baking powder contains sodium bicarbonate plus acidic ingredients and other components. They are not interchangeable for this drink.
Can baking soda help with weight loss?
There is no reliable evidence that drinking baking soda directly causes meaningful fat loss. It should not be used as a weight-loss drink.
Who should avoid baking soda drinks?
People who need to limit sodium, including some people with high blood pressure, heart disease, kidney disease, or other medical conditions, should speak with a healthcare professional before consuming baking soda for this purpose.
It may also interact with certain medications or affect how some medicines are absorbed.
What happens if I drink too much baking soda?
Excessive baking soda can cause nausea, vomiting, diarrhea, abdominal problems, high sodium levels, electrolyte disturbances, and metabolic alkalosis. Very large amounts can be dangerous.
If someone has consumed a large quantity and develops concerning symptoms, seek urgent medical advice or contact a poison-control service where available.
Final Thoughts For Shocking Benefits of Baking Soda
Baking soda is genuinely a fascinating kitchen ingredient, but its benefits are often exaggerated online.Its ability to neutralize acids is real, which explains its traditional use as an occasional antacid and its many culinary applications. However, that does not make baking soda water a miracle detox drink or a replacement for medical treatment.If you choose to use this recipe, keep the quantity small and occasional, and remember that plain water is the better choice for everyday hydration.For heartburn that happens frequently, unexplained digestive symptoms, or any medical condition requiring a low-sodium diet, talk with a healthcare professional rather than relying on baking soda water.Sometimes the most important wellness tip is not adding another “miracle” ingredient to your routine — it’s knowing when a simple home remedy has limits.
Take Honey With Turmeric Every Morning
If you are looking for a simple morning ritual that takes just a few minutes to prepare, this Honey With Turmeric recipe is a wonderful option. Made with just a handful of pantry ingredients, this golden mixture combines the natural sweetness of honey with earthy turmeric, a little lemon, and a pinch of black pepper.Many people enjoy turmeric as part of their daily diet because it contains curcumin, a naturally occurring plant compound that has been widely studied. Honey adds sweetness and makes the earthy flavor of turmeric much easier to enjoy.This isn’t a complicated recipe or a substitute for medical treatment. Instead, think of it as a small, comforting addition to a balanced morning routine.
Why You’ll Love This Recipe
There are plenty of reasons to add this simple turmeric and honey mixture to your morning routine.
First, it requires no cooking and only a few ingredients. You can prepare a small batch in minutes and keep it ready in the refrigerator.
The combination of honey, turmeric, lemon, and black pepper creates a pleasant balance of sweet, tangy, earthy, and slightly spicy flavors.
It is also incredibly versatile. You can take a small spoonful on its own, mix it into warm water, or use it as a flavorful addition to tea.
Most importantly, this recipe encourages a simple habit: starting your day with something homemade and mindful.
Ingredients For Take Honey With Turmeric
For One Serving
1 teaspoon raw or regular honey
¼ teaspoon ground turmeric
1 small pinch of freshly ground black pepper
½ teaspoon fresh lemon juice
1–2 teaspoons warm water, optional
A tiny pinch of ground cinnamon, optional
A small pinch of freshly grated ginger, optional
For a Small Batch
¼ cup honey
2 teaspoons ground turmeric
¼ teaspoon freshly ground black pepper
1 tablespoon fresh lemon juice
½ teaspoon ground cinnamon, optional
1 teaspoon finely grated fresh ginger, optional
Instructions For Take Honey With Turmeric
Prepare the Ingredients
Measure the honey and place it in a small clean bowl. Add the ground turmeric and freshly ground black pepper.
If you are using fresh ginger or cinnamon, add them now.
Add Lemon Juice
Add the fresh lemon juice and stir everything together.
The lemon adds a bright, refreshing flavor that helps balance the sweetness of the honey and the earthy taste of turmeric.
Mix Thoroughly
Stir with a small spoon until the turmeric is evenly distributed throughout the honey.
Turmeric can settle at the bottom, so make sure the mixture is well combined.
Adjust the Consistency
For a thicker spoonable mixture, leave it as it is.
If you prefer a lighter drink, add 1–2 teaspoons of warm water and stir until smooth.
Avoid very hot water, especially if you simply want to preserve the pleasant flavor and texture of the honey.
Enjoy
Take a small spoonful as part of your breakfast or morning routine, or stir it into warm water or tea.
If making a larger batch, transfer it to a clean airtight container and refrigerate.
Tips for the Best Honey With Turmeric
Use good-quality turmeric: Fresh, fragrant ground turmeric will provide the best flavor and color.
Don’t overdo the turmeric: A little goes a long way. Too much can make the mixture bitter and unpleasant.
Use freshly ground black pepper: Black pepper provides a sharper flavor than pre-ground pepper.
Choose the honey you enjoy: Raw honey, wildflower honey, or regular honey can all work. The most important thing is choosing a honey you enjoy eating.
Use fresh lemon: Freshly squeezed lemon generally gives the mixture a brighter flavor than bottled lemon juice.
Start small: If you have never tried turmeric and honey together, begin with a small amount to see how you like the flavor.
Stir before serving: Turmeric naturally settles, particularly in a larger batch, so give the mixture a good stir before each serving.
Potential Benefits For Take Honey With Turmeric
Honey and turmeric can both be part of a nutritious, balanced diet.
Contains Plant Compounds
Turmeric contains curcumin and other naturally occurring compounds. Curcumin has been studied for its antioxidant and anti-inflammatory properties, although the amount obtained from a small kitchen serving is not equivalent to doses used in research.
Easy Way to Add Turmeric to Your Diet
If you rarely use turmeric, this recipe provides an easy way to incorporate a small amount into your daily meals.
Naturally Sweet
Honey provides sweetness without requiring refined table sugar in the recipe. However, honey is still an added sugar and should be enjoyed in moderation.
Refreshing Morning Option
Adding lemon and warm water creates a light, refreshing drink that many people find enjoyable first thing in the morning.
Simple Homemade Routine
One of the biggest advantages is convenience. Preparing this recipe takes only a few minutes, making it easy to fit into a busy schedule.
Serving Suggestions For Take Honey With Turmeric
There are several delicious ways to enjoy this recipe.
Warm Turmeric Honey Drink
Mix one serving with a cup of warm water. Stir well and enjoy slowly.
Morning Tea
Add a small amount to warm herbal tea for a naturally sweet, golden drink.
Yogurt Topping
Swirl a small amount into plain Greek yogurt and top with berries, walnuts, or chia seeds.
Oatmeal
Add a little turmeric honey to oatmeal along with banana, cinnamon, and nuts.
Smoothie
Blend a small amount into a fruit or yogurt smoothie for extra flavor.
Nutrition Facts For Take Honey With Turmeric
Approximate nutrition per 1-teaspoon serving:
Calories: 22–25
Carbohydrates: 6 g
Total Sugar: 5–6 g
Protein: 0 g
Fat: 0 g
Fiber: Less than 1 g
Sodium: 0–1 mg
Frequently Asked Questions
Can I take honey with turmeric every morning?
For most healthy adults, small culinary amounts of honey and turmeric can generally be included as part of a balanced diet. However, there is no need to consume it daily to obtain the benefits of a healthy diet.
Should I take it on an empty stomach?
You don’t have to. Some people enjoy it before breakfast, while others prefer taking it with breakfast or adding it to a warm drink. Choose whichever feels most comfortable for you.
Why is black pepper added?
Black pepper contains piperine, a compound that can increase the absorption of curcumin. A small pinch is enough for this recipe.
Can I make it ahead?
Yes. Prepare a small batch, place it in a clean airtight container, and refrigerate it. Stir before using. For best quality, make small batches rather than storing it for a long time.
Can I use fresh turmeric?
Absolutely. Fresh turmeric can be finely grated and used instead of ground turmeric. Start with a small amount because fresh turmeric can have a strong flavor.
Can children have this recipe?
Honey should never be given to babies under 12 months because of the risk of infant botulism. For older children, ask their pediatrician if you have questions about introducing honey or turmeric.
Can I use this instead of medicine?
No. Honey with turmeric is a food, not a medication. It should not replace prescribed medicines or professional medical care.
Are there any precautions?
Large amounts of turmeric or concentrated turmeric supplements may not be appropriate for everyone. People who take certain medications, have gallbladder problems, bleeding disorders, or other medical conditions should consult a healthcare professional before regularly using concentrated turmeric products.
Final Thoughts For Take Honey With Turmeric
This Honey With Turmeric recipe is proof that a simple morning habit doesn’t need to involve complicated ingredients or lengthy preparation. Honey brings natural sweetness, turmeric adds its distinctive golden color and earthy flavor, while lemon and black pepper give the mixture a fresh and balanced finish.Enjoy it as a small part of a healthy breakfast, mix it into warm water, or add it to yogurt and oatmeal. The key is moderation and variety: no single food or drink can provide everything your body needs.If you enjoy simple homemade wellness recipes, this golden honey-turmeric mixture is an easy one to keep in your morning rotation.
I Put Baking Soda on My Feet Before Bed
I Put Baking Soda on My Feet Before Bed: A Simple Soothing Foot Soak
After a long day, your feet deserve a little extra care. A warm baking soda foot soak is an easy, inexpensive home ritual that can help you relax before bedtime while leaving your feet feeling clean and refreshed. With just a few basic ingredients and about 15–20 minutes, you can turn an ordinary evening into a calming self-care routine.This baking soda foot soak combines warm water with baking soda to create a simple soak for tired feet. While it isn’t a medical treatment or a “detox,” soaking your feet can be relaxing, and baking soda can help gently cleanse and soften the skin.
Why You’ll Love This Recipe
There are plenty of reasons to make this simple bedtime foot soak part of your routine:
Uses inexpensive ingredients
Takes only a few minutes to prepare
Creates a relaxing bedtime ritual
Helps cleanse the feet
Can leave rough skin feeling softer
Requires no complicated equipment
Easy to customize with a gentle moisturizer afterward
Perfect after a long day of standing or walking
The best part is that you probably already have the main ingredient in your kitchen.
Ingredients For baking soda foot soak
For the Baking Soda Foot Soak
4 cups comfortably warm water
2 tablespoons baking soda
1 tablespoon plain Epsom salt, optional
1 teaspoon gentle liquid soap, optional
Clean towel
Foot basin or large bowl
After the Soak
Fragrance-free moisturizer or foot cream
Clean cotton socks, optional
Instructions For baking soda foot soak
Prepare the Basin
Choose a clean foot basin or large bowl that gives your feet enough room to sit comfortably. Wash and rinse the container before use.
Add Warm Water
Pour about 4 cups of comfortably warm water into the basin. Test the temperature with your hand before putting your feet in.
Add Baking Soda
Add 2 tablespoons of baking soda to the water. Stir until it is mostly dissolved.
If you want, you can add a small amount of gentle liquid soap for cleansing. Epsom salt is also optional, although it isn’t necessary for the basic recipe.
Soak Your Feet
Place your clean feet into the mixture and soak for approximately 15–20 minutes.
Use this time to relax, read, listen to something calming, or simply sit quietly before bed.
Rinse
After soaking, rinse your feet with clean lukewarm water if your skin feels powdery or slippery.
Dry Thoroughly
Pat your feet dry with a clean towel. Pay special attention to the skin between your toes, where trapped moisture can cause problems.
Moisturize
Apply a fragrance-free moisturizer or foot cream to the tops, bottoms, and heels of your feet. Avoid applying thick moisturizer between the toes.
For especially dry heels, you can put on clean cotton socks afterward to help keep the moisturizer against the skin.
Tips for the Best Baking Soda Foot Soak
Keep the water comfortably warm. Hot water isn’t better and may leave your skin dry or irritated.
Don’t overdo the baking soda. More isn’t necessarily better. A couple of tablespoons in a small basin is sufficient for this simple soak.
Keep the soak short. About 15–20 minutes is plenty. Very long soaks can contribute to dry skin.
Moisturize afterward. Baking soda and repeated soaking may dry some people’s skin, so moisturizing after the soak is helpful.
Clean your basin. Wash and dry the container after every use to keep it hygienic.
Don’t scrub aggressively. If you have rough heels, gently use a washcloth or foot file after soaking. Avoid harsh scraping.
Potential Benefits For baking soda foot soak
A warm foot soak can be a pleasant way to unwind at the end of the day. The warmth and quiet routine may help you feel more relaxed and comfortable.
Baking soda also has mild cleansing properties and may help remove sweat, dirt, and surface residue from the feet.
The soak can temporarily make dry, thickened skin feel softer, which may make gentle moisturizing easier.
However, it’s important to keep expectations realistic. A baking soda foot soak does not remove toxins from your body, burn fat, cure infections, or treat underlying medical conditions. Your liver and kidneys handle the body’s normal waste-removal processes.
If you have persistent foot odor, itching, peeling, cracking, pain, swelling, or changes in your toenails, a foot soak shouldn’t replace professional medical advice.
Serving Suggestions For baking soda foot soak
Since this is a self-care recipe rather than food, there isn’t a traditional serving suggestion. For a relaxing bedtime routine, try pairing your foot soak with:
A glass of water
A calming book
Gentle stretching
A relaxing skincare routine
Clean cotton pajamas
A quiet, screen-free few minutes before bed
You can also make it part of a weekly at-home foot-care routine rather than using it every night.
Nutrition Facts For baking soda foot soak
Estimated nutrition per foot soak:
Calories: 0
Protein: 0 g
Carbohydrates: 0 g
Fat: 0 g
Sugar: 0 g
Frequently Asked Questions
Can I use baking soda on my feet every night?
It’s better not to assume that daily use is necessary. Frequent soaking or baking soda exposure may dry or irritate some people’s skin. Start with occasional use and stop if your skin becomes dry, red, itchy, or uncomfortable.
Does baking soda remove foot odor?
It may help cleanse the feet and reduce some surface odors temporarily, but persistent odor can have several causes. Keeping feet dry, changing socks regularly, and wearing breathable footwear are also important.
Can baking soda cure athlete’s foot?
No. Baking soda shouldn’t be considered a treatment for athlete’s foot or other fungal infections. Persistent itching, peeling, burning, or cracking should be evaluated by a healthcare professional.
Can I use this for cracked heels?
A warm soak may temporarily soften rough skin, but it doesn’t cure severely cracked heels. Moisturizing regularly is important. Avoid aggressive filing or scrubbing, especially if cracks are deep or painful.
Can I add essential oils?
You can, but they’re not necessary. Essential oils can irritate or trigger allergic reactions in some people, particularly on sensitive or damaged skin. The simplest version with warm water and baking soda is perfectly adequate.
Is baking soda safe for everyone?
Not necessarily. People with sensitive or damaged skin may experience irritation. If you have diabetes, poor circulation, reduced sensation in your feet, open wounds, or another foot condition, it’s best to ask your healthcare professional before using foot soaks.
Should I rinse my feet afterward?
If your skin feels coated or irritated after the soak, rinse with clean lukewarm water. Always dry thoroughly, especially between your toes.
Final Thoughts For baking soda foot soak
A baking soda foot soak before bed is a simple, budget-friendly way to turn ordinary foot care into a relaxing evening ritual. Warm water can feel comforting after a busy day, while baking soda provides gentle cleansing and can leave your feet feeling refreshed.Just remember that this is a self-care recipe, not a detox treatment or cure for medical conditions. Keep the water comfortably warm, limit the soaking time, moisturize afterward, and pay attention to how your skin responds.Sometimes the simplest routines are the easiest to maintain—and this one takes only a few minutes to prepare. So if your feet feel tired after a long day, set aside 15–20 minutes, make this easy baking soda foot soak, and enjoy a peaceful moment before bedtime.
Nutrient-Packed Vegetable Recipe for Eye
The Nutrient-Packed Vegetable Recipe for Eye, Liver & Digestive Health
This Nutrient-Packed Vegetable Recipe is a colorful, flavorful option made with fresh vegetables and nourishing ingredients. It’s an easy dish to enjoy as a light meal or healthy side.What makes this Nutrient-Packed Vegetable Recipe so appealing is its combination of colorful vegetables, fiber, vitamins, minerals, and plant-based goodness. Every bite brings delicious flavor along with ingredients that fit beautifully into a balanced eating routine.This Nutrient-Packed Vegetable Recipe is also a great choice when you want to include more vegetables in your diet without making complicated meals. It can be prepared with simple pantry staples and customized with your favorite herbs and seasonings.Whether you’re looking for a wholesome lunch, a light dinner, or an easy vegetable side, this Nutrient-Packed Vegetable Recipe is a delicious addition to your weekly menu. It’s simple, satisfying, and packed with natural vegetable goodness.
Why You’ll Love This Recipe
Full of Colorful Vegetables
This recipe combines carrots, broccoli, spinach, bell peppers, and onion for a colorful and nutritious meal.
Great Source of Fiber
The vegetables provide dietary fiber, which supports normal digestion and bowel regularity.
Eye-Friendly Nutrients
Carrots provide beta-carotene, while spinach contains lutein and zeaxanthin. These nutrients are associated with maintaining normal eye health.
Simple and Delicious
The vegetables are roasted with olive oil, garlic, herbs, and lemon, creating a flavorful dish without complicated ingredients.
Easy to Customize
You can substitute vegetables depending on what you have in your refrigerator.
Meal-Prep Friendly
Prepare a large batch and use it throughout the week as a side dish, salad topping, or bowl ingredient.
Ingredients For Nutrient-Packed Roasted Vegetable Bowl
For the Vegetables
3 medium carrots, peeled and sliced
2 cups broccoli florets
red bell pepper, sliced
1 small red onion, sliced
fresh spinach 2 cups
extra-virgin olive oil 2 tablespoons
3 cloves garlic, minced
paprika ½ teaspoon
dried oregano ½ teaspoon
ground black pepper ¼ teaspoon
salt ¼ teaspoon
½ teaspoon ground cumin
For the Lemon Dressing
2 tablespoons fresh lemon juice
1 tablespoon extra-virgin olive oil
Dijon mustard 1 teaspoon
1 small garlic clove, minced
chopped fresh parsley 1 tablespoon
Pinch of black pepper
Optional Toppings
2 tablespoons pumpkin seeds
chopped walnuts 2 tablespoons
Fresh parsley
Crumbled feta cheese
Sliced avocado
Red pepper flakes
Instructions For Nutrient-Packed Roasted Vegetable Bowl
Prepare the Vegetables
Preheat your oven to 425°F (220°C).
Wash and dry all the vegetables thoroughly.
Peel the carrots and cut them into thin rounds or small pieces. Cut the broccoli into bite-sized florets. Slice the bell pepper and red onion.
Try to cut the vegetables into relatively similar sizes so they cook evenly.
Season the Vegetables
Add the carrots, broccoli, bell pepper, and red onion to a large mixing bowl.
Drizzle with olive oil.
Add minced garlic, paprika, oregano, cumin, salt, and black pepper.
Toss everything thoroughly until the vegetables are evenly coated.
Arrange on a Baking Sheet
Spread the vegetables across a large baking sheet.
Keep them in a relatively even layer and avoid overcrowding.
If the vegetables are packed too closely together, they may release moisture and steam rather than roast.
Roast
Place the baking sheet in the preheated oven.
Roast for 20–25 minutes, stirring or flipping the vegetables halfway through cooking.
The vegetables should become tender with lightly browned, caramelized edges.
Add the Spinach
Remove the baking sheet from the oven.
Add the fresh spinach and gently toss it with the hot vegetables.
Return the tray to the oven for approximately 2–3 minutes, just until the spinach wilts.
You can also simply toss the spinach with the hot vegetables and allow residual heat to wilt it.
Make the Lemon Dressing
While the vegetables are roasting, combine lemon juice, olive oil, Dijon mustard, garlic, parsley, and black pepper in a small bowl.
Whisk until smooth.
Taste and adjust the seasoning according to your preference.
Combine and Serve
Transfer the roasted vegetables to a serving bowl.
Drizzle the lemon dressing over the top.
Gently toss to combine.
Sprinkle with pumpkin seeds, walnuts, parsley, feta, or another topping if desired.
Serve warm.
Tips for the Best Results
Dry Your Vegetables
After washing, dry the vegetables thoroughly. Excess water can interfere with browning.
Don’t Overcrowd the Pan
Use two baking sheets if necessary. Giving the vegetables enough room helps them roast rather than steam.
Cut Carrots Smaller
Carrots can take longer to become tender than peppers and spinach. Cutting them into smaller pieces helps everything finish at approximately the same time.
Add Spinach at the End
Spinach needs very little cooking. Adding it near the end helps preserve its texture and fresh flavor.
Use Fresh Lemon
Fresh lemon juice adds brightness and balances the sweetness of the roasted carrots.
Add Protein
For a complete meal, add grilled chicken, salmon, chickpeas, lentils, eggs, tofu, or beans.
Benefits For Nutrient-Packed Roasted Vegetable Bowl
This recipe provides a variety of vegetables, which means you get a broad range of nutrients rather than relying on one “miracle” food.
Carrots and sweet-colored vegetables provide beta-carotene, a carotenoid that the body can convert into vitamin A. Vitamin A plays an important role in normal vision.
Spinach provides lutein and zeaxanthin, carotenoids found in the retina that are associated with eye health.
Broccoli and bell peppers provide vitamin C, while the combination of vegetables supplies dietary fiber.
Fiber helps support normal bowel function and can contribute to digestive health when consumed regularly as part of a balanced diet.
The olive oil provides predominantly unsaturated fat and makes the roasted vegetables more satisfying.
It is important to remember that these benefits are part of an overall healthy eating pattern. No single food can restore damaged eyesight, remove fat from the liver, or physically cleanse the colon.
Serving Suggestions For Nutrient-Packed Roasted Vegetable Bowl
With Grilled Chicken
Serve the roasted vegetables alongside grilled chicken breast for a protein-rich dinner.
With Salmon
Pair them with baked or air-fried salmon for a flavorful, nutrient-rich meal.
With Chickpeas
Add roasted chickpeas to turn the vegetable bowl into a satisfying vegetarian meal.
Over Quinoa
Spoon the vegetables over cooked quinoa and finish with lemon dressing.
With Avocado
Add sliced avocado for creaminess and additional healthy fats.
With Greek Yogurt Sauce
Serve with a garlic-lemon Greek yogurt sauce for a creamy contrast.
As a Salad
Allow the roasted vegetables to cool slightly and serve over mixed greens with the lemon dressing.
Nutrition Facts For Nutrient-Packed Roasted Vegetable Bowl
Approximate nutrition per serving, without optional toppings:
Calories: 220
Protein: 5 g
Carbohydrates: 20 g
Fat: 14 g
Saturated Fat: 2 g
Fiber: 7 g
Sugar: 9 g
Sodium: 230 mg
Vitamin C: High
Vitamin A: High
Nutrition information is an estimate and can vary according to the exact vegetables and quantities used.
Frequently Asked Questions
Can this vegetable recipe restore eyesight?
No food can reliably restore damaged or lost vision. However, vegetables such as carrots and leafy greens contain nutrients associated with normal eye health. If you experience blurred vision, vision loss, flashes, or other persistent changes, seek evaluation from an eye-care professional.
Does this recipe clean the colon?
The colon does not need a special vegetable “cleanse.” Your digestive system naturally removes waste. Eating enough fiber from vegetables, fruits, legumes, and whole grains can support normal bowel regularity.
Can vegetables remove fat from the liver?
No single vegetable removes liver fat. Improving liver health generally involves an overall healthy eating pattern, physical activity, weight management when appropriate, and addressing any underlying medical conditions with a healthcare professional.
Can I make this recipe in an air fryer?
Yes. Place the carrots, broccoli, peppers, and onion in the air fryer and cook at approximately 375°F (190°C) for 12–18 minutes, shaking halfway through. Add the spinach during the final 1–2 minutes.
Can I use frozen vegetables?
Yes. Frozen broccoli and other vegetables can be used, although they may release more moisture. Avoid overcrowding the air fryer or baking tray.
Can I make this recipe vegan?
Yes. The recipe is vegan as written. Simply avoid adding optional feta cheese.
How long do leftovers last?
Store leftovers in an airtight container in the refrigerator for approximately 3–4 days.
Can I freeze the roasted vegetables?
You can freeze them, although the vegetables may become softer after thawing. For the best texture, prepare them fresh or refrigerate leftovers.
What other vegetables can I add?
Zucchini, cauliflower, Brussels sprouts, mushrooms, asparagus, cabbage, and green beans are all good options.
Final Thoughts For Nutrient-Packed Roasted Vegetable Bowl
This Nutrient-Packed Roasted Vegetable Bowl is a delicious way to add more colorful vegetables, fiber, and important micronutrients to your diet. Carrots provide beta-carotene, spinach contributes lutein and zeaxanthin, and broccoli and bell peppers add vitamin C and other beneficial nutrients.Rather than relying on claims about miracle foods or quick cleanses, focus on a consistent pattern of nutritious meals. Your body already has natural systems for eliminating waste, and supporting those systems with vegetables, fiber, adequate fluids, regular movement, and a balanced diet is a much more realistic approach.Serve these roasted vegetables with chicken, salmon, chickpeas, quinoa, or another protein source for a satisfying meal. The bright lemon-garlic dressing brings everything together and makes this simple vegetable recipe flavorful enough to enjoy again and again.
Mediterranean Ground Beef Pita Wrap with Hot Honey Feta Cream
Difficulty: Easy
Servings: 4
Prep Time: 15 minutes
Cook Time: 15 minutes
Total Time: 30 minutes
Description
These Mediterranean Ground Beef Pita Wraps with Hot Honey Feta Cream are packed with bold, fresh, savoury flavours. Seasoned ground beef is cooked with garlic, paprika, cumin, oregano, and lemon, then tucked into warm pita bread with crisp vegetables and a creamy feta sauce.
The star of the recipe is the hot honey feta cream—a smooth, tangy, slightly sweet sauce with a gentle spicy kick. The combination of salty feta, creamy yoghurt, honey, and chilli creates an irresistible contrast with the warmly spiced beef.
These wraps are perfect for a quick weeknight dinner, lunch, meal prep, or casual entertaining.
Ingredients For;
Beef
- 500 g ground beef
- 1 tablespoon olive oil
- 3 garlic cloves, minced
- 1 teaspoon paprika
- 1 teaspoon ground cumin
- 1 teaspoon dried oregano
- 1/2 teaspoon smoked paprika
- 1/2 teaspoon salt
- 1/4 teaspoon black pepper
- 1 tablespoon fresh lemon juice
- 2 tablespoons chopped fresh parsley
Hot Honey Feta Cream
- 100 g feta cheese, crumbled
- 1/2 cup plain Greek yogurt
- 1 tablespoon hot honey
- 1 tablespoon fresh lemon juice
- 1 small garlic clove, minced
- 1 tablespoon extra-virgin olive oil
- 1/4 teaspoon chili flakes, optional
- 1–2 tablespoons water, as needed
Wraps
- 4 pita breads
- 1 cup chopped lettuce
- 1/2 cucumber, diced
- 1 cup cherry tomatoes, halved
- 1/4 red onion, thinly sliced
- 1/4 cup Kalamata olives, sliced, optional
- Fresh parsley or mint
- Extra feta, optional
- Lemon wedges for serving
Instructions
1. Prepare the Beef Seasoning
In a small bowl, combine the paprika, cumin, oregano, smoked paprika, salt, and black pepper.
Mix well.
Having the seasoning prepared beforehand makes it easier to season the beef evenly while it cooks.
2. Cook the Ground Beef
Heat 1 tablespoon olive oil in a large skillet over medium-high heat.
Add the ground beef.
Cook for approximately 5–7 minutes, breaking it apart with a wooden spoon or spatula as it cooks.
Continue until the beef is browned and cooked through.
If there’s a large amount of excess fat, carefully drain some of it from the skillet.
3. Add the Garlic and Spices
Add the minced garlic to the cooked beef.
Cook for about 30–60 seconds, stirring frequently.
Add the prepared spice mixture.
Stir thoroughly so the spices coat the beef.
Cook for another 1–2 minutes to allow the spices to become fragrant.
4. Finish the Beef
Turn off the heat.
Add fresh lemon juice and chopped parsley.
Stir well.
Taste and adjust the seasoning if necessary.
The finished beef should be savoury, aromatic, slightly smoky, and bright from the lemon.
Set aside while you prepare the feta cream.
5. Make the Hot Honey Feta Cream
Add the crumbled feta, Greek yoghurt, hot honey, lemon juice, garlic, olive oil, and chilli flakes to a blender or food processor.
Blend until smooth and creamy.
If the mixture is too thick, add 1 tablespoon water at a time until you reach a smooth, spreadable consistency.
Taste and adjust the flavour For;
Sweetness, add another small drizzle of honey.
More heat, add additional chilli flakes.
Tang, add another squeeze of lemon juice.
6. Prepare the Fresh Vegetables
Wash and prepare the vegetables.
Chop the lettuce and cucumber.
Halve the cherry tomatoes.
Thinly slice the red onion.
Slice the olives if using.
Place everything in separate bowls or combine them into a simple salad mixture.
7. Warm the Pitta
Warm the pita breads in a dry skillet over medium heat for approximately 20–30 seconds per side.
You can also warm them in the oven or microwave.
Don’t overheat them, or they may become brittle and difficult to fold.
If using thick pita pockets, carefully open them.
For flat pita bread, simply place the fillings in the centre and fold like a wrap.
8. Assemble the Wraps
Spread a generous spoonful of hot honey feta cream over each warm pita.
Add a layer of lettuce.
Top with the seasoned ground beef.
Add cucumber, tomatoes, red onion, and Kalamata olives.
Sprinkle with fresh parsley or mint and additional feta if desired.
Finish with a small drizzle of hot honey for an extra sweet-spicy kick.
9. Fold and Serve
Fold the bottom of the pita upward slightly, then fold in the sides.
Roll tightly into a wrap.
Serve immediately with fresh lemon wedges.
For an extra Mediterranean touch, serve with hummus, a Greek salad, or roasted vegetables.
Recipe Notes
Choose the right ground beef
Ground beef with moderate fat content works especially well because it keeps the filling juicy and flavourful.
If using very lean beef, you may need an additional drizzle of olive oil during cooking.
Don’t overcook the beef
Cook just until browned and cooked through. Overcooking can make ground beef dry.
Fresh lemon makes a difference
The lemon juice added at the end brightens the spices and balances the richness of the beef and feta.
Blend the feta sauce
Blending creates a smooth, creamy sauce. If you prefer a more rustic texture, mash the ingredients together with a fork instead.
Adjust the heat
Hot honey and chilli flakes can vary significantly in spiciness. Start with a small amount and increase according to your taste.
Helpful Tips
1. Prep everything first.
Because the beef cooks quickly, prepare the vegetables and sauce before you start cooking.
2. Don’t overcrowd the skillet.
A large skillet helps the beef brown instead of steaming.
3. Warm the pita immediately before assembling.
Warm pita is softer and less likely to crack.
4. Keep the sauce cold.
The contrast between warm spiced beef and cool feta cream is especially delicious.
5. Add crunch.
Cucumber, lettuce, and red onion provide a refreshing contrast to the tender beef.
6. Use fresh herbs.
Parsley and mint add a bright Mediterranean finish.
Delicious Variations
Chicken Pita Wrap
Replace ground beef with ground chicken or turkey.
Use the same seasoning mixture and cook until the meat reaches a safe internal temperature.
Lamb Pita Wrap
Ground lamb works beautifully with cumin, oregano, garlic, and feta.
The richer lamb pairs particularly well with the bright lemony sauce.
Vegetarian Version
Replace the beef with roasted chickpeas, lentils, mushrooms, or a combination of vegetables.
Extra-Spicy Wrap
Add diced jalapeño or crushed red pepper to the beef and increase the chilli flakes in the feta cream.
Greek-Inspired Version
Add cucumber, tomato, red onion, Kalamata olives, oregano, and a generous amount of feta.
Make-Ahead Instructions
You can prepare most of the components ahead of time.
Cook the beef and refrigerate it in an airtight container for up to 3–4 days.
The feta cream can also be refrigerated for approximately 3–4 days.
Store the vegetables separately when possible.
When ready to eat, warm the beef and pita, then assemble the wrap with the chilled feta cream and fresh vegetables.
Storage
For the best texture, store the components separately rather than assembling the entire wrap in advance.
Fully assembled wraps can become soggy because of the sauce and vegetables.
Keep:
- Beef in one container
- Feta cream in another
- Vegetables separately
- Pita wrapped tightly
Assemble immediately before serving.
Approximate Nutritional Information
Per wrap, based on 4 servings:
- Calories: approximately 650–700
- Protein: approximately 35–40 g
- Carbohydrates: approximately 45–50 g
- Fat: approximately 32–36 g
- Fiber: approximately 5–7 g
- Sugar: approximately 7–10 g
- Sodium: approximately 800–1,000 mg
Nutrition is an estimate and will vary depending on the ground beef, pita, feta, yoghurt, and amount of sauce used.
For a lighter option, use smaller pita breads, leaner ground beef, and a reduced amount of feta cream.
Benefits of This Recipe
Protein-rich
Ground beef, Greek yoghurt, and feta contribute substantial protein, making these wraps satisfying and suitable for a protein-focused meal.
Includes vegetables
Fresh lettuce, cucumber, tomatoes, and onion add fibre, freshness, colour, and texture.
Healthy fats
Olive oil, feta, and Greek yoghurt contribute fats that help create a satisfying meal.
Flavorful without complicated cooking
The combination of cumin, paprika, garlic, oregano, lemon, and herbs creates a lot of flavour with simple ingredients.
Balanced meal
A pita wrap combines protein, carbohydrates, vegetables, and fats in one convenient meal.
These are general nutritional benefits of the ingredients and aren’t medical claims.
Frequently Asked Questions
Can I use ground turkey instead of beef?
Yes. Ground turkey is an excellent substitute. Because it is often leaner than beef, avoid overcooking it.
Can I make the feta cream without Greek yoghurt?
Yes. You can use a little extra feta with olive oil and lemon juice, although the texture will be thicker and more intensely salty.
Can I use regular honey instead of hot honey?
Absolutely. Add regular honey and a pinch of chilli flakes to create your own sweet-spicy sauce.
Is the sauce very spicy?
Not necessarily. The heat depends on the hot honey and chilli flakes. Start with a small amount and adjust.
Can I use naan instead of pita?
Yes. Naan, flatbread, or tortillas can all work as alternatives.
Can I make this recipe gluten-free?
Yes. Use certified gluten-free pita or another gluten-free flatbread.
Can I prepare the beef ahead of time?
Yes. Cooked beef can be refrigerated for up to 3–4 days and reheated before assembling.
How can I make the wrap lower in carbohydrates?
Use a low-carb pita or wrap and increase the amount of lettuce, cucumber, and other non-starchy vegetables.
Can I add hummus?
Definitely. Spread a thin layer of hummus underneath the feta cream for another delicious Mediterranean flavour.
What should I serve with these wraps?
Try them with Greek salad, hummus, roasted vegetables, cucumber salad, or a simple lentil soup.
Final Thoughts
This Mediterranean Ground Beef Pita Wrap with Hot Honey Feta Cream is a fantastic combination of savoury, creamy, fresh, sweet, and spicy flavours. The cumin-and-paprika-seasoned beef provides a hearty filling, while the tangy feta cream adds richness and a subtle kick.
Air Fryer Low-Carb Fish Cakes
These Air Fryer Low-Carb Fish Cakes are crispy on the outside, tender and flavorful on the inside, and incredibly easy to prepare. They are made with flaky white fish, fresh herbs, lemon, Parmesan, and a simple low-carb binder instead of traditional breadcrumbs or flour.The air fryer gives these fish cakes a beautifully golden exterior with only a small amount of oil. They’re perfect for a quick lunch, light dinner, meal prep, or even a healthy appetizer. Serve them with a creamy yogurt sauce, fresh salad, roasted vegetables, or steamed greens for a satisfying low-carb meal.If you’re looking for a recipe that’s high in protein, packed with flavor, and easy enough for a busy weeknight, these fish cakes are a fantastic choice
Prep Time: 15 minutes
Chill Time: 20 minutes
Cook Time: 10–14 minutes
Total Time: 45–50 minutes
Servings: 4
Air Fryer Temperature: 390°F (200°C)
Why You’ll Love This Recipe
Low in Carbohydrates
Traditional fish cakes often use breadcrumbs or flour. This version uses almond flour and Parmesan to create a flavorful low-carb coating.
Crispy Without Deep-Frying
The air fryer produces golden, crispy fish cakes without needing a large amount of oil.
High in Protein
Fish and eggs provide a satisfying source of protein, making these fish cakes ideal for lunch or dinner.
Fresh and Flavorful
Lemon, parsley, garlic, and seasonings give the fish cakes a bright, savory flavor.
Easy to Customize
You can use different types of white fish and adjust the herbs and spices according to your taste.
Great for Meal Prep
Prepare the mixture ahead of time and refrigerate the shaped fish cakes until you’re ready to cook.
Ingredients For Air Fryer Low-Carb Fish Cakes
For the Fish Cakes
1 pound (450 g) cooked white fish, such as cod, haddock, pollock, or tilapia
1 large egg
½ cup finely ground almond flour
¼ cup grated Parmesan cheese
2 tablespoons finely chopped fresh parsley
2 green onions, finely sliced
1 clove garlic, minced
1 tablespoon fresh lemon juice
lemon zest 1 teaspoon
paprika ½ teaspoon
dried dill ½ teaspoon
onion powder ¼ teaspoon
salt ½ teaspoon
black pepper ¼ teaspoon
1 tablespoon olive oil or cooking spray
Optional Additions
¼ teaspoon red pepper flakes
1 teaspoon Dijon mustard
Fresh chives
Fresh dill
A pinch of cayenne pepper
Instructions For Air Fryer Low-Carb Fish Cakes
Cook the Fish
If you’re starting with raw fish, place the fillets in a lightly greased baking dish and cook until they are opaque and flake easily with a fork.
You can also steam or poach the fish.
Allow the cooked fish to cool slightly.
Remove any bones and skin, then gently flake the fish into small pieces.
If using leftover cooked fish, make sure it hasn’t been heavily seasoned with strong sauces that could overpower the fish cakes.
Remove Excess Moisture
Moisture is one of the biggest enemies of crispy fish cakes.
After flaking the fish, gently press it between paper towels to remove excess moisture.
The fish should be moist but not wet.
Make the Fish Cake Mixture
Place the flaked fish in a large mixing bowl.
Add the egg, almond flour, Parmesan cheese, parsley, green onions, garlic, lemon juice, lemon zest, paprika, dill, onion powder, salt, and black pepper.
Add Dijon mustard or red pepper flakes if using.
Mix gently until all ingredients are combined.
The mixture should hold together when pressed.
If it feels too wet, add another tablespoon of almond flour. If it feels too dry, add a small amount of beaten egg.
Shape the Fish Cakes
Divide the mixture into approximately 8 equal portions.
Shape each portion into a compact patty about ½–¾ inch thick.
Press the edges together firmly so the fish cakes don’t fall apart during cooking.
Place the shaped patties on a plate or parchment-lined tray.
Chill the Fish Cakes
Refrigerate the fish cakes for approximately 20 minutes.
This step helps the mixture firm up and makes the patties easier to handle.
It also helps them maintain their shape during air frying.
Preheat the Air Fryer
Preheat your air fryer to 390°F (200°C) for about 3 minutes.
Lightly spray the air fryer basket with cooking spray.
Air Fry
Carefully place the fish cakes into the air fryer basket in a single layer.
Leave space between each patty for proper air circulation.
Lightly spray or brush the tops with olive oil.
Air fry at 390°F (200°C) for 5–7 minutes.
Carefully flip the fish cakes and lightly spray the second side with oil.
Continue cooking for another 5–7 minutes, or until the fish cakes are golden brown and heated through.
The exact time will depend on the thickness of the patties and your air fryer.
Rest and Serve
Remove the fish cakes from the air fryer and let them rest for 2–3 minutes.
Serve warm with lemon wedges and your favorite low-carb dipping sauce.
Tips for Perfect Air Fryer Fish Cakes
Choose Firm White Fish
Cod, haddock, pollock, and tilapia work especially well. Avoid fish that contains excessive moisture.
Remove Excess Moisture
If the fish mixture is too wet, the patties can fall apart. Press the cooked fish gently with paper towels before mixing.
Don’t Make the Patties Too Thick
Thinner patties cook more evenly and develop a better crispy exterior.
Chill Before Cooking
Even a short chilling period helps the fish cakes hold together.
Don’t Overcrowd the Basket
Air circulation is essential for crispiness. Cook in batches if necessary.
Flip Carefully
Use a thin spatula and turn the fish cakes gently to prevent them from breaking.
Add Oil Lightly
A small amount of olive oil helps with browning. Too much oil isn’t necessary.
Benefits For Air Fryer Low-Carb Fish Cakes
Fish is an excellent source of high-quality protein and can provide important nutrients such as vitamin B12, selenium, and, depending on the type of fish used, omega-3 fatty acids.
Replacing traditional breadcrumbs with almond flour reduces the carbohydrate content of these fish cakes. Parmesan adds flavor and contributes protein and calcium.
The air fryer also allows the fish cakes to become crisp with minimal added oil compared with traditional pan-frying or deep-frying.
For a complete low-carb meal, pair them with non-starchy vegetables, leafy greens, avocado, or a fresh cucumber salad.
Serving Suggestions For Air Fryer Low-Carb Fish Cakes
With Lemon Yogurt Sauce
Combine Greek yogurt, lemon juice, garlic, dill, salt, and pepper for a fresh dipping sauce.
With Green Salad
Serve two fish cakes over mixed greens with cucumber, tomatoes, avocado, and lemon vinaigrette.
With Roasted Vegetables
Pair them with roasted broccoli, zucchini, asparagus, or cauliflower.
With Cauliflower Mash
Serve alongside creamy cauliflower mash for a comforting low-carb dinner.
With Avocado
Add sliced avocado and fresh lemon for extra creaminess and healthy fats.
As an Appetizer
Make smaller fish cakes and serve them with a selection of dipping sauces for parties or gatherings.
Nutrition Facts For Air Fryer Low-Carb Fish Cakes
Approximate nutrition per serving, based on 4 servings:
Calories: 285
Protein: 31 g
Fat: 15 g
Saturated Fat: 3.5 g
Carbohydrates: 5 g
Fiber: 2 g
Net Carbohydrates: 3 g
Sugar: 1 g
Sodium: 510 mg
Calcium: 115 mg
Iron: 1.5 mg
Nutrition information is an estimate and will vary depending on the type of fish, almond flour, Parmesan, and other ingredients used.
Frequently Asked Questions
Can I use canned fish?
Yes. Canned tuna, salmon, or another canned fish can work. Drain it extremely well before adding it to the mixture.
Can I make fish cakes without almond flour?
Yes. You can use crushed pork rinds as a low-carb alternative. For a non-low-carb version, traditional breadcrumbs can also be used.
Why are my fish cakes falling apart?
The mixture may contain too much moisture or may not have enough binder. Make sure the fish is well drained and add a little extra almond flour if needed. Chilling the patties before cooking also helps.
Can I use frozen fish?
Yes. Thaw the fish completely and pat it very dry before cooking and flaking.
Can I make these fish cakes ahead of time?
Yes. Shape the uncooked fish cakes and refrigerate them for up to 24 hours before air frying.
Can I freeze fish cakes?
Yes. Place cooked and cooled fish cakes in an airtight freezer-safe container and freeze for up to 2 months. Thaw them in the refrigerator and reheat in the air fryer.
How do I reheat fish cakes?
Air fry refrigerated fish cakes at 350°F (175°C) for 4–6 minutes, or until heated through and crisp.
What fish is best for fish cakes?
Cod, haddock, pollock, and tilapia are excellent choices. Salmon can also be used if you prefer a richer flavor.
Can I make these dairy-free?
Yes. Omit the Parmesan and add an extra tablespoon or two of almond flour if necessary to help bind the mixture.
Final Thoughts For Air Fryer Low-Carb Fish Cakes
These Air Fryer Low-Carb Fish Cakes are a delicious combination of tender flaky fish and a golden, crispy exterior. They’re easy to prepare, packed with protein, and made without traditional breadcrumbs or flour.The key to successful fish cakes is controlling moisture. Make sure the fish is well drained, shape the patties firmly, and chill them before cooking. Once they’re in the air fryer, give them enough space to crisp properly and flip them carefully.Serve them with a fresh lemon yogurt sauce, crunchy salad, roasted vegetables, or cauliflower mash for a complete low-carb meal. They’re also excellent for meal prep and can be frozen for an easy dinner later.With their crisp edges, savory herbs, fresh lemon flavor, and tender center, these air fryer fish cakes are a simple recipe you’ll want to make again and again.
Air Fryer Baked Apple Fritters
These Air Fryer Baked Apple Fritters are a delicious way to enjoy the cozy flavor of classic apple fritters without deep-frying. They are soft and fluffy inside, lightly crisp and golden around the edges, and filled with juicy pieces of fresh apple. A simple sweet glaze drizzled over the top adds the perfect finishing touch.Traditional apple fritters are usually dropped into hot oil, but the air fryer offers a much easier alternative. You can achieve beautifully browned fritters with just a small amount of oil, making this recipe less messy and convenient for everyday baking.These homemade apple fritters are perfect for breakfast, brunch, an afternoon snack, or a comforting dessert. The combination of warm cinnamon, sweet apples, vanilla, and a delicate glaze makes every bite taste like fall.
Prep Time: 15 minutes
Cook Time: 10–14 minutes
Total Time: 25–30 minutes
Servings: 8 fritters
Air Fryer Temperature: 350°F (175°C)
Why You’ll Love This Recipe
No Deep-Frying
You can enjoy the classic apple fritter flavor without a pot full of hot oil.
Quick and Easy
The batter comes together quickly, and the air fryer cooks the fritters in just minutes.
Soft Inside, Golden Outside
The hot circulating air creates lightly crisp edges while keeping the center soft and tender.
Full of Apple Flavor
Fresh diced apples are mixed throughout the batter, giving you juicy apple pieces in every bite.
Cozy Cinnamon Flavor
Cinnamon and vanilla complement the apples beautifully and make these fritters taste warm and comforting.
Perfect for Any Time of Day
Enjoy them for breakfast with coffee, as an afternoon snack, or as a simple dessert.
Ingredients For Air Fryer Baked Apple Fritters
For the Apple Fritters
1½ cups all-purpose flour
2 teaspoons baking powder
½ teaspoon ground cinnamon
¼ teaspoon nutmeg
salt ¼ teaspoon
granulated sugar ¼ cup
1 large egg
½ cup milk
1 teaspoon vanilla extract
2 tablespoons melted butter
1½ cups peeled and finely diced apples
Cooking spray or 1 tablespoon melted butter, for brushing
For the Glaze
1 cup powdered sugar
2 tablespoons milk
½ teaspoon vanilla extract
½ teaspoon fresh lemon juice, optional
Optional Toppings
Extra cinnamon
Chopped walnuts or pecans
Thin apple slices
A light dusting of powdered sugar
Instructions For Air Fryer Baked Apple Fritters
Prepare the Apples
Peel the apples and remove the cores.
Cut them into small, evenly sized pieces. Small pieces distribute more evenly through the batter and cook more quickly.
For the best flavor, use apples that are slightly sweet and firm, such as Honeycrisp, Gala, Pink Lady, or Granny Smith.
If using Granny Smith apples, the slight tartness creates a wonderful contrast with the sweet glaze.
Mix the Dry Ingredients
In a medium bowl, whisk together the flour, baking powder, cinnamon, nutmeg, salt, and sugar.
Mix thoroughly to distribute the baking powder and spices evenly.
Mix the Wet Ingredients
In another bowl, whisk together the egg, milk, vanilla extract, and melted butter.
Make sure the melted butter has cooled slightly before adding it to the egg mixture.
Make the Batter
Pour the wet ingredients into the dry ingredients.
Gently stir until just combined.
Do not overmix the batter. A few small lumps are perfectly fine.
Fold in the diced apples.
The batter should be thick enough to hold its shape when spooned.
If it seems excessively dry, add another tablespoon of milk. If it is too loose, add a small amount of flour.
Preheat the Air Fryer
Preheat your air fryer to 350°F (175°C) for approximately 3 minutes.
Lightly spray the air fryer basket with cooking spray.
If your air fryer tends to stick, you can place a perforated piece of parchment paper designed for air fryers underneath the fritters.
Form the Fritters
Scoop approximately 2 tablespoons of batter for each fritter.
Place the portions into the air fryer basket, leaving space between each one.
Gently flatten each fritter slightly with the back of a spoon.
Avoid making them too thick because the centers need enough time to cook.
Depending on the size of your air fryer, you may need to cook the fritters in batches.
Air Fry
Lightly spray or brush the tops of the fritters with melted butter or cooking spray.
Air fry at 350°F (175°C) for 5–7 minutes.
Carefully flip each fritter.
Continue cooking for another 5–7 minutes, or until the fritters are golden brown and cooked through.
Insert a toothpick into the center of one fritter. It should come out clean or with a few moist crumbs.
Prepare the Glaze
While the fritters are cooking, prepare the glaze.
Add powdered sugar to a small bowl.
Gradually whisk in milk and vanilla extract.
Add the optional lemon juice for a subtle tang that balances the sweetness.
The glaze should be smooth and thick enough to coat the fritters while still being easy to drizzle.
If it is too thick, add a few drops of milk. If it is too thin, add a little more powdered sugar.
Glaze the Fritters
Allow the cooked fritters to cool for about 5 minutes.
Drizzle the glaze generously over the tops.
For a thicker coating, dip the tops directly into the glaze and allow the excess to drip off.
Let the glaze sit for a few minutes before serving.
Tips for Perfect Air Fryer Apple Fritters
Choose the Right Apples
Firm apples work best because they maintain some texture during cooking. Avoid very soft apples that can turn mushy.
Cut the Apples Small
Small apple pieces distribute throughout the batter and make the fritters easier to cook evenly.
Don’t Overmix
Overmixing can produce dense fritters. Stir only until the flour is incorporated.
Don’t Overcrowd the Basket
Leave space between fritters so hot air can circulate around them.
Flatten Slightly
A slightly flattened fritter cooks more evenly than a tall mound of batter.
Check the Center
The outside can brown before the center is fully cooked. Use a toothpick to check before removing the fritters.
Glaze While Slightly Warm
Fritters that are slightly warm absorb the glaze beautifully without making it disappear completely.
Benefits For Air Fryer Baked Apple Fritters
These air fryer apple fritters can be a more convenient alternative to traditional deep-fried fritters because they require very little added oil.
Apples provide dietary fiber, vitamin C, and naturally occurring antioxidants. Using fresh apples also adds moisture and natural fruit flavor to the fritters.
Air frying can reduce the amount of oil absorbed compared with deep-frying, while still giving the fritters attractive golden edges.
For a more balanced breakfast, serve one fritter with Greek yogurt and fresh fruit rather than treating several fritters as a full meal.
Serving Suggestions For Air Fryer Baked Apple Fritters
With Coffee
Serve warm apple fritters alongside coffee, cappuccino, or tea for a cozy breakfast or afternoon snack.
With Greek Yogurt
Add a spoonful of plain Greek yogurt for a creamy contrast to the sweet fritter.
With Fresh Fruit
Serve with sliced apples, berries, or pears for extra freshness.
With Cinnamon
Sprinkle a tiny amount of cinnamon over the glaze for an extra burst of warm spice.
With Ice Cream
For dessert, serve a warm fritter with a small scoop of vanilla ice cream.
With Caramel Sauce
Drizzle lightly with homemade or store-bought caramel sauce for an extra-indulgent treat.
Nutrition Facts For Air Fryer Baked Apple Fritters
Approximate nutrition per fritter, based on 8 fritters:
Calories: 225
Protein: 4 g
Carbohydrates: 38 g
Fat: 7 g
Saturated Fat: 4 g
Fiber: 2 g
Sugar: 20 g
Sodium: 190 mg
Calcium: 65 mg
Iron: 1.5 mg
Nutrition information is an estimate and will vary depending on the apples, milk, flour, butter, and amount of glaze used.
Frequently Asked Questions
Can I use different types of apples?
Yes. Granny Smith, Honeycrisp, Gala, Pink Lady, and Fuji are all excellent choices. You can even combine sweet and tart apples.
Can I make these fritters without a glaze?
Absolutely. They are delicious on their own. You can dust them with powdered sugar or sprinkle them with cinnamon sugar instead.
Why are my apple fritters dense?
The most common reason is overmixing the batter. Stir gently and only until the ingredients are combined.
Why are my fritters raw in the middle?
They may be too thick or your air fryer may cook the exterior faster than the center. Flatten the fritters slightly and cook them for a few additional minutes at the same temperature.
Can I use whole-wheat flour?
Yes, but the texture will be denser. For a lighter texture, replace only half of the all-purpose flour with whole-wheat flour.
Can I use frozen apples?
Fresh apples are recommended because frozen apples contain extra moisture and can make the batter too wet.
How should I store leftover fritters?
Store cooled fritters in an airtight container at room temperature for up to 1 day or refrigerate them for up to 3 days.
How do I reheat apple fritters?
Reheat them in the air fryer at 325°F (165°C) for 2–4 minutes until warmed through.
Can I freeze apple fritters?
Yes. Freeze the unglazed fritters in an airtight freezer-safe container for up to 2 months. Thaw and reheat them in the air fryer, then add fresh glaze before serving.
Final Thoughts For Air Fryer Baked Apple Fritters
These Air Fryer Baked Apple Fritters are a simple and delicious way to enjoy a classic apple treat without deep-frying. Fresh apples, cinnamon, vanilla, and a sweet glaze create the perfect combination of cozy flavors, while the air fryer gives the fritters beautifully golden edges.For the best results, use firm apples, cut them into small pieces, avoid overmixing the batter, and leave enough room between the fritters for air to circulate. Checking the center with a toothpick will also help you achieve perfectly cooked fritters every time.Serve them warm with coffee or tea for breakfast, enjoy them as an afternoon snack, or turn them into an easy dessert with vanilla ice cream and caramel sauce. Once you try this simple air fryer method, these homemade apple fritters may quickly become a family favorite.
Cheesy Potato & Vegetable Casserole
A comforting, golden-baked casserole packed with potatoes, zucchini, carrots, cheese, eggs, herbs, and a creamy sauce. This easy vegetable bake has a crisp, cheesy top and a tender, flavourful center, making it perfect for breakfast, brunch, lunch, dinner, or as a hearty side dish.
Recipe at a Glance
Servings: 6–8
Prep time: 20 minutes
Cook time: 45–55 minutes
Total time: About 1 hour 15 minutes
Oven temperature: 375°F / 190°C
Difficulty: Easy
Cuisine: Comfort food / American-inspired
Best served: Warm
Description
This Cheesy Potato & Vegetable Casserole is a delicious way to turn everyday vegetables into a satisfying family meal. Grated potatoes provide a hearty base, while zucchini and carrots add moisture, color, flavor, and nutrients. Eggs and sour cream help bind everything together, while mozzarella, cheddar, and Parmesan create a rich, savory flavor and beautifully browned crust.
The combination of vegetables and cheese makes this casserole especially appealing to children and adults alike. The outside becomes golden and slightly crisp during baking, while the inside remains soft, creamy, and tender.
It is also a wonderfully flexible recipe. You can serve it as a vegetarian main dish with a fresh salad, or alongside roasted meat, grilled chicken, fish, or other favorite dishes.
Ingredients
For the casserole
4 medium potatoes, peeled
2 medium zucchini
2 carrots
1 small onion
3 cloves garlic, minced
4 large eggs
1 cup sour cream or plain Greek yogurt
1 cup shredded mozzarella cheese
1 cup shredded cheddar cheese
½ cup grated Parmesan cheese
2 tablespoons all-purpose flour
2 tablespoons olive oil
1 teaspoon salt
½ teaspoon black pepper
1 teaspoon paprika
½ teaspoon dried oregano or Italian seasoning
2–3 tablespoons chopped fresh parsley or dill
½ teaspoon red pepper flakes, optional
For greasing
1 teaspoon butter or olive oil
Instructions
1. Prepare the vegetables
Preheat your oven to 375°F (190°C).
Peel the potatoes and wash the zucchini and carrots thoroughly. Grate the potatoes, zucchini, and carrots using the large holes of a box grater.
Finely chop the onion and mince the garlic.
The vegetables can be grated by hand, but a food processor with a grating attachment can make the preparation much faster.
2. Remove excess moisture
This is one of the most important steps in the recipe.
Zucchini and potatoes naturally contain a considerable amount of water. If you skip this step, your casserole can become watery instead of firm and creamy.
Place the grated zucchini and potatoes in a clean kitchen towel or several layers of cheesecloth. Gather the towel and squeeze firmly over the sink to remove as much liquid as possible.
You can also place the grated vegetables in a colander, sprinkle them lightly with salt, and allow them to drain for about 10 minutes before squeezing.
The drier the vegetables, the better the final texture will be.
3. Prepare the creamy mixture
In a large mixing bowl, whisk together:
4 eggs
1 cup sour cream or Greek yogurt
2 tablespoons flour
minced garlic
salt
black pepper
paprika
oregano or Italian seasoning
Whisk until the mixture is smooth and evenly combined.
The eggs provide structure while the sour cream gives the casserole a creamy texture.
4. Combine the vegetables
Add the squeezed potatoes and zucchini to the bowl.
Add the grated carrots and chopped onion as well.
Add the fresh parsley or dill and red pepper flakes if using.
Stir thoroughly until all the vegetables are coated with the egg and sour cream mixture.
5. Add the cheese
Add:
½ cup mozzarella
½ cup cheddar
½ cup Parmesan
Mix everything together.
Reserve the remaining mozzarella and cheddar for the topping.
The Parmesan contributes a salty, nutty flavor, while mozzarella gives a stretchy texture and cheddar provides a stronger cheesy taste.
6. Prepare the baking dish
Grease a 9 × 13-inch (23 × 33 cm) baking dish with butter or olive oil.
Transfer the vegetable mixture into the dish and spread it evenly with a spatula or the back of a spoon.
Make sure the mixture is distributed evenly so that the casserole cooks consistently.
7. Add the cheese topping
Sprinkle the remaining mozzarella and cheddar over the entire surface.
For an extra golden crust, you can add another tablespoon or two of Parmesan.
Try to spread the cheese evenly from edge to edge. The cheese will melt during baking and form the delicious golden topping characteristic of this casserole.
8. Bake
Cover the baking dish loosely with aluminum foil.
Bake at 375°F (190°C) for approximately 30 minutes.
Then carefully remove the foil and return the casserole to the oven.
Continue baking uncovered for another 15–25 minutes, or until the vegetables are tender and the cheese is melted, bubbling, and golden brown.
The exact baking time can vary depending on how wet the vegetables are and how deep your baking dish is.
9. Brown the top
For an especially attractive golden crust, you can switch the oven to the broil/grill setting during the final 2–3 minutes.
Watch the casserole carefully during this stage because cheese can go from golden to burnt very quickly.
10. Rest before serving
Remove the casserole from the oven and allow it to rest for 10–15 minutes before slicing.
This resting period allows the eggs and cheese to set slightly, making the casserole easier to serve.
Cut into squares and serve warm.
Recipe Notes
Squeezing the vegetables is essential
Do not underestimate this step. Zucchini releases a lot of water during cooking. Potatoes can also contain substantial moisture. Removing excess liquid helps create a casserole that holds together rather than becoming soupy.
Choose good melting cheese
Mozzarella works beautifully for melting, while cheddar adds flavor and color. Parmesan helps create a savory crust.
You can substitute Monterey Jack, Colby, Gruyère, or a combination of your favorite melting cheeses.
Fresh herbs
Parsley gives the casserole a fresh flavor, while dill provides a slightly more distinctive taste. You can use dried herbs if fresh herbs aren’t available.
Baking dish
A glass or ceramic casserole dish works particularly well. If your dish is significantly smaller or deeper than 9 × 13 inches, you may need to adjust the baking time.
Make it ahead
The casserole can be assembled several hours in advance and refrigerated, covered, until you’re ready to bake. If baking directly from the refrigerator, allow additional cooking time and make sure the center is fully cooked.
Helpful Tips for the Best Casserole
- Squeeze the potatoes and zucchini thoroughly. This is the most important tip.
- Don’t shred the vegetables too finely. Coarse grating gives the casserole better texture.
- Use freshly shredded cheese when possible. It generally melts more smoothly.
- Don’t overbake. Once the center is set and the top is golden, remove it from the oven.
- Let it rest before cutting. Ten to fifteen minutes makes serving much easier.
- Season according to taste. Potatoes benefit from generous seasoning.
- Add spice if desired. Red pepper flakes or a little cayenne can add pleasant heat.
- Watch the broiler carefully. The cheese can brown extremely quickly.
- Use full-fat sour cream for the richest result.
- Serve with something fresh. A green salad or tomato-cucumber salad balances the richness of the cheese.
Variations
Cheesy Chicken Casserole
Add approximately 1½ cups cooked, shredded chicken to the vegetable mixture. This turns the recipe into a more substantial main course.
Bacon Version
Cook and crumble 150–200 g (5–7 oz) bacon, then stir it into the mixture before baking.
Spinach Version
Add approximately 1 cup chopped cooked spinach, making sure to squeeze out excess water first.
Mushroom Version
Sauté sliced mushrooms until their moisture has evaporated, then add them to the casserole.
Spicy Version
Add red pepper flakes, chopped jalapeño, or a pinch of cayenne pepper.
Extra-Cheesy Version
Increase the total cheese slightly and add a little Parmesan to the top during the final 10 minutes of baking.
Serving Suggestions
This casserole is versatile enough to serve in several ways.
Breakfast or brunch, serve it with fresh fruit, tomatoes, avocado, or a simple green salad.
Lunch, pair a square of casserole with cucumber and tomato salad or steamed vegetables.
Dinner, serve it alongside grilled chicken, roasted meat, fish, or a large leafy salad.
A spoonful of sour cream, Greek yogurt, or garlic-herb yogurt sauce on top is also delicious.
Storage and Reheating
Allow leftovers to cool and refrigerate them in a covered container.
The casserole should be refrigerated promptly rather than left at room temperature for an extended period.
For best quality, enjoy refrigerated leftovers within 3–4 days.
To reheat, place individual portions in the microwave until hot, or use a 350°F (175°C) oven for approximately 10–20 minutes, depending on the portion size.
The oven method helps restore some of the crispness of the cheesy top.
Approximate Nutritional Information
Estimated per serving, assuming 8 servings and excluding optional additions:
Calories: approximately 330–380 kcal
Protein: approximately 16–18 g
Carbohydrates: approximately 30–34 g
Fat: approximately 16–20 g
Saturated fat: approximately 8–10 g
Fiber: approximately 4–5 g
Sugar: approximately 4–6 g
Sodium: approximately 550–750 mg
Calcium: approximately 250–350 mg
These numbers are estimates and can vary considerably depending on the exact size of the vegetables, type of sour cream or yogurt, cheese brands, and portion size.
Potential Benefits
This casserole combines several food groups in one dish.
Potatoes provide carbohydrates and potassium, making them a satisfying source of energy.
Zucchini and carrots contribute fiber, vitamins, minerals, and naturally occurring plant compounds. Carrots are particularly well known for their beta-carotene content.
Eggs and cheese contribute protein, calcium, and other nutrients. Protein can help make the meal more satisfying.
Fresh herbs and vegetables add flavor without requiring large amounts of additional seasoning or sauces.
Because this recipe contains vegetables along with eggs and dairy, it can be a more nutritionally varied choice than a casserole made primarily from potatoes and cheese alone.
For a lighter version, you can use Greek yogurt instead of sour cream, reduce the cheese slightly, and increase the amount of zucchini, carrots, spinach, or other vegetables.
Frequently Asked Questions
Can I make this casserole without zucchini?
Yes. You can replace the zucchini with additional carrots, grated sweet potato, spinach, or another suitable vegetable. Remember that different vegetables contain different amounts of moisture, so adjust the draining accordingly.
Why is my casserole watery?
The most common reason is excess moisture from the zucchini or potatoes. Squeeze the grated vegetables very thoroughly before mixing them with the other ingredients.
Can I use sweet potatoes?
Yes. Sweet potatoes can replace some or all of the regular potatoes. They will give the casserole a sweeter flavor and a slightly different texture.
Can I prepare it the night before?
Yes. Assemble the casserole, cover it, and refrigerate it. Bake when ready. Because the casserole will be cold, it may require additional baking time.
Can I freeze it?
It is possible, although the texture of zucchini can become softer after freezing and thawing. For the best texture, freezing is generally less ideal than refrigerating leftovers.
Can I make it vegetarian?
Yes. The recipe as written is vegetarian as long as the cheeses and other ingredients you choose are vegetarian-friendly.
Can I make it gluten-free?
Yes. Replace the all-purpose flour with a suitable gluten-free flour or starch. Also check the labels of your other ingredients if strict gluten avoidance is required.
How do I know when it is done?
The top should be deeply golden and bubbling, while the center should look set rather than liquid. A knife inserted near the center should come out without a runny egg mixture.
Can I use pre-shredded cheese?
Yes, but freshly shredded cheese often melts more smoothly. Pre-shredded cheese can contain anti-caking ingredients that may slightly affect melting.
What can I serve with it?
A fresh green salad, tomato salad, roasted vegetables, grilled chicken, fish, or a simple yogurt-garlic sauce all pair beautifully with this casserole.
Final Recipe Summary
Cheesy Potato & Vegetable Casserole is an easy, hearty, family-friendly dish featuring grated potatoes, zucchini, carrots, onion, garlic, eggs, sour cream, herbs, and plenty of melted cheese. The key to achieving the beautiful golden top and firm, tender interior is to remove excess moisture from the grated vegetables and allow the finished casserole to rest before serving.
Golden Spinach & Sun-Dried Tomato
Golden Spinach & Sun-Dried Tomato Rosti Quiche with Feta & Pine Nuts Recipe – Crispy, Creamy & Flavorful Savory Delight
Description
Golden Spinach & Sun-Dried Tomato Rosti Quiche with Feta & Pine Nuts is a beautiful combination of a crispy potato rosti crust and a creamy, flavorful quiche filling. This unique recipe blends the comforting texture of golden shredded potatoes with nutritious spinach, tangy feta cheese, sweet sun-dried tomatoes, and crunchy toasted pine nuts.
Unlike traditional quiche made with pastry crust, this recipe uses a crispy potato rosti base that creates a naturally gluten-free style crust with incredible flavor and texture. The outside becomes golden and crunchy while the inside remains soft, creamy, and packed with delicious ingredients.
This savory quiche is perfect for breakfast, brunch, lunch, meal prep, or a light dinner. It is elegant enough for special occasions but simple enough to prepare for everyday meals. The combination of vegetables, protein-rich eggs, cheese, and healthy fats makes it both satisfying and nourishing.
The Mediterranean-inspired flavors of spinach, feta, tomatoes, and herbs create a restaurant-quality dish that looks impressive on any table. Serve it warm with a fresh salad, roasted vegetables, or soup for a complete meal.
Ingredients For:
Rosti Potato Crust
- 4 large potatoes, peeled and grated
- 1 teaspoon salt
- 1/2 teaspoon black pepper
- 2 tablespoons olive oil
- 2 tablespoons melted butter
Spinach & Quiche Filling
- 3 cups fresh spinach
- 1/2 cup sun-dried tomatoes, chopped
- 1 cup crumbled feta cheese
- 6 large eggs
- 1/2 cup heavy cream or milk
- 1/2 cup shredded mozzarella cheese
- 2 cloves garlic, minced
- 1/2 teaspoon dried oregano
- 1/2 teaspoon dried basil
- 1/4 teaspoon chili flakes (optional)
- Salt and black pepper to taste
The Topping
- 1/4 cup toasted pine nuts
- Fresh parsley or basil leaves
- Extra feta cheese for garnish
Step-by-Step Instructions
Step 1: Prepare the Potato Rosti Crust
Preheat your oven to 400°F (200°C).
Peel and grate the potatoes using a box grater. Place the grated potatoes in a clean kitchen towel and squeeze firmly to remove as much moisture as possible.
Removing extra water is important because it helps create a crispy golden crust instead of a soft or soggy base.
Transfer the grated potatoes to a bowl. Add salt, black pepper, olive oil, and melted butter. Mix well until the potatoes are evenly coated.
Step 2: Bake the Rosti Base
Grease a round baking dish or tart pan with oil.
Press the potato mixture firmly into the bottom and sides of the pan, creating an even crust.
Bake for 25–30 minutes until the potatoes become golden and crispy around the edges.
Remove from the oven and allow it to cool slightly while preparing the filling.
Step 3: Prepare the Spinach Filling
Heat a skillet over medium heat and add a small amount of olive oil.
Add minced garlic and cook for about 30 seconds until fragrant.
Add fresh spinach and cook until wilted. This usually takes 2–3 minutes.
Remove from heat and allow it to cool slightly.
Chop the spinach if needed and remove any excess liquid.
Step 4: Make the Quiche Mixture
In a large bowl, whisk together eggs and cream until smooth.
Add:
- Cooked spinach
- Sun-dried tomatoes
- Feta cheese
- Mozzarella cheese
- Oregano
- Basil
- Chili flakes
- Salt and pepper
Mix gently until all ingredients are evenly combined.
Step 5: Assemble the Quiche
Pour the spinach and feta mixture into the baked potato rosti crust.
Spread evenly using a spoon.
Sprinkle additional feta cheese on top for extra flavor.
Step 6: Bake the Quiche
Reduce oven temperature to 375°F (190°C).
Bake for 30–40 minutes until:
- The filling is completely set.
- The top is lightly golden.
- The cheese is melted.
Insert a knife into the center. If it comes out clean, the quiche is ready.
Step 7: Add Final Garnish
Remove from the oven and allow the quiche to rest for 10 minutes.
Top with toasted pine nuts, fresh parsley, or basil.
Slice and serve warm.
Tips for Perfect Golden Spinach & Sun-Dried Tomato Rosti Quiche
1. Remove Moisture From Potatoes
Dry potatoes create a crispy crust. Always squeeze grated potatoes well before baking.
2. Cook Spinach First
Fresh spinach releases water during cooking. Removing excess moisture prevents a watery filling.
3. Use Quality Feta Cheese
Good-quality feta provides a creamy texture and delicious salty flavor that balances the sweetness of sun-dried tomatoes.
4. Toast Pine Nuts
Lightly toasting pine nuts enhances their natural nutty flavor and adds extra crunch.
5. Let the Quiche Rest
Allowing the quiche to cool slightly helps the filling set and makes slicing easier.
6. Customize the Filling
You can add:
- Mushrooms
- Roasted peppers
- Caramelized onions
- Broccoli
- Chicken
- Smoked salmon
Recipe Notes
- This quiche can be served warm or at room temperature.
- It is perfect for meal preparation because it stores well.
- Refrigerate leftovers in an airtight container for up to 4 days.
- Reheat slices in the oven for the best texture.
- The potato crust can be prepared one day ahead.
- For a lighter version, replace heavy cream with milk or Greek yogurt.
- Use sweet potatoes instead of regular potatoes for a different flavor.
Benefits of Golden Spinach & Sun-Dried Tomato Rosti Quiche
1. Rich in Protein
Eggs, feta cheese, and mozzarella provide protein that supports muscle repair and helps keep you feeling full.
2. Supports Healthy Digestion
Spinach contains dietary fiber that supports healthy digestion and regular bowel function.
3. Provides Essential Vitamins
Spinach provides vitamins A, C, and K, along with important minerals like iron and magnesium.
4. Contains Healthy Fats
Olive oil and pine nuts provide beneficial unsaturated fats that support overall wellness.
5. Supports Bone Health
Cheese provides calcium and phosphorus, important nutrients for maintaining strong bones.
6. Balanced Meal Option
This recipe combines vegetables, protein, carbohydrates, and healthy fats, making it a satisfying meal choice.
Note: Benefits depend on ingredients, serving size, and overall diet.
Servings & Nutritional Information
Recipe Name: Golden Spinach & Sun-Dried Tomato Rosti Quiche with Feta & Pine Nuts
Preparation Time: 25 minutes
Cooking Time: 60 minutes
Total Time: 1 hour 25 minutes
Servings: 8 slices
Approximate Nutrition Per Serving
- Calories: 320 kcal
- Protein: 14g
- Carbohydrates: 22g
- Fat: 21g
- Saturated Fat: 8g
- Fiber: 3g
- Sugar: 3g
- Calcium: 220mg
- Iron: 3mg
- Sodium: 520mg
Nutritional values may vary depending on brands and ingredient quantities.
Frequently Asked Questions (Q&A)
Can I make this quiche ahead of time?
Yes. This recipe is perfect for meal prep. Prepare it a day ahead and store it in the refrigerator. Reheat before serving.
Can I freeze Rosti Quiche?
Yes. Allow it to cool completely, wrap slices individually, and freeze for up to 2 months. Thaw and reheat before serving.
Can I use frozen spinach?
Yes. Frozen spinach works well. Thaw completely and squeeze out excess water before adding.
Can I make this recipe vegetarian?
Yes. The recipe is naturally vegetarian and packed with flavorful vegetables and cheese.
Can I make it dairy-free?
Yes. Replace dairy cheese with plant-based alternatives and use dairy-free milk.
What can I serve with this quiche?
It pairs well with:
- Fresh green salad
- Tomato salad
- Roasted vegetables
- Vegetable soup
- Fresh fruit
Why is my potato crust not crispy?
The most common reason is excess moisture in potatoes. Make sure to squeeze grated potatoes very well before baking.
Conclusion
Golden Spinach & Sun-Dried Tomato Rosti Quiche with Feta & Pine Nuts is a delicious Mediterranean-inspired recipe that combines crispy potatoes, creamy eggs, flavorful vegetables, and rich cheese into one impressive dish.
With its golden crust, colorful filling, and satisfying texture, this quiche is perfect for breakfast, brunch, lunch, or dinner. It is easy to customize, packed with nutrients, and guaranteed to become a favorite recipe for family and guests.
Spinach & Potato Rosti Bake with Feta
Crispy Spinach & Potato Rosti Crustless Bake with Feta & Sun-Dried Tomato
Description
This Crispy Spinach & Potato Rosti Crustless Bake with Feta & Sun-Dried Tomato is a delicious combination of crispy shredded potatoes, tender spinach, tangy feta cheese, and intensely flavourful sun-dried tomatoes, all baked together until golden and beautifully crisp on top.
Inspired by classic Swiss rösti, this recipe transforms those crispy potato flavours into an easy, satisfying crustless bake. Instead of making individual rösti cakes, the ingredients are layered and baked in one dish, making it perfect for breakfast, brunch, lunch, or a light dinner.
The potatoes develop wonderfully crisp golden edges while the centre remains tender and flavourful. Spinach adds colour and nutrients, feta provides a salty, creamy contrast, and sun-dried tomatoes bring a slightly sweet, savoury flavour that makes every bite more exciting.
It is especially delicious served warm with a simple green salad, roasted vegetables, Greek yoghurt, or a dollop of tzatziki.
Recipe Details
Prep Time: 20 minutes
Cook Time: 40–45 minutes
Total Time: About 1 hour 5 minutes
Servings: 6
Course: Breakfast, Brunch, Lunch, or Dinner
Cuisine: Mediterranean-inspired
Difficulty: Easy
Ingredients For:
Potato Rosti Base
- 4 medium russet or Yukon Gold potatoes, about 1½ pounds
- 2 tablespoons olive oil
- ½ teaspoon salt
- ¼ teaspoon black pepper
- ½ teaspoon garlic powder
- ½ teaspoon dried oregano
- ¼ teaspoon smoked paprika
Spinach Filling
- 5 ounces fresh baby spinach
- 1 small onion, finely diced
- 2 cloves garlic, minced
- 1 teaspoon olive oil
- ½ teaspoon dried oregano
- ¼ teaspoon black pepper
- ¼ teaspoon salt
Egg Mixture
- 6 large eggs
- ½ cup milk or unsweetened almond milk
- ½ cup crumbled feta cheese
- ⅓ cup chopped sun-dried tomatoes, preferably oil-packed and drained
- ¼ cup grated Parmesan cheese
- 2 tablespoons fresh parsley, chopped
- ¼ teaspoon black pepper
For Topping
- ¼ cup crumbled feta
- 2 tablespoons chopped sun-dried tomatoes
- 1 tablespoon fresh parsley or basil
- 1 teaspoon olive oil
- A pinch of black pepper
- Optional: a small sprinkle of red pepper flakes
Instructions
Step 1: Prepare the Oven and Baking Dish
Preheat your oven to 400°F (200°C).
Lightly grease a 9-inch square baking dish or similar-sized oven-safe casserole dish with olive oil. For extra easy removal, you can also line the bottom with parchment paper while lightly greasing the sides.
The relatively hot oven is important because it helps the potatoes become golden and crisp rather than soft and pale.
Step 2: Prepare the Potatoes
Peel the potatoes if desired, although leaving the skins on can add extra texture and nutrients.
Using a box grater or food processor, grate the potatoes into thin shreds.
Place the shredded potatoes in a large bowl of cold water and gently swish them around. This removes some of the excess starch and helps prevent the potatoes from becoming gummy.
Drain thoroughly.
Now comes one of the most important steps: squeeze the potatoes extremely well.
Transfer them to a clean kitchen towel or several layers of paper towel and press firmly to remove as much moisture as possible.
The drier the potatoes, the crispier your rösti-style crust will become.
Step 3: Season the Potatoes
Return the dry shredded potatoes to a bowl.
Add:
- 2 tablespoons olive oil
- ½ teaspoon salt
- black pepper
- garlic powder
- oregano
- smoked paprika
Toss everything together until the potato shreds are evenly coated.
Step 4: Build the Crispy Potato Base
Transfer approximately two-thirds of the seasoned potatoes into the prepared baking dish.
Spread them evenly across the bottom.
Using the back of a spoon or your fingertips, gently press the potatoes into a compact, even layer.
Don’t make the layer too thick. A relatively thin, firmly pressed layer will crisp much better.
Drizzle the remaining teaspoon or so of olive oil over the potatoes.
Bake for approximately 20 minutes, or until the edges are beginning to turn golden.
Step 5: Cook the Spinach
While the potatoes are baking, heat 1 teaspoon olive oil in a skillet over medium heat.
Add the diced onion and cook for approximately 3–4 minutes, until softened.
Minced garlic and cook for another 30 seconds.
Fresh spinach in handfuls.
Cook until the spinach wilts, usually about 2–3 minutes.
Season with oregano, salt, and black pepper.
Remove from the heat.
If the spinach mixture contains noticeable liquid, allow it to cool slightly and squeeze or drain away excess moisture. This prevents the finished bake from becoming watery.
Step 6: Prepare the Egg Mixture
In a large bowl, whisk together the eggs and milk until smooth.
Add:
- ½ cup feta
- Parmesan
- chopped sun-dried tomatoes
- parsley
- black pepper
Stir until everything is evenly distributed.
The feta and sun-dried tomatoes already provide plenty of flavour, so go easy on additional salt.
Step 7: Assemble the Bake
Remove the partially baked potato crust from the oven.
Spread the cooked spinach and onion mixture evenly over the potato layer.
Pour the egg mixture over the spinach.
Gently shake the baking dish so the egg mixture settles into the vegetables and potatoes.
Scatter the remaining shredded potatoes over the top.
Finish with the additional feta and chopped sun-dried tomatoes.
Drizzle lightly with olive oil.
Step 8: Bake Until Golden
Return the dish to the oven.
Bake at 400°F (200°C) for 20–25 minutes, or until the eggs are completely set and the potato topping is deeply golden and crisp.
If the top is browning too quickly before the centre is cooked, loosely cover the dish with foil for the remaining baking time.
For an extra-crispy finish, place the bake under the broiler for 1–2 minutes at the end.
Watch it carefully because the potatoes can brown very quickly.
Step 9: Rest Before Serving
Remove the bake from the oven and let it rest for 5–10 minutes.
This short resting period allows the egg mixture to finish setting and makes slicing much easier.
Sprinkle generously with fresh parsley or basil and add another small crumble of feta if desired.
Cut into six portions and serve warm.
Serving Suggestions
This bake is incredibly versatile.
Breakfast or brunch, serve it with:
- Fresh sliced tomatoes
- Avocado
- Greek yogurt
- Fresh berries
- A simple fruit salad
Lunch or dinner, pair it with:
- Mediterranean cucumber salad
- Mixed green salad
- Roasted zucchini
- Grilled vegetables
- Steamed broccoli
- Tzatziki
- A spoonful of hummus
For extra protein, serve it alongside grilled chicken, turkey, or a portion of white fish.
Recipe Notes
1. Dry potatoes are essential
Do not skip the squeezing step. Potatoes naturally contain a lot of water, and excess moisture is one of the biggest reasons homemade rösti becomes soft instead of crispy.
2. Don’t overload the filling
Although it can be tempting to add lots of vegetables, too many moisture-rich ingredients can prevent the eggs from setting properly.
3. Use block feta when possible
A good-quality feta crumbled by hand generally has better texture than very finely precrumbled feta.
4. Sun-dried tomatoes vary in saltiness
Taste your ingredients before adding extra salt. Oil-packed sun-dried tomatoes and feta can both be quite salty.
5. Let it rest
Cutting the bake immediately after removing it from the oven can cause the filling to appear loose. Give it several minutes to settle.
Helpful Tips for the Crispiest Rosti
Use russet potatoes: Their higher starch content makes them excellent for achieving crisp edges.
Squeeze twice if necessary: After squeezing the shredded potatoes, let them sit for a minute and squeeze them again.
Don’t overcrowd the pan: a thick potato layer can steam instead of crisp.
Preheat properly: Put the bake into a fully preheated oven.
Use enough oil: You don’t need a lot, but a light coating of olive oil helps the potatoes brown beautifully.
Don’t cover the bake while cooking; covering it traps steam and can make the potatoes soft.
Broil briefly at the end: A short burst of high heat creates an especially attractive golden crust.
Make-Ahead Instructions
This recipe is excellent for meal prep.
You can prepare the complete bake, allow it to cool, cover it, and refrigerate it for up to 3–4 days.
For the best texture, reheat individual portions in an oven, toaster oven, or air fryer rather than the microwave.
To reheat in the oven, place a portion in a 375°F (190°C) oven for approximately 10–15 minutes, or until heated through and crisp around the edges.
Storage
Allow leftovers to cool completely before transferring them to an airtight container.
Refrigerator: Store for up to 3–4 days.
Freezer: Individual portions can be frozen for approximately 2 months. Wrap portions tightly and place them in a freezer-safe container.
Thaw overnight in the refrigerator before reheating for the best texture.
Approximate Nutritional Information
Nutritional values will vary depending on the exact ingredients and brands used.
Per serving, based on 6 servings:
- Calories: Approximately 330
- Protein: 16–18 g
- Carbohydrates: 35–38 g
- Fat: 14–16 g
- Fiber: 4–5 g
- Sugar: Approximately 4–5 g
- Sodium: Approximately 550–650 mg
- Calcium: Approximately 180–220 mg
- Iron: Approximately 3 mg
For a lighter version, reduce the Parmesan and use less olive oil. For a higher-protein version, add extra egg whites or serve with Greek yoghurt.
Benefits of This Recipe
Spinach
Spinach provides fibre, folate, vitamin K, vitamin A, vitamin C, iron, and other beneficial plant compounds. It also adds plenty of colour and volume without requiring a large number of calories.
Potatoes
Potatoes provide carbohydrates for energy and contain potassium and vitamin C. Keeping the skin on can also contribute additional fibre.
Eggs
Eggs provide high-quality protein and several important nutrients, making the bake more satisfying and filling.
Feta Cheese
Feta contributes protein, calcium, and a strong savoury flavour, allowing you to use a moderate amount while still getting plenty of flavour.
Sun-Dried Tomatoes
Sun-dried tomatoes provide concentrated tomato flavour along with antioxidants such as lycopene. Their sweet-savoury taste works especially well with spinach and feta.
Olive Oil
Extra-virgin olive oil contributes monounsaturated fats and gives the potatoes their delicious golden crispness.
Overall, this recipe combines vegetables, protein, carbohydrates, healthy fats, and flavourful Mediterranean-inspired ingredients in one convenient meal.
Frequently Asked Questions
Can I use frozen spinach?
Yes. Thaw the spinach completely and squeeze out as much liquid as possible before adding it to the recipe. Frozen spinach contains considerably more released moisture, so draining it well is particularly important.
Can I make this without feta?
Absolutely. Goat cheese, ricotta, cottage cheese, or shredded mozzarella can be used instead. For a dairy-free version, use a suitable dairy-free feta alternative.
Can I use sweet potatoes?
Yes. Sweet potatoes can replace regular potatoes, although they have a softer texture and slightly sweeter flavour. They may not become quite as crisp as russet potatoes.
Can I add more vegetables?
Yes, but choose vegetables that don’t release excessive water. Bell peppers, mushrooms, zucchini, broccoli, and roasted red peppers can work well. Cook watery vegetables first and remove excess moisture.
Can I make it vegetarian?
Yes. The recipe is already vegetarian as written.
Can I make it gluten-free?
Yes. The ingredients listed are naturally gluten-free, but always check packaged ingredients such as seasonings and sun-dried tomatoes if you need to avoid gluten strictly.
Why did my potato crust turn soggy?
The most common reasons are excess moisture in the potatoes, too much filling liquid, or an oven that wasn’t hot enough. Make sure the shredded potatoes are thoroughly squeezed and the spinach is well drained.
Can I make this in a cast-iron skillet?
Yes. A well-seasoned oven-safe cast-iron skillet can produce excellent crispy edges. Make sure the skillet is appropriately sized so the potato layer isn’t excessively thick.
Can I prepare it the night before?
Yes. You can assemble it in advance and refrigerate it covered. When ready to bake, allow the chilled dish a little extra cooking time because the ingredients will be cold.
Is it good for meal prep?
Definitely. It stores and reheats well, making it a convenient breakfast or lunch option for several days.
What can I serve with it?
A fresh cucumber-tomato salad, Greek yoghurt, tzatziki, avocado, roasted vegetables, or a simple green salad are excellent choices.
Final Recipe Summary
This Crispy Spinach & Potato Rosti Crustless Bake with Feta & Sun-Dried Tomato delivers everything you want from a comforting baked dish: crispy golden potatoes, creamy eggs, tender spinach, salty feta, sweet-savoury sun-dried tomatoes, and plenty of Mediterranean flavour.
The secret is simple: remove as much moisture as possible from the potatoes and spinach, use a hot oven, and give the finished bake enough time to become beautifully golden and crisp.
Doctors Reveal That Eating Bananas Causes…
Healthy Boost to Your Daily Diet
Bananas are one of the world’s most popular fruits, loved for their naturally sweet flavour, convenience, and impressive nutritional value. While headlines often exaggerate health claims, doctors and nutrition experts generally agree that eating bananas as part of a balanced diet can support heart health, digestion, energy production, and overall wellness. They are rich in potassium, vitamin B6, vitamin C, fibre, and natural carbohydrates that provide sustained energy.
The bananas in your image appear ripe, with several dark patches on the peel. This is normal and usually indicates that the fruit inside is sweeter and softer, making it ideal for baking. As long as the bananas are not leaking, mouldy, or have an unpleasant smell, they are perfectly suitable for recipes such as banana bread.
Ultimate Moist Banana Bread Recipe
This classic banana bread transforms ripe bananas into a soft, moist, and flavourful loaf with a tender crumb. Perfect for breakfast, afternoon tea, dessert, or as a healthy snack, this recipe is easy enough for beginners while producing bakery-quality results every time.
Preparation Time
Prep Time: 15 minutes
Cooking Time: 55–65 minutes
Total Time: About 1 hour 20 minutes
Servings
Makes: 10 slices
Serves: 10 people
Ingredients
4 ripe bananas, mashed
250 g plain flour
150 g light brown sugar
100g unsalted butter, melted
2 large eggs
1 teaspoon vanilla extract
1 teaspoon baking soda
½ teaspoon baking powder
½ teaspoon salt
1 teaspoon ground cinnamon (optional)
50g chopped walnuts or pecans (optional)
50g dark chocolate chips (optional)
Equipment
Mixing bowls
Fork or potato masher
Whisk
Rubber spatula
2 lb loaf tin
Baking paper
Cooling rack
Instructions
Preheat the oven to 180°C (160°C fan) or 350°F. Grease and line a loaf tin with baking paper.
Peel the ripe bananas and mash thoroughly until smooth with only a few small lumps remaining.
In another bowl, whisk together the melted butter and brown sugar until well combined.
Add the eggs one at a time, whisking after each addition.
Mix in the vanilla extract.
In a separate bowl, combine the flour, baking soda, baking powder, salt, and cinnamon.
Gradually fold the dry ingredients into the wet ingredients.
Add the mashed bananas and stir gently until just combined.
Avoid overmixing, as this can make the bread dense.
Fold in the walnuts or chocolate chips if using.
Pour the batter into the prepared loaf tin and smooth the top.
Bake for 55–65 minutes, or until a skewer inserted into the centre comes out clean.
Allow the loaf to cool in the tin for 10 minutes before transferring to a cooling rack.
Slice and serve warm or at room temperature.
Chef’s Notes
Very ripe bananas create the sweetest bread.
Dark brown spots on the peel indicate natural sugar development.
If your bananas become too ripe, freeze them for future baking.
Room-temperature eggs mix more evenly.
A little cinnamon enhances the banana flavour without overpowering it.
Recipe Tips
Do not overmix the batter.
Measure flour accurately.
Check doneness at 55 minutes.
Cover loosely with foil if the top browns too quickly.
Let the loaf cool before slicing for cleaner pieces.
Variations
Chocolate Banana Bread
Add 100 g of chocolate chips.
Nutty Banana Bread
Use walnuts, pecans, or almonds.
Tropical Banana Bread
Add shredded coconut and chopped pineapple.
Healthy Version
Replace half the flour with wholemeal flour and reduce the sugar slightly.
Berry Banana Bread
Fold in fresh blueberries before baking.
Storage
Room Temperature:
Up to 3 days in an airtight container.
Refrigerator:
Up to 1 week.
Freezer:
Wrap tightly and freeze for up to 3 months.
Nutritional Information (Per Serving)
Approximate values
Calories: 245 kcal
Protein: 4 g
Fat: 9 g
Saturated Fat: 5 g
Carbohydrates: 38 g
Fiber: 2.5 g
Sugar: 18 g
Sodium: 190 mg
Potassium: 240 mg
Vitamin B6: 15% DV
Vitamin C: 8% DV
Calcium: 4% DV
Iron: 6% DV
Health Benefits of Bananas
1. Rich in Potassium
Potassium supports normal muscle function and nerve signalling and helps maintain healthy blood pressure.
2. Good Source of Fiber
Bananas contain dietary fibre that supports digestive health and can help promote regular bowel movements.
3. Natural Energy
Their natural carbohydrates make bananas a convenient source of energy before or after exercise.
4. Supports Heart Health
A diet that includes potassium-rich foods may contribute to cardiovascular health when combined with an overall balanced diet.
5. Contains Vitamin B6
Vitamin B6 helps with normal energy metabolism and the production of neurotransmitters.
6. Provides Antioxidants
Bananas contain natural antioxidants that help protect cells from oxidative stress.
7. Gentle on the Stomach
Ripe bananas are often easy to digest and can be a suitable food during mild digestive upset for many people.
8. Naturally Fat-Free
Bananas are naturally low in fat and contain no cholesterol.
Serving Suggestions
Serve warm with butter.
Spread with peanut butter or almond butter.
Drizzle with honey.
Top with Greek yoghurt.
Enjoy alongside coffee or tea.
Toast slices for extra flavour.
Add fresh berries on the side.
Serve with vanilla yoghurt for dessert.
Frequently Asked Questions
Q1. Can I use frozen bananas?
Yes. Thaw them completely and drain excess liquid before mashing.
Q2. Why are my bananas black?
Black patches on the peel are a normal sign of ripening. If the fruit inside is free of mould and doesn’t smell spoilt, it is usually excellent for baking.
Q3. Can I reduce the sugar?
Yes. Since ripe bananas are naturally sweet, you can reduce the sugar to suit your taste.
Q4. Can I make it dairy-free?
Yes. Replace the butter with a plant-based alternative or a neutral vegetable oil.
Q5. Can I make it gluten-free?
Yes. Use a gluten-free plain flour blend designed for baking.
Q6. Why is my banana bread dry?
Overbaking, adding too much flour, or using bananas that are not ripe enough can make the loaf dry.
Q7. Why did my loaf sink?
Opening the oven too early, underbaking, or adding too much raising agent can cause sinking.
Q8. Can children eat this?
Yes. Banana bread can be enjoyed by children as part of a balanced diet, taking into account any allergies to ingredients such as nuts.
Q9. Can I add oats?
Yes. Replace about 50g of the flour with rolled oats for a heartier texture.
Q10. How do I know when it is baked?
Insert a skewer into the centre. If it comes out clean or with only a few moist crumbs, the loaf is ready.
Feta Chicken Salad
Feta Chicken Salad
A Fresh Mediterranean-Inspired High-Protein Salad
Description
Feta chicken salad is a delicious Mediterranean-inspired meal that combines juicy seasoned chicken, crisp vegetables, creamy feta cheese, and a bright homemade dressing. This salad is packed with lean protein, healthy fats, vitamins, and fresh flavours, making it perfect for lunch, dinner, meal prep, or a light summer meal.
The combination of tender grilled chicken, tangy feta cheese, crunchy cucumbers, juicy tomatoes, colourful peppers, and fresh herbs creates a satisfying dish that feels both healthy and comforting. The creamy saltiness of feta pairs beautifully with the smoky chicken, while the lemon herb dressing brings everything together with a refreshing Mediterranean taste.
This recipe is ideal for anyone looking for a nutritious meal that supports a balanced lifestyle. It is naturally high in protein, low in processed ingredients, and can easily be customised with extra vegetables, grains, or toppings according to your preference.
Recipe Information
Recipe Name: Feta Chicken Salad
Cuisine: Mediterranean
Preparation Time: 15 minutes
Cooking Time: 15–20 minutes
Total Time: 35 minutes
Servings: 4 servings
Ingredients
For the Chicken
- 2 large boneless, skinless chicken breasts (about 1.5 pounds)
- 2 tablespoons olive oil
- 2 tablespoons fresh lemon juice
- 3 cloves garlic, minced
- 1 teaspoon dried oregano
- 1 teaspoon paprika
- ½ teaspoon ground cumin
- 1 teaspoon salt (adjust to taste)
- ½ teaspoon black pepper
- ½ teaspoon dried thyme
Salad Prep
- 6 cups chopped romaine lettuce or mixed greens
- 1 large cucumber, sliced
- 1½ cups cherry tomatoes, halved
- 1 red bell pepper, chopped
- ½ red onion, thinly sliced
- ¾ cup crumbled feta cheese
- ½ cup Kalamata olives (optional)
- ¼ cup fresh parsley, chopped
- ¼ cup fresh mint leaves, chopped
- 1 avocado, sliced (optional)
Lemon Herb Dressing
- ¼ cup extra virgin olive oil
- 3 tablespoons fresh lemon juice
- 1 tablespoon red wine vinegar
- 1 teaspoon Dijon mustard
- 1 teaspoon honey
- 1 garlic clove, minced
- 1 teaspoon dried oregano
- ½ teaspoon salt
- ½ teaspoon black pepper
Step-by-Step Instructions
Step 1: Prepare the Chicken Marinade
In a bowl, combine olive oil, lemon juice, minced garlic, oregano, paprika, cumin, thyme, salt, and black pepper. Mix well until all ingredients are combined.
Add the chicken breasts and coat them completely with the marinade. Cover the bowl and allow the chicken to marinate for at least 20 minutes. For deeper flavour, you can marinate it for 2–4 hours in the refrigerator.
Step 2: Cook the Chicken
Heat a grill pan, skillet, or outdoor grill over medium-high heat.
Cook the chicken for about 6–8 minutes per side until golden brown and fully cooked. The internal temperature should reach 165°F (74°C).
Remove the chicken from the heat and let it rest for 5 minutes. This helps keep the chicken juicy and tender.
Slice the chicken into strips or bite-sized pieces.
Step 3: Prepare the Salad Base
Wash and chop all vegetables.
In a large salad bowl, add romaine lettuce, cucumber slices, cherry tomatoes, bell pepper, red onion, olives, parsley, and mint.
Gently toss the vegetables together to evenly distribute the ingredients.
Step 4: Make the Dressing
In a small bowl or jar, combine olive oil, lemon juice, red wine vinegar, Dijon mustard, honey, garlic, oregano, salt, and pepper.
Whisk until the dressing becomes smooth and slightly creamy.
Taste and adjust seasoning if needed.
Step 5: Assemble the Salad
Add the sliced chicken over the prepared salad.
Sprinkle crumbled feta cheese generously on top.
Drizzle the lemon herb dressing over everything.
Gently toss the salad until all ingredients are coated with the dressing.
Serve immediately and enjoy a fresh, protein-packed Mediterranean meal.
Tips & Notes
1. Keep Chicken Juicy
Do not overcook the chicken because it can become dry. Allowing the chicken to rest before slicing keeps the juices inside.
2. Use Quality Feta Cheese
Authentic feta cheese made from sheep’s milk provides a stronger Mediterranean flavour and creamy texture.
3. Meal Prep Option
Prepare the chicken, vegetables, and dressing separately. Store them in airtight containers and assemble fresh salads throughout the week.
4. Add More Protein
For extra protein, add:
- Boiled eggs
- Chickpeas
- Greek yogurt dressing
- Extra grilled chicken
5. Make It Low-Carb
Skip high-carb additions and increase vegetables, avocado, and protein.
6. Make It More Filling
Serve this salad with:
- Quinoa
- Brown rice
- Whole grain pita bread
- Roasted potatoes
7. Avoid Soggy Salad
Always add dressing just before serving if storing leftovers.
Health Benefits of Feta Chicken Salad
High in Protein
Chicken breast provides high-quality lean protein that helps support muscle growth, repair, and fullness. Protein-rich meals can also help control cravings and maintain energy levels.
Supports Heart Health
Olive oil, vegetables, and herbs provide healthy fats and antioxidants that support cardiovascular wellness.
Rich in Vitamins and Minerals
Fresh vegetables provide important nutrients, including:
- Vitamin C from tomatoes and peppers
- Vitamin K from leafy greens
- Potassium from cucumbers and avocado
- Antioxidants from herbs and vegetables
Supports Weight Management
This salad is filling because it contains protein, fibre, and healthy fats. It can help reduce unnecessary snacking while keeping you satisfied.
Good for a Mediterranean Diet
The ingredients follow the Mediterranean eating pattern, which focuses on the following:
- Fresh vegetables
- Lean proteins
- Olive oil
- Herbs
- Natural whole foods
Supports Healthy Digestion
Vegetables provide dietary fibre that helps promote healthy digestion and gut function.
Servings & Nutritional Information
Serving Size: 1 large salad bowl
Calories: Approximately 430 calories
Protein: 42g
Carbohydrates: 18g
Fiber: 6g
Fat: 24g
Saturated Fat: 7g
Sugar: 5g
Sodium: 650mg
Nutritional values may vary depending on exact ingredients and portion sizes.
Frequently Asked Questions (Q&A)
Q: Can I use chicken thighs instead of chicken breast?
Yes. Chicken thighs add more flavour and moisture. Choose skinless thighs for a lighter option.
Q: Can I prepare this salad ahead of time?
Yes. Store chicken, vegetables, feta, and dressing separately. Combine before serving for the freshest texture.
Q: Is this recipe keto-friendly?
Yes. This salad is naturally low in carbohydrates. Reduce tomatoes slightly and avoid honey in the dressing for a stricter keto version.
Q: Can I make this vegetarian?
Absolutely. Replace chicken with chickpeas, grilled tofu, or extra feta cheese.
Q: What dressing can I use instead?
You can use:
- Greek yogurt lemon dressing
- Tzatziki sauce
- Balsamic dressing
- Garlic herb dressing
Q: How long does this salad last in the refrigerator?
Without dressing, it can last up to 3–4 days. Once mixed with dressing, it is best eaten within 24 hours.
Q: Can I freeze this salad?
Freezing is not recommended because fresh vegetables and lettuce lose their texture after thawing. However, cooked chicken can be frozen separately.
Q: Is this salad suitable for meal prep?
Yes. It is one of the best meal prep recipes because the chicken stays flavourful and the ingredients remain fresh when stored properly.
Final Thoughts
Feta chicken salad is a perfect example of how healthy food can be flavourful, satisfying, and easy to prepare. With juicy seasoned chicken, creamy feta, fresh vegetables, and a bright Mediterranean dressing, this recipe delivers restaurant-quality taste while keeping nutrition a priority.
Ultimate Crunchy Asian Salad
This Ultimate Crunchy Asian Salad is a fresh, vibrant, and flavour-packed dish loaded with crisp vegetables and tossed in a tangy, slightly sweet Asian-style dressing. It’s light yet satisfying, making it perfect as a healthy side dish, a meal prep lunch, or a refreshing base for grilled chicken, shrimp, or tofu. Every bite delivers crunch, colour, and bold flavour that feels both nourishing and exciting.
Ingredients
For the Salad
- 2 cups shredded cabbage (green or purple)
- 1 cup carrots, julienned
- ½ cup bell peppers, thinly sliced
- 2 cups romaine lettuce or mixed greens
- ½ cup cucumber, sliced
- 3 green onions, chopped
- ¼ cup fresh cilantro, chopped
- ¼ cup roasted peanuts or cashews
- 2 tablespoons sesame seeds
Optional Protein Add-Ins
- Grilled chicken, shrimp, tofu, or edamame
For the Dressing
- 3 tablespoons soy sauce
- 2 tablespoons rice vinegar
- 1 tablespoon sesame oil
- 1 tablespoon honey or maple syrup
- 1 teaspoon fresh ginger, grated
- 1–2 cloves garlic, minced
- 1 teaspoon sriracha or chili flakes (optional)
- Juice of ½ lime
Instructions
- In a large bowl, combine shredded cabbage, carrots, bell peppers, lettuce, cucumber, green onions, and cilantro.
- In a small bowl, whisk together soy sauce, rice vinegar, sesame oil, honey, ginger, garlic, lime juice, and sriracha until well blended.
- Pour the dressing over the salad just before serving and toss well to coat all ingredients evenly.
- Top with roasted peanuts or cashews and sesame seeds for extra crunch.
- Add your choice of protein if making it a full meal. Serve immediately for best texture.
Description Notes
This salad is all about texture and balance. The crisp vegetables create a refreshing base, while the dressing adds a perfect mix of salty, sweet, tangy, and slightly spicy flavours. The peanuts and sesame seeds bring a nutty crunch that ties everything together beautifully.
Helpful Tips
- Keep vegetables chilled for maximum crunch.
- Add dressing only right before serving to avoid sogginess.
- Use purple cabbage for extra colour and antioxidants.
- Toast sesame seeds for deeper flavour.
- Double the dressing if meal prepping for multiple servings.
Servings
Serves 4 as a side or 2 as a main dish.
Nutritional Information (Approximate Per Serving)
- Calories: 180
- Protein: 5g
- Carbohydrates: 14g
- Fat: 11g
- Fiber: 4g
- Sugar: 6g
Benefits of This Recipe
- Packed with fibre and vitamins from fresh vegetables.
- Low in calories but high in volume and nutrients.
- Healthy fats from nuts and sesame seeds support heart health.
- Easy to customise with protein for a complete meal.
- Naturally gluten-free (use gluten-free soy sauce if needed).
Questions & Answers
Q: Can I make this ahead of time?
Yes, but store dressing separately and mix just before serving.
Q: What protein works best?
Grilled chicken, shrimp, tofu, or even crispy chickpeas.
Q: Can I make it nut-free?
Yes, simply omit peanuts or cashews or replace them with sunflower seeds.
Q: How long does it last in the fridge?
Un dressed salad stays fresh for 2–3 days.
Q: Can I make it spicier?
Yes, add extra sriracha or fresh chopped chilli.
Q: What can I substitute for sesame oil?
You can use olive oil, but sesame oil gives the most authentic flavour.
This Ultimate Crunchy Asian Salad is fresh, colourful, and full of texture — a simple yet exciting dish that brings bold Asian-inspired flavours to your table in minutes.
2-Minute 30g Protein Brownie Mug Cake
Rich, fudgy, chocolatey, and incredibly satisfying, this 2-minute, 30g protein brownie mug cake is the perfect answer when you want dessert without spending an hour in the kitchen. Inspired by the gooey chocolate mug brownies shown in the image, this single-serving recipe combines protein powder, Greek yoghurt, cocoa, and a few simple pantry ingredients to create a warm brownie-like treat in about two minutes.
The centre stays soft and fudgy while the edges become slightly cakey—especially delicious when eaten straight from the mug. With approximately 30 grams of protein per serving, it can work as a quick breakfast, post-workout snack, or healthier dessert.
Recipe Name
2-Minute 30g Protein Fudgy Brownie Mug Cake
Preparation Time
1 minute
Cooking Time
60–90 seconds
Total Time
About 2 minutes
Servings
1 generous serving
Difficulty
Easy
Description
Imagine the texture of a warm, gooey brownie but with significantly more protein. This mug brownie is made directly in a microwave-safe mug, meaning there is practically no cleanup.
The combination of chocolate protein powder and unsweetened cocoa powder gives it an intense chocolate flavour, while Greek yoghurt adds moisture and protein. A small amount of flour or oat flour provides structure, and a little sweetener balances the bitterness of the cocoa.
For the best result, don’t overcook it. A microwave brownie can go from fudgy to dry very quickly. The centre should look slightly underdone when you remove it from the microwave because it will continue cooking from residual heat.
Ingredients
Dry Ingredients
- 1 scoop chocolate protein powder — approximately 30 g
- 1 tablespoon unsweetened cocoa powder
- 2 tablespoons oat flour or all-purpose flour
- ¼ teaspoon baking powder
- Pinch of salt
Wet Ingredients
- 2 tablespoons Greek yogurt — preferably plain, thick Greek yogurt
- 2 tablespoons milk — dairy or unsweetened plant milk
- 1 tablespoon maple syrup or zero-calorie sweetener, adjusted to taste
- ½ teaspoon vanilla extract
Optional Add-Ins
For an even more decadent brownie, add one or two of these:
- 1 tablespoon dark chocolate chips
- 1 teaspoon peanut butter
- 1 teaspoon almond butter
- 1 tablespoon chopped walnuts
- 1 tablespoon chopped pecans
- Tiny pinch of espresso powder
- A few raspberries or sliced strawberries
Optional Topping
- 1 tablespoon Greek yogurt
- Dusting of cocoa powder
- A few chocolate chips
- Peanut butter drizzle
- Sugar-free chocolate syrup
- Fresh berries
Full Recipe Instructions
Step 1: Choose the Right Mug
Use a large microwave-safe mug or ramekin, ideally with a capacity of at least 10–12 ounces.
This is important because the brownie will rise during cooking. A mug that’s too small can cause the batter to overflow.
Lightly spray the inside with cooking spray or brush it with a tiny amount of oil. This makes serving and cleanup easier.
Step 2: Mix the Dry Ingredients
Add the following directly to the mug:
- Chocolate protein powder
- Cocoa powder
- Oat flour
- Baking powder
- Salt
Mix thoroughly with a fork.
Breaking up any lumps now is important because protein powder and cocoa can easily form dry pockets.
Step 3: Add the Wet Ingredients
Add:
- Greek yogurt
- Milk
- Maple syrup or sweetener
- Vanilla extract
Stir until you have a smooth, thick brownie batter.
The consistency should be thick but spoonable. If it looks extremely dry, add another teaspoon of milk. If it looks very runny, add a small amount of oat flour.
Step 4: Add Chocolate
Fold in the chocolate chips if you’re using them.
For an especially gooey centre, push a few additional chocolate chips into the middle of the batter rather than mixing all of them throughout.
You can also add 1 teaspoon of peanut butter to the centre for a chocolate-peanut-butter brownie.
Step 5: Microwave
Place the mug in the microwave.
Cook on high for approximately 60–90 seconds.
Start with 60 seconds. Check the brownie.
If the surface is still extremely wet and liquid, microwave for another 10–15 seconds at a time.
The ideal brownie should have:
- Set edges
- A slightly soft center
- A moist surface
- No completely liquid batter
Do not automatically cook it until it’s completely firm.
Overcooking is the biggest reason protein mug cakes become rubbery or dry.
Step 6: Rest
Let the brownie sit for 30–60 seconds before eating.
This gives the centre time to finish setting while retaining its fudgy texture.
Step 7: Finish and Serve
Top with your favourite additions.
For a dessert-style version, try:
Greek yoghurt + chocolate chips + peanut butter drizzle.
For a simple version, just add a light dusting of cocoa powder.
Eat it warm directly from the mug.
Nutritional Information
Approximate nutrition for 1 mug brownie, using whey protein, nonfat Greek yoghurt, oat flour, unsweetened cocoa, skim milk, and a low-calorie sweetener:
| Nutrient | Approximate Amount |
|---|---|
| Calories | 280–320 kcal |
| Protein | 29–32 g |
| Carbohydrates | 25–30 g |
| Fat | 5–8 g |
| Fiber | 4–6 g |
| Sugar | 4–7 g |
Nutrition will vary considerably depending on your protein powder, milk, sweetener, yoghurt, and toppings.
Adding chocolate chips, peanut butter, nuts, or syrup will increase the calorie and fat content.
Benefits
1. High in Protein
With around 30 g of protein, this brownie can help you increase your daily protein intake while satisfying a chocolate craving.
Protein also tends to be more filling than a traditional sugary dessert.
2. Dessert-Like Flavor
Cocoa and chocolate protein powder create a deep chocolate flavour without requiring a complicated recipe.
Adding a little espresso powder can make the chocolate taste even richer without making the brownie taste strongly like coffee.
3. Extremely Fast
There’s no oven preheating, mixing bowls, or lengthy baking process.
Everything happens in one mug, and the brownie can be ready in roughly two minutes.
4. Minimal Cleanup
Because you mix and cook it in the same mug, cleanup is practically limited to your mug and spoon.
5. Easy to Customize
You can change the recipe according to your nutritional goals.
Use oat flour for a slightly heartier texture, different protein powders for different flavours, or add nuts and nut butter for extra richness.
Recipe Notes
Protein Powder Matters
Different protein powders absorb liquid differently.
Whey protein generally produces a softer texture, while some plant-based powders can absorb more liquid and create a denser brownie.
If using plant protein, you may need 1–2 additional teaspoons of milk.
Don’t overcook.
This is the most important tip.
Protein powder becomes increasingly firm as it cooks. A traditional flour brownie can tolerate some extra cooking, but a protein brownie can become dry and chewy surprisingly quickly.
Start at 60 seconds and increase the cooking time gradually.
Use unsweetened cocoa.
Unsweetened cocoa provides the strongest chocolate flavour and lets you control the sweetness yourself.
If your protein powder is already very sweet, you may not need any additional sweetener.
Adjust the Sweetness
Protein powders differ dramatically in sweetness.
Taste a tiny amount of the uncooked batter before microwaving if you’re comfortable doing so, and adjust the sweetener accordingly.
7 Tips for the Best Protein Brownie
1. Use a wide mug.
A wider mug gives the brownie more even exposure to microwave heat.
2. Don’t fill the mug more than halfway to two-thirds.
The batter rises as it cooks.
3. Mix the dry ingredients first.
This prevents cocoa and protein powder from clumping.
4. Don’t skip the salt.
A tiny pinch enhances the chocolate flavour.
5. Add espresso powder for deeper chocolate flavour.
You only need a very small amount.
6. Let it rest before eating.
Thirty seconds makes a noticeable difference in texture.
7. Add toppings after cooking.
Greek yoghurt, nut butter, fruit, and chocolate chips can turn a simple mug cake into a much more indulgent dessert.
Delicious Variations
Chocolate Berry Brownie
Fold in a few raspberries or chopped strawberries before microwaving. The berries become warm and jammy inside the brownie.
Chocolate Peanut Butter Brownie
Add 1 teaspoon of peanut butter to the centre of the batter. Microwave normally and allow it to rest before eating.
Mocha Brownie
Add ¼ teaspoon espresso powder to the dry ingredients. This gives the chocolate a deeper, more intense flavour.
Chocolate Banana Brownie
Mash ¼–½ small ripe banana into the wet ingredients. Reduce the milk slightly if the batter becomes too thin.
Double Chocolate Nut Brownie
Add dark chocolate chips and chopped walnuts for a classic brownie combination.
Frequently Asked Questions
Q: Can I make this without protein powder?
Yes, but it will no longer contain approximately 30 g of protein. Protein powder is a major contributor to the recipe’s protein content.
You can make a conventional mug brownie using additional flour and cocoa, but the nutritional profile will be different.
Q: Why did my protein brownie turn rubbery?
The most common reason is overcooking.
Try reducing the microwave time by 10–20 seconds next time. You can also add another teaspoon of Greek yoghurt or milk to the batter.
Q: Can I use plant-based protein powder?
Absolutely. However, plant proteins often absorb more liquid than whey.
Start with the recipe as written and add extra milk 1 teaspoon at a time until you achieve a thick brownie batter.
Q: Can I use almond flour?
Yes. Almond flour can work, although it will produce a slightly different, denser texture.
Because almond flour doesn’t absorb liquid exactly like oat or wheat flour, you may need to adjust the milk.
Q: Can I make it without Greek yoghurt?
Yes. You can substitute additional milk, mashed banana, applesauce, or a dairy-free yoghurt alternative. Greek yoghurt is recommended because it adds both moisture and protein.
Q: Can I cook it in an oven?
Yes. Transfer the batter to an oven-safe ramekin and bake at approximately 175°C / 350°F until the centre is just set, generally around 10–15 minutes depending on the size and depth of the dish.
Microwaving is much faster, however.
Q: Can I prepare the batter ahead of time?
For the best texture, microwave it immediately after mixing. If you prepare the batter in advance, the flour and protein powder will continue absorbing liquid, and the brownie may become thicker.
Q: Is it really 30 g of protein?
It can be, but the exact amount depends on your protein powder and the other ingredients. A protein powder containing approximately 24–25 g of protein per scoop will generally put this recipe around the 30 g protein range once the Greek yoghurt and milk are included.
Always check the nutrition label of your specific ingredients for an exact calculation.
Q: How can I make it more fudgy?
Use slightly less flour, don’t overcook it, and add a teaspoon of nut butter or a few dark chocolate chips to the centre.
The key is to remove it from the microwave while the centre still looks slightly soft.
Q: Can I make this lower in calories?
Yes. Use a low-calorie sweetener, nonfat Greek yoghurt, unsweetened almond milk, and a lower-calorie protein powder. Skip calorie-dense toppings such as peanut butter and chocolate chips if needed.
Q: Can I make it sweeter without adding sugar?
Use a calorie-free sweetener such as stevia, sucralose, monk fruit, or erythritol according to the product’s recommended conversion. Remember that sweetness varies between brands.
My Best-Texture Formula
If your priority is maximum brownie-like texture, use:
- Chocolate whey protein
- Unsweetened cocoa
- Oat flour
- Thick Greek yogurt
- Just enough milk to create a thick batter
- A tiny pinch of salt
- A few dark chocolate chips
- Microwave for the minimum time necessary
The final result should be soft, warm, intensely chocolatey, and slightly gooey in the middle rather than firm like a conventional cake.
Final Serving Idea
For the ultimate “brownie from heaven” experience, microwave the brownie with a few dark chocolate chips in the centre. Once cooked, let it rest for 30 seconds, then add a spoonful of cold Greek yoghurt and drizzle with a little warm peanut butter.