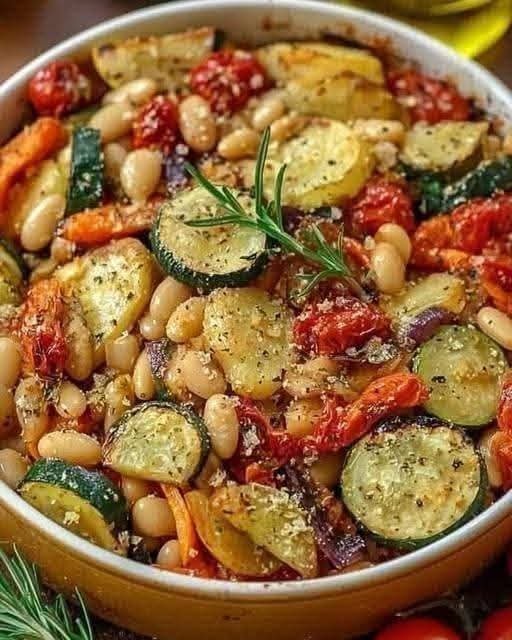
HealthyDiet RecipeWorld
Ginger, Garlic, Onion & Lemon Wellness Drink
🌟 Description
This homemade wellness drink combines fresh ginger, garlic, onion, and lemon juice into a simple daily tonic. Ginger is known for supporting digestion, garlic contains natural sulfur compounds, onion provides antioxidants, and lemon adds vitamin C and a refreshing citrus flavor. While many people enjoy this drink as part of a healthy lifestyle, it is not a cure or guaranteed treatment for any disease. Pair it with a balanced diet, regular exercise, and adequate hydration for the best overall wellness.
⏱️ Prep Time
10 minutes
🍽️ Servings
About 10 servings (1 teaspoon per serving)
🛒 Ingredients
- 1 medium fresh ginger root (about 100g), peeled
- 1 small onion, peeled
- 4 garlic cloves, peeled
- Juice of 2 fresh lemons
- 2–3 tablespoons water (if needed for blending)
👩🍳 Instructions
- Wash and peel the ginger, onion, and garlic.
- Chop everything into small pieces.
- Add the ginger, onion, garlic, and lemon juice to a blender.
- Blend until smooth, adding a little water if needed.
- Pour the mixture through a fine strainer or cheesecloth to remove the pulp if you prefer a smoother liquid.
- Transfer to a clean glass jar with a lid.
- Refrigerate for up to 5 days.
🥄 How to Use
- Take 1 teaspoon once daily.
- If the flavor is too strong, mix it into a small glass of warm water.
- It can be taken after a meal if consumed on an empty stomach causes discomfort.
💡 Tips
- Use fresh ingredients for the best flavor.
- Shake or stir before each use.
- Make small batches to keep it fresh.
- Avoid adding sugar to maintain the natural taste.
❓Frequently Asked Questions
Can I drink it every day?
Many people do, but moderation is important. If you have any medical conditions or take medications, consult a healthcare professional before using it regularly.
Can I add honey?
Yes, 1 teaspoon of honey can help balance the strong flavor.
How long does it last?
Store refrigerated and use within 5 days.
Can I freeze it?
Yes. Freeze in ice cube trays and thaw one portion as needed.
🥗 Approximate Nutrition (Per 1 Teaspoon)
- Calories: 3
- Carbohydrates: 1g
- Fat: 0g
- Protein: 0g
- Vitamin C: Small amount
- Naturally contains plant compounds from ginger, garlic, onion, and lemon.
Note: Claims that this drink can “clean the gut,” “cure disease,” or provide guaranteed health benefits are not supported by strong scientific evidence. Enjoy it as a flavorful wellness drink rather than a medical treatment.
Pico de Gallo Salsa
Description
Fresh, colorful, and packed with bold flavor, Pico de Gallo is one of the easiest Mexican-style salsas you can make at home. Made with juicy Roma tomatoes, crisp white onion, spicy jalapeño, fragrant cilantro, fresh lime juice, and a touch of salt, this chunky salsa comes together in just 15 minutes with no cooking required. Serve it with tortilla chips, tacos, burritos, grilled chicken, fish, burgers, or salads for an instant burst of freshness.
⏱️ Prep Time
15 minutes
🍽️ Servings
About 3 cups (6–8 servings)
🛒 Ingredients
Fresh Ingredients
- 🍅 4 large Roma tomatoes, diced
- 🧅 ½ medium white onion, finely diced
- 🌶️ 1–2 jalapeños, seeded and finely minced
- 🌿 ½ cup fresh cilantro, chopped
- 🍋 Juice of 1 large lime (2–3 tbsp)
- 🧂 ½–1 tsp kosher salt (adjust to taste)
👩🍳 Step-by-Step Instructions
1️⃣ Prepare the Vegetables
- Wash and dry all vegetables.
- Dice the Roma tomatoes into small, even pieces.
- If the tomatoes are very juicy, gently remove some seeds before chopping.
- Finely dice the white onion.
- Remove the seeds and white ribs from the jalapeños for a milder salsa, then mince finely.
- Roughly chop the cilantro leaves and tender stems.
2️⃣ Combine Everything
- Add the tomatoes, onion, jalapeño, and cilantro to a medium mixing bowl.
- Pour in the fresh lime juice.
- Sprinkle with ½ teaspoon salt.
3️⃣ Toss Gently
- Using a large spoon, gently fold everything together until evenly mixed.
- Avoid crushing the tomatoes to keep the salsa chunky.
4️⃣ Let It Rest
- Allow the Pico de Gallo to sit for 10–15 minutes at room temperature.
- During this time, the salt and lime juice naturally draw moisture from the tomatoes, creating a delicious fresh salsa juice.
5️⃣ Taste and Adjust
- Taste the salsa.
- Add more salt if needed.
- Add another squeeze of lime for extra brightness.
- For more heat, stir in additional minced jalapeño.
6️⃣ Serve
- Enjoy immediately with tortilla chips.
- Spoon over tacos, burritos, quesadillas, grilled chicken, steak, seafood, eggs, rice bowls, or salads.
💡 Tips for the Best Pico de Gallo
- ✔️ Roma tomatoes work best because they’re firm and less watery.
- ✔️ Chill for 20–30 minutes before serving for even better flavor.
- ✔️ Use fresh lime juice instead of bottled for the brightest taste.
- ✔️ Chop everything into similar-sized pieces for the best texture.
- ✔️ Fresh cilantro gives the salsa its signature flavor.
❓Frequently Asked Questions
Can I make it ahead of time?
Yes. It tastes even better after resting for about 30 minutes, but it’s best enjoyed within 24 hours.
How long does it last?
Store in an airtight container in the refrigerator for up to 2 days.
Can I make it less spicy?
Absolutely. Remove all jalapeño seeds and ribs, or simply use half a pepper.
Can I add other ingredients?
Yes. Diced avocado, cucumber, mango, corn, or black beans all make delicious variations.
🥗 Serving Ideas
- 🌮 Tacos
- 🌯 Burritos
- 🫓 Quesadillas
- 🥩 Grilled steak
- 🍗 Grilled chicken
- 🐟 Fish tacos
- 🥑 Avocado toast
- 🥙 Nachos
- 🥗 Fresh salads
- 🍳 Scrambled eggs
🥄 Nutrition (Per Serving – Approximate)
- Calories: 28
- Protein: 1g
- Carbohydrates: 6g
- Fiber: 2g
- Fat: 0g
- Sugar: 3g
- Sodium: 190mg
- Vitamin C: Excellent source
- Vitamin A: Good source
This fresh Pico de Gallo is proof that a handful of simple ingredients can create incredible flavor. Bright, crisp, juicy, and naturally refreshing, it’s the perfect homemade salsa for parties, taco nights, or any meal that needs a fresh finishing touch.
Blueberry Greek Yogurt Bites
Description
These Blueberry Greek Yogurt Bites are a refreshing, high-protein frozen snack made with creamy Greek yogurt, juicy blueberries, and a touch of honey. They’re naturally sweet, easy to prepare, and perfect for a healthy dessert, afternoon snack, or grab-and-go breakfast. Keep a batch in the freezer for a cool treat anytime!
🛒 Ingredients
- 1 cup plain Greek yogurt
- ½ cup fresh blueberries
- 1 tbsp honey or maple syrup
- 1 tsp vanilla extract
- ¼ cup melted white chocolate (optional, for marbled look)
👩🍳 Instructions
- Line a small tray or plate with parchment paper.
- In a bowl, mix the Greek yogurt, honey, and vanilla extract until smooth.
- Gently fold in the blueberries, being careful not to crush them.
- If using white chocolate, drizzle it into the yogurt mixture and lightly swirl with a spoon to create a marbled effect.
- Scoop small spoonfuls or use a silicone mold to portion the mixture into bite-sized rounds.
- Freeze for 2–3 hours, or until completely firm.
- Remove from the mold or parchment paper and transfer the bites to a freezer-safe container.
- Enjoy straight from the freezer.
💡 Tips
- Use full-fat Greek yogurt for the creamiest texture.
- Add chopped strawberries or raspberries for extra flavor.
- Sprinkle crushed pistachios or shredded coconut on top before freezing.
- Store in the freezer for up to 2 months.
❓Frequently Asked Questions
Can I use frozen blueberries?
Yes, but thaw and pat them dry before mixing.
Can I make these dairy-free?
Yes. Use your favorite dairy-free Greek-style yogurt.
How should I store them?
Keep them in an airtight freezer container and enjoy directly from the freezer.
🍽️ Servings
Makes: 12–16 bites
🥗 Approximate Nutrition (Per Bite)
- Calories: 45
- Protein: 3g
- Carbohydrates: 4g
- Fat: 2g
- Fiber: 0.3g
- Sugar: 3g
Carrot Cake Chia Pudding with Cottage Cheese
Description
This Carrot Cake Chia Pudding with Cottage Cheese is a creamy, high-protein breakfast or snack that tastes just like carrot cake. Made with wholesome ingredients like grated carrots, chia seeds, cottage cheese, cinnamon, and maple syrup, it’s naturally satisfying, packed with fiber and protein, and perfect for meal prep.
🛒 Ingredients
Chia Pudding
- 1 cup cottage cheese
- 1 cup milk (dairy or unsweetened almond milk)
- ¼ cup chia seeds
- 1 medium carrot, finely grated
- 2 tbsp maple syrup or honey
- 1 tsp vanilla extract
- 1 tsp ground cinnamon
- ¼ tsp ground nutmeg
- Pinch of salt
Toppings
- 2 tbsp chopped walnuts or pecans
- 1 tbsp shredded coconut (optional)
- Extra grated carrot
- A pinch of cinnamon
👩🍳 Instructions
- Add the cottage cheese, milk, maple syrup, vanilla, cinnamon, nutmeg, and salt to a blender.
- Blend until completely smooth and creamy.
- Pour the mixture into a bowl or jar.
- Stir in the chia seeds and grated carrot until evenly combined.
- Let the mixture sit for 10 minutes, then stir again to prevent the chia seeds from clumping.
- Cover and refrigerate for at least 4 hours, preferably overnight.
- Before serving, stir well and add a splash of milk if you prefer a thinner consistency.
- Top with chopped walnuts, shredded coconut, extra grated carrot, and a light sprinkle of cinnamon.
💡 Tips
- Finely grate the carrots for the best texture.
- For extra sweetness, add a few raisins.
- Store in airtight jars in the refrigerator for up to 4 days.
- Add a scoop of vanilla protein powder for even more protein.
❓Frequently Asked Questions
Can I make it dairy-free?
Yes. Use dairy-free cottage cheese and your favorite plant-based milk.
Can I use quick oats?
Yes. Stir in 2–3 tablespoons for a thicker, heartier pudding.
Can I freeze it?
Freezing isn’t recommended, as the texture may change after thawing.
🍽️ Servings
Serves: 2
🥗 Approximate Nutrition (Per Serving)
- Calories: 320
- Protein: 20g
- Carbohydrates: 24g
- Fat: 15g
- Fiber: 8g
- Sugar: 13g
🥗 Classic Creamy Chicken Salad
Description
This Classic Creamy Chicken Salad is packed with tender shredded chicken, a rich and creamy dressing, and fresh herbs for the perfect balance of flavor and texture. It’s ideal for sandwiches, wraps, crackers, lettuce cups, or meal prep. Ready in just minutes, this protein-packed recipe is perfect for lunch, picnics, or quick family meals.
🛒 Ingredients
Chicken Salad
- 4 cups cooked shredded chicken
- ¾ cup mayonnaise
- ¼ cup sour cream or Greek yogurt
- 2 celery stalks, finely diced
- 2 green onions, finely sliced
- 2 tbsp fresh parsley, chopped
- 1 tsp Dijon mustard
- 1 tsp garlic powder
- ½ tsp onion powder
- ½ tsp dried dill
- ½ tsp salt
- ¼ tsp black pepper
- 1 tbsp fresh lemon juice
👩🍳 Instructions
- Place the shredded chicken into a large mixing bowl.
- Add the mayonnaise, sour cream, Dijon mustard, and lemon juice.
- Sprinkle in the garlic powder, onion powder, dried dill, salt, and black pepper.
- Add the diced celery, green onions, and chopped parsley.
- Mix everything together until the chicken is evenly coated in the creamy dressing.
- Cover and refrigerate for 30 minutes to allow the flavors to blend.
- Stir once before serving.
- Serve in sandwiches, wraps, croissants, lettuce cups, or with crackers.
💡 Tips
- Rotisserie chicken works perfectly for this recipe.
- Add chopped grapes or dried cranberries for a touch of sweetness.
- Chopped pecans or almonds add a delicious crunch.
- Store in an airtight container in the refrigerator for up to 4 days.
❓Frequently Asked Questions
Can I make it ahead of time?
Yes! It actually tastes even better after chilling for a few hours.
Can I freeze it?
Freezing isn’t recommended because mayonnaise can separate after thawing.
Can I use canned chicken?
Yes, just drain it well before mixing.
🍽️ Servings
6 servings
🥗 Approximate Nutrition (Per Serving)
- Calories: 340
- Protein: 31g
- Carbohydrates: 3g
- Fat: 22g
- Fiber: 0.5g
- Sugar: 1g
Grilled Chicken Tomato Penne
Description
Grilled Chicken Tomato Penne is a hearty, flavorful pasta dish made with juicy grilled chicken, tender penne pasta, sweet cherry tomatoes, garlic, and a light Parmesan sauce. It’s an easy 30-minute dinner that’s perfect for busy weeknights while still feeling restaurant-quality.
🛒 Ingredients
For the Chicken
- 2 boneless, skinless chicken breasts
- 1 tbsp olive oil
- 1 tsp Italian seasoning
- 1 tsp garlic powder
- ½ tsp paprika
- Salt and black pepper, to taste
For the Pasta
- 12 oz (340g) penne pasta
- 1 tbsp olive oil
- 3 cloves garlic, minced
- 2 cups cherry tomatoes, halved
- 1 tsp Italian seasoning
- ¼ tsp red pepper flakes (optional)
- ½ cup chicken broth
- ½ cup heavy cream
- ½ cup freshly grated Parmesan cheese
- 2 tbsp chopped fresh basil
- Salt and black pepper, to taste
Garnish
- Extra Parmesan cheese
- Fresh basil leaves
👩🍳 Instructions
- Bring a large pot of salted water to a boil and cook the penne according to the package instructions until al dente. Drain and reserve ½ cup of the pasta water.
- Season the chicken with olive oil, Italian seasoning, garlic powder, paprika, salt, and pepper.
- Grill the chicken over medium-high heat for 5–6 minutes per side, or until the internal temperature reaches 165°F (74°C).
- Transfer the chicken to a cutting board and let it rest for 5 minutes before slicing.
- Heat 1 tablespoon of olive oil in a large skillet over medium heat.
- Add the garlic and sauté for about 30 seconds until fragrant.
- Stir in the cherry tomatoes and cook for 3–4 minutes until they soften.
- Add the Italian seasoning and red pepper flakes, then pour in the chicken broth. Simmer for 2 minutes.
- Stir in the heavy cream and Parmesan cheese until smooth and creamy.
- Add the cooked penne and toss to coat. If needed, stir in a little reserved pasta water to loosen the sauce.
- Fold in the chopped basil.
- Top with the sliced grilled chicken and garnish with extra Parmesan and fresh basil.
- Serve immediately while hot.
💡 Tips
- Marinate the chicken for 30 minutes for even more flavor.
- Add baby spinach or mushrooms for extra vegetables.
- Use freshly grated Parmesan for the smoothest sauce.
- Finish with a squeeze of fresh lemon juice for a brighter flavor.
❓Frequently Asked Questions
Can I make this ahead of time?
Yes! Store it in an airtight container in the refrigerator for up to 3 days.
Can I use another pasta?
Absolutely. Rigatoni, fusilli, or farfalle work just as well.
Can I make it lighter?
Yes. Replace the heavy cream with half-and-half or evaporated milk for a lighter sauce.
🍽️ Servings
Serves: 4
🥗 Approximate Nutrition (Per Serving)
- Calories: 560
- Protein: 36g
- Carbohydrates: 45g
- Fat: 24g
- Fiber: 3g
- Sugar: 5g
Cheesy Garlic Asparagus Bake
Ultra Moist Double Chocolate Banana Bread
Description
This rich, fudgy Double Chocolate Banana Bread is soft, moist, and packed with deep chocolate flavor. Made with ripe bananas and cocoa powder, it’s perfect for breakfast, dessert, or an afternoon snack. Every slice is tender with a slightly crisp top and a delicious chocolate aroma.
🛒 Ingredients
- 3 ripe bananas, mashed
- 2 large eggs
- ½ cup (120 ml) vegetable oil or melted butter
- ½ cup (100 g) brown sugar
- ¼ cup (50 g) granulated sugar
- 1 tsp vanilla extract
- 1½ cups (190 g) all-purpose flour
- ½ cup (45 g) unsweetened cocoa powder
- 1 tsp baking soda
- 1 tsp baking powder
- ¼ tsp salt
- ½ cup (90 g) semi-sweet chocolate chips
- Extra chocolate chips for topping (optional)
👩🍳 Instructions
- Preheat your oven to 350°F (175°C). Line a 9×5-inch loaf pan with parchment paper or lightly grease it.
- In a large bowl, mash the ripe bananas until smooth.
- Add the eggs, oil (or melted butter), brown sugar, granulated sugar, and vanilla extract. Whisk until well combined.
- In another bowl, mix the flour, cocoa powder, baking soda, baking powder, and salt.
- Gradually add the dry ingredients to the wet ingredients and gently fold until just combined. Do not overmix.
- Fold in the chocolate chips.
- Pour the batter into the prepared loaf pan and sprinkle extra chocolate chips on top if desired.
- Bake for 50–60 minutes, or until a toothpick inserted into the center comes out with only a few moist crumbs.
- Let the bread cool in the pan for 10–15 minutes before transferring it to a wire rack to cool completely.
- Slice and enjoy warm or at room temperature.
💡 Tips
- Use very ripe bananas with brown spots for the sweetest flavor.
- Avoid overmixing to keep the bread soft and fluffy.
- Store in an airtight container for up to 4 days.
- Freeze individual slices for up to 2 months.
❓Frequently Asked Questions
Can I use whole wheat flour?
Yes, replace up to half of the all-purpose flour for a heartier texture.
Can I add nuts?
Absolutely! Chopped walnuts or pecans make a delicious addition.
Can I make muffins instead?
Yes. Divide the batter into muffin cups and bake for 18–22 minutes.
🍽️ Servings
- Makes: 10 slices
🥗 Approximate Nutrition (Per Slice)
- Calories: 260
- Protein: 4g
- Carbohydrates: 34g
- Fat: 12g
- Fiber: 3g
- Sugar: 18g
Blood Sugar Support Herbal Tea
Description
This soothing herbal tea combines cinnamon, fenugreek seeds, and fresh mint for a warm, flavorful drink. Some of these ingredients have been studied for their potential role in supporting healthy blood sugar levels, but they are not a replacement for diabetes medication or medical care. Enjoy this tea as part of a balanced diet and healthy lifestyle.
Ingredients
- 2 cups water
- 1 cinnamon stick (or ½ tsp ground cinnamon)
- 1 tsp fenugreek seeds
- 8–10 fresh mint leaves
- 1 tsp fresh grated ginger (optional)
- 1 tsp lemon juice (optional)
- Honey or a sugar-free sweetener (optional)
Instructions
- Pour the water into a small saucepan and bring it to a gentle boil.
- Add the cinnamon stick, fenugreek seeds, and ginger (if using).
- Reduce the heat and simmer for 8–10 minutes.
- Add the fresh mint leaves and simmer for another 2 minutes.
- Remove from the heat and let the tea steep for 5 minutes.
- Strain into a mug.
- Add lemon juice if desired and stir well.
- Enjoy warm.
Tips
- Drink 1 cup once daily if it agrees with you.
- Avoid adding sugar if you’re trying to manage blood sugar.
- Pair this tea with a balanced diet, regular physical activity, and adequate hydration.
- If you take diabetes medication or have a medical condition, talk to your healthcare provider before using herbal remedies regularly, as ingredients like fenugreek may affect blood sugar.
Frequently Asked Questions
Can this cure diabetes?
No. There is no evidence that this tea cures diabetes. It may be a pleasant beverage, but it should not replace prescribed treatment.
Can I drink it every day?
Many people enjoy it daily, but check with your healthcare provider if you have diabetes, are pregnant, or take medications.
Can I use powdered cinnamon?
Yes. Use about ½ teaspoon in place of one cinnamon stick.
Nutrition (Approximate Per Serving)
- Calories: 5–10
- Carbohydrates: 2g
- Fat: 0g
- Protein: 0g
- Fiber: Less than 1g
- Sugar: 0g (without honey)
Note: This tea may complement a healthy lifestyle, but it is not proven to lower blood sugar on its own. If you have diabetes or prediabetes, continue following your prescribed treatment plan and monitor your blood sugar as recommended by your healthcare provider.
Healthy Layered Snack Salad
Creamy Cabbage and Vegetable Bake
This creamy cabbage and vegetable bake is a comforting savory casserole made with shredded cabbage, carrots, herbs, cheese, and a rich egg-cream mixture baked until golden brown. It is soft inside, slightly crispy on top, and perfect as a light dinner, side dish, or meal-prep recipe.
Ingredients (Serves 6–8)
- 1 small green cabbage, finely shredded
- 2 medium carrots, grated
- 1 onion, finely chopped
- 1 cup shredded mozzarella or cheddar cheese
- 4 eggs
- 1 cup heavy cream or milk
- ½ cup mayonnaise or sour cream
- 1 cup all-purpose flour
- 1 tsp baking powder
- 2 tbsp olive oil or melted butter
- 1 tsp salt
- ½ tsp black pepper
- 1 tsp garlic powder
- 1 tsp dried rosemary or parsley
- Optional: cooked chicken, mushrooms, or bacon bits
Instructions
1. Prepare the Vegetables
Preheat the oven to 180°C (350°F). Grease a baking dish with butter or cooking spray.
Shred the cabbage finely and place it in a large bowl. Add grated carrots and chopped onion. Toss everything together evenly.
2. Make the Creamy Batter
In another bowl, whisk eggs, cream, and mayonnaise until smooth. Add flour and baking powder slowly while whisking to avoid lumps. Season with salt, pepper, garlic powder, and herbs.
The mixture should be creamy but pourable.
3. Assemble
Spread the vegetable mixture evenly in the baking dish. Sprinkle cheese over the top.
Pour the creamy batter evenly across the vegetables so it reaches all corners. Lightly shake the dish to distribute the mixture.
4. Bake
Bake for 35–45 minutes or until the top becomes golden brown and the center is fully set.
Allow the casserole to rest for 10 minutes before slicing into squares.
Serve warm.
Description Notes
This dish combines the freshness of vegetables with the richness of a savory custard-like filling. The cabbage becomes tender and slightly sweet while baking, and the top develops a beautiful golden crust.
It tastes similar to a cross between a vegetable quiche and a savory pie, but without needing complicated pastry dough.
Perfect for:
- Family dinners
- Potlucks
- Vegetarian meals
- Lunchboxes
- Holiday side dishes
Tips for Best Results
- Drain excess moisture: If the cabbage releases too much water, lightly squeeze it before baking.
- Add protein: Chicken, tuna, or smoked sausage can make it a complete meal.
- Use fresh herbs: Dill, parsley, or chives boost flavor beautifully.
- Cheese options: Mozzarella gives stretchiness while cheddar adds stronger flavor.
- Crispier top: Broil for the last 2–3 minutes.
- Low-carb version: Replace flour with almond flour.
Nutritional Information (Approx. Per Serving)
- Calories: 260–320
- Protein: 10–14g
- Carbohydrates: 15–18g
- Fat: 18–22g
- Fiber: 3–5g
- Calcium: Good source
- Vitamin A: High
- Vitamin C: Moderate
Values vary depending on cheese and cream used.
Health Benefits
1. Rich in Fiber
Cabbage and carrots support digestion and help maintain gut health.
2. Packed with Vitamins
Carrots provide vitamin A for eye health, while cabbage offers vitamin C and antioxidants.
3. Good Energy Meal
The combination of eggs, cheese, and vegetables provides balanced protein and carbohydrates.
4. Budget-Friendly
Simple pantry ingredients make this recipe affordable and filling.
5. Versatile
You can customize it easily with different vegetables and proteins.
Questions & Answers
Q1: Can I make this ahead of time?
Yes. Prepare and refrigerate before baking for up to 24 hours.
Q2: Can I freeze it?
Yes. Slice into portions and freeze for up to 2 months.
Q3: What can replace mayonnaise?
Greek yogurt or sour cream works well.
Q4: Can I make it gluten-free?
Yes. Use gluten-free flour or oat flour.
Q5: Why is my casserole watery?
Cabbage naturally releases moisture. Salt lightly and drain excess liquid before baking.
Q6: What should I serve with it?
It pairs well with soup, salad, grilled meat, or roasted potatoes.
Creamy Orange Chia Pudding 🍊
Creamy Orange Chia Pudding 

Description
This creamy orange chia pudding is a refreshing, nutritious, and naturally sweet breakfast or dessert made with chia seeds, milk, and fresh oranges. The tiny chia seeds absorb the liquid and transform into a rich, creamy pudding with a delightful tapioca-like texture. Fresh orange juice and zest add a bright citrus flavor that perfectly complements the creamy base.
This recipe is incredibly easy to make and requires minimal effort. Simply mix the ingredients, refrigerate, and let the chia seeds do the work. It’s an ideal make-ahead breakfast for busy mornings, a healthy snack, or a light dessert. Packed with fiber, omega-3 fatty acids, and vitamins, this pudding is both delicious and nourishing.
The beautiful presentation in small jars makes it perfect for meal prep, brunches, or serving guests. Every spoonful is creamy, refreshing, and loaded with wholesome ingredients.
Servings
Serves: 3 people
Preparation Time: 10 minutes
Chilling Time: 4 hours or overnight
Total Time: 4 hours 10 minutes
Ingredients
- 2 cups milk (dairy or plant-based)
- 6 tablespoons chia seeds
- Juice of 1 large orange
- 1 teaspoon orange zest
- 1 tablespoon honey or maple syrup (optional)
- ½ teaspoon vanilla extract
- Orange slices for garnish
Equipment
- Mixing bowl
- Whisk or spoon
- Measuring cups and spoons
- Small glass jars or serving bowls
Instructions
Step 1: Mix Ingredients
In a medium bowl, combine:
- Milk
- Orange juice
- Orange zest
- Vanilla extract
- Honey (if using)
Whisk well.
Step 2: Add Chia Seeds
Stir in the chia seeds.
Mix thoroughly to prevent clumping.
Allow the mixture to sit for 5 minutes, then stir again.
Step 3: Chill
Cover the bowl and refrigerate for at least 4 hours or overnight.
The chia seeds will absorb the liquid and create a thick pudding.
Step 4: Serve
Divide into jars or bowls.
Garnish with fresh orange slices or extra zest.
Serve chilled.
Recipe Notes
- Almond milk and coconut milk work beautifully in this recipe.
- Add more milk if you prefer a thinner consistency.
- The pudding keeps well in the refrigerator for up to 4 days.
- Fresh oranges provide the best flavor.
Tips for Success
- Stir twice during the first 10 minutes to avoid clumps.
- Refrigerate overnight for the creamiest texture.
- Use fresh orange juice instead of bottled juice.
- Add berries or nuts for extra texture.
- Adjust sweetness according to your preference.
Nutritional Information (Per Serving)
- Calories: 220
- Protein: 6g
- Carbohydrates: 20g
- Fat: 12g
- Fiber: 10g
- Sugar: 8g
- Omega-3 Fatty Acids: High
- Vitamin C: Excellent source
Nutrition values are approximate.
Health Benefits
Rich in Fiber
Chia seeds are an excellent source of dietary fiber, promoting digestive health and helping you feel full longer.
High in Omega-3 Fatty Acids
Chia seeds provide plant-based omega-3s that support heart and brain health.
Supports Hydration
Chia seeds absorb liquid and help maintain hydration.
Excellent Source of Antioxidants
Oranges contain vitamin C and antioxidants that support the immune system.
Supports Healthy Digestion
The combination of fiber and citrus can help maintain digestive health.
Great for Meal Prep
This recipe can be prepared in advance for quick breakfasts and snacks.
Frequently Asked Questions (Q&A)
Q: Can I make this dairy-free?
Yes. Use almond, oat, soy, or coconut milk.
Q: How long does chia pudding last?
Up to 4 days in an airtight container in the refrigerator.
Q: Can I freeze it?
Freezing is not recommended because the texture may change.
Q: Why is my pudding too thin?
Add an extra tablespoon of chia seeds and chill longer.
Q: Can I add fruit?
Absolutely. Berries, bananas, mangoes, and kiwi pair wonderfully with orange.
Q: Is chia pudding healthy?
Yes. It is rich in fiber, healthy fats, vitamins, and minerals.
Final Thoughts
Creamy Orange Chia Pudding is a simple, nutritious, and delicious recipe that’s perfect for breakfast, snacks, or healthy desserts. The creamy chia base combined with fresh citrus flavor creates a refreshing treat that is both satisfying and nourishing. Make a batch ahead of time and enjoy a wholesome, grab-and-go option all week long.
Classic French Crepes (Sweet, Thin Pancakes)
Light, delicate, and flexible—these crêpes roll up beautifully with fillings like chocolate spread, fruit, or cream.
Ingredients (Serves 3–4 | ~
- 1 cup all-purpose flour
- 2 large eggs
- 1 ½ cups milk
- 2 tbsp melted butter (plus more for the pan)
- 1 tbsp sugar (optional, for sweet crêpes)
- ½ tsp vanilla extract (optional)
- Pinch of salt
Instructions
- Make the batter
In a bowl, whisk eggs and milk. Add flour, sugar, salt, and vanilla. Whisk until smooth. Stir in melted butter. - Rest the batter (important)
Let it sit for 15–30 minutes. This relaxes the gluten and gives softer crêpes. - Heat the pan
Use a nonstick skillet over medium heat. Lightly butter it. - Cook
Pour about ¼ cup batter into the pan, swirl to spread thin.
Cook 1–2 minutes until edges lift, flip, and cook 30–60 seconds more. - Stack & fill
Stack cooked crêpes. Fill with chocolate spread, fruit, or anything you like. Roll or fold.
Popular Fillings
- Chocolate spread (like Nutella)
- Sliced bananas or strawberries
- Whipped cream
- Honey or maple syrup
Description & Texture Notes
- Thin and slightly elastic
- Lightly golden with soft centers
- Flexible for rolling (like in your image)
Tips for Perfect Crêpes
- Batter should be thin like heavy cream—add milk if too thick
- First crêpe is often a “test” (don’t worry if it’s imperfect)
- Keep heat medium, not high, to avoid burning
- Stack with parchment if making a large batch
Variations
- Savory version: skip sugar/vanilla; fill with cheese, eggs, or spinach
- Protein boost: replace some milk with Greek yogurt + water
- Gluten-free: use a 1:1 GF flour blend
Servings
- 10–12 crêpes
- Serves 3–4 people
Nutritional Info (per crêpe, plain approx.)
- Calories: ~90–110
- Protein: 3 g
- Carbs: 10–12 g
- Fat: 4–5 g
(Fillings will add more)
Benefits
- Quick, affordable ingredients
- Customizable sweet or savory
- Good source of energy (carbs + fats)
Q&A
Why are my crêpes thick?
Your batter is too thick—add a bit more milk.
Why are they tearing?
Not enough rest time or flipped too early.
Can I store them?
Yes—refrigerate up to 2 days or freeze with parchment between layers.
Can I make without butter?
Yes, but flavor is better with it. Use oil as a substitute.
How do I reheat?
Warm in a skillet or microwave for 10–15 seconds.
Cheesy Potato Gratin Stack 🥔🧀
Spinach & Artichoke Stuffed Chicken Breasts
Description
Spinach & Artichoke Stuffed Chicken Breasts are juicy, golden-brown chicken breasts filled with a rich, creamy mixture of spinach, artichokes, cream cheese, mozzarella, and Parmesan. The chicken is perfectly seasoned, seared until golden, then baked until tender and finished with a creamy garlic Parmesan sauce. This restaurant-quality meal is perfect for family dinners, special occasions, or meal prep and pairs wonderfully with mashed potatoes, roasted vegetables, or a fresh salad.
Prep Time: 20 minutes
Cook Time: 30 minutes
Total Time: 50 minutes
Servings: 4
Ingredients
For the Chicken
- 4 large boneless, skinless chicken breasts
- 2 tablespoons olive oil
- 1 teaspoon paprika
- 1 teaspoon garlic powder
- 1 teaspoon onion powder
- 1 teaspoon Italian seasoning
- 1 teaspoon salt
- ½ teaspoon black pepper
For the Filling
- 4 oz (115g) cream cheese, softened
- 1 cup chopped cooked spinach (well drained)
- 1 cup chopped canned artichoke hearts, drained
- 1 cup shredded mozzarella cheese
- ¼ cup grated Parmesan cheese
- 2 cloves garlic, minced
- ½ teaspoon crushed red pepper flakes (optional)
For the Cream Sauce
- 2 tablespoons butter
- 2 cloves garlic, minced
- 1 cup heavy cream
- ½ cup grated Parmesan cheese
- Salt and black pepper to taste
- Chopped fresh parsley for garnish
Instructions
Step 1: Prepare the Chicken
Using a sharp knife, carefully cut a pocket into the side of each chicken breast without slicing all the way through. Pat the chicken dry with paper towels.
Step 2: Season
Mix paprika, garlic powder, onion powder, Italian seasoning, salt, and pepper together. Rub the seasoning evenly over both sides of each chicken breast.
Step 3: Make the Filling
In a bowl, combine cream cheese, spinach, chopped artichokes, mozzarella, Parmesan, minced garlic, and red pepper flakes. Stir until smooth and well combined.
Step 4: Stuff the Chicken
Divide the filling evenly among the chicken breasts, gently spooning it into each pocket. Secure the opening with toothpicks if necessary.
Step 5: Sear
Preheat the oven to 375°F (190°C).
Heat olive oil in a large oven-safe skillet over medium-high heat. Sear the chicken for about 3–4 minutes per side until golden brown.
Step 6: Bake
Transfer the skillet to the oven and bake for 18–22 minutes, or until the internal temperature reaches 165°F (74°C).
Step 7: Make the Sauce
While the chicken bakes, melt butter in a saucepan over medium heat. Add garlic and cook for about 30 seconds until fragrant.
Pour in the heavy cream and simmer for 2–3 minutes.
Whisk in the Parmesan cheese until smooth and creamy. Season with salt and pepper to taste.
Step 8: Finish
Remove the chicken from the oven and let it rest for 5 minutes.
Spoon the creamy Parmesan sauce over the chicken and garnish with fresh parsley before serving.
Tips & Notes
- Squeeze as much moisture as possible from the spinach to keep the filling thick.
- Toothpicks help keep the filling from leaking while cooking.
- Fresh mozzarella can be used for an even cheesier filling.
- Add chopped sun-dried tomatoes or cooked bacon for extra flavor.
- Store leftovers in an airtight container in the refrigerator for up to 3 days.
Frequently Asked Questions
Can I prepare this ahead of time?
Yes. Stuff and season the chicken up to one day ahead, then refrigerate until ready to cook.
Can I freeze it?
Yes. Freeze the uncooked stuffed chicken for up to 2 months. Thaw overnight before cooking.
What sides go well with it?
Mashed potatoes, roasted asparagus, steamed broccoli, green beans, rice, or a crisp Caesar salad pair perfectly.
How do I know it’s done?
Use a meat thermometer. The thickest part of the chicken should read 165°F (74°C).
Servings & Nutrition (Approximate Per Serving)
- Calories: 560
- Protein: 47g
- Fat: 37g
- Carbohydrates: 8g
- Fiber: 2g
- Sugar: 2g
- Sodium: 720mg
Crispy Cheesy Zucchini & Carrot Fritters
Description
These Crispy Cheesy Zucchini & Carrot Fritters are packed with fresh vegetables, melted cheese, and herbs, making them a delicious appetizer, snack, or light meal. They’re golden and crispy on the outside, soft and cheesy on the inside, and pair perfectly with a creamy garlic yogurt dipping sauce.
Ingredients
For the Fritters
- 2 medium zucchini, grated
- 2 medium carrots, grated
- 1½ cups shredded mozzarella cheese
- 2 eggs
- 3 green onions, finely chopped
- 2 cloves garlic, minced
- ½ cup all-purpose flour
- ½ teaspoon baking powder
- 1 teaspoon Italian seasoning
- ½ teaspoon paprika
- 1 teaspoon salt
- ½ teaspoon black pepper
- 2 tablespoons chopped parsley
- 2 tablespoons olive oil (for frying)
Garlic Yogurt Dip
- ½ cup Greek yogurt
- 2 tablespoons mayonnaise
- 1 clove garlic, minced
- 1 tablespoon lemon juice
- 1 tablespoon chopped dill or parsley
- Salt and black pepper to taste
Instructions
- Grate the zucchini and place it in a clean kitchen towel. Squeeze out as much moisture as possible.
- Grate the carrots and add them to a large mixing bowl.
- Add the squeezed zucchini, mozzarella cheese, green onions, garlic, eggs, parsley, Italian seasoning, paprika, salt, and black pepper.
- Mix well until everything is evenly combined.
- Stir in the flour and baking powder until a thick mixture forms.
- Divide the mixture into equal portions and shape each into a log or oval fritter.
- Heat the olive oil in a large non-stick skillet over medium heat.
- Cook the fritters for 4–5 minutes per side, turning carefully, until golden brown and cooked through.
- Transfer to a paper towel-lined plate.
- For the dip, whisk together the Greek yogurt, mayonnaise, garlic, lemon juice, dill, salt, and pepper until smooth.
- Serve the fritters warm with the creamy garlic yogurt dip.
Tips & Notes
- Removing the moisture from the zucchini helps the fritters stay crispy.
- Add grated Parmesan for extra flavor.
- Bake at 400°F (200°C) for 20–25 minutes or air fry at 375°F (190°C) for 12–15 minutes if preferred.
- These fritters are delicious served with sour cream, ranch, or spicy mayo.
Frequently Asked Questions
Can I make these ahead of time?
Yes. Prepare the mixture up to one day in advance and refrigerate until ready to cook.
How do I store leftovers?
Store in an airtight container in the refrigerator for up to 3 days. Reheat in a skillet, oven, or air fryer for the best texture.
Can I freeze them?
Yes. Freeze the cooked fritters for up to 2 months. Thaw overnight in the refrigerator and reheat before serving.
Servings
4–5 servings
Nutrition (Approx. Per Serving)
- Calories: 285
- Protein: 16g
- Carbohydrates: 13g
- Fat: 19g
- Fiber: 3g
- Sugar: 4g