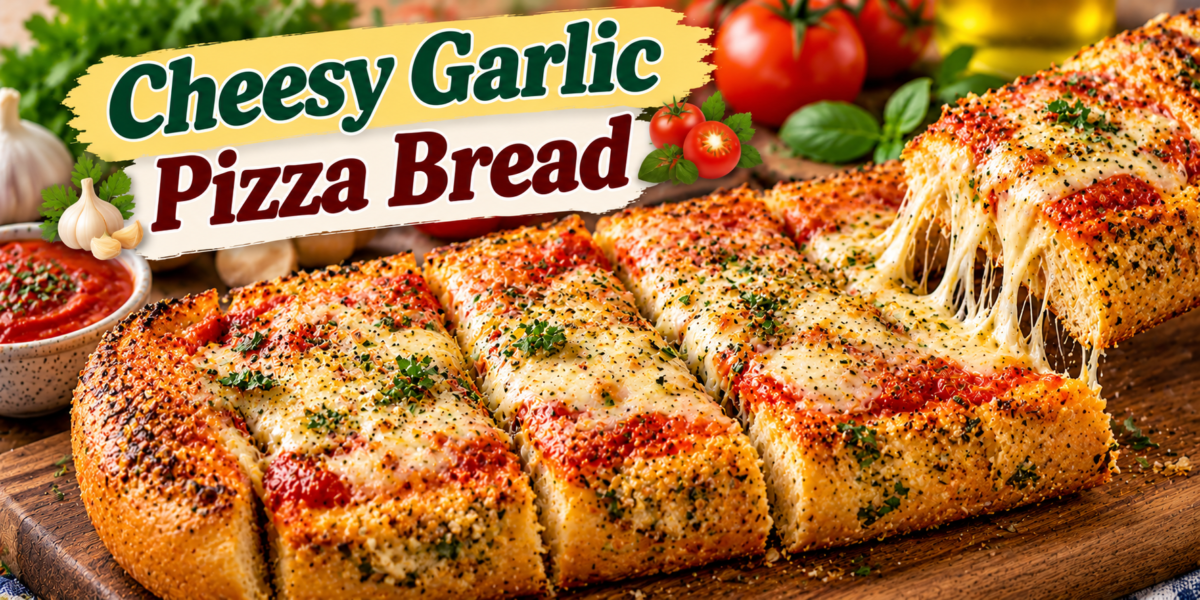
Cheesy Garlic Pizza Bread

Cheesy Garlic Pizza Bread with garlic butter, pizza sauce, mozzarella, Parmesan, herbs, and crispy golden bread

Cheesy Garlic Pizza Bread

Cheesy Garlic Pizza Bread is a quick, savory bake made with crusty bread, garlic butter, pizza sauce, mozzarella, Parmesan, herbs, and your favorite toppings. It combines the crisp edges of garlic bread with the cheesy comfort of pizza, making it perfect for snacks, easy lunches, family dinners, parties, or game-day spreads.

This Cheesy Garlic Pizza Bread is simple enough for beginners and flexible enough to customize. You can keep it classic with cheese and herbs, add pepperoni or vegetables, or serve it with marinara for dipping.

Prep Time: 15 minutes
Bake Time: 12 to 15 minutes
Total Time: About 30 minutes
Servings: 6

Ingredients

For the Garlic Bread Base

  • 1 large French bread loaf or Italian bread loaf
  • 4 tablespoons unsalted butter, softened
  • 2 tablespoons extra virgin olive oil
  • 3 garlic cloves, finely minced
  • 1 tablespoon chopped fresh parsley
  • 1/2 teaspoon dried oregano
  • 1/4 teaspoon garlic powder
  • 1/4 teaspoon salt

For the Pizza Topping

  • 3/4 cup pizza sauce or thick marinara
  • 2 cups shredded mozzarella cheese
  • 1/3 cup freshly grated Parmesan cheese
  • 1/2 teaspoon Italian seasoning
  • 1/4 teaspoon red pepper flakes, optional
  • 1/3 cup sliced pepperoni, optional
  • 1/4 cup sliced black olives, optional
  • 1/4 cup diced bell pepper, optional
  • 2 tablespoons chopped fresh basil

 Serving

  • Warm marinara sauce
  • Extra Parmesan
  • Fresh basil
  • Red pepper flakes

Why You’ll Love This Recipe

Cheesy Garlic Pizza Bread gives you the best parts of pizza and garlic bread in one easy recipe. The base turns crisp around the edges while staying slightly soft in the center, and the garlic butter soaks into the bread before the sauce and cheese are added.

Another reason to love this recipe is how easy it is to adapt. Use different cheeses, vegetables, or cooked meats to suit your taste.

How to Make Cheesy Garlic Pizza Bread

Step 1: Preheat the Oven

Preheat the oven to 425°F or 220°C.

Line a large baking sheet with parchment paper or foil.

A hot oven helps Cheesy Garlic Pizza Bread develop crisp edges quickly while melting the cheese evenly.

Step 2: Prepare the Bread

Slice the loaf in half lengthwise so you have two long pieces.

Place them cut-side up on the prepared baking sheet.

If the loaf is very thick, gently press the center down slightly with your hand to create a flatter surface for the toppings.

Step 3: Make the Garlic Butter

In a small bowl, combine softened butter, olive oil, minced garlic, parsley, oregano, garlic powder, and salt.

Mix until smooth.

Spread the garlic butter evenly over the cut surfaces of the bread.

This layer is what gives Cheesy Garlic Pizza Bread its rich garlic flavor from the very first bite.

Step 4: Toast the Bread First

Bake the buttered bread for 5 minutes before adding the pizza toppings.

This short pre-bake helps the surface become slightly crisp and prevents the sauce from soaking in too deeply.

Remove the bread from the oven once the edges begin to look lightly golden.

Step 5: Add the Pizza Sauce

Spread a thin, even layer of pizza sauce over each half.

Do not use too much sauce because excess moisture can make Cheesy Garlic Pizza Bread soggy.

Leave a small border around the edges for a crisp finish.

Step 6: Add the Cheese

Sprinkle mozzarella evenly over the sauce.

Add Parmesan, Italian seasoning, and red pepper flakes if using.

For the best melt, spread the cheese all the way toward the edges without covering the crust completely.

Step 7: Add Optional Toppings

Add pepperoni, olives, bell pepper, mushrooms, cooked sausage, or any other toppings you enjoy.

Keep the toppings fairly light so Cheesy Garlic Pizza Bread stays crisp and easy to slice.

Watery vegetables should be cooked or patted dry before adding.

Step 8: Bake Until Golden

Return the bread to the oven.

Bake for 7 to 10 minutes, or until the mozzarella is fully melted and bubbling.

For extra color, broil for 1 to 2 minutes at the end, watching closely.

Cheesy Garlic Pizza Bread is ready when the cheese has golden spots and the bread edges are crisp.

Step 9: Finish with Fresh Herbs

Remove the bread from the oven and sprinkle with fresh basil, extra parsley, or more Parmesan.

Let it rest for 2 to 3 minutes before slicing.

Step 10: Slice and Serve

Cut each half into thick strips or squares.

Serve Cheesy Garlic Pizza Bread warm with marinara sauce for dipping.

Serving Suggestions

Cheesy Garlic Pizza Bread works as an appetizer, snack, or light meal.

Serve it with tomato soup, minestrone, Caesar salad, cucumber salad, or roasted vegetables.

For a party, cut Cheesy Garlic Pizza Bread into smaller squares and serve with warm marinara or garlic dip.

It also pairs well with grilled chicken, meatballs, pasta, or a large Italian-style salad.

For another crispy and flavorful air fryer recipe, try our Air Fryer Crispy Pesto Gnocchi with basil pesto and Parmesan.

Recipe Tips

Use sturdy French or Italian bread rather than very soft sandwich bread.

Do not skip the first short bake with garlic butter.

Use a thick pizza sauce so the bread stays crisp.

Freshly shredded mozzarella melts more smoothly than many pre-shredded varieties.

Cheesy Garlic Pizza Bread tastes best when served immediately after baking.

Avoid overloading the bread with toppings.

Cook mushrooms, zucchini, or other watery vegetables before adding them.

Broil briefly at the end if you want browned cheese.

Let the bread rest for a few minutes before slicing so the cheese stays in place.

Easy Variations

For a classic pepperoni version, add thin slices of pepperoni over the mozzarella.

Cheesy Garlic Pizza Bread can also be made with cooked chicken, mushrooms, spinach, roasted peppers, or olives.

For a Mediterranean variation, use feta, mozzarella, tomatoes, olives, oregano, and a little red onion.

For extra heat, add jalapeños, chili flakes, or spicy sausage.

You can also use pesto instead of pizza sauce for a basil-forward version.

For a white pizza variation, skip the tomato sauce and use ricotta, mozzarella, Parmesan, garlic, and herbs.

Make-Ahead Instructions

Cheesy Garlic Pizza Bread is best baked fresh, but you can prepare several components ahead.

Mix the garlic butter up to 3 days in advance and refrigerate it in an airtight container. Let it soften slightly before spreading.

Prepare the cheese and toppings a day ahead if needed.

For best texture, assemble and bake the bread shortly before serving rather than letting it sit with sauce for hours.

Storage and Reheating

Store leftover Cheesy Garlic Pizza Bread in an airtight container in the refrigerator for up to 3 days.

To reheat, place slices in a 375°F or 190°C oven for 5 to 8 minutes until hot and crisp.

An air fryer also works well at 350°F or 175°C for 3 to 5 minutes.

The microwave is convenient, but the bread will become softer.

You can freeze baked slices for up to 2 months and reheat them in the oven.

Nutrition Information

Approximate nutrition per serving:

Calories: 390
Protein: 16 g
Carbohydrates: 38 g
Fat: 20 g
Saturated Fat: 9 g
Fiber: 3 g
Sugar: 5 g
Sodium: 760 mg

Nutrition values are estimates and may vary depending on the bread, cheese, sauce, and toppings.

Frequently Asked Questions

Can I use baguette instead of French bread?

Yes. A baguette works well and gives the finished bread an even crispier texture.

Can I make this without pizza sauce?

Yes. Use pesto, garlic cream sauce, or a thin layer of ricotta instead.

What cheese works best?

Mozzarella is the best base cheese because it melts well, while Parmesan adds flavor. Provolone and cheddar can also be mixed in.

How do I keep the bread from getting soggy?

Pre-bake the garlic-buttered bread, use a thick sauce, and avoid adding too many wet toppings.

Can I make it vegetarian?

Yes. Skip the pepperoni and use vegetables such as peppers, olives, mushrooms, spinach, or artichokes.

Can I use an air fryer?

Yes. Cut the bread to fit the basket and air fry at 375°F or 190°C until the cheese is melted and the edges are crisp.

What can I serve with it?

Soup, salad, pasta, grilled chicken, meatballs, or a simple vegetable side all pair well.

Final Thoughts

Cheesy Garlic Pizza Bread is an easy way to turn a simple loaf of bread into a warm, cheesy, crowd-pleasing meal or snack. Garlic butter, pizza sauce, mozzarella, Parmesan, herbs, and crisp bread come together quickly with very little preparation.

Because Cheesy Garlic Pizza Bread is so customizable, you can keep it simple or add your favorite pizza toppings depending on the occasion.

Keep this Cheesy Garlic Pizza Bread recipe in your rotation whenever you want something fast, flavorful, and comforting without making pizza dough from scratch.

If you enjoy easy Mediterranean-inspired brunch recipes, you may also like our Mediterranean Turkey, Cheese & Tomato Toast Bake.

Air Fryer Cheesy Vegetable Fritters

Air Fryer Cheesy Vegetable Fritters

Crispy on the outside, tender on the inside, and loaded with colorful vegetables and melty cheese, these Air Fryer Cheesy Vegetable Fritters are an easy way to turn everyday vegetables into a delicious family-friendly meal or side dish.Instead of deep-frying, these fritters are cooked in the air fryer with just a light coating of oil, giving them beautifully crisp edges while keeping the inside soft and cheesy. They are perfect for breakfast, lunch, dinner, or even a quick snack.The best part? You can customize them with almost any vegetables you have in your refrigerator. Zucchini, carrots, corn, bell peppers, spinach, and green onions all work beautifully together.

Prep Time: 15 minutes

Cook Time: 12–16 minutes

Total Time: 27–31 minutes

Servings: 4

Difficulty: Easy

Why You’ll Love This Recipe

These cheesy vegetable fritters are one of those recipes you’ll want to make whenever you have leftover vegetables.

Air fryer friendly: You get crispy fritters without deep-frying.

Cheesy and flavorful: Melted cheese adds richness and helps bring the vegetables together.

Easy to customize: Use whatever vegetables you already have available.

Family-friendly: Even picky eaters may be more interested in vegetables when they’re mixed with cheese and cooked until golden.

Great for meal prep: The fritters can be refrigerated and reheated for a quick snack or lunch.

Ingredients For Air Fryer Cheesy Vegetable Fritters

1 medium zucchini, grated

1 medium carrot, grated

½ cup finely chopped bell pepper

½ cup corn kernels

2 green onions, finely chopped

1 cup shredded cheddar cheese

2 large eggs

½ cup all-purpose flour

¼ cup grated Parmesan cheese

½ teaspoon garlic powder

½ teaspoon onion powder

paprika ½ teaspoon

black pepper ¼ teaspoon

salt ½ teaspoon

1 tablespoon olive oil or avocado oil

Fresh parsley, optional

Optional Additions

For extra flavor, add:

½ teaspoon dried Italian herbs

A pinch of chili flakes

¼ cup chopped spinach

1 tablespoon chopped fresh cilantro

¼ cup finely chopped mushrooms

Instructions For Air Fryer Cheesy Vegetable Fritters

Prepare the Zucchini

Grate the zucchini using the large holes of a box grater.

Place the grated zucchini in a clean kitchen towel or several layers of paper towel.

Squeeze firmly to remove as much liquid as possible.

This step is extremely important because zucchini contains a lot of water. Excess moisture can make your fritters soft and difficult to crisp.

Prepare the Vegetables

Grate the carrot and finely chop the bell pepper and green onions.

If you’re using fresh corn, remove the kernels from the cob. If using frozen corn, thaw it and drain it well.

Place all the prepared vegetables in a large mixing bowl.

Add the Cheese

Add the shredded cheddar and Parmesan cheese to the vegetables.

Stir gently until everything is evenly distributed.

Add the Eggs and Dry Ingredients

Crack the eggs into the bowl.

Add the flour, garlic powder, onion powder, paprika, black pepper, and salt.

Mix until a thick, scoopable mixture forms.

The mixture should hold together when pressed with a spoon. If it seems too wet, add another tablespoon of flour.

Preheat the Air Fryer

Preheat your air fryer to 375°F (190°C) for about 3 minutes if your model requires preheating.

Lightly brush or spray the air fryer basket with oil.

Shape the Fritters

Scoop approximately 2 tablespoons of mixture for each fritter.

Place the portions into the air fryer basket, leaving space between each one.

Gently flatten each fritter with the back of a spoon.

Avoid making them too thick, as thinner fritters cook more evenly and become crispier.

Air Fry

Lightly brush or spray the tops with oil.

Air fry at 375°F (190°C) for 6–8 minutes.

Carefully flip the fritters and continue cooking for another 5–7 minutes, or until golden brown and crisp around the edges.

Because air fryers vary, begin checking them a little early.

Serve

Remove the fritters from the air fryer and allow them to cool for 2–3 minutes.

Garnish with fresh parsley or green onions.

Serve warm with your favorite dipping sauce.

Tips for Perfect Vegetable Fritters

Squeeze the zucchini well: This is the most important step for crispy fritters.

Don’t overcrowd the basket: Arrange the fritters in a single layer with space between them so hot air can circulate.

Make them similar in size: Evenly sized fritters cook at the same rate.

Use freshly shredded cheese: It generally melts better and gives the fritters a delicious texture.

Adjust the flour: Different vegetables contain different amounts of moisture. Add a little extra flour if your mixture is too wet.

Don’t flip too early: Let the first side become firm and golden before turning.

Watch the final minutes: Cheese can brown quickly in an air fryer.

Make them spicy: Add chili flakes, cayenne, or finely chopped jalapeño.

Benefits For Air Fryer Cheesy Vegetable Fritters

These fritters are a delicious way to include several vegetables in one meal.

Zucchini and carrots contribute fiber, vitamins, minerals, and naturally occurring plant compounds. Bell peppers add additional vitamins and color, while corn contributes carbohydrates and fiber.

Eggs and cheese provide protein, helping make the fritters more satisfying than vegetables alone.

Air frying also means you can achieve a crisp texture with significantly less oil than traditional deep-frying.

Keep in mind that cheese, eggs, and flour add calories and carbohydrates, so these fritters are best enjoyed as part of a balanced meal.

Serving Suggestions For Air Fryer Cheesy Vegetable Fritters

These fritters are incredibly versatile.

Breakfast

Serve them with scrambled eggs, avocado, and fresh tomatoes for a savory breakfast.

Lunch

Pair two or three fritters with a fresh green salad and Greek yogurt dip.

Dinner

Serve them alongside grilled chicken, baked fish, or roasted meat.

Snack

Enjoy one or two fritters with homemade yogurt-garlic sauce, hummus, or salsa.

Dipping Sauce Ideas For Air Fryer Cheesy Vegetable Fritters

Try serving them with:

Garlic yogurt sauce

Tzatziki

Ranch dressing

Tomato salsa

Avocado dip

Spicy mayonnaise

Nutrition Facts For Air Fryer Cheesy Vegetable Fritters

Approximate nutrition per serving (¼ of recipe):

Calories: 280–310

Protein: 14–16 g

Carbohydrates: 24–27 g

Fat: 15–17 g

Saturated Fat: 7–8 g

Fiber: 3–4 g

Sugar: 5–6 g

Sodium: 500–650 mg

Calcium: Approximately 250–300 mg

Nutrition information is an estimate and can vary depending on the vegetables, cheese, flour, and brands used.

Frequently Asked Questions

Can I make these fritters without zucchini?

Yes. You can replace zucchini with additional carrots, shredded sweet potato, cauliflower rice, or finely chopped broccoli. Remember that vegetables have different moisture levels, so you may need to adjust the flour.

Why are my fritters falling apart?

The mixture may contain too much moisture or not enough binding ingredients. Make sure the zucchini is squeezed very dry and that the mixture is thick enough to hold its shape.

Can I use frozen vegetables?

Yes, but thaw and drain them thoroughly first. Excess water can make the fritters difficult to crisp.

Can I make these gluten-free?

Yes. Replace the regular flour with a gluten-free all-purpose flour blend. You can also experiment with almond flour, although the texture will be different.

Can I make them without eggs?

Eggs help bind the ingredients. You can experiment with an egg substitute, but you may need to adjust the amount of flour to achieve the right consistency.

What cheese is best?

Cheddar and Parmesan provide a flavorful combination. You can also use mozzarella, Monterey Jack, Colby, or a Mexican cheese blend.

Can I prepare them ahead of time?

Yes. Shape the uncooked fritters and refrigerate them covered for several hours before air frying. Alternatively, cook them ahead and reheat when needed.

How do I store leftovers?

Allow the fritters to cool, then place them in an airtight container and refrigerate. For the best texture, reheat them in the air fryer rather than the microwave.

How do I make them extra crispy?

Squeeze the vegetables thoroughly, avoid overcrowding the basket, flatten the fritters moderately thin, and lightly spray or brush them with oil before cooking.

Final Thoughts For Air Fryer Cheesy Vegetable Fritters

These Air Fryer Cheesy Vegetable Fritters are a delicious example of how simple vegetables can become something truly satisfying. With crispy golden edges, a tender vegetable-filled center, and plenty of melted cheese, they make an easy addition to almost any meal.The recipe is flexible enough to accommodate whatever vegetables you have in your refrigerator, making it perfect for reducing food waste and creating quick homemade meals.For the crispiest results, remember to remove excess moisture from the vegetables, leave space between the fritters, and cook them until deeply golden around the edges.Serve them with a creamy dipping sauce, fresh salad, or your favorite protein, and enjoy a simple air-fryer recipe that’s packed with color, texture, and flavor.