Million-dollar Spaghetti Casserole

Million-dollar Spaghetti Casserole


Why you’ll love the recipe:

This is a great recipe if you like to invite your family members or friends to a delicious dinner party. The spaghetti casserole is always a great idea for a quick but very appetizing meal for your loved ones.


How to serve it:

You can serve it with a dollop of sour cream or Greek yogurt, if you prefer, or with a glass of red wine.


Ingredients:

Spaghetti noodles

Spaghetti sauce

Ground beef

Salt and pepper to taste

Cream cheese softened

Cottage cheese

Sour cream

Butter melted

Parmesan cheese to taste

How to make Million-dollar Spaghetti Casserole:

Step 1. First, preheat your oven to 350 F or 180 C degrees.


Step 2. Cook the spaghetti to your liking and drain them in the colander.

Step 3. In a skillet over medium heat, brown the ground beef for about 5 minutes.


Step 4. Pour in the sauce and mix until combined.


Step 5. Mix the cream cheese, cottage cheese, and sour cream in a medium-sized bowl until well combined.


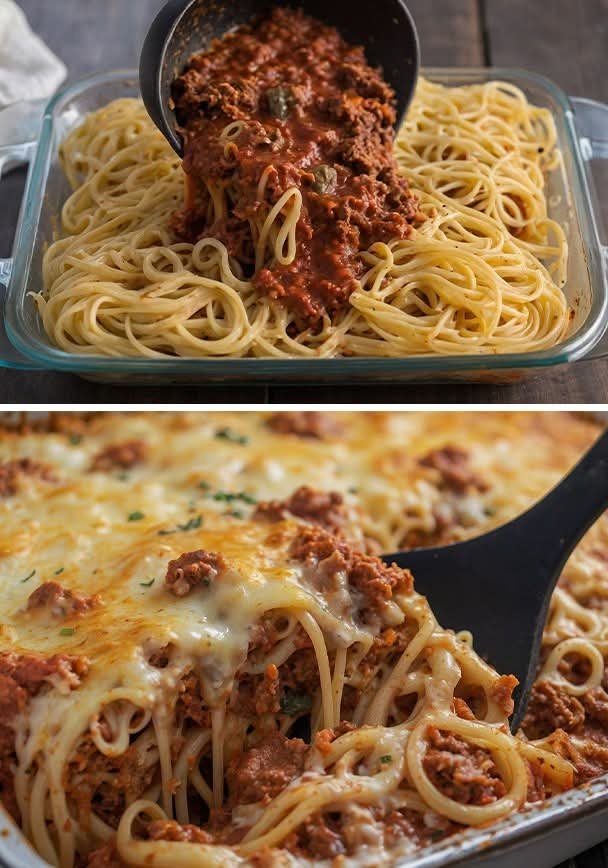
Step 6. Spray your 13×8 inch casserole pan with cooking spray and spread half of the noodles.

Step 7. Spread the cream cheese on top of the noodles, then add the second half of the noodles.


Step 8. Top with ground beef and sauce, and bake for about 30 minutes.


Step 9. Sprinkle some parmesan cheese on top and cook for additional 15 minutes.


Serve and enjoy

The dish is a weeknight idea for the family and a kid-friendly dish that everyone will enjoy.


Ingredients

1 lb. Spaghetti noodles

1 Jar spaghetti sauce

1 lb. Ground beef

Salt and pepper to taste

8 oz. Cream cheese softened

8 oz. Cottage cheese

¼ C. Sour cream

½ C. Butter melted

Parmesan cheese to taste

Instructions

First, preheat your oven to 350 F or 180 C degrees.

Cook the spaghetti to your liking and drain them in the colander.

In a skillet over medium heat, brown the ground beef for about 5 minutes.

Pour in the sauce and mix until combined.

Mix the cream cheese, cottage cheese and sour cream in a medium-sized bowl until well combined.

Spray your 13×8 inch casserole pan with cooking spray and spread half of the noodles.

Spread the cream cheese on top of the noodles, then add the second half of the noodles.

Top with ground beef and sauce, and bake for about 30 minutes.

Sprinkle some parmesan cheese on top and cook for additional 15 minutes.

Serve and enjoy.

Can you make it ahead?

You can make the spaghetti and sauce ahead of time for up to 1 day. Just assemble everything and bake it whenever you need.


Storage instructions

You can store this casserole dish in the fridge for up to 2 days and enjoy it warm when needed.


Variations and substitutes

You can easily swap the spaghetti with tagliatelle or fettuccine. Use ground turkey or some mustard in the sauce for a better flavor.

Strawberry Dole Whip

The “Smoothie Rule” Reality Check

While whole strawberries are 0 points, WW guidelines generally specify that when fruit is blended into a liquid or semi-liquid state (like a smoothie or this whip), it loses some of its “satiety” value, and the points can technically increase.

  • The Good News: Because you’re eating this with a spoon (as a “fluff” or “whip”) rather than drinking it through a straw, many members still count the fruit as zero.

  • The Sweetener: If you use Honey, you’ll want to track that (1 tbsp is roughly 4 points). If you swap it for a Zero-Calorie Sweetener (like Monkfruit or Stevia), you stay much closer to that 1-2 point range!


3 Tips to Make it Truly “Dole” Style

If you want that authentic theme-park “swirl” and flavor, try these tweaks:

  1. The Pineapple Punch: Add 1/4 teaspoon of Pineapple Extract. It gives it that signature “Dole” tropical back-note even though the base is strawberry.

  2. The Piping Bag Trick: If you want it to look like the picture, put the blended mixture into a gallon-sized Ziploc bag, snip the corner, and squeeze it into the bowl in a circular motion.

  3. The “Fizz” Factor: For a “Dole Float” version, plopping a scoop of this into a glass of Diet 7-Up or Sprite Zero is an absolute game-changer for 0 extra points.


Quick Comparison: Original vs. Yours

Feature Disney Dole Whip (Cup) Your Strawberry Version
Calories ~110 – 160 kcal ~80 kcal
Sugar ~25g – 30g ~12g (Natural)
Protein 0g 4g (from Yogurt)
Weight Watchers ~5-7 Points 1-2 Points

Peanut Butter Balls with Chocolate Rice Krispies!!!

Classic Chocolate Peanut Butter Balls with Rice Krispies for extra texture and crunch. A quick and easy candy recipe.

What do you get when you combine peanut butter, chocolate, and Rice Krispies in a simple no-bake dessert recipe? You get one happy family of taste testers.


I’ve shared my family’s Peanut Butter Balls (aka Buckeyes) recipe here before (and it’s one of my most popular recipes).Once you’ve made them, you’ll understand our love for those chocolate peanut butter treats.

All of these recipes make terrific Christmas Candies for gifting or for snacking. It’s a tradition in our family to make these each year.


These Peanut Butter Balls with Rice Krispies have become another friend and family favorite over the years.

I fondly remember enjoying Peanut Butter Balls with my family as a child. It brings back happy childhood memories every time I bite into one.


I’m delighted to share this recipe with you here so you can experience the same joy with your family!

Ingredients

1 cup crunchy peanut butter

1/4 cup margarine or butter, softened

1 cup powdered sugar

2 cups Kellogg’s(R) Rice Krispies(R) cereal

1 1/2 cups semi-sweet chocolate morsels

2 tablespoons vegetable shortening

54 mini-muffin paper cups

Directions

-In large electric mixer bowl, beat peanut butter, margarine and sugar on medium speed until thoroughly combined.


-Add KELLOGG’S RICE KRISPIES cereal, mixing thoroughly. Portion mixture, using rounded teaspoon. Shape into balls.

-Place each ball in paper cup. Refrigerate.


-Melt chocolate morsels and shortening in small saucepan, over low heat, stirring constantly.


-Spoon 1 teaspoon melted chocolate over each peanut butter ball. Refrigerate until firm.


-Store in airtight container in refrigerator.

Making These Pancakes Pop

Making These Pancakes Pop

While the milk, flour, sugar, and leavening agents (soda/powder) are a great start, you’ll get a much better result if you add:

  • 1 Egg: This provides structure so they don’t crumble.

  • 2 Tablespoons of Melted Butter or Oil: This gives them that rich flavor and prevents them from sticking.

  • A pinch of Salt: Essential for balancing that granulated sugar.

Why this works for Supper:

Since it’s dinner, you can actually “savory-up” this recipe to make it feel more like a full meal:

  • Add Protein: Mix some cooked, crumbled bacon directly into the batter.

  • The “Salty-Sweet”: Top them with a fried egg and a drizzle of hot honey instead of just syrup.

  • Balance: Serve them with a side of breakfast sausage or even some sautéed greens to cut through the sweetness of the milk and sugar.

The “Real” Zero/Low-Point Fluff Recipe

The “Real” Zero/Low-Point Fluff Recipe

To keep points near zero (depending on your specific plan), you generally need to use fat-free and sugar-free bases.

  • 1 cup Fat-Free Greek Yogurt: (0 Points) – This provides the protein and the “bulk.”

  • 1 pack Sugar-Free Instant Pudding Mix: (Cheesecake or Vanilla flavor) – Use about 1-2 tbsp of the dry powder.

  • 1 cup Sugar-Free Cool Whip: (Fold this in for that “bomb” fluff texture).

  • Lily’s Semi-Sweet Baking Chips: These are sweetened with stevia. While not zero points, they are significantly lower than standard chocolate chips.


How to make it:

  1. Whisk the Greek yogurt and the dry pudding mix together until smooth.

  2. Fold in the sugar-free Cool Whip gently so you don’t lose the airiness.

  3. Chill for 30 minutes to let the pudding mix thicken the yogurt into a mousse-like consistency.

  4. Top with a measured amount of sugar-free chips.

Pro Tip: If you want it even thicker (more like the photo), you can mix in a little bit of fat-free cottage cheese that has been blended until smooth!

It’s a bummer when those social media “zero point” claims turn out to be a bit too good to be true, but the yogurt/pudding hack is a legitimate game-changer for cravings.

🍒 Cherry Banana Cream Salad 🍌🍓🥣

🍒 Cherry Banana Cream Salad 🍌🍓🥣

Ingredients:

🍒 Fresh cherries

🍌 Banana slices

🍓 Strawberries

🥣 Greek yogurt or whipped cream

🍯 Honey (optional)

Instructions:

1️⃣ Add Greek yogurt or whipped cream to a bowl 🥣

2️⃣ Mix in chopped strawberries and banana slices 🍓🍌

3️⃣ Top with fresh cherries 🍒

4️⃣ Drizzle a little honey for sweetness 🍯

Healthy Beet & Strawberry Smoothie

Healthy Beet & Strawberry Smoothie

This recipe is refreshing, naturally sweet, and incredibly satisfying.


Ingredients

1 cup fresh beetroot (peeled and chopped into small chunks)

1 cup strawberries (washed, hulled, and frozen)

1 cup yogurt (low-fat or full-fat)Juice

½ banana (preferably frozen for extra creaminess)

½ cup orange juice

Instructions

Prep the Fruit: If you haven’t already, wash and hull your strawberries, then freeze them ahead of time. This helps achieve that thick, chilly smoothie texture.


Prepare the Beet: Peel your fresh beetroot and chop it into small, manageable pieces.Dairy & Eggs

Combine: Place the chopped beets, frozen strawberries, yogurt, frozen banana, and orange juice into your blender.


Blend: Secure the lid and blend on high until the mixture is completely smooth and vibrant.

Serve: Pour into your favorite glass and enjoy immediately while fresh.Orange Juice


Tips for Success


Blend well: Because you are using raw beets, make sure to blend for an extra minute or use a high-powered blender to ensure the beets are fully pulverized into a silky texture.


Adjust consistency: If the smoothie is too thick, simply add a splash more orange juice or your preferred milk until you reach your desired consistency.Juice


Beet stains: Raw beets are highly pigmented. To avoid staining your fingers or countertops, you can wear kitchen gloves while peeling and chopping, and use a non-porous cutting board.


Quick and Easy Dessert with 3 Ingredients in 10 minutes

Hello everyone! Welcome to our food blog, your favorite place to find delicious recipes. Here you will find desserts, snacks, breakfast, appetizers, fresh salads. Let’s get started!

Meal Prep: Quick and Easy Dessert

Learn how to prepare for dessert step-by-step recipes inspired by top online culinary schools. Whether you’re an aspiring chef or just love gourmet cooking at home, these professional recipe ideas are perfect for busy days and high-quality meals.

Recipe ingredients:

1 packet (25 g / 0.88 oz) pineapple-flavored powdered juice mix

1 packet (25 g / 0.88 oz) strawberry-flavored powdered juice mix

4 cartons of heavy cream (200 g / 7 oz each), well chilled

Instructions

In a mixer, add 2 cartons (400 g / 14 oz) of chilled cream and the pineapple juice powder.

Beat on high speed for about 2 minutes, until it becomes light and fluffy.

Pour this mixture into disposable cups (250 ml / 8.5 oz) filling them halfway, or use dessert glasses if you prefer.


Strawberry Layer:

Repeat the same process with the strawberry juice powder and the remaining 2 cartons of cream.


Pour this strawberry mixture over the pineapple layer in each cup or glass.


Refrigerate for about 30 minutes, or until set.

Now just remove from the fridge and enjoy this incredibly easy and delicious 2-ingredient dessert!


Pro Tips to Make It Even Better:

If you want, you can change the flavors according to your preference.

Add chopped fresh fruits like strawberries or pineapple between the layers for extra texture and flavor.

For a firmer texture, freeze it for about 1 hour and serve as a semi-frozen dessert.

Decorate with mint leaves, grated chocolate, or fruit slices to make it look even more beautiful when serving

Healthy Ranch Chicken Salad

Healthy Ranch Chicken Salad


Why You’ll Love This Healthy Ranch Chicken Salad

High in protein, low in guilt: Lean chicken and Greek yogurt-based ranch keep it light but satisfying.

Bursting with flavor and texture: Creamy, crunchy, tangy, and savory in every bite.

Perfect for lunch, dinner, or meal prep: Easy to pack and stays fresh.

Naturally gluten-free: Great for a variety of dietary preferences.

Ingredients


Salad Base:

1 lb chicken breast, cut into bite-sized pieces

1 tbsp olive oil

4 cups packed greens (romaine, arugula, or spinach)

¼ small red onion, sliced thin

¾ cup cherry or grape tomatoes, halved

½ English cucumber, sliced

1 avocado, sliced

⅓ cup corn (fresh, frozen, or canned)

Homemade Ranch Dressing:

1 cup plain non-fat Greek yogurt

2–3 garlic cloves, minced

2 tsp lemon juice

2 tbsp finely chopped onion

1 tbsp Dijon mustard

2 tbsp fresh chives, finely chopped

1 tbsp fresh parsley, finely chopped

1 tbsp fresh dill, finely chopped

Sea salt and black pepper, to taste

Instructions

1. Make the Dressing

In a small jar or bowl, add:

Greek yogurt

Garlic

Lemon juice

Onion

Dijon mustard

Chives, parsley, dill

Salt and pepper

Secure the lid and shake well to emulsify or whisk until creamy. Set aside about ⅓ of the dressing for marinating the chicken, and refrigerate the rest.


2. Marinate the Chicken

Place your chicken pieces in a bowl and toss with the reserved dressing. Let them sit for at least 15 minutes to absorb the flavors.


3. Cook the Chicken

Heat olive oil in a large non-stick skillet over medium-high heat. Add the marinated chicken in a single layer and cook 5-7 minutes until golden brown and fully cooked.


4. Assemble the Salad

In a large bowl or plate:

Add your greens

Top with onions, tomatoes, cucumbers, corn, avocado, and cooked chicken

Drizzle with your homemade ranch and toss gently just before serving.


Meal Prep Tips

Store separately: Keep dressing and salad in different containers until ready to eat.

Use pre-cooked chicken: Shredded rotisserie or grilled chicken makes this salad even faster.

Double the dressing: It keeps for up to 5 days in the fridge and works great as a veggie dip.

Variations

Make it dairy-free: Use a dairy-free yogurt alternative.

Add crunch: Top with roasted chickpeas or sunflower seeds.

Spice it up: Add a dash of cayenne or smoked paprika to the chicken marinade.

Nutrition Boost

This salad delivers:


Lean protein from chicken and Greek yogurt

Healthy fats from avocado and olive oil

Fiber and antioxidants from fresh veggies

Probiotics from Greek yogurt

It’s a true powerhouse for clean eating and healthy living.


More Healthy Recipes You’ll Love:

Mediterranean Chickpea Salad

Lemon Herb Grilled Chicken

Avocado Tuna Salad

Sweet Potato Kale Bowl

Final Thoughts

This Healthy Ranch Chicken Salad hits every note—it’s creamy, crunchy, fresh, and satisfying, all while keeping your health goals in check. Whether you’re eating clean, watching calories, or just love a great salad, this one’s for you. Try it today and let the ranchy goodness win you over!

Air Fryer Crustless Quiche

🍳 Air Fryer Sausage & Spinach Frittata

A quick, savory bake that serves about 2-3 people.


Tips for Success

  • The Pan: If you don’t have a specific “pizza pan,” any small cake barrel or oven-safe glass dish that fits in your air fryer basket will work perfectly. Just make sure it has at least 1-inch sides!

  • The Nutmeg: Don’t skip this! Nutmeg is the “secret ingredient” in egg and spinach dishes—it adds a subtle warmth that makes the cheese taste richer.

  • Drain the Spinach: After microwaving the spinach with that tablespoon of water, give it a quick squeeze or drain it well. Excess water can make the eggs a bit soggy.

Cranberry Walnut Oatmeal Cookies

Cranberry Walnut Oatmeal Cookies

Prep time: 10 mins | Bake time: 10-12 mins | Yields: ~15 cookies


Ingredients

The Dry Goods:

  • 1 cup Rolled oats

  • ¾ cup All-purpose flour

  • ½ tsp Baking soda

  • ½ tsp Cinnamon

  • ¼ tsp Salt

The Wet Goods & Mix-ins:

  • ½ cup Butter (softened)

  • ½ cup Brown sugar (packed)

  • ¼ cup White sugar

  • 1 Large egg

  • 1 tsp Vanilla extract

  • ½ cup Dried cranberries

  • ½ cup Chopped walnuts


Instructions

  1. Prep: Preheat your oven to 175°C (350°F) and line a baking sheet with parchment paper.

  2. Cream: In a large bowl, beat the softened butter, brown sugar, and white sugar until light and fluffy.

  3. Combine: Beat in the egg and vanilla extract.

  4. Whisk & Fold: In a separate bowl, whisk the flour, oats, baking soda, cinnamon, and salt. Gradually add the dry ingredients to the wet mixture.

  5. The Good Stuff: Fold in the dried cranberries and chopped walnuts by hand.

  6. Bake: Drop rounded tablespoons of dough onto the baking sheet. Bake for 10–12 minutes or until the edges are golden brown.

  7. Cool: Let them sit on the pan for 5 minutes before transferring to a wire rack.

Pro Tip: For that professional look in the photo, press a few extra cranberries and walnut pieces into the top of the dough balls right before they go into the oven!

🍓 Homemade Mixed Berry Sorbet

🍓 Homemade Mixed Berry Sorbet

Refreshing, tart, and budget-friendly.


The Essentials

Ingredient Amount Notes
Mixed Frozen Berries 2 1/2 cups Use a blend of raspberry, blackberry, & blueberry.
Fresh Lemon Juice 2 tsp Adds brightness and prevents browning.
Raw Honey or Maple Syrup 1–2 tbsp Adjust based on your preferred “sweetness factor.”
Warm Water 2–3 tbsp Only if needed to help the blender catch.

Quick Instructions

  1. Combine: Toss the frozen berries, lemon juice, and your choice of sweetener into a high-speed blender or food processor.

  2. Blend: Pulse until smooth and creamy. If the blades are spinning but not grabbing the fruit, add the warm water one tablespoon at a time.

  3. Scrape: Stop occasionally to scrape down the sides to ensure no icy chunks are left behind.

  4. Set: Transfer the mixture to a freezer-safe container. Freeze for 2–3 hours to reach a scoopable consistency.

  5. Serve: Use an ice cream scoop and garnish with fresh mint or extra berries.


Pro-Tips for Success

  • Zest it Up: As Rachel suggested, adding a bit of lemon zest into the blender adds a sophisticated floral note that balances the tart berries.

  • The Texture Trick: If you leave it in the freezer overnight, it might get quite hard. Just let it sit on the counter for 5–10 minutes before scooping to get that perfect “creamy” sorbet texture.

  • Consistency: For a “soft serve” style, you can actually eat this immediately right out of the blender!

Hearty Ham & Navy Bean Soup

Hearty Ham & Navy Bean Soup

Prep time: 15 mins | Cook time: 1.5 – 2 hours | Servings: 6-8

Ingredients

Category Item Quantity
The Stars Dried Navy Beans (soaked overnight) 1 lb (16 oz)
Ham Bone (or 2 cups diced smoked ham) 1 bone
Aromatics Yellow Onion, diced 1 large
Carrots, diced 2 medium
Celery stalks, diced 2 stalks
Garlic, minced 3 cloves
Liquid/Spice Chicken Broth or Water 6 – 8 cups
Fresh Thyme (plus more for garnish) 3-4 sprigs
Bay Leaf 1 leaf
Black Pepper & Salt To taste

Instructions

  1. Sauté the Base: In a large Dutch oven or heavy-bottomed pot, heat a splash of oil over medium heat. Add the onion, carrots, and celery. Cook for 5–7 minutes until the onions are translucent. Stir in the garlic for the last minute.

  2. Combine: Add the soaked beans, the ham bone (or diced ham), thyme, and bay leaf. Pour in the broth until everything is covered by at least 2 inches of liquid.

  3. Simmer: Bring the soup to a gentle boil, then reduce heat to low. Cover and simmer for 1.5 to 2 hours. You’ll know it’s ready when the beans are tender and the meat is falling off the bone.

  4. The “Creamy” Secret: For that slightly thick texture seen in the photo, take a potato masher and lightly mash about 10% of the beans directly in the pot. This releases starches and thickens the broth beautifully.

  5. Finish: Remove the bone and the woody thyme stems. Shred any meat from the bone and return it to the pot. Season with plenty of cracked black pepper. (Wait to add salt until the end, as the ham is naturally very salty!)

Pro Tip: If you want that extra “zing” seen in high-end versions, add a teaspoon of apple cider vinegar or a squeeze of lemon just before serving to brighten the savory flavors.

Crispy Cheesy Potato Puffs

Crispy Cheesy Potato Puffs

The perfect “second life” for leftover mashed potatoes.

Ingredient Amount
Mashed Potatoes 3 cups
All-Purpose Flour 1 cup
Shredded Cheese (Cheddar or Monterey Jack) 1 cup
Grated Parmesan 1/4 cup
Sour Cream 1/3 cup
Green Onions or Chives 2 tbsp (chopped)
Fresh Parsley 1/4 cup (chopped)
Eggs 2 (whisked)
Sea Salt To taste

Preparation Steps

  1. The Mix: In a large bowl, combine the mashed potatoes, flour, shredded cheese, Parmesan, green onions, sour cream, parsley, and salt. Mix until well incorporated.

  2. Bind: Fold in the whisked eggs. The mixture should be thick enough to hold its shape.

  3. Shape: Roll the mixture into small, uniform balls (about the size of a golf ball) or press them into small discs for a “fritter” style.

Cooking Options

  • Bake (The Lighter Way): Preheat your oven to 200°C (400°F). Line a tray with parchment paper and bake for 15–20 minutes until golden and firm.

  • Fry (The Crispiest Way): Heat a thin layer of oil in a skillet over medium-high heat. Fry in batches for 3–4 minutes per side until a deep golden brown. Drain on paper towels.


Quick Tip: If your mashed potatoes were already very buttery or creamy, you might need an extra tablespoon or two of flour to ensure they don’t fall apart in the pan!

The “No-Sabotage” High-Protein Poppers

The “No-Sabotage” High-Protein Poppers

Makes about 10–12 poppers

Ingredient Amount
Ground Chicken or Turkey (Lean) 1 lb (approx. 450g)
Zucchini (Grated & squeezed dry) 1 medium
Almond Flour (or Breadcrumbs) 1/4 cup
Green Onions (Finely chopped) 2–3 stalks
Garlic (Minced) 2 cloves
Fresh Parsley/Cilantro 1/4 cup
Salt, Pepper, Onion Powder To taste

Quick Instructions

  1. Prep the Veg: Grate the zucchini and squeeze it in a paper towel to remove all moisture. This is the secret to them not getting soggy!

  2. Mix: Combine everything in a bowl. Form into small discs (like the photo).

  3. Cook: Air fry at 200°C for 10–12 minutes OR pan-fry in a touch of olive oil until golden and cooked through.

  4. The Dip: That green sauce looks like a Cilantro-Lime Greek Yogurt dip—perfect for adding even more protein without the fat of mayo.


Pro Tip: To really hit that 40g+ protein mark, aim for about 5 or 6 of these per serving, especially if you use a Greek yogurt-based dipping sauce.

Grandma’s Legacy Candied Sweet Potatoes

Grandma’s Legacy Candied Sweet Potatoes

With Toasted Walnuts & Dried Cranberries

Ingredients

  • 6–8 lbs Sweet Potatoes: Peeled and cut into 1-inch-thick rounds or large chunks.

  • 1 cup butter: Unsalted is best so you can control the salt.

  • 1 ½ cups Dark Brown Sugar: Packed (dark sugar gives that deep molasses flavor).

  • ½ cup maple syrup or honey: for that extra “sticky” shine.

  • 1 ½ cups Shelled Walnuts: Roughly chopped.

  • 1 cup Dried Cranberries: For a tart pop of color.

  • 1 tbsp Ground Cinnamon

  • ½ tsp Ground Nutmeg

  • 1 tsp Salt

  • Optional “Secret”: 1 tsp of vanilla extract or 2 tbsp of bourbon/orange juice.


Instructions

  1. Parboil the Potatoes: Place your sweet potato chunks into a large pot of boiling water. Cook for about 8–10 minutes until they are just fork-tender but not falling apart. Drain well.

  2. Make the Glaze: In a separate large saucepan (or one of those big pots from the photo), melt the butter over medium heat. Whisk in the brown sugar, maple syrup, cinnamon, nutmeg, salt, and your “secret” liquid (vanilla or bourbon). Stir until the sugar is completely dissolved and the mixture starts to bubble.

  3. Combine & Coat: Gently fold the drained sweet potatoes into the glaze. Add the dried cranberries and half of the walnuts. Stir very carefully with a large wooden spoon to ensure every piece is coated without breaking the potatoes.

  4. The Simmer (The “Magic” Step): Turn the heat to low. Cover the pot and let it simmer for 15–20 minutes. This allows the potatoes to soak up the syrup and turn that deep, translucent amber color seen in your photo.

  5. The Finish: Transfer to a serving dish (or keep it in the pot!) and top with the remaining toasted walnuts for a fresh crunch.


Tips for Success

  • The Texture: If you prefer a thicker sauce, simmer the glaze without the lid for the last 5 minutes.

  • Make-Ahead: This dish actually tastes better the next day after the potatoes have fully “candied” in the fridge! Just reheat gently on the stovetop with a splash of water or orange juice.

Honeyed Pistachio Baklava Cheesecake

Honeyed Pistachio Baklava Cheesecake

Description

This decadent dessert fuses the classic New York-style cheesecake with the flavors of Middle Eastern baklava. A crisp phyllo and pistachio base meets a smooth cream cheese filling, all drizzled with golden honey syrup. It’s nutty, sweet, and indulgently creamy — perfect for special occasions or a luxurious treat.

Time

Prep time: 45 minutes

Bake time: 1 hour

Chill time: 4–6 hours (preferably overnight)

Total time: ~6–7 hours

Ingredients

For the Pistachio Phyllo Crust:

6 sheets phyllo dough, thawed

1/2 cup finely chopped pistachios

2 tbsp granulated sugar

For the Cheesecake Filling:

24 oz (680 g) cream cheese, room temperature

1 cup granulated sugar

1 tsp vanilla extract

3 large eggs

1/2 cup sour cream

1/4 cup heavy cream

1/4 tsp salt

For the Honey Syrup:

1/2 cup honey

2 tbsp water

1 tsp lemon juice

1/2 tsp ground cinnamon

1/4 cup chopped pistachios, for garnish

Instructions

 Prepare the Crust

Preheat oven to 350°F (175°C).

Brush a 9-inch springform pan with butter.

Layer 2–3 sheets of phyllo in the pan, brushing each with melted butter.

Sprinkle half the chopped pistachios and sugar over the layers.

Repeat with remaining phyllo sheets and pistachios.

Bake the phyllo base for 10–12 minutes until golden. Let cool slightly.

Make the Cheesecake Filling

In a large bowl, beat cream cheese until smooth.

Add sugar and beat until fluffy.

Mix in eggs one at a time, then add sour cream, heavy cream, vanilla, and salt.

Pour the filling over the cooled phyllo crust.

Bake the Cheesecake

Bake at 325°F (160°C) for 55–60 minutes, or until the edges are set and the center slightly jiggles.

Turn off the oven and leave the cheesecake inside for 15 minutes.

Remove from oven and cool to room temperature, then refrigerate for 4–6 hours or overnight.

Prepare Honey Syrup

In a small saucepan, combine honey, water, lemon juice, and cinnamon.

Warm gently until combined (do not boil).

Serve

Drizzle honey syrup over chilled cheesecake.

Garnish with remaining chopped pistachios.

Slice with a warm knife for clean cuts.

Frequently Asked Questions

Q1: Can I make it ahead of time?

Yes! Cheesecake actually tastes better after resting overnight, allowing flavors to meld.

Q2: Can I use walnuts instead of pistachios?

Absolutely. Walnuts or almonds are a fine substitution, though pistachios give the authentic baklava flavor.

Q3: Can I freeze this cheesecake?

Yes, wrap tightly in plastic and freeze for up to 2 months. Thaw in the fridge before serving.

Q4: Can I use pre-made baklava crust?

You can, but make sure it fits the springform pan and is baked lightly before adding cheesecake filling.

Strawberry Mousse

🍓 Strawberry Mousse

Description

Strawberry Mousse is a light, airy, and creamy dessert made with fresh strawberries, whipped cream, and a touch of sweetness. It has a smooth texture and a naturally fruity flavor that feels elegant yet refreshing. Perfect for summer gatherings, romantic dinners, or anytime you want a dessert that’s indulgent without being heavy.

📝 Ingredients

  • 2 cups fresh strawberries (hulled and chopped)

  • ¼ cup granulated sugar (adjust to taste)

  • 1 teaspoon lemon juice

  • 1 cup heavy whipping cream (cold)

  • 1 teaspoon vanilla extract

  • 1 teaspoon powdered gelatin (optional, for firmer texture)

  • 2 tablespoons warm water (if using gelatin)

👩‍🍳 Instructions

  1. Prepare the Strawberries

    • Blend strawberries, sugar, and lemon juice until smooth.

    • Taste and adjust sweetness if needed.

  2. Optional Gelatin Step (for stability)

    • Sprinkle gelatin over warm water and let it bloom for 5 minutes.

    • Gently warm until fully dissolved, then mix into strawberry purée.

  3. Whip the Cream

    • In a cold bowl, whip the heavy cream with vanilla extract until soft peaks form.

  4. Fold Together

    • Gently fold the strawberry purée into the whipped cream using a spatula.

    • Do not overmix; keep the mousse light and airy.

  5. Chill & Serve

    • Spoon into serving glasses.

    • Chill for at least 2 hours before serving.

🍽️ Servings

  • Serves: 4–6 people

  • Serving Size: ~½ cup per person

💡 Notes

  • Fresh strawberries give the best flavor, but frozen ones can be used (thawed and drained).

  • Gelatin is optional but recommended if serving in warm weather or making ahead.

  • You can layer it with crushed biscuits or sponge cake for a parfait-style dessert.

🌟 Tips for Perfect Strawberry Mousse

  • Chill the bowl and whisk before whipping cream for best results.

  • Fold gently to avoid deflating the mousse.

  • Strain the strawberry purée if you prefer an ultra-smooth texture.

  • Garnish with fresh berries, mint leaves, or shaved chocolate.

🧮 Nutritional Information (Approx. per serving)

  • Calories: 220–260 kcal

  • Carbohydrates: 18–22 g

  • Protein: 3 g

  • Fat: 16–18 g

  • Fiber: 2 g

  • Sugar: 15–18 g

(Values may vary depending on ingredients used.)

💚 Health Benefits

  • Rich in Vitamin C: Strawberries boost immunity and skin health.

  • Antioxidants: Help fight inflammation and oxidative stress.

  • Light Dessert Option: Lower in calories compared to baked desserts.

  • Mood Booster: Sweet treats can enhance serotonin levels.

❓ Q & A

Q: Can I make strawberry mousse without gelatin?
A: Yes! It will still be delicious but slightly softer in texture.

Q: How long does strawberry mousse last?
A: It stays fresh in the refrigerator for up to 2 days.

Q: Can I use non-dairy cream?
A: Absolutely. Coconut cream or plant-based whipping cream works well.

Q: Can I freeze strawberry mousse?
A: Freezing is not recommended as it may affect the texture once thawed.

Healthy Oats with Eggs and Milk (Skillet Breakfast)

Healthy Oats with Eggs and Milk (Skillet Breakfast)

Ingredients (1 serving)

  • 1 cup rolled oats (or quick oats)

  • 2 eggs

  • 1 cup milk (dairy or plant-based)

  • ½ teaspoon cinnamon

  • 1 teaspoon honey (optional)

  • ½ cup fresh berries or sliced banana (optional)


Instructions

  1. Mix

    • In a bowl, whisk eggs and milk until smooth.

    • Add oats and cinnamon.

    • Let sit 1–2 minutes so oats absorb liquid.

  2. Cook

    • Heat a non-stick skillet over medium heat.

    • Lightly grease if needed.

    • Pour mixture into pan like a thick pancake.

    • Cook 2–3 minutes per side until golden and firm.

  3. Serve

    • Drizzle with honey while warm.

    • Top with berries or banana.


Optional Add-Ins

For more protein:

  • 1 tablespoon protein powder or extra egg white

For fiber:

  • 1 tablespoon chia or flaxseed

For crunch:

  • Chopped nuts or seeds

For indulgence:

  • Peanut butter or dark chocolate chips

Savory version:

  • Skip cinnamon & honey

  • Add salt, herbs, and top with avocado or extra egg


Make-Ahead Tips

  • Mix batter the night before and refrigerate

  • Cook in batches and store in fridge (3 days)

  • Freeze cooked portions up to 1 month


Nutrition (Approx. per serving)

  • Calories: 350

  • Protein: 15g

  • Fiber: 5g

  • Carbs: 40g

  • Fat: 11g

Cheesy Baked Tortilla Wraps with Ground Beef

Cheesy Baked Tortilla Wraps with Ground Beef

Table of Contents

These tortilla wraps are stuffed with savory ground beef, creamy sauce, and gooey melted cheese, then baked until golden and irresistible. They’re perfect for busy weeknights or lazy weekends — comforting, filling, and guaranteed crowd-pleasers!

🧀 Ingredients (Serves 4–6)

  • 8 medium flour tortillas

  • 500g (1 lb) ground beef

  • 1 small onion, finely chopped

  • 2 cloves garlic, minced

  • 1 tbsp olive oil

  • 1 tsp paprika

  • 1 tsp cumin

  • ½ tsp chili powder (optional)

  • Salt & black pepper to taste

  • 1 cup tomato sauce or crushed tomatoes

  • 1 cup shredded cheese (cheddar, mozzarella, or blend)

  • 1 cup cream cheese or sour cream

  • ½ cup heavy cream or milk

  • 2 tbsp butter

  • Fresh parsley or cilantro for garnish

Optional add-ins:
corn, bell peppers, jalapeños, black beans — anything you love!

👩‍🍳 Instructions

1️⃣ Cook the Beef Filling

Heat the olive oil in a skillet over medium heat. Add the chopped onion and cook for 3–4 minutes until soft and fragrant. Stir in the garlic and cook for another minute. Add the ground beef, breaking it up with a spoon as it browns. Cook until no longer pink.

Season the beef with paprika, cumin, chili powder, salt, and pepper. Stir in the tomato sauce and let it simmer gently for 5–7 minutes until slightly thickened. If you want extra richness, stir in a spoonful of cream cheese. Turn off the heat and set aside.

See also  Mediterranean Caramelized Winter Vegetable Tray with Golden Goat Cheese & Maple Cranberry Finish

2️⃣ Prepare the Creamy Sauce

In a small saucepan, melt the butter over low heat. Add the cream cheese and whisk gently until smooth. Slowly pour in the cream or milk, whisking to create a silky sauce. Season lightly with salt and pepper. This creamy layer is what makes the wraps extra luxurious and cheesy!

3️⃣ Assemble the Wraps

Preheat your oven to 180°C / 350°F.

Lay a tortilla flat and spoon some of the beef mixture into the center. Add a drizzle of the creamy sauce and a sprinkle of shredded cheese. Fold the sides inward like a little parcel or envelope.

Place each wrapped tortilla seam-side down into a greased baking dish. Repeat until all tortillas are filled and arranged neatly.

Pour the remaining creamy sauce over the tops of the wraps and finish with a generous handful of shredded cheese.

4️⃣ Bake

Bake uncovered for 20–25 minutes, until the cheese is melted, bubbly, and lightly golden on top. For an extra toasty finish, switch on the broiler for 2–3 minutes — just keep an eye on them!

🌿 Serve & Enjoy

Sprinkle with chopped parsley or cilantro for a fresh pop of color. Serve hot with:

  • salad

  • salsa

  • sour cream

  • or guacamole

These wraps are cheesy, saucy, and deeply satisfying — true comfort food!

💡 Tips & Variations

  • Use chicken or turkey instead of beef

  • Make it spicy with jalapeños

  • Add veggies for extra texture

  • Swap flour tortillas for whole-wheat

Great for meal prep and reheating too!

Enjoy every bite 😋

Homemade Natural Energy and Immunity Booster

Homemade Natural Energy and Immunity Booster


Ingredients

  • 50g (1.75 oz) walnuts
  • 50g (1.75 oz) almonds
  • 50g (1.75 oz) prunes
  • 50g (1.75 oz) dried apricots
  • 50g (1.75 oz) raisins
  • 1 whole organic lemon
  • 50-70ml (3-5 tablespoons) raw honey
  • Baking soda (for cleaning lemon)

Instructions

Preparing the Nuts

  1. Soak walnuts and almonds in clean water for 4-6 hours
  2. Drain thoroughly and pat dry with paper towels
  3. This soaking process activates the nuts and makes them more digestible

Preparing the Dried Fruits

  1. Rinse prunes and dried apricots under running water
  2. Pat dry thoroughly with paper towels
  3. Rinse raisins and pat dry

Preparing the Lemon

  1. Clean the lemon by sprinkling with baking soda
  2. Scrub gently and rinse thoroughly
  3. Cut the whole lemon into pieces, including the peel
  4. Remove any visible seeds

Making the Mixture

  1. Place all dried fruits and nuts in a food processor or blender
  2. Add the cut lemon pieces
  3. Process until finely chopped and well combined
  4. Transfer to a clean bowl
  5. Stir in honey until thoroughly incorporated
  6. Store in an airtight glass jar in the refrigerator

Usage

  • Take 1 teaspoon daily, preferably in the morning
  • Can be consumed with a glass of water
  • Best taken on an empty stomach

Storage

  • Keep refrigerated in an airtight glass container
  • Will last up to 3 months when properly stored
  • Do not use metal containers for storage

Nutrition Information

Per teaspoon (approximately 5g):

  • Calories: 20
  • Protein: 0.5g
  • Healthy Fats: 1g
  • Carbohydrates: 2.5g
  • Fiber: 0.5g

Health Benefits

This natural supplement is rich in:

  • Vitamin C from fresh lemon
  • Vitamin E and healthy fats from nuts
  • Iron and fiber from dried fruits
  • Antioxidants from all ingredients
  • Natural enzymes and minerals
  • Beneficial plant compounds

Important Notes

  • Always use organic ingredients when possible
  • Consult with healthcare provider before starting any new supplement
  • Not recommended as a meal replacement
  • Adjust honey amount based on personal preference
  • Those with nut allergies should avoid this mixture
  • Diabetics should consult their doctor due to natural sugar content

This time-tested remedy combines the nutritional benefits of nuts, dried fruits, and honey to create a natural energy booster that supports daily health and vitality when taken regularly as part of a balanced diet.

Quick Cinnamon Swirl Bread – Soft, Sweet, and So Addictive

Servings: 10 slices
Total Time: 45 minutes
Calories per Serving: ~180 kcal
Macros: 10g Protein / 4g Net Carbs / 13g Fat / 2g Fiber

Introduction

Few things smell as comforting as fresh cinnamon bread baking in the oven — and this Keto Cinnamon Bread brings that same nostalgic aroma to your low-carb kitchen. Each slice is buttery, moist, and gently sweet, with warm swirls of cinnamon running through a soft almond-flour crumb.

If you follow KetoLow CarbSlimmingWeight Watchers, or even a Mediterranean-inspired high-protein plan, this loaf fits beautifully. It’s gluten-free, sugar-free, and made from wholesome, nutrient-dense ingredients that support your wellness goals without sacrificing flavor.

This is your new go-to for cozy mornings, clean snacks, or healthy desserts that satisfy your cravings and your macros.

Look at the Recipe

  • Texture: Soft, moist, and buttery with a tender crumb.
  • Flavor: Warm cinnamon and vanilla notes, like a sweet bakery loaf.
  • Diet Benefit: Low-carb, high-protein, sugar-free, and Slimming & WW compatible.

Ingredients Needed

Dry Ingredients

  • 2 cups almond flour
  • 2 tbsp coconut flour
  • 1 tbsp baking powder
  • 1 tsp ground cinnamon
  • Pinch of salt

Wet Ingredients

  • large eggs
  • ½ cup unsweetened almond milk
  • ⅓ cup melted butter (or coconut oil for dairy-free)
  • ¼ cup granulated erythritol or monk fruit sweetener
  • 1 tsp vanilla extract

Cinnamon Swirl

  • 2 tbsp melted butter
  • 1 tbsp cinnamon
  • 1½ tbsp brown erythritol

How to Make Our Keto Cinnamon Bread

  1. Preheat oven to 350°F (175°C). Line a loaf pan with parchment paper.
  2. Mix dry ingredients: In a bowl, combine almond flour, coconut flour, baking powder, cinnamon, and salt.
  3. Mix wet ingredients: In another bowl, whisk eggs, almond milk, melted butter, sweetener, and vanilla.
  4. Combine: Add wet to dry ingredients and stir until thick batter forms.
  5. Layer: Pour half the batter into the pan. Add half the cinnamon swirl mixture. Repeat layers.
  6. Swirl: Use a knife to create gentle marbling.
  7. Bake: 35–40 minutes, or until a toothpick comes out clean.
  8. Cool: Let cool fully before slicing to keep structure and moisture intact.

Storage & Serving Suggestions

  • Store: Airtight container, up to 5 days at room temp or 7 in the fridge.
  • Freeze: Slice, wrap, and freeze for up to 3 months. Toast or microwave before serving.
  • Reheat: 10–15 seconds in the microwave or 3–4 minutes in a toaster oven.
  • Serve With: Cream cheese frosting, sugar-free glaze, almond butter, or Greek yogurt.

Macros & Plan Compatibility

Plan Notes
Keto & Low-Carb ~4g net carbs per slice; sugar-free and grain-free; fits Keto macros perfectly.
Slimming About 3–4 Syns per slice; mostly Free/Slimming-friendly when portioned.
High-Protein ~10g protein per slice; ideal for post-workout or as a balanced snack.
Weight Watchers ~2–3 SmartPoints per slice; use light butter or reduced-fat spread for fewer points.
Mediterranean Naturally nutrient-dense; made with clean fats and almond flour for heart health.

Tips & FAQs

Can I make this dairy-free?
Yes — swap butter for coconut oil and use a dairy-free milk like almond or cashew milk.

Can I skip coconut flour?
No, it helps balance the texture. Only almond flour will make the bread too dense.

How can I reduce the sweetness?
Use 2 tablespoons of erythritol instead of ¼ cup for a milder taste.

Can I meal prep it?
Yes! Slice, freeze, and thaw individual portions for breakfast or a quick snack.

Is it Slimming or WW friendly?
Yes — each slice is around 3–4 Syns or 2–3 SmartPoints depending on sweetener and butter.

Home Made Cucumber Sandwiches

Ingredients

  • 2 oz 1/3 less fat cream cheesesoftened to room temperature
  • 2 tablespoons plain nonfat Greek yogurt
  • 2 teaspoons chopped fresh dill
  • 1 teaspoon lemon juice
  • 1/8 teaspoon salt
  • 1/8 teaspoon black pepper
  • 4 slices soft wheat bread(I used Wegmans soft 100% Whole Wheat Bread)
  • ½ a fresh cucumberthinly sliced

Instructions

  • In a small mixing bowl, combine the cream cheese, yogurt, dill, lemon juice, salt, and pepper and stir together until mixed.
  • Use a silicone spatula or butter knife to divide the cream cheese mixture into four equal sections. Spread a section of cream cheese mix across the surface of each slice of bread so that all four slices have cream cheese mix on one side. Lay cucumber slices over the cheesy surface of two of the slices of bread and cover with the remaining slices so that the cucumber layer has cream cheese on both sides. Cut the sandwich into quarters or “fingers (rectangles) and serve.

Notes

W/W Points per sandwich: 8 

Nutrition Information per sandwich:

240 calories, 32 g carbs, 8 g sugars, 9 g fat, 4 g saturated fat, 10 g protein, 3 g fiber, 399 mg sodium

MY W/W SMARTPOINTS PER sandwich:

Green: 7 Smart Points/ Blue: 7 Smart Points/ Purple: 7 Smart Points

W/W Points Plus:

6 per sandwich

Low-Carb Cheesy Garlic Chicken Wraps

Low-Carb Cheesy Garlic Chicken Wraps that are quick and easy to prepare, perfect for lunch or dinner!
**Ingredients:**
– 2 cups cooked chicken (shredded or diced)
– 1 cup shredded mozzarella cheese
– 1/2 cup cream cheese (softened)
– 2 cloves garlic (minced)
– 1 tsp Italian seasoning
– Salt and pepper to taste
– 4 large low-carb tortillas (such as almond flour or coconut flour tortillas)
– 1 cup fresh spinach or lettuce (optional)
– Olive oil (for cooking)
**Instructions:**
1. **Prepare the filling:** In a large bowl, mix the cooked chicken, mozzarella cheese, cream cheese, minced garlic, Italian seasoning, salt, and pepper until well combined.
2. **Assemble the wraps:** Lay a low-carb tortilla flat and place a generous amount of the chicken mixture in the center. Add fresh spinach or lettuce if desired. Fold in the sides and roll up the tortilla tightly to enclose the filling.
3. **Cook the wraps:** Heat a bit of olive oil in a skillet over medium heat. Place the wraps seam-side down in the skillet. Cook for 3-4 minutes on each side until golden brown and the cheese is melted.
4. **Serve:** Slice the wraps in half and serve warm with your favorite low-carb dipping sauce or a side salad.
These Low-Carb Cheesy Garlic Chicken Wraps are loaded with flavor and can be customized with your favorite ingredients, making them a delicious and satisfying meal! Enjoy!

Fluffy Pancakes – Light, Filling & Guilt-Free

Meta Info


Servings: 2 (4 pancakes)


Total Time: 15 minutes


Difficulty: Easy


Calories per Serving: ~240


Macros (Per Serving):


Protein 18g • Carbs 10g • Fat 12g • Fiber 3g


Introduction


Few things feel as comforting as warm pancakes fresh off the pan. Soft centers, lightly crisp edges, and that familiar cozy aroma instantly turn an ordinary morning into something special. These pancakes deliver all the comfort you crave without the heaviness of traditional versions

Made with simple ingredients and easy swaps, this recipe fits beautifully into low-carb, high-protein, and balanced eating plans. They’re filling, satisfying, and perfect for breakfast, brunch, or even a quick sweet meal any time of day.


If you’re looking for pancakes that feel indulgent but support your goals, these fluffy pancakes are quick to make, easy to customize, and endlessly reliable.

Look at the Recipe


Light, fluffy texture with a soft center


Mild sweetness that pairs with any topping


Protein-rich and lower in carbs than classic pancakes


Ingredients Needed


Pancake Batter


½ cup oat flour or almond flour


½ cup cottage cheese or Greek yogurt


2 large eggs


½ tsp baking powder

½ tsp vanilla extract


Sweetener of choice, to taste


Pinch of salt


For Cooking


Olive oil spray or butter


How to Make Our Pancakes


Blend all pancake batter ingredients until smooth.


Heat a non-stick pan over medium heat and lightly grease.


Pour batter into small circles to form pancakes.


Cook for 2–3 minutes until bubbles form on the surface.

Flip gently and cook another 1–2 minutes until golden.


Serve warm with your favorite toppings.


This method keeps the pancakes fluffy while maintaining a macro-friendly balance for low-carb and high-protein eating.


Macros & Plan Compatibility

Plan Notes

Keto & Low-Carb ~3–4g net carbs per pancake using almond flour and sugar-free sweetener.

Slimming About 3–4 syns per serving using oat flour as a Healthy Extra B and low-fat cottage cheese.

High-Protein ~20–22g protein per serving; add whey protein or extra egg whites for more protein.

Weight Watchers ~3–4 SmartPoints (Blue plan) using low-fat dairy and minimal oil.

Mediterranean Fits well using yogurt, eggs, olive oil, and natural sweetness.

Storage & Serving Suggestions

Store:

Refrigerate pancakes in an airtight container for up to 3 days.


Reheat:

Warm in a dry skillet or microwave for 20–30 seconds.


Freeze:

Freeze with parchment between pancakes for up to 1 month.


Serve With:


Fresh berries

Greek yogurt

Nut butter

Sugar-free syrup or honey (non-low-carb plans)

Tips & FAQs

Can I make these pancakes ahead of time?

Yes. They reheat well and are perfect for meal prep breakfasts.


Why are my pancakes too dense?

Overmixing or too much flour can cause density. Blend just until smooth.


Can I make them dairy-free?

Yes. Use plant-based yogurt and adjust thickness with water or almond milk.


Are these pancakes good for weight loss?

Yes. They’re filling, protein-rich, and lower in refined carbs.


Can I make them savory?


Absolutely. Skip sweetener and add herbs or cheese.