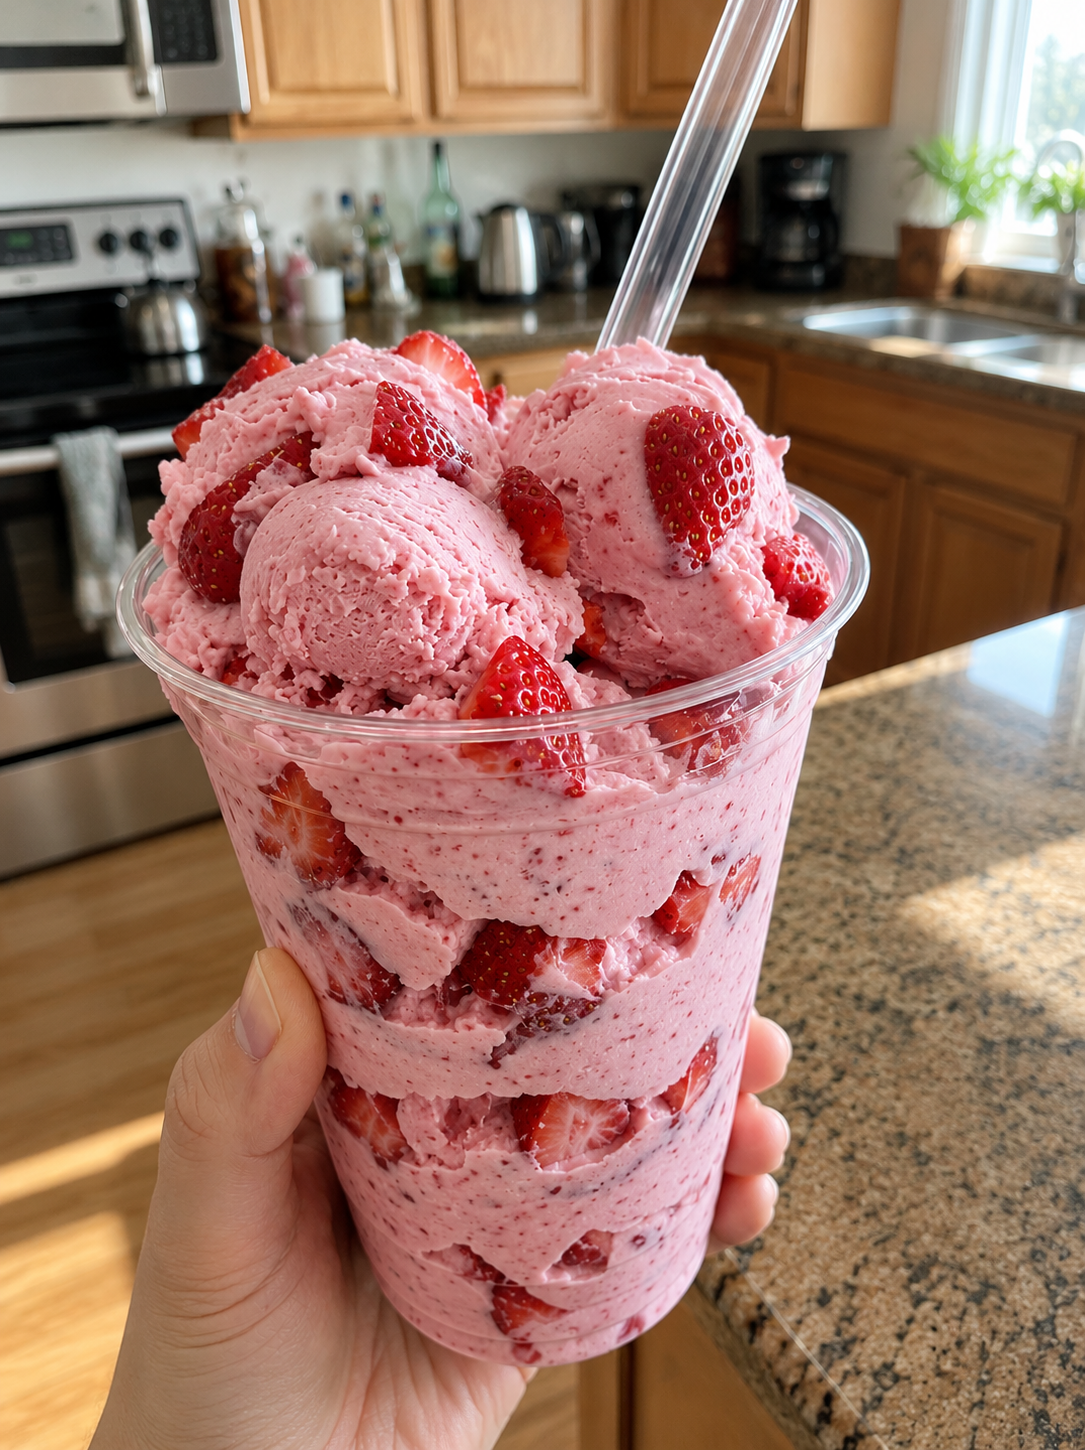
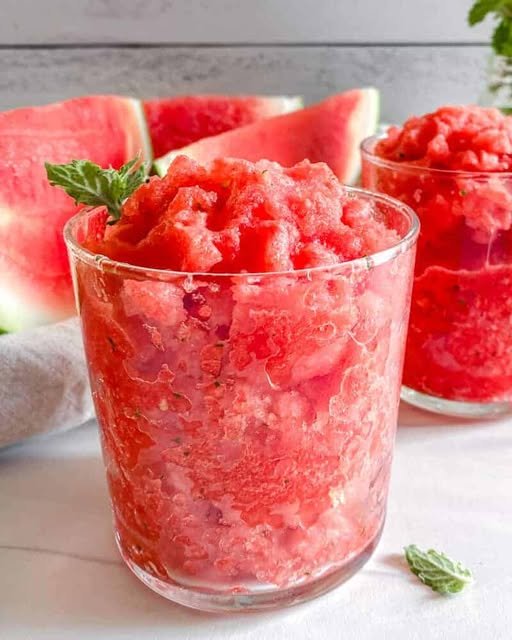
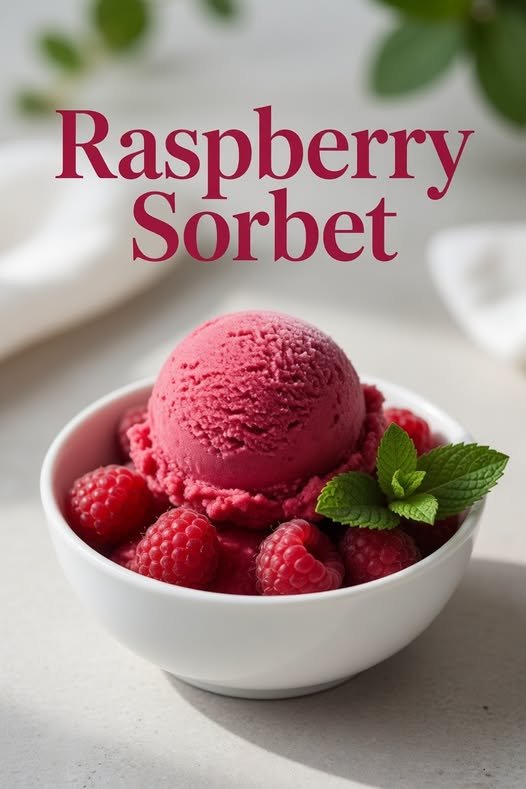
Raspberry Sorbet

Raspberry Sorbet

Description
This homemade Raspberry Sorbet is light, fruity, refreshing, and bursting with fresh berry flavor. Made with just a handful of simple ingredients, it’s naturally dairy-free and perfect for hot summer days. The sweet-tart raspberries blend into a silky smooth frozen dessert that’s elegant enough for guests yet easy enough to make at home. Whether served after dinner or enjoyed as an afternoon treat, this vibrant sorbet is a delicious way to cool down.

Ingredients

For the Sorbet

  • 4 cups fresh or frozen raspberries
  • ¾ cup granulated sugar
  • ½ cup water
  • 1 tablespoon lemon juice
  • 1 teaspoon lemon zest (optional)
  • Pinch of salt

Optional Garnish

  • Fresh raspberries
  • Fresh mint leaves
  • Lemon zest

Step-by-Step Instructions

Step 1: Make the Simple Syrup

In a small saucepan, combine the sugar and water. Heat over medium heat, stirring until the sugar completely dissolves. Remove from the heat and allow the syrup to cool completely.

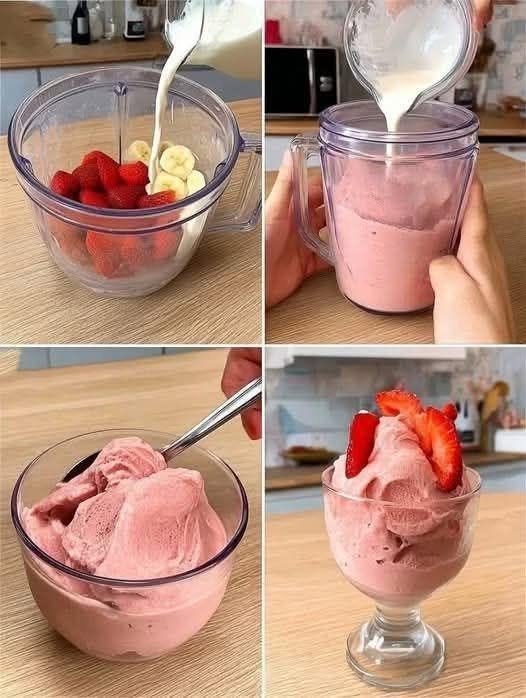
Step 2: Blend the Ingredients

Add the raspberries, cooled syrup, lemon juice, lemon zest, and a pinch of salt to a blender or food processor. Blend until completely smooth.

Step 3: Strain the Mixture

Pour the blended mixture through a fine-mesh sieve into a bowl. Use a spoon or spatula to press the puree through, leaving the seeds behind for an ultra-smooth texture.

Step 4: Chill

Cover the bowl and refrigerate for at least 2 hours. Chilling the mixture before freezing helps create a smoother sorbet.

Step 5: Freeze

Pour the chilled mixture into an ice cream maker and churn according to the manufacturer’s instructions until it reaches a soft-serve consistency.

Step 6: Firm the Sorbet

Transfer the sorbet to a freezer-safe container. Cover tightly and freeze for 2–4 hours until firm.

Step 7: Serve

Let the sorbet sit at room temperature for 5 minutes before scooping. Garnish with fresh raspberries and mint leaves for a beautiful presentation.

Tips & Notes

  • Frozen raspberries work just as well as fresh.
  • Taste the raspberry puree before freezing and adjust sweetness if needed.
  • Add a teaspoon of raspberry extract for an even stronger berry flavor.
  • Store in an airtight container for up to 2 weeks.
  • If the sorbet becomes too firm, let it soften for a few minutes before serving.

Frequently Asked Questions

Can I make this without an ice cream maker?
Yes! Pour the mixture into a shallow container and freeze. Stir vigorously every 30–45 minutes for about 3–4 hours until smooth and frozen.

Can I use other berries?
Absolutely! Strawberries, blackberries, blueberries, or mixed berries all work well.

Why strain the mixture?
Removing the seeds gives the sorbet a silky, smooth texture.

Can I reduce the sugar?
Yes, but sugar also helps keep the sorbet soft. Reducing too much may make it freeze harder.

Servings & Nutrition

Servings: 6

Approximate Nutrition (per serving):

  • Calories: 140
  • Carbohydrates: 35g
  • Protein: 1g
  • Fat: 0g
  • Fiber: 5g
  • Sugar: 28g
  • Sodium: 5mg

Cinnamon Ginger Lemon Wellness Tea

Description

This warm Cinnamon Ginger Lemon Wellness Tea is a soothing bedtime drink made with simple kitchen ingredients. The combination of cinnamon, fresh ginger, and lemon creates a comforting beverage that may support hydration and digestion as part of a balanced lifestyle. While some social media posts claim drinks like this can cause rapid weight loss, there is no evidence that any single drink alone can produce significant weight loss. Healthy eating, regular physical activity, good sleep, and an overall calorie balance are the key factors.

🛒 Ingredients

  • 💧 2 cups water
  • 🌿 1 cinnamon stick (or ½ teaspoon ground cinnamon)
  • 🫚 1-inch piece fresh ginger, sliced
  • 🍋 1 tablespoon fresh lemon juice
  • 🍯 1 teaspoon honey (optional)

👩‍🍳 Step-by-Step Instructions

1️⃣ Boil the Water

  • Add the water, cinnamon stick, and sliced ginger to a small saucepan.
  • Bring to a gentle boil.

2️⃣ Simmer

  • Reduce the heat and let it simmer for 8–10 minutes to infuse the flavors.

3️⃣ Strain

  • Remove from the heat.
  • Strain the tea into a mug.

4️⃣ Finish

  • Stir in the fresh lemon juice.
  • Add honey if desired.
  • Enjoy warm about 30–60 minutes before bedtime.

💡 Tips

  • Use fresh ginger for the best flavor.
  • Adjust the lemon juice to your taste.
  • Avoid adding too much honey if you’re watching added sugar intake.
  • Pair this drink with a nutritious diet and regular exercise for overall wellness.

❓Frequently Asked Questions

Q: Does this drink burn fat while I sleep?
No. There is no scientific evidence that this or any other drink melts fat overnight. It can be part of a healthy routine, but lasting weight loss comes from sustainable lifestyle habits.

Q: Can I drink it every night?
Most healthy adults can enjoy it in moderation. If you have a medical condition, take blood-thinning medication, or are pregnant, consult your healthcare provider before making it a daily habit.

Q: Can I serve it cold?
Yes. Chill the tea after brewing and serve over ice for a refreshing version.

🍽️ Servings

  • Serves: 2
  • Prep Time: 5 minutes
  • Cook Time: 10 minutes
  • Total Time: 15 minutes

🥗 Nutrition (Per Serving, without honey)

  • 🔥 Calories: ~8
  • 🍋 Carbohydrates: 2g
  • 💪 Protein: 0g
  • 🧈 Fat: 0g
  • 🌾 Fiber: 0g
  • 🍬 Sugar: 0g
  • 🧂 Sodium: 2mg

Enjoy this cozy wellness tea as a relaxing evening beverage, keeping in mind that no single drink can replace healthy eating, regular movement, and consistent sleep for long-term weight management. 🌙☕

Tropical Banana Pineapple Mango Smoothie

Tropical Banana Pineapple Mango Smoothie

Description

This Tropical Banana Pineapple Mango Smoothie is creamy, naturally sweet, and packed with fruity flavor. Made with banana, pineapple, mango, yogurt, and almond milk, it’s a refreshing breakfast, post-workout snack, or afternoon pick-me-up. While smoothies like this can be part of a balanced diet, no single drink causes weight loss on its own. Pair it with healthy eating habits and regular physical activity for the best results.

🛒 Ingredients

  • 🍌 1 ripe banana
  • 🍍 1 cup pineapple chunks (fresh or frozen)
  • 🥭 1 cup mango chunks (fresh or frozen)
  • 🥣 ½ cup plain Greek yogurt
  • 🥛 1 cup unsweetened almond milk
  • 🧊 ½ cup ice cubes (optional)
  • 🍯 1 teaspoon honey (optional, if you prefer it sweeter)
  • 🌱 1 tablespoon chia seeds (optional, for extra fiber)

👩‍🍳 Instructions

1️⃣ Prepare the Ingredients

  • Peel and slice the banana.
  • Cut the pineapple and mango into chunks if using fresh fruit.

2️⃣ Blend

  • Add the banana, pineapple, mango, Greek yogurt, almond milk, and ice cubes to a blender.
  • Add honey or chia seeds if using.

3️⃣ Blend Until Smooth

  • Blend on high speed for 45–60 seconds until the smoothie is thick, creamy, and smooth.
  • If it’s too thick, add a little more almond milk.

4️⃣ Serve

  • Pour into a chilled glass.
  • Serve immediately for the freshest flavor.

💡 Tips

  • Freeze the fruit beforehand for an extra thick, creamy smoothie.
  • Add a scoop of vanilla protein powder for more protein.
  • Sprinkle a few chia seeds or shredded coconut on top for texture.
  • Use unsweetened almond milk to keep added sugar lower.

❓Frequently Asked Questions

Q: Can I make it dairy-free?
Yes! Use a dairy-free yogurt alternative.

Q: Can I prepare it ahead of time?
It’s best enjoyed fresh, but you can refrigerate it for up to 24 hours in a sealed jar. Shake well before drinking.

Q: Can I use other milk?
Absolutely! Oat milk, soy milk, or regular milk all work well.

🍽️ Servings

  • Serves: 2
  • Prep Time: 5 minutes
  • Cook Time: 0 minutes
  • Total Time: 5 minutes

🥗 Nutrition (Per Serving)

  • 🔥 Calories: ~210
  • 🍌 Carbohydrates: 35g
  • 💪 Protein: 7g
  • 🧈 Fat: 4g
  • 🌾 Fiber: 4g
  • 🍬 Natural Sugars: 24g
  • 🧂 Sodium: 80mg

Enjoy this refreshing tropical smoothie as a delicious, nutrient-rich drink that’s perfect for breakfast, a snack, or after a workout! 🌴🥭🍍

Ruby Red Anti-Inflammatory Elixir

This vibrant Ruby Red Anti-Inflammatory Elixir is a warm, comforting herbal drink made with natural spices, fresh ginger, turmeric, chai tea, and colorful fruits and vegetables. It delivers a bold, cozy flavor that is perfect for chilly mornings or relaxing evenings. While ingredients like ginger, turmeric, and cinnamon are commonly included in wellness drinks, it’s important to note that no drink can prevent or cure inflammation or disease on its own. Enjoy this elixir as part of a balanced diet and healthy lifestyle.

🛒 Ingredients

For the Herbal Base

  • 2 cups water
  • 1 large cinnamon stick
  • 1-inch fresh ginger, sliced
  • 1-inch fresh turmeric, sliced (or 1 teaspoon ground turmeric)
  • 8–10 whole black peppercorns
  • 2 chai tea bags

Optional Flavor Additions

  • 1 small beet, peeled and sliced
  • 1 stalk celery, chopped
  • ½ cup fresh cranberries
  • ½ green apple, sliced
  • 1 tablespoon fresh lemon juice
  • 1–2 teaspoons honey or maple syrup (optional)

👩‍🍳 Step-by-Step Instructions

Step 1: Prepare the Base

Pour 2 cups of water into a small saucepan. Add the cinnamon stick, sliced ginger, turmeric, and black peppercorns.

Step 2: Simmer

Bring the mixture to a gentle boil. Reduce the heat and simmer for 10–15 minutes so the spices infuse the water.

Step 3: Steep the Tea

Remove the saucepan from the heat. Add the chai tea bags and let them steep for 5 minutes.

Step 4: Strain

Remove the tea bags and strain the liquid into a heat-safe pitcher or large jar.

Step 5: Add Optional Ingredients

If using beet, celery, cranberries, and apple for extra flavor and presentation, add them to the serving jar. Pour the strained tea over the fruit and vegetables.

Step 6: Sweeten

Stir in honey or maple syrup if desired. Add a squeeze of fresh lemon juice for brightness.

Step 7: Serve

Enjoy warm, or let it cool and serve over ice for a refreshing herbal drink.

💡 Tips

  • Fresh turmeric gives the brightest color and freshest flavor.
  • Black pepper enhances the absorption of compounds in turmeric.
  • Adjust the sweetness to your taste.
  • Refrigerate leftovers for up to 3 days.
  • Reheat gently without boiling to preserve the delicate tea flavors.

❓Frequently Asked Questions

Can I drink this every day?
Yes, most healthy adults can enjoy it in moderation as part of a balanced diet.

Can I use powdered ginger and turmeric?
Yes. Use about 1 teaspoon of each if fresh is unavailable.

Can I make it caffeine-free?
Absolutely. Replace the chai tea bags with caffeine-free herbal chai or rooibos tea.

Can I drink it cold?
Yes. Chill it in the refrigerator and serve over ice.

🍽️ Servings

  • Makes: 2–3 servings

🥤 Approximate Nutrition (Per Serving)

  • Calories: 25–45 (without added sweetener)
  • Carbohydrates: 6–10g
  • Protein: 0g
  • Fat: 0g
  • Fiber: 1–2g
  • Sugar: 2–5g (varies with fruit and sweetener)

🌿 Wellness Note

This drink contains ingredients that are commonly used in traditional herbal beverages, such as ginger, turmeric, cinnamon, and tea. Although these ingredients have been studied for potential health benefits, no single drink can treat or cure inflammation or medical conditions. If you have a medical condition, are pregnant, or take blood-thinning medications, consult your healthcare provider before consuming large amounts of ginger or turmeric regularly.

Carrot Cake Chia Pudding with Cottage Cheese

Description
This Carrot Cake Chia Pudding with Cottage Cheese is a creamy, high-protein breakfast or snack that tastes just like carrot cake. Made with wholesome ingredients like grated carrots, chia seeds, cottage cheese, cinnamon, and maple syrup, it’s naturally satisfying, packed with fiber and protein, and perfect for meal prep.

🛒 Ingredients

Chia Pudding

  • 1 cup cottage cheese
  • 1 cup milk (dairy or unsweetened almond milk)
  • ¼ cup chia seeds
  • 1 medium carrot, finely grated
  • 2 tbsp maple syrup or honey
  • 1 tsp vanilla extract
  • 1 tsp ground cinnamon
  • ¼ tsp ground nutmeg
  • Pinch of salt

Toppings

  • 2 tbsp chopped walnuts or pecans
  • 1 tbsp shredded coconut (optional)
  • Extra grated carrot
  • A pinch of cinnamon

👩‍🍳 Instructions

  1. Add the cottage cheese, milk, maple syrup, vanilla, cinnamon, nutmeg, and salt to a blender.
  2. Blend until completely smooth and creamy.
  3. Pour the mixture into a bowl or jar.
  4. Stir in the chia seeds and grated carrot until evenly combined.
  5. Let the mixture sit for 10 minutes, then stir again to prevent the chia seeds from clumping.
  6. Cover and refrigerate for at least 4 hours, preferably overnight.
  7. Before serving, stir well and add a splash of milk if you prefer a thinner consistency.
  8. Top with chopped walnuts, shredded coconut, extra grated carrot, and a light sprinkle of cinnamon.

💡 Tips

  • Finely grate the carrots for the best texture.
  • For extra sweetness, add a few raisins.
  • Store in airtight jars in the refrigerator for up to 4 days.
  • Add a scoop of vanilla protein powder for even more protein.

❓Frequently Asked Questions

Can I make it dairy-free?
Yes. Use dairy-free cottage cheese and your favorite plant-based milk.

Can I use quick oats?
Yes. Stir in 2–3 tablespoons for a thicker, heartier pudding.

Can I freeze it?
Freezing isn’t recommended, as the texture may change after thawing.

🍽️ Servings

Serves: 2

🥗 Approximate Nutrition (Per Serving)

  • Calories: 320
  • Protein: 20g
  • Carbohydrates: 24g
  • Fat: 15g
  • Fiber: 8g
  • Sugar: 13g

No-Bake Mixed Berry Cheesecake Cups

No-Bake Mixed Berry Cheesecake Cups

Description
These No-Bake Mixed Berry Cheesecake Cups are creamy, light, and loaded with fresh strawberries, blueberries, and raspberries. The silky cheesecake filling is made with cream cheese and whipped cream, then layered with juicy berries for a refreshing dessert that’s perfect for summer gatherings, holidays, or an easy make-ahead treat. No oven required, and every spoonful is rich, fruity, and delicious.

🛒 Ingredients

For the Cheesecake Filling

  • 8 oz (225 g) cream cheese, softened
  • 1 cup (240 ml) heavy whipping cream
  • ⅓ cup powdered sugar
  • 1 tsp vanilla extract
  • 1 tbsp lemon juice
  • ½ tsp lemon zest (optional)

For the Berry Mix

  • 1 cup strawberries, diced
  • ¾ cup blueberries
  • ¾ cup raspberries

Optional Crust

  • 1 cup graham cracker crumbs
  • 3 tbsp melted butter

👩‍🍳 Instructions

  1. If using a crust, combine the graham cracker crumbs with melted butter until evenly moistened. Divide among 4–6 serving glasses and press down gently with the back of a spoon.
  2. In a large mixing bowl, beat the softened cream cheese until smooth and creamy.
  3. Add the powdered sugar, vanilla extract, lemon juice, and lemon zest. Beat until fully combined.
  4. In a separate bowl, whip the heavy cream until stiff peaks form.
  5. Gently fold the whipped cream into the cream cheese mixture using a spatula until light and fluffy.
  6. Fold about half of the mixed berries into the cheesecake filling, leaving the remaining berries for the topping.
  7. Spoon or pipe the cheesecake mixture evenly into the prepared dessert glasses.
  8. Top generously with the remaining strawberries, blueberries, and raspberries.
  9. Refrigerate for at least 2–3 hours before serving so the filling can set.
  10. Serve chilled and enjoy every creamy, fruity bite!

💡 Tips

  • Use full-fat cream cheese for the creamiest texture.
  • Chill overnight for the best flavor and consistency.
  • Garnish with fresh mint leaves or white chocolate shavings for an elegant finish.
  • Fresh berries are recommended, but well-drained thawed frozen berries can also be used.

❓Frequently Asked Questions

Can I make these ahead of time?
Yes! They can be made up to 2 days in advance and stored covered in the refrigerator.

Can I substitute the berries?
Absolutely. Blackberries, cherries, peaches, or mangoes work wonderfully.

How do I store leftovers?
Cover each dessert cup and refrigerate for up to 3 days.

🍽️ Servings

  • Serves: 4–6

🥗 Approximate Nutrition (Per Serving)

  • Calories: 330
  • Protein: 5g
  • Carbohydrates: 22g
  • Fat: 25g
  • Fiber: 3g
  • Sugar: 17g

Creamy Orange Chia Pudding 🍊

Creamy Orange Chia Pudding 🍊🥄

Description

This creamy orange chia pudding is a refreshing, nutritious, and naturally sweet breakfast or dessert made with chia seeds, milk, and fresh oranges. The tiny chia seeds absorb the liquid and transform into a rich, creamy pudding with a delightful tapioca-like texture. Fresh orange juice and zest add a bright citrus flavor that perfectly complements the creamy base.

This recipe is incredibly easy to make and requires minimal effort. Simply mix the ingredients, refrigerate, and let the chia seeds do the work. It’s an ideal make-ahead breakfast for busy mornings, a healthy snack, or a light dessert. Packed with fiber, omega-3 fatty acids, and vitamins, this pudding is both delicious and nourishing.

The beautiful presentation in small jars makes it perfect for meal prep, brunches, or serving guests. Every spoonful is creamy, refreshing, and loaded with wholesome ingredients.

Servings

Serves: 3 people

Preparation Time: 10 minutes
Chilling Time: 4 hours or overnight
Total Time: 4 hours 10 minutes

Ingredients

  • 2 cups milk (dairy or plant-based)
  • 6 tablespoons chia seeds
  • Juice of 1 large orange
  • 1 teaspoon orange zest
  • 1 tablespoon honey or maple syrup (optional)
  • ½ teaspoon vanilla extract
  • Orange slices for garnish

Equipment

  • Mixing bowl
  • Whisk or spoon
  • Measuring cups and spoons
  • Small glass jars or serving bowls

Instructions

Step 1: Mix Ingredients

In a medium bowl, combine:

  • Milk
  • Orange juice
  • Orange zest
  • Vanilla extract
  • Honey (if using)

Whisk well.

Step 2: Add Chia Seeds

Stir in the chia seeds.

Mix thoroughly to prevent clumping.

Allow the mixture to sit for 5 minutes, then stir again.

Step 3: Chill

Cover the bowl and refrigerate for at least 4 hours or overnight.

The chia seeds will absorb the liquid and create a thick pudding.

Step 4: Serve

Divide into jars or bowls.

Garnish with fresh orange slices or extra zest.

Serve chilled.

Recipe Notes

  • Almond milk and coconut milk work beautifully in this recipe.
  • Add more milk if you prefer a thinner consistency.
  • The pudding keeps well in the refrigerator for up to 4 days.
  • Fresh oranges provide the best flavor.

Tips for Success

  1. Stir twice during the first 10 minutes to avoid clumps.
  2. Refrigerate overnight for the creamiest texture.
  3. Use fresh orange juice instead of bottled juice.
  4. Add berries or nuts for extra texture.
  5. Adjust sweetness according to your preference.

Nutritional Information (Per Serving)

  • Calories: 220
  • Protein: 6g
  • Carbohydrates: 20g
  • Fat: 12g
  • Fiber: 10g
  • Sugar: 8g
  • Omega-3 Fatty Acids: High
  • Vitamin C: Excellent source

Nutrition values are approximate.

Health Benefits

Rich in Fiber

Chia seeds are an excellent source of dietary fiber, promoting digestive health and helping you feel full longer.

High in Omega-3 Fatty Acids

Chia seeds provide plant-based omega-3s that support heart and brain health.

Supports Hydration

Chia seeds absorb liquid and help maintain hydration.

Excellent Source of Antioxidants

Oranges contain vitamin C and antioxidants that support the immune system.

Supports Healthy Digestion

The combination of fiber and citrus can help maintain digestive health.

Great for Meal Prep

This recipe can be prepared in advance for quick breakfasts and snacks.

Frequently Asked Questions (Q&A)

Q: Can I make this dairy-free?
Yes. Use almond, oat, soy, or coconut milk.

Q: How long does chia pudding last?
Up to 4 days in an airtight container in the refrigerator.

Q: Can I freeze it?
Freezing is not recommended because the texture may change.

Q: Why is my pudding too thin?
Add an extra tablespoon of chia seeds and chill longer.

Q: Can I add fruit?
Absolutely. Berries, bananas, mangoes, and kiwi pair wonderfully with orange.

Q: Is chia pudding healthy?
Yes. It is rich in fiber, healthy fats, vitamins, and minerals.

Final Thoughts

Creamy Orange Chia Pudding is a simple, nutritious, and delicious recipe that’s perfect for breakfast, snacks, or healthy desserts. The creamy chia base combined with fresh citrus flavor creates a refreshing treat that is both satisfying and nourishing. Make a batch ahead of time and enjoy a wholesome, grab-and-go option all week long. 🍊🥄✨🥛

Nighttime Fat-Burning Drink for a Flat Tummy in 2 Weeks

Lemon Ginger Bedtime Drink

Description

This simple lemon ginger bedtime drink is a warm, soothing beverage that may support digestion and help you relax before sleep. Made with warm water, fresh lemon juice, ginger, and optional apple cider vinegar and honey, it’s easy to prepare in just a few minutes. While it won’t cause instant weight loss, it can be a healthy addition to a balanced lifestyle when paired with nutritious meals and regular physical activity.

Ingredients

  • 1 glass warm water
  • 1 tbsp fresh lemon juice
  • 1 tsp apple cider vinegar (optional)
  • ½ tsp grated fresh ginger or ginger powder
  • 1 tsp honey (optional, for taste)

Instructions

  1. Warm the water until it is comfortably warm, not boiling.
  2. Pour the warm water into a glass or mug.
  3. Add the lemon juice and grated ginger (or ginger powder).
  4. Stir in the apple cider vinegar if using.
  5. Mix well until everything is fully combined.
  6. Add honey if you’d like a sweeter flavor and stir until dissolved.
  7. Drink slowly about 30–60 minutes before bedtime.

Tips

  • Enjoy this drink 4–5 times per week rather than every night.
  • Fresh ginger provides a brighter flavor, while ginger powder is a convenient alternative.
  • Avoid making the drink with boiling water, as it may reduce the fresh taste of the lemon.
  • If you have a sensitive stomach, start with a smaller amount of lemon juice or ginger to see how your body responds.

Frequently Asked Questions

Can I drink this every day?
It’s generally better to enjoy it a few times a week instead of relying on it daily.

Can I skip the apple cider vinegar?
Yes. The drink is still enjoyable and flavorful without it.

Can I use maple syrup instead of honey?
Yes. Maple syrup or another preferred sweetener can be used if desired.

Nutrition (Approximate per serving)

  • Calories: 10–25 (without honey) or 30–45 (with honey)
  • Carbohydrates: 3–9g
  • Protein: 0g
  • Fat: 0g
  • Fiber: Less than 1g
  • Vitamin C: Good source from fresh lemon juice

Note: This drink may support hydration and digestion, but it is not a proven weight-loss remedy. For lasting health benefits, combine it with a balanced diet, regular exercise, quality sleep, and adequate hydration.

Green Detox Smoothie

INGREDIENTS

  • 1 cup fresh spinach
  • 1 green apple, chopped
  • 1/2 cucumber
  • 1–2 celery stalks
  • 1 small handful fresh coriander (cilantro)
  • 1/2 inch fresh ginger
  • Juice of 1/2 lemon
  • 1 cup cold water (or coconut water)
  • Ice cubes (optional)

INSTRUCTIONS

  1. Wash all ingredients thoroughly.
  2. Chop apple, cucumber, and celery into small pieces.
  3. Add spinach, coriander, ginger, apple, cucumber, and celery into a blender.
  4. Pour in water (or coconut water).
  5. Blend until smooth and creamy.
  6. Add lemon juice and blend again for a few seconds.
  7. Strain if you prefer a lighter texture (optional).
  8. Serve chilled with ice.

TIPS

    • Use a green apple for a fresher, tangy taste.
    • Add more ginger if you want a stronger detox effect.

Ezoic

  • Coconut water makes it more hydrating and slightly sweet.
  • Drink fresh immediately for maximum nutrients.
  • You can add chia seeds or flax seeds for extra fiber.

Homemade Strawberry Ice Cream

Description

This creamy homemade strawberry ice cream is packed with fresh strawberries and rich flavor. It’s smooth, refreshing, and perfect for hot days. With just a few simple ingredients, you can make a delicious frozen treat without artificial flavors. The fresh strawberry chunks throughout give every bite a burst of fruity goodness.

🛒 Ingredients

For the Strawberry Mixture

  • 2 cups fresh strawberries, diced
  • ¼ cup granulated sugar

For the Ice Cream Base

  • 2 cups heavy whipping cream
  • 1 can (14 oz) sweetened condensed milk
  • 1 teaspoon vanilla extract

👩‍🍳 Instructions

Step 1: Prepare the Strawberries

  1. Wash and dice the strawberries.
  2. Place them in a bowl and sprinkle with sugar.
  3. Stir well and let sit for 15–20 minutes until juicy.

Step 2: Make the Ice Cream Base

  1. In a large mixing bowl, whip the heavy cream until stiff peaks form.
  2. In another bowl, combine sweetened condensed milk and vanilla extract.
  3. Gently fold the whipped cream into the condensed milk mixture.

Step 3: Add the Strawberries

  1. Fold most of the strawberries into the ice cream base.
  2. Reserve a few pieces for layering.

Step 4: Freeze

  1. Transfer half of the mixture into a freezer-safe container.
  2. Add some reserved strawberry pieces.
  3. Pour in the remaining mixture and top with the rest of the strawberries.
  4. Cover tightly and freeze for 6–8 hours or overnight.

Step 5: Serve

  1. Let the ice cream sit at room temperature for 5 minutes before scooping.
  2. Scoop into cups or bowls.
  3. Garnish with fresh strawberry slices and enjoy!

💡 Tips

  • Use ripe strawberries for the best flavor.
  • Add chocolate chips for extra texture.
  • Store in an airtight container for up to 2 weeks.
  • For a softer texture, stir once after 2 hours of freezing.

❓ Q&A

Can I use frozen strawberries?
Yes, thaw and drain them before using.

Can I reduce the sugar?
Absolutely. Adjust according to the sweetness of your strawberries.

Do I need an ice cream machine?
No, this is a simple no-churn recipe.

🍽️ Servings

6–8 servings

🥗 Nutrition (Approx. Per Serving)

  • Calories: 310
  • Carbohydrates: 28g
  • Protein: 4g
  • Fat: 20g
  • Sugar: 25g
  • Fiber: 2g

Enjoy this creamy, fruity, homemade strawberry ice cream anytime! 🍓🍨✨

Wholesome 4-Ingredient Weight Watchers Strawberry Banana Ice Cream

This creamy homemade ice cream is made with simple, wholesome ingredients and no added refined sugar. It’s a refreshing treat that’s perfect when you’re craving something sweet while keeping things light and balanced.

Servings: 4

Ingredients

  • 2 cups fresh strawberries, hulled
  • 2 ripe bananas, sliced and frozen
  • 1 cup unsweetened Greek yogurt
  • ½ cup unsweetened almond milk (or milk of choice)

Instructions

  1. Slice the bananas and freeze them for at least 2–3 hours or overnight.
  2. Add the frozen bananas, strawberries, Greek yogurt, and almond milk to a blender or food processor.
  3. Blend until completely smooth and creamy, scraping down the sides as needed.
  4. For a soft-serve texture, serve immediately.
  5. For a firmer ice cream texture, transfer the mixture to a freezer-safe container and freeze for 1–2 hours.
  6. Scoop into bowls or dessert glasses and garnish with fresh strawberry slices if desired.

Tips

  • Use very ripe bananas for natural sweetness.
  • Add a splash of vanilla extract for extra flavor.
  • Freeze leftovers in an airtight container for up to 1 week.

Nutrition (Approx. Per Serving)

  • Calories: 110
  • Protein: 5g
  • Carbohydrates: 20g
  • Fat: 1.5g
  • Fiber: 3g

Q&A
Can I use frozen strawberries?
Yes! Frozen strawberries make the ice cream even thicker and creamier.

Can I make it dairy-free?
Absolutely. Use a dairy-free yogurt alternative.

Can I add sweetener?
You can add a small amount of honey or a calorie-free sweetener if desired, but ripe bananas usually provide enough sweetness.

Homemade Rice, Clove & Fennel Toners

Note: These DIY toners may feel refreshing and hydrating, but claims such as “erase wrinkles,” “boost collagen,” or “remove dark spots” are not guaranteed. Always patch-test before applying to your face.

1️⃣ Rice Water Toner (For Hydration & Smoother-Looking Skin)

Ingredients

  • ½ cup uncooked rice
  • 1 cup water

Instructions

  1. Rinse the rice quickly to remove dirt.
  2. Place rice in a bowl and add water.
  3. Let it soak for 30 minutes.
  4. Stir well and strain the liquid into a clean bottle.
  5. Refrigerate and use within 5–7 days.

How to Use

  • Apply with a cotton pad after cleansing.
  • Use morning or evening.

2️⃣ Clove Toner (For Oily or Acne-Prone Skin)

Ingredients

  • 1 tablespoon whole cloves
  • 1 cup water

Instructions

  1. Bring water to a gentle boil.
  2. Add cloves and simmer for 5–10 minutes.
  3. Allow to cool completely.
  4. Strain and pour into a spray bottle.
  5. Store in the refrigerator for up to 1 week.

How to Use

  • Mist lightly onto clean skin or apply with a cotton pad.
  • Use 2–3 times per week.

3️⃣ Fennel Seed Toner (Refreshing & Soothing)

Ingredients

  • 1 tablespoon fennel seeds
  • 1 cup water

Instructions

  1. Boil the water.
  2. Add fennel seeds and simmer for 5 minutes.
  3. Cover and let steep for 20 minutes.
  4. Strain and cool completely.
  5. Transfer to a clean bottle and refrigerate.

How to Use

  • Apply after cleansing.
  • Follow with moisturizer.

❓Q&A

Q: How long do homemade toners last?
A: Usually 5–7 days in the refrigerator since they contain no preservatives.

Q: Can I use them daily?
A: Rice water and fennel toner can generally be used daily. Clove toner is best used a few times per week.

Q: Will they remove wrinkles or dark spots?
A: They may help skin feel refreshed and hydrated, but they are not proven to erase wrinkles or permanently remove dark spots.

✨ For best results, always wear sunscreen during the day and discontinue use if irritation occurs.

🍫 Keto Chocolate Ice Cream

🍫 Keto Chocolate Ice Cream

Description

This rich and creamy Keto Chocolate Ice Cream is the perfect low-carb dessert for chocolate lovers. Made with heavy whipping cream, cocoa powder, and a keto-friendly sweetener, it delivers a smooth, velvety texture without added sugar. Easy to make with or without an ice cream machine, this frozen treat is ideal for satisfying sweet cravings while keeping carbs low.

Ingredients

  • 1½ cups heavy whipping cream
  • ½ cup unsweetened cocoa powder
  • ⅓–½ cup powdered erythritol or monk fruit sweetener (adjust to taste)
  • 1 teaspoon vanilla extract
  • 1 pinch sea salt
  • 2 tablespoons sugar-free chocolate chips, melted (optional)

Instructions

Step 1: Mix Dry Ingredients

In a large mixing bowl, whisk together the cocoa powder, sweetener, and sea salt until completely combined and free of lumps.

Step 2: Add Cream

Pour in the heavy whipping cream and vanilla extract. Stir gently to combine.

Step 3: Whip the Mixture

Using a hand mixer or stand mixer, beat the mixture until soft peaks form. The texture should resemble a thick chocolate mousse.

Step 4: Add Extra Chocolate (Optional)

If using melted sugar-free chocolate chips, gently fold them into the mixture for extra chocolate richness and fudge-like swirls.

Step 5: Freeze

Transfer the mixture into a freezer-safe container.

  • Without an Ice Cream Maker: Place directly in the freezer.
  • With an Ice Cream Maker: Churn according to the manufacturer’s instructions for about 20 minutes, then transfer to a container and freeze.

Step 6: Chill Until Firm

Freeze for at least 4 hours or overnight until fully set.

Tips & Notes

✅ Let the ice cream sit at room temperature for 5–10 minutes before scooping for the creamiest texture.

✅ For an extra smooth consistency, add 1 tablespoon vodka before freezing. It helps reduce ice crystal formation.

✅ Want a deeper chocolate flavor? Add 1 teaspoon instant espresso powder. It enhances the chocolate taste without making the ice cream taste like coffee.

✅ Store in an airtight container in the freezer for up to 2 weeks.

Q&A

Q: Can I use a different sweetener?
A: Yes, any powdered keto-friendly sweetener works well. Adjust the amount to your preferred sweetness.

Q: Why is keto ice cream harder than regular ice cream?
A: Sugar helps keep traditional ice cream soft. Since keto versions contain little or no sugar, they freeze firmer.

Q: Can I make it dairy-free?
A: You can experiment with full-fat coconut cream, though the flavor and texture will be slightly different.

Servings & Nutrition

Servings: 6

Approximate Nutrition Per Serving

  • Calories: 230
  • Fat: 22g
  • Protein: 3g
  • Total Carbohydrates: 5g
  • Fiber: 2g
  • Net Carbs: 3g
  • Sugar: 1g

🍨 Enjoy a creamy, chocolatey keto dessert that feels indulgent while staying low in carbs!

Green Detox Smoothie

Green Detox Smoothie (Weight Loss Recipe)

Servings: 1
Prep Time: 5 minutes

🛒 Ingredients

  • 1 green apple, chopped
  • 1 small cucumber, sliced
  • 1 cup fresh spinach
  • 1 tsp grated ginger
  • 1 tbsp chia seeds
  • 1 cup cold water
  • Ice cubes (optional)

👩‍🍳 Instructions

  1. Wash all ingredients thoroughly.
  2. Add the green apple, cucumber, spinach, ginger, chia seeds, and water to a blender.
  3. Blend for 45–60 seconds until completely smooth and creamy.
  4. Add a few ice cubes and blend again if you prefer a colder smoothie.
  5. Pour into a glass and serve immediately.

💡 Tips

  • Drink in the morning for a refreshing start to the day.
  • For extra protein, add a spoonful of Greek yogurt.
  • Adjust water quantity for a thinner or thicker consistency.

🥗 Nutrition (Approximate)

  • Calories: 140
  • Protein: 3g
  • Carbohydrates: 28g
  • Fiber: 7g
  • Fat: 3g

❓Q&A

Q: Can I make it ahead of time?
A: Yes, but it’s best consumed within 24 hours.

Q: Can I replace spinach?
A: Yes, kale works well too.

Beetroot, Cucumber & Ginger Detox Juice

Beetroot, Cucumber & Ginger Detox Juice

Description
This vibrant homemade juice combines earthy beetroot, refreshing cucumber, and spicy ginger into a naturally sweet and refreshing drink. It’s easy to make, packed with nutrients, and perfect for breakfast, a midday refreshment, or post-workout hydration.

Ingredients

  • 2 medium beetroots, peeled and chopped
  • 1 large cucumber, chopped
  • 1-inch piece fresh ginger, peeled
  • 1½ cups cold water
  • Juice of 1 lemon (optional)
  • Ice cubes, for serving

Instructions

Step 1: Prepare the Ingredients

  • Wash the beetroot and cucumber thoroughly.
  • Peel the beetroot and ginger.
  • Cut everything into small chunks for easier blending.

Step 2: Blend

  • Add the chopped beetroot, cucumber, ginger, and water to a blender.
  • Blend on high speed for 1–2 minutes until completely smooth.

Step 3: Strain

  • Place a fine-mesh strainer or cheesecloth over a large bowl or pitcher.
  • Pour the blended mixture through the strainer.
  • Press with a spoon to extract as much juice as possible.

Step 4: Add Lemon

  • Stir in the fresh lemon juice if using.
  • Taste and adjust as desired.

Step 5: Serve

  • Pour into glasses over ice.
  • Serve immediately for the freshest flavor.

Tips

  • Chill the ingredients before blending for a colder drink.
  • Add a green apple for extra sweetness.
  • Store in an airtight bottle in the refrigerator for up to 24 hours.

Servings

  • Makes 3–4 servings

Nutrition (Approx. Per Serving)

  • Calories: 55
  • Carbohydrates: 12g
  • Protein: 1g
  • Fat: 0g
  • Fiber: 2g
  • Vitamin C: 15% DV

Q&A

Can I make this without a blender?
Yes, use a juicer instead and skip the straining step.

Can I freeze it?
It’s best enjoyed fresh, but you can freeze it in ice cube trays and blend later.

Can I add other fruits?
Absolutely! Apples, oranges, and pineapple pair very well with beetroot. 🍹🥒🫚💜

Orange Yogurt Cloud Dessert

Orange Yogurt Cloud Dessert

Light, fluffy, and naturally vibrant.

  • Prep time: 15 minutes

  • Chilling time: 2–4 hours

  • Servings: 4–6

  • Difficulty: Easy

Ingredients

  • 2 cups Thick Greek yogurt (Plain or Honey-flavored)

  • 1 cup Heavy whipping cream (cold)

  • 1/2 cup Freshly squeezed orange juice

  • 2 tbsp Orange zest (about 2 large oranges)

  • 1/4 cup Honey or Maple syrup (adjust to taste)

  • 1 tsp Vanilla extract

  • Optional: Orange segments and mint leaves for garnish

Instructions

  1. Prep the Citrus: Zest your oranges first, then juice them. Set aside a pinch of zest for the final garnish.

  2. Whisk the Base: In a large bowl, whisk together the Greek yogurt, orange juice, orange zest, honey, and vanilla extract until smooth.

  3. Whip the Cream: In a separate chilled bowl, beat the heavy cream until stiff peaks form.

    Note: Be careful not to over-beat, or you’ll end up with orange butter!

  4. Fold Gently: Gently fold the whipped cream into the yogurt mixture using a spatula. Use a “cut and fold” motion to keep the air in—this is what creates the “cloud” texture.

  5. Chill: Spoon the mixture into individual serving glasses or one large glass bowl. Refrigerate for at least 2 hours to allow the flavors to meld and the texture to set.

  6. Serve: Top with fresh orange segments and a sprig of mint just before serving.

Nutritional Information (Per Serving)

Estimate based on 6 servings using whole-milk yogurt.

Nutrient Amount
Calories 210 kcal
Total Fat 14g
Protein 6g
Carbohydrates 16g
Sugars 13g
Calcium 12% DV

Benefits of This Dessert

  • Probiotic Boost: Using live-culture Greek yogurt supports gut health.

  • Vitamin C: Fresh orange juice and zest provide a natural immune boost.

  • Lower Sugar: Unlike traditional puddings or cakes, this relies on the natural sweetness of fruit and a touch of honey.

  • High Protein: Greek yogurt makes this more satiating than your average sugary treat.

Expert Tips for Success

  • Temperature Matters: Ensure your heavy cream is ice-cold before whipping; it will hold its volume much better.

  • Strain the Yogurt: If your yogurt seems watery, strain it through a cheesecloth for 30 minutes. The thicker the yogurt, the more stable the “cloud.”

  • The Zest Secret: Most of the orange flavor lives in the oils of the skin. Don’t skip the zest!

Common Questions (Q&A)

Q: Can I make this vegan?

A: Absolutely. Substitute the Greek yogurt with a thick coconut-based yogurt and use a chilled can of full-fat coconut cream (whipped) instead of heavy dairy cream. Use maple syrup instead of honey.

Q: How long does it stay fresh?

A: It’s best eaten within 24 hours. Because it’s so airy, it may begin to deflate or “weep” (release liquid) after two days in the fridge.

Q: Can I use store-bought orange juice?

A: You can, but the flavor won’t be as bright. If you do, make sure it’s 100% juice without added sugars, and definitely don’t skip the fresh zest!

Q: Is this the same as a mousse?

A: It’s very similar, but a traditional mousse often uses egg whites or gelatin. This version is much simpler and relies purely on the fat content of the cream and the thickness of the yogurt for structure.

6-Day Healthy Smoothie Plan

6-Day Healthy Smoothie Plan

Monday – Spinach Mango Banana Smoothie

Description
A refreshing green smoothie packed with fruit, fiber, and nutrients to start the week.

Ingredients

  • 1 cup spinach
  • 1 cup mango chunks
  • 1 banana
  • 1 tbsp chia seeds
  • 1 cup almond milk

Instructions

  1. Add almond milk to the blender.
  2. Add spinach, mango, banana, and chia seeds.
  3. Blend until smooth.
  4. Serve immediately.

Calories: ~240


Tuesday – Berry Oat Protein Smoothie

Description
A creamy berry smoothie rich in antioxidants and protein.

Ingredients

  • ½ cup raspberries
  • ½ cup strawberries
  • ½ cup Greek yogurt
  • ¼ cup oats
  • 1 cup coconut water

Instructions

  1. Add coconut water to the blender.
  2. Add berries, yogurt, and oats.
  3. Blend until creamy.
  4. Enjoy chilled.

Calories: ~280


Wednesday – Blueberry Avocado Smoothie

Description
A nutrient-packed smoothie loaded with healthy fats and antioxidants.

Ingredients

  • 1 cup blueberries
  • ½ cup blackberries
  • 1 cup kale
  • ½ avocado
  • 1 scoop vanilla protein powder
  • 1 cup water or almond milk

Instructions

  1. Place all ingredients into the blender.
  2. Blend until silky smooth.
  3. Serve immediately.

Calories: ~320


Thursday – Pineapple Green Detox Smoothie

Description
A tropical smoothie with refreshing flavors and vibrant greens.

Ingredients

  • 1 cup pineapple chunks
  • 1 cup coconut milk
  • 1 cup spinach
  • 6 mint leaves
  • Juice of 1 lime

Instructions

  1. Add all ingredients to the blender.
  2. Blend until smooth.
  3. Serve cold.

Calories: ~230


Friday – Chocolate Banana Energy Smoothie

Description
A naturally sweet and satisfying smoothie perfect for breakfast or a snack.

Ingredients

  • 1 banana
  • 1 tbsp peanut butter
  • 1 tbsp cocoa powder
  • 3 dates
  • ¼ cup granola
  • 1 cup milk

Instructions

  1. Add milk to the blender.
  2. Add remaining ingredients.
  3. Blend until creamy.
  4. Serve immediately.

Calories: ~390


Saturday – Carrot Orange Turmeric Smoothie

Description
A bright, vitamin-rich smoothie with a natural immune-supporting boost.

Ingredients

  • 1 carrot, chopped
  • 1-inch fresh ginger
  • 1 orange, peeled
  • 1 cup mango chunks
  • ½ tsp turmeric
  • 1 apple, chopped
  • 1 cup water

Instructions

  1. Add all ingredients to the blender.
  2. Blend until smooth.
  3. Serve fresh.

Calories: ~250

Tips

  • Add ice cubes for a colder smoothie.
  • Use frozen fruit for a thicker texture.
  • Adjust liquid as needed for your preferred consistency.
  • Store in the refrigerator for up to 24 hours.

Watermelon Granita (Refreshing Frozen Watermelon Dessert)

Watermelon Granita is a light, icy Italian-style frozen dessert made with fresh watermelon, a touch of lime, and natural sweetness. It’s incredibly refreshing on hot summer days and requires only a few simple ingredients. The texture is similar to shaved ice or a fruity snow cone, making it the perfect healthy treat when you’re craving something cold, sweet, and hydrating.

Ingredients

For the Granita

  • 6 cups seedless watermelon, cubed
  • 2 tbsp fresh lime juice
  • 2 tbsp honey or maple syrup (optional)
  • 6–8 fresh mint leaves (optional)

For Garnish

  • Fresh mint sprigs
  • Small watermelon wedges

Step-by-Step Instructions

Step 1: Prepare the Watermelon

  • Cut the watermelon into cubes.
  • Remove any visible seeds.
  • Place the cubes in a blender.

Step 2: Blend

  • Add lime juice and honey if using.
  • Blend until completely smooth.

Step 3: Strain (Optional)

  • For a smoother granita, pour the mixture through a fine mesh strainer.
  • This removes excess pulp.

Step 4: Freeze

  • Pour the watermelon mixture into a shallow baking dish.
  • Spread evenly.
  • Place in the freezer.

Step 5: Scrape

  • After 1 hour, use a fork to scrape the frozen edges toward the center.
  • Return to the freezer.

Step 6: Repeat

  • Continue scraping every 30–45 minutes for about 3–4 hours.
  • The mixture will gradually become fluffy and icy.

Step 7: Serve

  • Spoon the granita into chilled glasses.
  • Garnish with fresh mint leaves and watermelon wedges.

Step 8: Enjoy

  • Serve immediately for the best texture.

Tips & Notes

  • Use very ripe watermelon for maximum sweetness.
  • Freeze the serving glasses beforehand for an extra refreshing treat.
  • Add strawberries for a mixed berry-watermelon version.
  • Lime juice enhances the natural sweetness of the fruit.
  • Granita is best enjoyed the day it is made.

Q&A

Q: Can I make this without added sweetener?
A: Yes. Sweet watermelon is usually naturally sweet enough.
Q: Can I use frozen watermelon?
A: Yes, but you may need less freezing time.
Q: How long does granita last?
A: Up to 3 days in the freezer, though the texture is best fresh.
Q: Can I add other fruits?
A: Absolutely. Strawberries, raspberries, and mango work wonderfully.

Servings

  • Serves: 6

Nutrition (Approximate Per Serving)

  • Calories: 65
  • Protein: 1g
  • Carbohydrates: 16g
  • Fat: 0g
  • Fiber: 1g
  • Sugar: 13g
  • Sodium: 2mg

This Watermelon Granita is the ultimate summer dessert—cool, refreshing, naturally sweet, and incredibly easy to make. With its vibrant color and icy texture, it’s a crowd-pleasing treat perfect for backyard gatherings, pool parties, or simply cooling off on a hot afternoon. 🍉❄️

Jolly Rancher Protein Water

Description

Jolly Rancher Protein Water is a refreshing, candy-inspired high-protein drink that combines hydration with a delicious fruity flavor. Unlike traditional protein shakes, this drink is light, clear, and juice-like, making it perfect for post-workout recovery, hot summer days, or anyone looking to increase protein intake without a heavy shake.

🥤 Ingredients

For the Protein Water

  • 1 gallon (128 oz) cold filtered water
  • 6–8 scoops clear whey protein isolate (fruit-flavored or unflavored)
  • 4–6 sugar-free Jolly Rancher drink mix packets
  • 2–4 cups ice cubes

👩‍🍳 Instructions

1️⃣ Prepare the Water

  • Pour the cold filtered water into a large gallon pitcher or jug.

2️⃣ Add the Protein

  • Add the clear whey protein isolate.
  • Shake vigorously or whisk until fully dissolved.

3️⃣ Let the Foam Settle

  • Allow the mixture to rest for 5–10 minutes.
  • The foam will naturally disappear, leaving a clearer drink.

4️⃣ Add Flavor

  • Add the sugar-free Jolly Rancher drink mix packets.
  • Stir thoroughly until completely dissolved.

5️⃣ Taste and Adjust

  • Taste the mixture.
  • Add another flavor packet if you prefer a stronger candy flavor.

6️⃣ Chill and Serve

  • Fill glasses with ice.
  • Pour the protein water over the ice.
  • Serve immediately or refrigerate until cold.

🍓 Flavor Variations

Blue Raspberry Blast

  • Blue Raspberry Jolly Rancher packets

Watermelon Candy Splash

  • Watermelon packets only

Cherry Apple Fusion

  • Cherry + Green Apple packets

Tropical Candy Mix

  • Watermelon + Cherry blend

💡 Tips

  • Use very cold water for the best flavor.
  • Clear whey isolate creates the most juice-like consistency.
  • Refrigerate for 1–2 hours before serving for maximum refreshment.
  • Stir before serving if stored overnight.

❓ Q & A

Q: Can I use regular protein powder?
A: Yes, but the drink will become creamy instead of clear.

Q: Why is there foam?
A: Foam is normal when mixing clear whey protein and will settle naturally.

Q: How long does it last?
A: Store refrigerated for up to 48 hours.

🍽️ Servings

  • 16 servings (1 cup each)

🥗 Nutrition (Approx. Per Serving)

  • Calories: 45–80
  • Protein: 8–15g
  • Carbohydrates: 0–2g
  • Fat: 0–1g
  • Sugar: 0g

✨ A fun, fruity, candy-flavored way to stay hydrated while boosting your daily protein intake! 💪🍬🥤

Iron-Boosting Fruit Punch

Description

This vibrant fruit punch combines beetroot, oranges, and pineapple into a refreshing drink packed with vitamin C and naturally occurring nutrients. The citrus helps enhance iron absorption from plant foods, making this a delicious addition to a balanced diet.

🍊 Ingredients

  • 1 medium beetroot, peeled and chopped
  • 3 oranges, peeled
  • ¼ pineapple, peeled and chopped
  • 1 cup cold water (optional)
  • Ice cubes (optional)

👩‍🍳 Instructions

1️⃣ Prepare the Fruit

  • Wash and peel the beetroot.
  • Peel the oranges and remove any seeds.
  • Cut the pineapple into chunks.

2️⃣ Blend

  • Add beetroot, oranges, and pineapple to a blender.
  • Add water if needed for easier blending.
  • Blend until completely smooth.

3️⃣ Strain (Optional)

  • For a smoother drink, strain through a fine mesh sieve.
  • If you prefer extra fiber, leave it unstrained.

4️⃣ Chill & Serve

  • Pour into glasses over ice.
  • Serve immediately for the freshest flavor.

💡 Tips

  • Chill the fruit beforehand for an extra refreshing drink.
  • Add a squeeze of lemon for a brighter flavor.
  • Drink fresh to preserve the best taste and nutrients.

❓ Q&A

Q: Can I make it ahead of time?
A: Yes, but it’s best consumed within 24 hours and kept refrigerated.

Q: Can I skip the beetroot?
A: Yes, but the color and flavor will be less rich.

Q: Is this an iron supplement?
A: No. While beetroot contains some iron and the oranges provide vitamin C, this drink should not replace medical treatment or iron supplements prescribed by a healthcare professional.

🍽️ Servings

  • Makes: 2–3 servings

🥗 Nutrition (Approx. Per Serving)

  • Calories: 110
  • Carbohydrates: 27g
  • Fiber: 4g
  • Protein: 2g
  • Fat: 0g
  • Vitamin C: High
  • Iron: Small amount naturally present

🍹 Sweet, refreshing, naturally colorful, and a great way to enjoy fruit with a vitamin C boost!

Homemade Lemon Ginger Drink with Pink Salt

Homemade Lemon Ginger Drink with Pink Salt

Ingredients

  • 24 ounces (3 cups) water
  • 2 tablespoons fresh lemon juice
  • 1 tablespoon apple cider vinegar
  • ¼ teaspoon pink Himalayan salt
  • ¼ teaspoon ground ginger

Instructions

Step 1: Prepare the Glass

Pour 24 ounces of water into a large mason jar or pitcher.

Step 2: Add the Lemon Juice

Add 2 tablespoons of fresh lemon juice and stir gently.

Step 3: Add Apple Cider Vinegar

Pour in 1 tablespoon of apple cider vinegar.

Step 4: Add the Pink Salt

Add ¼ teaspoon pink Himalayan salt and stir until dissolved.

Step 5: Add Ground Ginger

Sprinkle in ¼ teaspoon ground ginger and mix thoroughly.

Step 6: Stir and Serve

Stir well for 30–60 seconds until everything is combined. Serve immediately or chill before serving.

Prep Time

  • Prep Time: 5 minutes
  • Total Time: 5 minutes

Servings

  • 3 servings

Nutritional Information (Approximate)

Per serving:

  • Calories: 5
  • Carbohydrates: 1g
  • Fat: 0g
  • Protein: 0g
  • Sodium: Varies depending on salt used

Frequently Asked Questions

Can I use fresh ginger instead of ground ginger?

Yes. Use about ½ teaspoon freshly grated ginger.

Can I make this ahead of time?

Yes. Store it in the refrigerator for up to 24 hours and stir before serving.

Can I add honey?

Yes. Add 1–2 teaspoons honey if you prefer a sweeter flavor.

Notes

  • Fresh lemon juice provides the best flavor.
  • Adjust the amount of ginger to suit your taste.
  • Serve chilled over ice for a refreshing drink.

Recipe Yield: 3 servings
Category: Beverage
Cuisine: Homemade Wellness Drink
Keyword: Lemon Ginger Drink with Pink Salt, Apple Cider Vinegar Drink, Homemade Hydration Drink

Important: This is a homemade beverage recipe. It is not a substitute for medical treatments or prescription medications, and it is not equivalent to Mounjaro.

Cabbage & Mint Detox Drink

Cabbage & Mint Detox Drink

Note: No drink can specifically “melt fat” from the stomach, back, or thighs. Fat loss comes from overall healthy eating, physical activity, and consistent habits. This drink can be a refreshing, low-calorie addition to a balanced diet.

Ingredients

  • 2 cups chopped green cabbage
  • 1 cucumber, chopped
  • 8-10 fresh mint leaves
  • Juice of 1 lemon
  • 2 cups cold water
  • 1 teaspoon honey (optional)

Instructions

Step 1

Wash the cabbage, cucumber, and mint leaves thoroughly.

Step 2

Add the cabbage, cucumber, mint leaves, lemon juice, and water to a blender.

Step 3

Blend until smooth and creamy.

Step 4

Strain if you prefer a smoother drink, or leave it unstrained for extra fiber.

Step 5

Add honey if desired and stir well.

Step 6

Pour into a glass and serve chilled.

Nutritional Benefits

  • Cabbage provides fiber, vitamin C, and antioxidants.
  • Cucumber helps with hydration.
  • Mint adds freshness and flavor.
  • Lemon provides vitamin C and a bright taste.
  • Low in calories and easy to prepare.

Q&A

Q: Can I drink this every day?
A: Yes, as part of a balanced diet.

Q: Does this drink burn belly fat?
A: No single drink can target belly fat. Healthy eating and regular exercise are important for fat loss.

Q: Can I store it for later?
A: Yes, refrigerate and consume within 24 hours.

Q: Can I add other fruits or vegetables?
A: Yes, apple, celery, or spinach are good additions.

Simple Celery Hydration Juice

A fresh, light vegetable juice that supports hydration, digestion, and provides antioxidants and minerals. Best used as a morning hydration drink, not a detox cure.

 Ingredients (1 serving)

  • 6–8 fresh celery stalks (organic if possible)

  • ½ cup water (optional, if blending)

  • Optional add-ins (gentle, not detox):

    • ½ cucumber

    • Small squeeze of lemon (for taste, not “cleansing”)

 Instructions

  1. Wash celery thoroughly.

  2. Juicer method: Juice celery directly.
    Blender method: Blend with water, then strain.

  3. Drink immediately for best taste and nutrient retention.

 How to Use It (this matters)

  • Drink on an empty stomach if it feels good to you

  • 1 small glass (200–250 ml) is enough

  • Not more than 3–4 times per week

  • Stop if you experience bloating, dizziness, or diarrhea

Servings

  • 1 serving per recipe

 Approximate Nutritional Info (per serving)

  • Calories: ~40

  • Water: ~95%

  • Fiber: Low (most removed during juicing)

  • Potassium: Moderate

  • Vitamin K: High

  • Antioxidants: Present (flavonoids)

Beetroot Wellness Drink

Beetroot Wellness Drink

Ingredients

  • 1 medium beetroot, peeled and chopped
  • 1 carrot, chopped
  • 1 small apple, chopped
  • Juice of 1 lemon
  • 1 cup water
  • 1 tsp honey (optional)

Instructions

Step 1

Wash and prepare the beetroot, carrot, and apple.

Step 2

Add all the ingredients to a blender along with the water.

Step 3

Blend until smooth and well combined.

Step 4

Strain through a fine sieve if you prefer a smoother drink.

Step 5

Add lemon juice and honey, then stir well.

Step 6

Pour into a glass and serve immediately.

Nutritional Benefits

  • Beetroot is rich in antioxidants and natural nitrates.
  • Carrots provide vitamin A for eye health.
  • Apples add fiber and natural sweetness.
  • Lemon provides vitamin C and a refreshing flavor.
  • May help support overall health as part of a balanced diet.

Q&A

Q: Can I drink this every day?
A: Yes, in moderation as part of a balanced diet.

Q: Can I skip the apple?
A: Yes, but the drink will be less sweet.

Q: How long can I store it?
A: It is best consumed fresh, but can be refrigerated for up to 24 hours.

Note

While nutritious, no drink can guarantee curing arthritis, eliminating fatigue, or reducing cholesterol to zero. Healthy eating, exercise, and medical advice are important for managing health conditions

5 smoothie recipes

Iron Boosting Juice

Ingredients

  • 1 small beetroot, peeled and chopped
  • 1 cup kale
  • 4 strawberries
  • 1 green apple, chopped
  • 1 cup cold water

Instructions

Step 1

Wash all ingredients thoroughly.

Step 2

Add beetroot, kale, strawberries, apple, and water to a blender.

Step 3

Blend until smooth.

Step 4

Strain if desired.

Step 5

Serve immediately.

Nutritional Benefits

  • Rich in iron-supporting nutrients.
  • High in vitamin C.
  • Contains antioxidants and fiber.
  • Helps support energy levels.

Juice for Gut Health

Ingredients

  • 1 cup pineapple chunks
  • 2 celery stalks
  • 1-inch piece ginger
  • Juice of 1 lemon
  • 1 cup water

Instructions

Step 1

Wash and chop the pineapple, celery, and ginger.

Step 2

Add all ingredients to a blender.

Step 3

Blend until smooth.

Step 4

Strain if preferred.

Step 5

Pour into a glass and enjoy fresh.

Nutritional Benefits

  • Supports healthy digestion.
  • Rich in vitamin C.
  • Provides hydration.
  • Contains natural enzymes from pineapple.

Nature’s Fruit Punch

Ingredients

  • 1 cup pineapple chunks
  • 1 orange, peeled
  • 1 mango, peeled and diced
  • Juice of 1 lime
  • 1/2 cup cold water

Instructions

Step 1

Place pineapple, orange, mango, lime juice, and water in a blender.

Step 2

Blend until smooth.

Step 3

Strain if desired.

Step 4

Chill for 10 minutes.

Step 5

Serve cold.

Nutritional Benefits

  • High in vitamin C.
  • Rich in antioxidants.
  • Naturally sweet with no refined sugar.
  • Refreshing and hydrating.

Sunrise Boost Juice

Ingredients

  • 2 oranges, peeled
  • 2 carrots, chopped
  • 1 apple, chopped
  • 1-inch piece ginger
  • 1/2 cup water

Instructions

Step 1

Wash and prepare all ingredients.

Step 2

Add oranges, carrots, apple, ginger, and water to a blender.

Step 3

Blend until smooth.

Step 4

Strain for a smoother juice.

Step 5

Serve immediately.

Nutritional Benefits

  • Rich in vitamin A and vitamin C.
  • Supports immune health.
  • Contains antioxidants.
  • Naturally energizing.