Banana Cream Ring Cake

🍌 Banana Cream Ring Cake


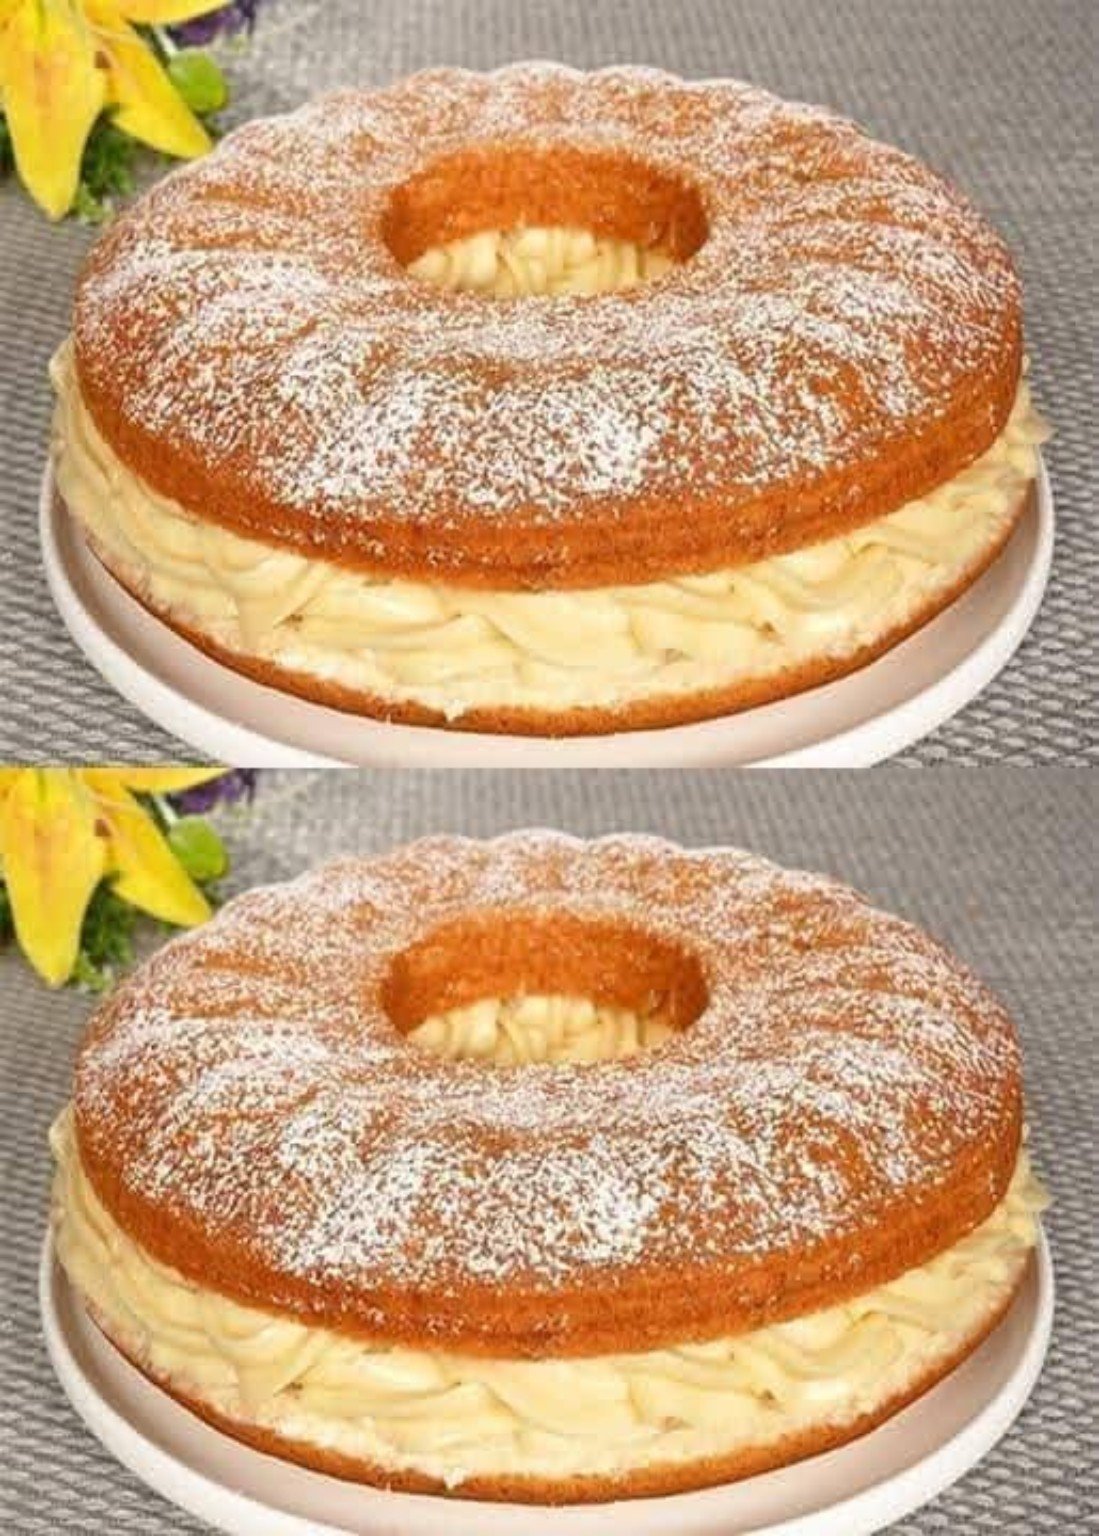
A soft, fluffy vanilla ring cake filled with creamy banana filling and dusted with powdered sugar—just like the cake in your picture.

Ingredients

For the Cake

  • 2 cups all-purpose flour
  • 1½ tsp baking powder
  • ½ tsp baking soda
  • ¼ tsp salt
  • ½ cup butter, softened
  • ¾ cup granulated sugar
  • 3 large eggs
  • 1 tsp vanilla extract
  • ¾ cup milk
  • 2 ripe bananas, mashed

For the Banana Cream Filling

  • 2 ripe bananas, thinly sliced
  • 1½ cups heavy whipping cream
  • ½ cup powdered sugar
  • 1 tsp vanilla extract
  • ½ cup cream cheese, softened
  • 2 tbsp instant vanilla pudding powder (optional, for a thicker filling)

For Decoration

  • Powdered sugar, for dusting
  • Banana slices, optional


Method

1. Prepare the cake: Preheat oven to 175°C (350°F). Grease and flour a Bundt/ring cake pan.

2. In a bowl, whisk together flour, baking powder, baking soda and salt.

3. In another bowl, beat softened butter and sugar until light and fluffy.

4. Add eggs one at a time, beating well after each addition. Mix in vanilla and mashed bananas.

5. Add the dry ingredients alternately with milk, mixing just until combined. Do not overmix.

6. Pour the batter into the prepared ring pan and smooth the top.

7. Bake for 35–45 minutes, or until a toothpick inserted into the cake comes out clean.

8. Let the cake cool in the pan for about 10 minutes, then turn it onto a wire rack and cool completely.


🍌 Make the Cream Filling

1. Beat cream cheese until smooth.

2. Add powdered sugar and vanilla and mix well.

3. Add chilled whipping cream and beat until thick and fluffy.

4. If using pudding powder, beat it in until the filling becomes firm enough to spread.

5. Fold in some thinly sliced bananas.

Assemble

1. Once completely cool, carefully slice the cake horizontally into two layers.

2. Spread a generous layer of banana cream over the bottom layer.

3. Arrange banana slices over the cream.

4. Place the top cake layer back on.

5. Dust generously with powdered sugar.

6. Chill for 1–2 hours before slicing for the best texture.

🍰 Tips

Use ripe but firm bananas so the filling doesn’t become watery.

Make sure the cake is completely cool before adding the cream.

Keep the finished cake refrigerated.

For an extra banana flavor, add a few drops of banana extract to the cream.


Prep: 20 minutes | Bake: 35–45 minutes | Chill: 1–2 hours | Serves: 10–12

Baked Apple Fusion Dessert

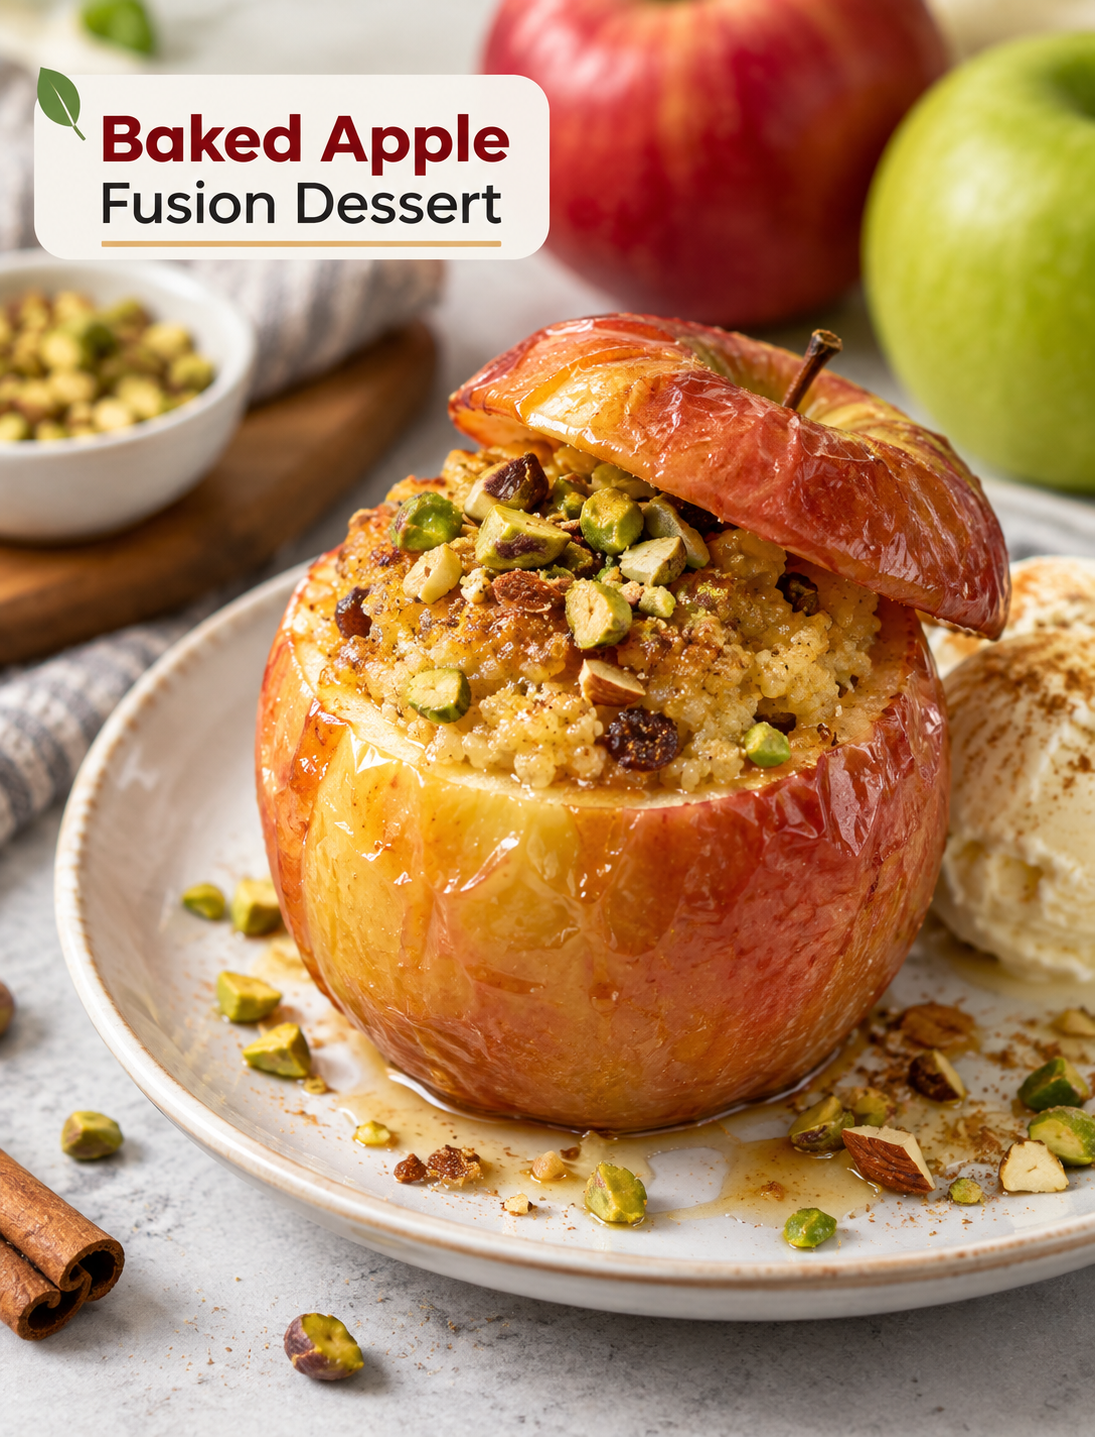
Baked apple fusion dessert filled with halva-style semolina, nuts, cardamom, and topped with pistachios

Baked Apple Fusion Dessert

This Baked Apple Fusion Dessert brings together two comforting flavors in one easy treat: tender baked apples and rich, nutty halva-style semolina filling. Each apple is filled with lightly roasted suji, warm cardamom, crunchy nuts, and a touch of sweetness before being baked until soft and fragrant.

The recipe is inspired by classic South Asian halva but uses baked apples to create a fresh, fruit-filled dessert. The tartness of Granny Smith apples works especially well with the creamy semolina filling, while Honeycrisp or Fuji apples give the dessert a sweeter finish.

This dessert is simple enough for a family dinner but feels special enough for holidays, weekend gatherings, and cozy fall meals. Serve it warm with vanilla ice cream, whipped cream, or a light drizzle of maple syrup.

Why You’ll Love This Baked Apple Dessert

  • Warm and comforting: Baked apples become soft while keeping enough texture to hold the filling.
  • Nutty and aromatic: Toasted semolina, cardamom, pistachios, and almonds create a rich flavor.
  • Easy to customize: You can change the nuts, dried fruit, spices, or sweetener to suit your taste.
  • Great for fall: Apples, cardamom, cinnamon-style warmth, and nuts make this a natural cold-weather dessert.
  • Make-ahead friendly: The halva filling can be prepared in advance to save time.
  • Flexible for dietary needs: Plant-based milk, vegan butter, and maple syrup can be used for a vegan version.

Ingredients

For the Apples

  • 4 medium Granny Smith, Honeycrisp, or Fuji apples
  • 2 tablespoons fresh lemon juice

For the Halva-Style Filling

  • ½ cup semolina (suji)
  • 3 tablespoons ghee or unsalted butter
  • ¼ cup granulated sugar, adjusted to taste
  • 1 cup milk or unsweetened plant-based milk
  • ¼ teaspoon ground cardamom
  • 2 tablespoons chopped almonds, pistachios, or cashews
  • 1 tablespoon raisins or finely chopped dates, optional
  • A pinch of saffron, optional
  • 1 tablespoon warm milk for soaking saffron, optional
  • A few drops of rosewater, optional

For the Topping

  • Chopped pistachios or walnuts
  • Honey or maple syrup
  • Vanilla ice cream or whipped cream, optional

How to Make Baked Apple Fusion Dessert

Step 1: Prepare the Apples

Preheat your oven to 350°F (180°C) so it is ready when the apples are filled.

Wash and dry the apples thoroughly. Slice about ½ inch from the top of each apple to create a small lid.

Use an apple corer or a small knife to remove the core and seeds. Leave enough flesh around the sides and bottom so each apple keeps its shape during baking.

Brush the inside and outside of each apple with lemon juice. This helps reduce browning and adds a light tart note that balances the sweet filling.

Arrange the apples upright in a lightly greased baking dish, leaving a little space between them.

Step 2: Prepare the Halva Filling

Place a nonstick skillet over medium heat and add the ghee or butter.

Add the semolina and roast it for about 5–7 minutes, stirring constantly. The suji should turn lightly golden and release a warm, nutty aroma.

Pour in the milk slowly while stirring continuously. Adding the liquid gradually helps create a smooth filling and reduces the chance of lumps.

Add the sugar and ground cardamom. If using saffron, soak it in warm milk first and add it to the pan.

Cook the mixture over medium-low heat until it thickens and begins to pull away from the sides of the skillet.

Stir in the chopped nuts, raisins or dates, and rosewater if using.

Remove the pan from the heat and let the filling cool for a few minutes. It should remain soft enough to spoon into the apples.

Step 3: Fill the Apples

Spoon the warm halva mixture into each prepared apple.

Fill each cavity generously without packing the mixture too tightly. Leaving a little room allows the filling to expand slightly as it heats.

Place the apple tops back over the filling if desired. The lids make the finished dessert look attractive and help retain moisture while baking.

Step 4: Bake the Apples

Cover the baking dish loosely with aluminum foil.

Bake at 350°F (180°C) for 30–35 minutes, depending on the size and firmness of the apples.

Check the apples by inserting a thin knife near the center. They should be tender but not falling apart.

Remove the foil and bake for another 5 minutes to give the filling a lightly golden finish.

Avoid overbaking the apples because very soft apples can split and lose their shape.

Step 5: Rest and Serve

Remove the baking dish from the oven and let the apples rest for about 10 minutes.

Top each apple with chopped pistachios or walnuts.

Drizzle lightly with honey or maple syrup just before serving.

For a richer dessert, serve each warm apple with a scoop of vanilla ice cream or a spoonful of whipped cream.

Best Apples to Use

Choose apples that are firm enough to hold their shape during baking.

Granny Smith apples provide a bright tart flavor that contrasts beautifully with the sweet halva filling.

Honeycrisp apples offer a crisp texture and balanced sweetness.

Fuji apples are a good choice when you prefer a naturally sweeter dessert.

Avoid very soft or mealy varieties because they can become mushy during baking.

Easy Ingredient Swaps

You can make this recipe fit different dietary preferences without changing the basic method.

For a vegan version, replace ghee with vegan butter or coconut oil and use almond, oat, or soy milk.

Replace honey with maple syrup if you want the finished dessert to remain completely plant-based.

You can also use chopped pecans, walnuts, hazelnuts, or extra pistachios instead of the suggested nuts.

For a warmer spice profile, add a small pinch of cinnamon, nutmeg, or ground clove.

Orange zest can add a fresh citrus note that pairs well with both apples and cardamom.

Make-Ahead and Storage Tips

The halva filling can be prepared up to 2 days ahead and stored in an airtight container in the refrigerator.

When ready to bake, bring the filling close to room temperature so it is easier to spoon into the apples.

Leftover baked apples should be refrigerated in an airtight container for up to 3 days.

To reheat, cover the apples and warm them in a 325°F (160°C) oven for about 10–12 minutes.

For the best texture, avoid repeatedly reheating the same portion.

Serving Ideas

Serve this dessert warm when you want the softest apple texture and the most aromatic filling.

Vanilla ice cream provides a cool contrast to the warm apple and nutty semolina.

Greek yogurt can be used instead of whipped cream for a lighter serving option.

A sprinkle of chopped pistachios adds color, crunch, and a mild buttery flavor.

For a holiday table, arrange the baked apples on a serving platter and add a light maple drizzle just before serving.

Recipe Notes

The semolina needs to be roasted before adding the milk because this develops its nutty flavor and improves the texture of the filling.

Keep stirring while adding milk to prevent lumps from forming.

The filling should be thick but soft before it goes into the apples.

Apple size affects baking time, so begin checking smaller apples around the 30-minute mark.

For a less sweet dessert, reduce the sugar and use naturally sweet apples such as Fuji.

If your apples are very tart, a small amount of additional maple syrup or honey can balance the flavor when serving.

Frequently Asked Questions

Can I make this Baked Apple Fusion Dessert vegan?

Yes. Use vegan butter or coconut oil instead of ghee, plant-based milk instead of dairy milk, and maple syrup instead of honey.

Which apples are best for this recipe?

Granny Smith, Honeycrisp, and Fuji apples work well because they are firm enough to hold their shape while baking.

Can I prepare the halva filling ahead of time?

Yes. Prepare the filling up to 2 days ahead and refrigerate it in an airtight container until you are ready to use it.

How long do baked apples last in the refrigerator?

Store leftovers in an airtight container for up to 3 days and reheat them gently in a covered baking dish.

Can I use different nuts?

Yes. Almonds, pistachios, cashews, walnuts, pecans, and hazelnuts can all be used according to your preference.

Can I make this dessert without saffron?

Yes. Saffron is optional, so you can leave it out without changing the basic cooking method.

How do I prevent the apples from becoming mushy?

Use firm apples, avoid overbaking, and check their tenderness after about 30 minutes.

What can I serve with baked stuffed apples?

Vanilla ice cream, whipped cream, Greek yogurt, chopped pistachios, or a light maple drizzle all pair well with the warm apples.

Air Fryer Chocolate Hazelnut Stuffed Croissant Bites

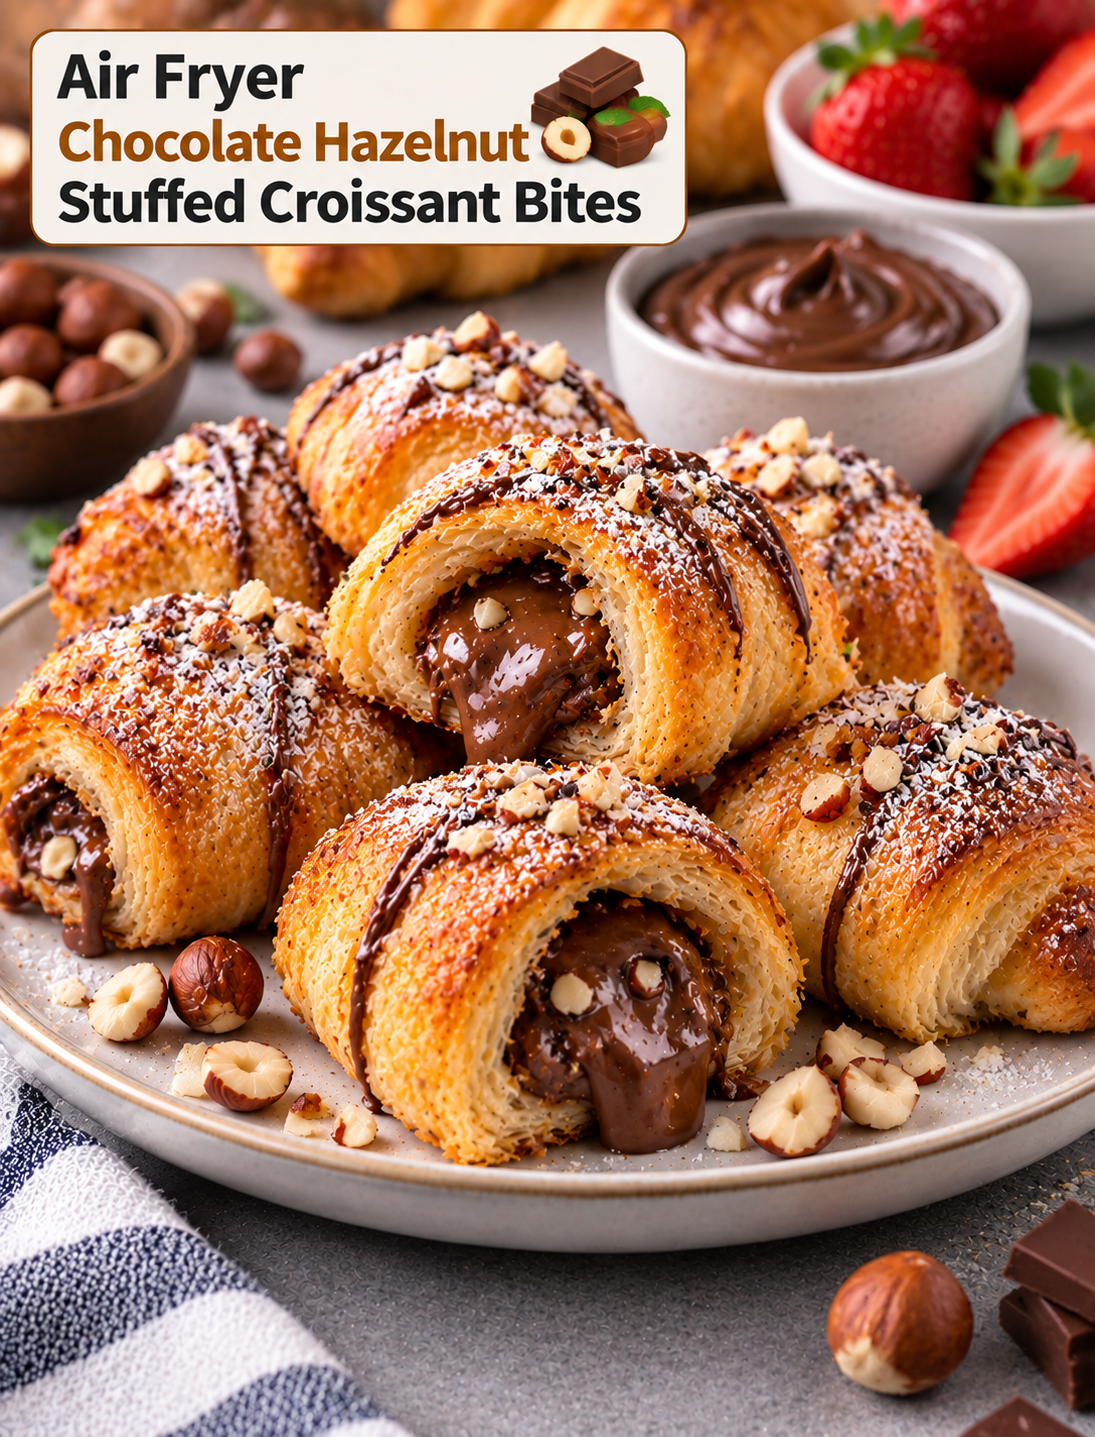
Golden air fryer croissant bites filled with melted chocolate hazelnut spread and topped with powdered sugar and chopped hazelnuts

Air Fryer Chocolate Hazelnut Stuffed Croissant Bites

Air Fryer Chocolate Hazelnut Stuffed Croissant Bites turn refrigerated crescent dough and creamy chocolate hazelnut spread into a warm, flaky dessert. Each bite has a golden exterior with a soft, rich chocolate center.

These small pastries are easy to prepare and cook quickly in the air fryer. The circulating heat helps the dough become crisp and golden without deep frying.

They are a great choice for breakfast treats, weekend brunch, afternoon snacks, holiday gatherings, or simple desserts. A light dusting of powdered sugar adds a bakery-style finish, while fresh berries can provide a bright contrast to the rich filling.

Why You’ll Love These Croissant Bites

These stuffed croissant bites combine flaky pastry with a smooth chocolate hazelnut center. The contrast between the crisp outside and soft filling makes each bite satisfying.

The recipe also requires only a few basic ingredients. Refrigerated crescent dough keeps preparation simple, while chocolate hazelnut spread provides most of the sweetness and chocolate flavor.

The small size makes these pastries easy to portion. You can make them for a family breakfast or prepare a larger batch for guests.

Air frying also makes cleanup easier than traditional frying. There is no large pot of hot oil, and the pastries can be cooked directly in the air fryer basket when your appliance allows it.

Ingredients You’ll Need

Crescent Dough

Refrigerated crescent roll dough provides a soft, buttery base that becomes flaky and golden during cooking. Use a fresh package that is easy to unroll and separate.

Puff pastry can also be used, but the texture will be lighter and more layered than crescent dough.

Chocolate Hazelnut Spread

A smooth chocolate hazelnut spread creates the creamy center. Use enough to provide a noticeable filling without making the dough difficult to seal.

Keep the spread chilled for a short time if it feels too soft to handle. A firmer filling is easier to portion onto small pieces of dough.

Butter

Melted butter can be brushed over the dough before air frying. It encourages browning and adds a richer pastry flavor.

Powdered Sugar

Powdered sugar provides a simple finishing touch. Add it after cooking so it stays bright and does not melt into the pastry.

Hazelnuts

Finely chopped toasted hazelnuts are optional but add crunch and reinforce the nutty flavor of the filling.

Optional Flavorings

A small amount of vanilla extract, cinnamon, or orange zest can add extra flavor. Use these additions lightly so they do not overpower the chocolate.

How to Make Air Fryer Chocolate Hazelnut Stuffed Croissant Bites

Prepare the Dough

Open the refrigerated crescent dough carefully and separate it into triangles along the existing perforations.

If the triangles are large, cut them into smaller pieces to create bite-sized pastries. Keep the pieces reasonably similar in size so they cook at the same rate.

Place each piece on a clean work surface with the wider end facing toward you.

Add the Chocolate Filling

Place a small amount of chocolate hazelnut spread near the wide end of each dough piece. Avoid adding too much because the filling can escape as the pastry cooks.

If using chopped hazelnuts, sprinkle a small amount over the spread.

Roll the dough toward the narrow tip, keeping the filling enclosed. Pinch the edges gently if needed to create a secure seal.

For smaller bites, tuck the ends inward slightly after rolling. This helps keep the filling inside during air frying.

Prepare the Air Fryer

Preheat the air fryer according to your model’s instructions if preheating is recommended.

Lightly grease the basket if necessary. Arrange the croissant bites in a single layer with space between each piece.

Do not stack the pastries. Proper airflow helps the dough become evenly browned and crisp.

Brush the tops lightly with melted butter. Avoid using too much because excess butter can make the pastry greasy.

Air Fry Until Golden

Cook the bites until the dough is puffed, golden brown, and fully cooked.

Cooking time depends on the size of the pastries, dough thickness, and air fryer model. Begin checking early during the first batch because smaller pieces can brown quickly.

If the outside becomes dark before the center is fully baked, reduce the temperature slightly and continue cooking until the dough is done.

Allow the bites to cool for several minutes before serving. The chocolate filling can remain extremely hot after cooking.

Tips for Flaky and Golden Croissant Bites

Keep the refrigerated dough cold until you are ready to use it. Cold dough is easier to handle and can produce a better flaky texture.

Use a small amount of filling in each pastry. Overfilled bites are more likely to split and leak chocolate.

Seal the dough carefully around the filling. Press the seams gently so there are no obvious openings.

Leave space between the pastries in the air fryer basket. Crowding can reduce airflow and cause uneven browning.

Brush the dough lightly with butter rather than soaking it. A thin coating is enough to support a golden exterior.

Watch the final minutes closely. Pastry can brown quickly once it reaches the right temperature.

How to Prevent Chocolate From Leaking

The most important step is controlling the amount of filling. A teaspoon or small spoonful is usually easier to contain than a large scoop.

Keep the spread toward the center of the dough and away from the edges. This gives you enough dough to close around the filling.

Do not stretch the dough too thin around the chocolate. Thin areas can tear during rolling.

Pinch or press the seams gently before placing the bites in the basket. Positioning the seam underneath can also help keep it closed.

If the chocolate hazelnut spread is very soft, chill it briefly before assembling the pastries. Firmer spread is easier to handle and less likely to run during preparation.

Best Toppings and Serving Ideas

Powdered sugar is one of the simplest toppings for these pastries. Dust it lightly over the cooled bites just before serving.

Fresh strawberries, raspberries, and blueberries add color and a slightly tart contrast to the sweet filling.

For extra crunch, sprinkle finely chopped toasted hazelnuts over the finished pastries.

A small drizzle of melted chocolate can create a richer dessert presentation. Allow the drizzle to set briefly before serving.

For brunch, serve the bites with fresh fruit, yogurt, coffee, or hot chocolate.

For dessert, pair them with vanilla ice cream or a small spoonful of whipped cream.

Easy Variations to Try

Chocolate Almond Bites

Replace the hazelnut spread with chocolate almond spread and add finely chopped toasted almonds to the filling.

Peanut Butter Chocolate Bites

Add a small amount of creamy peanut butter alongside the chocolate filling. Keep the portions small so the dough remains easy to seal.

Cinnamon Chocolate Bites

Add a light sprinkle of cinnamon to the filling before rolling. Cinnamon gives the chocolate a warm bakery-style flavor.

Strawberry Chocolate Bites

Add a very small piece of fresh strawberry with the chocolate spread. Pat the fruit dry first to reduce excess moisture.

Orange Chocolate Bites

Add a little finely grated orange zest to the chocolate filling. The citrus aroma provides a bright contrast to the rich pastry.

White Chocolate Hazelnut Bites

Use white chocolate hazelnut spread for a sweeter variation. Finish with chopped hazelnuts for extra texture.

How to Make Them for a Party

These croissant bites work well for brunches, birthdays, holiday breakfasts, and casual gatherings.

Prepare the pastries in several small batches instead of overcrowding the air fryer. This gives each piece enough room to brown evenly.

Arrange the finished bites on a serving platter and add powdered sugar shortly before guests arrive.

Serve different toppings on the side. Fresh berries, chopped nuts, chocolate drizzle, and whipped cream allow guests to customize their pastries.

For a breakfast spread, pair them with savory items such as scrambled eggs, breakfast potatoes, or turkey sausage. The sweet pastries can then serve as a simple dessert-style option.

How to Store and Reheat

Allow leftover pastries to cool completely before storing them. Place them in an airtight container and refrigerate if you plan to keep them for more than a short period.

The air fryer is the preferred method for reheating because it helps restore the flaky exterior.

Reheat the bites until warmed through, then allow them to cool briefly before eating. The chocolate center can become very hot during reheating.

Avoid adding powdered sugar before storage because moisture can cause it to disappear into the pastry.

If you want to freeze the finished bites, cool them completely and store them in a freezer-safe container. Reheat them in the air fryer until warm and crisp.

Common Mistakes to Avoid

Do not overfill the dough because excess chocolate can leak during cooking.

Avoid using dough that has become warm and difficult to handle. Refrigerated dough is easier to roll and seal.

Do not crowd the air fryer basket. Limited airflow can leave the pastries pale or unevenly cooked.

Avoid brushing the dough with too much butter because excess fat can make the exterior greasy.

Do not add powdered sugar while the pastries are extremely hot. Wait until they have cooled slightly for a cleaner finish.

Avoid eating the pastries immediately after cooking. The filling can stay much hotter than the pastry exterior.

Frequently Asked Questions

Can I use puff pastry instead of crescent dough?

Yes, puff pastry works well and creates a lighter, more layered texture than refrigerated crescent dough.

How much chocolate hazelnut spread should I use?

Use a small spoonful for each bite so the filling stays enclosed and does not leak during cooking.

Why did my chocolate filling leak out?

Overfilling, weak seams, or placing the spread too close to the dough edges can cause the filling to escape.

Can I make these ahead of time?

Yes, assemble the unbaked bites ahead and keep them refrigerated until you are ready to air fry them.

Can I freeze chocolate croissant bites?

Yes, cooled baked bites can be frozen in an airtight container and reheated in the air fryer.

How do I make them extra crispy?

Keep the dough cold, avoid overcrowding the basket, and lightly brush the pastries with butter before cooking.

Can I use other fillings?

Yes, peanut butter, almond spread, fruit preserves, caramel, or white chocolate spread can be used in small amounts.

What should I serve with these bites?

Fresh berries, coffee, hot chocolate, yogurt, whipped cream, or vanilla ice cream all pair well with the warm chocolate pastries.

Final Thoughts

Air Fryer Chocolate Hazelnut Stuffed Croissant Bites are an easy way to make a bakery-style treat with refrigerated dough and a creamy chocolate filling. The air fryer creates a golden exterior while keeping the center soft and rich.

The key to successful bites is simple: use a moderate amount of filling, seal the dough carefully, leave space between pastries, and watch the final minutes of cooking closely.

Serve them with powdered sugar and fresh berries for a simple breakfast treat, or add nuts and chocolate drizzle for a more indulgent dessert. With a few easy filling swaps, the same method can create several different sweet pastry variations.
Healthier Greek Yogurt Carrot Cake – Moist & Protein-Rich

Healthier Greek Yogurt Carrot Cake – Moist & Protein-Rich

Healthier Greek Yogurt Carrot Cake

Moist, Protein-Rich & Naturally Delicious

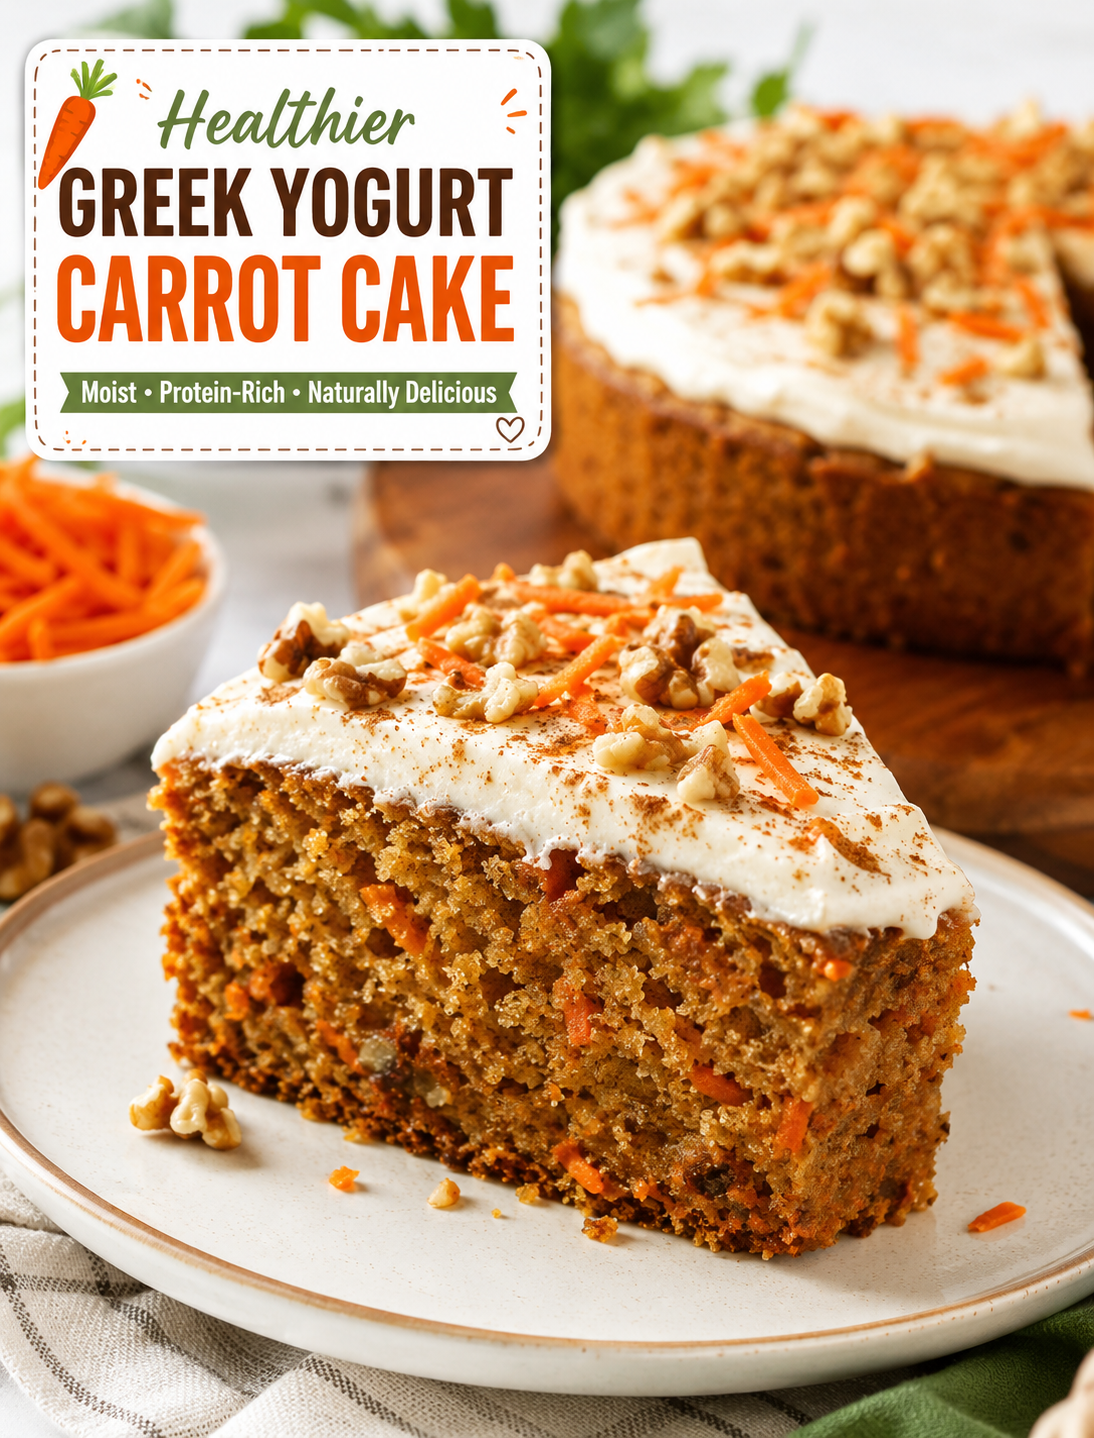
If you love classic carrot cake but want a lighter homemade option, this Healthier Greek Yogurt Carrot Cake is a great choice. It has a soft, moist crumb, warm cinnamon flavor, fresh carrots, and a creamy Greek yogurt frosting.

Greek yogurt adds moisture and protein without making the cake heavy. Freshly grated carrots add natural sweetness, fiber, and beta-carotene. Whole wheat flour, walnuts, and a modest amount of honey or maple syrup make this carrot cake a more balanced choice for breakfast, an afternoon snack, or dessert.

The recipe is simple enough for a busy weekday and satisfying enough for a family gathering. It also stores well in the refrigerator, making it useful for meal prep.

Why You’ll Love This Healthier Carrot Cake

This recipe keeps the familiar flavor of carrot cake while using several wholesome ingredients. Greek yogurt replaces part of the richer ingredients often found in traditional cakes and helps create a tender texture.

Fresh carrots are the star ingredient. They bring moisture, color, mild sweetness, and a pleasant texture to every slice. Cinnamon and nutmeg add warm spice without needing extra sugar.

The light Greek yogurt cream cheese frosting adds creamy richness without covering the cake in a thick layer of frosting. You can also skip the frosting if you want a simple breakfast cake or snack.

With about 15 minutes of preparation and 35–40 minutes of baking, this homemade carrot cake is easy to fit into a busy schedule.

Ingredients for Greek Yogurt Carrot Cake

For the Carrot Cake

  • 2 cups whole wheat flour or all-purpose flour
  • 2 cups freshly grated carrots
  • ¾ cup plain Greek yogurt
  • 3 large eggs
  • ½ cup honey or pure maple syrup
  • ¼ cup olive oil or melted coconut oil
  • 1 teaspoon vanilla extract
  • 2 teaspoons ground cinnamon
  • ½ teaspoon ground nutmeg
  • 1 teaspoon baking powder
  • ½ teaspoon baking soda
  • ¼ teaspoon salt
  • ½ cup chopped walnuts, optional
  • ¼ cup raisins, optional

For the Greek Yogurt Cream Cheese Frosting

  • 4 ounces reduced-fat cream cheese, softened
  • ½ cup plain Greek yogurt
  • 2 tablespoons honey or maple syrup
  • 1 teaspoon vanilla extract
  • Pinch of cinnamon

Optional Garnishes

  • Chopped walnuts
  • Freshly grated carrot
  • Light cinnamon sprinkle
  • Orange zest

Fresh carrots and plain Greek yogurt work best because they provide moisture without adding strong flavors that compete with the spices.

How to Make Healthier Greek Yogurt Carrot Cake

1. Prepare the Oven and Pan

Preheat your oven to 350°F (175°C). Grease an 8×8-inch baking pan or line it with parchment paper.

Parchment makes the finished cake easier to lift and slice after cooling.

2. Grate the Carrots

Wash and peel the carrots before grating them with the small or medium side of a box grater.

Do not squeeze out the carrot moisture. That natural moisture helps keep the cake soft and prevents a dry crumb.

3. Mix the Wet Ingredients

Add Greek yogurt, eggs, honey or maple syrup, olive oil, and vanilla to a large mixing bowl.

Whisk until the mixture looks smooth and evenly blended. Room-temperature ingredients can help the batter combine more easily.

4. Combine the Dry Ingredients

In a separate bowl, whisk together the flour, cinnamon, nutmeg, baking powder, baking soda, and salt.

Mixing the dry ingredients first helps spread the spices and leavening agents evenly throughout the cake.

5. Make the Batter

Gradually add the dry mixture to the wet ingredients. Stir gently until just combined.

Fold in the grated carrots, walnuts, and raisins if you are using them. Avoid overmixing because excessive stirring can produce a heavier cake.

6. Bake Until Tender

Transfer the batter to the prepared pan and spread it into an even layer.

Bake for 35–40 minutes. Insert a toothpick into the center; it should come out clean or with a few moist crumbs.

Let the cake cool completely before adding the frosting.

7. Make the Greek Yogurt Frosting

Beat the softened cream cheese until smooth. Add Greek yogurt, honey or maple syrup, vanilla, and cinnamon.

Mix until creamy and smooth. Spread the frosting over the completely cooled cake.

8. Garnish and Serve

Finish with chopped walnuts, a little grated carrot, orange zest, or a light dusting of cinnamon.

Serve the cake chilled or at room temperature. Chilling it can make the frosting firmer and easier to slice.

Tips for a Moist Carrot Cake

Use freshly grated carrots rather than dry packaged shreds. Fresh carrots release moisture into the batter as the cake bakes.

Do not overmix once the flour is added. Stir only until the ingredients are combined.

Measure flour accurately by spooning it into a measuring cup and leveling the top. Too much flour can make the cake dry.

Avoid overbaking. Start checking the cake around the 35-minute mark because oven temperatures can vary.

Let the cake cool fully before frosting. Warm cake can soften or melt the yogurt-based topping.

For the best texture, allow refrigerated cake to sit at room temperature for a few minutes before serving.

Easy Recipe Variations

Carrot Cake Muffins

Divide the batter among a lined muffin pan and bake for about 18–22 minutes. Check with a toothpick before removing them from the oven.

Gluten-Free Carrot Cake

Use a reliable gluten-free flour blend designed for baking. Follow the package guidance if it includes a recommended amount of xanthan gum.

Lower-Sugar Version

Reduce the honey or maple syrup slightly and let the natural sweetness of the carrots provide more of the flavor.

Tropical Carrot Cake

Add unsweetened shredded coconut and a small amount of crushed pineapple. Drain excess pineapple liquid first to avoid making the batter too wet.

Higher-Protein Version

Add a suitable vanilla protein powder while keeping enough Greek yogurt in the batter to maintain moisture. Because protein powders vary, the texture may change slightly.

Frosting-Free Carrot Cake

Skip the frosting for a simpler snack or breakfast option. Add chopped walnuts and a little cinnamon before serving for extra texture and flavor.

Healthier Carrot Cake Benefits

This homemade cake includes several ingredients that offer useful nutrients.

Greek yogurt contributes protein and calcium while helping create a moist, tender texture. Eggs also provide protein and help bind the batter.

Carrots provide fiber and beta-carotene, which the body can convert into vitamin A. Whole wheat flour can provide more fiber than refined flour when compared with an equal amount of all-purpose flour.

Walnuts add healthy unsaturated fats, protein, and texture. Olive oil provides another source of unsaturated fat when used in place of butter.

These ingredients do not make cake a health food, but they can make this version a more nutrient-conscious choice than many heavily frosted desserts.

Storage and Freezing Instructions

Because the frosting contains Greek yogurt and cream cheese, store the finished cake in an airtight container in the refrigerator.

For the best quality, enjoy refrigerated frosted cake within about 5 days.

You can freeze the unfrosted cake for up to 3 months. Wrap individual portions tightly and place them in a freezer-safe container or bag.

Thaw the cake overnight in the refrigerator. Add fresh frosting after thawing for the best texture.

Serving Ideas

Serve a slice with fresh berries for a colorful dessert plate. A spoonful of plain Greek yogurt can also add extra creaminess without requiring more frosting.

For breakfast, pair a small slice with fruit and a protein-rich food. For dessert, add a light sprinkle of walnuts and orange zest.

This cake also works well for brunch, family gatherings, lunchbox treats, and weekend baking.

Recipe Details

Prep Time: 15 minutes
Cook Time: 35–40 minutes
Total Time: About 55 minutes
Servings: 12 slices
Oven Temperature: 350°F (175°C)
Pan Size: 8×8 inches

Approximate Nutrition Per Slice

Based on 12 servings, one slice provides approximately:

  • Calories: 240
  • Protein: 8g
  • Carbohydrates: 32g
  • Fiber: 4g
  • Fat: 10g
  • Sugar: 12g
  • Calcium: 120mg
  • Iron: 1.5mg

Nutrition values vary based on the flour, yogurt, sweetener, frosting, nuts, and serving size used.

Frequently Asked Questions

Can I make carrot cake without frosting?

Yes. The cake stays moist and flavorful without frosting, making it a simple option for breakfast or snacks.

Can I use regular yogurt instead of Greek yogurt?

Yes. Regular yogurt works, but Greek yogurt gives the cake a thicker texture and adds more protein.

Can I make this recipe dairy-free?

Yes. Use a dairy-free yogurt and dairy-free cream cheese alternative that works well for baking and frosting.

How do I keep carrot cake moist?

Use freshly grated carrots, avoid overmixing, and remove the cake when a toothpick shows only a few moist crumbs.

Can I use almond flour?

Yes, but almond flour changes the structure and creates a softer, denser cake. A tested almond-flour recipe gives more reliable results.

How long does Greek yogurt carrot cake last?

Store frosted cake in the refrigerator and use it within about 5 days for the best quality and freshness.

Can I freeze carrot cake?

Yes. Freeze the unfrosted cake for up to 3 months, then thaw it overnight and add fresh frosting before serving.

Is this carrot cake good for meal prep?

Yes. Cut the cooled cake into individual portions and refrigerate them in sealed containers for convenient snacks during the week.

Final Thoughts

This Healthier Greek Yogurt Carrot Cake brings together fresh carrots, creamy Greek yogurt, warm spices, walnuts, and a lighter frosting for a satisfying homemade treat. Its moist texture and simple preparation make it easy to serve for breakfast, brunch, snacks, or dessert.

For the best results, use freshly grated carrots, measure the flour carefully, avoid overmixing, and let the cake cool completely before frosting. Whether you keep the walnuts and raisins or customize the recipe with your favorite additions, this carrot cake offers a delicious way to enjoy a classic favorite with a more balanced ingredient list.