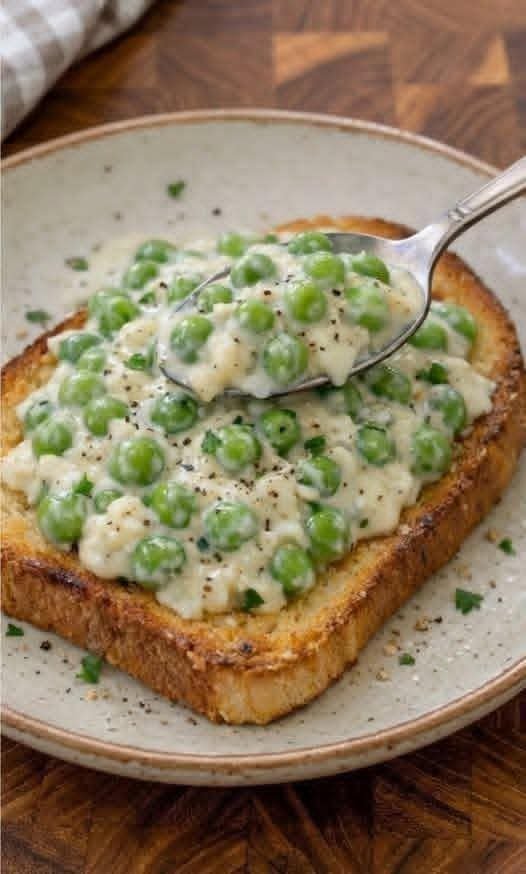
Creamed Peas on Toast

Creamed Peas served over crisp golden toast with creamy white sauce, green peas, black pepper, and fresh herbs

Creamed Peas on Toast

Creamed Peas are a classic comfort-food dish made with tender green peas in a smooth, lightly seasoned cream sauce served over crisp golden toast. This old-fashioned recipe is simple, budget-friendly, and perfect for breakfast, lunch, or a quick light dinner. Creamed Peas are especially useful when you want something warm and satisfying without spending much time in the kitchen.

The combination of buttery toast, sweet peas, and creamy white sauce gives this dish a nostalgic homemade flavor. You only need a few basic ingredients, and the entire recipe comes together in about 25 minutes.

Prep Time: 10 minutes
Cook Time: 15 minutes
Total Time: About 25 minutes
Servings: 4

Ingredients

For the Creamed Peas

  • 3 cups frozen green peas
  • 3 tablespoons unsalted butter
  • 3 tablespoons all-purpose flour
  • 2 cups whole milk
  • 1/4 cup heavy cream
  • 1/2 teaspoon salt
  • 1/4 teaspoon black pepper
  • 1/4 teaspoon garlic powder
  • 1/8 teaspoon onion powder
  • Pinch of ground nutmeg, optional
  • 1 teaspoon lemon juice, optional

For the Toast

  • 8 slices sturdy sandwich bread, sourdough, or country bread
  • 2 tablespoons butter, softened
  • Chopped parsley or chives for garnish
  • Extra black pepper for serving

Why You’ll Love This Recipe

Creamed Peas are quick, comforting, and made with ingredients that are easy to keep on hand. Frozen peas work beautifully, which means there is no need to wait for fresh peas to be in season.

Another reason to love Creamed Peas is their versatility. You can keep the sauce simple, add herbs, include cooked chicken or ham, or serve the mixture over biscuits, baked potatoes, or rice instead of toast.

The recipe is also easy to adjust. Use more milk for a thinner sauce or let it cook a little longer if you prefer a thicker, richer consistency.

How to Make Creamed Peas

Step 1: Prepare the Peas

Bring a small saucepan of lightly salted water to a gentle boil.

Add the frozen peas and cook for about 2 to 3 minutes, just until heated through and bright green.

Drain well and set aside.

Avoid overcooking because the peas will warm again in the cream sauce.

Step 2: Toast the Bread

While the peas cook, toast the bread until golden and crisp.

Spread each slice lightly with softened butter.

For extra flavor, you can toast the bread in a skillet with butter instead of using a toaster.

Step 3: Melt the Butter

Place a medium saucepan or deep skillet over medium heat.

Add 3 tablespoons butter and let it melt completely.

Step 4: Make the Roux

Sprinkle the flour over the melted butter.

Whisk constantly for about 1 minute.

The mixture should become smooth and slightly bubbly without turning brown.

This roux is what gives Creamed Peas their thick, velvety sauce.

Step 5: Add the Milk

Slowly pour in the milk while whisking continuously.

Adding it gradually helps prevent lumps.

Continue whisking until the mixture is smooth.

Step 6: Thicken the Sauce

Cook the sauce over medium heat for 4 to 5 minutes, stirring frequently.

It should gradually thicken enough to coat the back of a spoon.

Do not let it boil aggressively.

Step 7: Add the Cream and Seasonings

Stir in the heavy cream, salt, black pepper, garlic powder, onion powder, and optional nutmeg.

Simmer gently for another minute.

At this stage, the sauce for Creamed Peas should be smooth, creamy, and well seasoned.

Step 8: Add the Peas

Fold the cooked peas into the cream sauce.

Stir gently so the peas stay whole.

Cook for 2 to 3 minutes, until everything is hot.

Step 9: Adjust the Consistency

If the sauce is too thick, add a small splash of milk.

If it is too thin, continue simmering for another minute or two.

Step 10: Add a Bright Finish

Stir in the optional lemon juice just before removing the pan from the heat.

The small amount of acidity helps balance the richness of the sauce.

Step 11: Assemble the Toast

Place two slices of toast on each serving plate.

Spoon a generous portion of Creamed Peas over the toast.

Let some of the sauce soak into the bread while keeping the edges crisp.

Step 12: Garnish and Serve

Sprinkle with chopped parsley or chives and a little extra black pepper.

Serve immediately while the toast is warm.

Serving Suggestions

This dish is filling enough for a simple breakfast or lunch, but it can also be served as part of a larger meal.

Pair Creamed Peas with scrambled eggs, fried eggs, roasted tomatoes, breakfast potatoes, or turkey sausage for a hearty morning plate.

For lunch or dinner, serve them with grilled chicken, baked ham, roasted vegetables, or a fresh green salad.

You can also spoon the creamy pea mixture over biscuits, mashed potatoes, rice, or baked potatoes when you want a change from toast.

For another creamy seafood dish, try our Baked Shrimp Parmesan Alfredo Seafood Cups with tender shrimp, rich Alfredo sauce, Parmesan, mozzarella, and crisp golden shells.

Recipe Tips

Use frozen peas rather than canned peas if possible. Frozen peas usually have a brighter color, fresher flavor, and firmer texture.

Do not overcook the peas before adding them to the sauce.

Whisk continuously while adding the milk so the sauce stays smooth and lump-free.

Use whole milk for the creamiest texture, although 2% milk can also work.

For richer Creamed Peas, add a little extra cream or a spoonful of cream cheese.

Toast the bread until it is crisp enough to hold the sauce without becoming soggy immediately.

Season gradually, especially with salt, because butter and bread can already contain sodium.

Easy Variations

This recipe can be customized in several easy ways.

For a ham version, stir in 1 cup of diced cooked ham before serving.

For extra protein, add shredded cooked chicken or turkey.

You can make Creamed Peas with pearl onions for a traditional holiday-style variation. Cook the onions until tender and stir them into the sauce with the peas.

For a cheesy version, add 1/2 cup shredded cheddar or Parmesan after the sauce thickens.

Fresh dill, parsley, chives, or thyme can also be added for more herb flavor.

For a slightly sweeter version, add a small pinch of sugar to highlight the natural sweetness of the peas.

You may also enjoy our Slow Cooker Cabbage and Ground Beef Stew for a hearty, comforting meal with tender cabbage, seasoned beef, potatoes, carrots, tomatoes, and savory broth.

Make-Ahead Instructions

The creamy pea mixture can be prepared up to 2 days ahead.

Let it cool completely, transfer it to an airtight container, and refrigerate.

When ready to serve, reheat gently in a saucepan over low heat.

Add a splash of milk because the sauce will usually thicken in the refrigerator.

Toast the bread fresh just before serving so it stays crisp.

Storage and Reheating

Store leftover Creamed Peas in an airtight container in the refrigerator for up to 3 days.

Keep the toast separate from the sauce to prevent it from becoming soggy.

Reheat the pea mixture in a saucepan over low heat, stirring frequently.

Add a tablespoon or two of milk if needed to loosen the sauce.

Individual portions can also be microwaved in short intervals, stirring between each interval.

Freezing is not ideal because dairy-based sauces can separate after thawing.

Nutrition Information

Approximate nutrition per serving, including toast:

Calories: 420
Protein: 14 g
Carbohydrates: 56 g
Fat: 17 g
Saturated Fat: 9 g
Fiber: 8 g
Sugar: 13 g
Sodium: 520 mg

Nutrition values are estimates and may vary depending on the bread, milk, cream, butter, and serving size.

Frequently Asked Questions

Can I use canned peas?

Yes, but drain them well and add them only near the end because they are already soft.

Can I use fresh peas?

Yes. Cook fresh peas until tender before adding them to the sauce.

Can I make Creamed Peas without heavy cream?

Yes. Use additional milk instead. The sauce will be slightly lighter but still creamy.

Can I use gluten-free bread?

Yes. Choose your favorite gluten-free bread and use a gluten-free all-purpose flour blend for the sauce if needed.

Why is my sauce lumpy?

The milk may have been added too quickly. Whisking constantly and adding the milk gradually usually prevents lumps.

Can I add cheese?

Yes. Cheddar, Parmesan, Gruyère, or Monterey Jack can be stirred into the hot sauce.

Can I make this recipe ahead?

Yes. Make the pea mixture ahead, refrigerate it, and prepare fresh toast when ready to serve.

Final Thoughts

Creamed Peas are a simple reminder that a few everyday ingredients can create a warm and satisfying meal.

Because Creamed Peas combine sweet green peas, buttery white sauce, and crisp toast, the dish has a pleasant balance of creamy and crunchy textures.

Keep this Creamed Peas recipe handy for busy mornings, easy lunches, quick dinners, or days when you want an old-fashioned comfort food.

With tender peas, a smooth sauce, crisp bread, and gentle seasoning, Creamed Peas are easy to prepare, economical, and comforting enough to become a regular part of your meal rotation.
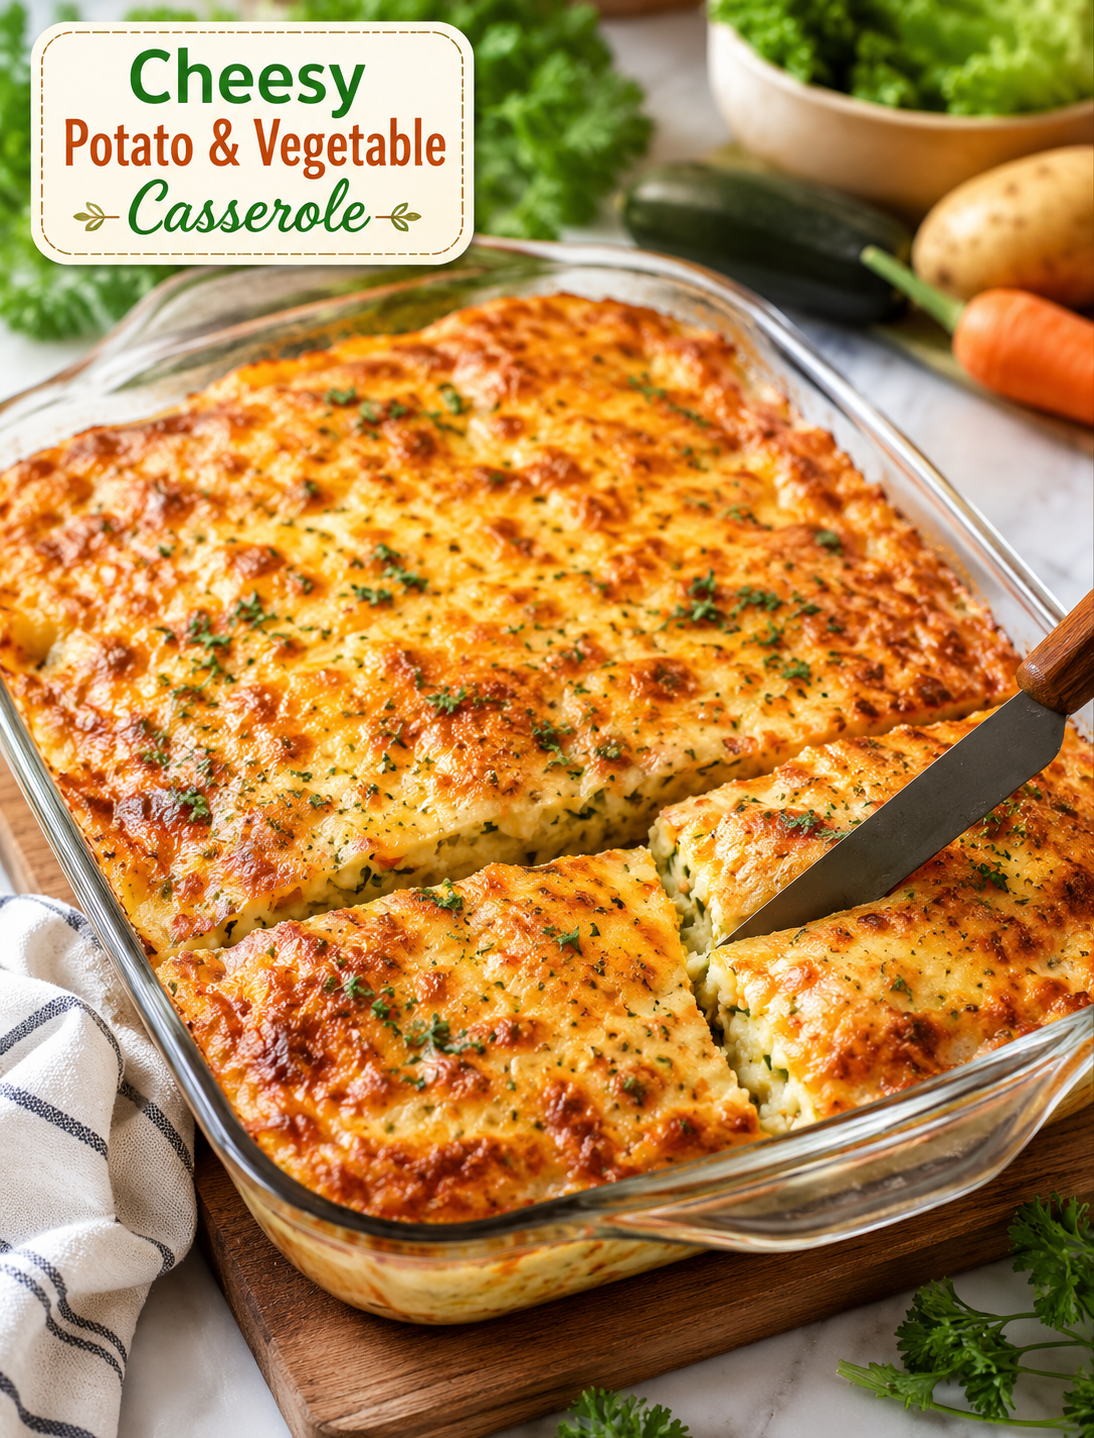
Cheesy Potato & Vegetable Casserole

Cheesy Potato & Vegetable Casserole

Cheesy Potato & Vegetable Casserole

A comforting, golden-baked casserole packed with potatoes, zucchini, carrots, cheese, eggs, herbs, and a creamy sauce. This easy vegetable bake has a crisp, cheesy top and a tender, flavourful center, making it perfect for breakfast, brunch, lunch, dinner, or as a hearty side dish.

Recipe at a Glance

Servings: 6–8

Prep time: 20 minutes

Cook time: 45–55 minutes

Total time: About 1 hour 15 minutes

Oven temperature: 375°F / 190°C

Difficulty: Easy

Cuisine: Comfort food / American-inspired

Best served: Warm

Description

This Cheesy Potato & Vegetable Casserole is a delicious way to turn everyday vegetables into a satisfying family meal. Grated potatoes provide a hearty base, while zucchini and carrots add moisture, color, flavor, and nutrients. Eggs and sour cream help bind everything together, while mozzarella, cheddar, and Parmesan create a rich, savory flavor and beautifully browned crust.

The combination of vegetables and cheese makes this casserole especially appealing to children and adults alike. The outside becomes golden and slightly crisp during baking, while the inside remains soft, creamy, and tender.

It is also a wonderfully flexible recipe. You can serve it as a vegetarian main dish with a fresh salad, or alongside roasted meat, grilled chicken, fish, or other favorite dishes.

Ingredients
For the casserole
4 medium potatoes, peeled
2 medium zucchini
2 carrots
1 small onion
3 cloves garlic, minced
4 large eggs
1 cup sour cream or plain Greek yogurt
1 cup shredded mozzarella cheese
1 cup shredded cheddar cheese
½ cup grated Parmesan cheese
2 tablespoons all-purpose flour
2 tablespoons olive oil
1 teaspoon salt
½ teaspoon black pepper
1 teaspoon paprika
½ teaspoon dried oregano or Italian seasoning
2–3 tablespoons chopped fresh parsley or dill
½ teaspoon red pepper flakes, optional
For greasing
1 teaspoon butter or olive oil
Instructions
1. Prepare the vegetables
Preheat your oven to 375°F (190°C).

Peel the potatoes and wash the zucchini and carrots thoroughly. Grate the potatoes, zucchini, and carrots using the large holes of a box grater.

Finely chop the onion and mince the garlic.

The vegetables can be grated by hand, but a food processor with a grating attachment can make the preparation much faster.

2. Remove excess moisture
This is one of the most important steps in the recipe.

Zucchini and potatoes naturally contain a considerable amount of water. If you skip this step, your casserole can become watery instead of firm and creamy.

Place the grated zucchini and potatoes in a clean kitchen towel or several layers of cheesecloth. Gather the towel and squeeze firmly over the sink to remove as much liquid as possible.

You can also place the grated vegetables in a colander, sprinkle them lightly with salt, and allow them to drain for about 10 minutes before squeezing.

The drier the vegetables, the better the final texture will be.

3. Prepare the creamy mixture
In a large mixing bowl, whisk together:

4 eggs
1 cup sour cream or Greek yogurt
2 tablespoons flour
minced garlic
salt
black pepper
paprika
oregano or Italian seasoning
Whisk until the mixture is smooth and evenly combined.

The eggs provide structure while the sour cream gives the casserole a creamy texture.

4. Combine the vegetables
Add the squeezed potatoes and zucchini to the bowl.

Add the grated carrots and chopped onion as well.

Add the fresh parsley or dill and red pepper flakes if using.

Stir thoroughly until all the vegetables are coated with the egg and sour cream mixture.

5. Add the cheese
Add:

½ cup mozzarella
½ cup cheddar
½ cup Parmesan
Mix everything together.

Reserve the remaining mozzarella and cheddar for the topping.

The Parmesan contributes a salty, nutty flavor, while mozzarella gives a stretchy texture and cheddar provides a stronger cheesy taste.

6. Prepare the baking dish
Grease a 9 × 13-inch (23 × 33 cm) baking dish with butter or olive oil.

Transfer the vegetable mixture into the dish and spread it evenly with a spatula or the back of a spoon.

Make sure the mixture is distributed evenly so that the casserole cooks consistently.

7. Add the cheese topping
Sprinkle the remaining mozzarella and cheddar over the entire surface.

For an extra golden crust, you can add another tablespoon or two of Parmesan.

Try to spread the cheese evenly from edge to edge. The cheese will melt during baking and form the delicious golden topping characteristic of this casserole.

8. Bake
Cover the baking dish loosely with aluminum foil.

Bake at 375°F (190°C) for approximately 30 minutes.

Then carefully remove the foil and return the casserole to the oven.

Continue baking uncovered for another 15–25 minutes, or until the vegetables are tender and the cheese is melted, bubbling, and golden brown.

The exact baking time can vary depending on how wet the vegetables are and how deep your baking dish is.

9. Brown the top
For an especially attractive golden crust, you can switch the oven to the broil/grill setting during the final 2–3 minutes.

Watch the casserole carefully during this stage because cheese can go from golden to burnt very quickly.

10. Rest before serving
Remove the casserole from the oven and allow it to rest for 10–15 minutes before slicing.

This resting period allows the eggs and cheese to set slightly, making the casserole easier to serve.

Cut into squares and serve warm.

Recipe Notes
Squeezing the vegetables is essential
Do not underestimate this step. Zucchini releases a lot of water during cooking. Potatoes can also contain substantial moisture. Removing excess liquid helps create a casserole that holds together rather than becoming soupy.

Choose good melting cheese
Mozzarella works beautifully for melting, while cheddar adds flavor and color. Parmesan helps create a savory crust.

You can substitute Monterey Jack, Colby, Gruyère, or a combination of your favorite melting cheeses.

Fresh herbs
Parsley gives the casserole a fresh flavor, while dill provides a slightly more distinctive taste. You can use dried herbs if fresh herbs aren’t available.

Baking dish
A glass or ceramic casserole dish works particularly well. If your dish is significantly smaller or deeper than 9 × 13 inches, you may need to adjust the baking time.

Make it ahead
The casserole can be assembled several hours in advance and refrigerated, covered, until you’re ready to bake. If baking directly from the refrigerator, allow additional cooking time and make sure the center is fully cooked.

Helpful Tips for the Best Casserole

  • Squeeze the potatoes and zucchini thoroughly. This is the most important tip.
  • Don’t shred the vegetables too finely. Coarse grating gives the casserole better texture.
  • Use freshly shredded cheese when possible. It generally melts more smoothly.
  • Don’t overbake. Once the center is set and the top is golden, remove it from the oven.
  • Let it rest before cutting. Ten to fifteen minutes makes serving much easier.
  • Season according to taste. Potatoes benefit from generous seasoning.
  • Add spice if desired. Red pepper flakes or a little cayenne can add pleasant heat.
  • Watch the broiler carefully. The cheese can brown extremely quickly.
  • Use full-fat sour cream for the richest result.
  • Serve with something fresh. A green salad or tomato-cucumber salad balances the richness of the cheese.

Variations
Cheesy Chicken Casserole
Add approximately 1½ cups cooked, shredded chicken to the vegetable mixture. This turns the recipe into a more substantial main course.

Bacon Version
Cook and crumble 150–200 g (5–7 oz) bacon, then stir it into the mixture before baking.

Spinach Version
Add approximately 1 cup chopped cooked spinach, making sure to squeeze out excess water first.

Mushroom Version
Sauté sliced mushrooms until their moisture has evaporated, then add them to the casserole.

Spicy Version
Add red pepper flakes, chopped jalapeño, or a pinch of cayenne pepper.

Extra-Cheesy Version
Increase the total cheese slightly and add a little Parmesan to the top during the final 10 minutes of baking.

Serving Suggestions
This casserole is versatile enough to serve in several ways.

Breakfast or brunch, serve it with fresh fruit, tomatoes, avocado, or a simple green salad.

Lunch, pair a square of casserole with cucumber and tomato salad or steamed vegetables.

Dinner, serve it alongside grilled chicken, roasted meat, fish, or a large leafy salad.

A spoonful of sour cream, Greek yogurt, or garlic-herb yogurt sauce on top is also delicious.

Storage and Reheating
Allow leftovers to cool and refrigerate them in a covered container.

The casserole should be refrigerated promptly rather than left at room temperature for an extended period.

For best quality, enjoy refrigerated leftovers within 3–4 days.

To reheat, place individual portions in the microwave until hot, or use a 350°F (175°C) oven for approximately 10–20 minutes, depending on the portion size.

The oven method helps restore some of the crispness of the cheesy top.

Approximate Nutritional Information
Estimated per serving, assuming 8 servings and excluding optional additions:

Calories: approximately 330–380 kcal
Protein: approximately 16–18 g
Carbohydrates: approximately 30–34 g
Fat: approximately 16–20 g
Saturated fat: approximately 8–10 g
Fiber: approximately 4–5 g
Sugar: approximately 4–6 g
Sodium: approximately 550–750 mg
Calcium: approximately 250–350 mg
These numbers are estimates and can vary considerably depending on the exact size of the vegetables, type of sour cream or yogurt, cheese brands, and portion size.

Potential Benefits
This casserole combines several food groups in one dish.

Potatoes provide carbohydrates and potassium, making them a satisfying source of energy.

Zucchini and carrots contribute fiber, vitamins, minerals, and naturally occurring plant compounds. Carrots are particularly well known for their beta-carotene content.

Eggs and cheese contribute protein, calcium, and other nutrients. Protein can help make the meal more satisfying.

Fresh herbs and vegetables add flavor without requiring large amounts of additional seasoning or sauces.

Because this recipe contains vegetables along with eggs and dairy, it can be a more nutritionally varied choice than a casserole made primarily from potatoes and cheese alone.

For a lighter version, you can use Greek yogurt instead of sour cream, reduce the cheese slightly, and increase the amount of zucchini, carrots, spinach, or other vegetables.

Frequently Asked Questions
Can I make this casserole without zucchini?
Yes. You can replace the zucchini with additional carrots, grated sweet potato, spinach, or another suitable vegetable. Remember that different vegetables contain different amounts of moisture, so adjust the draining accordingly.

Why is my casserole watery?
The most common reason is excess moisture from the zucchini or potatoes. Squeeze the grated vegetables very thoroughly before mixing them with the other ingredients.

Can I use sweet potatoes?
Yes. Sweet potatoes can replace some or all of the regular potatoes. They will give the casserole a sweeter flavor and a slightly different texture.

Can I prepare it the night before?
Yes. Assemble the casserole, cover it, and refrigerate it. Bake when ready. Because the casserole will be cold, it may require additional baking time.

Can I freeze it?
It is possible, although the texture of zucchini can become softer after freezing and thawing. For the best texture, freezing is generally less ideal than refrigerating leftovers.

Can I make it vegetarian?
Yes. The recipe as written is vegetarian as long as the cheeses and other ingredients you choose are vegetarian-friendly.

Can I make it gluten-free?
Yes. Replace the all-purpose flour with a suitable gluten-free flour or starch. Also check the labels of your other ingredients if strict gluten avoidance is required.

How do I know when it is done?
The top should be deeply golden and bubbling, while the center should look set rather than liquid. A knife inserted near the center should come out without a runny egg mixture.

Can I use pre-shredded cheese?
Yes, but freshly shredded cheese often melts more smoothly. Pre-shredded cheese can contain anti-caking ingredients that may slightly affect melting.

What can I serve with it?
A fresh green salad, tomato salad, roasted vegetables, grilled chicken, fish, or a simple yogurt-garlic sauce all pair beautifully with this casserole.

Final Recipe Summary
Cheesy Potato & Vegetable Casserole is an easy, hearty, family-friendly dish featuring grated potatoes, zucchini, carrots, onion, garlic, eggs, sour cream, herbs, and plenty of melted cheese. The key to achieving the beautiful golden top and firm, tender interior is to remove excess moisture from the grated vegetables and allow the finished casserole to rest before serving.