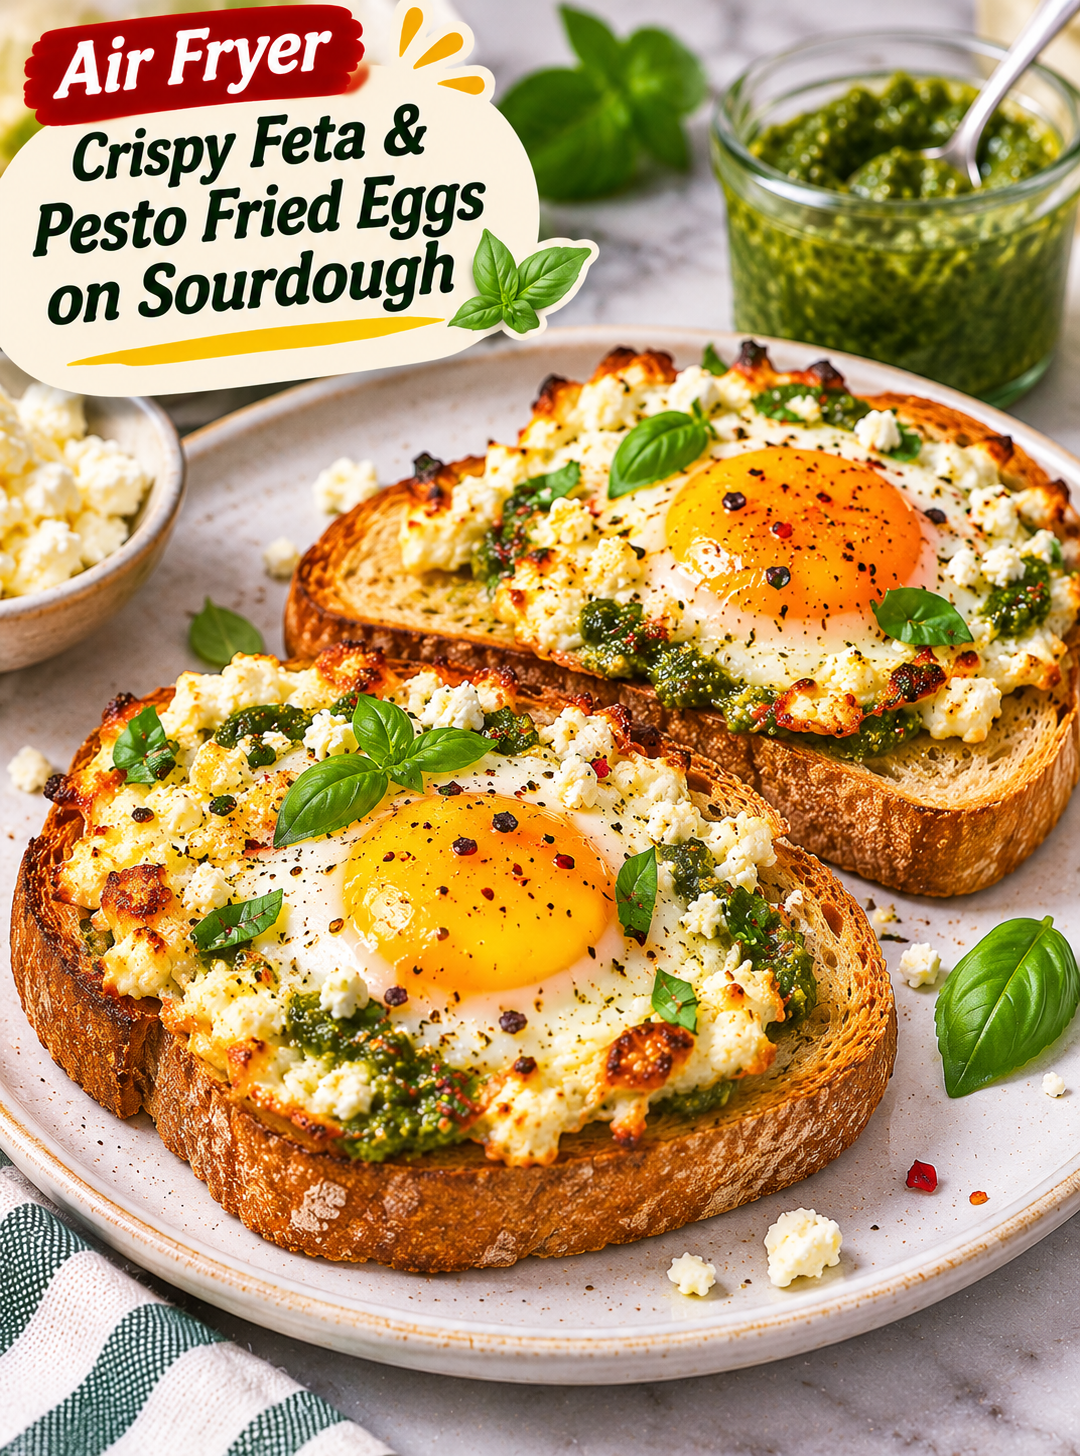
Air Fryer Crispy Feta & Pesto Fried Eggs on Sourdough

Air Fryer Crispy Feta & Pesto Fried Eggs on Sourdough

Want a breakfast that feels special but takes very little effort? These Air Fryer Crispy Feta & Pesto Fried Eggs on Sourdough bring together creamy eggs, golden feta, flavorful pesto, and crunchy toasted bread. Each bite has a delicious mix of crisp edges, rich cheese, fresh herbs, and soft sourdough.

This easy breakfast is inspired by Mediterranean flavors and uses simple ingredients you can find at most grocery stores. The air fryer helps cook the feta and eggs with less hands-on work, while sourdough provides a sturdy, tangy base for serving.

Feta cheese becomes lightly golden around the edges as it cooks. Pesto adds garlic, basil, and olive oil flavor, while the egg brings a creamy texture that pairs beautifully with toasted bread. You can finish the dish with fresh basil, cracked black pepper, or a little chili flake for extra flavor.

Serve it for a relaxed weekend breakfast, a quick weekday brunch, or a satisfying lunch. Once you try this combination, it may become one of your favorite ways to enjoy eggs and sourdough.

Why You’ll Love These Air Fryer Crispy Feta & Pesto Fried Eggs on Sourdough

This recipe combines simple preparation with bold flavor. Here are a few reasons to add it to your breakfast routine.

  1. Crispy feta edges: Feta develops a golden, savory crust around the egg as it cooks.
  2. Rich pesto flavor: Basil pesto adds garlic, herbs, and olive oil to every bite.
  3. Easy air fryer method: The air fryer cooks the egg and cheese in a small oven-safe dish without needing a stovetop skillet.
  4. Crunchy sourdough base: Toasted sourdough holds the egg and provides a satisfying texture.
  5. Simple ingredients: You only need a handful of everyday ingredients.
  6. Easy to customize: Add avocado, tomatoes, chili flakes, or fresh herbs to change the flavor.
  7. Perfect for more than breakfast: Enjoy it as brunch, a light lunch, or a quick savory snack.

Ingredients You’ll Need for Air Fryer Crispy Feta & Pesto Fried Eggs on Sourdough

Choose fresh eggs, good-quality feta, and flavorful pesto for the best results. The ingredients below make two servings.

For the Crispy Feta Eggs

  • ½ cup crumbled feta cheese
  • 2 large eggs
  • 2 teaspoons olive oil
  • 2 tablespoons basil pesto
  • ¼ teaspoon black pepper
  • ¼ teaspoon garlic powder
  • A small pinch of red pepper flakes (optional)

For the Sourdough Toast

  • 2 thick slices sourdough bread
  • 1 teaspoon olive oil or softened butter

Optional Toppings

  • 2 tablespoons chopped fresh basil
  • ½ avocado, sliced
  • ¼ cup cherry tomatoes, halved
  • A little extra crumbled feta
  • Freshly cracked black pepper
  • A squeeze of fresh lemon juice

Ingredient tip: Traditional basil pesto works well, but sun-dried tomato pesto is another flavorful option. If your feta is very salty, avoid adding extra salt until you taste the finished dish.
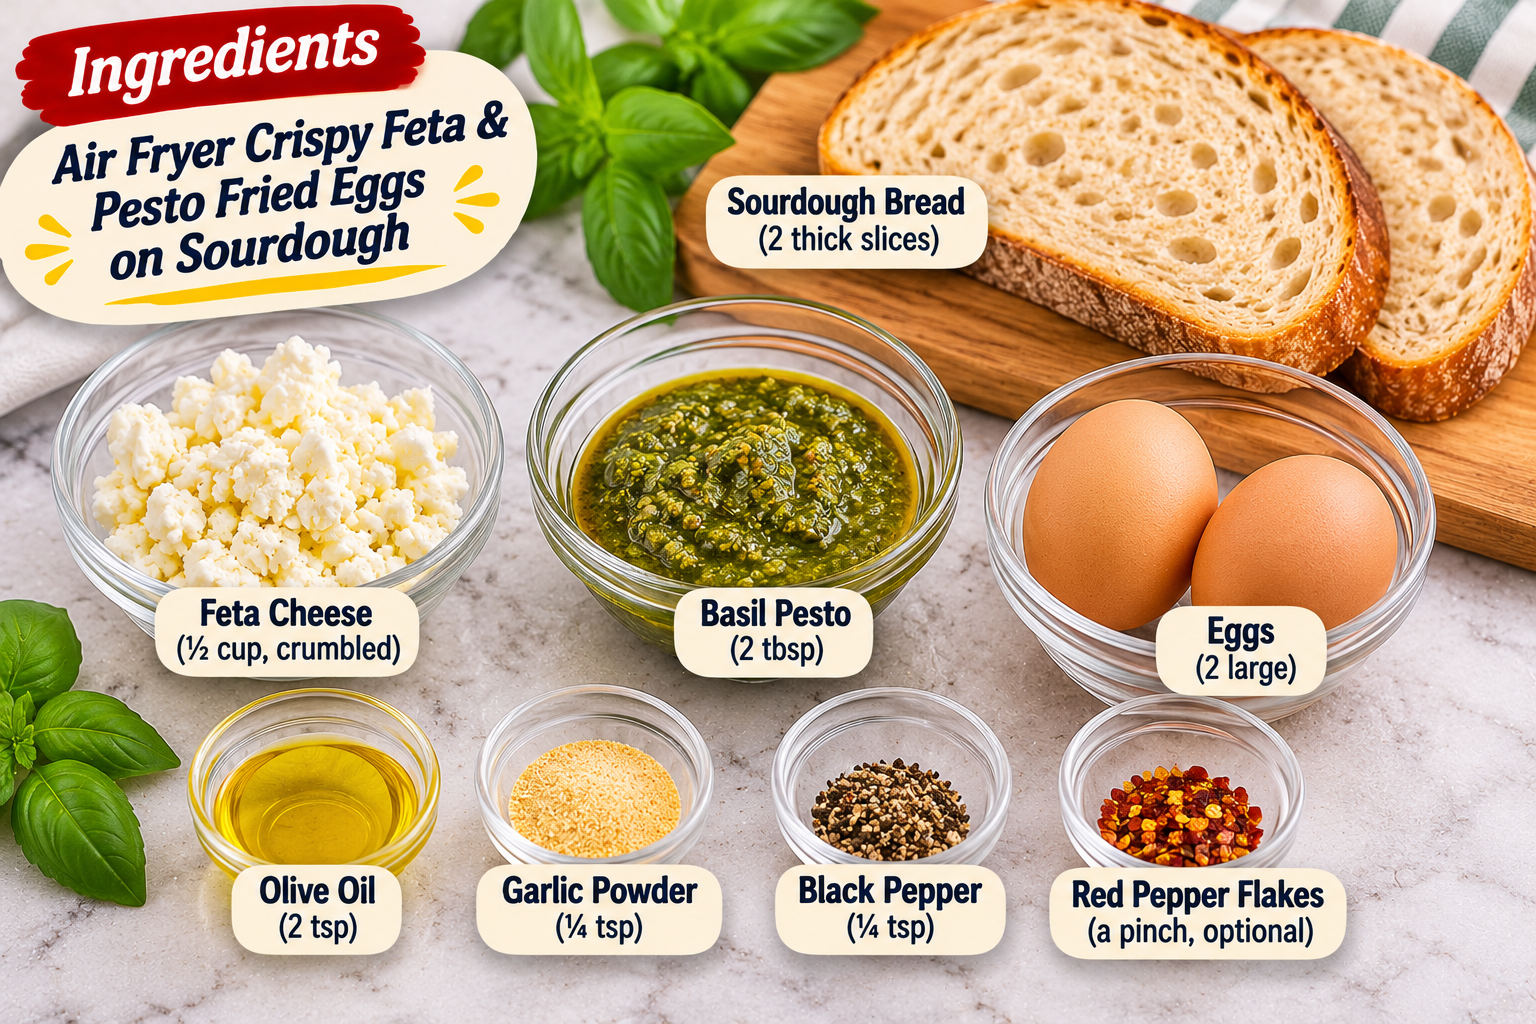
Ingredients for air fryer crispy feta and pesto fried eggs on sourdough, including eggs, crumbled feta cheese, basil pesto, sourdough bread, olive oil, garlic powder, black pepper, and red pepper flakes.

How to Make Air Fryer Crispy Feta & Pesto Fried Eggs on Sourdough

Follow these steps to prepare crispy feta eggs and perfectly toasted sourdough. Cooking times can vary between air fryer models, so check the eggs as they cook.

Step 1: Prepare the Ingredients

Gather the eggs, feta cheese, pesto, sourdough bread, olive oil, and seasonings.

Crumble the feta into small pieces if it is not already crumbled. Chop the fresh basil and prepare any optional toppings, such as avocado or cherry tomatoes.

Set out two small oven-safe ramekins or shallow baking dishes that fit inside your air fryer basket. Check your air fryer manual to confirm that the dishes are safe for the appliance.

Step 2: Prepare the Feta Mixture

Add the crumbled feta to a small bowl. Stir in the olive oil, garlic powder, black pepper, and red pepper flakes if you are using them.

Mix gently until the feta is lightly coated. Keep some larger cheese pieces because they create a pleasant texture after cooking.

Divide the seasoned feta between the two oven-safe dishes. Spread it around the edges, leaving a small space in the center for each egg.
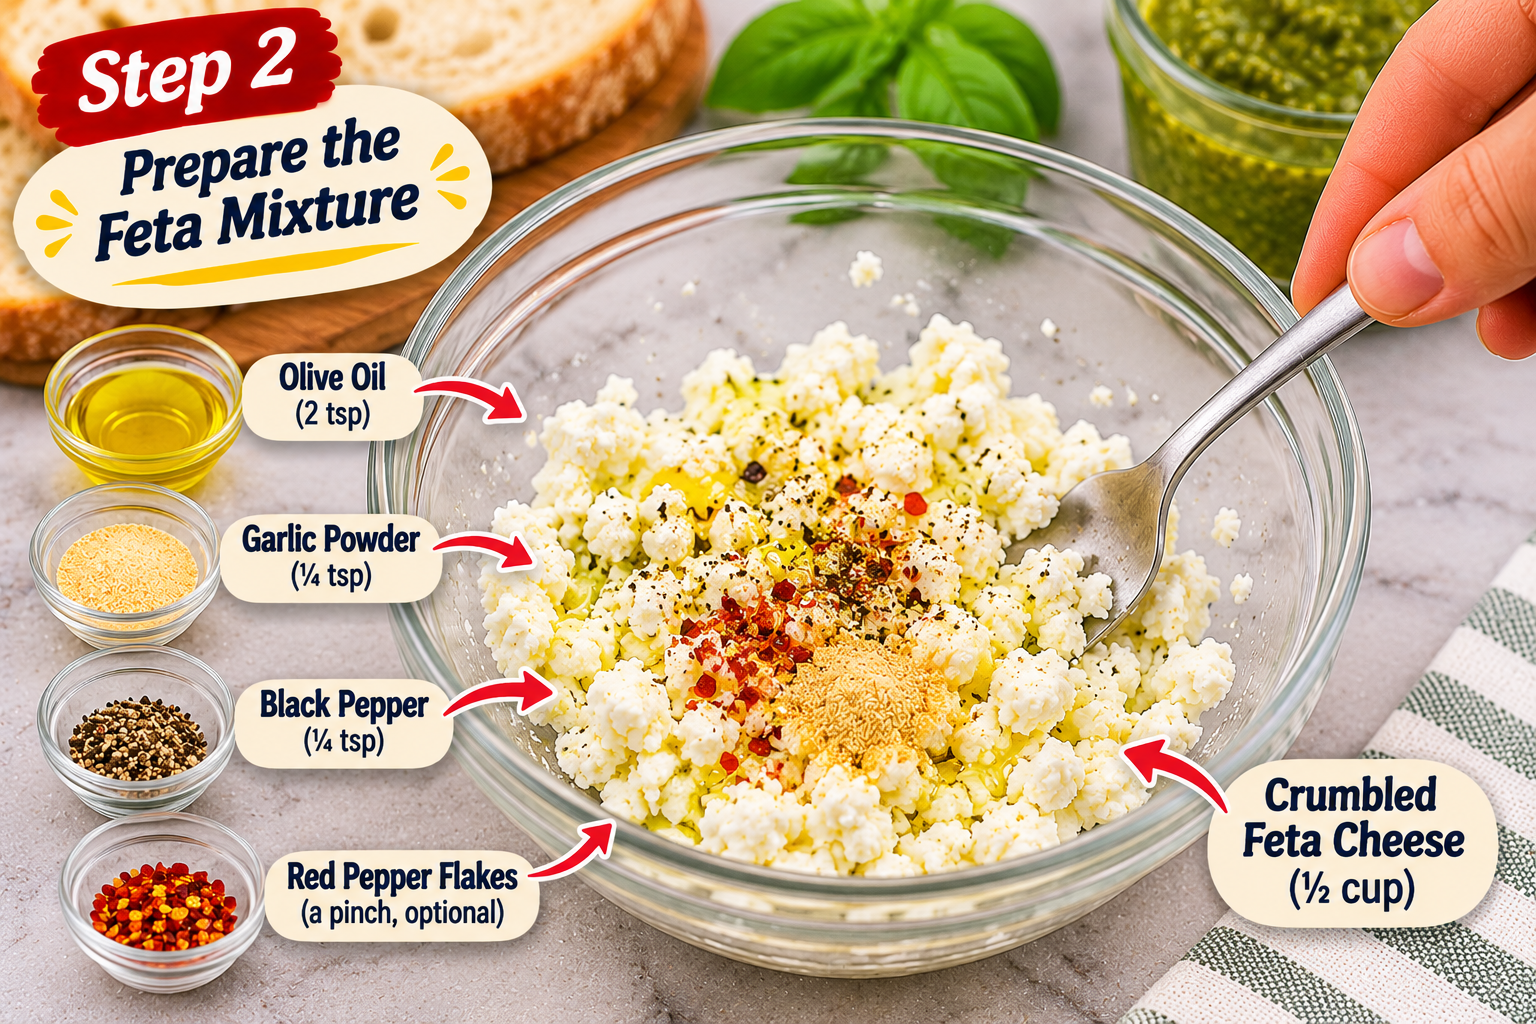
Preparing the feta mixture for air fryer crispy feta and pesto eggs by combining crumbled feta cheese, olive oil, garlic powder, black pepper, and red pepper flakes.

Step 3: Preheat the Air Fryer

Preheat your air fryer to 350°F for about 3 minutes, if your appliance requires preheating.

A preheated air fryer helps the feta begin cooking evenly. It also makes the cooking time easier to manage.

Place the empty ramekins in the basket only if your appliance instructions allow preheating with accessories inside. Otherwise, add them after preheating.

Step 4: Add the Eggs and Pesto

Crack one egg into the center of each feta-lined dish. Take care not to break the yolk if you want a traditional fried-egg appearance.

Add one tablespoon of basil pesto to each dish. You can place a small spoonful beside the yolk or gently swirl it into the feta around the edges.

Avoid covering the entire egg with pesto because the yolk and egg white should remain visible while cooking.

Step 5: Air Fry the Feta and Eggs

Carefully place the ramekins in the air fryer basket. Cook at 350°F for approximately 5–8 minutes, checking the eggs as they cook.

The feta should become warm and lightly golden around the edges. The egg white should turn opaque and begin to set.

For food safety, cook eggs until both the white and yolk are firm, or until the egg mixture reaches 160°F. If you prefer a softer yolk, use pasteurized eggs and understand that a runny yolk carries additional food-safety risk.

Cooking time depends on the size and depth of your ramekins and the type of air fryer you use. Add short cooking intervals if needed rather than leaving the eggs unattended.
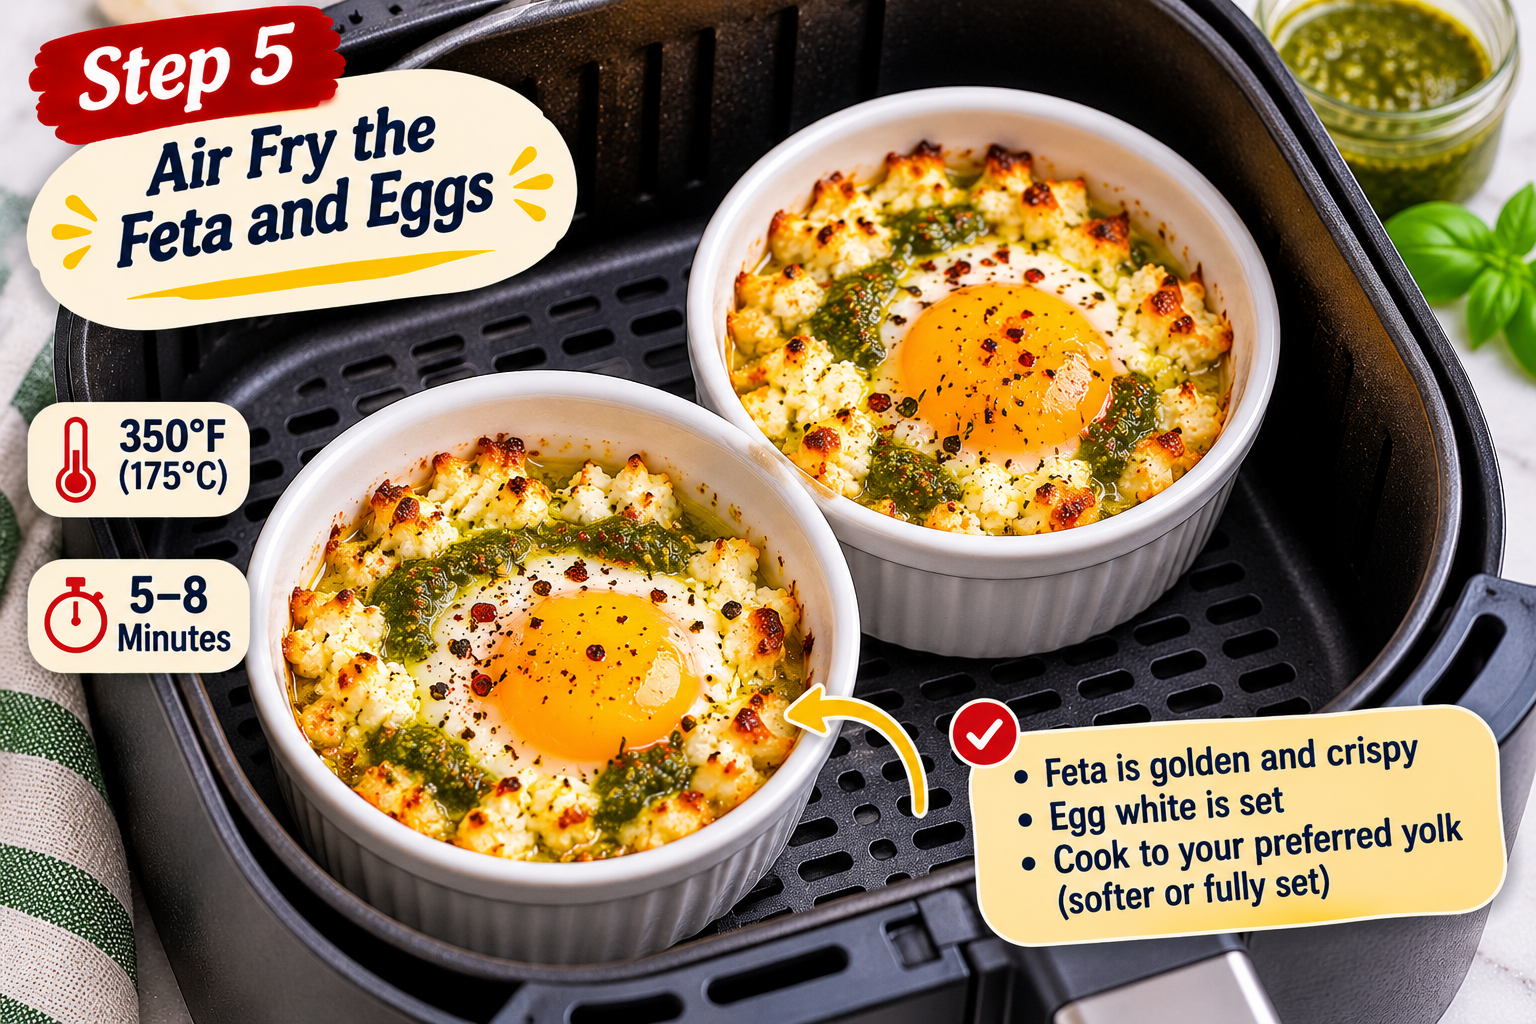
Air frying feta and pesto eggs in oven-safe ramekins at 350°F until the feta turns golden and crispy and the egg whites are set.

Step 6: Toast the Sourdough Bread

While the eggs cook, brush both sides of the sourdough slices lightly with olive oil or softened butter.

Place the bread in the air fryer basket when there is enough space, or toast it separately after removing the cooked egg dishes.

Air fry at approximately 350°F for 2–4 minutes, turning halfway through if needed. Watch the bread closely because thin slices can brown quickly.

The sourdough should be golden and crisp around the edges while remaining slightly tender in the center.

Step 7: Assemble the Toast

Carefully remove the hot ramekins using heat-safe oven mitts. Let them rest briefly because the dishes will remain hot after cooking.

Place one slice of toasted sourdough on each serving plate. Use a spoon to loosen the feta and egg from the sides of the ramekin if necessary.

Transfer one cooked feta egg mixture onto each slice of sourdough. Keep the egg centered so the feta and pesto spread across the toast.
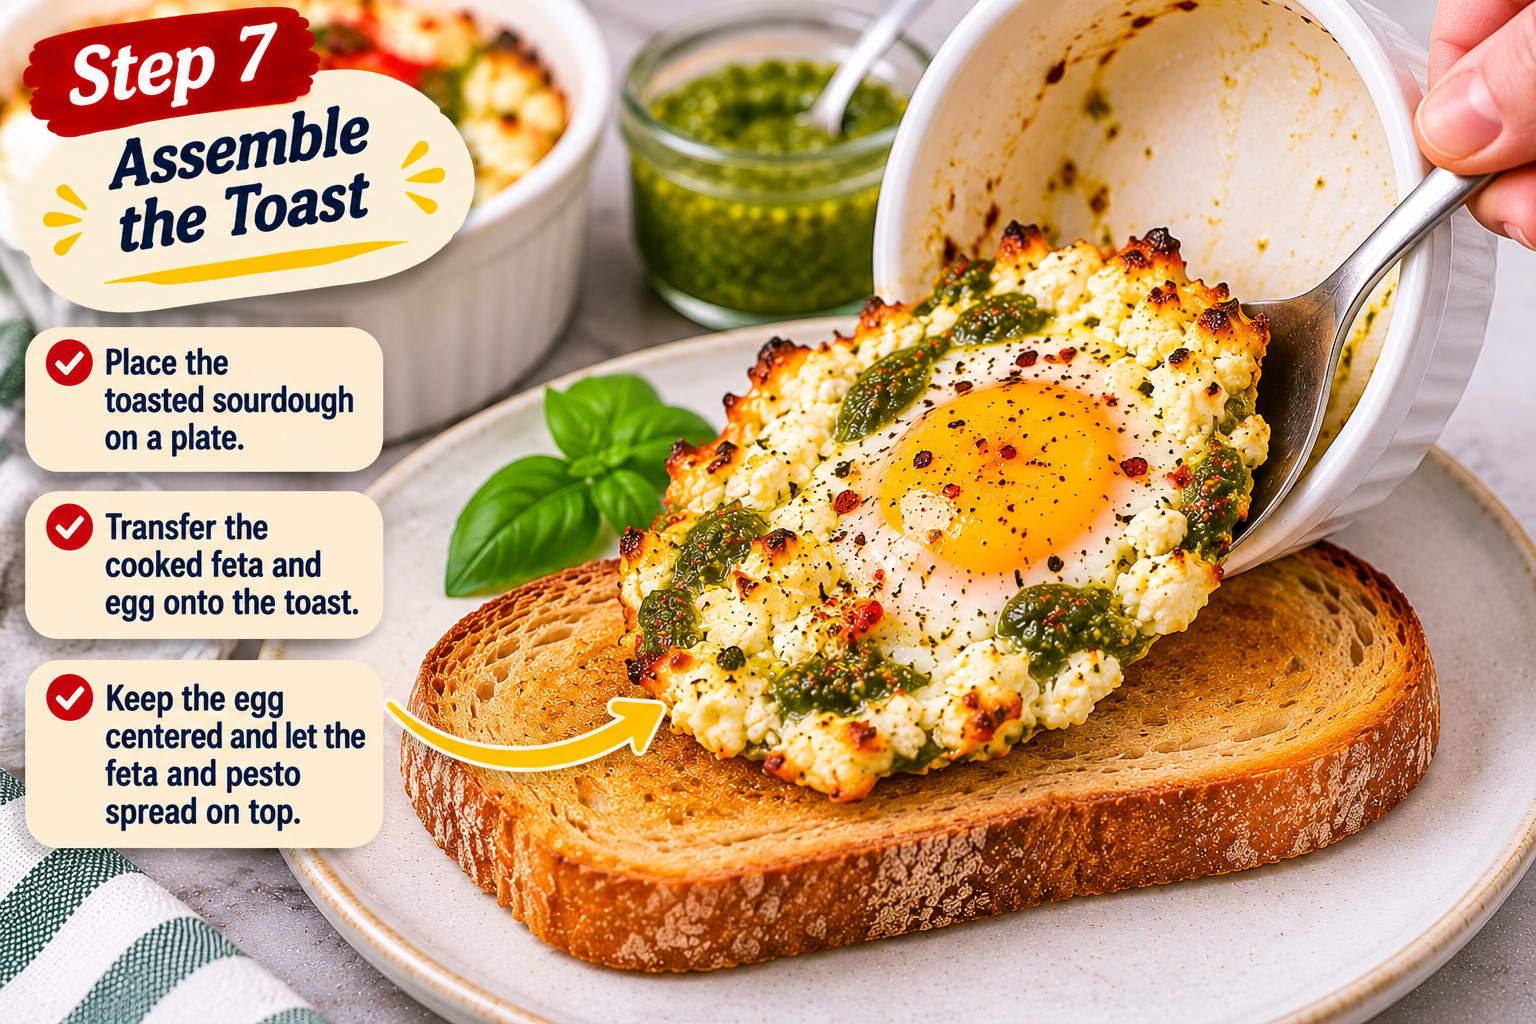
Assembling air fryer crispy feta and pesto fried eggs on golden toasted sourdough bread, with the cooked egg, crispy feta, and basil pesto placed in the center.

Step 8: Add Fresh Toppings

Finish each serving with chopped fresh basil and a little cracked black pepper.

Add sliced avocado or halved cherry tomatoes for extra freshness. A small squeeze of lemon juice can brighten the rich flavor of the feta and pesto.

If you enjoy spicy food, sprinkle a few red pepper flakes over the top. Serve immediately while the sourdough is crisp and the eggs are warm.

Best Tips for Air Fryer Crispy Feta & Pesto Fried Eggs on Sourdough

A few small details can improve the texture and flavor of this breakfast.

  1. Use shallow ramekins: A shallow dish allows the egg to cook more evenly than a deep bowl.
  2. Choose good-quality feta: Feta made from sheep’s milk or a traditional Greek-style blend gives a rich, tangy flavor.
  3. Leave space for the egg: Arrange the feta around the sides so the egg has room in the center.
  4. Avoid too much pesto: A moderate amount adds flavor without making the dish overly oily.
  5. Check the eggs early: Air fryers vary, so begin checking around the 5-minute mark.
  6. Toast bread separately if needed: Do not overcrowd the air fryer basket with ramekins and bread.
  7. Use heat-safe dishes: Only use ramekins approved for oven or air fryer temperatures.
  8. Serve immediately: Sourdough tastes best when it is freshly toasted and crisp.

Easy Variations to Try Air Fryer Crispy Feta & Pesto Fried Eggs on Sourdough

You can change the toppings and seasonings to create different versions of this Mediterranean-inspired breakfast.

Add Creamy Avocado

Place sliced avocado on the sourdough before adding the cooked feta egg. Its creamy texture pairs well with the salty cheese and fresh pesto.

Try Sun-Dried Tomato Pesto

Replace basil pesto with sun-dried tomato pesto for a deeper, slightly sweet flavor. This version tastes especially good with fresh basil and extra feta.

Make It Spicy

Add red pepper flakes, a pinch of cayenne, or a drizzle of hot honey after cooking. Start with a small amount so the spice does not overpower the pesto.

Add Fresh Tomatoes

Serve with halved cherry tomatoes or thin tomato slices. Their juicy texture adds freshness and balances the rich cheese.

Use Different Bread

Sourdough is a great choice, but whole-grain bread or thick country-style bread can also work. Choose slices sturdy enough to hold the egg and cheese.

Add Extra Herbs

Fresh parsley, oregano, chives, or dill can add a different flavor. Use small amounts so the herbs complement the pesto rather than compete with it.

What to Serve with Air Fryer Crispy Feta & Pesto Fried Eggs on Sourdough

These eggs and sourdough are filling on their own, but a few simple sides can turn them into a complete brunch.

  • Fresh fruit: Strawberries, blueberries, or orange slices add a sweet contrast.
  • Greek salad: Tomatoes, cucumber, olives, and a light dressing make a refreshing side.
  • Roasted potatoes: Serve with seasoned breakfast potatoes for a heartier meal.
  • Sautéed spinach: Lightly cooked spinach adds color and pairs well with feta.
  • Fresh avocado salad: Combine avocado, lemon juice, and chopped herbs for a simple side.

For a brunch platter, serve the toast with fresh fruit, cherry tomatoes, and a small bowl of olives.

How to Store and Reheat Leftovers Air Fryer Crispy Feta & Pesto Fried Eggs on Sourdough

This recipe tastes best when freshly prepared because the sourdough stays crisp and the feta has its best texture straight from the air fryer.

If you have leftovers, remove the egg and feta from the bread and place them in an airtight container. Refrigerate within 2 hours of cooking and keep at 40°F or below.

For the best quality, use refrigerated cooked egg leftovers within 3–4 days. Reheat until the center reaches 165°F.

You can reheat the egg and feta mixture in an air fryer at a moderate temperature until heated through. Check frequently to prevent the egg from becoming too dry. Toast fresh sourdough separately and assemble just before serving.

Freezing is not recommended because cooked eggs and feta can change texture after thawing. It is also better to prepare the pesto and fresh toppings shortly before serving.

Helpful Cooking and Food Safety Resources

Want to make your favorite recipes with greater confidence? Following reliable food preparation and safety guidance can help you handle ingredients properly and prepare meals safely at home. Visit the USDA – By What Methods Can You Cook Eggs Safely for practical food safety tips and helpful guidance to support your everyday cooking.

Frequently Asked Questions About Air Fryer Crispy Feta & Pesto Fried Eggs on Sourdough

1. Can I cook feta and eggs together in an air fryer?

Yes. Place the feta around the edges of an oven-safe ramekin, crack the egg into the center, and cook at 350°F until done.

2. How long do eggs take in the air fryer?

They may take about 5–8 minutes in shallow ramekins at 350°F. Timing varies with dish depth and air fryer model.

3. Can I use regular pesto instead of basil pesto?

Yes. Basil pesto is traditional for this recipe, but sun-dried tomato pesto also works well.

4. What type of feta is best?

Traditional Greek-style feta offers a salty, tangy flavor and works well with pesto. Crumbled or block feta can both be used.

5. Can I make this recipe without sourdough?

Yes. Use thick whole-grain bread, country bread, or another sturdy toast that can hold the egg and cheese.

6. How do I keep the sourdough from getting soggy?

Toast the bread separately and assemble it just before serving. Avoid placing the egg mixture on the bread too early.

7. Can I prepare the ingredients ahead of time?

Yes. Crumble the feta, measure the pesto, and prepare the toppings ahead. Cook the eggs and toast the bread just before serving.

8. How do I know when the eggs are safely cooked?

For food safety, cook until the whites and yolks are firm or the egg mixture reaches 160°F. Use a food thermometer when needed.
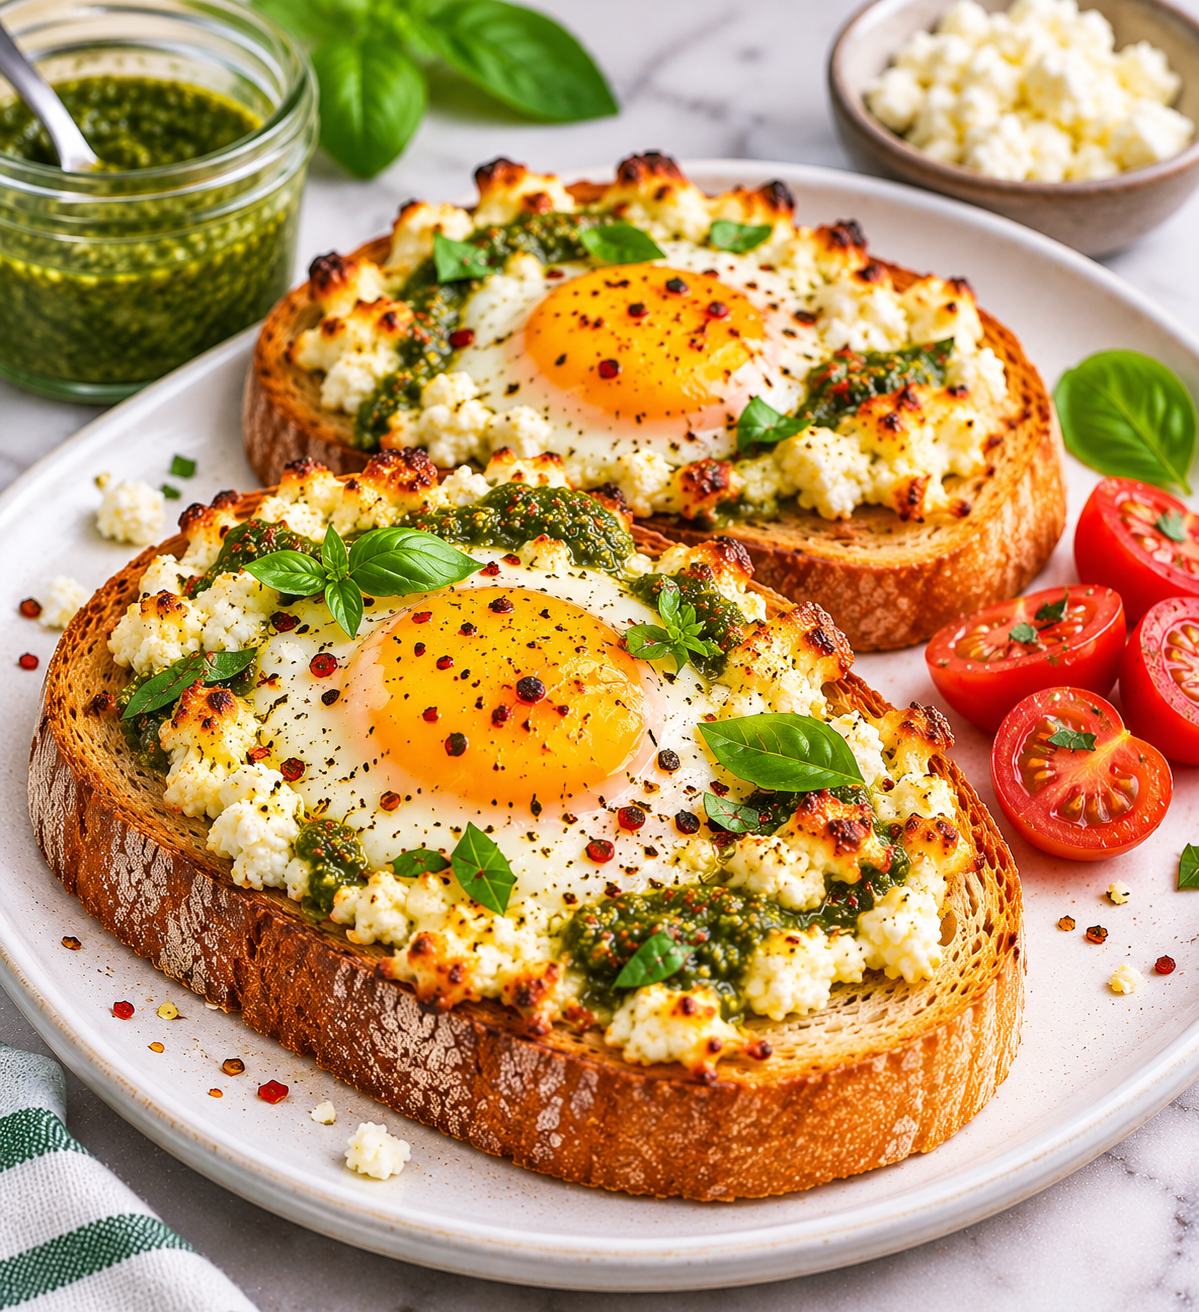
Crispy feta and pesto fried eggs served on golden toasted sourdough bread, topped with fresh basil, black pepper, and red pepper flakes, with cherry tomatoes on the side.

Final Thoughts of Air Fryer Crispy Feta & Pesto Fried Eggs on Sourdough

Air Fryer Crispy Feta & Pesto Fried Eggs on Sourdough are a delicious way to make breakfast feel a little more special. The combination of golden feta, flavorful basil pesto, warm eggs, and crunchy sourdough creates a satisfying meal with very little preparation.

You can keep the recipe simple with just feta and pesto or add avocado, tomatoes, and fresh herbs for extra flavor. It works beautifully for weekend brunch, a quick lunch, or any morning when you want something more exciting than plain toast and eggs.

For the best results, use shallow oven-safe dishes, check the eggs as they cook, and toast the sourdough just before serving.

Which topping would you choose: creamy avocado, juicy cherry tomatoes, or a little extra feta? Share your favorite in the comments!

Discover More Delicious Recipes

Love trying simple, flavorful recipes at home? Explore more delicious ideas at The Protein Blogger, where you can find easy recipes, satisfying meals, and inspiration for your everyday cooking. Try our Air Fryer Honey Glazed Halloumi & Peach Skewers next and discover another tasty dish to add to your meal plan!
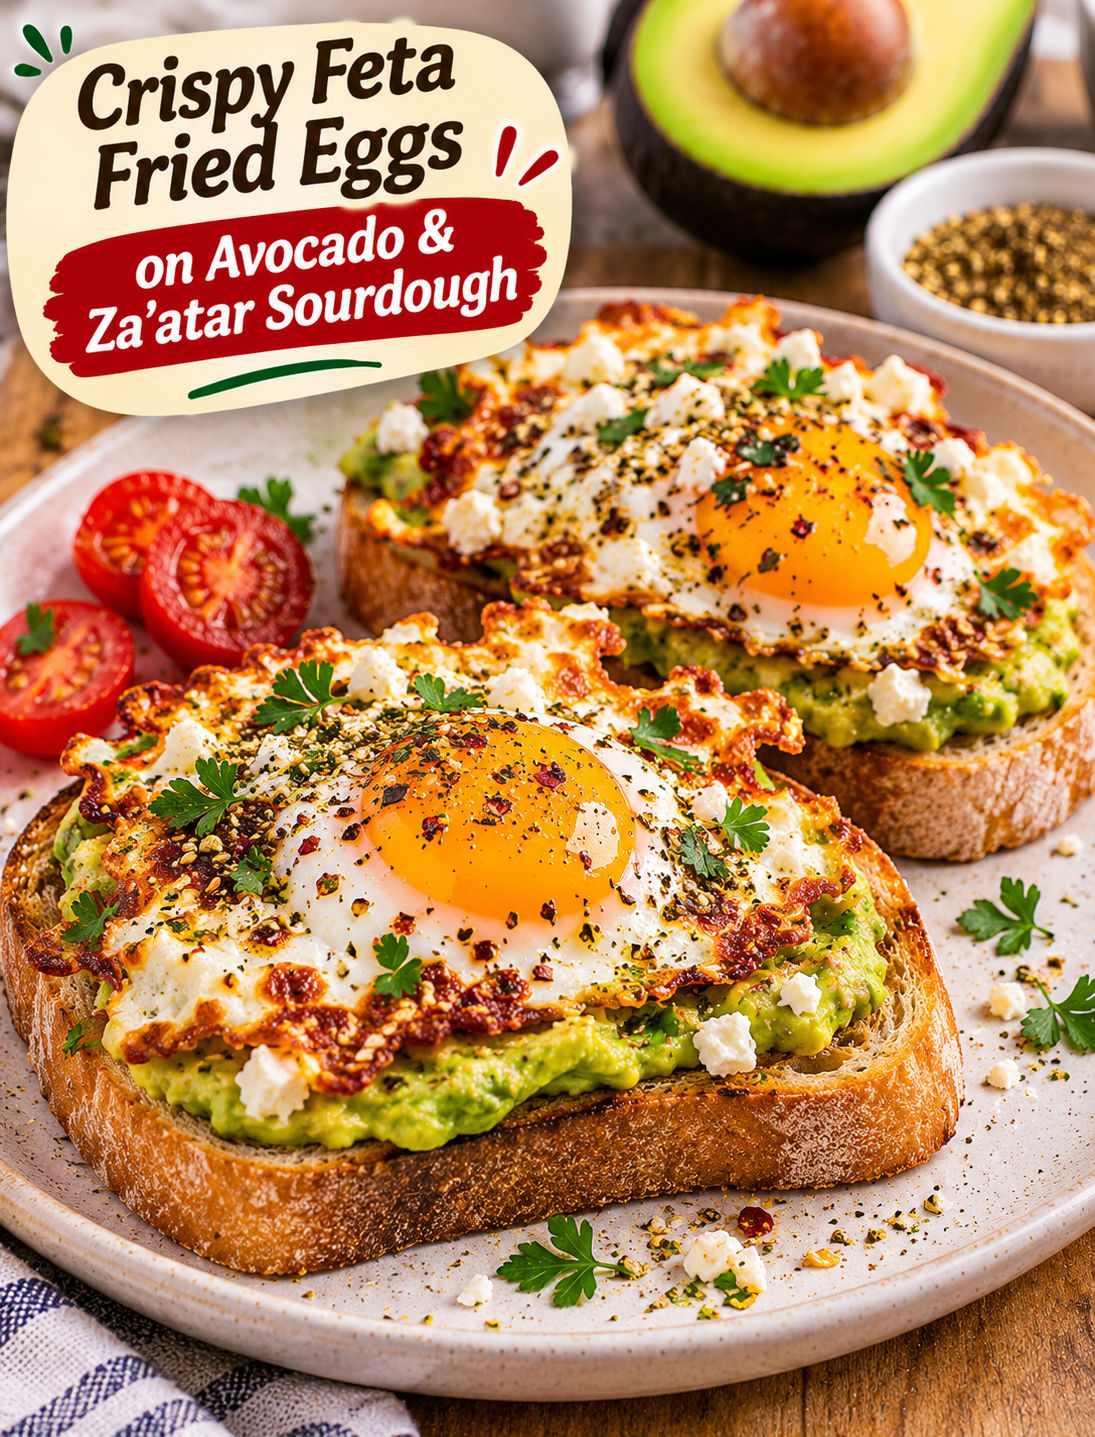
Crispy Feta Fried Eggs on Avocado & Za’atar Sourdough

Crispy Feta Fried Eggs on Avocado & Za'atar Sourdough

If you love a savory breakfast with crispy edges, creamy avocado, and perfectly cooked eggs, this recipe deserves a spot in your morning routine. Crispy Feta Fried Eggs on Avocado & Za’atar Sourdough bring together simple ingredients to create a flavorful breakfast that feels special without requiring much effort.

The best part is the feta cheese. When it cooks in a warm skillet, its edges turn golden and crisp while the center stays soft and salty. A fried egg cooks right alongside it, creating a delicious combination of crispy cheese and rich egg yolk.

Served over toasted sourdough with mashed avocado and a sprinkle of za’atar, every bite has a mix of creamy, crunchy, tangy, and savory flavors.

This easy breakfast works well for busy mornings, weekend brunch, or a satisfying midday meal. You can prepare it in about 20 minutes using ingredients that are easy to find at most U.S. grocery stores.

Why You’ll Love This Crispy Feta Fried Eggs on Avocado & Za’atar Sourdough Recipe

  • Quick to prepare: You can make this breakfast in around 20 minutes.
  • Simple ingredients: Eggs, feta, avocado, sourdough, and a few seasonings create plenty of flavor.
  • Crispy and creamy texture: Golden feta pairs beautifully with soft avocado and a runny egg yolk.
  • Mediterranean-inspired flavor: Za’atar adds an earthy, herbal, and slightly tangy taste.
  • Easy to customize: Add tomatoes, chili flakes, or fresh herbs to make it your own.
  • Great for brunch: The colorful presentation makes it a lovely option for a weekend breakfast.

Ingredients You’ll Need Crispy Feta Fried Eggs on Avocado & Za’atar Sourdough

Each ingredient adds a different flavor or texture to this breakfast. For the best results, use ripe avocado, fresh eggs, and good-quality feta cheese.

Main Ingredients

  • 2 slices sourdough bread: Choose thick slices that toast well and hold the toppings.
  • 2 large eggs: Fresh eggs work well for frying and give you a rich yolk.
  • ½ cup crumbled feta cheese: Use feta made from sheep’s milk or a traditional feta blend for a tangy, salty flavor.
  • 1 ripe avocado: It should feel slightly soft when gently pressed.
  • 1 tablespoon olive oil: Helps crisp the feta and adds a smooth Mediterranean flavor.
  • 1 teaspoon za’atar seasoning: Adds herbal, earthy, and citrusy notes.
  • ¼ teaspoon black pepper: Gives the eggs a mild peppery finish.
  • 1 teaspoon fresh lemon juice: Brightens the mashed avocado.
  • 1 tablespoon chopped fresh parsley: Adds color and a fresh herbal taste.
  • A small pinch of salt: Add only if needed because feta is already salty.

Optional Toppings

  • Red pepper flakes for gentle heat
  • Cherry tomatoes for freshness
  • Extra crumbled feta for serving
  • A small drizzle of extra virgin olive oil
  • Fresh dill or chopped chives

How to Make Crispy Feta Fried Eggs on Avocado & Za’atar Sourdough

Follow these simple steps to prepare crispy feta, perfectly fried eggs, and creamy avocado toast.

Step 1: Prepare the Avocado

  1. Cut the ripe avocado in half and remove the pit.
  2. Scoop the flesh into a small bowl.
  3. Add fresh lemon juice and black pepper.
  4. Mash with a fork until creamy but slightly chunky.
  5. Taste and add a little salt only if needed.

Tip: Avoid over-mashing the avocado if you enjoy a thicker texture on your toast.

Step 2: Toast the Sourdough Bread

  1. Place the sourdough slices in a toaster or on a warm skillet.
  2. Toast until the outside becomes golden and crisp.
  3. Remove the bread and place it on serving plates.
  4. Keep the slices warm while you prepare the eggs.

Tip: A sturdy sourdough slice works best because it supports the avocado and egg without becoming soggy.

Step 3: Heat the Skillet

  1. Place a nonstick skillet over medium-low heat.
  2. Add the olive oil and spread it across the cooking surface.
  3. Allow the oil to warm gently.
  4. Avoid overheating the pan because feta can brown too quickly.

A medium-low temperature gives the cheese time to develop a golden crust without burning.

Step 4: Add the Feta Cheese

  1. Divide the crumbled feta into two small portions.
  2. Place each portion in the skillet, leaving enough space for the eggs.
  3. Gently spread each portion into a thin circle.
  4. Cook for about 1–2 minutes until the bottom edges begin to turn golden.

The feta should start to melt slightly and form a crisp layer around the edges.

Step 5: Add the Eggs

  1. Carefully crack one egg over each feta portion.
  2. Keep the yolks centered if possible.
  3. Season with black pepper and a light sprinkle of za’atar.
  4. Cover the skillet with a lid to help the egg whites cook evenly.
  5. Cook for about 3–5 minutes, depending on your preferred yolk texture.

Cook until the egg whites are set. For food safety, eggs should reach 160°F (71°C), or be cooked until both the whites and yolks are firm.

Step 6: Spread the Avocado

  1. Divide the mashed avocado between the toasted sourdough slices.
  2. Spread it evenly across each slice.
  3. Leave a small border around the edges.
  4. Add a light sprinkle of za’atar for extra flavor.

This creamy avocado layer balances the salty feta and gives the toast a smooth texture.

Step 7: Assemble the Toast

  1. Carefully remove each feta fried egg from the skillet using a thin spatula.
  2. Place one egg and its crispy feta layer over each avocado toast.
  3. Keep the crispy cheese underneath the egg when possible.
  4. Add chopped parsley and optional red pepper flakes.

Handle the eggs gently so the yolks stay intact if you prefer a softer center.

Step 8: Garnish and Serve

  1. Add cherry tomato halves or fresh herbs if desired.
  2. Finish with a small drizzle of olive oil.
  3. Sprinkle a little extra za’atar over the top.
  4. Serve immediately while the sourdough is crisp and the feta is warm.

Enjoy your breakfast while the crispy cheese and creamy avocado are at their best.

Tips for Crispy Feta Fried Eggs on Avocado & Za’atar Sourdough

A few small details can make a big difference in the final texture and flavor.

  • Use medium-low heat: Gentle heat helps the feta brown without burning.
  • Choose block feta: Crumbling feta from a block often gives a better texture than very fine pre-crumbled cheese.
  • Use ripe avocado: A ripe avocado is easier to mash and spreads smoothly.
  • Toast the bread well: Crisp sourdough holds the toppings better.
  • Avoid too much salt: Feta already provides plenty of saltiness.
  • Cook eggs to your preference: Keep the heat gentle and cook until the whites are properly set.
  • Serve immediately: The feta crust is at its crispiest straight from the skillet.

Easy Variations of Crispy Feta Fried Eggs on Avocado & Za’atar Sourdough

You can adjust this breakfast with a few simple ingredient swaps.

Add Cherry Tomatoes

Serve with halved cherry tomatoes for a juicy, slightly sweet contrast to the salty feta.

Make It Spicy

Add red pepper flakes, sliced jalapeños, or a little hot sauce for extra heat.

Use Whole-Grain Bread

Replace sourdough with whole-grain toast if you prefer a heartier bread with a nutty flavor.

Add Fresh Herbs

Fresh dill, parsley, or chives bring brightness and complement the Mediterranean seasoning.

Add Cucumber

Thinly sliced cucumber adds a cool, crunchy texture that pairs well with avocado.

What to Serve With This Crispy Feta Fried Eggs on Avocado & Za’atar Sourdough

This sourdough toast is satisfying on its own, but a few sides can turn it into a complete brunch spread.

  • Fresh fruit: Serve with berries, orange slices, or melon.
  • Greek yogurt: Add a small bowl of plain Greek yogurt for extra protein.
  • Roasted tomatoes: Their natural sweetness balances the salty feta.
  • Cucumber salad: A simple lemon and olive oil dressing keeps the meal fresh.
  • Coffee or tea: Pair with your favorite morning drink.

How to Store Leftovers Crispy Feta Fried Eggs on Avocado & Za’atar Sourdough

This recipe tastes best when served fresh because the sourdough and feta lose their crisp texture over time.

  • Avocado: Store leftover mashed avocado in an airtight container with a little lemon juice. Refrigerate and use as soon as possible.
  • Cooked eggs: Refrigerate promptly in a covered container and use within 3–4 days.
  • Feta: Keep unused feta refrigerated according to its package instructions.
  • Assembled toast: Avoid storing fully assembled toast because the bread can become soggy.

For the best result, prepare only as many eggs and toast slices as you plan to serve.

Helpful Cooking and Food Safety Resources

Want to make your favorite recipes with greater confidence? Following reliable food preparation and safety guidance can help you handle ingredients properly and prepare meals safely at home. Visit the USDA FSIS – How to Cook Eggs Safely for practical food safety tips and helpful guidance to support your everyday cooking.

Common Mistakes to Avoid Crispy Feta Fried Eggs on Avocado & Za’atar Sourdough

  • Cooking feta over high heat: This can burn the cheese before it becomes crisp.
  • Using unripe avocado: Firm avocado is difficult to mash and lacks a creamy texture.
  • Adding too much za’atar: A heavy sprinkle can overpower the mild avocado flavor.
  • Skipping the toasted bread: Soft bread may become soggy under the toppings.
  • Leaving the eggs unattended: Eggs cook quickly, especially when the skillet is covered.

Frequently Asked Questions About Crispy Feta Fried Eggs on Avocado & Za’atar Sourdough

1. Can I use crumbled feta for this recipe?

Yes. Crumbled feta works well, but gently press it into small circles so it forms a more even crispy layer.

2. What does za’atar taste like?

Za’atar has an earthy, herbal, and slightly tangy flavor, often with notes of thyme, sesame, and sumac.

3. Can I make this recipe without sourdough?

Yes. Whole-grain bread, country bread, or thick-cut multigrain toast are good alternatives.

4. How do I make feta crispy?

Cook crumbled feta in a lightly oiled skillet over medium-low heat until the bottom edges turn golden and crisp.

5. Can I prepare the avocado ahead of time?

You can mash it shortly before serving and refrigerate it with lemon juice in an airtight container to slow browning.

6. Is this recipe suitable for meal prep?

It is best prepared fresh, but you can portion the toppings and seasonings ahead of time to save cooking time.

7. Can I make the eggs fully cooked?

Yes. Cover the skillet and cook until both the egg whites and yolks are firm, or until they reach 160°F (71°C).

8. What can I use instead of za’atar?

Try a small amount of dried oregano, thyme, sesame seeds, and sumac if available.

Final Thoughts of Crispy Feta Fried Eggs on Avocado & Za’atar Sourdough

Crispy Feta Fried Eggs on Avocado & Za’atar Sourdough turn everyday breakfast ingredients into a flavorful and satisfying meal. The golden feta, creamy avocado, and seasoned eggs create a delicious contrast of textures, while toasted sourdough gives every bite a sturdy, crunchy base.

Make it for a relaxed weekend brunch or a quick weekday breakfast. Add your favorite fresh toppings, adjust the seasoning, and enjoy it straight from the skillet.

Give this recipe a try! Would you top your toast with extra chili flakes or fresh cherry tomatoes? Share your favorite combination in the comments.

Discover More Delicious Recipes

Love trying simple, flavorful recipes at home? Explore more delicious ideas at The Protein Blogger, where you can find easy recipes, satisfying meals, and inspiration for your everyday cooking. Try our Carrot Cake Protein Muffins next and discover another tasty dish to add to your meal plan!
 

Air Fryer Spinach Feta Tortilla Quiche Cups

Air Fryer Spinach Feta Tortilla Quiche Cups

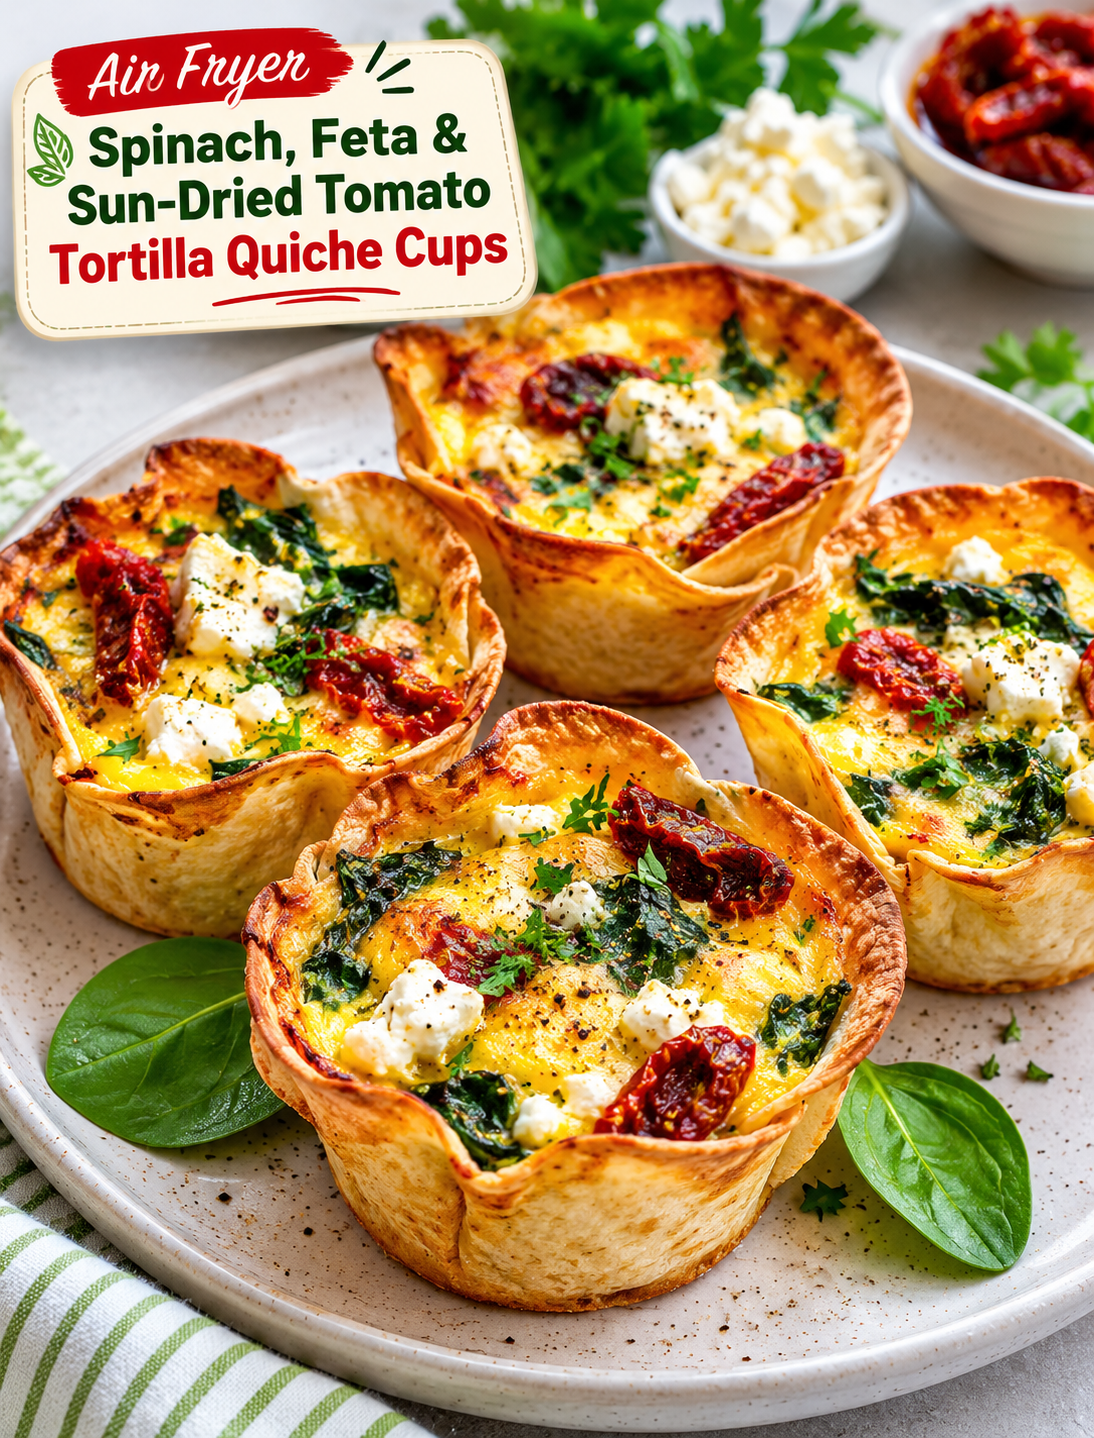
Imagine biting into a golden, crispy tortilla cup filled with fluffy eggs, creamy feta, tender spinach, and tangy sun-dried tomatoes. These Air Fryer Crispy Spinach, Feta & Sun-Dried Tomato Tortilla Quiche Cups bring the delicious flavors of a Mediterranean-style breakfast into one easy, handheld meal.

Unlike traditional quiche, this recipe uses small flour tortillas instead of pastry dough. The tortillas form crisp edible cups that hold a savory egg filling without requiring complicated preparation. Everything cooks in the air fryer, making this a convenient option for busy mornings, weekend brunch, or a quick lunch.

Each cup combines simple ingredients that work beautifully together. Spinach adds freshness, feta brings a salty and creamy flavor, and sun-dried tomatoes provide a rich, slightly sweet taste. A little mozzarella helps bind the filling and creates a delicious cheesy finish.

You can prepare these individual quiche cups for breakfast, serve them at a brunch gathering, or make a batch for convenient weekday meals. They are easy to customize with your favorite vegetables, herbs, and cheeses.

Why You’ll Love These Tortilla Quiche Cups

There are plenty of reasons to add this recipe to your breakfast rotation:

  • Crispy tortilla shells: Small flour tortillas create golden, crunchy cups without making pastry dough.
  • Flavorful Mediterranean filling: Spinach, feta, and sun-dried tomatoes deliver a delicious combination of savory and tangy flavors.
  • Quick preparation: The filling takes only a few minutes to mix.
  • Individual portions: Each tortilla cup is easy to serve and enjoy.
  • Air fryer convenience: You can cook small batches without heating a full-sized oven.
  • Easy to customize: Add mushrooms, bell peppers, olives, or your favorite cheese.
  • Great for meal prep: Prepare several cups ahead of time and refrigerate the leftovers.

Preparation and Cooking Time

Detail Time
Prep Time 12 minutes
Cook Time 8–12 minutes
Total Time 20–24 minutes
Servings 4 tortilla cups
Air Fryer Temperature 325°F (163°C)

Cooking time may vary depending on tortilla thickness, filling depth, and air fryer model.

Ingredients You’ll Need

These ingredients create four individual tortilla quiche cups.

For the Tortilla Cups

  • 4 small flour tortillas (approximately 6 inches each)
  • 1 teaspoon olive oil or cooking spray

For the Egg Filling

  • 4 large eggs
  • 2 tablespoons milk
  • ½ cup fresh spinach, finely chopped
  • ⅓ cup crumbled feta cheese
  • ¼ cup sun-dried tomatoes, drained and finely chopped
  • ¼ cup shredded mozzarella cheese
  • 2 tablespoons finely diced red onion
  • 1 tablespoon chopped fresh parsley
  • ¼ teaspoon garlic powder
  • ¼ teaspoon dried oregano
  • ⅛ teaspoon black pepper
  • A small pinch of salt, if needed

Optional Toppings

  • Extra crumbled feta
  • Fresh parsley or basil
  • A pinch of red pepper flakes
  • A little shredded mozzarella
  • Freshly cracked black pepper

Ingredient tip: Use sun-dried tomatoes packed in oil, but drain them well before chopping. This prevents excess oil from making the egg filling greasy.

How to Make Air Fryer Crispy Spinach, Feta & Sun-Dried Tomato Tortilla Quiche Cups

Follow these simple steps to create crisp tortilla shells with a soft, flavorful egg center.

Step 1: Prepare the Tortillas

  • Take four small flour tortillas and let them sit at room temperature for a few minutes.
  • Lightly warm each tortilla for about 10–15 seconds in the microwave to make it easier to shape.
  • Brush both sides lightly with olive oil or use a little cooking spray.
  • Gently press each tortilla into a small, air-fryer-safe ovenproof ramekin or silicone baking cup.
  • Fold the edges naturally to create a cup shape.

Choose containers that fit comfortably inside your air fryer basket and are rated for the cooking temperature.

Step 2: Pre-Crisp the Tortilla Shells

  • Preheat the air fryer to 325°F (163°C), if your model requires preheating.
  • Place the prepared tortilla cups in their heat-safe containers.
  • Air fry for approximately 2–3 minutes.
  • Check that the tortillas have started to firm up but are not overly browned.

Pre-crisping helps the tortilla shells hold their shape after adding the wet egg mixture.

Step 3: Prepare the Spinach and Tomato Filling

  • Wash and dry the fresh spinach thoroughly.
  • Chop it into small pieces so it distributes evenly through the egg mixture.
  • Drain the sun-dried tomatoes and chop them into small pieces.
  • Finely dice the red onion.
  • If the spinach is very wet, briefly sauté it in a pan and allow it to cool before using.

Removing excess moisture helps prevent watery quiche cups.

Step 4: Whisk the Egg Mixture

  • Crack the four eggs into a medium mixing bowl.
  • Add the milk, garlic powder, dried oregano, and black pepper.
  • Add a small pinch of salt only if needed because feta already contains salt.
  • Whisk until the eggs and milk are fully combined.

A smooth egg mixture helps the filling cook evenly and creates a soft, fluffy texture.

Step 5: Add the Vegetables and Cheese

  • Add the chopped spinach to the egg mixture.
  • Stir in the sun-dried tomatoes and diced red onion.
  • Add the crumbled feta and shredded mozzarella.
  • Mix gently until the ingredients are evenly distributed.
  • Add the chopped parsley for a fresh herbal flavor.

Keep a little feta and mozzarella aside if you want to garnish the tops before cooking.

Step 6: Fill the Tortilla Cups

  • Carefully remove the pre-crisped tortilla cups from the air fryer.
  • Divide the egg mixture evenly among the four cups.
  • Fill each tortilla approximately two-thirds to three-quarters full.
  • Avoid filling them to the top because the eggs expand as they cook.
  • Sprinkle the reserved cheese over each cup.

Make sure the filling stays inside the tortilla shells. Do not overfill, as the egg mixture may spill during cooking.

Step 7: Air Fry Until the Eggs Are Set

  • Arrange the filled tortilla cups in a single layer inside the air fryer.
  • Leave enough space between them for hot air to circulate.
  • Air fry at 325°F (163°C) for approximately 8–12 minutes.
  • Begin checking around the 8-minute mark.
  • Continue cooking until the egg centers are firm and no longer liquid.

For food safety, the egg mixture should reach an internal temperature of 160°F (71°C). Check the center with a food thermometer.

Step 8: Add the Final Toppings

  • Carefully remove the quiche cups from the air fryer.
  • Allow them to rest for approximately 2–3 minutes.
  • Sprinkle with fresh parsley, extra feta, or black pepper.
  • Add a pinch of red pepper flakes if you enjoy a little heat.

The resting time helps the filling settle and makes the cups easier to remove from their containers.

Step 9: Serve and Enjoy

  • Carefully lift the tortilla cups out of their ramekins or silicone molds.
  • Arrange them on a serving plate.
  • Serve warm with fresh fruit, avocado slices, or a simple green salad.

Enjoy the contrast between the crispy tortilla edges and the soft, cheesy Mediterranean-inspired filling.

Tips for Perfect Crispy Tortilla Quiche Cups

A few simple techniques can make a big difference in the final texture.

  1. Use small tortillas: Six-inch flour tortillas are easier to shape into individual cups.
  2. Warm before shaping: Slightly warming the tortillas helps prevent cracks and makes them more flexible.
  3. Pre-crisp the shells: A short initial cooking time helps the tortillas hold their shape.
  4. Drain sun-dried tomatoes: Excess oil can affect the texture of the egg filling.
  5. Dry the spinach: Wet spinach can release moisture and make the centers soggy.
  6. Avoid overfilling: Leave room for the egg mixture to expand during cooking.
  7. Use heat-safe containers: Silicone molds and oven-safe ramekins help support the tortilla shells.
  8. Check the egg centers: Cooking times vary, so use a thermometer to confirm the eggs reach 160°F (71°C).
  9. Cook in batches: Avoid overcrowding the air fryer basket for more even results.

Delicious Variations to Try

You can easily change the filling while keeping the same tortilla-cup method.

1. Mediterranean Olive Quiche Cups

Add 2 tablespoons of chopped Kalamata olives to the filling. Their briny flavor pairs especially well with feta and sun-dried tomatoes.

2. Mushroom and Spinach Cups

Add ¼ cup of finely chopped, sautéed mushrooms. Cook off their moisture before mixing them into the eggs.

3. Bell Pepper and Feta Cups

Mix in ¼ cup of finely diced red or yellow bell pepper for extra color, sweetness, and crunch.

4. Turkey Bacon Quiche Cups

Add ¼ cup of fully cooked, crumbled turkey bacon for a smoky, savory variation.

5. Cheddar and Spinach Cups

Replace the mozzarella with sharp cheddar for a stronger cheese flavor. Keep the feta for its creamy, salty taste.

6. Spicy Mediterranean Cups

Add a pinch of red pepper flakes and a little chopped jalapeño to create a spicy breakfast option.

What to Serve with Tortilla Quiche Cups

These individual quiche cups are satisfying on their own, but pairing them with a few simple sides creates a more complete meal.

  • Fresh fruit salad: Strawberries, blueberries, melon, and grapes add natural sweetness.
  • Avocado slices: Creamy avocado balances the tangy feta and tomato flavors.
  • Greek yogurt: Plain Greek yogurt provides a cool, creamy side.
  • Roasted breakfast potatoes: Crispy potatoes make a hearty brunch combination.
  • Fresh cucumber salad: Cucumber, lemon juice, and parsley add a refreshing contrast.
  • Green salad: Serve with mixed greens and a light lemon dressing.
  • Fresh orange juice: A glass of orange juice complements the savory breakfast flavors.

Storage and Reheating Instructions

How to Store

Allow the tortilla quiche cups to cool slightly.

  • Place leftovers in an airtight container.
  • Refrigerate within 2 hours of cooking.
  • Store in the refrigerator for up to 3–4 days.
  • Keep the cups in a single layer when possible to help protect their shape.

How to Reheat

The air fryer is the best option for bringing back some of the tortilla’s crispness.

  • Preheat the air fryer to 300°F (150°C).
  • Place the refrigerated quiche cups in the basket.
  • Heat for approximately 3–5 minutes, or until warmed through.
  • Check that the center reaches 165°F (74°C).

You can also use a microwave, but the tortilla shell may become softer.

Can You Freeze These Quiche Cups?

Yes, but the tortilla texture may change slightly after freezing.

  • Allow the cups to cool completely.
  • Wrap each portion individually.
  • Place them in a freezer-safe container.
  • Freeze for up to 2 months for best quality.
  • Thaw overnight in the refrigerator before reheating.

For the best crispy texture, freshly prepared cups are recommended.

Frequently Asked Questions

1. Can I use corn tortillas instead of flour tortillas?

Yes, but corn tortillas are less flexible. Warm them gently before shaping and check that they fit securely inside your cooking containers.

2. Can I make these tortilla quiche cups without milk?

Yes. Simply leave out the milk or replace it with an unsweetened milk alternative. The eggs will still cook properly.

3. Why are my tortilla cups soggy?

Excess moisture from spinach or tomatoes can make the shells soft. Dry the vegetables, drain the tomatoes, and pre-crisp the tortillas before filling.

4. Can I use frozen spinach?

Yes. Thaw it completely, squeeze out excess water, and chop it before adding it to the egg mixture.

5. Can I prepare these cups ahead of time?

Yes. Prepare the vegetable and cheese filling in advance and refrigerate it separately. Assemble and cook the tortilla cups shortly before serving.

6. How do I know when the eggs are fully cooked?

The center should be firm with no liquid egg remaining. Use a food thermometer to confirm an internal temperature of 160°F (71°C).

7. Can I make these quiche cups dairy-free?

Yes. Use an unsweetened dairy-free milk alternative and dairy-free cheese. Check the pesto or other added ingredients if using them to make sure they contain no dairy.

8. Can I make larger tortilla quiche cups?

Yes. Use larger tortillas and appropriately sized oven-safe containers. Add a little more filling and adjust the cooking time while checking the center for doneness.

Final Thoughts

These Air Fryer Crispy Spinach, Feta & Sun-Dried Tomato Tortilla Quiche Cups are a delicious way to make breakfast more interesting. The crispy tortilla shell, fluffy egg filling, tangy feta, and rich sun-dried tomatoes create a combination that feels special without requiring complicated cooking techniques.

They are easy to customize, simple to portion, and suitable for breakfast, brunch, or a quick lunch. Keep the ingredients on hand and you can prepare a flavorful batch whenever you need a convenient meal.

Ready to give your breakfast a Mediterranean-inspired upgrade? Try these crispy tortilla quiche cups and tell us which addition you love most: extra feta, Kalamata olives, or sautéed mushrooms!

Save this recipe for your next breakfast, share it with a friend who loves easy egg recipes, and let us know how your batch turns out.

Spinach & Potato Rosti Bake with Feta

Crispy Spinach Potato Rosti With Feta & Sun-Dried Tomato

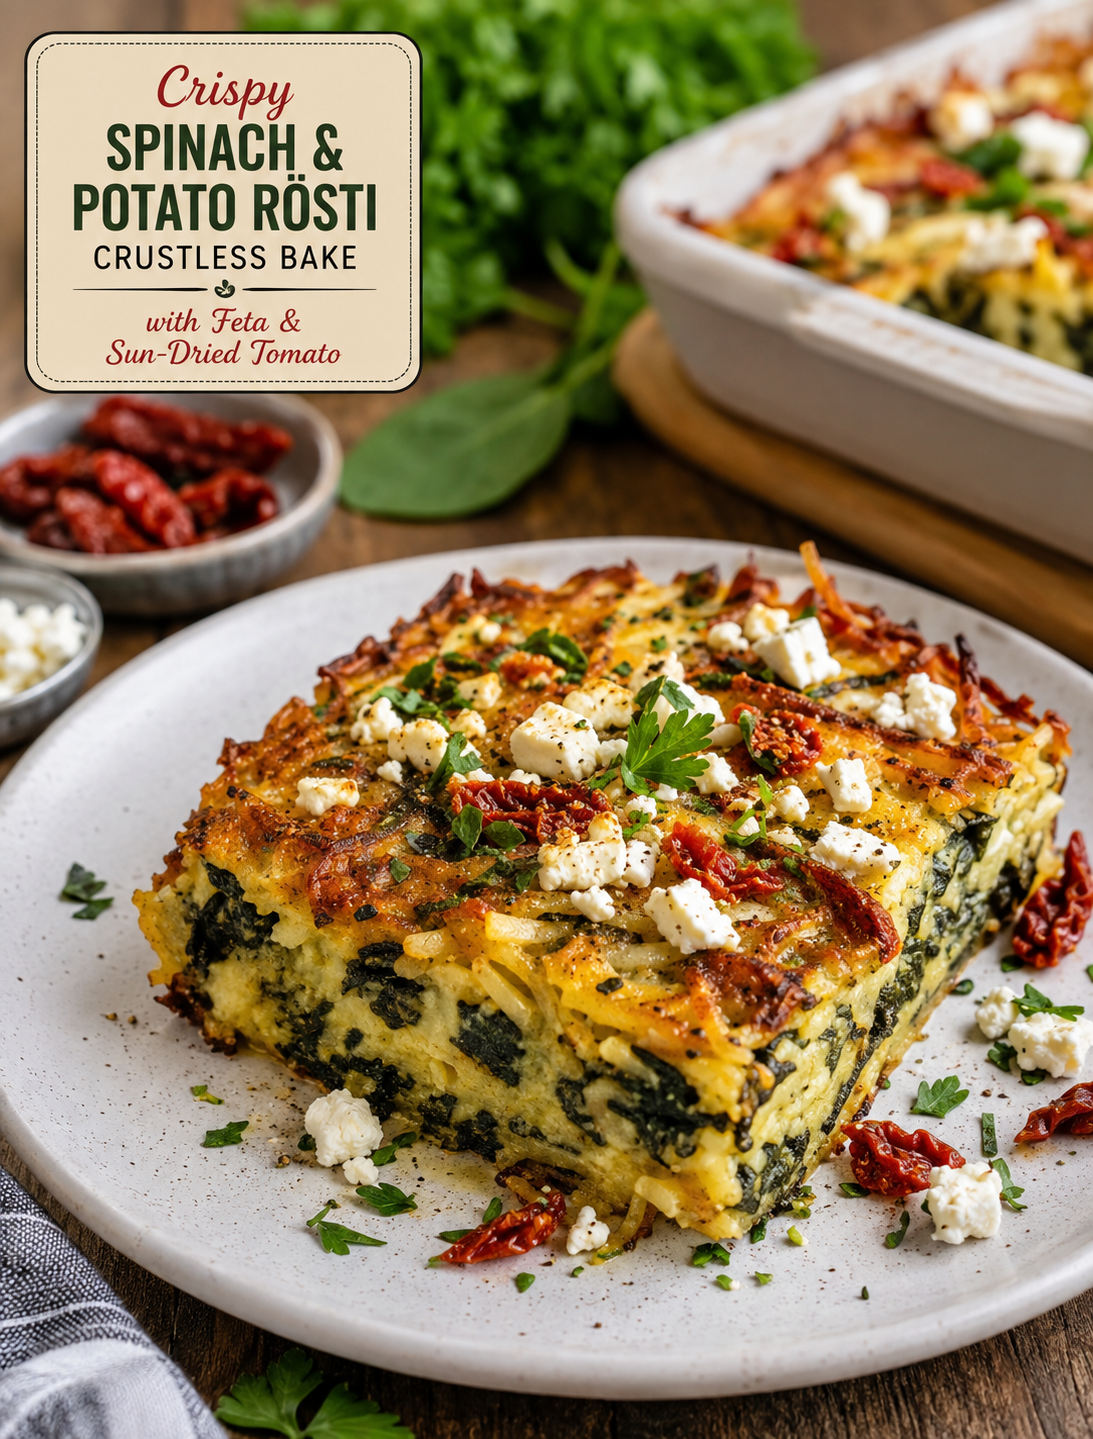
Crispy Spinach & Potato Rosti Crustless Bake with Feta & Sun-Dried Tomato

Description

This Crispy Spinach & Potato Rosti Crustless Bake with Feta & Sun-Dried Tomato is a delicious combination of crispy shredded potatoes, tender spinach, tangy feta cheese, and intensely flavourful sun-dried tomatoes, all baked together until golden and beautifully crisp on top.

Inspired by classic Swiss rösti, this recipe transforms those crispy potato flavours into an easy, satisfying crustless bake. Instead of making individual rösti cakes, the ingredients are layered and baked in one dish, making it perfect for breakfast, brunch, lunch, or a light dinner.

The potatoes develop wonderfully crisp golden edges while the centre remains tender and flavourful. Spinach adds colour and nutrients, feta provides a salty, creamy contrast, and sun-dried tomatoes bring a slightly sweet, savoury flavour that makes every bite more exciting.

It is especially delicious served warm with a simple green salad, roasted vegetables, Greek yoghurt, or a dollop of tzatziki.

Recipe Details

Prep Time: 20 minutes
Cook Time: 40–45 minutes
Total Time: About 1 hour 5 minutes
Servings: 6
Course: Breakfast, Brunch, Lunch, or Dinner
Cuisine: Mediterranean-inspired
Difficulty: Easy

Ingredients For:

Potato Rosti Base
  • 4 medium russet or Yukon Gold potatoes, about 1½ pounds
  • 2 tablespoons olive oil
  • ½ teaspoon salt
  • ¼ teaspoon black pepper
  • ½ teaspoon garlic powder
  • ½ teaspoon dried oregano
  • ¼ teaspoon smoked paprika
Spinach Filling
  • 5 ounces fresh baby spinach
  • 1 small onion, finely diced
  • 2 cloves garlic, minced
  • 1 teaspoon olive oil
  • ½ teaspoon dried oregano
  • ¼ teaspoon black pepper
  • ¼ teaspoon salt
Egg Mixture
  • 6 large eggs
  • ½ cup milk or unsweetened almond milk
  • ½ cup crumbled feta cheese
  • ⅓ cup chopped sun-dried tomatoes, preferably oil-packed and drained
  • ¼ cup grated Parmesan cheese
  • 2 tablespoons fresh parsley, chopped
  • ¼ teaspoon black pepper

For Topping

  • ¼ cup crumbled feta
  • 2 tablespoons chopped sun-dried tomatoes
  • 1 tablespoon fresh parsley or basil
  • 1 teaspoon olive oil
  • A pinch of black pepper
  • Optional: a small sprinkle of red pepper flakes

Instructions

Step 1: Prepare the Oven and Baking Dish

Preheat your oven to 400°F (200°C).

Lightly grease a 9-inch square baking dish or similar-sized oven-safe casserole dish with olive oil. For extra easy removal, you can also line the bottom with parchment paper while lightly greasing the sides.

The relatively hot oven is important because it helps the potatoes become golden and crisp rather than soft and pale.

Step 2: Prepare the Potatoes

Peel the potatoes if desired, although leaving the skins on can add extra texture and nutrients.

Using a box grater or food processor, grate the potatoes into thin shreds.

Place the shredded potatoes in a large bowl of cold water and gently swish them around. This removes some of the excess starch and helps prevent the potatoes from becoming gummy.

Drain thoroughly.

Now comes one of the most important steps: squeeze the potatoes extremely well.

Transfer them to a clean kitchen towel or several layers of paper towel and press firmly to remove as much moisture as possible.

The drier the potatoes, the crispier your rösti-style crust will become.

Step 3: Season the Potatoes

Return the dry shredded potatoes to a bowl.

Add:

  • 2 tablespoons olive oil
  • ½ teaspoon salt
  • black pepper
  • garlic powder
  • oregano
  • smoked paprika

Toss everything together until the potato shreds are evenly coated.

Step 4: Build the Crispy Potato Base

Transfer approximately two-thirds of the seasoned potatoes into the prepared baking dish.

Spread them evenly across the bottom.

Using the back of a spoon or your fingertips, gently press the potatoes into a compact, even layer.

Don’t make the layer too thick. A relatively thin, firmly pressed layer will crisp much better.

Drizzle the remaining teaspoon or so of olive oil over the potatoes.

Bake for approximately 20 minutes, or until the edges are beginning to turn golden.

Step 5: Cook the Spinach

While the potatoes are baking, heat 1 teaspoon olive oil in a skillet over medium heat.

Add the diced onion and cook for approximately 3–4 minutes, until softened.

Minced garlic and cook for another 30 seconds.

Fresh spinach in handfuls.

Cook until the spinach wilts, usually about 2–3 minutes.

Season with oregano, salt, and black pepper.

Remove from the heat.

If the spinach mixture contains noticeable liquid, allow it to cool slightly and squeeze or drain away excess moisture. This prevents the finished bake from becoming watery.

Step 6: Prepare the Egg Mixture

In a large bowl, whisk together the eggs and milk until smooth.

Add:

  • ½ cup feta
  • Parmesan
  • chopped sun-dried tomatoes
  • parsley
  • black pepper

Stir until everything is evenly distributed.

The feta and sun-dried tomatoes already provide plenty of flavour, so go easy on additional salt.

Step 7: Assemble the Bake

Remove the partially baked potato crust from the oven.

Spread the cooked spinach and onion mixture evenly over the potato layer.

Pour the egg mixture over the spinach.

Gently shake the baking dish so the egg mixture settles into the vegetables and potatoes.

Scatter the remaining shredded potatoes over the top.

Finish with the additional feta and chopped sun-dried tomatoes.

Drizzle lightly with olive oil.

Step 8: Bake Until Golden

Return the dish to the oven.

Bake at 400°F (200°C) for 20–25 minutes, or until the eggs are completely set and the potato topping is deeply golden and crisp.

If the top is browning too quickly before the centre is cooked, loosely cover the dish with foil for the remaining baking time.

For an extra-crispy finish, place the bake under the broiler for 1–2 minutes at the end.

Watch it carefully because the potatoes can brown very quickly.

Step 9: Rest Before Serving

Remove the bake from the oven and let it rest for 5–10 minutes.

This short resting period allows the egg mixture to finish setting and makes slicing much easier.

Sprinkle generously with fresh parsley or basil and add another small crumble of feta if desired.

Cut into six portions and serve warm.

Serving Suggestions

This bake is incredibly versatile.

Breakfast or brunch, serve it with:

  • Fresh sliced tomatoes
  • Avocado
  • Greek yogurt
  • Fresh berries
  • A simple fruit salad

Lunch or dinner, pair it with:

  • Mediterranean cucumber salad
  • Mixed green salad
  • Roasted zucchini
  • Grilled vegetables
  • Steamed broccoli
  • Tzatziki
  • A spoonful of hummus

For extra protein, serve it alongside grilled chicken, turkey, or a portion of white fish.

Recipe Notes

1. Dry potatoes are essential

Do not skip the squeezing step. Potatoes naturally contain a lot of water, and excess moisture is one of the biggest reasons homemade rösti becomes soft instead of crispy.

2. Don’t overload the filling

Although it can be tempting to add lots of vegetables, too many moisture-rich ingredients can prevent the eggs from setting properly.

3. Use block feta when possible

A good-quality feta crumbled by hand generally has better texture than very finely precrumbled feta.

4. Sun-dried tomatoes vary in saltiness

Taste your ingredients before adding extra salt. Oil-packed sun-dried tomatoes and feta can both be quite salty.

5. Let it rest

Cutting the bake immediately after removing it from the oven can cause the filling to appear loose. Give it several minutes to settle.

Helpful Tips for the Crispiest Rosti

Use russet potatoes: Their higher starch content makes them excellent for achieving crisp edges.

Squeeze twice if necessary: After squeezing the shredded potatoes, let them sit for a minute and squeeze them again.

Don’t overcrowd the pan: a thick potato layer can steam instead of crisp.

Preheat properly: Put the bake into a fully preheated oven.

Use enough oil: You don’t need a lot, but a light coating of olive oil helps the potatoes brown beautifully.

Don’t cover the bake while cooking; covering it traps steam and can make the potatoes soft.

Broil briefly at the end: A short burst of high heat creates an especially attractive golden crust.

Make-Ahead Instructions

This recipe is excellent for meal prep.

You can prepare the complete bake, allow it to cool, cover it, and refrigerate it for up to 3–4 days.

For the best texture, reheat individual portions in an oven, toaster oven, or air fryer rather than the microwave.

To reheat in the oven, place a portion in a 375°F (190°C) oven for approximately 10–15 minutes, or until heated through and crisp around the edges.

Storage

Allow leftovers to cool completely before transferring them to an airtight container.

Refrigerator: Store for up to 3–4 days.

Freezer: Individual portions can be frozen for approximately 2 months. Wrap portions tightly and place them in a freezer-safe container.

Thaw overnight in the refrigerator before reheating for the best texture.

Approximate Nutritional Information

Nutritional values will vary depending on the exact ingredients and brands used.

Per serving, based on 6 servings:

  • Calories: Approximately 330
  • Protein: 16–18 g
  • Carbohydrates: 35–38 g
  • Fat: 14–16 g
  • Fiber: 4–5 g
  • Sugar: Approximately 4–5 g
  • Sodium: Approximately 550–650 mg
  • Calcium: Approximately 180–220 mg
  • Iron: Approximately 3 mg

For a lighter version, reduce the Parmesan and use less olive oil. For a higher-protein version, add extra egg whites or serve with Greek yoghurt.

Benefits of This Recipe

Spinach

Spinach provides fibre, folate, vitamin K, vitamin A, vitamin C, iron, and other beneficial plant compounds. It also adds plenty of colour and volume without requiring a large number of calories.

Potatoes

Potatoes provide carbohydrates for energy and contain potassium and vitamin C. Keeping the skin on can also contribute additional fibre.

Eggs

Eggs provide high-quality protein and several important nutrients, making the bake more satisfying and filling.

Feta Cheese

Feta contributes protein, calcium, and a strong savoury flavour, allowing you to use a moderate amount while still getting plenty of flavour.

Sun-Dried Tomatoes

Sun-dried tomatoes provide concentrated tomato flavour along with antioxidants such as lycopene. Their sweet-savoury taste works especially well with spinach and feta.

Olive Oil

Extra-virgin olive oil contributes monounsaturated fats and gives the potatoes their delicious golden crispness.

Overall, this recipe combines vegetables, protein, carbohydrates, healthy fats, and flavourful Mediterranean-inspired ingredients in one convenient meal.

Frequently Asked Questions

Can I use frozen spinach?

Yes. Thaw the spinach completely and squeeze out as much liquid as possible before adding it to the recipe. Frozen spinach contains considerably more released moisture, so draining it well is particularly important.

Can I make this without feta?

Absolutely. Goat cheese, ricotta, cottage cheese, or shredded mozzarella can be used instead. For a dairy-free version, use a suitable dairy-free feta alternative.

Can I use sweet potatoes?

Yes. Sweet potatoes can replace regular potatoes, although they have a softer texture and slightly sweeter flavour. They may not become quite as crisp as russet potatoes.

Can I add more vegetables?

Yes, but choose vegetables that don’t release excessive water. Bell peppers, mushrooms, zucchini, broccoli, and roasted red peppers can work well. Cook watery vegetables first and remove excess moisture.

Can I make it vegetarian?

Yes. The recipe is already vegetarian as written.

Can I make it gluten-free?

Yes. The ingredients listed are naturally gluten-free, but always check packaged ingredients such as seasonings and sun-dried tomatoes if you need to avoid gluten strictly.

Why did my potato crust turn soggy?

The most common reasons are excess moisture in the potatoes, too much filling liquid, or an oven that wasn’t hot enough. Make sure the shredded potatoes are thoroughly squeezed and the spinach is well drained.

Can I make this in a cast-iron skillet?

Yes. A well-seasoned oven-safe cast-iron skillet can produce excellent crispy edges. Make sure the skillet is appropriately sized so the potato layer isn’t excessively thick.

Can I prepare it the night before?

Yes. You can assemble it in advance and refrigerate it covered. When ready to bake, allow the chilled dish a little extra cooking time because the ingredients will be cold.

Is it good for meal prep?

Definitely. It stores and reheats well, making it a convenient breakfast or lunch option for several days.

What can I serve with it?

A fresh cucumber-tomato salad, Greek yoghurt, tzatziki, avocado, roasted vegetables, or a simple green salad are excellent choices.

Final Recipe Summary

This Crispy Spinach & Potato Rosti Crustless Bake with Feta & Sun-Dried Tomato delivers everything you want from a comforting baked dish: crispy golden potatoes, creamy eggs, tender spinach, salty feta, sweet-savoury sun-dried tomatoes, and plenty of Mediterranean flavour.

The secret is simple: remove as much moisture as possible from the potatoes and spinach, use a hot oven, and give the finished bake enough time to become beautifully golden and crisp.