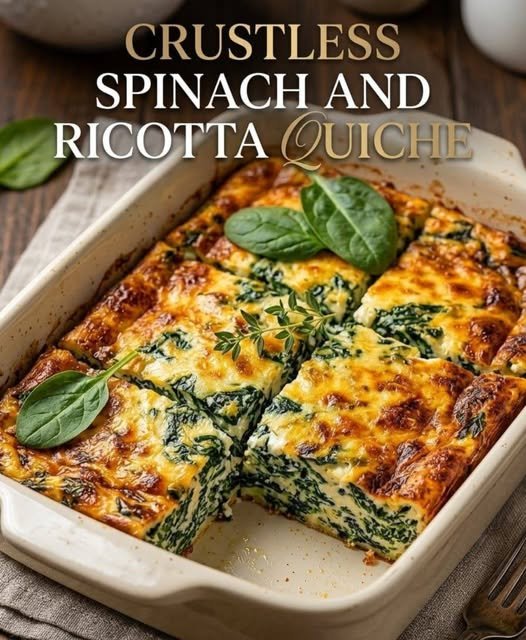
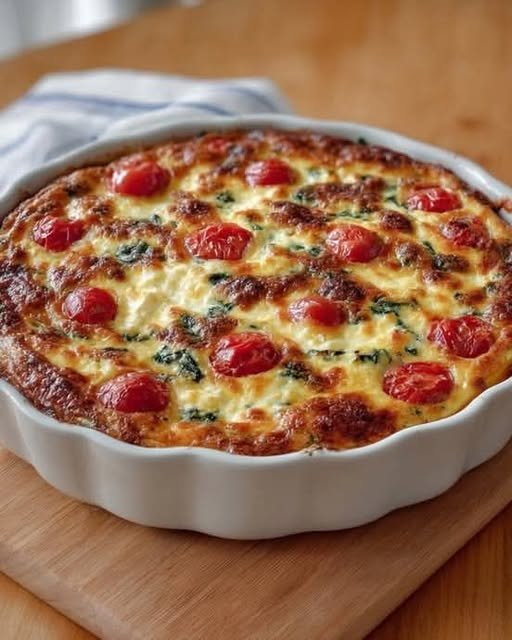
Crustless Spinach and Ricotta Quiche
Crustless spinach and ricotta quiche is a light, protein-rich dish that feels comforting without being heavy. It has a soft, custardy texture with creamy ricotta, tender spinach, and a gentle hint of nutmeg that brings everything together. Since there’s no crust, it’s quicker to prepare and naturally lower in carbs, making it a great option for breakfast, brunch, or even a simple dinner. It’s also highly versatile, so you can easily adapt it with whatever cheeses or vegetables you have on hand.
Prep Time: 15 minutes
Cook Time: 35–40 minutes
Total Time: 55–60 minutes
Servings: 6
Ingredients
Main Ingredients
10 oz frozen chopped spinach, thawed and completely squeezed dry or 2–3 cups fresh baby spinach, sautéed and wilted
1 cup ricotta cheese
3 to 6 large eggs, beaten
¼ to ½ cup milk or cream
Cheeses & Flavorings
¼ to ½ cup grated Parmesan cheese
½ to 1 cup shredded mozzarella, cheddar, or Swiss cheese (optional)
1 small onion, diced and sautéed
1 to 2 cloves garlic, minced
Seasonings
¼ teaspoon nutmeg
½ teaspoon garlic powder (optional)
½ teaspoon onion powder (optional)
Salt and black pepper to taste
Instructions
Preheat the oven to 180°C and lightly grease a baking dish or pie dish.
If using fresh spinach, sauté it in a pan until wilted, then let it cool and squeeze out any excess moisture. If using frozen spinach, ensure it is fully thawed and well-drained.
In a pan, lightly sauté onion until soft and translucent. Add garlic and cook briefly until fragrant. Set aside to cool.
In a large bowl, whisk together eggs, milk or cream, ricotta cheese, Parmesan, salt, pepper, and nutmeg until smooth and well combined.
Stir in the spinach, sautéed onion, and garlic. Mix gently until everything is evenly distributed.
If using extra shredded cheese, fold it into the mixture or sprinkle it on top before baking.
Pour the mixture into the prepared baking dish and spread evenly.
Bake for 35 to 40 minutes or until the quiche is set in the center and lightly golden on top. A knife inserted should come out mostly clean.
Let it cool for at least 10 minutes before slicing to help it set properly. Serve warm or at room temperature.
Tips
Make sure spinach is very dry to avoid a watery quiche
Use whole milk ricotta for a creamier, richer texture
Do not overbeat eggs to keep the texture soft and custardy
Let sautéed onions and garlic cool before mixing to avoid curdling eggs
Add nutmeg carefully as it enhances flavor without overpowering
Bake until just set to avoid dryness
Let the quiche rest before slicing for clean portions
Use a ceramic or glass dish for even baking
Add cheese on top for a golden, slightly crisp finish
Serve with a light salad for a balanced meal
Variations
Add mushrooms for an earthy flavor
Include sun-dried tomatoes for a tangy twist
Swap ricotta with cottage cheese for a lighter version
Use feta cheese for a saltier Mediterranean profile
Add cooked bacon or ham for a protein boost
Mix in zucchini or bell peppers for extra vegetables
Make it dairy-free with plant-based cheese and milk alternatives
Add fresh herbs like basil, parsley, or dill
Turn into mini muffin quiches for meal prep
Add chili flakes for a mild spicy kick
FAQs
Can I make this ahead of time
Yes, it stores well and can be reheated or served cold
Can I freeze crustless quiche
Yes, freeze after baking and reheat when needed
Why is my quiche watery
Spinach was likely not fully drained
Can I use fresh spinach instead of frozen
Yes, just cook and drain it well before using
What size baking dish should I use
An 8 to 9 inch dish works best
Can I add meat
Yes, cooked chicken, bacon, or sausage work well
How do I store leftovers
Keep refrigerated for up to 3 days
Can I make it low-fat
Yes, use low-fat ricotta and milk
Is it good for breakfast meal prep
Yes, it reheats very well and is filling
Can I serve it cold
Yes, it tastes great chilled or at room temperature
Nutrition
(Approx. per serving)
Calories: 180–240
Protein: 14–18g
Carbohydrates: 4–7g
Fat: 12–16g
Fiber: 1–2g
Conclusion
Crustless spinach and ricotta quiche is a simple, nourishing dish that delivers comfort and flavor in every bite. The creamy ricotta, tender spinach, and subtle seasoning create a soft, satisfying texture that works for any time of day. It’s easy to prepare, flexible with ingredients, and perfect for meal prep or serving guests. Once you make it, it quickly becomes a go-to recipe for a light yet satisfying homemade meal.
 Ingredients
 Dressing
 Instructions
 Tips & Variations