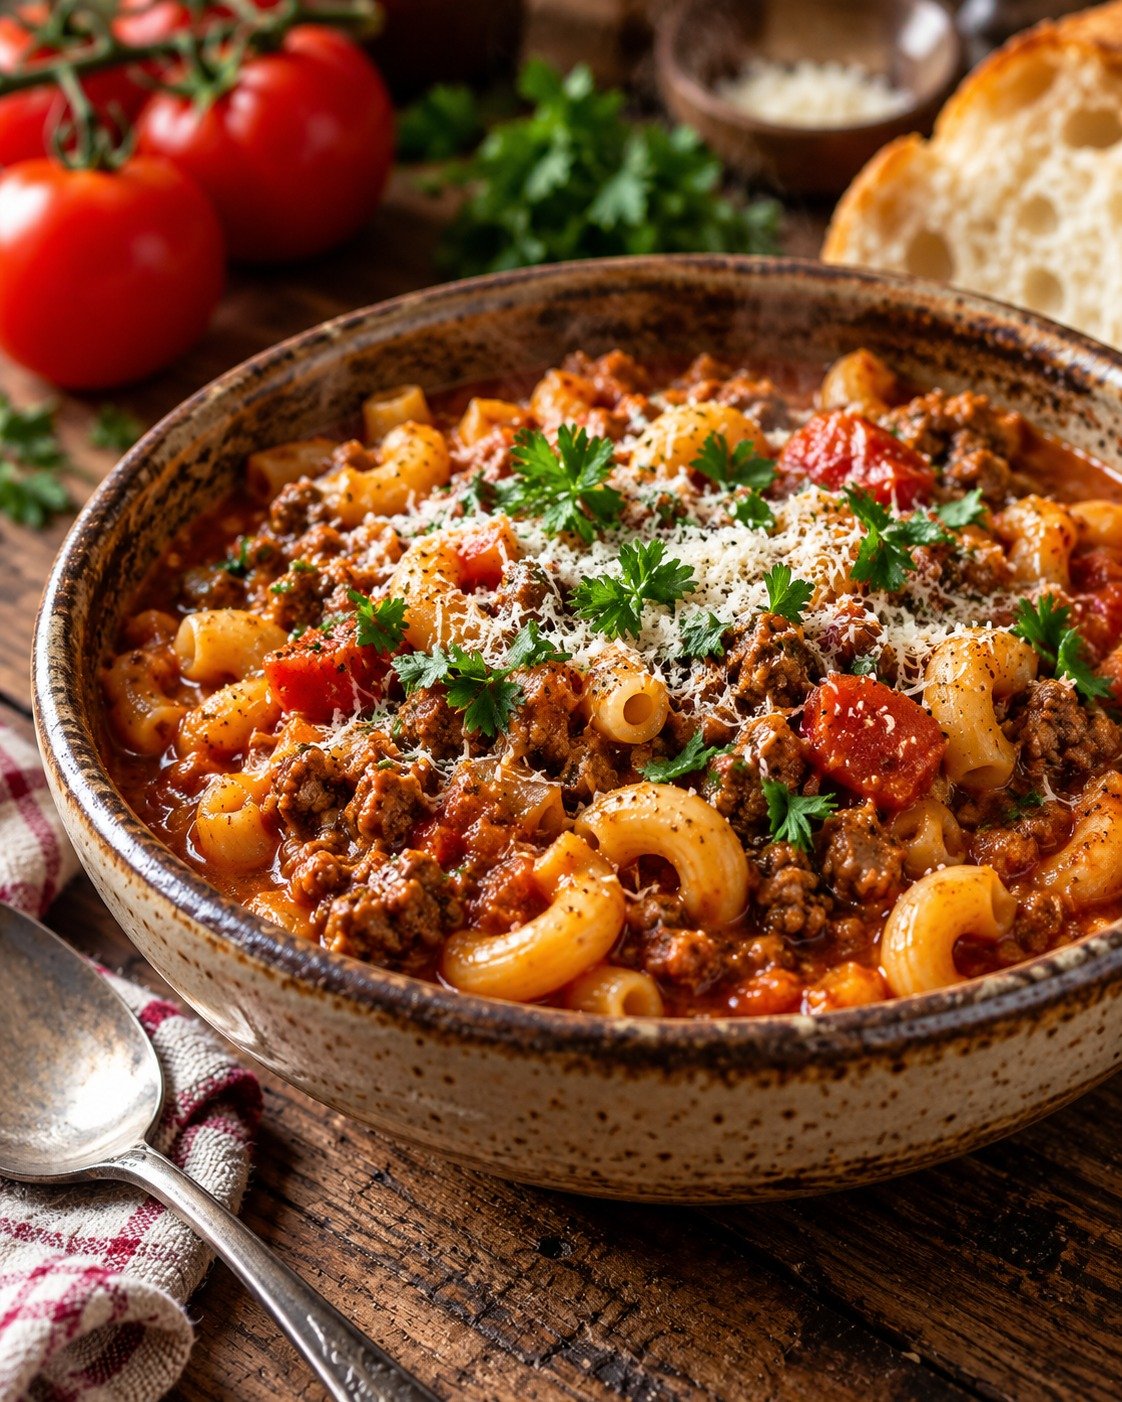
Goulash Recipe

Beef Goulash with tender beef, potatoes, carrots, onions, tomatoes, paprika, herbs, and rich savory sauce

Goulash Recipe

Beef Goulash is a rich, comforting one-pot meal made with tender beef, onions, garlic, tomatoes, paprika, broth, and simple herbs. It has deep savory flavor, a warm red sauce, and enough body to feel satisfying without being complicated.

This Beef Goulash is ideal for chilly evenings, family dinners, meal prep, or weekends when you want a slow-simmered dish that tastes even better after resting. Serve it with noodles, mashed potatoes, rice, or crusty bread to soak up every spoonful of the flavorful sauce.

Prep Time: 20 minutes
Cook Time: 1 hour 45 minutes
Total Time: About 2 hours 5 minutes
Servings: 6

Ingredients

For the Beef

  • 2 pounds beef chuck, cut into 1-inch cubes
  • 1 teaspoon salt
  • 1/2 teaspoon black pepper
  • 2 tablespoons olive oil

Ingredients For the Goulash Base

  • 2 large yellow onions, diced
  • 4 garlic cloves, minced
  • 2 tablespoons sweet paprika
  • 1 teaspoon smoked paprika
  • 1 teaspoon caraway seeds, lightly crushed
  • 2 tablespoons tomato paste
  • 1 can (14.5 ounces) diced tomatoes
  • 3 cups beef broth
  • 1 red bell pepper, chopped
  • 2 carrots, sliced
  • 2 medium potatoes, peeled and cubed
  • 1 bay leaf
  • 1 teaspoon dried marjoram or oregano
  • 1 tablespoon Worcestershire sauce, optional

For Serving

  • Chopped fresh parsley
  • Sour cream, optional
  • Egg noodles, mashed potatoes, or crusty bread

Why You’ll Love This Recipe

Beef Goulash is the kind of meal that rewards slow cooking with tender meat and a deeply flavored sauce. The onions soften into the broth, the paprika adds warmth and color, and the beef becomes fork-tender after a gentle simmer.

Another reason to love Beef Goulash is its flexibility. Serve it as a thick stew, spoon it over noodles, or add extra broth for a looser consistency. Leftovers also reheat beautifully.

How to Make Beef Goulash

Step 1: Prepare the Beef

Pat the beef cubes dry with paper towels, then season with salt and black pepper.

Drying the meat helps it brown rather than steam. Browning creates extra flavor that will later blend into the sauce.

Step 2: Brown the Beef

Heat one tablespoon of olive oil in a large Dutch oven or heavy pot over medium-high heat.

Add half of the beef in a single layer and cook for 3 to 4 minutes per side until browned. Transfer to a plate, add the remaining oil, and brown the rest of the meat.

Work in batches so the pan does not become overcrowded.

Step 3: Cook the Onions

Reduce the heat to medium.

Add the diced onions to the same pot and cook for 8 to 10 minutes, stirring often, until soft and lightly golden.

The onions are an important part of Beef Goulash because they naturally thicken the sauce and add sweetness as they cook.

Step 4: Add Garlic and Spices

Stir in the garlic, sweet paprika, smoked paprika, and caraway seeds.

Cook for about 30 seconds, stirring constantly.

Paprika can become bitter if scorched, so keep the heat moderate and move quickly to the next step.

Step 5: Add Tomato Paste

Stir in the tomato paste and cook for 1 to 2 minutes.

Cooking the paste briefly deepens its flavor and removes some of its raw acidity.

Step 6: Build the Sauce

Add the diced tomatoes, beef broth, Worcestershire sauce if using, bay leaf, and marjoram.

Scrape the bottom of the pot with a wooden spoon to release any browned bits.

Return the beef and any juices from the plate to the pot.

Bring Beef Goulash to a gentle boil, then reduce the heat to low.

Step 7: Simmer Slowly

Cover the pot partially and simmer for about 60 minutes.

Stir occasionally and check that the liquid is only bubbling gently.

A slow simmer gives Beef Goulash enough time to tenderize the beef while keeping the sauce smooth and rich.

Step 8: Add the Vegetables

Add the chopped bell pepper, carrots, and potatoes.

Stir well, cover partially again, and continue simmering for 35 to 45 minutes, or until the beef and vegetables are tender.

If the sauce becomes too thick, add a small splash of broth.

Step 9: Adjust the Seasoning

Remove the bay leaf.

Taste the sauce and add extra salt, black pepper, or paprika if needed.

For a deeper savory flavor, you can add a small splash of Worcestershire sauce or an extra spoonful of tomato paste.

Step 10: Rest Before Serving

Turn off the heat and let the pot rest for 10 minutes.

This short resting period allows Beef Goulash to settle and gives the sauce a slightly thicker consistency.

Step 11: Garnish and Serve

Ladle the goulash into bowls or spoon it over noodles or mashed potatoes.

Finish with chopped parsley and a small spoonful of sour cream if desired.

Serving Suggestions

Beef Goulash can be served in several comforting ways.

For a traditional-style meal, spoon it over buttered egg noodles, dumplings, or mashed potatoes so they can soak up the rich paprika sauce.

For a simpler dinner, serve Beef Goulash with crusty bread and a cucumber salad or lightly dressed green salad.

You can also pair it with roasted cabbage, steamed green beans, or pickled vegetables for a little contrast.

For another hearty comfort-food dinner, try our Crockpot Cabbage Roll Casserole with beef, cabbage, rice, tomatoes, and savory herbs.

Recipe Tips

Choose beef chuck because it becomes tender and flavorful during slow cooking.

Cut the beef into similar-size cubes so it cooks evenly.

Brown the meat in batches to build better flavor.

Use good-quality paprika because it is one of the main flavors in the dish.

Do not let paprika burn after adding it to the pot.

Keep the simmer gentle rather than boiling aggressively.

For thicker Beef Goulash, simmer uncovered for the final 10 to 15 minutes.

For a thinner stew, add extra beef broth near the end of cooking.

Let the finished dish rest before serving for the best texture.

Easy Variations

Beef Goulash can be adjusted depending on the ingredients you have.

For a spicier version, add hot paprika, cayenne pepper, or a pinch of chili flakes.

For extra vegetables, add mushrooms, celery, parsnips, or green beans.

You can leave out the potatoes and serve the stew over noodles instead.

For a richer sauce, stir in a spoonful of sour cream after the pot is removed from the heat.

If you prefer a soupier version, add another cup of beef broth and reduce the cooking time slightly once the vegetables are tender.

Make-Ahead Instructions

Beef Goulash is an excellent make-ahead recipe because the flavors become even deeper after a night in the refrigerator.

Prepare the recipe completely, allow it to cool, and store it in an airtight container.

Reheat gently on the stovetop over medium-low heat, adding a splash of broth if the sauce has thickened too much.

Storage and Reheating

Store leftover Beef Goulash in an airtight container in the refrigerator for up to 4 days.

Reheat it in a saucepan over medium-low heat until steaming, stirring occasionally.

Individual portions can also be reheated in the microwave in short intervals.

For longer storage, freeze the cooled goulash for up to 3 months. Thaw overnight in the refrigerator before reheating.

Nutrition Information

Approximate nutrition per serving:

Calories: 430
Protein: 36 g
Carbohydrates: 28 g
Fat: 20 g
Saturated Fat: 7 g
Fiber: 5 g
Sugar: 8 g
Sodium: 680 mg

Nutrition values are estimates and will vary depending on the beef, broth, vegetables, and serving size.

Frequently Asked Questions

What cut of beef works best?

Beef chuck is ideal because it contains enough connective tissue to become tender and flavorful during slow simmering.

Can I make this in a slow cooker?

Yes. Brown the beef and onions first, then transfer everything to the slow cooker. Cook on low for 7 to 8 hours or high for 4 to 5 hours.

Can I make it without potatoes?

Yes. Beef Goulash can be made without potatoes and served over noodles, rice, or mashed potatoes instead.

Why is my beef still tough?

It usually needs more time. Continue simmering gently until the meat becomes fork-tender.

Can I use ground beef?

You can, although the result will be more like an American-style goulash than a traditional beef stew.

Can I freeze it?

Yes. Cool completely, store in freezer-safe containers, and freeze for up to 3 months.

How can I thicken the sauce?

Simmer uncovered near the end of cooking, or mash a few potato pieces into the sauce.

Final Thoughts

Beef Goulash is a hearty one-pot meal that combines tender beef, paprika, onions, tomatoes, and vegetables in a rich savory sauce.

Because Beef Goulash reheats well and can be made ahead, it is a practical choice for family dinners, meal prep, and cold-weather comfort food.

Keep this Beef Goulash recipe handy whenever you want a warm, filling meal with deep flavor and simple ingredients. Serve Beef Goulash with noodles, bread, potatoes, or your favorite vegetables for a satisfying homemade dinner.

If you enjoy easy high-protein meals, you may also like our Chicken Pizza Crust with a cheesy chicken base and your favorite pizza toppings.
Chicken Pizza Crust

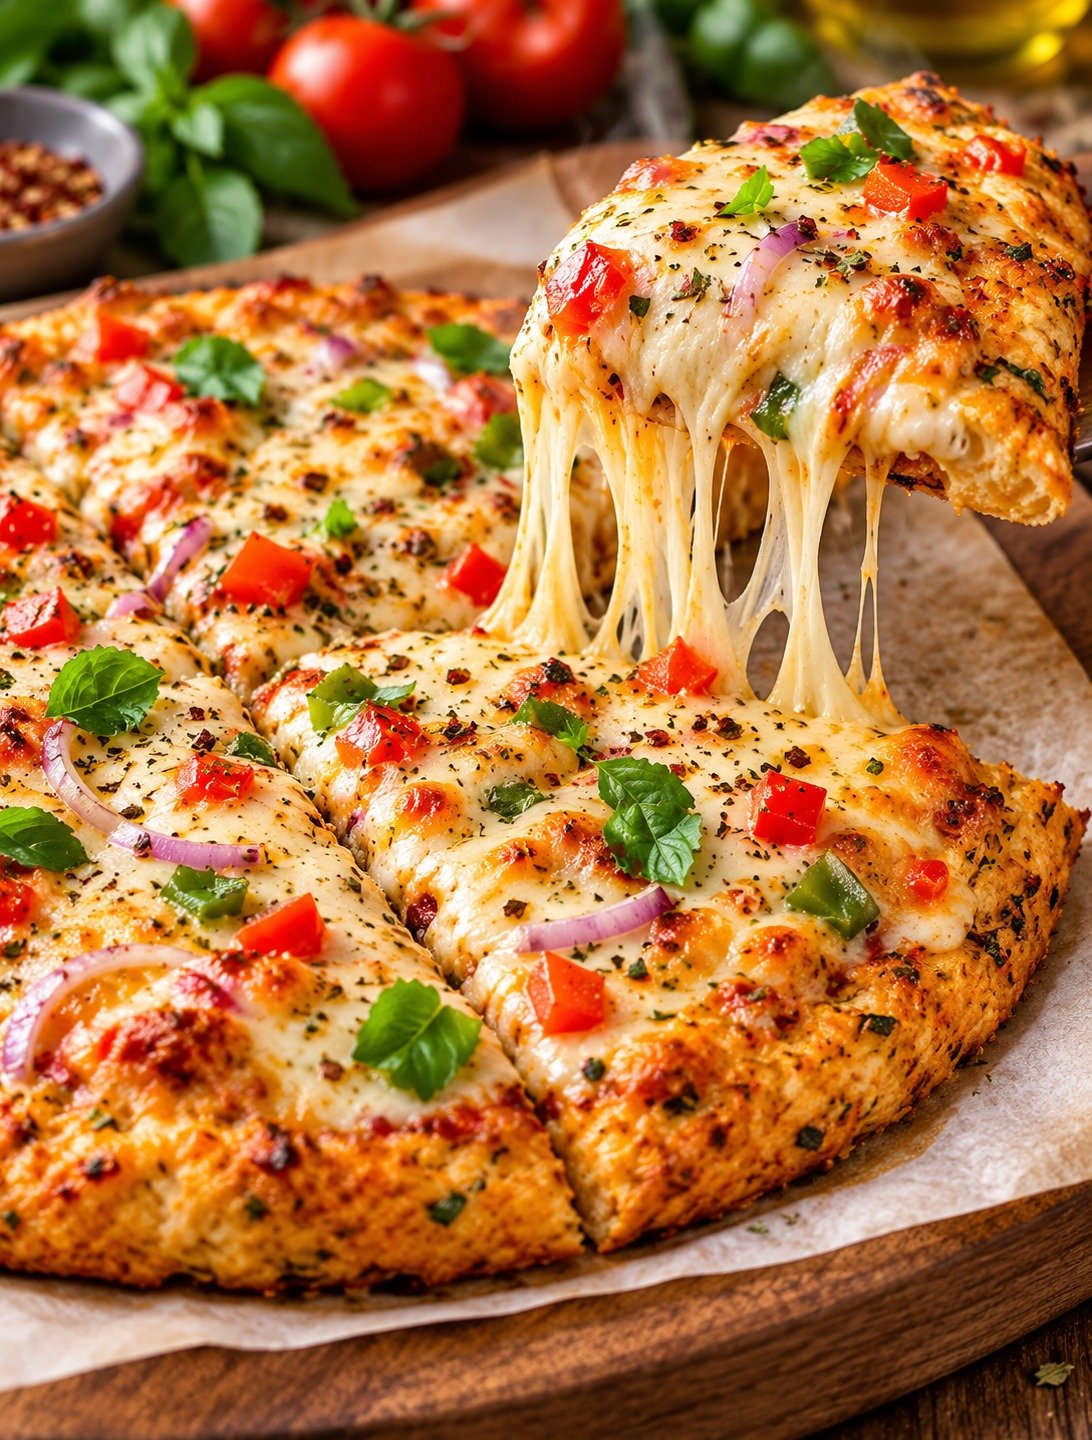
Chicken Pizza Crust topped with tomato sauce, mozzarella, vegetables, herbs, and a golden high-protein chicken base

Chicken Pizza Crust

Chicken Pizza Crust is a high-protein, low-carb pizza base made with finely shredded chicken, eggs, Parmesan, mozzarella, and simple seasonings. It bakes into a sturdy, savory crust that can hold tomato sauce, melted cheese, vegetables, and your favorite pizza toppings without traditional flour or yeast.

This Chicken Pizza Crust is perfect when you want pizza flavor with extra protein and fewer refined carbohydrates. The mixture comes together quickly, requires no kneading or rising, and can be prepared ahead for an easy lunch, family dinner, or meal-prep option.

Prep Time: 15 minutes
Bake Time: 25–30 minutes
Total Time: 45 minutes
Servings: 4

Ingredients

For the Crust

  • 2 cups finely shredded cooked chicken or well-drained canned chicken
  • 1 large egg
  • 1/2 cup shredded mozzarella cheese
  • 1/3 cup finely grated Parmesan cheese
  • 1 teaspoon Italian seasoning
  • 1/2 teaspoon garlic powder
  • 1/2 teaspoon onion powder
  • 1/4 teaspoon black pepper
  • Pinch of salt, if needed

For the Pizza Topping

  • 1/3 cup pizza sauce or marinara sauce
  • 1 cup shredded mozzarella cheese
  • 1/4 cup thinly sliced bell peppers
  • 1/4 cup sliced mushrooms
  • 2 tablespoons sliced black olives
  • 2 tablespoons thinly sliced red onion
  • Fresh basil or parsley for garnish
  • Red pepper flakes, optional

Why You’ll Love This Recipe

Chicken Pizza Crust gives you the comfort and flavor of pizza with a protein-rich base instead of traditional dough. The combination of chicken, egg, mozzarella, and Parmesan creates a crust that becomes golden around the edges while remaining sturdy enough to pick up.

Another reason to love Chicken Pizza Crust is how quickly it comes together. There is no yeast, flour, kneading, proofing, or complicated shaping. Once the ingredients are mixed, you simply press the mixture into a thin layer and bake.

It is also easy to customize. Keep it classic with mozzarella and tomato sauce, or add vegetables, pepperoni, cooked sausage, olives, herbs, or any toppings your family enjoys.

How to Make Chicken Pizza Crust

Step 1: Preheat the Oven

Preheat your oven to 425°F or 220°C.

Line a large baking sheet or pizza pan with parchment paper. Lightly spray the parchment with cooking spray if desired.

A hot oven helps the edges become golden while allowing the center to firm properly.

Step 2: Prepare the Chicken

If using freshly cooked chicken, shred it very finely. You can also pulse it several times in a food processor until it has a fine texture.

When using canned chicken, drain it extremely well. Press the chicken between paper towels to remove as much liquid as possible.

Removing excess moisture is important because wet chicken can prevent Chicken Pizza Crust from becoming firm enough to hold toppings.

Step 3: Make the Crust Mixture

Place the prepared chicken in a large mixing bowl.

Add the egg, mozzarella, Parmesan, Italian seasoning, garlic powder, onion powder, black pepper, and a small pinch of salt.

Mix thoroughly until all the ingredients are evenly distributed.

The mixture should hold together when pressed. It will not feel like traditional pizza dough, but it should be moist enough to shape without falling apart.

Step 4: Shape the Crust

Transfer the chicken mixture onto the prepared baking sheet.

Place another piece of parchment paper over the mixture and gently press it into a round or rectangle approximately 1/4 inch thick.

Remove the top parchment carefully.

Keeping Chicken Pizza Crust evenly thick helps prevent thin areas from burning before thicker sections have finished baking.

Step 5: Bake the Crust

Place the pan in the preheated oven.

Bake for approximately 18 to 20 minutes, or until the surface looks dry and the edges are beginning to turn golden brown.

The center should feel firm when gently touched.

For an especially crisp crust, carefully flip it using another piece of parchment and bake the second side for an additional 4 to 5 minutes.

Step 6: Add the Sauce

Remove the baked crust from the oven and let it rest for about 3 minutes.

Spread a thin layer of pizza sauce or marinara over the surface, leaving a small border around the outside.

Avoid using too much sauce because excessive moisture can soften Chicken Pizza Crust and make slices harder to pick up.

Step 7: Add the Cheese and Toppings

Sprinkle shredded mozzarella evenly over the sauce.

Add bell peppers, mushrooms, olives, red onion, or any other toppings you enjoy.

Keep the topping layer relatively light. Heavy or watery toppings can make the finished pizza softer.

If using vegetables that release a lot of liquid, such as mushrooms or zucchini, cooking them briefly before adding them can produce better results.

Step 8: Bake Again

Return the pizza to the oven.

Bake for another 7 to 10 minutes, or until the mozzarella has completely melted and begins to bubble.

For a more golden cheese topping, turn on the broiler during the final 1 to 2 minutes. Watch carefully because cheese can brown quickly.

Step 9: Let It Rest

Remove the finished pizza from the oven.

Allow it to rest on the baking sheet for 5 minutes before slicing.

This resting time helps Chicken Pizza Crust become firmer and makes it easier to cut into neat slices without losing the toppings.

Step 10: Garnish and Serve

Sprinkle fresh basil, parsley, red pepper flakes, or extra Parmesan over the top.

Slice with a sharp knife or pizza cutter and serve warm.

Serving Suggestions

Chicken Pizza Crust can easily become a complete meal when topped with vegetables, cheese, and your favorite pizza ingredients.

Serve it with a crisp green salad, cucumber and tomato salad, roasted broccoli, grilled zucchini, or steamed vegetables for a fresh contrast.

For a heartier dinner, pair Chicken Pizza Crust with a bowl of vegetable soup, tomato soup, or a simple bean salad.

You can also cut it into smaller squares and serve it as an appetizer for parties, family gatherings, or game nights. Provide warm marinara on the side for dipping.

For a hearty Mediterranean-style main dish, try our Mediterranean Baked Feta & Veggie Pasta with creamy feta, roasted vegetables, herbs, and tender pasta.

Recipe Tips

Drain canned chicken thoroughly before using it.

Finely shredded chicken creates a smoother and more stable crust than large pieces.

Use freshly grated Parmesan when possible because it blends easily with the other ingredients.

Parchment paper makes shaping easier and prevents sticking.

Press the mixture into an even layer so every section cooks at approximately the same rate.

Always pre-bake the crust before adding pizza sauce.

For crispier Chicken Pizza Crust, flip it after the first baking stage and cook the second side for several minutes.

Avoid very heavy layers of toppings.

Let the finished pizza rest before slicing so it holds together better.

Easy Variations

Chicken Pizza Crust works with many different pizza flavor combinations, so you can easily change it according to what you have available.

For a Margherita-style pizza, top the baked crust with tomato sauce, mozzarella, sliced tomatoes, and fresh basil.

For a barbecue version, replace the tomato sauce with a thin layer of barbecue sauce. Add mozzarella, sliced red onion, and a little chopped cilantro after baking.

A Mediterranean version is delicious with spinach, olives, roasted peppers, feta cheese, tomatoes, and oregano.

For extra heat, add sliced jalapeños, red pepper flakes, pepper jack cheese, or a drizzle of spicy sauce.

You can also make a garlic-Parmesan version by skipping tomato sauce and brushing the crust lightly with garlic-infused olive oil before adding mozzarella and Parmesan.

If you want a classic dessert to finish the meal, you may also like our Pumpkin Pie with creamy spiced filling and a flaky golden crust.

Make-Ahead Instructions

Chicken Pizza Crust is an excellent recipe for preparing ahead when you know you will have a busy evening.

Bake the plain crust through the first baking stage and allow it to cool completely.

Wrap it tightly in plastic wrap or store it in a covered container in the refrigerator for up to 3 days.

When ready to eat, place the crust on a baking sheet, add sauce, cheese, and toppings, and bake until everything is hot and melted.

You can also prepare the raw chicken mixture several hours ahead and refrigerate it until you are ready to shape and bake the crust.

Storage and Reheating

Store leftover Chicken Pizza Crust pizza in an airtight container in the refrigerator for up to 3 days.

For the best texture, reheat slices in a 375°F or 190°C oven for approximately 8 to 10 minutes.

You can also reheat slices in an air fryer for several minutes until hot and lightly crisp.

The microwave works when you are short on time, although the crust will become softer.

For longer storage, wrap individual portions and freeze them for up to 1 month. Thaw overnight in the refrigerator before reheating.

Nutrition Information

Approximate nutrition per serving before additional pizza toppings:

Calories: 285
Protein: 38 g
Carbohydrates: 4 g
Fat: 13 g
Saturated Fat: 6 g
Fiber: 0 g
Sugar: 1 g
Sodium: 620 mg

Nutrition values are estimates. Actual values will depend on the chicken, cheese, pizza sauce, portion size, and toppings you choose.

Frequently Asked Questions

Can I use canned chicken?

Yes. Canned chicken is convenient and works very well. Drain it thoroughly and press away as much moisture as possible before mixing.

Can I use ground chicken?

Yes. Cook the ground chicken completely first, drain any excess moisture, let it cool, and then combine it with the remaining crust ingredients.

Why did my crust turn out soft?

Excess moisture is usually responsible. Make sure the chicken is dry, pre-bake the crust until firm, and avoid adding too much pizza sauce or watery vegetables.

Can I leave out the Parmesan?

Yes. You can replace it with additional mozzarella or another finely shredded cheese, although Parmesan helps provide flavor and structure.

Can I freeze it?

Yes. Chicken Pizza Crust can be baked, completely cooled, wrapped tightly, and frozen for up to one month.

Does it taste like regular pizza dough?

Not exactly. The base has a savory chicken and cheese flavor rather than the yeasty flavor of traditional bread dough. However, it provides a sturdy surface for classic pizza toppings.

Can I make mini pizzas?

Yes. Divide the mixture into several small rounds. Because smaller crusts cook more quickly, begin checking them several minutes earlier.

Final Thoughts

Chicken Pizza Crust is an easy way to enjoy pizza with a protein-rich base made from chicken, eggs, mozzarella, and Parmesan instead of traditional flour dough.

Because Chicken Pizza Crust requires no yeast, kneading, or rising time, it is especially convenient for busy weeknight dinners, meal prep, or quick lunches.

Keep this Chicken Pizza Crust recipe handy whenever you want a savory homemade pizza alternative that can be customized with different sauces, vegetables, cheeses, and proteins.

With crisp golden edges, plenty of cheesy flavor, and a sturdy center, this easy pizza base gives you a satisfying way to enjoy your favorite toppings while adding extra protein to the meal.

Pumpkin Pie

Pumpkin Pie with creamy spiced pumpkin filling, flaky golden crust, whipped cream, and a sprinkle of cinnamon

Pumpkin Pie

Pumpkin Pie is a classic fall dessert with a smooth, warmly spiced pumpkin filling baked inside a flaky pie crust. It is rich without being heavy, gently sweet, and full of cozy cinnamon, ginger, nutmeg, and clove flavor. Whether you serve it for Thanksgiving, a weekend dinner, or a seasonal gathering, this recipe gives you a dependable homemade dessert with a creamy center and crisp crust.

It uses simple pantry ingredients, including pumpkin puree, eggs, evaporated milk, brown sugar, and traditional spices. Make it ahead, chill overnight, and serve with whipped cream.

Prep Time: 20 minutes
Bake Time: 50–60 minutes
Cooling Time: 2 hours
Total Time: About 3 hours 20 minutes
Servings: 8 slices

Ingredients

For the Pie Crust

  • 1 unbaked 9-inch pie crust, homemade or store-bought
  • 1 egg white, lightly beaten, optional for brushing

Ingredients For the Pumpkin Filling

  • 1 can (15 ounces) pumpkin puree
  • 3 large eggs
  • 3/4 cup packed brown sugar
  • 1/4 cup granulated sugar
  • 1 can (12 ounces) evaporated milk
  • 1 teaspoon pure vanilla extract
  • 1 1/2 teaspoons ground cinnamon
  • 1 teaspoon ground ginger
  • 1/2 teaspoon ground nutmeg
  • 1/4 teaspoon ground cloves
  • 1/2 teaspoon salt
  • 1 tablespoon all-purpose flour or cornstarch

For Serving

  • Whipped cream
  • Ground cinnamon
  • Chopped pecans, optional
  • Caramel sauce, optional

Why You’ll Love This Recipe

Pumpkin Pie has the perfect balance of creamy texture, warm spices, and buttery pastry. The filling is smooth and custard-like, while the crust adds a crisp contrast that makes every slice satisfying.

Another reason to love Pumpkin Pie is how practical it is for entertaining. Bake it a day ahead, refrigerate, and add whipped cream before serving. The filling also comes together in one bowl, so cleanup stays simple.

How to Make Pumpkin Pie

Step 1: Preheat the Oven

Preheat the oven to 425°F or 220°C.

Place a rack in the lower third of the oven. This helps the bottom crust bake more evenly and reduces the chance of a soggy base.

Step 2: Prepare the Pie Crust

Fit the unbaked pie crust into a 9-inch pie dish.

Trim any excess dough and crimp the edges.

Refrigerate the prepared crust while you make the filling.

Step 3: Mix the Pumpkin and Sugars

Add pumpkin puree, brown sugar, and granulated sugar to a large mixing bowl.

Whisk until smooth.

Using pure pumpkin puree rather than pre-sweetened filling gives you full control over the sweetness and spice level.

Step 4: Add the Eggs

Crack the eggs into the pumpkin mixture one at a time, whisking after each addition.

Mix until the filling looks smooth and evenly blended.

The eggs help the custard set while keeping the center soft and creamy.

Step 5: Add the Milk and Vanilla

Pour in the evaporated milk and vanilla extract.

Whisk gently until combined.

Avoid beating too much air into the mixture because excess bubbles can affect the surface of Pumpkin Pie as it bakes.

Step 6: Add the Spices

Sprinkle in cinnamon, ginger, nutmeg, cloves, salt, and flour or cornstarch.

Whisk until there are no visible dry streaks.

The small amount of flour or cornstarch helps stabilize the filling and makes each slice cleaner after cooling.

Step 7: Fill the Crust

Remove the chilled crust from the refrigerator.

Pour the pumpkin filling slowly into the pie shell.

Do not overfill. If you have a little extra filling, bake it separately in a small ramekin.

Step 8: Start at High Heat

Place the pie in the oven and bake at 425°F for 15 minutes.

The initial high heat helps the crust begin to set and gives it a better texture.

Step 9: Lower the Temperature

Without opening the oven for too long, reduce the temperature to 350°F or 175°C.

Continue baking for 35 to 45 minutes.

Pumpkin Pie is ready when the edges look set but the center still has a slight wobble when the dish is gently moved.

Step 10: Protect the Crust if Needed

Check the pie after about 30 minutes of total baking time.

If the crust edges are browning too quickly, cover them loosely with strips of foil or a pie shield.

This keeps the pastry golden without letting it become too dark.

Step 11: Cool Completely

Remove Pumpkin Pie from the oven and place it on a wire rack.

Let it cool at room temperature for at least 2 hours.

The filling continues to set as it cools, so cutting it too early can make the center look loose.

Step 12: Chill Before Serving

For the cleanest slices, refrigerate the cooled pie for at least 1 hour before cutting.

Use a sharp knife and wipe the blade between slices.

Top with whipped cream and a light dusting of cinnamon before serving.

Serving Suggestions

Pumpkin Pie is delicious served chilled, at room temperature, or slightly cool.

A generous spoonful of whipped cream is the most traditional topping. You can also add chopped toasted pecans, a drizzle of caramel, or a sprinkle of cinnamon.

For a holiday dessert table, serve Pumpkin Pie beside apple crisp, pecan pie, or vanilla ice cream. Coffee, chai, black tea, or warm apple cider also pair beautifully with the warm spices.

For a warm and hearty main dish, try our Homestyle Beef and Tender Cabbage Roll Soup with tender beef, cabbage, tomatoes, rice, and savory herbs.

Recipe Tips

Use pure pumpkin puree, not pre-sweetened pumpkin pie filling.

Do not overmix the filling after adding the eggs.

Bake the pie on a lower oven rack to help the crust cook thoroughly.

If the crust browns too quickly, shield the edges with foil.

Do not bake until the center is completely firm. Pumpkin Pie should have a small wobble in the middle when it comes out of the oven.

Cool completely before slicing.

For the best flavor, make the pie one day ahead and refrigerate overnight.

Easy Variations

Pumpkin Pie is easy to customize while keeping the classic texture.

For a maple version, replace part of the granulated sugar with pure maple syrup.

For a deeper spice flavor, add a small pinch of cardamom or allspice.

You can also make a gingerbread-inspired version by adding a little molasses and extra ginger.

For a nutty finish, sprinkle chopped pecans around the edge before serving.

A chocolate variation can include a thin layer of melted dark chocolate spread over the cooled crust before adding the filling.

If you want a quick no-bake snack or dessert, you may also like our Viral High-Protein Dunkaroo Dip Made with Only 4 Ingredients.

Make-Ahead Instructions

Pumpkin Pie is one of the best desserts to prepare ahead.

Bake it the day before serving, cool it completely, cover loosely, and refrigerate overnight.

The pie dough can be made up to 2 days ahead and refrigerated. The filling can also be mixed several hours ahead, covered, and chilled; whisk gently before using.

Storage and Freezing

Store Pumpkin Pie in the refrigerator after it has cooled.

Cover the pie loosely with foil or plastic wrap and refrigerate for up to 4 days.

For longer storage, wrap individual slices or the whole cooled pie well and freeze for up to 1 month. Thaw overnight in the refrigerator before serving.

Nutrition Information

Approximate nutrition per slice:

Calories: 315
Protein: 6 g
Carbohydrates: 45 g
Fat: 13 g
Saturated Fat: 6 g
Fiber: 3 g
Sugar: 28 g
Sodium: 320 mg

Nutrition values are estimates and may vary depending on the crust, milk, sugar, and toppings used.

Frequently Asked Questions

Can I use fresh pumpkin puree?

Yes. Make sure it is thick and well drained so the filling does not become watery.

Why did my pie crack?

Cracks usually happen when the pie is overbaked or cooled too quickly. Remove it while the center still has a slight wobble.

Can I use heavy cream instead of evaporated milk?

Yes. Heavy cream creates a richer filling, although the texture may be slightly softer.

Can I make this without a crust?

Yes. Pour the filling into a greased pie dish and bake it as a crustless custard.

How do I know when it is done?

The outer 2 to 3 inches of Pumpkin Pie should look set, while the center should jiggle slightly.

Can I make it gluten-free?

Yes. Use a gluten-free pie crust and cornstarch instead of flour.

Should I refrigerate leftovers?

Yes. Because the filling contains eggs and milk, leftovers should be refrigerated.

Final Thoughts

Pumpkin Pie is a timeless dessert that combines creamy pumpkin custard, warm spices, and flaky pastry in one simple recipe.

Because Pumpkin Pie can be made ahead, refrigerated overnight, and served with minimal finishing work, it is especially useful for Thanksgiving, fall gatherings, and family dinners.

Keep this Pumpkin Pie recipe handy whenever you want a classic seasonal dessert with a smooth filling, warm spice flavor, and dependable results.

A homemade Pumpkin Pie may look impressive on the table, but the method is straightforward enough for beginner bakers and reliable enough for special occasions.

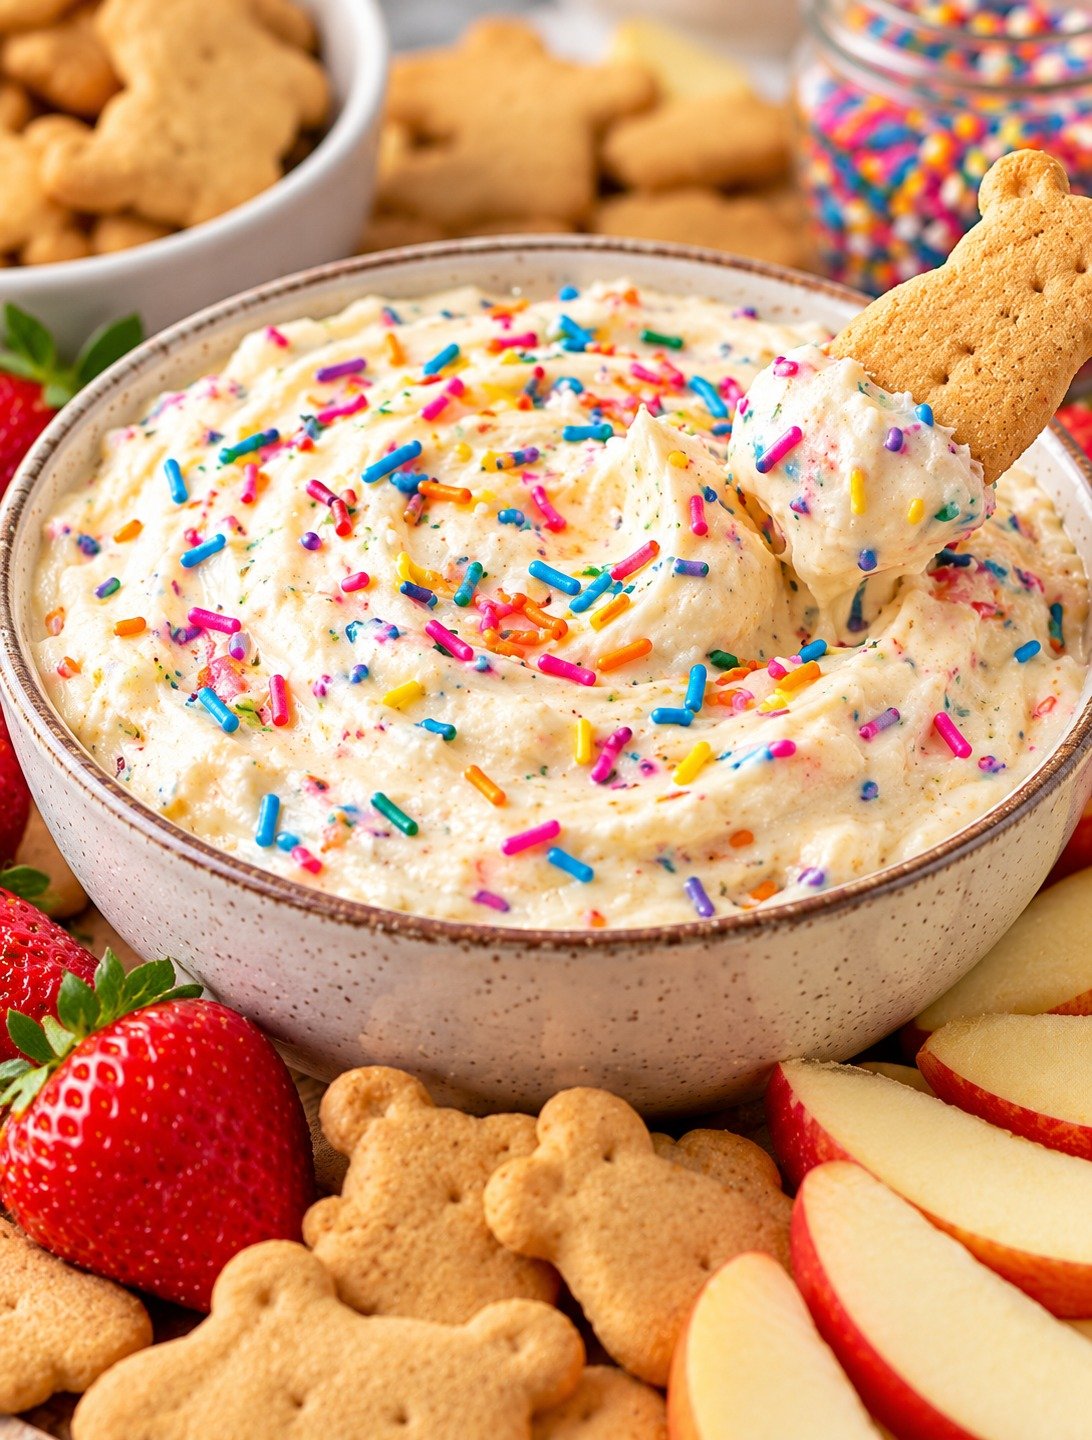
Viral High-Protein Dunkaroo Dip Made with Only 4 Ingredients

Dunkaroo Protein Dip with Greek yogurt, vanilla protein powder, pudding mix, and colorful rainbow sprinkles

Viral High-Protein Dunkaroo Dip Made with Only 4 Ingredients

Dunkaroo Protein Dip is a creamy, sweet, nostalgic snack made with just four simple ingredients: Greek yogurt, vanilla protein powder, sugar-free vanilla pudding mix, and rainbow sprinkles. It has the fun birthday-cake flavor people love in classic Dunkaroo-style dips, but with a higher-protein base that makes it more filling for snacks, meal prep, or dessert.

This Dunkaroo Protein Dip takes only a few minutes to mix, requires no baking, and can be served immediately or chilled for an even thicker texture. Pair it with fruit, graham crackers, pretzels, or mini cookies for a colorful treat that works for both everyday snacking and parties.

Prep Time: 5 minutes
Chill Time: 15 minutes, optional
Total Time: 5–20 minutes
Servings: 4

Ingredients

For the Dip

  • 1 1/2 cups thick plain or vanilla Greek yogurt
  • 1/2 cup vanilla protein powder
  • 2 tablespoons sugar-free vanilla pudding mix
  • 2 tablespoons rainbow sprinkles

That is all you need for this recipe. The yogurt creates the creamy base, the protein powder adds sweetness and extra protein, the pudding mix gives the dip a thick cake-batter texture, and the sprinkles provide the colorful finish.

Why You’ll Love This Recipe

Dunkaroo Protein Dip is one of those recipes that looks playful but is surprisingly practical. It is fast, easy to portion, and made from ingredients that are easy to keep on hand.

The texture is thick enough for dipping but still soft and creamy. Because the recipe uses Greek yogurt, it also has a light tang that balances the sweetness of the vanilla protein powder and pudding mix.

Another reason to love this dip is that it is easy to prepare ahead. Mix it in the morning, refrigerate it, and you have a ready-to-eat snack later in the day.

How to Make Dunkaroo Protein Dip

Step 1: Add the Greek Yogurt

Place the Greek yogurt in a medium mixing bowl.

For the thickest Dunkaroo Protein Dip, use a strained Greek yogurt rather than a thin regular yogurt. A thick base helps the finished dip hold onto fruit, crackers, and pretzels without sliding off.

If you are using vanilla Greek yogurt, the dip will be sweeter. Plain Greek yogurt gives you more control over the final sweetness.

Step 2: Add the Protein Powder

Add the vanilla protein powder to the bowl.

Use a protein powder that you already enjoy because its flavor will be noticeable. Whey, casein, or a blended protein powder can work, but they absorb moisture differently.

Stir slowly at first so the powder does not puff out of the bowl.

Step 3: Add the Pudding Mix

Sprinkle the sugar-free vanilla pudding mix over the yogurt and protein powder.

This ingredient helps Dunkaroo Protein Dip become thicker, smoother, and more like cake batter.

Do not add too much pudding mix. A small amount is enough to thicken the yogurt and improve the vanilla flavor without making the dip overly dense.

Step 4: Mix Until Smooth

Use a spoon, whisk, or silicone spatula to stir everything together.

Mix until there are no dry pockets of protein powder or pudding mix.

If the dip becomes very thick, continue stirring for another 30 seconds before deciding whether it needs adjusting. The yogurt often loosens slightly as everything blends together.

The finished Dunkaroo Protein Dip should be creamy, thick, and easy to scoop.

Step 5: Fold in the Sprinkles

Add most of the rainbow sprinkles and gently fold them into the dip.

Save a small amount for decorating the top.

Avoid aggressive mixing because some sprinkles can release color into the yogurt and create streaks.

Step 6: Taste the Dip

Taste a small spoonful.

Different protein powders vary in sweetness, so the flavor may be slightly different depending on the brand you use.

Because this is a four-ingredient recipe, keeping the ingredient list simple is part of the appeal of Dunkaroo Protein Dip.

Step 7: Chill if Desired

You can serve the dip immediately, but chilling it for 15 to 30 minutes gives it an even thicker texture.

Cover the bowl and place it in the refrigerator.

As the pudding mix and protein powder absorb moisture, Dunkaroo Protein Dip becomes more scoopable and dessert-like.

Step 8: Garnish and Serve

Spoon the dip into a serving bowl and scatter the reserved sprinkles over the top.

Serve it with your favorite dippers and enjoy.

Serving Suggestions

Dunkaroo Protein Dip works with a wide variety of dippers, so you can make the snack as light or indulgent as you like.

For more crunch, serve Dunkaroo Protein Dip with graham crackers, pretzel sticks, animal crackers, vanilla wafers, or mini rice cakes.

You can also pair it with apple slices, strawberries, banana, grapes, or other fresh fruit for a colorful snack plate.

For a savory main dish, try our Lemon & Garlic Chicken Bites with tender chicken, fresh lemon, garlic, herbs, and olive oil.

Recipe Tips

Use thick Greek yogurt for the best consistency.

A vanilla protein powder gives the most classic cake-batter flavor.

Add the protein powder gradually if your brand absorbs a lot of liquid.

Choose rainbow jimmies rather than very small nonpareils if you want less color bleeding.

Do not overmix the sprinkles.

For the smoothest texture, sift protein powder first if it tends to form lumps.

Chill the dip before serving if you prefer a thicker consistency.

If you prepare it ahead, add a few fresh sprinkles on top just before serving for the brightest appearance.

Easy Variations

Dunkaroo Protein Dip can be changed without making the basic method complicated.

For a chocolate version, use chocolate protein powder instead of vanilla while keeping the other ingredients the same.

A birthday-cake protein powder can make the flavor even more dessert-like.

For a cookies-and-cream twist, use cookies-and-cream protein powder and keep the rainbow sprinkles for color.

You can also use strawberry Greek yogurt for a fruity variation.

If you want a slightly tangier Dunkaroo Protein Dip, choose plain Greek yogurt. For a sweeter version, use vanilla Greek yogurt.

Make-Ahead Instructions

Dunkaroo Protein Dip is a convenient make-ahead snack because it actually thickens slightly as it rests.

Prepare the recipe up to one day before serving and keep it covered in the refrigerator.

For the neatest appearance, mix most of the sprinkles into the dip but wait to add the final garnish until serving time.

If the dip becomes thicker than you prefer after refrigeration, stir it well before serving. Usually, that is enough to restore the creamy texture.

Storage

Store leftover Dunkaroo Protein Dip in an airtight container in the refrigerator for up to 3 days.

Give it a quick stir before eating because a small amount of liquid may collect on the surface.

Keep the dip chilled when serving at a party, especially if it will sit out for a longer period.

Freezing is not recommended because Greek yogurt can become grainy or watery after thawing.

Nutrition Information

Approximate nutrition per serving, based on four servings:

Calories: 170
Protein: 22 g
Carbohydrates: 14 g
Fat: 3 g
Saturated Fat: 1 g
Fiber: 1 g
Sugar: 7 g
Sodium: 220 mg

Nutrition values are estimates and will vary depending on the Greek yogurt, protein powder, pudding mix, and sprinkles you choose.

Frequently Asked Questions

Can I use plain Greek yogurt?

Yes. Plain Greek yogurt works very well and gives the recipe a slightly tangier flavor.

What protein powder is best?

Vanilla protein powder is the easiest choice because it creates the classic sweet cake-batter flavor. Birthday-cake protein powder also works well.

Can I make it without pudding mix?

You can, but the texture will be thinner and the flavor will be less like a classic dessert dip.

Why is my dip too thick?

Some protein powders absorb more moisture than others. Stir the mixture thoroughly and let it rest before deciding whether the texture needs adjusting.

Can I make this for meal prep?

Yes. Dunkaroo Protein Dip can be portioned into small containers and refrigerated for quick snacks.

What are the best dippers?

Fruit, graham crackers, pretzels, mini cookies, and rice cakes all work well.

Can children eat this recipe?

It can be served as a snack, but the suitability of a particular protein powder depends on the product and individual dietary needs. For children, check the product label and follow appropriate guidance.

Final Thoughts

Dunkaroo Protein Dip is an easy way to turn four simple ingredients into a creamy, colorful snack with nostalgic birthday-cake flavor.

Because Dunkaroo Protein Dip takes only minutes to prepare, it works well for busy days, meal prep, parties, or a quick dessert when you do not want to bake.

Keep this Dunkaroo Protein Dip recipe handy whenever you want something sweet, creamy, fun, and protein-rich with almost no preparation.

With Greek yogurt, vanilla protein powder, pudding mix, and rainbow sprinkles, Dunkaroo Protein Dip proves that a simple four-ingredient recipe can still feel like a special treat.

If you want an easy no-bake dessert, you may also like our Apple Samoas Recipe with crisp apples, caramel, toasted coconut, and chocolate.

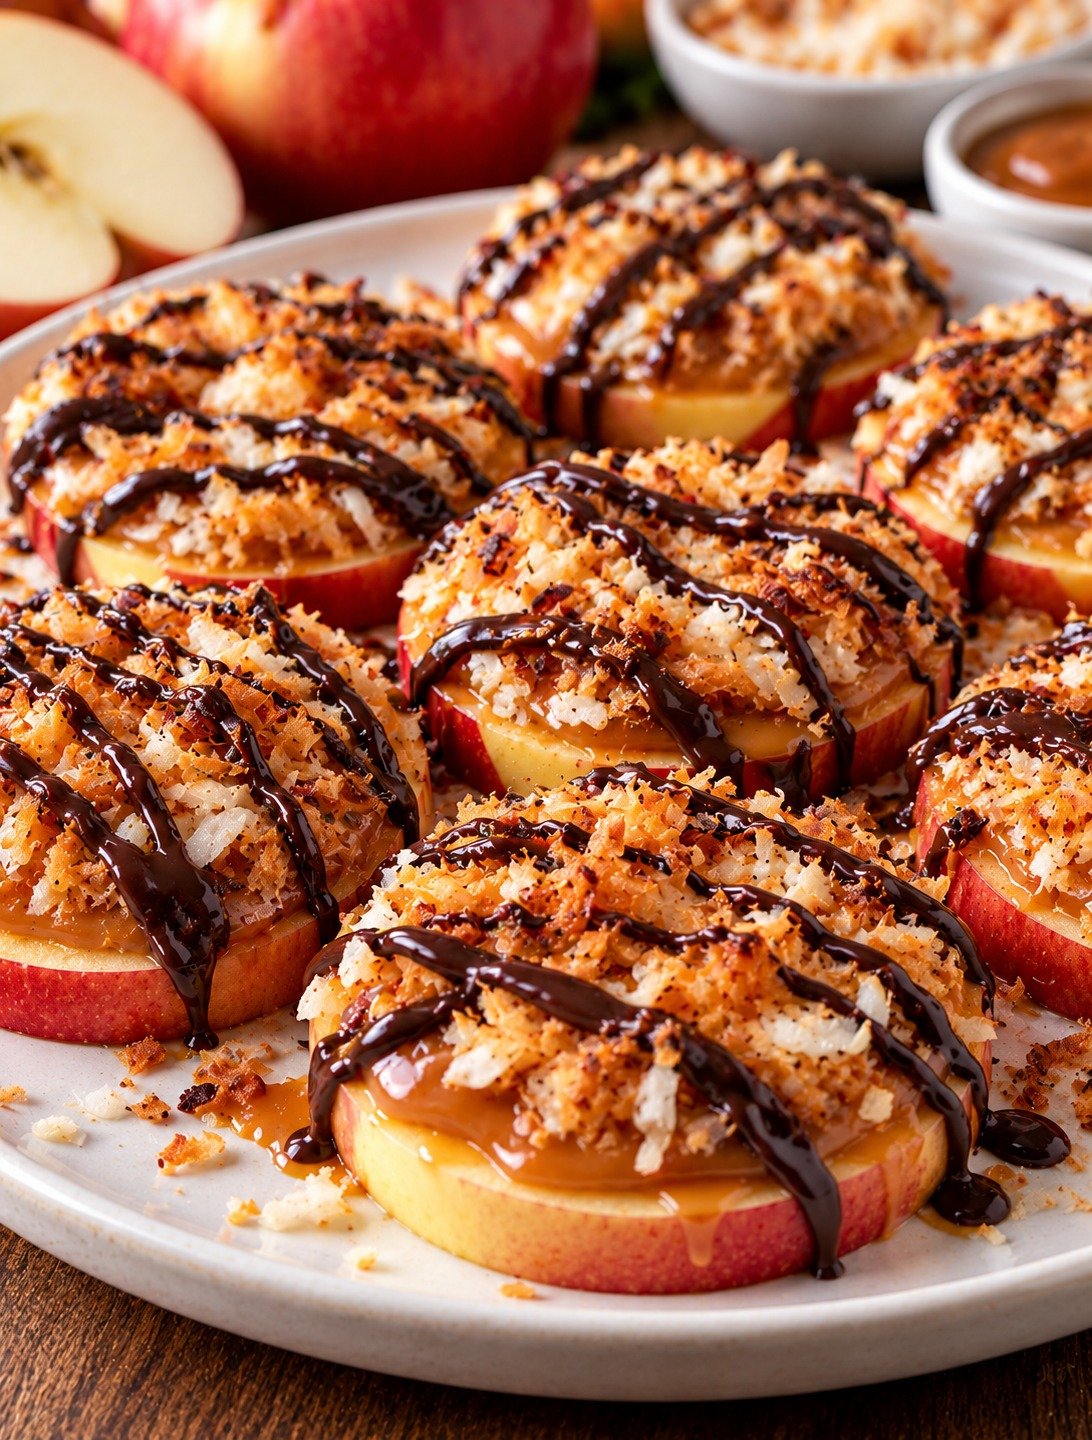
Apple Samoas Recipe

Apple Samoas with crisp apple slices, toasted coconut, caramel, dark chocolate drizzle, and chopped nuts

Apple Samoas Recipe

Apple Samoas are a quick, fun, no-bake treat made with crisp apple slices, chewy toasted coconut, caramel, and melted chocolate. Inspired by the classic coconut-caramel-chocolate flavor combination, these fresh apple rounds are lighter than traditional cookies while still feeling sweet, rich, and satisfying.

These Apple Samoas are perfect for an after-school snack, party tray, easy dessert, or weekend treat. They come together with simple ingredients, require no oven, and can be decorated in minutes. The crisp apples give every bite freshness, while the caramel-coconut topping and chocolate drizzle make them feel indulgent.

Prep Time: 20 minutes
Chill Time: 15 minutes
Total Time: 35 minutes
Servings: 8 to 10 apple rounds

Ingredients

For the Apple Base

  • 2 large crisp apples, such as Honeycrisp, Pink Lady, Gala, or Granny Smith
  • 1 tablespoon fresh lemon juice
  • 1 cup cold water

Ingredients For the Coconut-Caramel Topping

  • 1 cup unsweetened shredded coconut
  • 1/2 cup soft caramel sauce
  • 1 tablespoon almond butter or peanut butter, optional
  • 1/2 teaspoon vanilla extract
  • Pinch of salt

For the Chocolate Layer

  • 1/2 cup dark or semi-sweet chocolate chips
  • 1 teaspoon coconut oil

Optional Garnishes

  • Extra toasted coconut
  • Flaky sea salt
  • Chopped pecans or almonds

Why You’ll Love This Recipe

Apple Samoas combine the crisp bite of fresh fruit with the familiar flavors of toasted coconut, caramel, and chocolate. They are easy to assemble and visually appealing.

Another reason to love Apple Samoas is that they require very little preparation. There is no dough to mix, no baking tray to watch, and no complicated decorating. Make a small batch for a snack or double it for a party.

The recipe is also flexible. Choose tart apples for contrast, sweeter apples for a dessert-like result, dark chocolate for a deeper flavor, or milk chocolate for a softer finish.

How to Make Apple Samoas

Step 1: Toast the Coconut

Place the shredded coconut in a dry skillet over medium-low heat.

Cook for 3 to 5 minutes, stirring frequently, until the coconut becomes lightly golden and fragrant.

Do not walk away because coconut can change from golden to burned very quickly.

Transfer it to a plate and let it cool completely.

Step 2: Prepare the Apple Slices

Wash and dry the apples.

Slice them crosswise into rounds about 1/4 to 1/3 inch thick.

Use a small round cutter, paring knife, or metal piping tip to remove the center core from each slice.

This creates the doughnut-like shape that makes Apple Samoas especially attractive on a serving platter.

Step 3: Prevent Browning

Combine cold water and lemon juice in a shallow bowl.

Dip the apple rounds briefly into the lemon water, then pat them very dry with paper towels.

Removing surface moisture is important because the toppings stick better to dry apple slices.

Step 4: Make the Coconut-Caramel Mixture

In a medium bowl, combine the toasted coconut, caramel sauce, vanilla, salt, and almond butter if using.

Stir until the coconut is evenly coated.

The mixture should be sticky enough to hold together but not runny.

If it feels too loose, add a little more toasted coconut.

Step 5: Add the Topping

Arrange the dried apple rounds on a parchment-lined tray.

Spoon the coconut-caramel mixture over each apple slice.

Use the back of the spoon to gently press and spread the topping around the surface.

Leave the center opening visible if you want the classic ring appearance.

Step 6: Melt the Chocolate

Place chocolate chips and coconut oil in a microwave-safe bowl.

Microwave in 20-second intervals, stirring after each interval, until smooth.

Step 7: Add the Chocolate Base

For a richer version, dip the bottom of each topped apple slice lightly into melted chocolate.

Place it back on the parchment paper with the chocolate side down.

This step is optional, but it gives Apple Samoas an extra chocolate layer similar to the cookie-inspired flavor.

Step 8: Drizzle the Tops

Transfer the remaining melted chocolate to a small zip-top bag and snip off one tiny corner.

Drizzle thin chocolate lines over the coconut-caramel topping.

You can also use a spoon if you prefer a more rustic appearance.

Step 9: Chill Briefly

Refrigerate the tray for 10 to 15 minutes, or until the chocolate is set.

The caramel may remain slightly soft and chewy.

Avoid chilling too long before serving because fresh apples have the best texture when they remain crisp.

Step 10: Serve

Arrange Apple Samoas on a clean platter.

Finish with a pinch of flaky sea salt, extra toasted coconut, or finely chopped nuts if desired.

Serve them chilled or slightly cool for the best balance of crisp apple, chewy topping, and firm chocolate.

Serving Suggestions

Apple Samoas are delicious on their own and work especially well as an easy dessert platter.

Serve them with fresh berries, grapes, or orange slices for a colorful fruit board.

For a party, arrange them beside chocolate-covered strawberries and yogurt dip.

They are also fun as an after-school snack paired with milk, hot cocoa, or a simple smoothie.

For a more indulgent dessert, add a scoop of vanilla yogurt or ice cream on the side.

For a savory breakfast or snack option, try our Broccoli & Cheddar Savory Muffins with tender broccoli, cheddar, herbs, and a soft golden crumb.

Recipe Tips

Choose firm, crisp apples so the slices hold their shape.

Pat the apple rounds completely dry before adding the topping.

Toast the coconut slowly and stir often.

Use a thick caramel sauce rather than a very thin syrup.

Do not overheat the chocolate because it can become thick or grainy.

For neat Apple Samoas, chill them briefly after drizzling so the chocolate sets before serving.

If making them for children, chop the coconut mixture more finely for easier bites.

Prepare the apples close to serving time for maximum crispness.

Easy Variations

Apple Samoas are easy to customize with different flavors.

Use peanut butter instead of almond butter for a richer, nutty topping.

Swap dark chocolate for milk chocolate or white chocolate.

Add chopped pecans, walnuts, or almonds to the coconut mixture for extra crunch.

For a cinnamon version, sprinkle a small amount of cinnamon over the apple slices before adding the topping.

You can also make Apple Samoas with green apples for a sharper tart-sweet contrast.

For a slightly less sweet version, use unsweetened coconut, dark chocolate, and only enough caramel to bind the topping.

Make-Ahead Instructions

Apple Samoas are best eaten the day they are made, but part of the recipe can be prepared ahead.

Toast the coconut up to 3 days in advance and store it in an airtight container.

The coconut-caramel mixture can be made several hours ahead and refrigerated. Let it soften slightly at room temperature before spreading.

Melt the chocolate and slice the apples closer to serving time for the freshest texture and appearance.

Storage

Store leftover Apple Samoas in a single layer in an airtight container in the refrigerator for up to 24 hours.

Place parchment paper between layers if stacking is necessary.

The apple slices will gradually release moisture, so the texture is best within the first several hours.

These treats are not recommended for freezing because thawed apples become soft and watery.

Nutrition Information

Approximate nutrition per apple round:

Calories: 165
Protein: 2 g
Carbohydrates: 24 g
Fat: 8 g
Saturated Fat: 5 g
Fiber: 3 g
Sugar: 18 g
Sodium: 65 mg

Nutrition values are estimates and will vary depending on the apple variety, caramel, chocolate, and toppings used.

Frequently Asked Questions

What apples work best?

Honeycrisp, Pink Lady, Gala, Fuji, and Granny Smith all work well because they are firm and crisp.

Can I use store-bought caramel?

Yes. Choose a thick caramel sauce so it stays on the apple rounds rather than running off.

Can I make these without coconut?

You can, but the coconut is an important part of the Samoa-inspired flavor. Chopped nuts or granola can be used for a different style of treat.

How do I keep the apples from turning brown?

A quick dip in lemon water helps slow browning. Be sure to dry the slices before adding toppings.

Can I use white chocolate?

Yes. White chocolate creates a sweeter variation and looks especially pretty with toasted coconut.

Can I make these ahead for a party?

Yes, but Apple Samoas are best assembled only a few hours before serving so the apples remain crisp.

Can I use caramel candies?

Yes. Melt soft caramel candies with a small splash of milk or cream until smooth, then mix with the toasted coconut.

Final Thoughts

Apple Samoas are an easy way to turn fresh apples into a fun dessert with caramel, toasted coconut, and chocolate.

Because Apple Samoas require no baking and can be customized with different chocolates, nuts, and apple varieties, they are useful for parties, family snacks, and quick desserts.

Keep this Apple Samoas recipe handy whenever you want a simple fruit-based treat that looks special but takes very little time to prepare.

With crisp apples, chewy coconut-caramel topping, and a chocolate drizzle, Apple Samoas deliver plenty of texture and flavor in every bite.

If you want a creamy no-bake treat, you may also like our Chocolate Cherry Cheesecake Yogurt Bowl with cherries, cocoa, Greek yogurt, and dark chocolate.

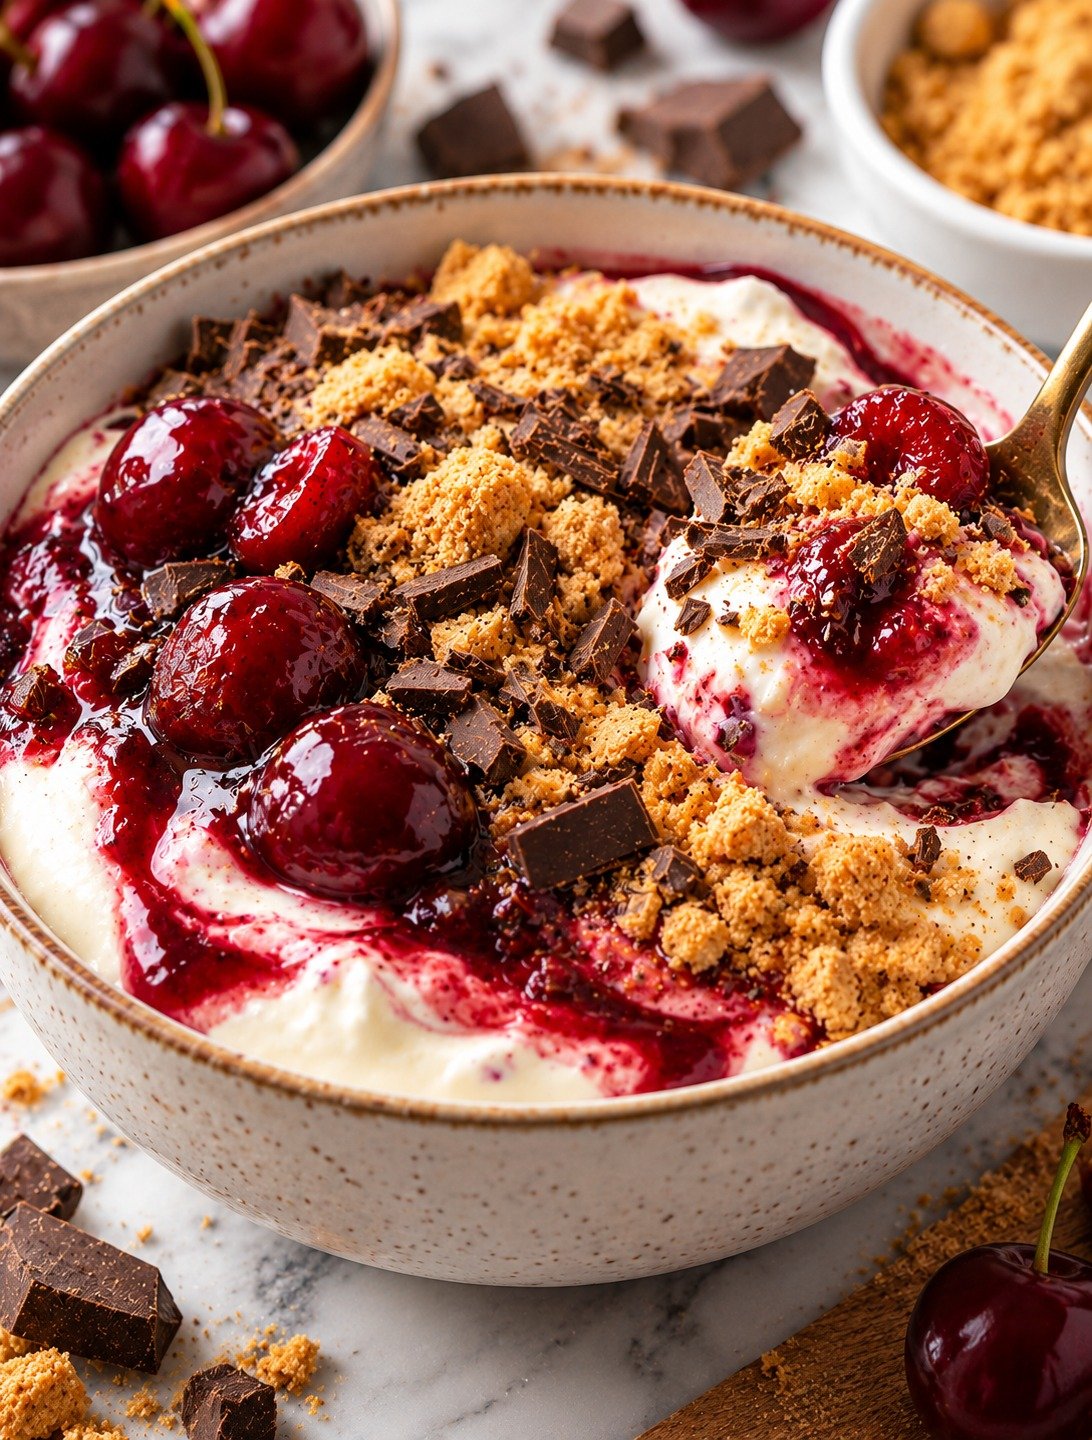
Chocolate Cherry Cheesecake Yogurt Bowl

Cherry Cheesecake Bowl with Greek yogurt, cherries, cocoa, cream cheese, dark chocolate, graham crumbs, and chopped nuts

Chocolate Cherry Cheesecake Yogurt Bowl

Cherry Cheesecake Bowl is a creamy, chocolatey, fruit-filled breakfast or dessert made with thick Greek yogurt, cream cheese, cocoa, fresh or frozen cherries, vanilla, and a simple crunchy topping. It delivers the flavor of cheesecake in a much easier bowl that takes only a few minutes to assemble.

This Cherry Cheesecake Bowl is ideal for breakfast, an afternoon snack, or a lighter dessert when you want something sweet but still filling. The combination of protein-rich yogurt, juicy cherries, and a small amount of chocolate makes it feel indulgent without requiring baking.

Prep Time: 10 minutes
Cook Time: 0 minutes
Total Time: 10 minutes
Servings: 1 large bowl or 2 small bowls

Ingredients

For the Cheesecake Yogurt Base

  • 1 cup thick plain Greek yogurt
  • 2 tablespoons cream cheese, softened
  • 1 tablespoon unsweetened cocoa powder
  • 1 to 2 tablespoons maple syrup or honey
  • 1/2 teaspoon vanilla extract
  • 1 teaspoon fresh lemon juice
  • Pinch of salt

Ingredients For the Cherry Layer

  • 3/4 cup pitted cherries, fresh or frozen
  • 1 teaspoon maple syrup or honey, optional
  • 1/4 teaspoon vanilla extract
  • 1 teaspoon chia seeds, optional

For the Topping

  • 1 tablespoon dark chocolate chips or chopped dark chocolate
  • 1 tablespoon crushed graham crackers
  • 1 tablespoon chopped almonds or walnuts
  • Extra cherries for garnish
  • A small spoonful of Greek yogurt, optional

Why You’ll Love This Recipe

Cherry Cheesecake Bowl combines creamy cheesecake flavor with the convenience of a yogurt bowl. There is no baking, no crust to prepare, and no long chilling time.

Another reason to love Cherry Cheesecake Bowl is the balance of textures. The yogurt and cream cheese create a rich base, the cherries add juicy sweetness, and the chocolate, nuts, and graham crumbs add crunch.

It is also easy to customize. You can make it more chocolatey, add extra fruit, use a different sweetener, or prepare it ahead for a quick breakfast.

How to Make Cherry Cheesecake Bowl

Step 1: Soften the Cream Cheese

Place the cream cheese in a medium bowl and let it sit at room temperature for several minutes.

Softened cream cheese blends more smoothly with yogurt and helps create the creamy cheesecake-style texture.

Step 2: Make the Yogurt Base

Add Greek yogurt, cocoa powder, maple syrup or honey, vanilla, lemon juice, and salt to the cream cheese.

Whisk until completely smooth.

The lemon adds a slight tang that makes Cherry Cheesecake Bowl taste more like classic cheesecake.

Step 3: Prepare the Cherries

If using fresh cherries, remove the pits and slice them in half.

If using frozen cherries, thaw them first and drain any excess liquid.

For a softer fruit layer, place the cherries in a small bowl and mash a few of them with a fork.

Step 4: Sweeten the Fruit

Mix the cherries with maple syrup and vanilla if desired.

If your cherries are naturally sweet, you can skip the extra sweetener.

Stir in chia seeds if you want the fruit mixture to thicken slightly.

Step 5: Build the First Layer

Spoon about half of the chocolate cheesecake yogurt mixture into a serving bowl.

Spread it evenly with the back of a spoon.

Add half of the cherry mixture over the yogurt.

Step 6: Add the Second Layer

Spoon the remaining yogurt mixture over the cherries.

Top with the rest of the fruit.

Layering Cherry Cheesecake Bowl helps distribute the cherry flavor throughout instead of leaving all the fruit on top.

Step 7: Add the Crunchy Toppings

Sprinkle dark chocolate, crushed graham crackers, and chopped nuts over the bowl.

The graham crumbs give the recipe a subtle cheesecake-crust flavor without needing to make a full crust.

Step 8: Garnish

Add a few extra cherries and a small spoonful of yogurt if desired.

For a prettier finish, shave a little dark chocolate over the top.

Step 9: Chill or Serve Immediately

You can eat Cherry Cheesecake Bowl immediately for a soft, creamy texture.

For a thicker cheesecake-like consistency, refrigerate it for 20 to 30 minutes before serving.

Step 10: Enjoy

Serve with a spoon and enjoy it as breakfast, a snack, or dessert.

For a more filling meal, pair the bowl with a boiled egg, a small handful of nuts, or whole-grain toast.

Serving Suggestions

Cherry Cheesecake Bowl is delicious on its own, but it also works well with simple additions.

For breakfast, serve it with a cup of coffee or tea and a small piece of toast.

As a snack, pair Cherry Cheesecake Bowl with almonds, walnuts, or a piece of fresh fruit.

For dessert, add extra dark chocolate, whipped Greek yogurt, or a few crushed graham crackers.

You can also divide the recipe into two small glasses and serve it as a simple layered dessert for guests.

If you enjoy easy high-protein meals, you may also like our Crockpot Steak Bites with tender beef and rich savory flavor.

Recipe Tips

Use thick Greek yogurt for the creamiest texture.

Choose full-fat or reduced-fat cream cheese depending on the richness you prefer.

Taste the cherries before adding sweetener because some varieties are naturally very sweet.

Use unsweetened cocoa powder so you can control the sugar level.

For the smoothest Cherry Cheesecake Bowl, make sure the cream cheese is softened before mixing.

Do not add too much lemon juice, because the base can become thinner.

Add crunchy toppings shortly before serving so they stay crisp.

Easy Variations

Cherry Cheesecake Bowl is easy to customize with different flavors and toppings.

For a stronger chocolate version, add an extra teaspoon of cocoa powder or a few more dark chocolate chips.

For a vanilla version, omit the cocoa and add more vanilla extract.

Swap cherries for strawberries, raspberries, or blueberries if needed.

You can also stir a spoonful of almond butter or peanut butter into the yogurt base.

For a higher-protein version, add a small scoop of chocolate or vanilla protein powder. If the mixture becomes too thick, stir in a splash of milk.

Make-Ahead Instructions

Cherry Cheesecake Bowl can be prepared the night before.

Mix the cheesecake yogurt base and store it in an airtight container in the refrigerator.

Prepare the cherries separately and refrigerate them in another small container.

Assemble the bowl in the morning and add graham crumbs, nuts, and chocolate just before eating.

This keeps the toppings fresh and prevents them from becoming soft.

Storage

Store assembled Cherry Cheesecake Bowl in the refrigerator for up to 2 days.

Keep it covered tightly so the yogurt does not absorb other refrigerator odors.

If possible, store crunchy toppings separately and add them immediately before serving.

This recipe is not ideal for freezing because Greek yogurt and cream cheese can change texture after thawing.

Nutrition Information

Approximate nutrition for one large bowl:

Calories: 390
Protein: 25 g
Carbohydrates: 45 g
Fat: 14 g
Saturated Fat: 6 g
Fiber: 6 g
Sugar: 28 g
Sodium: 210 mg

Nutrition values are estimates and will vary depending on the yogurt, cream cheese, sweetener, chocolate, and toppings used.

Frequently Asked Questions

Can I use frozen cherries?

Yes. Thaw them and drain excess liquid before adding them to the bowl.

Can I make this without cream cheese?

Yes. Use all Greek yogurt for a lighter texture, although it will taste less like cheesecake.

Can I use flavored yogurt?

Yes, but flavored yogurt usually contains more sugar. Vanilla Greek yogurt works especially well.

Can I add protein powder?

Yes. A small scoop of chocolate or vanilla protein powder can make Cherry Cheesecake Bowl even more filling.

Can I make it dairy-free?

Yes. Use thick dairy-free yogurt and dairy-free cream cheese.

What can I use instead of graham crackers?

Crushed oats, granola, digestive-style biscuits, or chopped nuts can all work.

Is this suitable for meal prep?

Yes. Prepare the yogurt and cherries ahead, then add toppings when ready to eat.

Final Thoughts

Cherry Cheesecake Bowl is an easy way to enjoy chocolate, cherries, and cheesecake-inspired flavor without turning on the oven.

Because Cherry Cheesecake Bowl uses simple ingredients and takes only a few minutes to assemble, it works well for busy mornings, afternoon snacks, or a quick dessert.

Keep this Cherry Cheesecake Bowl recipe handy whenever you want something creamy, fruity, chocolatey, and satisfying with minimal preparation.

Cherry Cheesecake Bowl also makes a convenient option when you need a fast treat without baking. For a special presentation, layer the mixture in a clear glass so the chocolate yogurt and bright cherries remain beautifully visible.

For a lighter bread option, try our Fluffy No-Flour High Protein Cloud Bread with eggs, Greek yogurt, and a soft airy texture.