Cheesy Low Carb Spaghetti Squash Bake

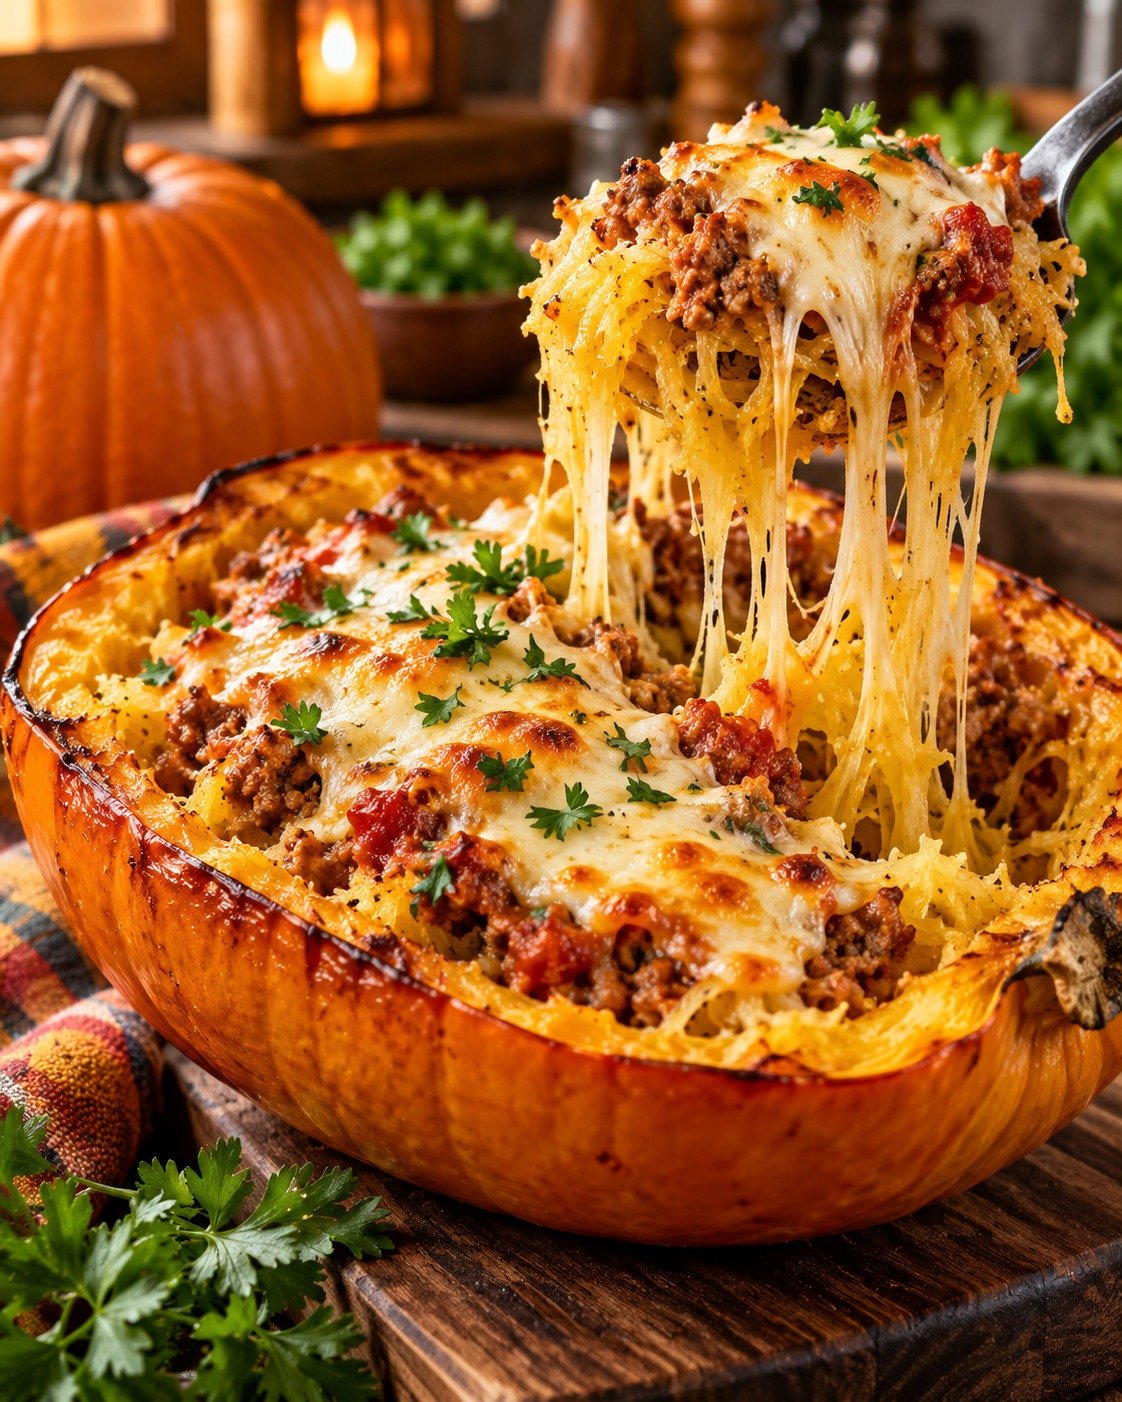
Spaghetti Squash Bake with roasted spaghetti squash, seasoned ground beef, marinara, mozzarella, cheddar, Parmesan, and fresh herbs

Cheesy Low Carb Spaghetti Squash Bake

Spaghetti Squash Bake is a cheesy, comforting, low-carb dinner made with roasted spaghetti squash, seasoned ground beef, tomato sauce, mozzarella, Parmesan, herbs, and simple spices. It has the cozy flavor of a baked pasta casserole, but the tender strands of spaghetti squash take the place of traditional noodles.

This Spaghetti Squash Bake is perfect for family dinners, meal prep, or cooler evenings when you want something warm and satisfying without a heavy pasta base.

Prep Time: 20 minutes
Cook Time: 55 minutes
Total Time: 1 hour 15 minutes
Servings: 6

Ingredients

For the Spaghetti Squash

1 large spaghetti squash, about 3 to 4 pounds

1 tablespoon olive oil

1/2 teaspoon salt

1/4 teaspoon black pepper

For the Meat Sauce

1 pound lean ground beef or ground turkey

1 small yellow onion, diced

3 garlic cloves, minced

1 can (14.5 ounces) diced tomatoes

1 cup marinara sauce

2 tablespoons tomato paste

1 teaspoon Italian seasoning

1/2 teaspoon dried oregano

1/2 teaspoon smoked paprika

1/4 teaspoon red pepper flakes, optional

1/2 teaspoon salt

1/4 teaspoon black pepper

For the Cheesy Topping

1 1/2 cups shredded mozzarella cheese

1/2 cup shredded cheddar cheese

1/3 cup grated Parmesan cheese

2 tablespoons chopped fresh parsley

1 tablespoon chopped fresh basil, optional

Why You’ll Love This Recipe

Spaghetti Squash Bake gives you the comfort of a cheesy casserole while keeping the base lighter than traditional pasta. The squash has a mild flavor that works beautifully with tomato sauce, seasoned beef, garlic, herbs, and melted cheese.

Another reason to love Spaghetti Squash Bake is how flexible it is. You can use ground beef, turkey, chicken, or even a vegetarian filling. It also reheats well, which makes it useful for meal prep or busy weeknights.

How to Make Spaghetti Squash Bake

Step 1: Preheat the Oven

Preheat the oven to 400°F or 200°C.

Line a large baking sheet with parchment paper or lightly grease it with olive oil.

Step 2: Prepare the Squash

Carefully cut the spaghetti squash in half lengthwise.

Use a spoon to scoop out the seeds and stringy center.

Brush the cut sides with olive oil and season with salt and black pepper.

Place the squash halves cut-side down on the prepared baking sheet.

Step 3: Roast the Squash

Roast for 35 to 40 minutes, or until the flesh is tender enough to scrape easily with a fork.

Avoid overcooking because very soft squash can release too much moisture into Spaghetti Squash Bake.

Remove from the oven and let the halves cool for several minutes.

Step 4: Make the Meat Sauce

While the squash roasts, heat a large skillet over medium heat.

Add the ground beef and cook for 5 to 7 minutes, breaking it into small crumbles.

Add the onion and cook for another 3 to 4 minutes until softened.

Stir in the garlic and cook for about 30 seconds.

Step 5: Add Tomatoes and Seasonings

Stir in the diced tomatoes, marinara sauce, tomato paste, Italian seasoning, oregano, smoked paprika, red pepper flakes, salt, and black pepper.

Reduce the heat to medium-low and simmer for 10 to 12 minutes.

Step 6: Shred the Squash

Use a fork to gently scrape the roasted squash flesh into long strands.

Leave a thin layer of squash inside the shell if you plan to use the halves as serving bowls.

If you prefer a casserole dish, transfer all the squash strands to a large bowl.

Step 7: Remove Extra Moisture

Place the squash strands in a clean kitchen towel or several layers of paper towels.

Press gently to remove excess moisture.

This step is important because dry squash helps Spaghetti Squash Bake stay cheesy and rich instead of watery.

Step 8: Combine the Filling

Add the spaghetti squash strands to the skillet with the meat sauce.

Stir gently until the squash is evenly coated.

Add half of the mozzarella and half of the Parmesan, then stir again.

Step 9: Fill the Squash Shells

Divide the filling between the two roasted squash shells.

Sprinkle the remaining mozzarella, cheddar, and Parmesan evenly over the top.

Step 10: Bake Until Bubbly

Return the filled squash halves or casserole dish to the oven.

Bake for 15 to 20 minutes, or until the cheese is fully melted and the edges are bubbling.

For a deeper golden top, broil for 1 to 2 minutes at the end, watching carefully.

Step 11: Rest Before Serving

Remove Spaghetti Squash Bake from the oven and let it rest for 5 to 10 minutes.

Step 12: Garnish and Serve

Sprinkle fresh parsley and basil over the top.

Serve Spaghetti Squash Bake warm from the squash shells or portion it from the casserole dish.

Serving Suggestions

Spaghetti Squash Bake is hearty enough to serve as a complete dinner, but fresh sides work especially well with its cheesy tomato flavor.

Pair it with a crisp green salad, cucumber tomato salad, roasted broccoli, steamed green beans, or garlic sautéed spinach.

For a more substantial meal, serve it with grilled chicken, roasted vegetables, or a small piece of garlic bread if you are not strictly limiting carbohydrates.

For another cheesy and flavorful pasta dinner, try our Low Syn Cheesy Taco Salsa Spaghetti Bake Recipe with a delicious taco-inspired twist.

Recipe Tips

Choose a spaghetti squash that feels firm and heavy for its size.

Do not overroast the squash or the strands can become mushy.

Remove as much moisture as possible before mixing with the sauce.

Simmer the meat sauce until it is thick rather than watery.

Use freshly shredded cheese when possible because it melts more smoothly.

For the best texture, let the finished casserole rest before serving.

Broil only briefly at the end so the cheese browns without burning.

Easy Variations

Spaghetti Squash Bake can be customized in many different ways.

For a chicken version, replace the ground beef with shredded cooked chicken and use a creamy garlic or tomato sauce.

For a vegetarian version, omit the meat and add sautéed mushrooms, spinach, zucchini, bell peppers, or lentils.

You can also make a pizza-inspired version with pepperoni, mushrooms, olives, and extra mozzarella.

For a spicier version, add jalapeños, crushed red pepper, or spicy Italian sausage.

Make-Ahead Instructions

Spaghetti Squash Bake is a good make-ahead dinner because the components can be prepared separately.

Roast and shred the squash up to 2 days ahead. Keep it refrigerated in an airtight container after removing excess moisture.

Prepare the meat sauce up to 3 days ahead and store it separately.

When ready to bake, combine the squash and sauce, add cheese, transfer to the shells or casserole dish, and bake until hot and bubbly.

Storage and Reheating

Store leftover Spaghetti Squash Bake in an airtight container in the refrigerator for up to 4 days.

Reheat individual portions in the microwave for 1 to 2 minutes, or warm larger portions in a 350°F or 175°C oven for about 15 minutes.

If the casserole seems slightly dry after refrigeration, add a spoonful of marinara before reheating.

For longer storage, freeze cooled portions for up to 2 months. Thaw overnight in the refrigerator before reheating.

Nutrition Information

Approximate nutrition per serving:

Calories: 355
Protein: 28 g
Carbohydrates: 20 g
Fat: 20 g
Saturated Fat: 9 g
Fiber: 5 g
Sugar: 8 g
Sodium: 690 mg

Nutrition values are estimates and will vary depending on the meat, cheese, sauce, squash size, and serving portion.

Frequently Asked Questions

Can I make this without meat?

Yes. Replace the ground beef with mushrooms, lentils, spinach, zucchini, or another vegetable mixture.

Why is my casserole watery?

Spaghetti squash naturally contains a lot of moisture. Pressing the cooked strands dry and using a thick sauce helps prevent excess liquid.

Can I use ground turkey?

Yes. Ground turkey works very well and gives Spaghetti Squash Bake a lighter flavor.

Can I use store-bought marinara?

Yes. Choose a thick marinara sauce with a flavor you enjoy.

Can I prepare it ahead?

Yes. Assemble the casserole, cover it, refrigerate for up to one day, and bake when ready.

Can I freeze it?

Yes. Freeze fully cooled portions in airtight containers for up to 2 months.

What cheese works best?

Mozzarella gives the best melt, while cheddar adds flavor and Parmesan creates a savory finish.

Final Thoughts

Spaghetti Squash Bake is a satisfying way to enjoy a cheesy, comforting casserole while using tender spaghetti squash instead of traditional pasta.

Because Spaghetti Squash Bake combines vegetables, protein, tomato sauce, herbs, and melted cheese in one dish, it works well for family dinners, meal prep, and cozy weeknight meals.

Keep this Spaghetti Squash Bake recipe handy whenever you want a warm, flavorful dinner with plenty of cheesy goodness and a lighter pasta-style base. Spaghetti Squash Bake also works beautifully for make-ahead family meals.

With golden melted cheese, rich meat sauce, and tender squash strands, Spaghetti Squash Bake delivers the cozy look and flavor of a classic baked casserole without relying on traditional noodles.

If you enjoy comforting baked pasta dishes, you may also like our Baked Spaghetti Recipe: The Ultimate Comfort Food You’ll Love.
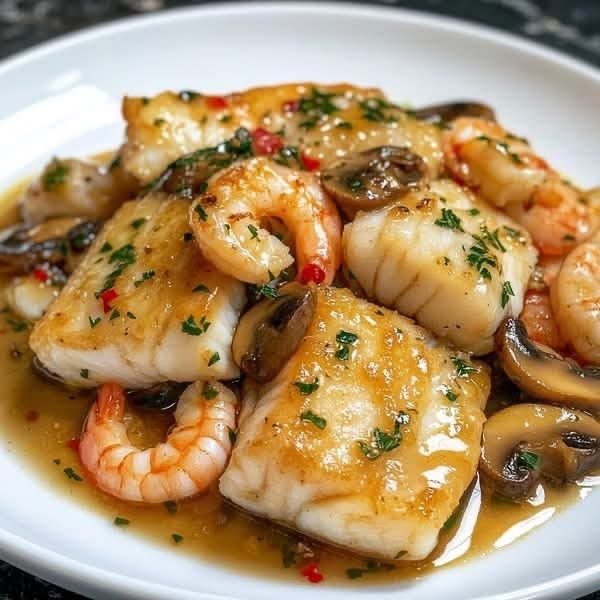
Garlic Butter Seafood Skillet with Shrimp, Scallops, Fish & Mushrooms

Garlic Butter Seafood Skillet with Shrimp, Scallops, Fish & Mushrooms

Recipe Description

This Garlic Butter Seafood Skillet is a delicious, restaurant-style meal featuring tender white fish, juicy shrimp, buttery scallops, and savory mushrooms simmered in a rich garlic butter sauce. Fresh parsley, a touch of red pepper, and a squeeze of lemon brighten the dish, creating a wonderful balance of buttery richness, fresh seafood flavor, and subtle spice.

Every bite combines flaky fish, plump shrimp, tender scallops, and golden mushrooms coated in a silky sauce that is perfect for spooning over rice, pasta, or crusty bread. The recipe looks elegant enough for a special dinner but is simple enough to prepare on a busy weeknight.

The secret to this dish is cooking each seafood ingredient carefully so everything remains tender and flavorful. Garlic and butter form the base of the sauce, while seafood juices, lemon juice, and a little broth bring all the ingredients together.

Whether you are planning a family dinner, a romantic meal, or a seafood-inspired weekend feast, this garlic butter seafood skillet is a satisfying choice for seafood lovers.

Preparation Time: 15 minutes

Cooking Time: 20 minutes

Total Time: 35 minutes

Servings: 4

Cuisine: American-inspired seafood

Course: Main course

Difficulty: Easy to moderate

Ingredients

For the Seafood

1 pound white fish fillets, such as cod, haddock, or halibut, cut into large pieces

12 ounces large shrimp, peeled and deveined

8 ounces sea scallops, side muscles removed

8 ounces cremini or button mushrooms, sliced

2 tablespoons olive oil

Salt, to taste

½ teaspoon freshly ground black pepper

½ teaspoon paprika

¼ teaspoon garlic powder

For the Garlic Butter Sauce

5 tablespoons unsalted butter

5 cloves garlic, finely minced

½ cup low-sodium chicken or seafood broth

2 tablespoons fresh lemon juice

1 teaspoon lemon zest

½ teaspoon red pepper flakes, or to taste

½ teaspoon Italian seasoning

2 tablespoons fresh parsley, finely chopped

1 tablespoon extra-virgin olive oil, if needed

Salt and black pepper, to taste

Optional Ingredients

¼ cup dry white wine, replacing part of the broth

2 tablespoons grated Parmesan cheese

1 tablespoon capers

Extra lemon wedges for serving

A small pinch of smoked paprika for additional depth

Instructions

Step 1: Prepare the Seafood

Begin by preparing all the seafood before heating the skillet. Pat the fish, shrimp, and scallops dry with paper towels. Removing excess moisture helps the seafood develop a beautiful golden surface instead of steaming in the pan.

Cut the fish into generous, evenly sized pieces so it cooks at a similar rate. Season the fish lightly with salt, black pepper, paprika, and garlic powder.

Season the shrimp and scallops with a little salt and black pepper as well. Keep the ingredients separate because they will be added to the skillet at different stages.

If the scallops are particularly wet, pat them dry once more immediately before cooking. Dry scallops are much easier to sear and develop a delicious golden crust.

Step 2: Sear the Fish

Heat a large, heavy skillet over medium-high heat. Add 2 tablespoons of olive oil and allow it to become hot but not smoking.

Carefully place the fish pieces in the skillet in a single layer. Avoid overcrowding the pan, as this can cause the fish to release moisture and cook unevenly.

Cook the fish for approximately 2–4 minutes on the first side, depending on thickness, until the surface turns golden. Gently turn each piece and cook for another 1–3 minutes, or until nearly cooked through.

The exact cooking time depends on the type and thickness of the fish. It should begin to flake easily but still hold its shape.

Transfer the fish to a clean plate and set it aside. It will finish cooking when returned to the sauce later.

Step 3: Cook the Scallops

If the skillet looks dry, add a small amount of olive oil. Arrange the scallops in the hot pan, leaving space between them.

Let them sear undisturbed for approximately 2 minutes, or until a golden crust forms. Turn them carefully and cook for another 1–2 minutes, depending on their size.

Scallops cook quickly, so avoid leaving them in the pan too long. Properly cooked scallops should be tender and moist rather than rubbery.

Transfer them to the plate with the fish.

Step 4: Sauté the Shrimp

Add the shrimp to the same skillet. Cook for approximately 1–2 minutes on the first side, then turn and cook for another 1–2 minutes.

The shrimp should turn pink and opaque and curl into a loose C shape. Remove them promptly once cooked.

If the shrimp are very large, they may require slightly longer. Avoid cooking them until they curl tightly into an O shape, as this can indicate overcooking.

Set the shrimp aside with the other seafood.

Step 5: Brown the Mushrooms

Reduce the heat to medium and add a small amount of olive oil if necessary. Add the sliced mushrooms in a single layer.

Cook for 5–7 minutes, stirring occasionally, until the mushrooms release their moisture and develop golden-brown edges.

Allowing the mushrooms to brown adds an earthy, savory flavor that complements the sweetness of the shrimp and scallops.

If the mushrooms release a lot of liquid, continue cooking until most of the moisture evaporates. This helps prevent the finished sauce from becoming watery.

Step 6: Make the Garlic Butter Sauce

Add the butter to the skillet with the mushrooms. Once it melts, stir in the minced garlic.

Cook for approximately 30–60 seconds, stirring frequently, until the garlic becomes fragrant. Do not let it brown too much, because burnt garlic can make the sauce bitter.

Add the red pepper flakes, Italian seasoning, lemon zest, and a little black pepper. Stir to distribute the seasonings evenly.

Pour in the broth and scrape the bottom of the skillet with a wooden spoon to release the flavorful browned bits left behind by the seafood and mushrooms.

If you are using white wine, add it before the broth and let it simmer briefly to reduce. Then add the broth.

Allow the sauce to simmer gently for 3–5 minutes, until it reduces slightly. Stir in the lemon juice and taste the sauce. Add salt only as needed, since the broth and seafood may already contribute enough seasoning.

For a richer finish, swirl in an additional tablespoon of butter.

Step 7: Return the Seafood to the Skillet

Reduce the heat to low. Carefully return the fish, scallops, and shrimp to the skillet, arranging them among the mushrooms.

Spoon the garlic butter sauce over the seafood so each piece is coated. Let everything warm together for approximately 2–3 minutes, or just until the seafood is fully cooked and heated through.

Avoid stirring aggressively, as the fish can break apart. Instead, gently tilt the pan and spoon the sauce over the ingredients.

For food safety, fish should reach an internal temperature of 145°F (63°C). Shrimp and scallops should be opaque and firm, without a raw or translucent center.

Step 8: Finish with Fresh Herbs

Remove the skillet from the heat. Sprinkle the chopped parsley over the seafood and add a little extra lemon juice if desired.

The fresh parsley adds color and a clean herbal flavor, while the lemon cuts through the richness of the butter.

Taste the sauce one final time and adjust the seasoning with salt, pepper, or red pepper flakes.

Serve immediately while the sauce is warm and glossy.

Tips for the Best Garlic Butter Seafood Skillet

1. Choose fresh or properly thawed seafood. Fresh seafood or frozen seafood that has been thawed safely in the refrigerator will work well. Pat everything dry before cooking.

2. Avoid overcrowding the skillet. Cook the seafood in batches if necessary. Giving each ingredient enough space helps create a golden surface and prevents excess moisture from accumulating.

3. Cook each seafood ingredient separately. Fish, shrimp, and scallops have different cooking times. Searing them individually helps keep everything tender.

4. Use fresh garlic. Freshly minced garlic gives the butter sauce a stronger aroma and more appealing flavor than garlic powder alone.

5. Do not burn the garlic. Garlic cooks quickly. Add the broth as soon as it becomes fragrant to prevent it from turning bitter.

6. Balance the butter with lemon. Lemon juice adds brightness and keeps the sauce from tasting too heavy. Start with the suggested amount and add more according to your preference.

7. Keep the sauce at a gentle simmer. Boiling the sauce vigorously after adding the seafood can cause the fish to break apart and the shrimp to become tough.

8. Serve the dish immediately. Seafood is at its best when freshly cooked. The sauce may thicken as it cools, so serve it while warm.

What to Serve with Garlic Butter Seafood

This seafood skillet pairs beautifully with several simple side dishes.

Steamed rice: White rice, brown rice, or lemon rice absorbs the flavorful garlic butter sauce.

Pasta: Linguine, spaghetti, or angel hair pasta turns the seafood into a satisfying pasta dinner.

Crusty bread: Warm sourdough or French bread is perfect for soaking up the sauce.

Roasted vegetables: Asparagus, broccoli, green beans, or zucchini add freshness and texture.

Mashed potatoes: Creamy potatoes complement the rich seafood sauce.

Fresh salad: A cucumber, tomato, and mixed-green salad with lemon dressing provides a refreshing contrast.

Cauliflower rice: A lighter, lower-carbohydrate option that allows the seafood to remain the star of the meal.

For an elegant presentation, spoon the seafood and mushrooms into a shallow white serving bowl, drizzle the sauce over the top, and finish with chopped parsley and lemon wedges.

Variations to Try

Creamy Garlic Butter Seafood

For a creamier sauce, add ¼ cup of heavy cream after the broth has reduced. Simmer gently until slightly thickened. Avoid boiling vigorously, and return the seafood to the skillet only when the sauce is ready.

Spicy Cajun Seafood Skillet

Replace the paprika and Italian seasoning with Cajun seasoning. Add a little extra cayenne pepper for more heat. Taste before adding salt because many Cajun blends already contain it.

Mediterranean Seafood Skillet

Add halved cherry tomatoes, sliced black olives, and a handful of baby spinach. Finish with lemon juice, parsley, and a little crumbled feta if desired.

Lemon Parmesan Seafood

Stir 2 tablespoons of finely grated Parmesan into the finished sauce off the heat. Add extra lemon zest and parsley for a bright, savory finish.

Seafood and Spinach Skillet

Add two handfuls of fresh spinach to the mushroom sauce and cook until wilted before returning the seafood to the pan. This adds color and makes the dish more vegetable-rich.

Storage and Reheating

Store leftover seafood in an airtight container in the refrigerator within two hours of cooking. For the best quality and food safety, consume within 1–2 days.

To reheat, place the seafood and sauce in a covered skillet over low heat. Add a tablespoon or two of broth or water if the sauce has thickened. Warm gently until heated through, avoiding prolonged cooking.

Microwave reheating is also possible. Use a microwave-safe dish, cover loosely, and heat in short intervals, checking frequently to prevent the seafood from becoming rubbery.

Freezing is possible, but the texture of cooked shrimp, scallops, and fish may deteriorate after thawing. For the best results, prepare this dish fresh.

Nutritional Information

The following figures are estimates for one serving when the recipe is divided into four portions. Actual values will vary according to the seafood, butter, broth, and portion sizes used.

Calories: 430–520

Protein: 38–48 g

Carbohydrates: 8–12 g

Fat: 25–32 g

Saturated fat: 12–17 g

Fiber: 1–2 g

Sodium: 500–850 mg

These estimates do not include rice, pasta, bread, or other side dishes. Using less butter can reduce the calories and saturated fat, while low-sodium broth can help lower the sodium content.

Benefits of This Recipe

High in protein: Fish, shrimp, and scallops provide protein that helps support muscle maintenance and normal body functions.

Provides important nutrients: Seafood can contribute nutrients such as vitamin B12, selenium, and iodine, depending on the varieties used.

Includes vegetables: Mushrooms contribute fiber and several micronutrients while adding savory flavor and texture.

Easy to customize: You can adjust the amount of butter, spice, and lemon or serve the seafood with vegetables instead of pasta or rice.

Suitable for a special dinner: The colorful combination of seafood, mushrooms, fresh herbs, and glossy sauce creates a restaurant-style presentation without requiring complicated cooking techniques.

This recipe is not automatically low in calories or saturated fat because it contains butter. Portion size and the choice of side dishes can help you adapt it to your dietary preferences.

Frequently Asked Questions

1. Can I use frozen seafood?

Yes. Thaw it in the refrigerator according to the package instructions and pat it dry before cooking. Do not cook frozen seafood directly in the skillet unless the product specifically recommends that method.

2. What fish works best for this recipe?

Cod, haddock, halibut, and other firm white fish are excellent choices because they have a mild flavor and hold their shape when cooked.

3. Can I make this recipe without scallops?

Absolutely. Increase the amount of shrimp or fish, or substitute another seafood you enjoy. Adjust the cooking time according to the ingredient.

4. How do I keep the fish from falling apart?

Cut the fish into large pieces, turn it gently, and avoid stirring the skillet after adding it to the sauce. Searing the fish first also helps it hold together.

5. Can I make the garlic butter sauce ahead of time?

You can prepare the sauce and sauté the mushrooms in advance, then refrigerate them separately. For the best seafood texture, cook the shrimp, scallops, and fish shortly before serving.

6. Is this recipe spicy?

It has only mild heat when prepared with the suggested amount of red pepper flakes. Omit them for a milder dish or increase them for a spicier version.

7. Can I make it dairy-free?

Yes. Replace the butter with a suitable dairy-free butter alternative or use olive oil. The flavor will be slightly different, but the garlic, lemon, mushrooms, and seafood will still make a delicious combination.

8. Why is my sauce watery?

Excess moisture from the seafood or mushrooms is usually the reason. Pat the seafood dry, brown the mushrooms properly, and let the broth simmer until slightly reduced before returning the seafood to the skillet.

9. Can I add cream to the sauce?

Yes. Add a small amount of heavy cream after reducing the broth and simmer gently until the sauce reaches your preferred consistency.

10. How can I tell when the seafood is cooked?

Shrimp should be pink and opaque, scallops should be opaque and firm, and fish should flake easily. Use a food thermometer to confirm that the fish reaches 145°F (63°C).

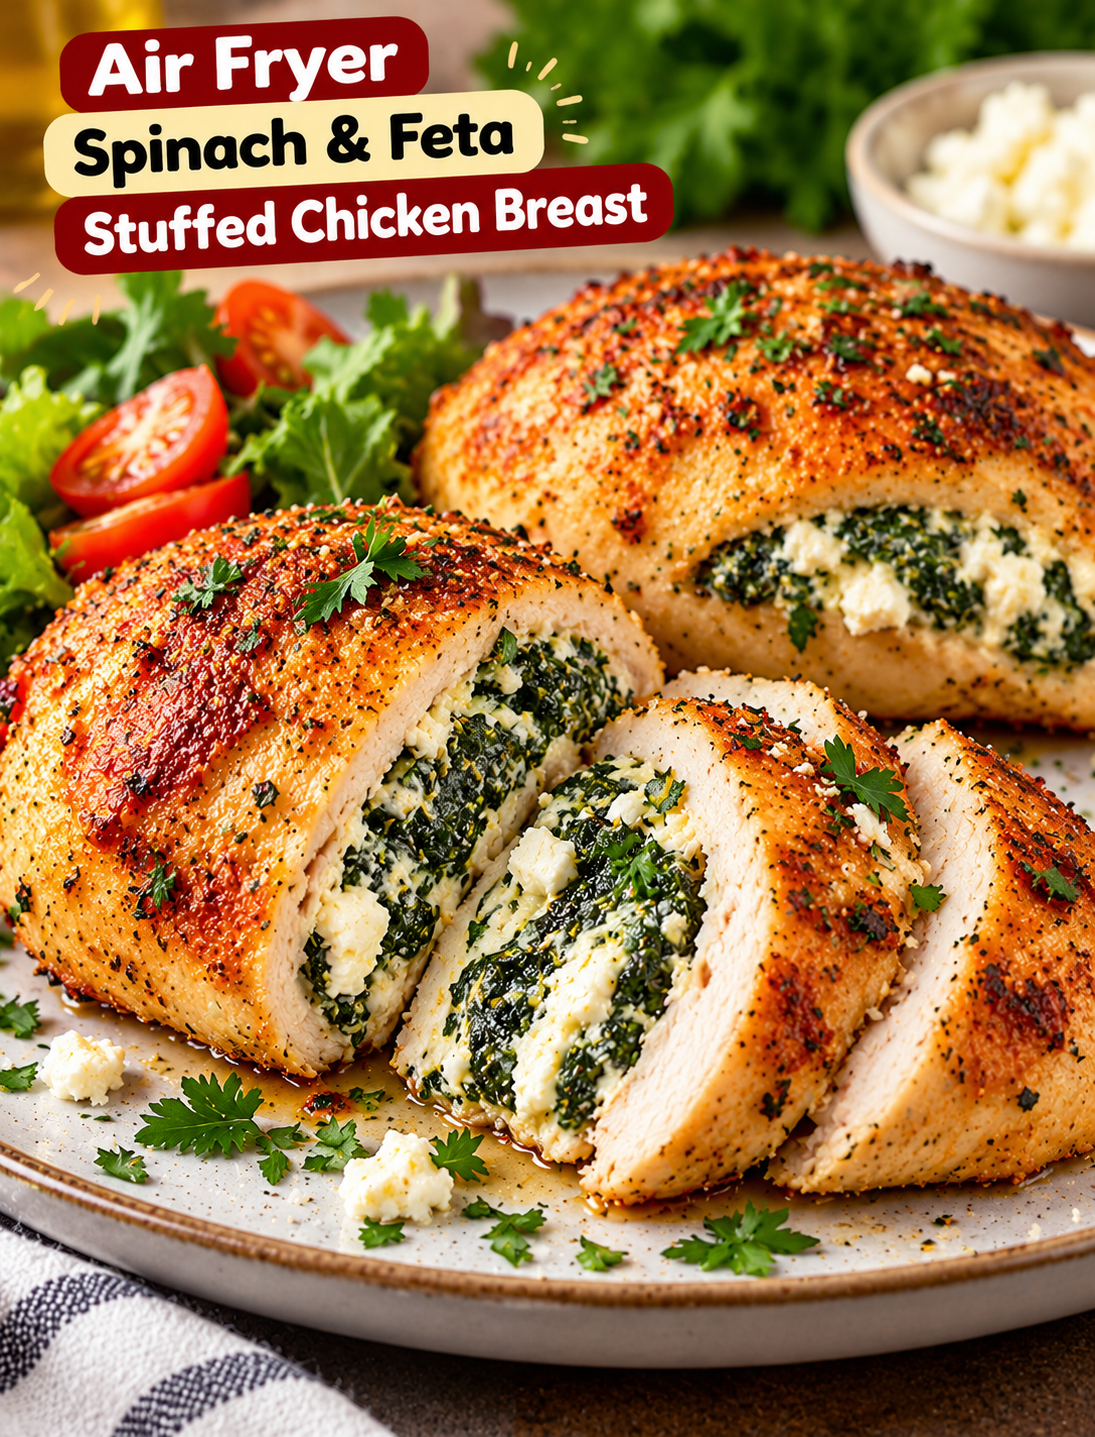
Air Fryer Spinach & Feta Stuffed Chicken Breast

Air fryer spinach and feta stuffed chicken breast sliced open to reveal a creamy spinach, garlic, and feta cheese filling.
Air Fryer Spinach & Feta Stuffed Chicken Breast

Looking for a chicken dinner that feels special but is easy enough for a busy weeknight? This Air Fryer Spinach & Feta Stuffed Chicken Breast is packed with tender spinach, creamy feta cheese, garlic, and simple Mediterranean-inspired seasonings. The chicken develops a lightly golden exterior while the savory filling adds flavor to every bite.

This recipe uses everyday ingredients and an air fryer to make a satisfying dinner without heating up the whole kitchen. A little olive oil, paprika, and Italian seasoning help season the chicken, while spinach and feta create a rich, tangy filling that pairs well with fresh vegetables, roasted potatoes, or a crisp salad.

Whether you are planning a family dinner or preparing meals for the week, this stuffed chicken breast is a delicious way to make lean chicken more exciting. Follow the step-by-step instructions below for juicy chicken, a flavorful filling, and a meal you can prepare with confidence.

Why You’ll Love This Air Fryer Spinach & Feta Stuffed Chicken Breast

  • Full of flavor: Salty feta, tender spinach, and garlic create a savory Mediterranean-style filling.
  • Easy preparation: The ingredients are simple, and the filling takes only a few minutes to mix.
  • Air fryer convenience: Hot circulating air cooks the chicken without requiring a large oven.
  • A balanced dinner option: Chicken provides protein, while spinach adds color, texture, and nutrients.
  • Easy to customize: Add sun-dried tomatoes, fresh herbs, or a little mozzarella to change the flavor.
  • Great for meal planning: Pair the chicken with different sides to create several satisfying meals.

Recipe Overview

  • Prep Time: 15 minutes
  • Cook Time: 18–25 minutes
  • Total Time: Approximately 35–40 minutes
  • Servings: 2
  • Course: Main Course
  • Cuisine: Mediterranean-Inspired
  • Cooking Method: Air Fryer
  • Difficulty: Easy to Moderate

Cooking time depends on the thickness of the chicken breasts and the air fryer model. Always check the internal temperature before serving.

Ingredients for Air Fryer Spinach & Feta Stuffed Chicken Breast

This recipe makes two stuffed chicken breasts using fresh spinach and tangy feta cheese.

For the Chicken

  • 2 boneless, skinless chicken breasts, about 6–8 ounces each
  • 1 tablespoon olive oil
  • 1/2 teaspoon paprika
  • 1/2 teaspoon Italian seasoning
  • 1/4 teaspoon garlic powder
  • 1/4 teaspoon onion powder
  • 1/4 teaspoon black pepper
  • 1/4 teaspoon salt, or to taste

For the Spinach and Feta Filling

  • 1 cup fresh spinach, finely chopped
  • 1/3 cup crumbled feta cheese
  • 2 tablespoons softened cream cheese
  • 2 garlic cloves, minced
  • 1 tablespoon grated Parmesan cheese
  • 1 teaspoon olive oil
  • 1/4 teaspoon dried oregano
  • A pinch of black pepper

Ingredient tip: Feta cheese is naturally salty, so taste the filling before adding extra salt. If using frozen spinach, thaw it completely and squeeze out as much water as possible.

How to Make Air Fryer Spinach & Feta Stuffed Chicken Breast

Follow these steps to prepare the filling, stuff the chicken, and air fry it until juicy and fully cooked.

Step 1: Prepare the Spinach

Wash the fresh spinach and dry it thoroughly with a clean towel. Chop it into small pieces so it mixes evenly with the cheese.

Heat 1 teaspoon of olive oil in a small skillet over medium heat. Add the spinach and cook for 1–2 minutes, stirring until it wilts.

Add the minced garlic and cook for another 30 seconds. Remove the mixture from the heat and let it cool before mixing it with the cheese.

Step 2: Make the Feta Filling

Place the cooled spinach mixture in a small bowl. Add the crumbled feta, softened cream cheese, Parmesan, dried oregano, and black pepper.

Stir until the ingredients are evenly combined. The cream cheese helps bind the filling, while the feta adds a tangy, salty flavor.

If the mixture looks watery, drain any excess liquid before stuffing the chicken. A thick filling is easier to handle and less likely to escape during cooking.

Step 3: Prepare the Chicken Breasts

Pat the chicken breasts dry with paper towels. Place each breast on a clean cutting board and hold it flat with one hand.

Using a sharp knife, carefully cut a pocket into the thickest side of each breast. Slice horizontally into the meat without cutting all the way through the opposite side.

Leave the outer edges intact so the filling stays inside. If one breast is much thicker than the other, gently pound the thickest area to create more even thickness.

Wash your hands and sanitize any surfaces that came into contact with raw chicken before handling cooked food.

Step 4: Stuff the Chicken

Divide the spinach and feta mixture between the two chicken breasts. Spoon the filling into each pocket, leaving enough room around the edges to close the opening.

Avoid overfilling the chicken because the cheese mixture may leak as it heats. Secure the opening with toothpicks if needed.

Make sure the toothpicks are easy to see and remember to remove them before serving.

Step 5: Season the Outside

In a small bowl, combine the paprika, Italian seasoning, garlic powder, onion powder, salt, and black pepper.

Rub the chicken breasts with olive oil, then sprinkle the seasoning mixture over all sides. The oil helps the seasonings stick and encourages the exterior to brown.

For a stronger Mediterranean flavor, add a pinch of dried oregano or lemon zest to the seasoning blend.

Step 6: Preheat the Air Fryer

Preheat the air fryer to 360°F for about 3 minutes, following your appliance instructions.

Lightly grease the basket with an air-fryer-safe oil if needed. Avoid overcrowding the basket, as the hot air needs room to circulate around each chicken breast.

If your air fryer does not require preheating, follow the manufacturer’s guidance.

Step 7: Air Fry the Stuffed Chicken

Place the stuffed chicken breasts in the basket in a single layer, with space between them. Cook at 360°F for approximately 18–25 minutes, depending on their size and thickness.

Carefully turn the chicken halfway through cooking if your air fryer browns unevenly. Avoid squeezing or pressing the chicken, as this can push the filling out of the pockets.

Begin checking the temperature around the 18-minute mark. Insert a food thermometer into the thickest part of the chicken meat, avoiding the filling.

The chicken must reach an internal temperature of 165°F to be safe to eat. If it has not reached that temperature, continue cooking in short intervals and check again.

Step 8: Rest Before Slicing

Transfer the cooked chicken to a clean plate and let it rest for about 5 minutes. This short rest helps the juices settle and makes the chicken easier to slice.

Remove all toothpicks before serving. Cut each breast into thick slices to show the spinach and feta filling inside.

If desired, finish with fresh parsley, a squeeze of lemon juice, or a light sprinkle of Parmesan cheese.

Step 9: Serve and Enjoy

Serve the stuffed chicken warm with your favorite sides. Roasted vegetables, steamed green beans, brown rice, or a Greek-style salad all complement the tangy cheese filling.

For extra flavor, drizzle a little lemon juice over the chicken just before serving. The fresh acidity balances the richness of the feta and cream cheese.

Tips for Juicy and Flavorful Stuffed Chicken

Use these practical tips to improve the texture and flavor of your air fryer chicken.

  • Choose similar-sized breasts: Similar thickness helps both pieces cook at roughly the same rate.
  • Remove excess spinach moisture: Wet filling can make the pocket messy and encourage leakage.
  • Do not overstuff: Leave room for the filling to expand as the cheese warms.
  • Secure the opening: Use toothpicks when necessary to keep the filling inside.
  • Use a meat thermometer: Color alone cannot confirm that chicken is fully cooked.
  • Avoid overcrowding: Leave space around each breast for even air circulation.
  • Rest before slicing: A brief rest helps keep the chicken moist.
  • Adjust for your appliance: Start checking early because air fryers vary in heat and airflow.

Easy Variations to Try

Change the filling to suit your preferences while keeping the same basic cooking method.

Spinach, Feta, and Sun-Dried Tomato Chicken

Add 1–2 tablespoons of chopped, drained sun-dried tomatoes to the filling. Their sweet, tangy flavor works well with spinach, garlic, and feta.

Spinach and Mozzarella Stuffed Chicken

Replace half the feta with shredded mozzarella for a milder, stretchier cheese filling. Keep the total filling quantity similar to avoid overstuffing.

Lemon Herb Stuffed Chicken

Add lemon zest, fresh parsley, and extra oregano to the filling. Serve with lemon wedges for a fresh finish.

Spicy Spinach and Feta Chicken

Mix a pinch of red pepper flakes into the filling and add a little extra black pepper to the seasoning. This variation adds warmth without overpowering the cheese.

Frozen Spinach Version

Use about 1/2 cup of thawed, well-drained frozen spinach instead of fresh spinach. Squeeze it firmly to remove excess water before combining it with the other filling ingredients.

What to Serve with Spinach and Feta Stuffed Chicken

Pair this flavorful chicken dinner with sides that balance its rich, savory filling.

  • Greek salad: Tomatoes, cucumber, red onion, and olives provide freshness and crunch.
  • Roasted potatoes: Crispy potatoes make the meal more filling and pair well with the garlic seasoning.
  • Steamed green beans: A simple vegetable side keeps the plate light.
  • Brown rice or quinoa: These grains absorb the chicken juices and help create a complete dinner.
  • Roasted zucchini: Tender zucchini complements the Mediterranean-inspired ingredients.
  • Lemon couscous: A light lemon dressing adds freshness to the plate.

For a quick weeknight meal, serve the chicken with a bagged salad and microwave-steamed vegetables.

Storage and Reheating Instructions

How to Store Leftover Stuffed Chicken

Allow the chicken to cool slightly, then place it in a shallow, airtight container. Refrigerate within 2 hours of cooking and use within 3–4 days.

Store leftovers with their filling intact to help prevent the chicken from drying out.

How to Reheat Stuffed Chicken in the Air Fryer

Preheat the air fryer to 320°F. Place the refrigerated chicken in the basket and heat for approximately 5–8 minutes, depending on thickness.

Check that the center reaches 165°F before eating. If the outside browns too quickly, lower the temperature and continue heating until the center is hot.

Can You Freeze Spinach and Feta Stuffed Chicken?

Yes. Freeze the cooked, cooled chicken in an airtight freezer-safe container for up to 2–3 months for best quality.

Thaw it in the refrigerator before reheating. Check the center with a food thermometer to make sure it reaches 165°F.

Common Mistakes to Avoid

  • Cutting all the way through the chicken: This creates an opening that allows the filling to escape.
  • Using wet spinach: Excess water can loosen the filling and affect the texture.
  • Adding too much filling: Overfilled pockets are harder to seal and cook evenly.
  • Cooking by time alone: Thick chicken breasts may need more time than smaller pieces.
  • Slicing immediately: Cutting too soon can release juices and spill hot cheese.
  • Forgetting toothpicks: Always remove them before serving.
  • Skipping safe temperature checks: Chicken is ready only when the thickest part reaches 165°F.

Frequently Asked Questions

1. How long does stuffed chicken breast take in the air fryer?

At 360°F, most stuffed chicken breasts take about 18–25 minutes, depending on their thickness and your air fryer.

2. What temperature should stuffed chicken reach?

The thickest part of the chicken must reach 165°F, measured with a food thermometer, to be safe to eat.

3. Can I use frozen spinach instead of fresh?

Yes. Thaw the spinach completely, squeeze out excess water, and mix it with the feta and cream cheese.

4. Why is my stuffed chicken breast dry?

Overcooking is a common cause of dry chicken. Use a thermometer and remove the chicken when it reaches 165°F.

5. Can I prepare stuffed chicken ahead of time?

Yes. Prepare and stuff the chicken, cover it, and refrigerate promptly until you are ready to cook it, ideally within 24 hours.

6. Can I make this recipe without cream cheese?

Yes. Replace the cream cheese with a small amount of ricotta or use extra feta, adjusting the amount to keep the filling thick.

7. Can I cook two stuffed chicken breasts at once?

Yes, as long as they fit in a single layer with space between them. Add cooking time if needed and check each breast separately.

8. What cheese works best with spinach stuffed chicken?

Feta provides a tangy, salty flavor, while cream cheese adds a smooth texture. Mozzarella can be added for a milder, stretchy filling.

Final Thoughts

Air Fryer Spinach & Feta Stuffed Chicken Breast turns everyday chicken into a flavorful dinner with a savory cheese filling and simple Mediterranean-inspired seasonings. The preparation is straightforward, and the air fryer makes it convenient for busy evenings.

Keep the spinach dry, avoid overfilling the pockets, and use a food thermometer to confirm doneness. Serve the chicken with roasted vegetables, a fresh salad, or your favorite grain for a satisfying meal.

Ready to try this easy stuffed chicken recipe? Save it for your next dinner, and leave a comment sharing whether you would add sun-dried tomatoes, mozzarella, or extra garlic to your filling.

Air Fryer Garlic Butter Pizza Bombs

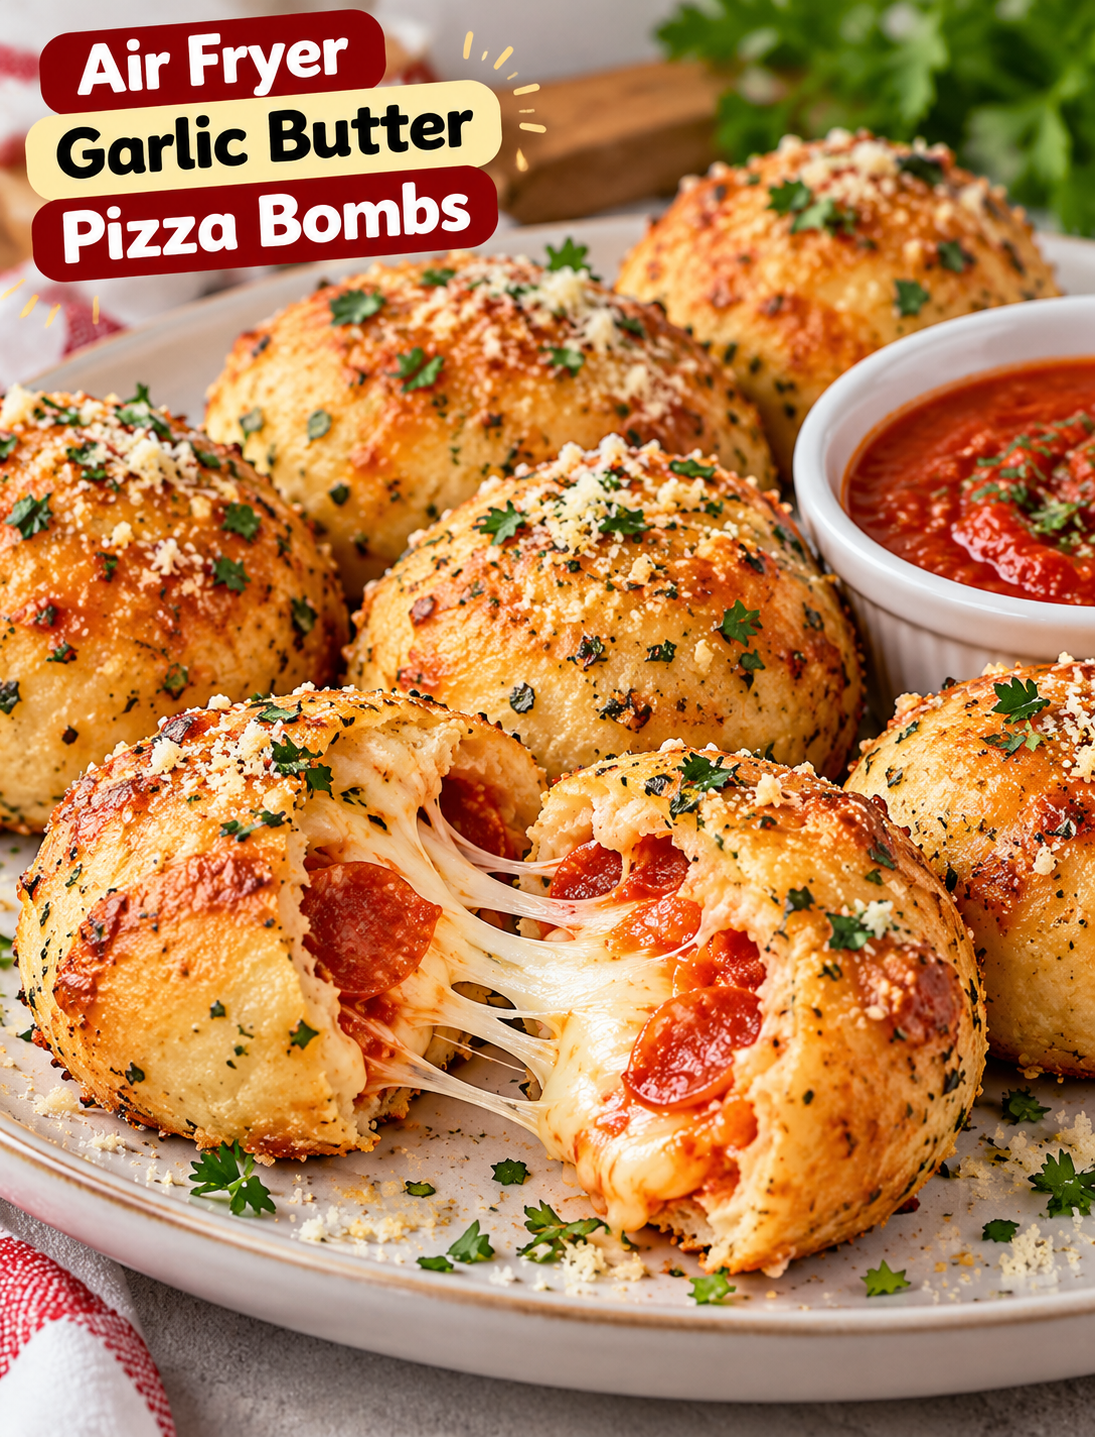
Air fryer garlic butter pizza bombs filled with melted mozzarella and pepperoni, served with marinara dipping sauce.
Air Fryer Garlic Butter Pizza Bombs

Imagine biting into a golden, crispy pizza bite filled with warm mozzarella, savory pizza sauce, and a rich garlic butter coating. These Air Fryer Garlic Butter Pizza Bombs bring all the best parts of pizza into small, cheesy bites that are easy to make at home. They are perfect for game day, family movie nights, after-school snacks, or a quick appetizer when friends stop by.

The best part is that you do not need to make pizza dough from scratch. Refrigerated biscuit dough keeps the preparation simple, while the air fryer creates a lightly crisp outside and a soft, cheesy center. A quick brush of homemade garlic butter adds extra flavor and gives each bite a delicious finish.

Serve these mini pizza bites with warm marinara sauce for dipping, and watch them disappear from the plate. If you love easy air fryer recipes with familiar ingredients, this one deserves a place in your regular snack rotation.

Why You’ll Love These Air Fryer Garlic Butter Pizza Bombs

  • Quick preparation: Refrigerated biscuit dough saves time and reduces kitchen cleanup.
  • Crispy outside: The air fryer helps the dough turn golden without deep-frying.
  • Cheesy center: Mozzarella melts inside each dough ball for a classic pizza flavor.
  • Garlic butter topping: Melted butter, garlic, and Italian seasoning add a savory finish.
  • Easy to customize: Add pepperoni, cooked sausage, mushrooms, or other favorite pizza toppings.
  • Perfect for sharing: Serve them as party appetizers, lunchbox treats, or a family snack.

Recipe Overview

  • Prep Time: 15 minutes
  • Cook Time: 8–12 minutes per batch
  • Total Time: Approximately 25–35 minutes
  • Servings: 8 pizza bombs
  • Course: Appetizer, Snack
  • Cuisine: American-Italian Inspired
  • Cooking Method: Air Fryer
  • Difficulty: Easy

Cooking time may vary depending on your air fryer model, the size of the dough pieces, and how many pizza bombs fit in the basket.

Ingredients for Air Fryer Garlic Butter Pizza Bombs

Use these simple ingredients to make eight cheesy pizza bites.

For the Pizza Bombs

  • 1 can (16 ounces) refrigerated biscuit dough, containing 8 biscuits
  • 1/2 cup shredded low-moisture mozzarella cheese
  • 1/3 cup thick pizza sauce or marinara sauce
  • 16–24 mini pepperoni slices, optional
  • 1 tablespoon all-purpose flour, for handling sticky dough if needed

Garlic Butter Topping

  • 3 tablespoons unsalted butter, melted
  • 2 garlic cloves, finely minced
  • 1 teaspoon Italian seasoning
  • 1 tablespoon grated Parmesan cheese
  • 1 tablespoon chopped fresh parsley, optional

Serving

  • 1/2 cup warm marinara sauce
  • Extra grated Parmesan cheese, optional

Ingredient tip: Thick pizza sauce and low-moisture mozzarella help prevent the filling from making the dough soggy. If your sauce is watery, drain off excess liquid before assembling the bites.

How to Make Air Fryer Garlic Butter Pizza Bombs

Follow these steps to create evenly filled pizza bombs with a golden exterior and a gooey cheese center.

Step 1: Preheat the Air Fryer

Preheat your air fryer to 350°F for about 3 minutes, following your appliance’s instructions. If your model does not require preheating, you can skip this step.

Lightly coat the basket with an air-fryer-safe cooking spray if needed. Avoid aerosol sprays that your appliance manufacturer advises against, as some can damage nonstick coatings.

Step 2: Prepare the Biscuit Dough

Open the refrigerated biscuit dough and separate the eight biscuits. Place them on a clean work surface.

Flatten each biscuit into a round disc about 3–4 inches wide. Use your fingers to press the dough gently from the center toward the edges.

Keep the middle slightly thicker than the edges so the dough can hold the filling without tearing.

Step 3: Add the Pizza Filling

Place about 1 teaspoon of pizza sauce in the center of each flattened biscuit. Add a small pinch of mozzarella cheese and 2–3 mini pepperoni slices, if using.

Do not overfill the dough. Too much sauce or cheese can make sealing difficult and cause the filling to leak during cooking.

Keep the filling away from the outer edges to make the next step easier.

Step 4: Seal the Pizza Bombs

Lift the edges of each biscuit and bring them together over the filling. Pinch the dough firmly until the opening is completely closed.

Roll each sealed biscuit gently between your palms to form a smooth ball. Place it seam-side down on a plate while you finish the remaining pieces.

Check each ball for small openings, especially around the pinched seam. A secure seal helps keep the melted cheese inside.

Step 5: Mix the Garlic Butter

Add the melted butter, minced garlic, and Italian seasoning to a small bowl. Stir until the garlic and herbs are evenly distributed.

Keep the Parmesan cheese and fresh parsley nearby for the final topping. You can add the Parmesan to the butter mixture if you prefer a stronger savory flavor.

For a milder garlic taste, use one clove instead of two.

Step 6: Arrange the Pizza Bombs in the Basket

Place the dough balls in a single layer in the air fryer basket, leaving space between them for hot air to circulate.

Cook in batches if necessary. Overcrowding can prevent the dough from browning evenly and may leave some sides undercooked.

For the best results, arrange the sealed seams facing down.

Step 7: Air Fry Until Golden

Air fry at 350°F for 8–12 minutes, checking around the 8-minute mark. The pizza bombs should be golden brown and cooked through.

If the tops brown too quickly, reduce the temperature slightly and continue cooking until the centers are done. Cooking time depends on your air fryer and dough thickness.

Use a food thermometer if you are unsure whether the centers are fully cooked. The center of the dough should reach at least 190°F for a fully baked texture, while any raw meat filling must be cooked to its appropriate safe internal temperature before assembly.

Step 8: Brush with Garlic Butter

Carefully remove the cooked pizza bombs from the air fryer basket. Brush the warm tops with the garlic butter mixture while the dough is still hot.

Sprinkle Parmesan cheese and chopped parsley over the top. The butter adds a rich finish, while the Parmesan provides a lightly salty, savory flavor.

Use a pastry brush or a small spoon to distribute the topping without breaking the crust.

Step 9: Serve Warm with Marinara Sauce

Allow the pizza bombs to cool for 2–3 minutes before serving. The cheese and sauce inside will be extremely hot immediately after cooking.

Arrange them on a serving plate with warm marinara sauce on the side. Add extra Parmesan or a pinch of red pepper flakes for more flavor.

Serve immediately for the best combination of crispy dough, melted cheese, and garlic butter.

Tips for Perfect Pizza Bombs

A few simple techniques can help you get better results every time.

  • Use thick sauce: Excess liquid can weaken the dough and cause leaks.
  • Avoid overfilling: A small amount of filling is easier to seal and cooks more evenly.
  • Seal every edge: Pinch the dough firmly and place the seam underneath.
  • Leave space in the basket: Air circulation helps brown the outside evenly.
  • Check early: Air fryers vary, so begin checking at 8 minutes.
  • Apply butter after cooking: Brushing the garlic butter on at the end helps preserve its fresh flavor and prevents excess butter from smoking.
  • Let them rest briefly: A short cooling period helps the filling settle and reduces the risk of burns.

Easy Variations to Try

You can change the filling to match your favorite pizza flavors without changing the basic method.

Pepperoni Pizza Bombs

Add mini pepperoni and mozzarella to each biscuit. Choose a thick pizza sauce to keep the filling contained.

Three-Cheese Pizza Bombs

Combine mozzarella, a little Parmesan, and shredded provolone for a richer cheese filling. Keep the total filling amount small enough to seal the dough securely.

Vegetarian Pizza Bombs

Use finely chopped bell peppers, cooked mushrooms, black olives, and mozzarella. Cook vegetables first and remove excess moisture before adding them to the dough.

Spicy Pizza Bombs

Mix a small pinch of red pepper flakes into the sauce and add sliced jalapeños. Serve with extra marinara for dipping.

Extra-Herby Garlic Butter Bombs

Add dried oregano or a little fresh basil to the garlic butter. Sprinkle with Parmesan immediately after brushing for a more pronounced Italian-inspired flavor.

What to Serve with Garlic Butter Pizza Bombs

These bite-sized snacks pair well with simple sides and dipping sauces.

  • Marinara sauce: A classic tomato-based dip that complements the cheese filling.
  • Ranch dressing: A creamy option for guests who enjoy a mild, tangy dip.
  • Fresh green salad: Adds freshness alongside the rich, buttery dough.
  • Vegetable sticks: Serve carrots, celery, or cucumber for a crunchy side.
  • Roasted vegetables: Pair with zucchini or bell peppers for a more complete snack plate.

For parties, serve the pizza bombs on a large platter with two dipping sauces so guests can choose their favorite.

Storage and Reheating Instructions

How to Store Leftovers

Allow the pizza bombs to cool, then transfer them to an airtight container. Refrigerate within 2 hours of cooking and use within 3–4 days.

Store dipping sauce separately to help the dough maintain its texture.

How to Reheat Pizza Bombs in the Air Fryer

Preheat the air fryer to 320°F. Arrange the refrigerated pizza bombs in a single layer and heat for approximately 3–5 minutes, checking that the centers are hot.

Add another minute if needed, but watch the outside closely to avoid over-browning. Reheating time varies with the size of the pizza bombs and your appliance.

Can You Freeze Pizza Bombs?

Yes. Freeze fully cooled pizza bombs in a freezer-safe container with parchment paper between layers. For best quality, use within 2 months.

Thaw overnight in the refrigerator before reheating for more even results. If reheating from frozen, use a lower temperature first and allow additional time until the centers are thoroughly hot.

Common Mistakes to Avoid

  • Adding too much sauce: This can make the dough wet and difficult to seal.
  • Leaving gaps in the seams: Openings allow cheese to escape during cooking.
  • Crowding the basket: Closely packed dough balls may cook unevenly.
  • Using cold, oversized filling portions: Large pieces of cheese or toppings can make sealing harder.
  • Skipping the doneness check: Golden tops do not always mean the dough is fully cooked inside.
  • Brushing with too much butter before cooking: Excess butter may drip into the basket and create smoke or greasy spots.

Frequently Asked Questions

1. How long do pizza bombs take in the air fryer?

Most biscuit-dough pizza bombs take 8–12 minutes at 350°F, depending on their size and your air fryer model.

2. Can I use crescent roll dough instead of biscuit dough?

Yes, but crescent roll dough is thinner and may produce a softer, flakier exterior. Seal the edges carefully and check the package instructions for baking guidance.

3. Why are my pizza bombs leaking cheese?

Overfilling, watery sauce, or loose seams can cause leaks. Use small filling portions and pinch every opening closed before cooking.

4. Can I make pizza bombs without pepperoni?

Yes. Leave out the pepperoni or replace it with cooked sausage, finely chopped vegetables, or extra cheese.

5. Do I need to flip pizza bombs in the air fryer?

Not always. If your air fryer browns unevenly, carefully turn the pizza bombs halfway through cooking to improve browning on all sides.

6. Can I prepare pizza bombs ahead of time?

Yes. Assemble them, cover, and refrigerate for a few hours before cooking. For the best texture, add the garlic butter after air frying.

7. How do I know when the dough is fully cooked?

The outside should be golden, and the dough inside should look baked rather than raw or gummy. Check a test piece if needed, especially when making larger pizza bombs.

8. What is the best cheese for pizza bombs?

Low-moisture mozzarella melts well and releases less liquid than fresh mozzarella. A small amount of Parmesan adds extra savory flavor.

Final Thoughts

Air Fryer Garlic Butter Pizza Bombs are a simple way to enjoy pizza flavors without preparing a full pizza. Refrigerated biscuit dough, melty mozzarella, thick pizza sauce, and homemade garlic butter create a snack that works for busy weeknights, game-day spreads, and casual gatherings.

Follow the sealing and spacing tips for better results, and adjust the cooking time to suit your air fryer. Serve the pizza bombs warm with marinara sauce, and customize the filling with your favorite toppings.

Ready to make these cheesy bites? Save this recipe for your next snack night, and share in the comments whether you prefer classic pepperoni, extra cheese, or a veggie-filled version.


Pumpkin Protein Balls

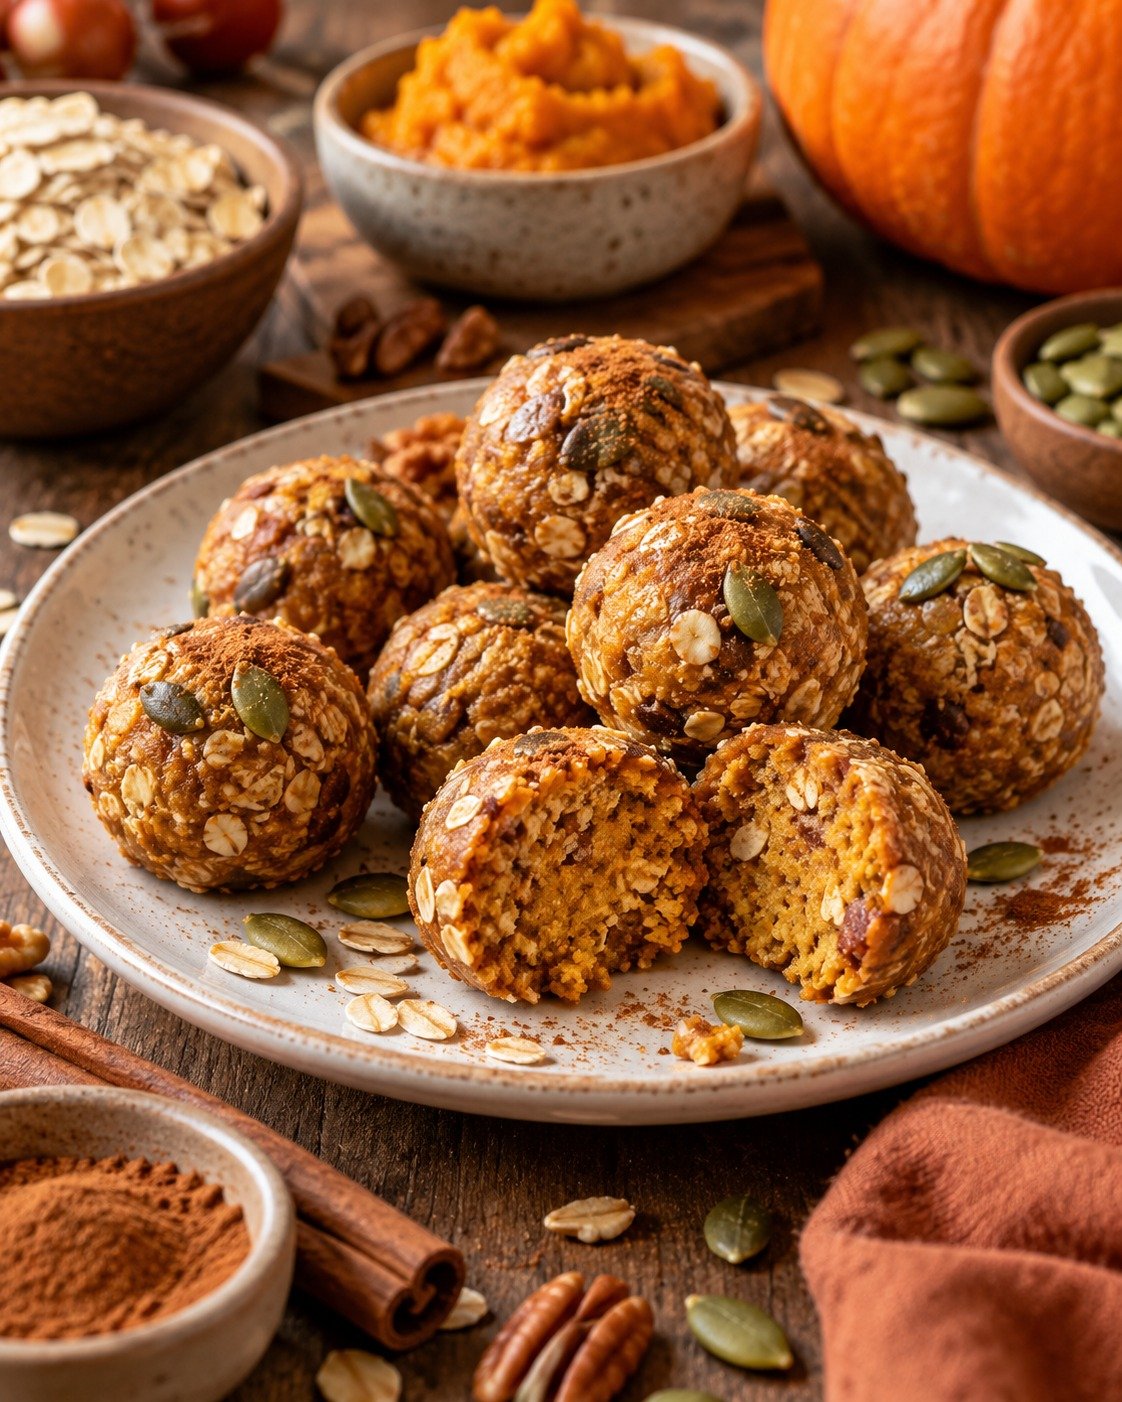
Pumpkin Protein Balls with pumpkin puree, oats, nut butter, vanilla protein powder, flaxseed, cinnamon, and chocolate chips

Pumpkin Protein Balls

Pumpkin Protein Balls are soft, chewy, no-bake bites made with pumpkin puree, oats, nut butter, vanilla protein powder, warm spices, and a touch of maple syrup. They are easy to prepare, naturally flavored with pumpkin and cinnamon, and perfect for breakfast prep, afternoon snacks, lunchboxes, or a quick post-workout bite.

These Pumpkin Protein Balls come together in one bowl and require no oven. The texture is tender but firm enough to hold its shape, while the pumpkin pie spice gives them a cozy seasonal flavor. Keep a batch in the refrigerator for busy days when you want something homemade, portable, and satisfying.

Prep Time: 15 minutes
Chill Time: 30 minutes
Total Time: 45 minutes
Servings: 16 balls

Ingredients

For the Protein Balls

  • 1 cup pumpkin puree
  • 1 1/2 cups rolled oats
  • 3/4 cup vanilla protein powder
  • 1/2 cup almond butter or peanut butter
  • 1/3 cup maple syrup or honey
  • 1/3 cup ground flaxseed
  • 1 teaspoon vanilla extract
  • 1 1/2 teaspoons pumpkin pie spice
  • 1/2 teaspoon ground cinnamon
  • 1/4 teaspoon salt
  • 1/3 cup mini dark chocolate chips, optional
  • 2 tablespoons chia seeds, optional

For Rolling, Optional

  • Finely chopped pecans
  • Unsweetened shredded coconut
  • Extra ground cinnamon

Why You’ll Love This Recipe

Pumpkin Protein Balls are simple, practical, and easy to customize. They give you the warm flavor of pumpkin spice without requiring baking, and the combination of oats, nut butter, flaxseed, and protein powder makes them more filling than a typical sweet snack.

Another reason to love Pumpkin Protein Balls is how well they work for meal prep. You can make them ahead, keep them chilled, and grab one or two whenever you need something quick. They are also easy to portion, easy to pack, and easy to adjust with different nut butters, seeds, or mix-ins.

How to Make Pumpkin Protein Balls

Step 1: Prepare the Mixing Bowl

Choose a large bowl with enough room to mix the ingredients comfortably. Because the mixture becomes thick, using a sturdy spoon or silicone spatula will make the process easier.

Step 2: Mix the Wet Ingredients

Add pumpkin puree, almond butter, maple syrup, and vanilla extract to the bowl.

Stir until smooth and evenly combined.

This creamy base gives Pumpkin Protein Balls their soft texture and helps bind the dry ingredients together.

Step 3: Add the Dry Ingredients

Add rolled oats, vanilla protein powder, ground flaxseed, pumpkin pie spice, cinnamon, and salt.

Stir slowly at first so the protein powder does not puff out of the bowl.

Continue mixing until a thick, sticky dough forms.

Step 4: Adjust the Texture

The exact texture can vary depending on the protein powder and pumpkin puree you use.

If the mixture feels too wet to shape, add a few tablespoons of oats or a little extra protein powder.

If it feels too dry, add a spoonful of pumpkin puree or nut butter.

Pumpkin Protein Balls should feel soft but should hold together when pressed.

Step 5: Add the Mix-Ins

Fold in mini chocolate chips and chia seeds if using.

You can also add chopped pecans, walnuts, dried cranberries, or shredded coconut.

Mix only until the add-ins are evenly distributed.

Step 6: Chill the Mixture

Cover the bowl and refrigerate for about 30 minutes.

Chilling helps the oats absorb moisture and makes Pumpkin Protein Balls easier to roll without sticking heavily to your hands.

Step 7: Portion the Dough

Use a small cookie scoop or tablespoon to portion the mixture.

Aim for roughly 1 1/2 tablespoons per ball.

Keeping the portions similar in size helps with serving and makes the nutrition estimate more consistent.

Step 8: Roll into Balls

Roll each portion gently between your palms until smooth.

If the mixture sticks, lightly dampen your hands with water.

For a decorative finish, roll some Pumpkin Protein Balls in chopped pecans, coconut, or a light dusting of cinnamon.

Step 9: Chill Again

Place the finished balls on a parchment-lined tray or plate.

Refrigerate for another 15 to 20 minutes so they become firmer.

This second chill helps them hold their shape during storage.

Step 10: Serve

Enjoy Pumpkin Protein Balls cold or let them sit at room temperature for 5 minutes before eating if you prefer a softer texture.

They pair well with coffee, tea, milk, yogurt, or fresh fruit.

Serving Suggestions

Pumpkin Protein Balls are convenient enough for many different occasions.

Serve one or two with Greek yogurt and berries for a quick breakfast. Add them to a lunchbox with fruit and cheese, or keep a few ready in the refrigerator for an afternoon snack.

For a post-workout snack, pair Pumpkin Protein Balls with milk, a smoothie, or extra yogurt for a more substantial protein boost.

They also work nicely on a fall snack board with apple slices, grapes, nuts, dark chocolate, and cinnamon yogurt dip.

For a fresh and colorful side, try our Mediterranean Chickpea Cucumber Feta Salad with crisp vegetables, creamy feta, chickpeas, herbs, and lemon dressing.

Recipe Tips

Use pure pumpkin puree, not pumpkin pie filling, so you control the sweetness and spices.

Choose a vanilla protein powder you already enjoy because its flavor will be noticeable.

Use thick nut butter for the easiest shaping.

If the mixture is sticky, chill it longer before rolling.

For firmer bites, add a little extra oats or ground flaxseed.

For softer bites, increase the pumpkin puree slightly.

Do not add too much liquid sweetener at once because it can make the dough difficult to shape.

Mini chocolate chips distribute more evenly than full-size chips.

Easy Variations

Pumpkin Protein Balls can be changed easily depending on your preferences.

For a chocolate version, replace some of the vanilla protein powder with chocolate protein powder and add a teaspoon of cocoa powder.

For extra crunch, add chopped pecans or walnuts.

A coconut version works well with shredded coconut mixed into the dough and rolled around the outside.

For more spice, add extra cinnamon, ginger, nutmeg, or cloves.

You can also make them with peanut butter instead of almond butter for a stronger nutty flavor.

For a fruitier version, mix in finely chopped dried cranberries or raisins.

If you enjoy easy high-protein meal prep recipes, you may also like our High-Protein Sausage, Cheddar & Cottage Cheese Breakfast Biscuits.

Make-Ahead Instructions

These protein bites are ideal for preparing ahead.

Mix, chill, roll, and store them in an airtight container so they are ready whenever you need a quick snack.

You can prepare them several days before serving, which makes them useful for weekly meal prep.

If you plan to roll them in coconut or nuts, you can do that at the same time you shape them or just before serving.

Storage and Freezing

Store the finished bites in an airtight container in the refrigerator for up to 5 days.

Place parchment paper between layers if stacking them.

For longer storage, freeze them for up to 2 months. Arrange the balls on a tray until firm, then transfer them to a freezer-safe container or bag.

Thaw overnight in the refrigerator or let a frozen ball sit at room temperature for about 15 minutes before eating.

Nutrition Information

Approximate nutrition per ball:

Calories: 145
Protein: 7 g
Carbohydrates: 16 g
Fat: 7 g
Saturated Fat: 1.5 g
Fiber: 3 g
Sugar: 6 g
Sodium: 95 mg

Nutrition values are estimates and will vary depending on the protein powder, nut butter, sweetener, and optional mix-ins used.

Frequently Asked Questions

Can I use quick oats?

Yes. Quick oats work, although the finished texture may be softer and more uniform than when using rolled oats.

Can I use canned pumpkin?

Yes. Plain canned pumpkin puree works perfectly. Avoid pumpkin pie filling because it already contains sugar and spices.

Can I make these without protein powder?

Yes, but you will need to replace it with additional oats, oat flour, or ground nuts. The protein content will also be lower.

Why are my balls too sticky?

The mixture may contain too much pumpkin or sweetener. Add extra oats or protein powder and chill longer before rolling.

Can I use sunflower seed butter?

Yes. Sunflower seed butter is a good nut-free option and works well in Pumpkin Protein Balls.

Can I freeze them?

Yes. Freeze them in a sealed container for up to 2 months and thaw before serving.

Are they good for meal prep?

Yes. Pumpkin Protein Balls are especially convenient for meal prep because they store well and require no reheating.

Final Thoughts

Pumpkin Protein Balls are an easy no-bake snack that combines pumpkin, oats, nut butter, protein powder, flaxseed, and warm fall spices in one portable bite.

Because Pumpkin Protein Balls can be prepared ahead, customized with different mix-ins, refrigerated, or frozen, they are practical for breakfast prep, busy afternoons, and grab-and-go snacks.

Keep this Pumpkin Protein Balls recipe handy whenever you want a soft, flavorful snack with cozy pumpkin spice flavor and simple everyday ingredients.

With a creamy pumpkin base, warm cinnamon, and a satisfying chewy texture, Pumpkin Protein Balls are a simple seasonal recipe worth making again and again.

High-Protein Sausage, Cheddar & Cottage Cheese Breakfast Biscuits

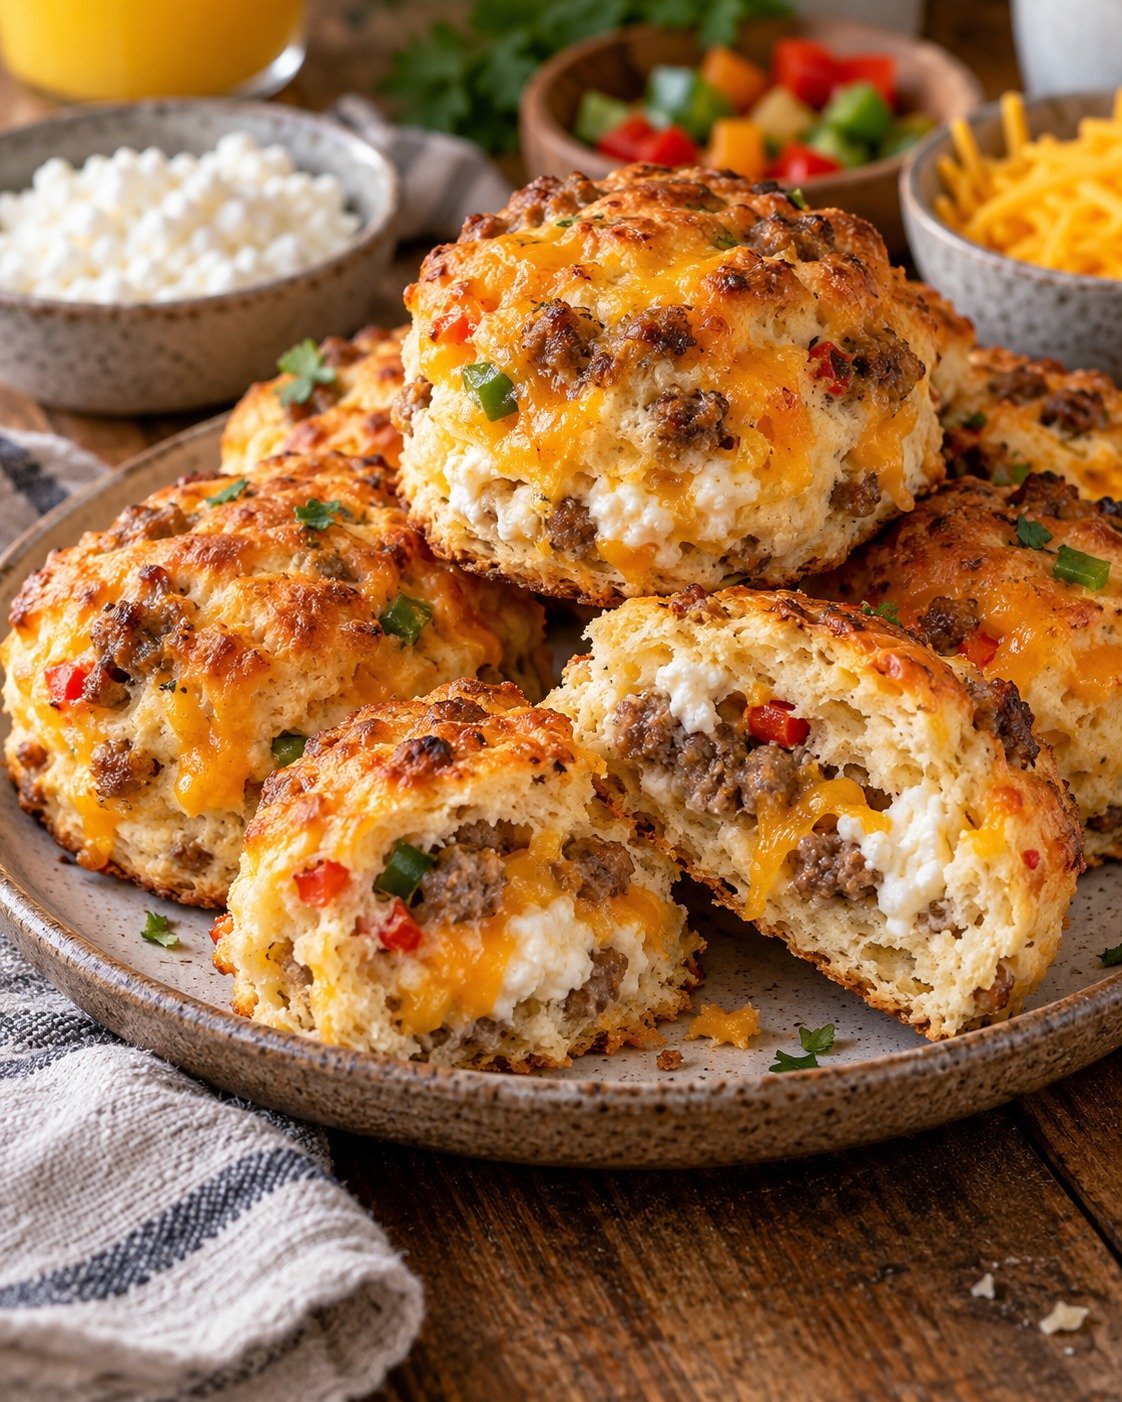
Sausage Breakfast Biscuits with sausage, cottage cheese, cheddar, eggs, spinach, peppers, and a soft golden savory crumb

High-Protein Sausage, Cheddar & Cottage Cheese Breakfast Biscuits

Sausage Breakfast Biscuits are savory, filling, and perfect for busy mornings when you want something you can grab and go. These soft breakfast biscuits combine cooked sausage, cottage cheese, sharp cheddar, eggs, vegetables, and simple seasonings in a tender biscuit-style batter. They are satisfying enough for breakfast yet convenient for meal prep, lunchboxes, or a quick afternoon snack.

The browned sausage and cheddar add plenty of flavor, while cottage cheese keeps the centers moist and adds extra protein. They also refrigerate well and reheat in minutes.

Prep Time: 20 minutes
Cook Time: 22–25 minutes
Total Time: About 45 minutes
Servings: 10 biscuits

Ingredients

For the Sausage Mixture

  • 12 ounces breakfast sausage, turkey sausage, or chicken sausage
  • 1/2 cup finely diced red bell pepper
  • 1/3 cup finely diced onion
  • 1 cup baby spinach, finely chopped
  • 1 teaspoon olive oil, if needed

For the Biscuit Batter

  • 1 1/2 cups all-purpose flour
  • 2 teaspoons baking powder
  • 1/2 teaspoon baking soda
  • 1/2 teaspoon garlic powder
  • 1/2 teaspoon smoked paprika
  • 1/4 teaspoon black pepper
  • 1/4 teaspoon salt
  • 2 large eggs
  • 1 cup cottage cheese
  • 1/2 cup plain Greek yogurt
  • 1 cup shredded sharp cheddar cheese
  • 2 tablespoons chopped chives
  • 1 tablespoon melted butter or olive oil

Why You’ll Love This Recipe

Sausage Breakfast Biscuits combine protein, vegetables, cheese, and a tender biscuit base in one portable breakfast. You do not need to cook eggs, toast, and sausage separately, which makes them especially convenient on busy mornings.

They are especially useful for meal prep. Bake once, refrigerate or freeze the extras, and reheat individual portions when needed.

You can also customize them with turkey sausage, extra vegetables, different cheese, or smaller portions for lunchboxes.

How to Make Sausage Breakfast Biscuits

Step 1: Preheat the Oven

Preheat the oven to 375°F or 190°C.

Line a large baking sheet with parchment paper or lightly grease it with cooking spray.

Step 2: Cook the Sausage

Heat a large skillet over medium heat.

Add the sausage and cook for 6 to 8 minutes, breaking it into small crumbles with a wooden spoon.

Cook until no pink remains and the sausage is lightly browned. Transfer it to a paper-towel-lined plate to drain excess grease.

Step 3: Cook the Vegetables

In the same skillet, add the bell pepper and onion.

If the pan is dry, add a teaspoon of olive oil.

Cook for 3 to 4 minutes until the vegetables begin to soften.

Add the chopped spinach and cook for another minute, just until wilted.

Remove the skillet from the heat and let the vegetables cool slightly.

Step 4: Mix the Dry Ingredients

In a large bowl, whisk together the flour, baking powder, baking soda, garlic powder, smoked paprika, black pepper, and salt.

Mixing the dry ingredients first helps the leavening and seasonings distribute evenly.

Step 5: Mix the Wet Ingredients

In a separate bowl, whisk the eggs until smooth.

Add the cottage cheese, Greek yogurt, and melted butter or olive oil.

Stir until combined.

A slightly textured cottage cheese mixture is fine; the curds soften as Sausage Breakfast Biscuits bake.

Step 6: Combine Wet and Dry Mixtures

Pour the wet mixture into the bowl with the dry ingredients.

Use a spatula to fold everything together until only a few streaks of flour remain.

Do not overmix. Too much stirring can make Sausage Breakfast Biscuits dense instead of soft and tender.

Step 7: Add the Fillings

Fold in the cooked sausage, vegetables, shredded cheddar, and chives.

Mix gently until everything is evenly distributed.

The batter should be thicker than muffin batter but softer than traditional biscuit dough. Add a little milk if too dry or flour if unusually loose.

Step 8: Portion the Biscuits

Use a large cookie scoop or two spoons to divide the batter into 10 equal portions on the prepared baking sheet.

Leave about 2 inches between each portion.

Shape the tops lightly with a spoon, but do not press them flat.

Keeping the batter slightly mounded helps Sausage Breakfast Biscuits stay thick and soft in the center.

Step 9: Bake Until Golden

Bake for 22 to 25 minutes, or until the tops are golden and the centers feel set.

A toothpick inserted into the center should come out clean or with a few moist crumbs.

Step 10: Cool Briefly

Remove the baking sheet from the oven and let Sausage Breakfast Biscuits cool on the tray for 5 minutes.

Transfer them to a wire rack.

Allowing Sausage Breakfast Biscuits to rest briefly helps the structure firm up and makes them easier to handle.

Step 11: Serve Warm

Serve Sausage Breakfast Biscuits warm on their own or split them and add a little butter, avocado, hot sauce, or extra cheese.

Serving Suggestions

Sausage Breakfast Biscuits are filling on their own, but simple sides can make breakfast more complete.

Serve with berries, orange slices, melon, or apple for something fresh. For brunch, add scrambled eggs, avocado, roasted potatoes, or a green salad.

They also pair well with Greek yogurt, salsa, coffee, or tea.

For another warm and comforting meal, try our Hearty Chicken and Vegetable Stew with tender chicken, potatoes, carrots, peas, and savory herbs.

Recipe Tips

Cook and drain the sausage well before adding it to the batter.

Dice the vegetables finely so each biscuit holds together easily.

Use sharp cheddar for stronger cheese flavor.

Do not overmix once the flour and wet ingredients come together.

For the softest Sausage Breakfast Biscuits, measure the flour carefully and avoid packing it into the measuring cup.

Full-fat or low-fat cottage cheese both work, but very watery cottage cheese should be drained briefly.

Freshly shredded cheddar usually melts more smoothly. Let Sausage Breakfast Biscuits cool briefly so the centers can finish setting.

Easy Variations

Change the flavor with simple swaps. Add jalapeño, chili flakes, or pepper jack for heat. Mix in mushrooms, broccoli, or roasted red pepper for extra vegetables.

Swap cheddar for mozzarella, Monterey Jack, Swiss, or a cheese blend. Turkey or chicken sausage also works well. Fresh parsley, dill, basil, or extra chives can add more herb flavor.

For mini biscuits, use smaller portions and reduce the baking time.

Make-Ahead Instructions

Sausage Breakfast Biscuits are excellent for meal prep. Bake the full batch, cool completely, and store in an airtight container.

You can also cook the sausage and vegetables one day ahead and refrigerate them separately, then mix and bake the batter the next morning. Wrap cooled portions individually for faster grab-and-go breakfasts.

Storage and Reheating

Store leftover Sausage Breakfast Biscuits in an airtight container in the refrigerator for up to 4 days.

Reheat one biscuit in the microwave for 20 to 30 seconds, or warm several in a 325°F or 165°C oven for about 8 minutes.

For longer storage, freeze the cooled biscuits for up to 2 months. Wrap each biscuit individually and place them in a freezer-safe bag.

Thaw overnight in the refrigerator or reheat from frozen at a lower oven temperature until warmed through.

Nutrition Information

Approximate nutrition per biscuit:

Calories: 245
Protein: 16 g
Carbohydrates: 18 g
Fat: 12 g
Saturated Fat: 5 g
Fiber: 2 g
Sugar: 3 g
Sodium: 480 mg

Nutrition values are estimates and will vary depending on the sausage, cottage cheese, cheddar, and exact portion size.

Frequently Asked Questions

Can I use turkey sausage?

Yes. Turkey sausage is a great choice and keeps Sausage Breakfast Biscuits flavorful while reducing some of the fat.

Can I use small-curd cottage cheese?

Yes. Small-curd or large-curd cottage cheese both work. If your cottage cheese is very watery, drain it briefly before mixing.

Can I make these gluten-free?

Yes. Use a 1:1 gluten-free baking flour designed for quick breads or biscuits.

Can I freeze them?

Yes. Sausage Breakfast Biscuits freeze very well and can be reheated directly from frozen or thawed overnight first.

Why are my biscuits dense?

Overmixing the batter or adding too much flour is usually the cause. Stir gently and stop as soon as the ingredients are combined.

Can I make them without vegetables?

Yes. Leave out the bell pepper, onion, and spinach if you prefer a simpler sausage-and-cheese biscuit.

Can I make mini biscuits?

Yes. Use smaller portions and begin checking them several minutes earlier because they will bake faster.

Final Thoughts

Sausage Breakfast Biscuits are a convenient way to combine sausage, eggs, cottage cheese, cheddar, vegetables, and a tender biscuit base in one filling breakfast.

Because Sausage Breakfast Biscuits can be prepared ahead, refrigerated, frozen, and reheated in minutes, they are especially practical for busy families and weekly meal prep.

Keep Sausage Breakfast Biscuits handy whenever you want a portable breakfast that feels homemade, satisfying, and easy to serve.

With savory sausage, melty cheddar, creamy cottage cheese, and colorful vegetables, Sausage Breakfast Biscuits deliver plenty of flavor and protein in every bite.

If you enjoy rich and hearty one-pot dinners, you may also like our Goulash Recipe with tender beef, paprika, tomatoes, and vegetables.