Blueberry Cheesecake Parfait

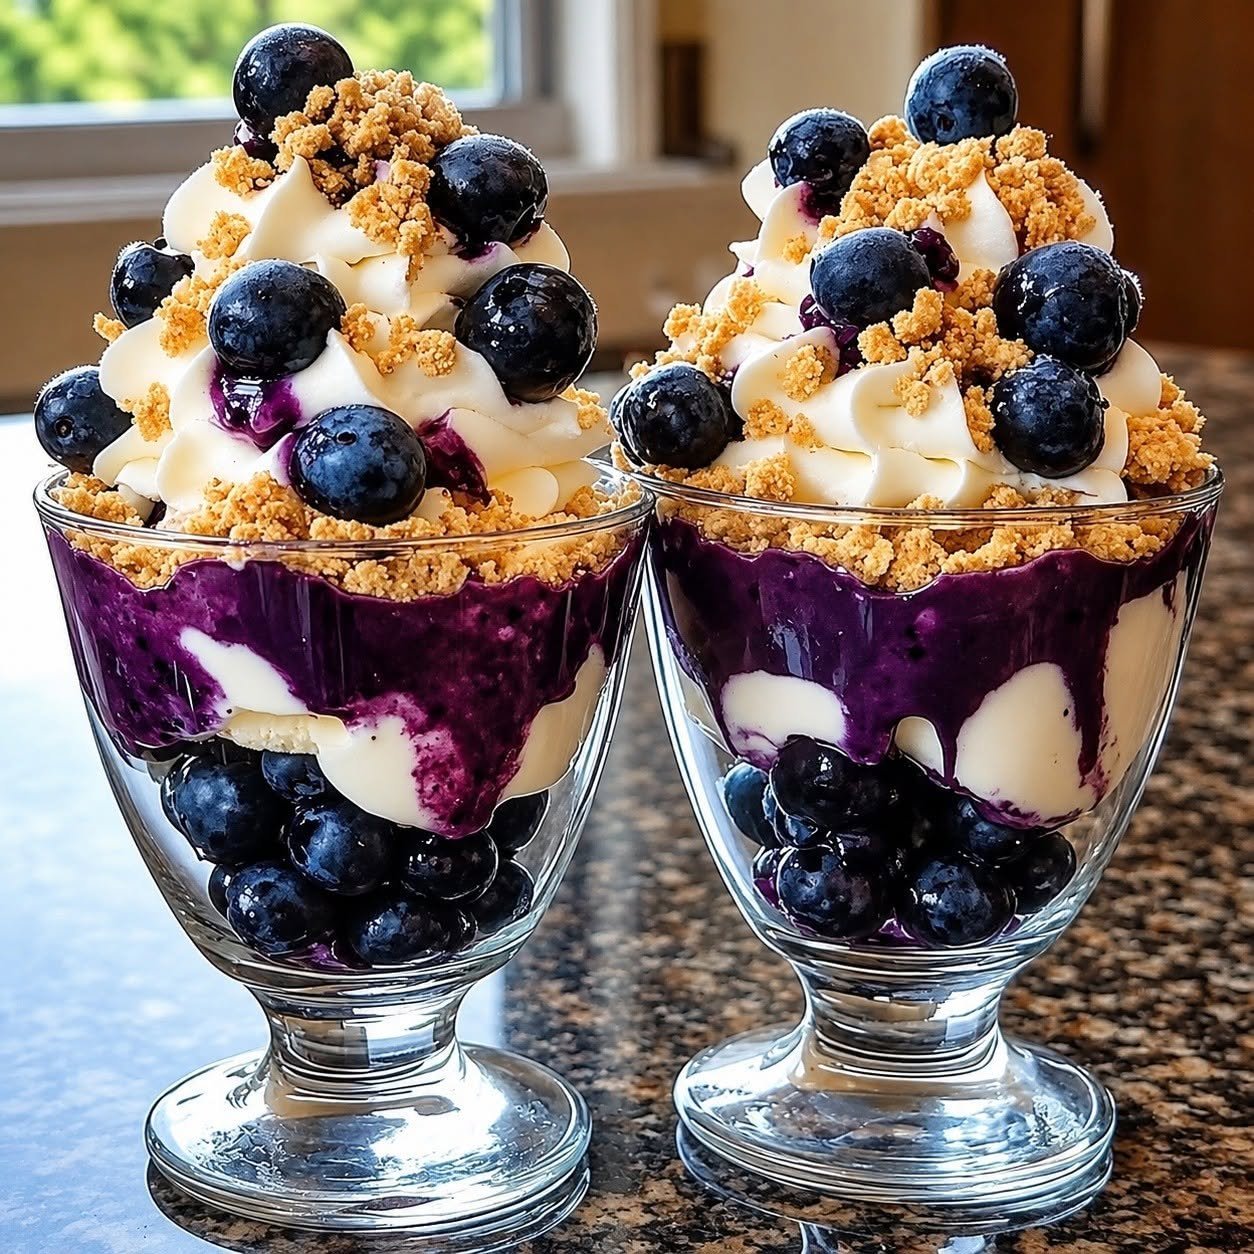
Blueberry Parfait with creamy cheesecake filling, fresh blueberries, blueberry sauce, and graham cracker crumbs

Blueberry Cheesecake Parfait

Blueberry Parfait is a creamy no-bake dessert layered with tangy cheesecake filling, juicy blueberries, and buttery graham cracker crumbs. It has all the flavor of classic blueberry cheesecake without the need for a springform pan, water bath, or long baking time. Blueberry Parfait is especially useful when you need an elegant dessert that can be prepared ahead and served in individual glasses for parties, brunches, holidays, or relaxed family dinners.

Prep Time: 25 minutes

Cook Time: 8 minutes
Chill Time: 1 hour
Total Time: About 1 hour 35 minutes
Servings: 6

Ingredients

For the Blueberry Topping

  • 2 cups fresh or frozen blueberries
  • 1/4 cup granulated sugar
  • 1 tablespoon fresh lemon juice
  • 1 teaspoon lemon zest
  • 1 tablespoon cornstarch
  • 2 tablespoons water
  • 1/2 teaspoon vanilla extract

For the Cheesecake Filling

  • 8 ounces cream cheese, softened
  • 1/2 cup powdered sugar
  • 1 teaspoon vanilla extract
  • 1 tablespoon fresh lemon juice
  • 1 cup cold heavy whipping cream
  • 1/4 cup plain Greek yogurt or sour cream, optional

Ingredients For the Graham Cracker Layer

  • 1 1/2 cups graham cracker crumbs
  • 3 tablespoons unsalted butter, melted
  • 1 tablespoon brown sugar
  • Pinch of salt

For Garnishing

  • 1/2 cup fresh blueberries
  • Whipped cream
  • Lemon zest
  • Crushed graham crackers
  • Fresh mint leaves, optional

Why You’ll Love This Recipe

Blueberry Parfait gives you the rich, creamy texture of cheesecake in an easy layered dessert. The cheesecake filling is smooth and lightly tangy, while the blueberry topping adds bright fruit flavor and beautiful color.

Another reason to love Blueberry Parfait is that it can be prepared ahead. Each component can be made separately and assembled before serving, which makes the recipe convenient for entertaining.

How to Make Blueberry Parfait

Step 1: Prepare the Blueberry Topping

Add the blueberries, sugar, lemon juice, and lemon zest to a small saucepan. Place over medium heat and cook for 3 to 4 minutes, stirring occasionally, until the berries begin releasing their juices.

For a chunky fruit layer, gently press only a few berries with the back of a spoon and leave the rest mostly whole.

Step 2: Thicken the Blueberry Sauce

Mix the cornstarch and water in a small bowl until smooth. Pour the slurry into the simmering blueberries while stirring.

Cook for another 1 to 2 minutes until the mixture becomes glossy and slightly thick. Remove from the heat and stir in vanilla.

Transfer the topping to a bowl and cool completely. A cold fruit layer helps Blueberry Parfait keep clean, distinct layers.

Step 3: Make the Graham Cracker Crumbs

Combine the graham cracker crumbs, melted butter, brown sugar, and a small pinch of salt in a bowl.

Stir until the crumbs look evenly moistened and resemble damp sand.

Step 4: Beat the Cream Cheese

Place softened cream cheese in a large mixing bowl. Beat with an electric mixer for 1 to 2 minutes until completely smooth.

Add powdered sugar, vanilla, and lemon juice. Beat again until creamy and well combined. If using Greek yogurt or sour cream, mix it in now.

A lump-free cream cheese mixture is important for a silky filling.

Step 5: Whip the Cream

In a separate chilled bowl, beat the heavy whipping cream until medium-stiff peaks form.

Do not overbeat it. The cream should hold its shape while still looking smooth and soft.

Step 6: Finish the Cheesecake Filling

Fold the whipped cream gently into the cream cheese mixture in two or three additions.

The finished filling for Blueberry Parfait should be thick enough to spoon or pipe into glasses without running.

Step 7: Start the First Layer

Place about 2 tablespoons of graham cracker crumbs in the bottom of each serving glass.

Step 8: Add the Cheesecake Layer

Spoon or pipe a layer of cheesecake filling over the crumbs.

For neat layers, use a piping bag or zip-top bag with one corner snipped off. This keeps the sides of the glasses cleaner.

Step 9: Add the Blueberry Layer

Spoon a layer of cooled blueberry topping over the cheesecake filling.

Step 10: Repeat the Layers

Add another layer of graham crumbs, followed by more cheesecake filling and blueberry topping.

Depending on the size of your glasses, you may have two or three sets of layers. This dessert looks especially attractive in clear glasses because every color and texture is visible.

Step 11: Chill

Cover the parfaits and refrigerate for at least 1 hour before serving.

Step 12: Garnish and Serve

Just before serving, top each glass with whipped cream, fresh blueberries, crushed graham crackers, and a little lemon zest.

Serving Suggestions

Blueberry Parfait is elegant enough for birthdays, baby showers, brunch tables, holiday meals, and summer gatherings. Serve it in small dessert glasses for a formal presentation or use mason jars for a casual picnic-style dessert.

For extra color, garnish Blueberry Parfait with fresh strawberries, raspberries, or mint. You can also serve it alongside coffee, iced tea, or sparkling water with lemon.

If you love creamy seafood dishes, try these Baked Shrimp Parmesan Alfredo Seafood Cups for a rich, cheesy appetizer with tender shrimp and plenty of flavor.

Recipe Tips

Make sure the cream cheese is fully softened before beating. Cold cream cheese can leave small lumps in the filling.

Cool the blueberry sauce completely before layering.

Use cold heavy cream because it whips more easily and holds its shape better.

For a cleaner Blueberry Parfait presentation, pipe the cheesecake mixture rather than spooning it into narrow glasses.

If you are making the dessert ahead, reserve the final graham cracker garnish until serving so it stays crisp.

Easy Variations

Blueberry Parfait is easy to customize depending on the season or ingredients you have available.

To make a mixed berry version, replace half of the blueberries with raspberries, blackberries, or chopped strawberries. You can also add extra lemon zest for a brighter flavor.

If you want a lighter Blueberry Parfait, use reduced-fat cream cheese. You can also replace part of the whipped cream with thick Greek yogurt.

The texture will be slightly less rich but still creamy.

For another creamy and satisfying option, try this Creamy Chicken Broccoli Bacon Pasta Salad with tender chicken, crisp broccoli, smoky bacon, and cheddar cheese.

Make-Ahead Instructions

The blueberry topping can be prepared up to 3 days ahead and kept refrigerated in an airtight container.

For the best texture, assemble Blueberry Parfait up to 8 hours before serving. This gives the layers time to set while preventing the graham crumbs from becoming overly soft.

Add fresh berries, whipped cream, mint, and extra crumbs immediately before serving.

Storage and Freezing

Store assembled parfaits covered in the refrigerator for up to 3 days.

Blueberry Parfait is not ideal for freezing after assembly because whipped cream and cream cheese can change texture when thawed. However, the cooked blueberry topping can be frozen separately for up to 2 months.

Nutrition Information

Approximate nutrition per serving:

Calories: 470
Protein: 5 g
Carbohydrates: 49 g
Fat: 29 g
Saturated Fat: 17 g
Fiber: 3 g
Sugar: 34 g
Sodium: 260 mg

Nutrition values are estimates and may vary depending on the cream cheese, whipping cream, graham crackers, sugar, and serving size used.

Frequently Asked Questions

Can I use frozen blueberries?

Yes. Frozen berries work very well in the cooked topping. There is no need to thaw them first, although the sauce may need another minute or two to thicken.

Can I make Blueberry Parfait without cooking the berries?

Yes. You can use fresh blueberries mixed with a little sugar and lemon juice. The result will be fresher and less saucy than the cooked version.

Can I make this dessert without heavy cream?

You can substitute stabilized whipped topping. The flavor will be slightly different, but it creates a stable, fluffy filling.

Why is my cheesecake filling runny?

The heavy cream may not have been whipped enough, the cream cheese may have been too warm, or the filling may have been overmixed. Chill the mixture briefly before assembling if needed.

Can I make Blueberry Parfait gluten-free?

Yes. Use gluten-free graham crackers or gluten-free vanilla cookies for the crumb layer.

Final Thoughts

Blueberry Parfait turns familiar cheesecake flavors into a simple, attractive dessert that requires no oven and very little complicated preparation.

Blueberry Parfait offers the combination of juicy blueberry sauce, airy cheesecake filling, and buttery crumbs, creating rich flavor and contrasting textures in every spoonful.

Because Blueberry Parfait can be assembled in individual portions, it is easy to serve at parties and convenient to prepare in advance.

Keep this Blueberry Parfait recipe handy whenever you want a no-bake dessert that looks special without demanding hours in the kitchen. Whether served for a summer dinner, holiday table, brunch, or family treat, it offers the creamy comfort of cheesecake with the bright freshness of blueberries.
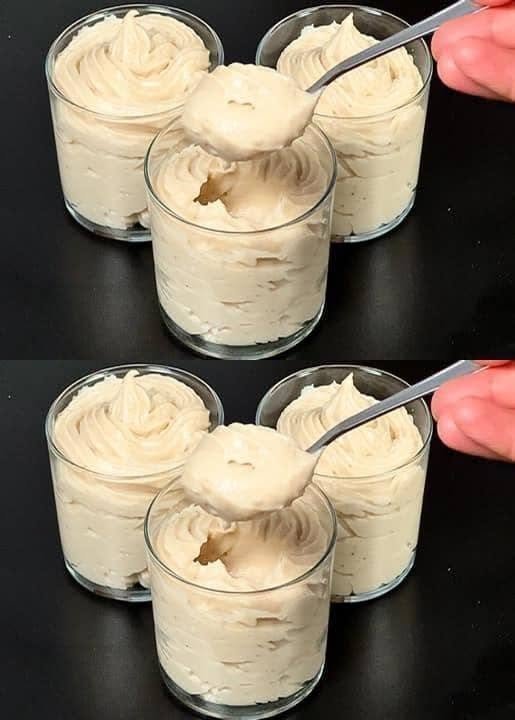
Banana Mousse Pudding

Banana Mousse with ripe bananas, cream cheese, vanilla pudding, whipped cream, and a smooth creamy texture

Banana Mousse Pudding

Banana Mousse is a light, creamy, no-bake dessert made with ripe bananas, cream cheese, whipped cream, vanilla, and a little pudding mix for stability. It has a smooth texture, fresh banana flavor, and a soft mousse-like finish that makes it perfect for family dinners, parties, summer desserts, or make-ahead treats. This dessert is especially useful when you want something easy and elegant without turning on the oven.

Prep Time: 20 minutes
Chill Time: 2 hours
Total Time: About 2 hours 20 minutes
Servings: 6

Ingredients

For the Banana Mousse

  • 3 ripe bananas
  • 8 ounces cream cheese, softened
  • 1 box (3.4 ounces) instant vanilla pudding mix
  • 1 cup cold milk
  • 1 teaspoon vanilla extract
  • 1 tablespoon fresh lemon juice
  • 1 1/2 cups heavy whipping cream
  • 1/4 cup powdered sugar
  • Pinch of salt

Optional Toppings

  • Banana slices
  • Crushed vanilla wafers or graham crackers
  • Whipped cream
  • Chopped walnuts or pecans
  • Ground cinnamon
  • Shaved chocolate

Why You’ll Love This Recipe

Banana Mousse is creamy, smooth, and easy to prepare with simple ingredients. The bananas add natural sweetness, while cream cheese gives the dessert body and a gentle tang.

Another reason to love this dessert is that it can be prepared ahead. The mousse becomes even better after chilling, so it is perfect for entertaining or meal prep.

It is also easy to customize with chocolate, peanut butter, cookies, nuts, or caramel.

How to Make Banana Mousse

Step 1: Prepare the Bananas

Peel the bananas and place them in a medium bowl.

Mash them very well with a fork until mostly smooth.

Add the lemon juice and stir. The lemon helps balance the sweetness and slows browning.

Step 2: Beat the Cream Cheese

Place the softened cream cheese in a large mixing bowl.

Beat with an electric mixer for 1 to 2 minutes until smooth and creamy.

Scrape down the sides of the bowl so there are no lumps.

Step 3: Add the Pudding Mix

Add the vanilla pudding mix, cold milk, vanilla extract, and salt.

Beat on low speed until combined, then increase to medium speed for about 1 minute.

The mixture should become thick and smooth.

Step 4: Add the Mashed Bananas

Add the mashed bananas to the cream cheese mixture.

Mix on low speed until evenly incorporated.

At this stage, Banana Mousse should already have a rich banana aroma and a smooth, thick base.

Step 5: Whip the Cream

In a separate chilled bowl, add the heavy whipping cream and powdered sugar.

Beat on medium-high speed until medium-stiff peaks form.

Do not overbeat, or the cream can become grainy.

Step 6: Fold in the Whipped Cream

Add about one-third of the whipped cream to the banana mixture.

Fold gently with a spatula until mostly combined.

Add the remaining whipped cream in two additions, folding slowly so the mixture stays light and airy.

Step 7: Check the Texture

The finished mousse should be thick, fluffy, and spoonable.

If it feels too soft, chill it for 20 to 30 minutes before portioning.

Step 8: Fill the Serving Glasses

Spoon the mousse into individual glasses, ramekins, or dessert cups.

You can also use a piping bag for a neater presentation.

Step 9: Add Layers, If Desired

For a layered dessert, add crushed vanilla wafers or graham crackers between spoonfuls of mousse.

You can also add sliced bananas, chopped nuts, or a small drizzle of caramel.

Step 10: Chill

Cover the dessert cups and refrigerate for at least 2 hours.

Chilling helps Banana Mousse firm up and allows the flavors to blend.

Step 11: Garnish

Just before serving, top with whipped cream, banana slices, cookie crumbs, nuts, cinnamon, or chocolate shavings.

Step 12: Serve

Serve cold for the best texture and flavor.

Serving Suggestions

Banana Mousse is delicious on its own, but it also works well with fresh berries, sliced strawberries, or a small handful of toasted nuts.

For a more indulgent dessert, serve Banana Mousse with caramel sauce, chocolate drizzle, or crushed cookies.

You can also layer it with vanilla wafers for a banana-pudding-inspired presentation.

For parties, portion the mousse into small glasses or clear cups so the creamy texture and toppings are easy to see.

For an especially pretty presentation, chill the serving glasses before filling them and pipe the mousse using a large star tip. A thin layer of crushed cookies at the bottom adds contrast without making the dessert heavy. If you are serving this after a large meal, use smaller dessert glasses because the filling is rich and creamy. Fresh mint, a light dusting of cinnamon, or a few toasted nuts can make each cup look finished without adding much extra work. Keep any crunchy garnish separate until serving so it stays crisp.

For another rich homemade treat, try our Chocolate Chunk Cookies with soft chewy centers, crisp golden edges, and plenty of melted chocolate in every bite.

Recipe Tips

Use ripe bananas with plenty of brown speckles for the best sweetness and flavor.

Make sure the cream cheese is fully softened before mixing.

Cold milk helps the pudding mix thicken properly.

For the best Banana Mousse texture, whip the cream separately and fold it in gently.

Do not add too much lemon juice because excess liquid can loosen the mousse.

If the mousse tastes too sweet, add a pinch of salt or a little extra lemon juice.

Chill the dessert before serving so it becomes thicker and more stable.

Add fresh banana slices only just before serving to prevent browning.

Easy Variations

Banana Mousse is easy to customize.

For a chocolate version, fold in mini chocolate chips or add cocoa powder to part of the mixture.

For a peanut butter variation, beat 1/3 cup creamy peanut butter into the cream cheese before adding the pudding mixture.

You can make Banana Mousse with crushed vanilla wafers for a classic banana pudding flavor.

For a tropical version, add toasted coconut and a little coconut extract.

A caramel version can include a swirl of caramel sauce in each serving cup.

For extra crunch, add chopped walnuts, pecans, or almonds.

You may also enjoy our Homemade Yogurt Ice Cream for a cool, creamy dessert with a smooth texture and refreshing homemade flavor.

Make-Ahead Instructions

This dessert is ideal for preparing ahead.

Make Banana Mousse up to 24 hours before serving and keep it covered in the refrigerator.

For the freshest appearance, add banana slices and crunchy toppings only shortly before serving.

If you are transporting the dessert, keep the cups chilled in an insulated container.

Storage

Store leftover Banana Mousse in airtight containers in the refrigerator for up to 3 days.

The mousse may darken slightly over time because of the bananas, but the lemon juice helps slow that process.

Do not leave the dessert at room temperature for long periods because it contains dairy.

Freezing is possible, but the texture may become firmer and slightly icy. If frozen, thaw slowly in the refrigerator before serving.

Nutrition Information

Approximate nutrition per serving:

Calories: 410
Protein: 6 g
Carbohydrates: 42 g
Fat: 25 g
Saturated Fat: 15 g
Fiber: 2 g
Sugar: 30 g
Sodium: 330 mg

Nutrition values are estimates and may vary depending on the bananas, pudding mix, cream cheese, milk, toppings, and serving size.

Frequently Asked Questions

Can I use frozen bananas?

Yes. Thaw them completely and drain any excess liquid before mashing.

Can I make this without pudding mix?

Yes. You can make a simpler version with cream cheese, whipped cream, banana puree, vanilla, and powdered sugar, but the texture may be softer.

Can I use Greek yogurt?

Yes. Replace part of the cream cheese with thick Greek yogurt for a lighter, tangier mousse.

Why is my mousse too runny?

The cream may not have been whipped enough, the bananas may have added too much liquid, or the dessert may need more chilling time.

Can I make Banana Mousse without cream cheese?

Yes. Use mascarpone, thick Greek yogurt, or extra whipped cream, though the texture will change.

Can I add cookies?

Yes. Vanilla wafers, graham crackers, or shortbread crumbs all work well.

Can I make this ahead?

Yes. Banana Mousse can be made a day ahead and chilled until serving.

Final Thoughts

Banana Mousse is an easy way to turn ripe bananas into a smooth, creamy dessert with very little effort.

Because Banana Mousse combines fresh banana flavor, cream cheese, vanilla pudding, and whipped cream, it has a rich but airy texture that works well for both casual family meals and special occasions.

Keep this Banana Mousse recipe handy for parties, summer desserts, make-ahead treats, or days when you need a quick no-bake recipe.

With its creamy texture, fresh banana flavor, and flexible toppings, Banana Mousse is simple to prepare, easy to serve, and delicious straight from the refrigerator.

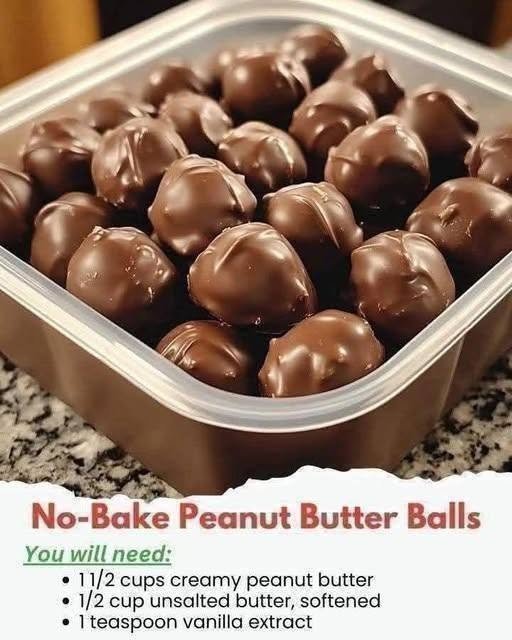
No Bake Peanut Butter Balls

Peanut Butter Balls with creamy peanut butter centers and smooth chocolate coating

No Bake Peanut Butter Balls

Peanut Butter Balls are a rich, creamy, chocolate-coated no-bake treat made with peanut butter, softened butter, powdered sugar, vanilla, and melted chocolate. They are simple enough for everyday dessert but festive enough for Christmas cookie trays, parties, gift boxes, and holiday gatherings. Peanut Butter Balls have a smooth peanut butter center surrounded by a crisp chocolate shell, giving every bite the perfect balance of salty, sweet, creamy, and chocolatey flavors.

This recipe requires no oven and can be prepared ahead, making it especially useful during busy holidays or whenever you need an easy homemade sweet.

Prep Time: 25 minutes
Chill Time: 1 hour
Chocolate Setting Time: 30 minutes
Total Time: About 1 hour 55 minutes
Servings: 30 balls

Ingredients

For the Peanut Butter Filling

  • 1 1/2 cups creamy peanut butter
  • 1/2 cup unsalted butter, softened
  • 1 teaspoon vanilla extract
  • 3 cups powdered sugar
  • 1/4 teaspoon salt
  • 1/2 cup graham cracker crumbs, optional for extra texture

For the Chocolate Coating

  • 12 ounces semi-sweet chocolate
  • 1 tablespoon coconut oil or vegetable shortening

Optional Toppings

  • Crushed peanuts
  • Flaky sea salt
  • White chocolate drizzle
  • Holiday sprinkles
  • Mini chocolate chips

Why You’ll Love This Recipe

Peanut Butter Balls are incredibly easy to make because there is no baking, no complicated candy thermometer, and no difficult technique involved. The filling mixes together in just a few minutes, and chilling makes it easy to shape.

Another reason to love Peanut Butter Balls is that they store very well. You can make a large batch several days before a party and keep them chilled until needed.

They are also easy to customize with different chocolate coatings, toppings, or crunchy additions.

How to Make Peanut Butter Balls

Step 1: Prepare the Baking Sheet

Line a large baking sheet with parchment paper or wax paper.

Make sure the baking sheet can fit inside your refrigerator or freezer.

Step 2: Beat the Peanut Butter and Butter

Place the peanut butter and softened butter in a large mixing bowl.

Beat with an electric mixer for 1 to 2 minutes, or until smooth and creamy.

The butter should be soft but not melted.

Step 3: Add Vanilla and Salt

Add the vanilla extract and salt.

Mix again until evenly incorporated.

These simple ingredients help balance the sweetness and deepen the peanut butter flavor.

Step 4: Add the Powdered Sugar

Gradually add the powdered sugar, about 1 cup at a time.

Mix on low speed after each addition.

As more powdered sugar is added, the mixture will become thick and dough-like.

The filling for Peanut Butter Balls should be firm enough to roll without sticking heavily to your hands.

Step 5: Add Graham Cracker Crumbs

If using graham cracker crumbs, fold them into the mixture.

They add a little extra structure and subtle texture but are completely optional.

Step 6: Shape the Balls

Scoop about 1 tablespoon of filling at a time.

Roll between your palms to create smooth balls.

Arrange them on the prepared baking sheet.

Try to keep the portions similar in size so they look neat and set evenly.

Step 7: Chill the Filling

Place Peanut Butter Balls in the refrigerator for at least 30 minutes or in the freezer for about 15 minutes.

The centers should be firm before dipping into chocolate.

Chilling helps prevent them from falling apart when coated.

Step 8: Melt the Chocolate

Place the chocolate and coconut oil in a microwave-safe bowl.

Microwave in 20-second intervals, stirring thoroughly after each interval, until smooth.

You can also melt the chocolate in a heatproof bowl set over gently simmering water.

Step 9: Dip in Chocolate

Use a fork or candy dipping tool to lower each chilled ball into the melted chocolate.

Turn gently until completely coated.

Lift it out and allow excess chocolate to drip back into the bowl.

Step 10: Transfer to the Tray

Place each coated ball back onto the parchment-lined baking sheet.

Before the chocolate sets, add crushed peanuts, sea salt, or sprinkles if desired.

At this stage, Peanut Butter Balls should have a smooth glossy chocolate coating.

Step 11: Chill Until Set

Refrigerate for about 30 minutes, or until the chocolate has completely hardened.

Step 12: Finish and Serve

If desired, drizzle the finished Peanut Butter Balls with melted white chocolate for decoration.

Serve chilled or allow them to sit at room temperature for several minutes before eating.

Serving Suggestions

Peanut Butter Balls are perfect for Christmas cookie trays, dessert boards, birthday parties, potlucks, and edible holiday gifts.

Serve Peanut Butter Balls alongside chocolate chip cookies, brownies, fudge, truffles, or fresh strawberries for a varied dessert platter.

They also pair well with coffee, hot chocolate, milk, or tea.

For gifting, place them in small paper candy cups and arrange them in a decorative tin or box.

For another hearty family dinner, try our Butternut Squash Casserole With Rice & Ground Beef with tender squash, seasoned beef, rice, tomatoes, herbs, and melted cheese.

Recipe Tips

Use regular creamy peanut butter rather than very runny natural peanut butter for the most reliable texture.

Make sure the butter is softened but not melted.

Add powdered sugar gradually so you can control the consistency.

For the best Peanut Butter Balls shape, chill the mixture before dipping.

If the filling feels too sticky, add 1 to 2 tablespoons additional powdered sugar.

If it feels too dry, mix in a small spoonful of peanut butter.

Keep the centers cold while dipping them into warm chocolate.

Use coconut oil or shortening to help the melted chocolate become smoother and easier to coat.

Let excess chocolate drip off before placing each piece on parchment.

Easy Variations

Peanut Butter Balls can be customized in many ways.

For a crunchy version, use crunchy peanut butter or stir chopped roasted peanuts into the filling.

For a dark chocolate version, coat them with bittersweet or dark chocolate.

You can make Peanut Butter Balls with white chocolate for a sweeter variation.

For extra texture, add finely crushed pretzels or graham crackers to the filling.

A holiday version can be decorated with red and green sprinkles.

For a sweet-and-salty finish, sprinkle a tiny amount of flaky sea salt on top before the chocolate hardens.

You may also enjoy our Cheesy Garlic Green Beans for a creamy, garlicky side dish with tender green beans, mozzarella, Parmesan, and a golden baked topping.

Make-Ahead Instructions

This recipe is ideal for preparing ahead.

Make the peanut butter centers up to 2 days before coating them.

Store the shaped centers in an airtight container in the refrigerator.

You can also prepare the complete Peanut Butter Balls several days before serving.

Once the chocolate has set, arrange them between layers of parchment paper in a covered container and keep refrigerated.

Storage and Freezing

Store Peanut Butter Balls in an airtight container in the refrigerator for up to 2 weeks.

Keep parchment paper between layers to prevent sticking.

They can also be frozen for up to 2 months.

Freeze them in a single layer until firm, then transfer to a freezer-safe container.

Thaw in the refrigerator before serving.

Avoid storing them in a very warm room because the chocolate coating can soften and the peanut butter filling may become too soft.

Nutrition Information

Approximate nutrition per ball:

Calories: 185
Protein: 4 g
Carbohydrates: 19 g
Fat: 11 g
Saturated Fat: 5 g
Fiber: 1 g
Sugar: 15 g
Sodium: 90 mg

Nutrition values are estimates and may vary depending on the peanut butter, chocolate, powdered sugar, toppings, and portion size.

Frequently Asked Questions

Can I use natural peanut butter?

You can, but natural peanut butter can be runnier because the oils separate. A no-stir creamy peanut butter usually gives the most consistent filling.

Can I use milk chocolate?

Yes. Milk chocolate creates a sweeter coating, while semi-sweet or dark chocolate provides more contrast with the filling.

Why are my Peanut Butter Balls too soft?

The filling may need more powdered sugar or additional chilling time. Add a little more sugar and refrigerate until firm.

Can I make them without butter?

Yes. You can replace some or all of the butter with additional peanut butter, although the texture will be slightly denser.

Can I add graham cracker crumbs?

Yes. Graham cracker crumbs add structure and a subtle crunch.

How do I keep the chocolate smooth?

Melt it slowly, stir frequently, and add a small amount of coconut oil or shortening.

Can I freeze these treats?

Yes. Peanut Butter Balls freeze very well for up to 2 months when stored in an airtight container.

Final Thoughts

Peanut Butter Balls are an easy homemade treat that combines creamy peanut butter filling with a rich chocolate coating.

Because Peanut Butter Balls require no baking and use simple pantry ingredients, they are especially convenient for holidays, parties, gift boxes, and make-ahead desserts.

Keep this Peanut Butter Balls recipe handy whenever you need an easy sweet treat that looks impressive without requiring complicated preparation.

With smooth peanut butter centers, crisp chocolate shells, and endless topping options, Peanut Butter Balls are a classic no-bake dessert that is easy to prepare, easy to store, and always enjoyable.

No-Bake Chocolate Walnut Oat Bars

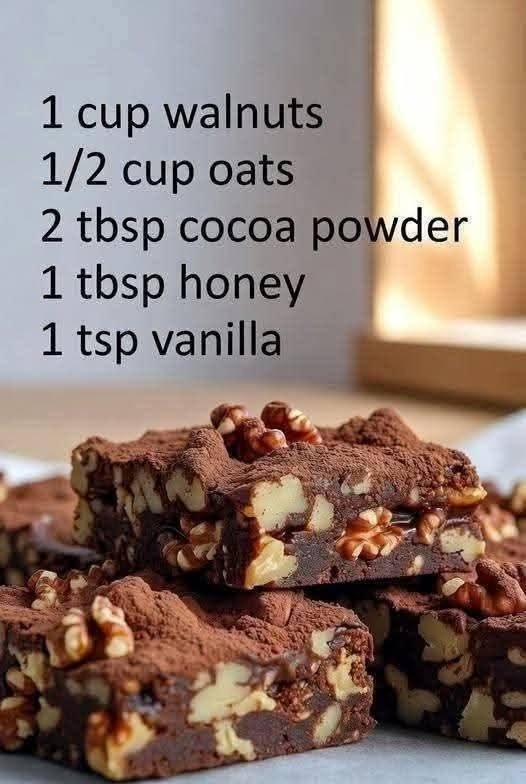
Chocolate Walnut Bars with walnuts, oats, cocoa powder, honey, vanilla, and a rich fudgy no-bake texture

No-Bake Chocolate Walnut Oat Bars

Chocolate Walnut Bars are a rich, chewy no-bake treat made with walnuts, oats, cocoa powder, honey, and vanilla. They are simple to prepare, require no oven, and come together with just a handful of pantry ingredients. Chocolate Walnut Bars have a fudgy texture, deep cocoa flavor, and plenty of crunchy walnut pieces, making them a practical option for snacks, lunchboxes, or an easy homemade dessert.

Prep Time: 15 minutes
Chill Time: 1 hour
Total Time: About 1 hour 15 minutes
Servings: 12 bars

Ingredients

For the Bars

  • 1 cup walnuts
  • 1/2 cup rolled oats
  • 2 tablespoons unsweetened cocoa powder
  • 1 tablespoon honey, plus more if needed
  • 1 teaspoon vanilla extract
  • 1/4 teaspoon salt
  • 2 tablespoons nut butter, optional for extra binding
  • 1 to 2 tablespoons water, only if needed

For the Optional Topping

  • 1 tablespoon cocoa powder
  • 2 tablespoons chopped walnuts
  • Pinch of flaky salt, optional

Why You’ll Love This Recipe

Chocolate Walnut Bars are easy to make because there is no baking, no complicated equipment, and no long ingredient list. The walnuts provide crunch and richness, while oats help give the bars structure and a satisfying chewy texture.

Another reason to love Chocolate Walnut Bars is how flexible they are. You can make them sweeter, more chocolatey, or softer depending on your preference. They are also easy to portion and store, which makes them convenient for meal prep or quick snacks during a busy week.

How to Make Chocolate Walnut Bars

Step 1: Prepare the Pan

Line a small loaf pan or an 8-inch square pan with parchment paper, leaving some paper hanging over the sides.

This makes it easier to lift the chilled bars from the pan later.

Step 2: Toast the Walnuts, Optional

For deeper flavor, place the walnuts in a dry skillet over medium-low heat.

Toast for 3 to 4 minutes, stirring frequently, until fragrant.

Allow them to cool completely before using.

Step 3: Process the Walnuts

Place the walnuts in a food processor.

Pulse several times until they are chopped into a mixture of fine crumbs and small pieces.

Avoid processing too long, or the walnuts may begin turning into nut butter.

Step 4: Add the Oats

Add the rolled oats to the food processor.

Pulse again until the oats are broken down but still have a little texture.

The mixture for Chocolate Walnut Bars should not become completely powdery.

Step 5: Add Cocoa and Salt

Add the cocoa powder and salt.

Pulse briefly to distribute them evenly throughout the walnut and oat mixture.

Step 6: Add Honey and Vanilla

Pour in the honey and vanilla extract.

Add the optional nut butter if you want a softer, more cohesive texture.

Process until the mixture begins clumping together.

Step 7: Check the Texture

Pinch a small amount between your fingers.

If it holds together, the mixture is ready.

If it feels too dry, add water 1 teaspoon at a time or add a little extra honey.

At this stage, Chocolate Walnut Bars should have a thick, sticky texture that can be pressed firmly into a pan.

Step 8: Press Into the Pan

Transfer the mixture to the prepared pan.

Use the back of a spoon, spatula, or a piece of parchment paper to press it down very firmly.

Compressing the mixture well is important because it helps the bars stay together after chilling.

Step 9: Add the Topping

Dust the surface lightly with cocoa powder.

Scatter chopped walnuts over the top and press them gently into the mixture.

A tiny pinch of flaky salt can be added for contrast if desired.

Step 10: Chill

Refrigerate for at least 1 hour, or until firm.

For extra-firm bars, chill for 2 hours.

Step 11: Slice

Use the parchment paper to lift the slab from the pan.

Place it on a cutting board and use a sharp knife to cut it into 12 squares or bars.

For cleaner slices, wipe the knife between cuts.

Step 12: Serve

Serve Chocolate Walnut Bars chilled or let them sit at room temperature for a few minutes for a softer texture.

Serving Suggestions

Chocolate Walnut Bars are delicious on their own with coffee, tea, or milk.

For a more complete snack, pair one bar with fresh berries, sliced banana, plain yogurt, or a small piece of fruit.

You can also crumble Chocolate Walnut Bars over yogurt or a smoothie bowl for extra cocoa and nutty flavor.

For dessert, serve them with a spoonful of lightly whipped cream or a few raspberries.

For another festive holiday appetizer, try our Christmas Cranberry Walnut Cheese Balls with creamy cheese, tart cranberries, crunchy walnuts, and fresh herbs.

Recipe Tips

Use fresh walnuts for the best flavor. Walnuts that have been stored too long can develop a bitter or stale taste.

Do not overprocess the nuts. A combination of fine crumbs and small pieces gives the bars a better texture.

Use rolled oats rather than steel-cut oats because they soften more easily and blend better.

For the best Chocolate Walnut Bars texture, press the mixture into the pan as firmly as possible.

If your honey is very thick, warm it briefly so it blends more easily.

Taste the mixture before pressing it into the pan. If you prefer more sweetness, add a small amount of extra honey.

If the mixture is too wet, add a spoonful of oats. If it is too dry, add a teaspoon of water or nut butter.

Easy Variations

Chocolate Walnut Bars can be customized with several simple ingredients.

For extra chocolate flavor, add 1 tablespoon mini dark chocolate chips or a small amount of melted dark chocolate.

For a coconut version, mix in 2 tablespoons unsweetened shredded coconut.

You can make Chocolate Walnut Bars with pecans, almonds, or cashews instead of walnuts, although the flavor and texture will change.

For a fruitier variation, add finely chopped dates, raisins, or dried cranberries.

A pinch of cinnamon also pairs well with cocoa and walnuts.

For extra crunch, stir in pumpkin seeds or sunflower seeds before pressing the mixture into the pan.

You may also enjoy our Christmas Cookies for a soft, buttery holiday treat filled with cream cheese, pecans, vanilla, and festive flavor.

Make-Ahead Instructions

This recipe is excellent for make-ahead snacks.

Prepare the bars, press them into the pan, and refrigerate overnight.

Once firm, slice them and store the pieces in a covered container.

Chocolate Walnut Bars can be made several days ahead, making them convenient for lunchboxes, road trips, or busy workweeks.

Storage and Freezing

Store Chocolate Walnut Bars in an airtight container in the refrigerator for up to 1 week.

Place parchment paper between layers if you stack them.

For longer storage, freeze them in a freezer-safe container for up to 2 months.

You can freeze individual bars separately so they are easy to grab when needed.

Thaw in the refrigerator or at room temperature for a few minutes before serving.

Because the bars contain honey and finely processed nuts, they soften if left in a warm room for too long.

Nutrition Information

Approximate nutrition per bar:

Calories: 135
Protein: 3 g
Carbohydrates: 10 g
Fat: 10 g
Saturated Fat: 1 g
Fiber: 2 g
Sugar: 4 g
Sodium: 50 mg

Nutrition values are estimates and may vary depending on the amount of honey, optional nut butter, walnuts, and serving size.

Frequently Asked Questions

Do I need to bake these bars?

No. This is a completely no-bake recipe. Chilling firms the mixture enough to slice.

Can I use quick oats?

Yes. Quick oats work well, although the texture may be slightly softer.

Can I make Chocolate Walnut Bars without honey?

Yes. Maple syrup can be used instead, but the mixture may be a little softer and could require extra oats.

Can I use another nut?

Yes. Pecans, almonds, or cashews can replace the walnuts.

Why are my bars falling apart?

The mixture may be too dry or may not have been pressed firmly enough. Add a small amount of honey, nut butter, or water and compress it well.

Can I make them sweeter?

Yes. Add more honey gradually, tasting as you go.

Can I add chocolate chips?

Yes. Mini dark chocolate chips can be folded into the mixture before pressing it into the pan.

Final Thoughts

Chocolate Walnut Bars are an easy way to turn a few pantry staples into a rich, no-bake snack with plenty of texture.

Because these bars combine walnuts, oats, cocoa, honey, and vanilla, they have a satisfying balance of nutty, chocolatey, and lightly sweet flavors.

Keep this Chocolate Walnut Bars recipe handy when you want a quick homemade treat without turning on the oven.

With their chewy texture, crunchy walnuts, deep cocoa flavor, and simple preparation, Chocolate Walnut Bars are a convenient dessert or snack that is easy to make, easy to store, and easy to enjoy.

Key Lime Pie… but Make It Very Low-Carb

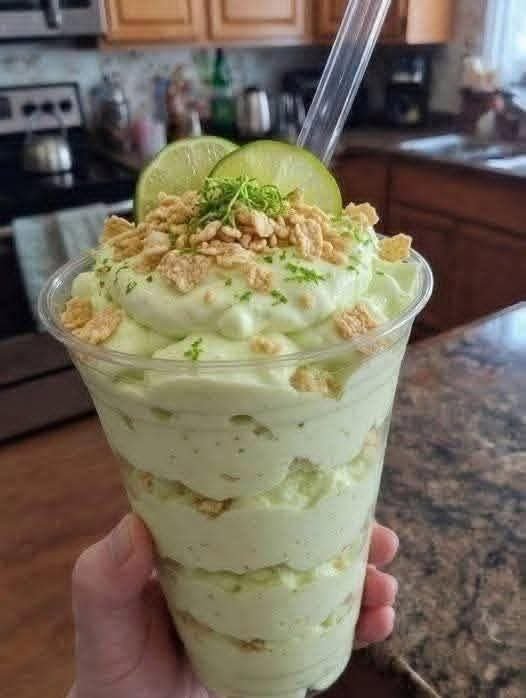
Key Lime Fluff with creamy lime filling, fresh lime slices, lime zest, and crunchy nut topping

Key Lime Pie… but Make It Very Low-Carb

Key Lime Fluff is a cool, creamy dessert inspired by classic key lime pie, but made without a traditional crust and with a low-sugar approach. It has a silky mousse-like texture, bright citrus flavor, and a rich creaminess that makes it perfect for warm days, easy desserts, or make-ahead treats. Key Lime Fluff is especially useful when you want something that feels indulgent without relying on a full graham cracker crust or a large amount of added sugar.

This version uses cream cheese, heavy cream, unsweetened Greek yogurt, fresh lime juice, lime zest, vanilla, and a low-carb sweetener. A small crunchy topping adds contrast, but it is optional if you want to keep the carbohydrate count as low as possible.

Prep Time: 15 minutes
Chill Time: 1 hour
Total Time: About 1 hour 15 minutes
Servings: 4

Ingredients

For the Key Lime Fluff

  • 8 ounces cream cheese, softened
  • 1 cup heavy whipping cream, cold
  • 1/2 cup plain unsweetened Greek yogurt
  • 3 tablespoons fresh lime juice
  • 1 tablespoon finely grated lime zest
  • 1/3 cup powdered low-carb sweetener, or to taste
  • 1 teaspoon vanilla extract
  • Pinch of salt

Optional Crunchy Topping

  • 1/4 cup chopped pecans or walnuts
  • 2 tablespoons unsweetened shredded coconut
  • 1 tablespoon almond flour
  • 1 teaspoon melted butter
  • Small pinch of cinnamon

For Garnish

  • Extra lime zest
  • Thin lime slices
  • A few crushed toasted nuts
  • Unsweetened whipped cream, optional

Why You’ll Love This Recipe

Key Lime Fluff is simple, refreshing, and does not require baking. The filling comes together in minutes and develops an even better texture after chilling.

Another reason to love this dessert is its balance of rich and bright flavors. Cream cheese and heavy cream make the dessert smooth, while fresh lime juice and zest keep it from tasting too heavy.

How to Make Key Lime Fluff

Step 1: Soften the Cream Cheese

Place the cream cheese at room temperature until soft enough to beat smoothly.

Soft cream cheese blends much more easily and helps prevent small lumps in the finished dessert.

Step 2: Beat the Cream Cheese

Add the softened cream cheese to a large mixing bowl.

Beat with an electric mixer for 1 to 2 minutes until smooth and creamy.

Step 3: Add the Sweetener

Add the powdered low-carb sweetener, vanilla extract, and salt.

Beat again until fully combined.

Using a powdered sweetener works better than a granulated one because it dissolves more easily and gives the mixture a smoother texture.

Step 4: Add Lime Flavor

Add the fresh lime juice and finely grated lime zest.

Mix on low speed until incorporated.

The mixture should taste bright and tangy but still creamy.

Step 5: Add Greek Yogurt

Add the unsweetened Greek yogurt and mix until smooth.

The yogurt adds a slight tang that works especially well with the lime.

Step 6: Whip the Cream

In a separate chilled bowl, beat the heavy cream until medium-stiff peaks form.

Step 7: Fold the Mixtures Together

Add about one-third of the whipped cream to the cream cheese mixture and fold gently.

Once combined, fold in the remaining whipped cream.

Use a spatula and gentle strokes so the dessert stays light and airy.

At this stage, the filling should be thick, soft, and mousse-like.

Step 8: Prepare the Optional Crunch

If using the topping, combine the chopped nuts, coconut, almond flour, melted butter, and cinnamon in a small skillet.

Toast over medium-low heat for 3 to 4 minutes, stirring frequently.

Step 9: Assemble the Dessert Cups

Spoon a small amount of Key Lime Fluff into each serving cup.

Add a light layer of the cooled nut mixture if desired.

Continue layering until the cups are filled.

Step 10: Chill

Cover the cups and refrigerate for at least 1 hour.

Chilling helps the mixture become firmer and allows the lime flavor to develop.

Step 11: Garnish

Top with extra lime zest, a thin lime slice, a little whipped cream, or a few toasted nuts.

Step 12: Serve

Serve cold for the best texture and flavor.

Serving Suggestions

Key Lime Fluff is delicious on its own, but it can also be served with fresh berries such as raspberries, strawberries, or blackberries in small portions.

For extra crunch, sprinkle a little toasted pecan or coconut mixture over the top just before serving.

For another wholesome homemade snack, try our Healthy Flourless Nut & Seed Cookies packed with oats, nuts, seeds, nut butter, and a touch of natural sweetness.

Recipe Tips

Use full-fat cream cheese for the richest and smoothest texture.

Make sure the cream cheese is fully softened before mixing.

Use fresh lime juice rather than bottled juice when possible because fresh juice has a brighter flavor.

Finely grate only the green outer part of the lime peel. Avoid the bitter white pith underneath.

For the best Key Lime Fluff texture, whip the cream separately and fold it in gently.

Taste the mixture before chilling and adjust the sweetener if necessary.

Do not add too much lime juice at once because excessive liquid can loosen the mixture.

Easy Variations

Key Lime Fluff is easy to customize while keeping the same creamy base.

For a coconut-lime version, add a few drops of coconut extract and garnish with toasted unsweetened coconut.

For a cheesecake-style variation, increase the cream cheese slightly and reduce the yogurt.

You can make Key Lime Fluff with lemon instead of lime for a bright lemon mousse.

For extra richness, add a spoonful of mascarpone.

If you prefer a firmer dessert, chill it for several hours or overnight before serving.

You may also enjoy our Creamed Peas on Toast for a simple old-fashioned comfort meal with tender green peas, creamy white sauce, and crisp golden toast.

Make-Ahead Instructions

This dessert is ideal for preparing ahead.

Make the filling, portion it into serving cups, cover, and refrigerate for up to 2 days.

Add crunchy toppings only shortly before serving so they stay crisp.

Key Lime Fluff can also be stored in one large covered bowl and portioned later.

Storage

For best results, keep Key Lime Fluff chilled. Store leftover Key Lime Fluff in an airtight container in the refrigerator for up to 3 days.

Keep the nut topping separate when possible.

Freezing is possible, but the texture may become firmer and more ice-cream-like. If frozen, let it soften in the refrigerator before serving.

Do not leave the dessert at room temperature for extended periods because it contains dairy.

Nutrition Information

Approximate nutrition per serving, without optional topping:

Calories: 390
Protein: 8 g
Carbohydrates: 8 g
Fiber: 0 g
Net Carbohydrates: About 8 g
Fat: 37 g
Saturated Fat: 23 g
Sugar: 5 g
Sodium: 250 mg

Nutrition values are estimates and vary depending on the cream cheese, yogurt, sweetener, lime juice, and portion size.

Despite the popular “zero carb” description, this dessert is not truly carb-free. Dairy products and lime juice naturally contain small amounts of carbohydrate. Using an appropriate low-carb sweetener and skipping high-carb crust or toppings can keep the carb count much lower than traditional key lime pie.

Frequently Asked Questions

Is this dessert really zero carb?

No. Key Lime Fluff is very low in carbohydrates compared with traditional key lime pie, but cream cheese, Greek yogurt, heavy cream, and lime juice all contain small amounts of carbohydrate.

Can I use bottled lime juice?

Yes, but fresh lime juice generally gives a brighter and fresher flavor.

Can I use regular sugar?

Yes. Regular powdered sugar works, but it will significantly increase the carbohydrate and sugar content.

Can I make this without Greek yogurt?

Yes. Replace it with additional cream cheese, sour cream, or whipped cream.

Can I make Key Lime Fluff dairy-free?

You can try dairy-free cream cheese and coconut cream, but the texture and nutrition will be different.

Why is my mixture too soft?

The cream may not have been whipped firmly enough, the cream cheese may have been too warm, or too much lime juice may have been added.

Can I freeze it?

Yes. Freeze it in individual cups for a firmer frozen dessert, then allow it to soften slightly before eating.

Final Thoughts

Key Lime Fluff is a simple way to enjoy the tangy flavor of key lime pie without making a traditional crust or using a large amount of sugar.

Because Key Lime Fluff combines cream cheese, whipped cream, Greek yogurt, lime juice, and lime zest, it has a rich texture balanced by fresh citrus flavor.

Keep this Key Lime Fluff recipe handy for warm-weather desserts, make-ahead treats, parties, or evenings when you want something cool and creamy.

With its smooth texture, bright lime flavor, and easy no-bake preparation, Key Lime Fluff is a refreshing dessert that feels indulgent while remaining much lower in carbohydrates than a traditional slice of key lime pie.

No-Bake Chocolate Peanut Clusters

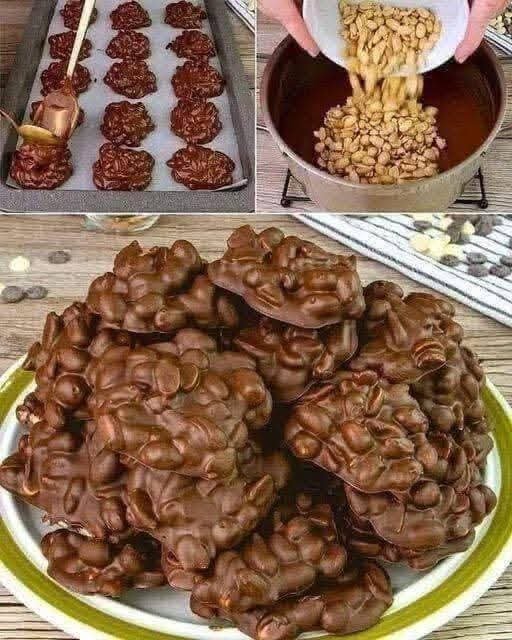
Chocolate Peanut Clusters with roasted peanuts, smooth chocolate, vanilla, and a touch of sea salt

No-Bake Chocolate Peanut Clusters

Chocolate Peanut Clusters are an easy no-bake treat made with roasted peanuts, smooth melted chocolate, and a touch of sea salt. They are crunchy, rich, simple to prepare, and perfect when you want a homemade sweet without turning on the oven. Chocolate Peanut Clusters are also great for parties, holiday trays, edible gifts, or quick dessert prep because the recipe uses only a few basic ingredients.

The combination of salty peanuts and creamy chocolate gives every bite a satisfying balance of crunch and sweetness.

Prep Time: 15 minutes
Chill Time: 30 minutes
Total Time: About 45 minutes
Servings: 18 to 20 clusters

Ingredients

For the Clusters

  • 2 1/2 cups roasted peanuts
  • 12 ounces semi-sweet chocolate, chopped
  • 4 ounces milk chocolate, chopped
  • 1 teaspoon coconut oil or butter, optional
  • 1/2 teaspoon vanilla extract
  • 1/4 teaspoon sea salt
  • Extra flaky salt, optional for topping

Why You’ll Love This Recipe

Chocolate Peanut Clusters are quick, beginner-friendly, and made without flour or baking. The peanuts provide a crisp texture, while the chocolate creates a smooth coating that firms beautifully once chilled.

Another reason to love Chocolate Peanut Clusters is how easy they are to customize. You can use dark chocolate, milk chocolate, sugar-free chocolate, mixed nuts, coconut, or a little cinnamon depending on your preferences.

They also store well, making them useful when you want a make-ahead sweet for holidays, lunchboxes, dessert boards, or last-minute guests.

How to Make Chocolate Peanut Clusters

Step 1: Prepare the Tray

Line a large baking sheet or tray with parchment paper.

Make sure there is enough room for the clusters to sit without touching one another.

Step 2: Prepare the Peanuts

If using salted roasted peanuts, taste them first so you know how much extra salt to add later.

You can use whole peanuts, lightly crushed peanuts, or a combination of both.

For the best results, choose dry-roasted peanuts with a crisp texture and fresh flavor.

Step 3: Chop the Chocolate

Chop the semi-sweet and milk chocolate into small, even pieces.

Smaller pieces melt faster and more evenly, reducing the chance of overheating.

Step 4: Melt the Chocolate

Place the chopped chocolate in a heatproof bowl.

Microwave in 20-second intervals, stirring well after each interval, until almost fully melted.

Once only a few small pieces remain, continue stirring until completely smooth.

If you prefer, you can melt the chocolate using a double boiler over gently simmering water.

Step 5: Add Coconut Oil and Vanilla

Stir in the optional coconut oil or butter.

This helps the chocolate flow more smoothly and gives the finished coating a softer bite.

Add the vanilla extract and stir until combined.

Step 6: Add the Peanuts

Pour the roasted peanuts into the melted chocolate.

Fold gently until every peanut is well coated.

The mixture for Chocolate Peanut Clusters should look thick, glossy, and full of peanuts without a large pool of extra chocolate at the bottom.

Step 7: Add Salt

Stir in the sea salt.

Taste a small amount of the mixture if safe to do so and adjust the salt only if needed.

Salt brings out the chocolate flavor and balances the sweetness.

Step 8: Scoop the Clusters

Use a tablespoon or small cookie scoop to portion the mixture onto the parchment-lined tray.

Each cluster should contain a generous amount of peanuts with enough chocolate to hold everything together.

Step 9: Shape the Clusters

Use the spoon to gently push the peanuts together into compact mounds.

Do not flatten them too much.

Chocolate Peanut Clusters look best when they have a slightly rough, craggy surface.

Step 10: Add Optional Toppings

Sprinkle the tops with flaky sea salt while the chocolate is still wet.

You can also add finely chopped peanuts, shredded coconut, or a small drizzle of melted white chocolate.

Step 11: Chill

Place the tray in the refrigerator for about 25 to 30 minutes.

Chill until the chocolate is completely firm and the clusters lift easily from the parchment.

Step 12: Serve

Transfer Chocolate Peanut Clusters to a serving plate or airtight container.

Serve chilled or let them sit at room temperature for a few minutes for a slightly softer texture.

Serving Suggestions

Chocolate Peanut Clusters are perfect on dessert platters, holiday cookie trays, snack boards, or alongside coffee and tea.

Serve them with fresh strawberries, banana slices, or a small bowl of mixed berries for a simple dessert plate.

They also work well as homemade gifts. Place them in mini paper liners and pack them in a decorative tin or food-safe box.

For an elegant seafood option, try our Mediterranean Creamy Spinach & Shrimp Stuffed Salmon with tender salmon, juicy shrimp, creamy spinach, feta, garlic, and herbs.

Recipe Tips

Use good-quality chocolate because it is one of the main flavors in the recipe.

Melt the chocolate slowly. High heat can cause it to become thick, grainy, or scorched.

Make sure the peanuts are dry before mixing them into the chocolate.

Use parchment paper so the clusters release easily once set.

For evenly sized portions, use the same spoon or cookie scoop every time.

Do not refrigerate uncovered for a long period because chocolate can absorb odors from the refrigerator.

If your kitchen is cool, the clusters can set at room temperature, but refrigeration is faster and more reliable.

Easy Variations

Chocolate Peanut Clusters can be adapted in many different ways.

For a darker, less sweet version, use 70% dark chocolate instead of milk or semi-sweet chocolate.

For extra crunch, mix peanuts with roasted almonds, cashews, or pecans.

Add shredded coconut for a chocolate-coconut variation.

A pinch of cinnamon or espresso powder can give Chocolate Peanut Clusters a deeper flavor.

For a spicy twist, add a tiny pinch of cayenne pepper or chili powder to the melted chocolate.

You can also add a few dried cranberries or chopped dried cherries for a sweet-tart contrast.

If you want a lower-sugar version, use a chocolate product that fits your dietary preferences, but check the package because “sugar-free” does not necessarily mean carbohydrate-free.

You may also enjoy our Spinach and Feta Turkey Meatballs for a lighter, protein-rich meal packed with lean turkey, spinach, creamy feta, garlic, and Mediterranean herbs.

Make-Ahead Instructions

Chocolate Peanut Clusters are excellent for make-ahead dessert prep.

Prepare them up to one week in advance and keep them in an airtight container.

Separate layers with parchment paper so the clusters do not stick together.

If your kitchen is warm, refrigerator storage is best.

For parties, you can make them several days ahead and transfer them to a serving tray shortly before guests arrive.

Storage

Store Chocolate Peanut Clusters in an airtight container in a cool room for up to 5 days.

For longer freshness, refrigerate them for up to 2 weeks.

Let refrigerated clusters sit at room temperature for 5 to 10 minutes before serving if you prefer a softer chocolate texture.

You can also freeze the clusters for up to 2 months. Place parchment between layers and thaw them in the refrigerator before serving.

Nutrition Information

Approximate nutrition per cluster:

Calories: 150
Protein: 4 g
Carbohydrates: 12 g
Fat: 11 g
Saturated Fat: 5 g
Fiber: 2 g
Sugar: 8 g
Sodium: 80 mg

Nutrition values are estimates and will vary depending on the chocolate, peanuts, serving size, and optional ingredients.

Despite some social-media claims, these are not a zero-carbohydrate food. Peanuts and chocolate both contain carbohydrates, and portions still matter.

Frequently Asked Questions

Can I use only dark chocolate?

Yes. Dark chocolate works very well and gives the clusters a richer, less sweet flavor.

Can I use salted peanuts?

Yes. If using salted peanuts, reduce or omit the added sea salt.

Do I need coconut oil?

No. It is optional. It simply makes the melted chocolate a little smoother and easier to coat around the peanuts.

Can I use other nuts?

Yes. Almonds, cashews, pecans, or mixed nuts all work.

Why did my chocolate become grainy?

The chocolate may have been overheated or exposed to water. Melt it slowly and keep all bowls and utensils completely dry.

Can I make Chocolate Peanut Clusters sugar-free?

You can use a sugar-free chocolate product if desired. Check its ingredient and nutrition label because different products vary in carbohydrate content.

Do I need to keep them refrigerated?

Not always. If your room is cool, they can stay in an airtight container at room temperature for several days. Refrigerate them in warm weather.

Final Thoughts

Chocolate Peanut Clusters are an easy homemade treat that combines rich chocolate with crunchy roasted peanuts in every bite.

Because Chocolate Peanut Clusters require no baking and very little preparation, they are perfect for beginners, holidays, quick desserts, edible gifts, and make-ahead treats.

Keep this Chocolate Peanut Clusters recipe handy whenever you want a simple chocolate snack made with just a handful of ingredients.

With crunchy peanuts, smooth chocolate, vanilla, and a touch of sea salt, Chocolate Peanut Clusters deliver a satisfying sweet-and-salty treat without complicated baking.