Apple Samoas Recipe

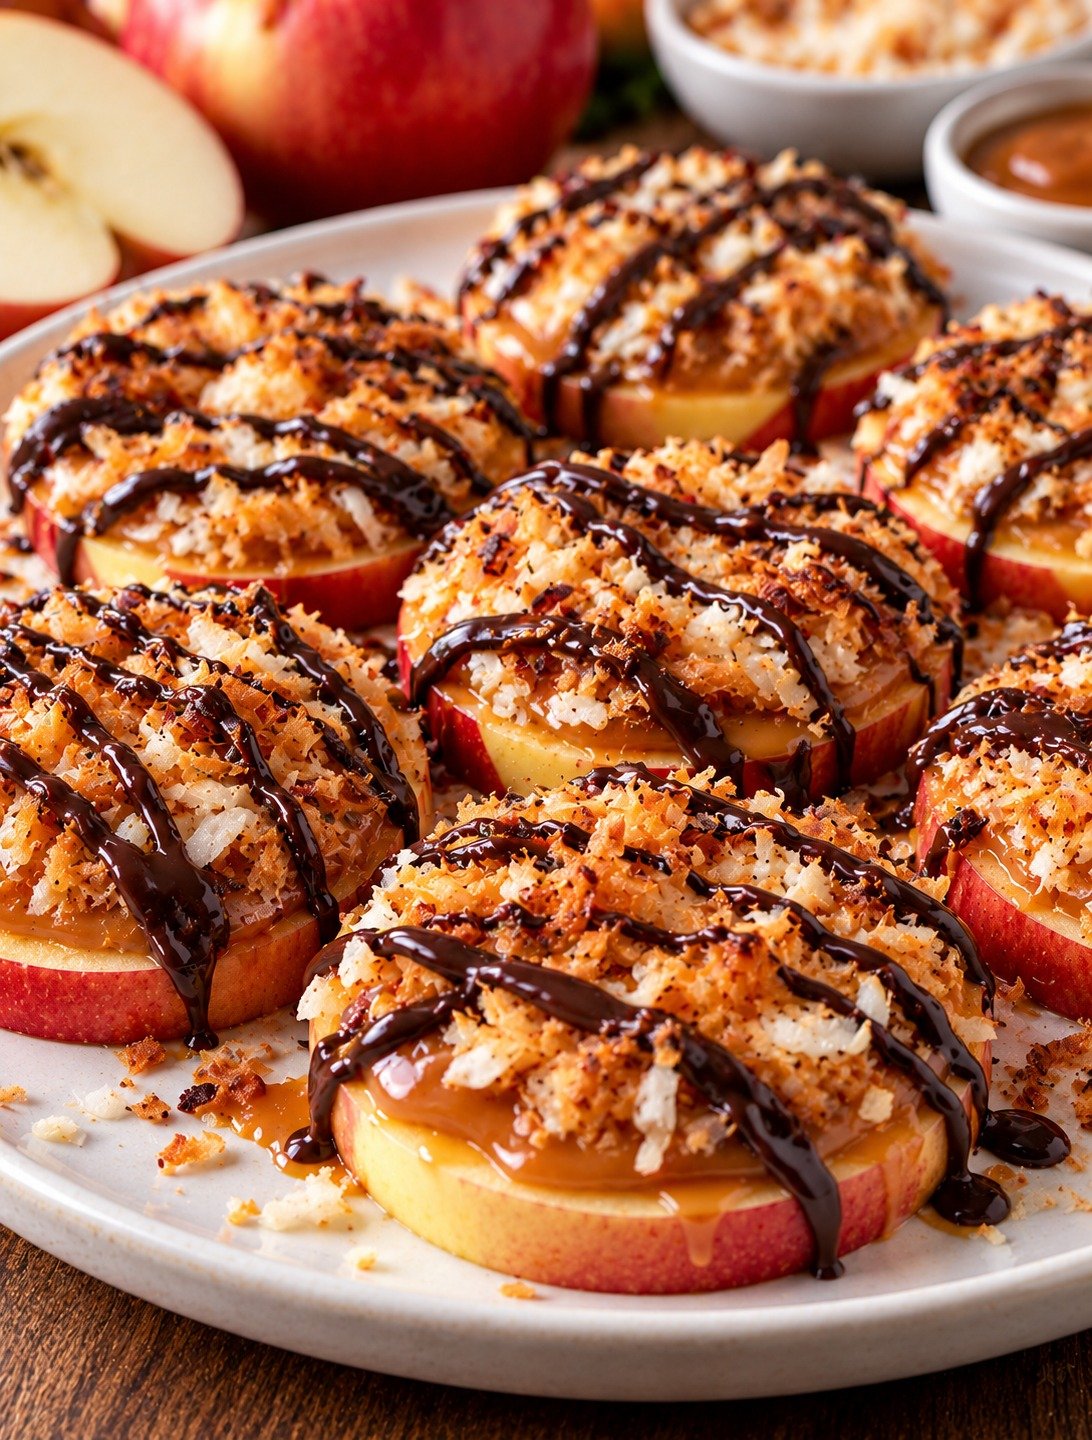
Apple Samoas with crisp apple slices, toasted coconut, caramel, dark chocolate drizzle, and chopped nuts

Apple Samoas Recipe

Apple Samoas are a quick, fun, no-bake treat made with crisp apple slices, chewy toasted coconut, caramel, and melted chocolate. Inspired by the classic coconut-caramel-chocolate flavor combination, these fresh apple rounds are lighter than traditional cookies while still feeling sweet, rich, and satisfying.

These Apple Samoas are perfect for an after-school snack, party tray, easy dessert, or weekend treat. They come together with simple ingredients, require no oven, and can be decorated in minutes. The crisp apples give every bite freshness, while the caramel-coconut topping and chocolate drizzle make them feel indulgent.

Prep Time: 20 minutes
Chill Time: 15 minutes
Total Time: 35 minutes
Servings: 8 to 10 apple rounds

Ingredients

For the Apple Base

  • 2 large crisp apples, such as Honeycrisp, Pink Lady, Gala, or Granny Smith
  • 1 tablespoon fresh lemon juice
  • 1 cup cold water

Ingredients For the Coconut-Caramel Topping

  • 1 cup unsweetened shredded coconut
  • 1/2 cup soft caramel sauce
  • 1 tablespoon almond butter or peanut butter, optional
  • 1/2 teaspoon vanilla extract
  • Pinch of salt

For the Chocolate Layer

  • 1/2 cup dark or semi-sweet chocolate chips
  • 1 teaspoon coconut oil

Optional Garnishes

  • Extra toasted coconut
  • Flaky sea salt
  • Chopped pecans or almonds

Why You’ll Love This Recipe

Apple Samoas combine the crisp bite of fresh fruit with the familiar flavors of toasted coconut, caramel, and chocolate. They are easy to assemble and visually appealing.

Another reason to love Apple Samoas is that they require very little preparation. There is no dough to mix, no baking tray to watch, and no complicated decorating. Make a small batch for a snack or double it for a party.

The recipe is also flexible. Choose tart apples for contrast, sweeter apples for a dessert-like result, dark chocolate for a deeper flavor, or milk chocolate for a softer finish.

How to Make Apple Samoas

Step 1: Toast the Coconut

Place the shredded coconut in a dry skillet over medium-low heat.

Cook for 3 to 5 minutes, stirring frequently, until the coconut becomes lightly golden and fragrant.

Do not walk away because coconut can change from golden to burned very quickly.

Transfer it to a plate and let it cool completely.

Step 2: Prepare the Apple Slices

Wash and dry the apples.

Slice them crosswise into rounds about 1/4 to 1/3 inch thick.

Use a small round cutter, paring knife, or metal piping tip to remove the center core from each slice.

This creates the doughnut-like shape that makes Apple Samoas especially attractive on a serving platter.

Step 3: Prevent Browning

Combine cold water and lemon juice in a shallow bowl.

Dip the apple rounds briefly into the lemon water, then pat them very dry with paper towels.

Removing surface moisture is important because the toppings stick better to dry apple slices.

Step 4: Make the Coconut-Caramel Mixture

In a medium bowl, combine the toasted coconut, caramel sauce, vanilla, salt, and almond butter if using.

Stir until the coconut is evenly coated.

The mixture should be sticky enough to hold together but not runny.

If it feels too loose, add a little more toasted coconut.

Step 5: Add the Topping

Arrange the dried apple rounds on a parchment-lined tray.

Spoon the coconut-caramel mixture over each apple slice.

Use the back of the spoon to gently press and spread the topping around the surface.

Leave the center opening visible if you want the classic ring appearance.

Step 6: Melt the Chocolate

Place chocolate chips and coconut oil in a microwave-safe bowl.

Microwave in 20-second intervals, stirring after each interval, until smooth.

Step 7: Add the Chocolate Base

For a richer version, dip the bottom of each topped apple slice lightly into melted chocolate.

Place it back on the parchment paper with the chocolate side down.

This step is optional, but it gives Apple Samoas an extra chocolate layer similar to the cookie-inspired flavor.

Step 8: Drizzle the Tops

Transfer the remaining melted chocolate to a small zip-top bag and snip off one tiny corner.

Drizzle thin chocolate lines over the coconut-caramel topping.

You can also use a spoon if you prefer a more rustic appearance.

Step 9: Chill Briefly

Refrigerate the tray for 10 to 15 minutes, or until the chocolate is set.

The caramel may remain slightly soft and chewy.

Avoid chilling too long before serving because fresh apples have the best texture when they remain crisp.

Step 10: Serve

Arrange Apple Samoas on a clean platter.

Finish with a pinch of flaky sea salt, extra toasted coconut, or finely chopped nuts if desired.

Serve them chilled or slightly cool for the best balance of crisp apple, chewy topping, and firm chocolate.

Serving Suggestions

Apple Samoas are delicious on their own and work especially well as an easy dessert platter.

Serve them with fresh berries, grapes, or orange slices for a colorful fruit board.

For a party, arrange them beside chocolate-covered strawberries and yogurt dip.

They are also fun as an after-school snack paired with milk, hot cocoa, or a simple smoothie.

For a more indulgent dessert, add a scoop of vanilla yogurt or ice cream on the side.

For a savory breakfast or snack option, try our Broccoli & Cheddar Savory Muffins with tender broccoli, cheddar, herbs, and a soft golden crumb.

Recipe Tips

Choose firm, crisp apples so the slices hold their shape.

Pat the apple rounds completely dry before adding the topping.

Toast the coconut slowly and stir often.

Use a thick caramel sauce rather than a very thin syrup.

Do not overheat the chocolate because it can become thick or grainy.

For neat Apple Samoas, chill them briefly after drizzling so the chocolate sets before serving.

If making them for children, chop the coconut mixture more finely for easier bites.

Prepare the apples close to serving time for maximum crispness.

Easy Variations

Apple Samoas are easy to customize with different flavors.

Use peanut butter instead of almond butter for a richer, nutty topping.

Swap dark chocolate for milk chocolate or white chocolate.

Add chopped pecans, walnuts, or almonds to the coconut mixture for extra crunch.

For a cinnamon version, sprinkle a small amount of cinnamon over the apple slices before adding the topping.

You can also make Apple Samoas with green apples for a sharper tart-sweet contrast.

For a slightly less sweet version, use unsweetened coconut, dark chocolate, and only enough caramel to bind the topping.

Make-Ahead Instructions

Apple Samoas are best eaten the day they are made, but part of the recipe can be prepared ahead.

Toast the coconut up to 3 days in advance and store it in an airtight container.

The coconut-caramel mixture can be made several hours ahead and refrigerated. Let it soften slightly at room temperature before spreading.

Melt the chocolate and slice the apples closer to serving time for the freshest texture and appearance.

Storage

Store leftover Apple Samoas in a single layer in an airtight container in the refrigerator for up to 24 hours.

Place parchment paper between layers if stacking is necessary.

The apple slices will gradually release moisture, so the texture is best within the first several hours.

These treats are not recommended for freezing because thawed apples become soft and watery.

Nutrition Information

Approximate nutrition per apple round:

Calories: 165
Protein: 2 g
Carbohydrates: 24 g
Fat: 8 g
Saturated Fat: 5 g
Fiber: 3 g
Sugar: 18 g
Sodium: 65 mg

Nutrition values are estimates and will vary depending on the apple variety, caramel, chocolate, and toppings used.

Frequently Asked Questions

What apples work best?

Honeycrisp, Pink Lady, Gala, Fuji, and Granny Smith all work well because they are firm and crisp.

Can I use store-bought caramel?

Yes. Choose a thick caramel sauce so it stays on the apple rounds rather than running off.

Can I make these without coconut?

You can, but the coconut is an important part of the Samoa-inspired flavor. Chopped nuts or granola can be used for a different style of treat.

How do I keep the apples from turning brown?

A quick dip in lemon water helps slow browning. Be sure to dry the slices before adding toppings.

Can I use white chocolate?

Yes. White chocolate creates a sweeter variation and looks especially pretty with toasted coconut.

Can I make these ahead for a party?

Yes, but Apple Samoas are best assembled only a few hours before serving so the apples remain crisp.

Can I use caramel candies?

Yes. Melt soft caramel candies with a small splash of milk or cream until smooth, then mix with the toasted coconut.

Final Thoughts

Apple Samoas are an easy way to turn fresh apples into a fun dessert with caramel, toasted coconut, and chocolate.

Because Apple Samoas require no baking and can be customized with different chocolates, nuts, and apple varieties, they are useful for parties, family snacks, and quick desserts.

Keep this Apple Samoas recipe handy whenever you want a simple fruit-based treat that looks special but takes very little time to prepare.

With crisp apples, chewy coconut-caramel topping, and a chocolate drizzle, Apple Samoas deliver plenty of texture and flavor in every bite.

If you want a creamy no-bake treat, you may also like our Chocolate Cherry Cheesecake Yogurt Bowl with cherries, cocoa, Greek yogurt, and dark chocolate.
Broccoli & Cheddar Savory Muffins

Broccoli & Cheddar Savory Muffins

Broccoli Cheddar Muffins are a warm, savory, and family-friendly bake made with tender broccoli, sharp cheddar, eggs, milk, herbs, and a soft muffin-style batter. They are ideal for breakfast, brunch, lunchboxes, snacks, or an easy side dish when you want something more interesting than plain bread.

These Broccoli Cheddar Muffins are simple to prepare, easy to portion, and a practical way to use extra broccoli. The cheesy flavor makes them comforting, while the vegetables add color and texture. They can also be made ahead and reheated, which makes them useful for busy mornings and meal prep.

Prep Time: 20 minutes
Cook Time: 22–25 minutes
Total Time: About 45 minutes
Servings: 12 muffins

Ingredients

For the Broccoli

  • 2 cups broccoli florets, finely chopped
  • 1 teaspoon olive oil
  • 1/4 teaspoon salt

For the Dry Ingredients

  • 2 cups all-purpose flour
  • 2 teaspoons baking powder
  • 1/2 teaspoon baking soda
  • 1/2 teaspoon garlic powder
  • 1/2 teaspoon onion powder
  • 1/2 teaspoon dried oregano
  • 1/2 teaspoon salt
  • 1/4 teaspoon black pepper

Ingredients For the Wet Ingredients

  • 2 large eggs
  • 1 cup milk
  • 1/3 cup plain Greek yogurt
  • 1/4 cup olive oil or melted butter
  • 1 teaspoon Dijon mustard

For the Cheese Mixture

  • 1 1/2 cups shredded sharp cheddar cheese
  • 1/4 cup grated Parmesan cheese
  • 2 tablespoons chopped fresh chives
  • 2 tablespoons chopped parsley

Why You’ll Love This Recipe

Broccoli Cheddar Muffins combine a soft, tender crumb with savory cheese and small bites of broccoli in every portion. They are easy to hold, easy to pack, and work well for both adults and children.

Another reason to love Broccoli Cheddar Muffins is their flexibility. You can serve them warm with eggs at breakfast, add them to a lunchbox, or pair them with soup or salad for dinner. They are also freezer-friendly and can be reheated quickly.

Because the recipe uses everyday ingredients, you do not need special equipment or complicated steps. A mixing bowl, muffin tin, whisk, and spatula are enough.

How to Make Broccoli Cheddar Muffins

Step 1: Preheat the Oven

Preheat the oven to 375°F or 190°C.

Lightly grease a 12-cup muffin tin or line it with paper liners. If using liners, spray them lightly with cooking spray to reduce sticking.

Step 2: Prepare the Broccoli

Bring a small pot of water to a boil and add the broccoli.

Cook for 2 minutes, then drain immediately. Let it cool slightly and pat it dry with paper towels.

Finely chop the broccoli so it distributes evenly through Broccoli Cheddar Muffins and does not create large wet pockets in the batter.

Step 3: Mix the Dry Ingredients

In a large bowl, whisk together flour, baking powder, baking soda, garlic powder, onion powder, oregano, salt, and black pepper.

Whisking the dry ingredients first helps the leavening agents spread evenly throughout the batter.

Step 4: Mix the Wet Ingredients

In a separate bowl, whisk the eggs, milk, Greek yogurt, olive oil, and Dijon mustard until smooth.

The yogurt adds moisture and helps Broccoli Cheddar Muffins stay tender after baking.

Step 5: Combine the Mixtures

Pour the wet ingredients into the dry ingredients.

Stir gently with a spatula until the flour is almost incorporated. A few small streaks of flour are fine at this stage.

Avoid overmixing because too much stirring can make the muffins dense.

Step 6: Add the Cheese and Broccoli

Fold in the chopped broccoli, cheddar, Parmesan, chives, and parsley.

Mix only until everything is evenly distributed.

The batter for Broccoli Cheddar Muffins should be thick but scoopable. If it seems unusually dry, add one or two tablespoons of milk.

Step 7: Fill the Muffin Cups

Divide the batter evenly among the 12 muffin cups.

Fill each cup about three-quarters full.

For a more golden top, sprinkle a little extra cheddar over each portion before baking.

Step 8: Bake Until Golden

Bake for 22 to 25 minutes, or until the tops are lightly golden and a toothpick inserted into the center comes out clean.

The tops of Broccoli Cheddar Muffins should spring back lightly when touched.

Step 9: Cool Briefly

Let the muffins cool in the pan for 5 minutes.

Transfer them to a wire rack and allow them to cool for another 10 minutes before serving.

This short rest helps the crumb set and makes the muffins easier to remove without breaking.

Step 10: Serve Warm

Serve Broccoli Cheddar Muffins warm or at room temperature.

They are especially good with a little butter, cream cheese, Greek yogurt, or a light savory spread.

Serving Suggestions

Broccoli Cheddar Muffins are versatile enough for breakfast, lunch, snacks, or dinner.

Serve them with scrambled eggs, sliced avocado, and fresh fruit for breakfast.

For lunch, pair Broccoli Cheddar Muffins with tomato soup, chicken soup, a leafy green salad, or sliced turkey.

They also make an easy side for roasted chicken, grilled fish, vegetable stew, or a hearty bean soup.

For a snack platter, serve them with cucumber slices, cherry tomatoes, hummus, or a yogurt-based dip.

For a fresh and colorful side, try our Chickpea Mediterranean Salad with crisp vegetables, herbs, chickpeas, and a bright lemon dressing.

Recipe Tips

Use sharp cheddar for the strongest cheese flavor.

Chop the broccoli very finely so it blends evenly into the batter.

Pat the broccoli dry after blanching to prevent excess moisture.

Do not overmix the batter once the flour is added.

Use freshly shredded cheese if possible because it melts more smoothly than some pre-shredded varieties.

For lighter Broccoli Cheddar Muffins, use part-skim milk and reduce the cheddar slightly.

Let the muffins cool for several minutes before serving because the cheese inside will be very hot.

Easy Variations

Broccoli Cheddar Muffins can be changed in many simple ways.

Add finely chopped spinach, grated carrot, or diced red bell pepper.

Swap cheddar for Monterey Jack, mozzarella, pepper jack, or a mixture of cheeses.

For extra protein, stir in finely chopped cooked chicken, turkey, or crumbled turkey sausage.

Add chili flakes, smoked paprika, or chopped jalapeño for a spicy version.

You can also add fresh dill, thyme, or basil for a different herb flavor.

For a whole-grain version, replace up to half of the all-purpose flour with whole-wheat flour.

If you want a fresh make-ahead snack or light dessert, you may also like our Mediterranean No-Bake Blueberry Protein Lemon Bars.

Make-Ahead Instructions

Broccoli Cheddar Muffins are excellent for meal prep.

Bake the muffins as directed, cool completely, and store them in an airtight container.

You can prepare them one or two days before serving and warm them briefly in the oven or microwave.

The broccoli can also be chopped and blanched a day ahead. Keep it refrigerated in a sealed container until you are ready to mix the batter.

Storage and Reheating

Store Broccoli Cheddar Muffins in an airtight container in the refrigerator for up to 4 days.

Reheat individual muffins in the microwave for 20 to 30 seconds.

For a slightly crisp exterior, warm them in a 325°F or 165°C oven for about 8 minutes.

You can also freeze them for up to 2 months. Wrap each muffin individually, place them in a freezer-safe bag, and thaw overnight in the refrigerator.

Nutrition Information

Approximate nutrition per muffin:

Calories: 205
Protein: 9 g
Carbohydrates: 21 g
Fat: 10 g
Saturated Fat: 4 g
Fiber: 2 g
Sugar: 2 g
Sodium: 340 mg

Nutrition values are estimates and may vary depending on the cheese, milk, yogurt, and serving size.

Frequently Asked Questions

Can I use frozen broccoli?

Yes. Thaw it completely, squeeze out excess moisture, and chop it finely before adding it to the batter.

Can I make these gluten-free?

Yes. Use a 1:1 gluten-free baking flour designed for muffins or quick breads.

Can I use another cheese?

Yes. Monterey Jack, mozzarella, pepper jack, or a blend of cheeses can all work.

Why are my muffins dense?

Overmixing the batter is the most common reason. Stir only until the ingredients are combined.

Can I make mini muffins?

Yes. Broccoli Cheddar Muffins can be baked in a mini muffin tin. Reduce the baking time and start checking them around 12 minutes.

Can I freeze them?

Yes. Cool them completely, wrap well, and freeze for up to 2 months.

Can I serve them cold?

Yes, although they are best slightly warm because the cheese becomes softer and more flavorful.

Final Thoughts

Broccoli Cheddar Muffins are an easy way to combine broccoli, cheddar, herbs, and a soft savory batter in a convenient handheld bake.

Because Broccoli Cheddar Muffins can be prepared ahead, frozen, reheated, and served at different meals, they are a useful recipe for busy families, meal prep, and lunchboxes.

Keep these Broccoli Cheddar Muffins on your recipe list whenever you want a cheesy vegetable snack or side dish that is simple, satisfying, and easy to share.

Crispy Parmesan Zucchini Chips

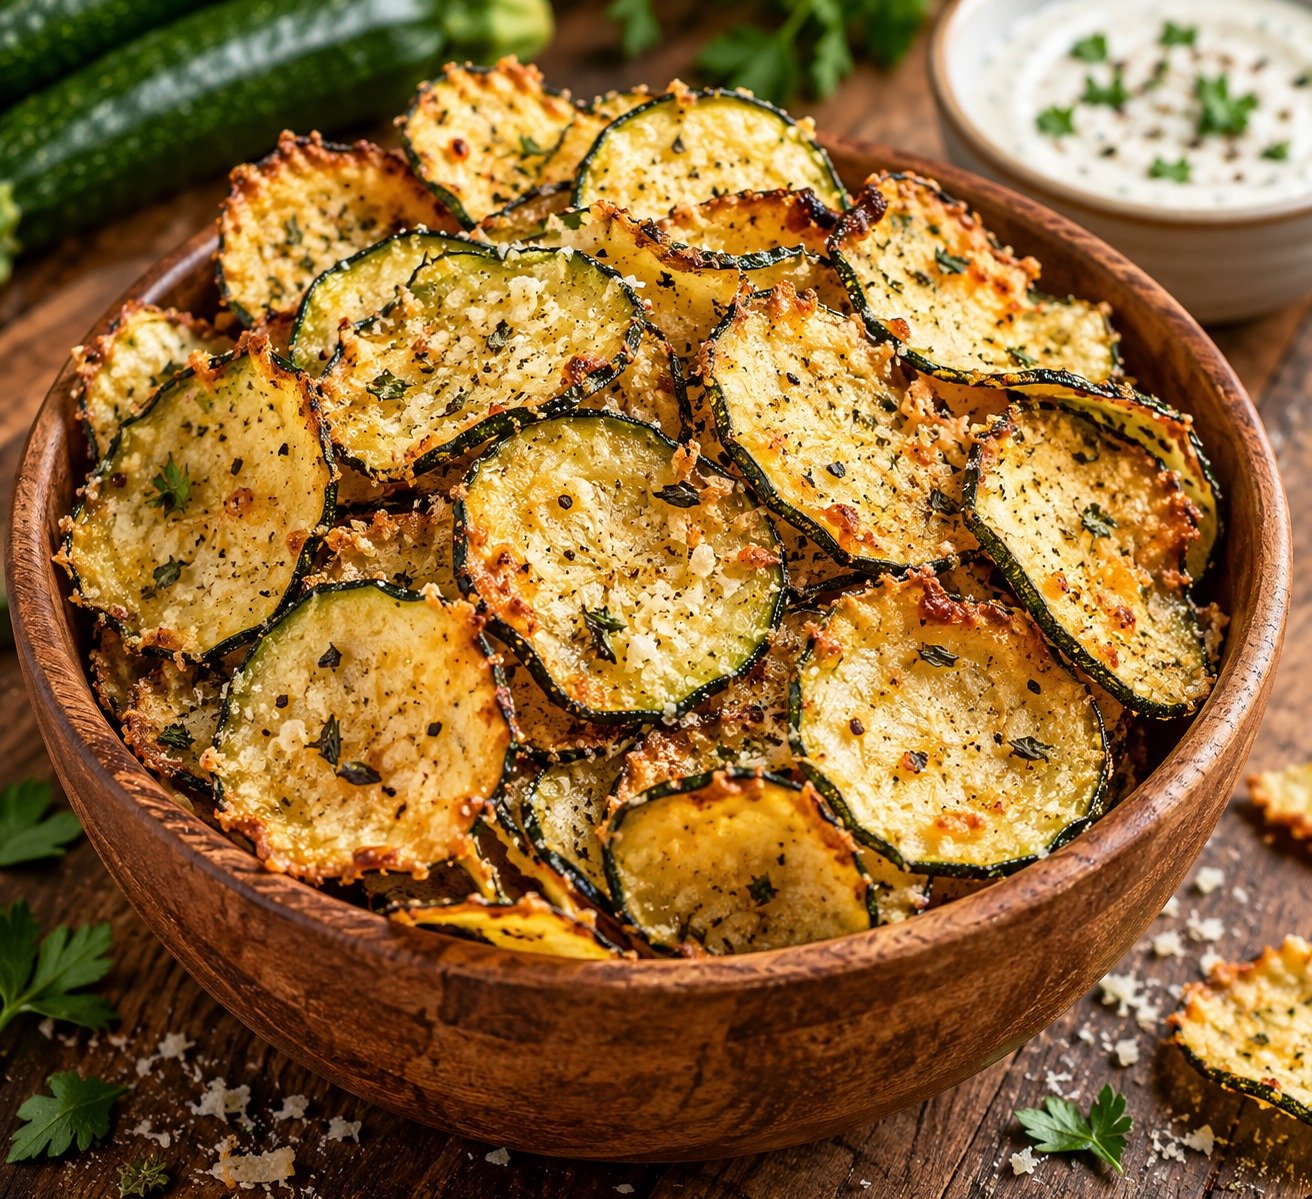
Parmesan Zucchini Chips with fresh zucchini, Parmesan, panko breadcrumbs, garlic, herbs, and crispy golden edges

Crispy Parmesan Zucchini Chips

Parmesan Zucchini Chips are a crispy, savory snack made with fresh zucchini, Parmesan cheese, breadcrumbs, herbs, and simple seasonings. The zucchini slices bake until golden around the edges while the cheesy coating turns crisp and flavorful.

These Parmesan Zucchini Chips work as an appetizer, side dish, or lighter alternative to fried snacks. They use everyday ingredients and pair well with marinara, garlic yogurt sauce, or lemon.

Prep Time: 15 minutes
Cook Time: 22–28 minutes
Total Time: 40 minutes
Servings: 4

Ingredients

For the Zucchini

  • 2 medium zucchini
  • 1/2 teaspoon salt
  • 1 tablespoon extra virgin olive oil

Crispy Coating

  • 3/4 cup finely grated Parmesan cheese
  • 1/2 cup panko breadcrumbs
  • 1 teaspoon garlic powder
  • 1 teaspoon dried oregano
  • 1/2 teaspoon dried basil
  • 1/2 teaspoon smoked paprika
  • 1/4 teaspoon black pepper
  • 1/4 teaspoon red pepper flakes, optional

For the Egg Mixture

  • 1 large egg
  • 1 tablespoon milk
  • 1 teaspoon fresh lemon juice

Serving

  • Marinara sauce
  • Garlic yogurt dip
  • Fresh parsley or basil
  • Lemon wedges
  • Extra grated Parmesan, optional

Why You’ll Love This Recipe

Parmesan Zucchini Chips have the crunch and savory flavor people love in snack foods while still putting fresh zucchini at the center of the recipe. Parmesan creates a salty, nutty crust, while panko adds extra crispness.

Another reason to love Parmesan Zucchini Chips is that they are baked rather than deep-fried, which means less oil and easier cleanup.

They are also easy to customize with different herbs, spices, and dipping sauces.

How to Make Parmesan Zucchini Chips

Step 1: Preheat the Oven

Preheat the oven to 425°F or 220°C.

Line a large baking sheet with parchment paper, or place a wire rack over the sheet and lightly grease the rack.

Step 2: Slice the Zucchini

Wash and dry the zucchini thoroughly.

Slice it into rounds about 1/4 inch thick. Try to keep the slices even so they finish cooking at the same time.

Very thick slices can stay soft in the center, while slices that are too thin may burn before the coating becomes properly golden.

Step 3: Remove Excess Moisture

Arrange the zucchini slices on paper towels or a clean kitchen towel.

Sprinkle lightly with salt and let them rest for 10 minutes. Pat both sides dry.

This step is important because zucchini contains a lot of water. Removing surface moisture helps Parmesan Zucchini Chips become crisp instead of steaming in the oven.

Step 4: Prepare the Coating

In a shallow bowl, combine Parmesan, panko, garlic powder, oregano, basil, smoked paprika, black pepper, and optional red pepper flakes.

Mix well so the herbs and seasonings are evenly distributed.

The Parmesan will melt into the breadcrumb mixture as it bakes, creating a deeply savory crust.

Step 5: Prepare the Egg Mixture

In a second shallow bowl, whisk together the egg, milk, and lemon juice.

The egg mixture helps the coating stick and encourages an even golden finish.

Step 6: Coat the Zucchini

Dip each zucchini slice into the egg mixture, allowing excess liquid to drip off.

Press both sides into the Parmesan mixture until well coated.

Arrange the coated slices on the prepared baking sheet in a single layer, leaving a little space between them.

Crowding the pan traps steam and can prevent Parmesan Zucchini Chips from becoming crisp.

Step 7: Add a Light Oil Finish

Lightly drizzle or brush the coated zucchini with olive oil.

You do not need much. A small amount helps the coating brown and gives the chips a crisp texture without making them greasy.

Step 8: Bake Until Golden

Bake for 12 to 14 minutes, then carefully flip each slice.

Continue baking for another 10 to 14 minutes, or until the coating is golden and the zucchini is tender.

Parmesan Zucchini Chips should have browned edges and a crisp coating while remaining slightly tender in the center.

Step 9: Rest Briefly

Remove the baking sheet from the oven and let the chips rest for 3 to 5 minutes.

The coating firms slightly as it cools, making the chips easier to lift.

Step 10: Garnish and Serve

Transfer Parmesan Zucchini Chips to a serving plate.

Sprinkle with fresh parsley, basil, extra Parmesan, or a little lemon zest.

Serve immediately with your favorite dipping sauce.

Serving Suggestions

Parmesan Zucchini Chips are delicious with warm marinara because the tomato flavor pairs naturally with Parmesan, garlic, and oregano.

For a cooler dip, serve them with garlic yogurt sauce, tzatziki, ranch-style dressing, or lemon-herb Greek yogurt.

You can also serve Parmesan Zucchini Chips alongside grilled chicken, baked fish, burgers, sandwiches, or pasta. They work especially well as a lighter side dish when you want something crisp without serving fries.

For a party platter, pair them with olives, tomatoes, cucumber, and hummus.

For another hearty and comforting meal, try our Homestyle Beef and Tender Cabbage Roll Soup with savory beef, cabbage, rice, tomatoes, and herbs.

Recipe Tips

Choose small or medium zucchini because very large zucchini often contain more water and larger seeds.

Slice the zucchini evenly so all pieces cook at the same speed.

Do not skip the salting and drying step. Removing moisture is one of the best ways to improve crispness.

Use finely grated Parmesan so it mixes evenly with the breadcrumbs.

Panko creates a lighter and crunchier coating than very fine breadcrumbs.

Leave space between the slices on the baking sheet.

For the crispiest Parmesan Zucchini Chips, use a wire rack if you have one.

Serve them soon after baking because zucchini naturally softens as it sits.

Easy Variations

Parmesan Zucchini Chips can be seasoned in many different ways.

For an Italian-style version, add extra oregano, basil, and a pinch of dried thyme.

For a spicy version, add cayenne pepper, extra red pepper flakes, or a little chili powder to the coating.

You can replace some of the Parmesan with finely grated Pecorino Romano for a sharper, saltier flavor.

For a gluten-free version, use gluten-free panko or finely crushed gluten-free crackers.

If you want a low-carb variation, replace the breadcrumbs with almond flour mixed with extra Parmesan.

You can also use the same coating method for yellow squash, although the cooking time may vary slightly.

If you want something sweet after this savory dish, you may also like our Chocolate Walnut Bites.

Make-Ahead Instructions

Parmesan Zucchini Chips are best freshly baked, but some preparation can be done ahead.

Slice the zucchini and prepare the Parmesan coating several hours ahead. Store them separately in the refrigerator.

For the best texture, coat and bake the zucchini shortly before serving. If the coated slices sit too long before baking, the breadcrumbs may absorb moisture from the zucchini and become soft.

Storage and Reheating

Store leftovers in an airtight container in the refrigerator for up to 3 days.

To reheat, bake at 400°F or 200°C for 6 to 8 minutes. An air fryer also helps restore crispness.

Microwaving is not recommended if you want a crunchy texture because steam will soften the coating.

Freezing is possible, but freshly baked or refrigerated chips generally have the best texture.

Nutrition Information

Approximate nutrition per serving:

Calories: 220
Protein: 13 g
Carbohydrates: 17 g
Fat: 12 g
Saturated Fat: 5 g
Fiber: 2 g
Sugar: 4 g
Sodium: 560 mg

Nutrition values are estimates and vary by ingredients and serving size.

Frequently Asked Questions

Why are my zucchini chips soggy?

The most common causes are excess moisture, overcrowding the pan, or removing them from the oven too early. Salting and drying the zucchini first can make a noticeable difference.

Can I make these in an air fryer?

Yes. Arrange the slices in a single layer and air fry at 390°F or 200°C until golden and crisp, flipping once if needed.

Can I use regular breadcrumbs instead of panko?

Yes, but panko usually gives a lighter, crunchier crust.

Can I make them without eggs?

Yes. Brush the zucchini lightly with olive oil or use a thin coating of Greek yogurt to help the crumbs stick.

What dipping sauce works best?

Marinara is a classic choice, but garlic yogurt sauce, tzatziki, pesto yogurt, or ranch-style dip also works well.

Can I prepare them ahead for a party?

You can prepare the ingredients ahead, but bake Parmesan Zucchini Chips shortly before serving for the best crunch.

Can I use yellow squash?

Yes. Yellow squash can be prepared the same way, although softer varieties may cook a little faster.

Final Thoughts

Parmesan Zucchini Chips are a simple way to turn fresh zucchini into a golden, cheesy, and satisfying snack. Parmesan, panko, garlic, herbs, and a touch of olive oil create plenty of flavor without requiring deep frying.

Because Parmesan Zucchini Chips are easy to customize, they work well as an appetizer, snack, or side dish for family meals and casual gatherings.

Keep this Parmesan Zucchini Chips recipe handy whenever you want a crisp vegetable snack that is easy to prepare, full of savory flavor, and delicious with your favorite dipping sauce.

Baked Cucumber Chips with Salt

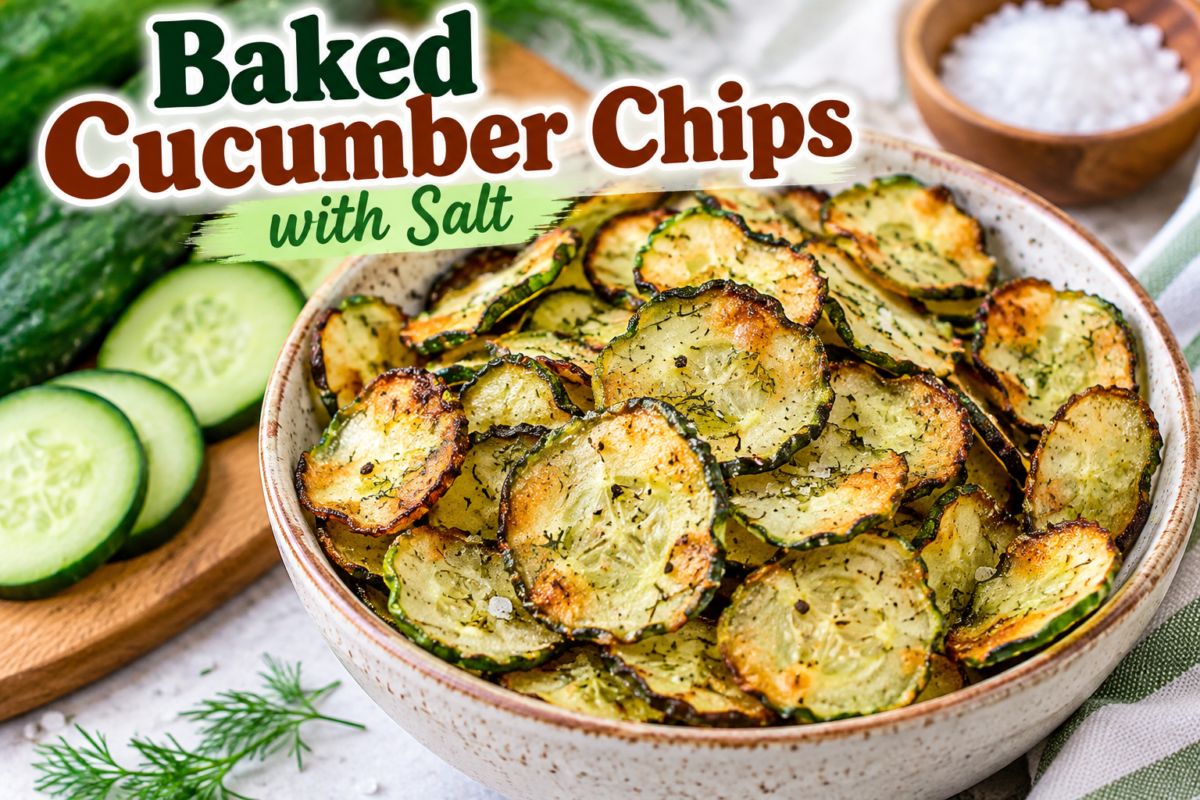
Baked Cucumber Chips with Salt, herbs, and black pepper served in a bowl

Baked Cucumber Chips with Salt

These Baked Cucumber Chips are a simple, light snack made from fresh cucumbers, a little olive oil, and sea salt. Thin cucumber slices are slowly baked until their moisture is reduced and the edges become crisp and lightly golden. The finished snack is crunchy, savory, and refreshing, making it a useful alternative to heavier packaged snacks.

The key to successful Baked Cucumber Chips is removing as much surface moisture as possible before baking. Cucumbers contain a lot of water, so thin, even slices and a low oven temperature help them dry gradually without burning. A light sprinkle of salt draws out additional moisture and gives the finished chips a clean savory flavor.

These Baked Cucumber Chips can be enjoyed on their own, served beside sandwiches, added to a snack board, or paired with a creamy yogurt dip. You can keep the seasoning simple with sea salt, or add garlic powder, dill, black pepper, paprika, or dried herbs for extra flavor.

Prep Time: 15 minutes
Salting and Drying Time: 20 minutes
Bake Time: 2–3 hours
Total Time: About 3 hours 35 minutes
Servings: 4

Ingredients

For the Cucumber Chips

2 large firm cucumbers

1 tablespoon extra virgin olive oil

½ teaspoon fine sea salt, plus more if needed

¼ teaspoon black pepper

¼ teaspoon garlic powder, optional

½ teaspoon dried dill, optional

¼ teaspoon smoked paprika, optional

For Serving

Plain Greek yogurt or tzatziki

Fresh dill

Lemon wedges

Extra black pepper

Step-by-Step Instructions

1. Choose and Prepare the Cucumbers

Choose firm cucumbers with smooth skin and no soft spots. English cucumbers are especially convenient because they have thin skin and relatively small seeds, although regular garden cucumbers also work very well.

Wash the cucumbers thoroughly and dry them completely with a clean kitchen towel. There is no need to peel them unless you prefer a softer texture.

Using a sharp knife or mandoline slicer, cut the cucumbers into very thin slices, ideally around ⅛ inch thick. Try to keep every slice as even as possible. Uneven slices will finish at different times, meaning some may become too brown while thicker pieces remain soft.

For Baked Cucumber Chips, consistent thickness is more important than using a large amount of seasoning. Thin slices allow moisture to escape more easily and give you a better chance of achieving a crisp texture.

2. Remove Excess Moisture

Place the cucumber slices in a large bowl and sprinkle them lightly with the sea salt. Toss gently so the salt is distributed evenly.

Allow the cucumbers to sit for about 15–20 minutes. During this time, the salt will draw water toward the surface.

After resting, arrange the slices on a clean kitchen towel or several layers of paper towels. Place another towel over them and gently press to remove as much moisture as possible.

Do not crush the slices. The goal is simply to absorb the liquid released by the cucumbers.

This drying step is essential for Baked Cucumber Chips because excess water can make the slices steam in the oven instead of becoming crisp.

3. Preheat the Oven

Preheat your oven to 225°F (107°C). A low temperature is important because cucumbers need time to lose their water without becoming too dark.

Line one or two large baking sheets with parchment paper. If you have a wire rack that fits inside the baking sheet, you can place the rack over the sheet to improve airflow around the slices.

Arrange the cucumber slices in a single layer. Do not overlap them because overlapping creates trapped moisture and uneven cooking.

4. Add the Seasoning

Lightly brush or toss the cucumber slices with extra virgin olive oil. Use only a small amount because too much oil can prevent the chips from drying properly.

Sprinkle with black pepper and, if desired, garlic powder, dried dill, or smoked paprika.

For Baked Cucumber Chips, simple seasoning often works best. Salt provides the main savory flavor, while a little dill or garlic can add extra character without overpowering the cucumber.

If you already salted the cucumber heavily during the moisture-removal step, taste one raw slice before adding more salt. It is easier to add a small amount later than to correct an overly salty snack.

5. Arrange the Slices

Spread the cucumber slices across the prepared baking sheets. Leave a small amount of space between the slices whenever possible.

The slices will shrink as they bake, so they do not need a large gap, but they should not overlap.

For Baked Cucumber Chips with the most even texture, place the thinnest slices toward the center of the tray and keep noticeably thicker slices toward the outer edges.

6. Bake Slowly

Place the baking sheets in the preheated oven.

Bake for approximately 60 minutes. Then carefully check the slices and rotate the baking sheets if your oven heats unevenly.

Continue baking for another 45–90 minutes, checking every 20–30 minutes.

The exact baking time depends on the thickness of the cucumber slices, their water content, your oven, and how thoroughly they were dried before baking.

Baked Cucumber Chips are ready when they have visibly shrunk, feel dry around the edges, and become crisp as they cool.

Some slices may finish before others. Remove the crisp pieces from the tray and return softer pieces to the oven.

7. Cool Completely

When the cucumber slices look dry and lightly golden, remove them from the oven.

Allow them to cool completely on the baking sheet or a wire rack.

This step matters because Baked Cucumber Chips often become noticeably crispier as they cool. A slice that feels slightly flexible while hot may become crunchy after several minutes at room temperature.

Do not immediately place warm chips into a sealed container. Trapped steam can soften them.

Tips for Crispy Cucumber Chips

Use Thin Slices

Thin slices are the most important factor when making Baked Cucumber Chips. A mandoline slicer can help create uniform pieces, but always use the safety guard and work carefully.

If you are using a knife, take your time and aim for slices that are similar in thickness.

Dry the Cucumbers Well

Cucumbers naturally contain a large amount of water. Patting the slices dry before baking can significantly improve the final texture.

For extra-dry slices, you can leave the salted cucumbers on towels for several additional minutes before placing them on the tray.

Do Not Use Too Much Oil

Oil can add flavor, but too much can make the chips greasy and slow down moisture loss.

A light coating is enough. You should not see pools of oil on the baking sheet.

Keep the Oven Low

A low oven temperature gives the cucumbers time to dehydrate gradually. If the oven is too hot, the edges may brown before the center has dried.

Baked Cucumber Chips are more about slow drying than fast roasting, so patience produces better results.

Check Frequently Near the End

Once the slices have lost most of their moisture, they can change from lightly browned to overdone relatively quickly.

Check the tray every 15–20 minutes during the final stage and remove finished pieces as needed.

Do Not Expect Every Slice to Be Identical

Cucumbers naturally vary in water content. Some slices may become completely crisp while others remain slightly chewy.

If you prefer a very crunchy texture, continue baking the softer pieces at the same low temperature until they reach your preferred texture.

Seasoning Ideas

Classic Sea Salt

For a simple snack, use only sea salt and a tiny amount of olive oil. The natural cucumber flavor remains the focus.

Garlic and Dill

Add garlic powder and dried dill for a fresh, savory combination. This version pairs especially well with Greek yogurt or tzatziki.

Smoky Paprika

A small amount of smoked paprika gives the chips a deeper flavor and a warm color.

Lemon Herb

After baking and cooling, add a tiny amount of finely grated lemon zest and dried herbs. Avoid adding fresh lemon juice directly to the chips because the liquid can make them soft.

Spicy Version

Add a small pinch of cayenne pepper or crushed red pepper flakes before baking. Use a light amount so the heat does not overpower the delicate cucumber flavor.

Serving Suggestions

These Baked Cucumber Chips make a convenient snack on their own, but they can also be part of a larger meal.

Serve them beside a sandwich or wrap for a crunchy side. They can also be placed on a snack board with hummus, olives, cheese, fresh vegetables, and pita.

For a refreshing dip, serve Baked Cucumber Chips with plain Greek yogurt mixed with lemon juice, garlic, dill, and black pepper.

You can also crumble a few cooled chips over salads for extra crunch. Add them just before serving so they retain their texture.

Another option is to serve them alongside grilled chicken or fish. Their light flavor works particularly well with lemon, garlic, herbs, and Mediterranean-style dishes.

Storage Instructions

Allow the chips to cool completely before storing them.

Place Baked Cucumber Chips in an airtight container lined with a dry paper towel. The paper towel can help absorb small amounts of residual moisture.

Store the container at room temperature in a cool, dry place and enjoy the chips as soon as possible for the best texture.

If the chips soften, you can return them to a low oven for several minutes to help restore some crispness. Allow them to cool completely again before sealing the container.

Avoid storing them while warm because condensation can make them chewy.

Frequently Asked Questions

Can I Use Regular Cucumbers?

Yes. Regular garden cucumbers work well. English cucumbers are simply convenient because they have thinner skin and smaller seeds.

Can I Make These Without Oil?

Yes. Oil is optional. Omitting it can produce a lighter snack, although the texture and browning may be slightly different.

Can I Use More Salt?

You can adjust the salt to taste, but remember that salting also draws moisture from the cucumber. Start with a small amount and add more after baking if necessary.

Why Are My Cucumber Chips Not Crispy?

The most common reasons are slices that are too thick, excess moisture, overlapping slices, or insufficient baking time. Continue drying them at the low temperature until they reach your preferred texture.

Can I Bake Them at a Higher Temperature?

A higher temperature may shorten the cooking time, but it also increases the risk of burning the edges before the moisture has escaped. Low and slow is usually easier for consistent results.

Do Cucumber Chips Taste Like Potato Chips?

Not exactly. Cucumber chips have a lighter, more delicate flavor and can range from crisp to slightly chewy depending on their thickness and moisture content.

Can I Use a Dehydrator?

Yes. A food dehydrator can work very well because it is designed to remove moisture slowly. Follow your dehydrator’s instructions for temperature and timing.

Can Children Eat These?

Yes, provided the seasoning and texture are appropriate for the child. Keep the salt level modest and make sure the pieces are not too hard for younger children.

Can I Make Them Ahead?

Yes. They are convenient to prepare ahead, but their crispness is best soon after cooling. Store them only after they are completely dry and cool.

Nutrition Information

Approximate nutrition per serving will depend on cucumber size and the amount of oil and salt used.

Calories: 55 kcal
Protein: 1g
Carbohydrates: 5g
Fat: 4g
Fiber: 1g
Sugar: 2g
Sodium: 290mg

These numbers are estimates and can vary according to ingredient brands, serving sizes, and optional seasonings.

Benefits and Practical Notes

Cucumbers are naturally low in calories and contain a high amount of water. Baking changes their texture while keeping the ingredient list simple.

Because this snack is easy to season, you can control the amount of salt and oil. Using herbs, garlic, paprika, or lemon zest can add flavor without needing a heavy coating.

Baked Cucumber Chips are also a useful way to use extra cucumbers when you want something different from salads or fresh cucumber snacks.

Keep in mind that cucumber chips shrink considerably because most of the vegetable is water. Start with more cucumber slices than you think you will need if you are serving several people.

Final Thoughts

These Baked Cucumber Chips are a simple homemade snack that turns fresh cucumbers into thin, savory bites with a crisp or lightly chewy texture. The recipe depends on three basic techniques: slice evenly, remove excess moisture, and bake slowly.

Once you understand those steps, you can easily adjust the seasoning. Keep the flavor classic with sea salt, add garlic and dill for a fresh herb version, or use smoked paprika and black pepper for a deeper savory taste.

Baked Cucumber Chips are especially enjoyable with Greek yogurt dip, hummus, or tzatziki. They can also be served alongside sandwiches, wraps, salads, grilled chicken, or fish.

The most important thing is patience. Cucumbers contain a lot of water, so the chips need enough time to dry. If a few slices remain soft, simply return them to the oven and continue baking until they reach the texture you prefer.

For the best results, make Baked Cucumber Chips in a single layer and avoid adding too much oil. Let the finished chips cool completely before deciding whether they need more baking time.

This simple recipe is easy to customize and can become a regular homemade snack whenever you have fresh cucumbers available.