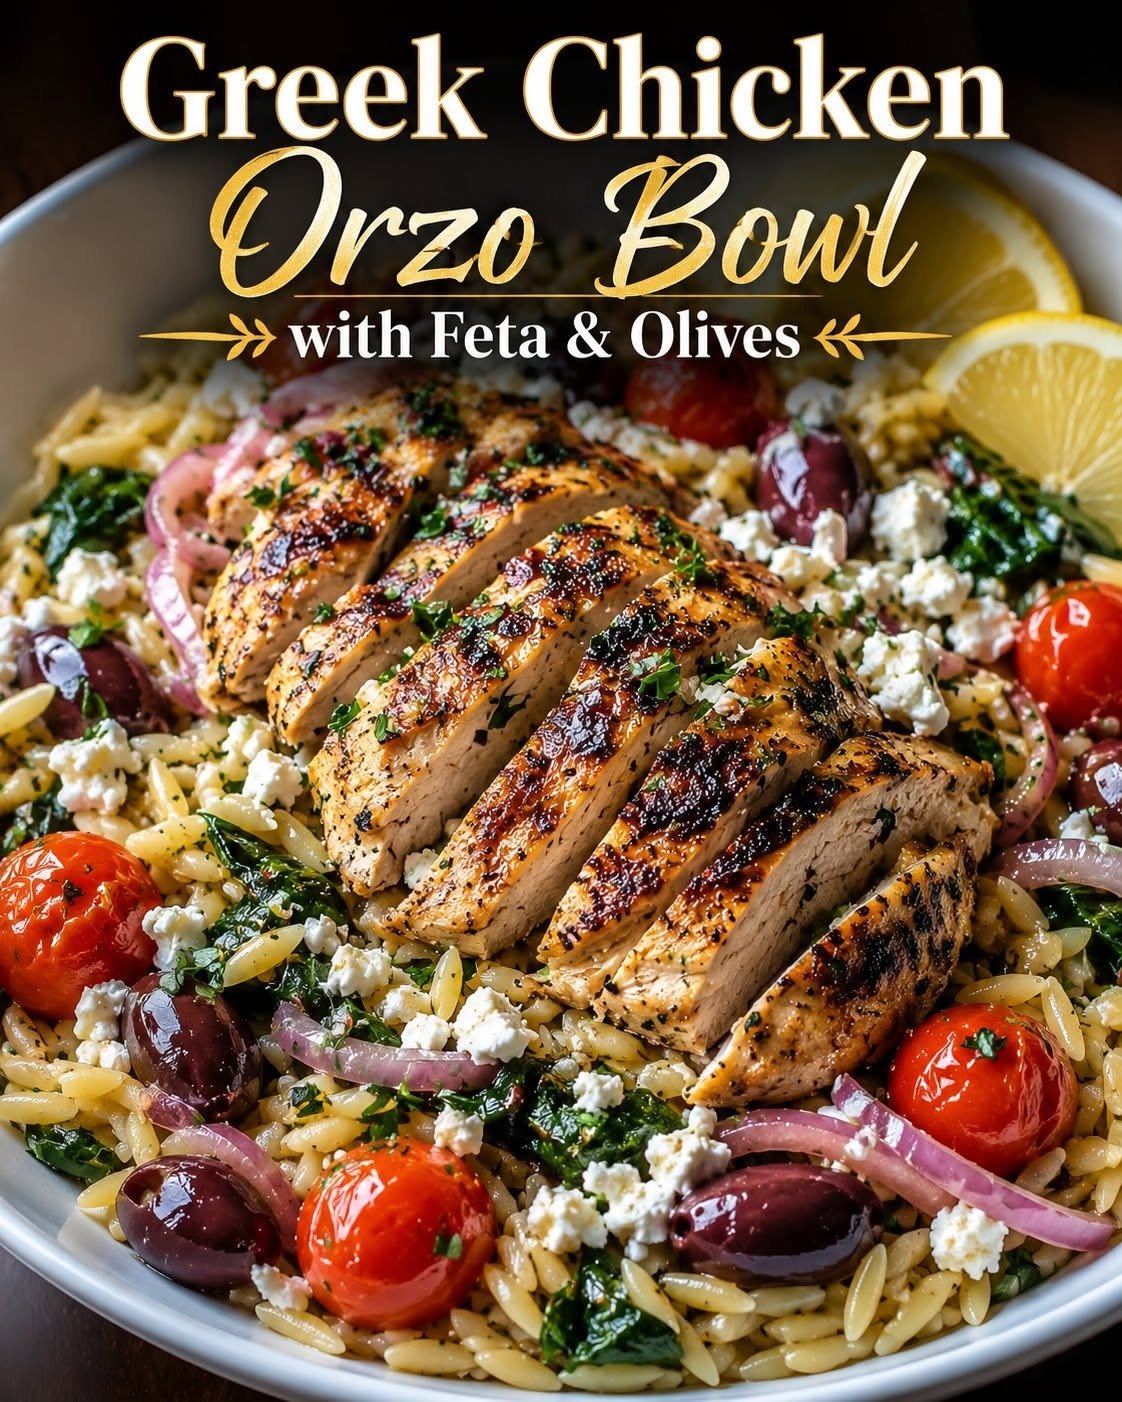
Greek Chicken Orzo Bowl with Feta & Olives

Greek Chicken Orzo Bowl with Feta & Olives

Greek Chicken Orzo Bowl with Feta & Olives

Description

This Greek Chicken Orzo Bowl with Feta & Olives is a fresh, colorful Mediterranean-inspired meal packed with juicy lemon-herb chicken, tender orzo, crisp vegetables, briny Kalamata olives, and creamy feta cheese. Everything comes together with a bright homemade lemon-oregano dressing that gives every bite a delicious balance of savory, tangy, and fresh flavors. The combination of protein-rich chicken, satisfying orzo, vegetables, and olive oil makes these bowls filling enough for dinner while still feeling light and vibrant. They’re perfect for busy weeknights, summer lunches, healthy meal prep, or serving family-style when you want something impressive without complicated cooking.

Ingredients For the Greek Chicken

  • 1½ lbs boneless, skinless chicken breasts or thighs
  • 2 tbsp extra-virgin olive oil
  • 2 tbsp fresh lemon juice
  • 3 garlic cloves, minced
  • 1½ tsp dried oregano
  • 1 tsp smoked paprika
  • ½ tsp ground cumin
  • ¾ tsp salt
  • ½ tsp freshly ground black pepper
  • 1 tsp lemon zest

Orzo

  • 1½ cups dry orzo pasta
  • 4 cups water or low-sodium chicken broth
  • 1 tbsp extra-virgin olive oil
  • 1 tbsp fresh lemon juice
  • 2 tbsp fresh parsley, chopped
  • ¼ tsp salt
  • ¼ tsp black pepper

For the Bowl Toppings

  • 1½ cups cherry tomatoes, halved
  • 1 large cucumber, diced
  • ½ small red onion, thinly sliced
  • ¾ cup Kalamata olives, pitted and halved
  • 1 cup crumbled feta cheese
  • ¼ cup fresh parsley, chopped
  • 2 tbsp fresh dill, chopped, optional
  • Lemon wedges, for serving

Lemon-Oregano Dressing

  • ¼ cup extra-virgin olive oil
  • 3 tbsp fresh lemon juice
  • 1 tbsp red wine vinegar
  • 1 garlic clove, finely minced
  • 1 tsp dried oregano
  • 1 tsp Dijon mustard
  • ½ tsp honey
  • ¼ tsp salt
  • ¼ tsp freshly ground black pepper

Step-by-Step Instructions

Begin by preparing the chicken marinade. In a large bowl, combine olive oil, lemon juice, minced garlic, oregano, smoked paprika, cumin, salt, black pepper, and lemon zest.

Add the chicken and toss thoroughly until every piece is coated in the marinade.

Cover and refrigerate for at least 30 minutes. For deeper flavor, marinate for up to several hours in the refrigerator.

While the chicken marinates, prepare the lemon-oregano dressing.

Add olive oil, lemon juice, red wine vinegar, garlic, oregano, Dijon mustard, honey, salt, and black pepper to a small jar.

Close tightly and shake vigorously until emulsified. Set aside.

Bring water or chicken broth to a boil in a medium saucepan.

Add the orzo and cook according to the package directions until al dente, stirring occasionally.

Drain the orzo thoroughly.

Transfer it to a large bowl and immediately toss with olive oil, lemon juice, parsley, salt, and black pepper.

Set aside and allow it to cool slightly while preparing the chicken.

Heat a large skillet or grill pan over medium-high heat.

Remove the chicken from the marinade, allowing excess marinade to drip away. Discard any marinade that contacted raw chicken.

Place the chicken in the hot skillet.

Cook for approximately 5–7 minutes per side, depending on thickness.

Continue cooking until the thickest part reaches an internal temperature of 165°F (74°C).

Transfer the cooked chicken to a clean cutting board.

Allow it to rest for 5–10 minutes before slicing. This helps keep the chicken juicy.

Meanwhile, prepare the vegetables.

Halve the cherry tomatoes, dice the cucumber, thinly slice the red onion, and halve the Kalamata olives.

For a milder onion flavor, soak the sliced red onion in cold water for approximately 10 minutes, then drain thoroughly.

Divide the warm or room-temperature lemon-herb orzo among four large serving bowls.

Arrange cucumber, cherry tomatoes, red onion, and Kalamata olives around the orzo.

Slice the rested chicken into strips or bite-sized pieces.

Place a generous portion of Greek chicken over each bowl.

Sprinkle crumbled feta generously over the chicken and vegetables.

Add fresh parsley and optional dill.

Drizzle the lemon-oregano dressing over each bowl.

Finish with freshly ground black pepper and an extra squeeze of lemon.

Serve immediately with lemon wedges on the side.

Tips

  • Don’t overcook the chicken. Use an instant-read thermometer and remove it once the center reaches 165°F (74°C).
  • Chicken thighs are an excellent alternative to breasts and tend to remain especially juicy.
  • Cooking orzo in chicken broth instead of water gives it additional savory flavor.
  • Toss warm orzo with lemon juice and olive oil immediately after draining so it absorbs the flavor.
  • Use good-quality Kalamata olives for their rich, briny flavor.
  • Block feta crumbled by hand often has a creamier texture than pre-crumbled feta.
  • Add the dressing shortly before serving if you want the vegetables to remain especially crisp.
  • For additional crunch, add sliced bell peppers or chopped romaine.

Notes

These Greek chicken orzo bowls are excellent for meal prep. Prepare the chicken, orzo, dressing, and vegetables ahead and refrigerate them in separate airtight containers. Assemble the bowls when ready to eat. For the freshest texture, keep the dressing separate and add it immediately before serving. Refrigerate cooked chicken promptly and enjoy leftovers within 3–4 days.
For an even more Mediterranean-style bowl, add hummus, tzatziki, roasted red peppers, chickpeas, artichoke hearts, or pepperoncini. You can also substitute quinoa or brown rice for the orzo if desired.

Q&A

Can I make this bowl ahead of time?
Yes. It is an excellent meal-prep recipe. Store the components separately and assemble when ready to eat.
Can I serve the orzo cold?
Absolutely. This bowl is delicious with warm, room-temperature, or chilled orzo.
Can I use rotisserie chicken?
Yes. For a shortcut, season shredded rotisserie chicken with lemon juice, oregano, olive oil, and black pepper before adding it to the bowls.
Can I make it vegetarian?
Yes. Replace the chicken with chickpeas, grilled tofu, or roasted vegetables.
What can I use instead of Kalamata olives?
Green olives or another Mediterranean-style olive can be substituted, or simply leave them out.
What sauce goes well with this bowl?
The lemon-oregano dressing is excellent, but homemade tzatziki also makes a delicious creamy addition.

Servings

Makes approximately 4 generous servings

Nutrition (Approx. Per Serving)

  • Calories: 620
  • Protein: 45g
  • Carbohydrates: 57g
  • Fat: 25g
  • Saturated Fat: 7g
  • Fiber: 6g
  • Sugar: 7g
  • Sodium: 850mg
  • Cholesterol: 115mg
  • Potassium: 820mg
    Nutritional values are estimates and may vary depending on chicken, feta, olives, orzo, dressing, and portion size.

Tantuni (Turkish Steak Wraps)

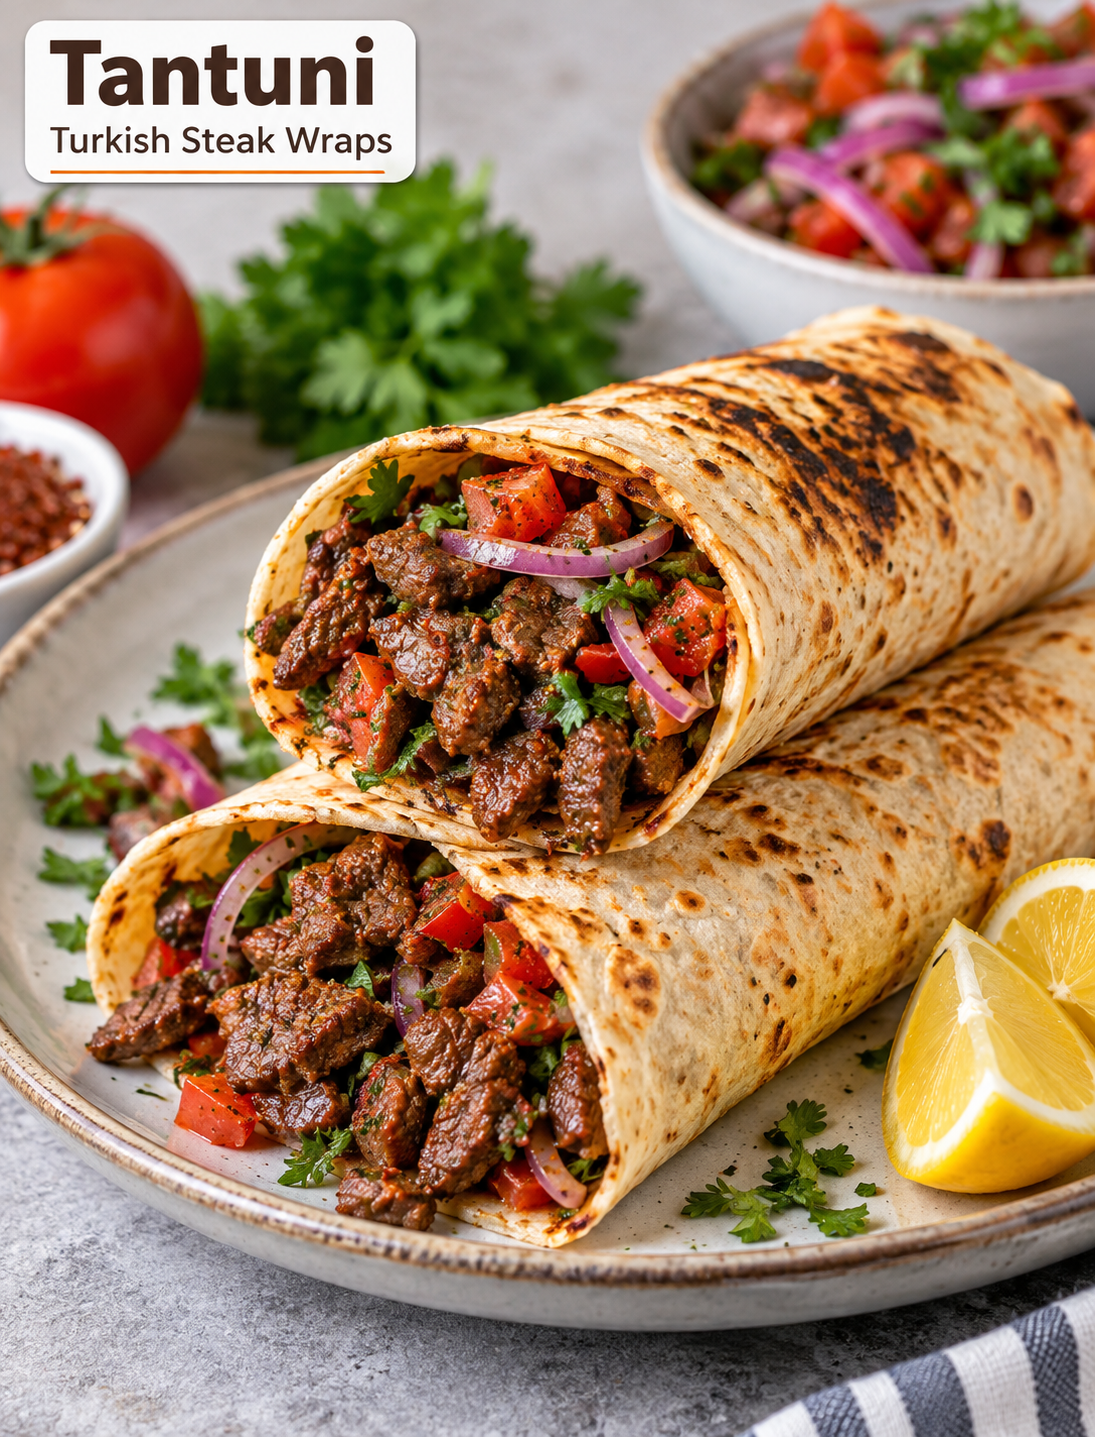
Tantuni Turkish steak wraps with seasoned beef, tomatoes, parsley, sumac onions, and lemon in soft lavash bread

Tantuni (Turkish Steak Wraps)

Tantuni is a flavorful Turkish street-food wrap made with small pieces of seared steak, seasoned oil, tomatoes, parsley, and tangy sumac onions. The meat is cooked quickly in a hot pan, then finished with paprika and hot water to create a rich, savory mixture that soaks into the flatbread.

This Tantuni recipe is easy to make at home and works well for a quick lunch, weeknight dinner, or casual family meal. Traditional tantuni is served in thin lavash bread, but large flour tortillas are a practical option when lavash is hard to find.

The combination of tender beef, fresh vegetables, lemon, and warm spices gives every bite a bright and satisfying flavor.

Why You’ll Love This Tantuni Recipe

  • Quick cooking: Small steak pieces cook in about 8 minutes.
  • Bold flavor: Paprika, sumac, lemon, and Aleppo pepper add depth.
  • Fresh topping: Tomato, parsley, and onion balance the rich beef.
  • Easy ingredients: Most items are available at regular U.S. grocery stores.
  • Flexible bread: Use lavash or large flour tortillas.
  • Great for sharing: Make several wraps for lunch, dinner, or gatherings.

Ingredients for Tantuni

For the Steak Wraps

  • 1½ pounds flank steak
  • ¼ cup extra virgin olive oil
  • 2 teaspoons paprika
  • ¾ cup hot water
  • 1 teaspoon Aleppo pepper, optional
  • 6 sheets homemade lavash or burrito-size flour tortillas
  • Kosher salt, to taste

For the Fresh Topping

  • 1 small red onion, thinly sliced into half moons
  • 2 teaspoons sumac
  • 3 Roma tomatoes, finely chopped
  • 1 bunch flat-leaf parsley, finely chopped
  • 2 lemons
  • Kosher salt, to taste

Step 1: Prepare the Sumac Onions

Place the thinly sliced red onion in a medium bowl. Add the sumac and a small pinch of kosher salt.

Use clean hands to gently massage the seasoning into the onions for about 1 minute. This softens the onion and helps the sumac spread through every slice.

Tip: Thin onion slices work best because they blend easily with the tomato and steak.

Step 2: Make the Fresh Salad

Add the chopped Roma tomatoes and parsley to the seasoned onions.

Add ½ teaspoon of Aleppo pepper if you want a mild, fruity heat. Squeeze the juice from one lemon over the mixture and season with additional salt.

Toss everything gently until the vegetables are evenly coated.

Cut the second lemon into wedges and set them aside for serving.

Tip: Prepare the salad before cooking the steak so the lemon and sumac have time to flavor the vegetables.

Step 3: Cut the Steak

Trim away any large pieces of excess fat from the flank steak.

Cut the beef into very small pieces, roughly the size of a sugar cube. Small pieces are important because traditional tantuni uses finely chopped beef that cooks quickly.

Tip: Place the steak in the freezer for about 15–20 minutes before cutting if you want firmer slices and easier chopping.

Step 4: Sear the Beef

Heat the olive oil in a medium skillet over medium-high heat.

When the oil starts to shimmer but is not smoking, add the chopped steak.

Cook the beef for about 8 minutes, stirring often. The pieces should become browned and release some of their juices before the liquid cooks back into the meat.

Important: Avoid overcrowding the pan because too much meat at once can cause steaming instead of browning.

Step 5: Season and Finish the Steak

Add the paprika, remaining Aleppo pepper if using, and about 1 teaspoon of kosher salt.

Stir well so the spices coat the beef evenly.

Pour in the hot water and reduce the heat to medium.

Let the steak mixture simmer for about 5 minutes. The liquid should reduce slightly while keeping the beef moist and flavorful.

Tip: The seasoned liquid is an important part of the wrap because it adds moisture and flavor to the bread.

Step 6: Warm and Soak the Lavash

Keep the beef in the skillet and reduce the heat to low.

Place one sheet of lavash over the meat.

Gently press the bread down with a spatula or your hands so it absorbs some of the hot, seasoned liquid. Let it warm for at least 30 seconds.

The bread should become soft, flexible, and lightly golden.

Note: If your lavash is too delicate to form the traditional U-shape, do not force it. A regular folded wrap works just as well.

Step 7: Fill the Wrap

Transfer the warm lavash to a serving plate with the moistened side facing upward.

Spoon a small amount of the seasoned liquid over the steak.

Place a thin line of the cooked beef near one edge of the lavash.

Add a line of the tomato, parsley, and onion salad beside the steak. Do not overfill the bread because too much filling makes rolling difficult.

Step 8: Roll the Tantuni

Pull the edge of the lavash toward you and roll it tightly around the beef and salad.

The finished wrap should be long and narrow, similar to a thin burrito.

If your lavash is flexible enough, gently curve the wrap into a U-shape.

Serve immediately with fresh lemon wedges.

Squeeze lemon juice into the open end as you eat so the citrus mixes with the warm steak and seasoned juices.

Step 9: Repeat and Serve

Repeat the filling and rolling process with the remaining lavash and steak.

Serve the tantuni while it is hot and fresh.

For a complete meal, pair the wraps with extra tomato salad, lemon wedges, pickled vegetables, or a simple side salad.

Tips for Making the Best Tantuni

  • Use flank steak: It cooks quickly and has a rich beef flavor.
  • Cut the beef small: Small pieces give the wrap its traditional texture.
  • Keep the pan hot: Proper heat helps the steak brown instead of becoming watery.
  • Do not skip the lemon: Fresh lemon cuts through the richness of the beef.
  • Use sumac: It gives the onion topping a bright, tangy flavor.
  • Do not overfill: A thin filling makes the wrap easier to roll.
  • Warm the bread: Soft lavash holds the filling better and absorbs the seasoned juices.
  • Serve immediately: Tantuni tastes best while the beef and bread are still warm.

What Can You Use Instead of Lavash?

Large flour tortillas are the easiest substitute for lavash in the United States. Choose burrito-size tortillas that are soft and flexible enough to fold without cracking.

The shape may not look exactly like traditional Turkish tantuni, but the combination of seasoned beef, fresh salad, and lemon will still deliver the same style of meal.

How to Store Leftover Tantuni

For the best texture, store the cooked steak and fresh salad separately in airtight containers in the refrigerator.

Reheat the beef in a skillet over medium heat until hot, then warm the lavash separately. Assemble the wrap just before serving.

Avoid storing a fully assembled wrap for too long because the bread can become soggy from the meat juices and tomato salad.

Frequently Asked Questions

What is Tantuni?

Tantuni is a popular Turkish street-food dish made with finely chopped beef, seasoned oil, spices, fresh vegetables, and lemon wrapped in lavash bread.

What cut of beef is best for Tantuni?

Flank steak works very well because it has good beef flavor and can be cut into small pieces for quick cooking.

Can I make Tantuni with flour tortillas?

Yes. Large burrito-size flour tortillas are a convenient substitute for lavash and are widely available in U.S. grocery stores.

Is Tantuni spicy?

Tantuni is usually mildly spiced, but Aleppo pepper can be increased or reduced depending on your preferred level of heat.

What does sumac add to Tantuni?

Sumac gives the onion topping a bright, tangy flavor that balances the richness of the seasoned beef.

Can I prepare Tantuni ahead of time?

You can prepare the steak and vegetable topping ahead, but assemble the wraps just before serving for the best texture.

What should I serve with Tantuni?

Serve Tantuni with lemon wedges, extra fresh salad, pickled vegetables, or a simple green salad for a balanced meal.

How do I keep the wrap from breaking?

Use soft lavash or flour tortillas, avoid overfilling them, and gently warm the bread before rolling.

Air Fryer Crispy Philly Cheesesteak Stuffed Rolls

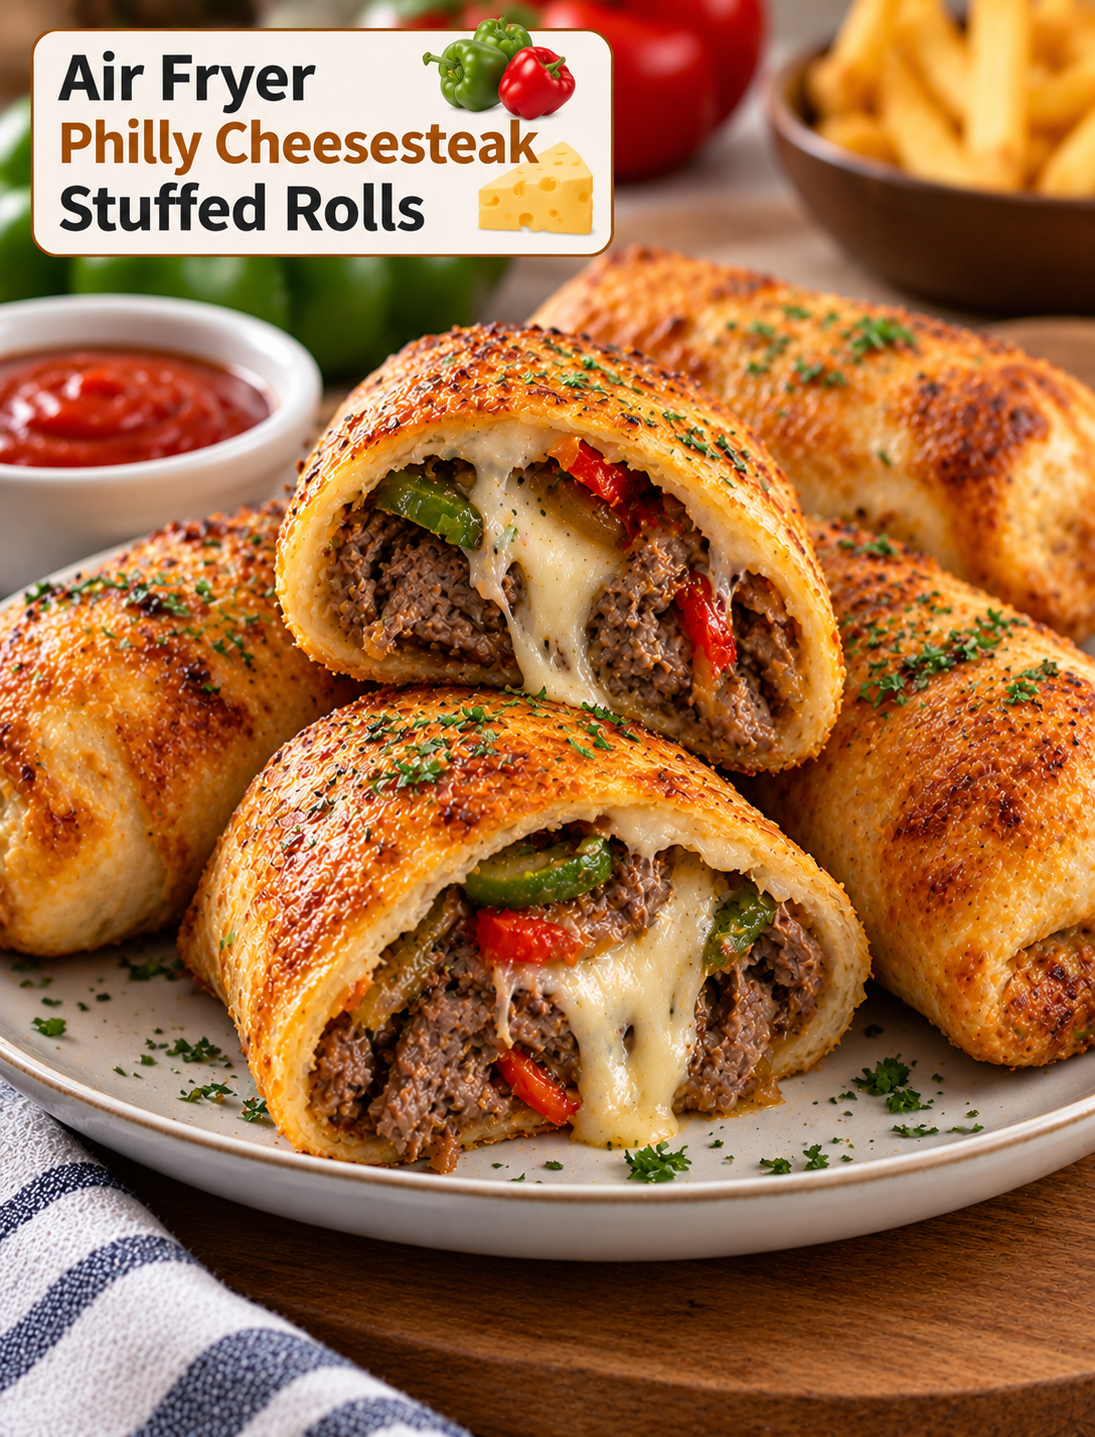
Golden crispy Philly cheesesteak stuffed rolls filled with tender beef, melted cheese, sautéed peppers and onions

Air Fryer Crispy Philly Cheesesteak Stuffed Rolls

Air Fryer Crispy Philly Cheesesteak Stuffed Rolls pack the classic flavors of a Philly cheesesteak into a golden, handheld roll. Thinly sliced beef, sautéed onions, peppers, and melted cheese are wrapped in soft dough and cooked until the outside becomes crisp and golden.

This easy recipe is a great choice when you want a hearty snack, quick lunch, party appetizer, or casual dinner. The air fryer gives the rolls a crunchy finish without deep frying, while the hot filling stays savory and cheesy.

The recipe uses simple ingredients that are easy to find at most U.S. grocery stores. You can use shaved steak, thinly sliced sirloin, or another tender cut of beef. Provolone is a classic cheese choice, but mozzarella or American cheese can also create a smooth, melty filling.

Why You’ll Love These Stuffed Rolls

These stuffed rolls combine several textures in one bite. The outside becomes crisp from the circulating hot air, while the center stays filled with tender beef, melted cheese, and flavorful vegetables.

The individual portions are also easy to serve. You can make smaller rolls for appetizers or larger ones for a filling meal.

Using an air fryer keeps the cooking process simple. There is no need to heat a large amount of oil, and the rolls can be cooked in batches when serving a crowd.

The filling is flexible, too. Add mushrooms for extra savory flavor, use hot peppers for a spicy version, or switch the cheese to match your preference.

Ingredients You’ll Need

Thinly Sliced Beef

Use shaved steak, thinly sliced ribeye, sirloin, or another tender beef cut. Thin slices cook quickly and make the filling easier to bite through.

If your beef is not already thinly sliced, place it in the freezer briefly before slicing. Slightly chilled meat is easier to cut into very thin strips.

Onion

Thinly sliced yellow or white onion adds the sweet, savory flavor associated with a classic cheesesteak. Cook the onion until softened and lightly browned for deeper flavor.

Bell Pepper

Green bell pepper adds freshness, mild sweetness, and color. Red or yellow peppers can be used if you prefer a sweeter taste.

Cheese

Provolone is a traditional choice for cheesesteak-style filling. American cheese creates a very creamy texture, while mozzarella provides plenty of stretch.

Refrigerated Dough

Use refrigerated pizza dough, crescent dough, or another sturdy refrigerated dough that can be rolled around the filling. Follow the package instructions for handling and cooking if needed.

Butter or Olive Oil

A small amount of melted butter or olive oil helps the outside of the rolls brown during air frying.

Seasonings

Salt, black pepper, garlic powder, and Italian seasoning provide a simple savory base. Worcestershire sauce can also be added to the beef for deeper flavor.

How to Make Air Fryer Crispy Philly Cheesesteak Stuffed Rolls

Cook the Beef and Vegetables

Heat a skillet over medium-high heat and add a small amount of oil. Add the thinly sliced beef and cook until it is browned and nearly cooked through.

Break up larger pieces with a spatula so the meat becomes evenly distributed throughout the filling.

Add the sliced onions and bell peppers. Cook until the vegetables soften and the beef is fully cooked.

Season the mixture with salt, black pepper, garlic powder, and a small amount of Worcestershire sauce if desired.

Remove the skillet from the heat and allow the filling to cool slightly. Excessively hot filling can make the dough difficult to handle.

Add the Cheese

Once the beef mixture has cooled slightly, add the cheese. You can place slices directly over the warm beef so they begin to melt, or mix shredded cheese into the filling.

Keep the filling reasonably dry. Excess liquid can make the dough soft and difficult to seal.

Prepare the Rolls

Unroll the refrigerated dough on a lightly floured surface. Divide it into portions based on the size of rolls you want.

Place a small amount of the cheesesteak mixture in the center of each piece. Avoid overfilling because too much filling can cause the dough to split during cooking.

Fold the dough around the filling and pinch the seams firmly closed. Place each roll seam-side down while preparing the remaining pieces.

Brush the outside lightly with melted butter or olive oil. A light coating encourages a golden, crisp surface.

Air Fry the Rolls

Preheat your air fryer according to the manufacturer’s instructions. Arrange the stuffed rolls in the basket with space between them.

Do not stack the rolls because they need direct exposure to circulating hot air. Cook until the dough is golden brown, crisp, and fully cooked.

Cooking time depends on the type and thickness of dough and the size of the rolls. Check the first batch early because air fryer models can vary considerably.

Let the rolls rest for a few minutes before serving. The cheese and beef filling will be very hot immediately after cooking.

Tips for Crispy Stuffed Rolls

Keep the filling relatively dry before adding it to the dough. Moisture is one of the main reasons stuffed dough becomes soft instead of crisp.

Do not overfill the rolls. A moderate amount of beef and cheese leaves enough dough around the filling for a secure seal.

Pinch every seam firmly. An open seam can allow melted cheese and juices to escape during cooking.

Leave space between the rolls in the basket. Good airflow helps the dough brown evenly on all sides.

Brush the outside lightly rather than heavily. Too much butter or oil can make the surface greasy instead of crisp.

If the rolls brown quickly but the dough is not fully cooked, reduce the air fryer temperature slightly and continue cooking until the center is done.

How to Get the Best Cheesesteak Flavor

Thinly sliced beef provides the most authentic cheesesteak-style texture. Avoid large chunks because they can make the rolls difficult to eat.

Cook the onions until they become soft and lightly caramelized. This adds natural sweetness without requiring extra sugar.

Provolone provides a mild, slightly tangy cheese flavor that works especially well with beef and onions.

For a richer filling, add a small amount of Worcestershire sauce while cooking the beef. Use it sparingly because its flavor is concentrated.

Freshly ground black pepper can also enhance the savory beef flavor without overpowering the cheese.

Easy Variations to Try

Mushroom Cheesesteak Rolls

Add thinly sliced mushrooms to the skillet with the onions and peppers. Cook until the mushrooms release their moisture and become lightly browned before adding them to the filling.

Spicy Cheesesteak Rolls

Add sliced jalapeños or banana peppers to the beef mixture. Pepper Jack cheese can replace provolone for an extra spicy and creamy filling.

Pizza Cheesesteak Rolls

Add a small amount of marinara sauce and mozzarella to the beef mixture. Keep the sauce limited so the dough does not become too wet.

Bacon Cheesesteak Rolls

Add finely chopped cooked bacon to the filling for smoky flavor. Use a moderate amount because bacon adds both salt and richness.

Chicken Cheesesteak Rolls

Replace the beef with thinly sliced cooked chicken. Provolone, peppers, and onions work well with the lighter protein.

Best Dips and Sauces

These stuffed rolls are flavorful enough to eat on their own, but a dipping sauce adds another layer of flavor.

Classic marinara works well with the cheesy filling. A creamy horseradish sauce adds tang and mild heat that pairs nicely with beef.

Ranch dressing is an easy option for casual gatherings. Garlic aioli provides a rich, savory dip for those who enjoy creamy sauces.

For a classic sandwich-inspired experience, serve the rolls with a small amount of ketchup, spicy mustard, or your favorite steak sauce.

Keep dipping sauces on the side rather than inside the rolls. Extra moisture inside the dough can prevent a crisp finish.

What to Serve With Cheesesteak Rolls

A fresh green salad provides a light contrast to the rich beef and cheese filling. Use lettuce, tomatoes, cucumbers, and a simple vinaigrette.

For a casual dinner, serve the rolls with air-fried French fries or potato wedges. Coleslaw can also add a cool, crunchy side.

For game day, arrange the rolls on a platter with several dipping sauces. Add pickle spears, vegetable sticks, or chips for an easy party spread.

Smaller rolls can be served as appetizers, while larger portions work well as a complete lunch or dinner.

How to Store and Reheat

Allow leftover rolls to cool before placing them in an airtight container. Refrigerate them promptly and use them within a few days for the best quality.

Reheat the rolls in the air fryer rather than the microwave when possible. The air fryer helps bring back some of the crisp texture of the dough.

Heat until the center is hot and the cheese is melted. Avoid excessive reheating because the beef can become dry.

If you are preparing them ahead, keep the cooked filling refrigerated and assemble the rolls shortly before air frying. This helps protect the dough from excess moisture.

Common Mistakes to Avoid

Do not use wet beef filling because excess juices can make the dough soggy and difficult to seal.

Avoid cutting the beef into thick chunks. Thin slices blend better with the onions, peppers, and cheese.

Do not overfill the dough. Too much filling can cause the seams to open and cheese to leak into the air fryer.

Avoid overcrowding the basket because limited airflow can leave the rolls unevenly browned.

Do not serve the rolls immediately after cooking. Allowing them to rest briefly reduces the chance of burning your mouth on the hot filling.

Frequently Asked Questions

What beef is best for cheesesteak rolls?

Thinly sliced ribeye or shaved steak gives the most tender texture, while thinly sliced sirloin is a leaner alternative.

What cheese should I use?

Provolone is a classic choice, but American, mozzarella, and Pepper Jack also melt well in the filling.

Can I use crescent roll dough?

Yes, crescent dough can be used, but handle it gently and avoid overfilling because it is softer than pizza dough.

How do I stop the filling from leaking?

Cool the filling slightly, avoid overfilling, and firmly pinch the dough seams closed before cooking.

Can I prepare these ahead of time?

Yes, prepare the filling ahead and refrigerate it, then assemble and air fry the rolls shortly before serving.

Can I freeze stuffed cheesesteak rolls?

Yes, cooled cooked rolls can be frozen in an airtight container and reheated in the air fryer until hot.

Can I add mushrooms and peppers?

Yes, mushrooms, green peppers, onions, and banana peppers are easy additions that complement the beef and cheese.

How do I make the rolls extra crispy?

Keep the filling dry, leave space between the rolls, and lightly brush the dough with butter or oil before air frying.

Final Thoughts

Air Fryer Crispy Philly Cheesesteak Stuffed Rolls turn a beloved sandwich combination into a convenient handheld recipe. Tender beef, sautéed onions and peppers, and melted cheese are wrapped in dough and air fried until golden and crisp.

The key to great results is controlling moisture and avoiding overfilling. Use thinly sliced beef, cook the vegetables until their excess moisture is gone, seal each roll carefully, and leave enough room for hot air to circulate.

Serve these rolls with your favorite dipping sauces for a satisfying appetizer, lunch, dinner, or game-day snack. With a few simple ingredient swaps, you can also create spicy, mushroom, bacon, chicken, or pizza-inspired versions.

Air Fryer Crispy Chicken Parmesan Wrap

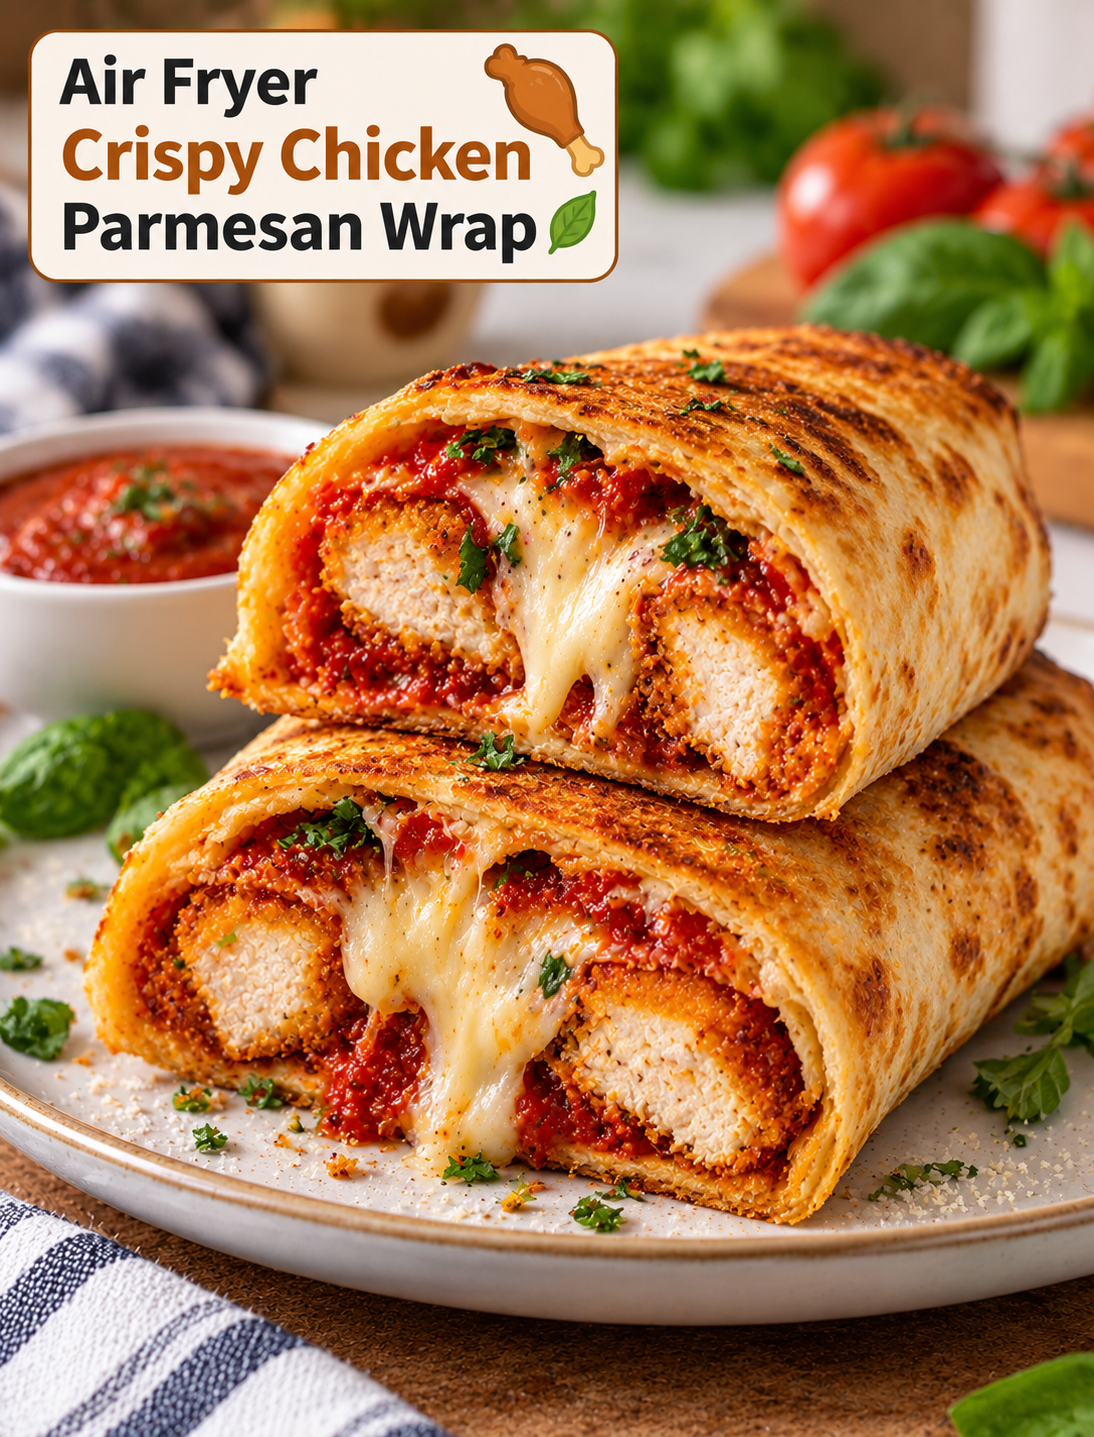
Crispy chicken Parmesan wrap with melted mozzarella, marinara sauce, Parmesan cheese, and fresh basil served on a plate

Air Fryer Crispy Chicken Parmesan Wrap

An Air Fryer Crispy Chicken Parmesan Wrap combines crunchy chicken, melted mozzarella, marinara sauce, and Parmesan cheese inside a warm tortilla. It brings the flavor of classic chicken Parmesan into an easy handheld meal.

The chicken is cooked in the air fryer until golden and crisp, then layered with rich tomato sauce and cheese. The assembled wrap goes back into the air fryer for a short finish, allowing the cheese to melt while the tortilla becomes lightly crisp.

This recipe is a practical choice for busy weeknights, quick lunches, casual dinners, or game-day meals. It uses familiar ingredients and takes less effort than making a traditional chicken Parmesan dinner with pasta.

Why You’ll Love This Chicken Parmesan Wrap

This wrap has several textures in one bite. The crispy chicken provides a crunchy coating, the mozzarella becomes soft and melty, and the tortilla adds a lightly toasted finish.

The recipe also gives you the classic flavors of chicken Parmesan without requiring a deep fryer. Air frying uses circulating hot air to brown the chicken and tortilla while keeping the cooking process simple.

It is easy to customize as well. You can use homemade or store-bought marinara, switch the cheese, add fresh basil, or make the chicken spicy with red pepper flakes.

The handheld format makes serving easy. You can cut each wrap in half and serve it with a small bowl of marinara for dipping.

Ingredients You’ll Need

Chicken

Use boneless, skinless chicken breasts or chicken tenders. Chicken breasts should be sliced or pounded to an even thickness so they cook at the same rate.

Breadcrumbs

Panko breadcrumbs create a crisp coating with plenty of crunch. Regular breadcrumbs can be used for a finer crust.

Parmesan Cheese

Grated Parmesan adds a salty, savory flavor to the chicken coating. Freshly grated Parmesan can provide a stronger flavor and better texture.

Mozzarella

Low-moisture mozzarella melts well without adding too much liquid to the wrap. Shredded mozzarella is convenient, while thin slices create a richer cheese layer.

Marinara Sauce

Use your favorite marinara or tomato pasta sauce. Choose a thick sauce because excess liquid can make the tortilla soggy.

Tortillas

Large flour tortillas are flexible enough to hold the chicken, sauce, and cheese without tearing. Burrito-size tortillas work especially well.

Egg

A beaten egg helps the breadcrumb mixture stick to the chicken and creates a more even crust.

Seasonings

Garlic powder, Italian seasoning, black pepper, and a small amount of salt give the chicken a classic Italian-inspired flavor.

Cooking Spray

A light coating of cooking spray helps the breadcrumb crust brown and crisp in the air fryer.

How to Make Air Fryer Crispy Chicken Parmesan Wrap

Prepare the Chicken

Pat the chicken dry with paper towels. If using chicken breasts, slice them horizontally or gently pound them until they are evenly thick.

Season both sides with garlic powder, Italian seasoning, black pepper, and a small amount of salt.

Dip each piece into beaten egg, allowing excess egg to drip back into the bowl. Press the chicken into the seasoned breadcrumbs and Parmesan until both sides are evenly coated.

Avoid pressing the coating too aggressively because a loose, even layer can become crispier during air frying.

Air Fry the Chicken

Preheat the air fryer according to your model’s instructions. Lightly spray the basket and place the breaded chicken pieces in a single layer.

Leave space between the pieces so hot air can circulate around the chicken. Lightly spray the top of the breading to encourage even browning.

Cook until the coating is crisp and the chicken reaches an internal temperature of 165°F. Cooking time depends on the thickness of the chicken and the air fryer model, so use an instant-read thermometer for accuracy.

Allow the chicken to rest for a few minutes before assembling the wraps.

Assemble the Wraps

Place a large flour tortilla on a clean surface. Spread a thin layer of marinara sauce over the center, leaving room around the edges for folding.

Add the crispy chicken, followed by shredded mozzarella and a sprinkle of Parmesan cheese.

For extra flavor, add a small amount of fresh basil or Italian seasoning. Do not add too much sauce because excess moisture can soften the tortilla.

Fold the sides toward the center, then roll the tortilla tightly from the bottom to create a secure wrap.

Crisp the Finished Wrap

Place the assembled wraps seam-side down in the air fryer basket. Cook until the tortilla becomes lightly golden and the cheese inside is melted.

Turn the wrap carefully if your air fryer browns more strongly on one side. Remove it when the outside is crisp and the filling is hot.

Let the wrap rest briefly before cutting. This helps the melted cheese settle and makes the wrap easier to handle.

Tips for the Crispiest Chicken

Use panko breadcrumbs when you want a lighter and crunchier coating. Their larger flakes create more surface texture than fine breadcrumbs.

Keep the chicken pieces similar in thickness. Even pieces cook more consistently and are less likely to become dry.

Do not overcrowd the air fryer basket. Crowded chicken traps moisture and can prevent the breading from becoming crisp.

A light coating of cooking spray helps the breadcrumbs brown without requiring a large amount of oil.

For the best texture, assemble the wrap shortly after the chicken finishes cooking. A long wait can allow steam to soften the crust.

How to Keep the Wrap From Getting Soggy

The amount and placement of sauce make a big difference. Use a moderate amount of thick marinara rather than soaking the tortilla.

Keep the sauce away from the outer edges of the tortilla. This gives you a clean surface for folding and helps prevent leaks.

Make sure the chicken is crisp before assembling the wrap. A soft coating can become even softer when combined with warm sauce and cheese.

A short final air-fryer step is also important. It helps remove surface moisture and gives the tortilla a toasted finish.

Easy Variations to Try

Spicy Chicken Parmesan Wrap

Add crushed red pepper flakes to the breadcrumb mixture or drizzle hot sauce over the chicken before wrapping. Pepper jack can also replace some of the mozzarella for extra heat.

Garlic Parmesan Wrap

Add extra garlic powder and Parmesan to the breading. Finish the cooked wrap with a small sprinkle of Parmesan and fresh parsley.

Pesto Chicken Parmesan Wrap

Spread a thin layer of basil pesto inside the tortilla along with the marinara. Use a small amount because pesto has a strong flavor.

Chicken Parmesan Caesar Wrap

Replace some of the marinara with Caesar dressing and add chopped romaine lettuce after the chicken has cooled slightly. This version should be served soon after assembly.

Extra-Cheesy Version

Use mozzarella and a little provolone for a richer cheese layer. Keep the filling balanced so the wrap remains easy to roll.

What to Serve With Chicken Parmesan Wraps

A simple side salad adds freshness to the rich chicken and cheese. Use mixed greens, tomatoes, cucumbers, and a light Italian dressing.

For a heartier meal, serve the wrap with air-fried potato wedges or roasted vegetables. Garlic bread also pairs well with the marinara flavor.

For dipping, warm extra marinara sauce in a small bowl. Ranch dressing can also work if you enjoy creamy dipping sauces with crispy chicken.

For lunch, serve the wrap with fresh fruit or a simple vegetable salad to keep the meal lighter.

How to Store and Reheat

Store leftover wraps in an airtight container and refrigerate them promptly. Keep the wraps separate from dipping sauce to protect the tortilla texture.

For the best reheating results, use the air fryer rather than the microwave. Air frying helps restore crispness to the tortilla and chicken coating.

Reheat until the center is hot and the cheese is melted. Avoid excessive reheating because the chicken can become dry.

If you plan to prepare the recipe ahead, keep the crispy chicken and tortillas separate from the sauce until you are ready to assemble and cook the wraps.

Common Mistakes to Avoid

Using chicken pieces with different thicknesses can lead to uneven cooking. Pound or slice the chicken so the pieces are similar in size.

Adding too much marinara can make the wrap difficult to roll and cause the tortilla to become soggy.

Overfilling the tortilla can cause the wrap to split during cooking. Keep the filling centered and leave enough space around the edges.

Skipping the final air-fryer step can leave the tortilla soft instead of lightly crisp.

Do not judge chicken doneness by color alone. Always check the thickest part with a food thermometer and make sure it reaches 165°F.

Frequently Asked Questions

Can I use chicken tenders?

Yes, chicken tenders are convenient because they are already small and cook evenly when arranged in a single layer.

Can I use frozen breaded chicken?

Yes, frozen breaded chicken can work, but cook it fully according to its package directions before assembling the wrap.

What cheese is best for chicken Parmesan wraps?

Low-moisture mozzarella melts smoothly, while Parmesan adds a savory flavor and crisp texture.

Can I make these wraps ahead of time?

Prepare the crispy chicken ahead, but assemble the wraps close to serving time to prevent the tortillas from becoming soggy.

How do I keep the tortilla crispy?

Use a moderate amount of thick marinara and air fry the assembled wrap briefly until the outside is lightly golden.

Can I use whole-wheat tortillas?

Yes, whole-wheat tortillas work well, although they may have a slightly firmer texture than regular flour tortillas.

Can I freeze chicken Parmesan wraps?

Freezing is possible, but the tortilla and breading may lose some crispness after thawing; reheating in an air fryer helps restore texture.

What sauce goes well with this wrap?

Marinara is the classic choice, but spicy tomato sauce, garlic sauce, or a small amount of pesto can also work well.

Final Thoughts

Air Fryer Crispy Chicken Parmesan Wraps make a classic comfort-food combination easier to enjoy on a busy day. Crispy seasoned chicken, tomato sauce, Parmesan, and melted mozzarella come together inside a toasted flour tortilla.

For the best results, focus on evenly cooked chicken, a crisp breadcrumb coating, moderate sauce, and a short final air-fryer step. Serve the wraps warm with extra marinara, a fresh salad, or your favorite side for a simple meal that delivers classic chicken Parmesan flavor in every bite.

Slow Cooker Ground Beef and Corn Casserole

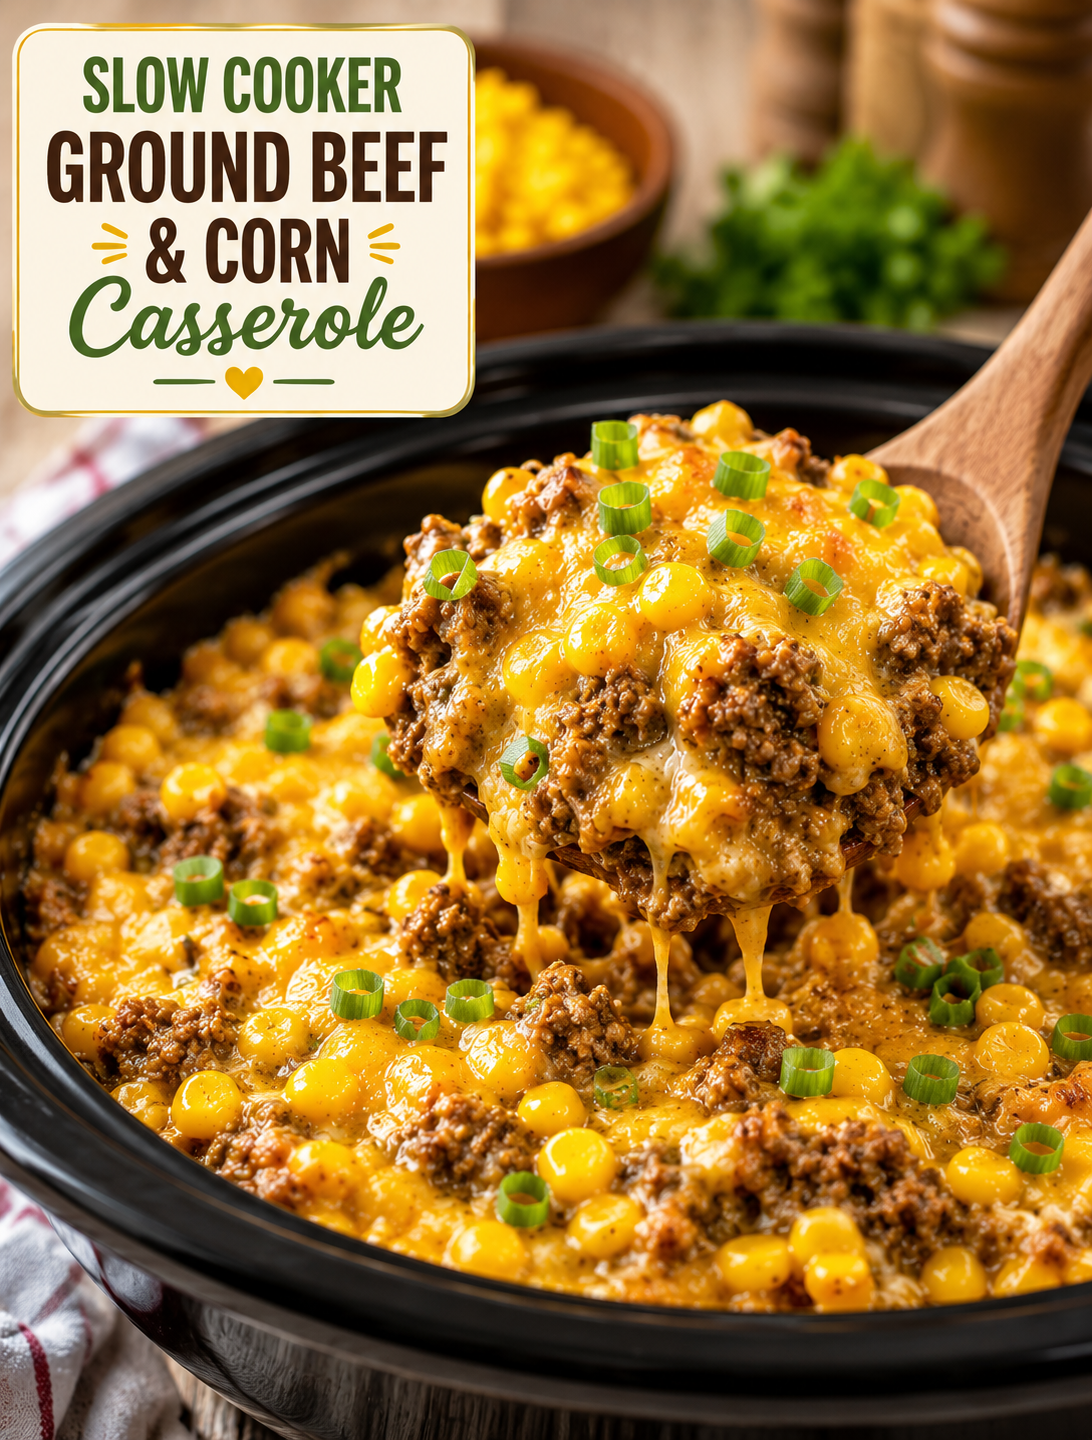
Slow Cooker Ground Beef and Corn Casserole – Easy Cheesy Dinner

Slow Cooker Ground Beef and Corn Casserole

Description

This Slow Cooker Ground Beef and Corn Casserole is an easy comfort-food dinner made with lean ground beef, sweet corn, creamy soup, sour cream, and cheddar cheese. The ingredients come together in the slow cooker for a warm, filling meal with very little hands-on work.

The beef is browned first to build a rich savory base, then mixed with corn and a creamy sauce before slow cooking. Melted cheddar adds a cheesy finish, while optional green onions, parsley, or crushed tortilla chips give the casserole extra flavor and texture.

This family-friendly casserole is a practical choice for busy weeknights, casual gatherings, potlucks, and make-ahead meals. It makes 6–8 servings, so leftovers can be packed for lunch or reheated for another dinner.

Ingredients

Main Ingredients

  • 1½ lbs (680g) lean ground beef: Choose lean beef to limit excess grease while keeping the casserole flavorful.
  • 1 medium onion, diced: Onion adds savory flavor and a slightly sweet taste as it cooks.
  • 2 cloves garlic, minced: Fresh garlic gives the beef mixture a deeper flavor.
  • 2 cans (15 oz each) whole kernel corn, drained: Corn adds sweetness, texture, and color to the casserole.
  • 1 can (10.5 oz) cream of mushroom soup: The soup creates the creamy base and helps bind the ingredients.
  • 1 cup sour cream: Sour cream adds richness and a mild tangy flavor.
  • 1½ cups shredded cheddar cheese: Cheddar melts into the casserole and creates a cheesy topping.
  • 1 teaspoon salt: Salt brings out the flavor of the beef, corn, and creamy sauce.
  • ½ teaspoon black pepper: Black pepper adds mild seasoning without overpowering the other ingredients.
  • 1 teaspoon paprika: Paprika provides gentle warmth and a subtle smoky note.

Optional Toppings

  • Chopped green onions: Add them after cooking for a fresh, mild onion flavor.
  • Fresh parsley: Parsley gives the finished casserole a fresh look and light herbal taste.
  • Crushed tortilla chips: Sprinkle them on individual servings for a crunchy contrast.

Instructions

Step 1: Brown the Beef

Heat a large skillet over medium heat and add the ground beef. Cook until no longer pink, breaking it into small pieces as it browns.

Add the diced onion and minced garlic. Cook for another 2–3 minutes, until the onion begins to soften and the garlic becomes fragrant.

Drain excess grease from the skillet if needed. Removing extra fat keeps the casserole from becoming overly oily during slow cooking.

Step 2: Mix the Casserole

Place the cooked beef mixture in a large mixing bowl. Add the drained corn, cream of mushroom soup, sour cream, 1 cup of shredded cheddar cheese, salt, black pepper, and paprika.

Stir until the beef, corn, seasoning, and creamy ingredients are evenly combined. Mixing everything before transferring it to the slow cooker helps distribute the flavors throughout the casserole.

Step 3: Transfer to Slow Cooker

Lightly grease the inside of your slow cooker to make serving and cleanup easier.

Pour the beef and corn mixture into the slow cooker. Spread it into an even layer so it cooks consistently from edge to center.

Step 4: Add Cheese

Sprinkle the remaining ½ cup of shredded cheddar cheese evenly over the top.

The cheese will melt during cooking and create a rich, creamy layer over the casserole.

Step 5: Cook

Cover the slow cooker with its lid and cook according to your preferred setting.

  • LOW: Cook for 4–5 hours.
  • HIGH: Cook for 2–3 hours.

Avoid repeatedly removing the lid because heat escapes each time, which can extend the cooking time.

The casserole is ready when it is hot throughout and the cheese has melted completely.

Step 6: Serve

Turn off the slow cooker and allow the casserole to rest for about 10 minutes before serving. This short resting period allows the creamy mixture to settle and makes portions easier to scoop.

Top each serving with chopped green onions, fresh parsley, or crushed tortilla chips if desired.

Serve the casserole warm with a simple green salad, steamed vegetables, garlic bread, or dinner rolls.

Servings

This recipe makes approximately 6–8 servings, depending on portion size.

It works well for family dinners because the slow cooker keeps the casserole warm while everyone gets ready to eat. For a larger gathering, serve it alongside simple vegetable dishes or a fresh salad.

Nutritional Information

The following nutrition estimates are based on the listed ingredients and may vary depending on the brands and products used.

Nutrient Approximate Amount
Calories 390
Protein 24g
Carbohydrates 18g
Fat 25g
Saturated Fat 11g
Fiber 3g
Sugar 4g
Sodium 620mg

For more accurate nutrition information, calculate the recipe using the exact ingredient brands and quantities you use.

Health Benefits

High in Protein

Ground beef provides protein that helps support normal muscle function and contributes to a satisfying meal. Using lean ground beef also helps reduce the amount of excess fat.

Source of Fiber

Corn contributes dietary fiber along with carbohydrates and other nutrients. Keeping the corn in the recipe also adds texture and natural sweetness.

Complete Comfort Meal

This casserole combines beef, vegetables, dairy, and seasonings in one dish. Pairing it with a green salad or steamed vegetables can add more variety to the meal.

Easy Slow Cooker Recipe

Most of the preparation involves browning the beef and combining the ingredients. Once the mixture is in the slow cooker, it requires little hands-on attention.

Great for Leftovers

The recipe makes several servings and reheats well when stored properly. Leftovers can provide a convenient lunch or dinner during the following days.

Recipe Notes

Use lean ground beef when possible because it produces less grease and keeps the creamy sauce from becoming too heavy.

Cream of chicken soup can replace cream of mushroom soup if you prefer a different flavor. The consistency should remain similar when making this substitution.

Fresh or frozen corn can replace canned corn. If using frozen corn, thaw it first and drain any excess liquid.

The casserole becomes slightly thicker as it cools. Letting it rest for about 10 minutes before serving helps it reach a better serving consistency.

For a different flavor profile, try pepper jack instead of cheddar. You can also add diced bell peppers, jalapeños, or cooked rice.

Helpful Tips

Brown the ground beef before adding it to the slow cooker. This step improves the flavor and lets you remove excess grease before the creamy ingredients are added.

Drain canned corn well so extra liquid does not thin the casserole.

Shred cheddar cheese yourself when possible for smooth melting. Pre-shredded cheese can contain ingredients that affect its melting texture.

Add cooked rice or pasta if you want to turn the casserole into an even heartier meal. Make sure the rice or pasta is already cooked before mixing it in.

For extra vegetables, stir in diced bell peppers before slow cooking. Green, red, or yellow peppers all work well.

If you enjoy spicy food, add diced jalapeños, chili powder, or your favorite hot sauce.

For a crunchy finish, add crushed tortilla chips or crispy fried onions immediately before serving. Adding them at the end helps maintain their texture.

If preparing the casserole ahead, keep the assembled mixture refrigerated until you are ready to cook it. Do not leave perishable ingredients at room temperature for extended periods.

Frequently Asked Questions

Can I make this casserole ahead of time?

Yes. Assemble the ingredients ahead, refrigerate them, and transfer the mixture to the slow cooker when you are ready to cook.

Can I freeze leftovers?

Yes. Cool the casserole completely, place it in airtight freezer-safe containers, and freeze for up to 3 months.

What can I serve with this casserole?

A green salad, steamed vegetables, garlic bread, or dinner rolls pair well with this creamy beef and corn dish.

Can I use ground turkey instead of ground beef?

Yes. Ground turkey can replace ground beef for a lighter variation while keeping the same basic cooking method.

How long do leftovers last?

Refrigerate leftovers in an airtight container and use them within 4 days for the best quality and food safety.

Can I make this casserole spicy?

Yes. Add diced jalapeños, chili powder, hot sauce, or pepper jack cheese to increase the heat.

Can I use frozen corn?

Yes. Thaw frozen corn first and drain excess water before adding it to the mixture.

Can I add rice to the casserole?

Yes. Add cooked rice for a heartier dish, and mix it with the beef and corn mixture before slow cooking.

Recipe Information

Recipe Name: Slow Cooker Ground Beef and Corn Casserole
Prep Time: 15 minutes
Cook Time: 4–5 hours on LOW or 2–3 hours on HIGH
Total Time: About 5 hours 15 minutes
Difficulty: Easy
Course: Main Course, Dinner
Cuisine: American Comfort Food
Diet: High-Protein
Yield: 6–8 servings
Calories: Approximately 390 per serving