Cottage Cheese Zucchini Fritters

Zucchini Fritters with cottage cheese, Parmesan, eggs, garlic, herbs, and crisp golden edges

Cottage Cheese Zucchini Fritters

Zucchini Fritters are crisp on the outside, tender in the center, and packed with fresh zucchini, creamy cottage cheese, eggs, herbs, and Parmesan. They make an easy breakfast, light lunch, savory snack, or simple side dish. Zucchini Fritters are especially useful when you have extra zucchini and want a quick recipe that feels fresh, filling, and family-friendly.

The cottage cheese adds moisture and protein, while Parmesan gives the fritters a savory edge. A little flour and egg help bind everything together so the patties hold their shape and cook up golden in the skillet.

Prep Time: 20 minutes
Cook Time: 20 minutes
Total Time: About 40 minutes
Servings: 10 to 12 fritters

Ingredients

For the Fritters

  • 2 medium zucchini, grated
  • 1 cup cottage cheese
  • 2 large eggs
  • 1/2 cup all-purpose flour
  • 1/2 cup grated Parmesan cheese
  • 2 green onions, finely sliced
  • 2 tablespoons chopped fresh parsley
  • 1 tablespoon chopped fresh dill
  • 2 garlic cloves, minced
  • 1/2 teaspoon baking powder
  • 1/2 teaspoon salt, divided
  • 1/4 teaspoon black pepper
  • 1/4 teaspoon smoked paprika
  • 1/4 teaspoon red pepper flakes, optional
  • 2 to 3 tablespoons olive oil for cooking

For Serving

  • Plain Greek yogurt or sour cream
  • Lemon wedges
  • Extra chopped herbs
  • Sliced avocado
  • Tomato cucumber salad

Why You’ll Love This Recipe

Zucchini Fritters are simple to prepare and use everyday ingredients. The zucchini keeps the centers tender, while cottage cheese adds creaminess without making the mixture heavy.

Another reason to love Zucchini Fritters is their flexibility. You can serve them with eggs for breakfast, add a salad for lunch, or pair them with chicken, fish, or soup for dinner.

They also reheat well, which makes them practical for meal prep and lunchboxes.

How to Make Zucchini Fritters

Step 1: Grate the Zucchini

Wash and dry the zucchini, then grate it using the large holes of a box grater.

Place the grated zucchini in a colander and sprinkle with 1/4 teaspoon salt.

Let it sit for about 10 minutes.

Step 2: Remove Excess Moisture

Transfer the zucchini to a clean kitchen towel or several layers of paper towels.

Squeeze firmly to remove as much liquid as possible.

This is one of the most important steps because too much moisture can make Zucchini Fritters soft and difficult to flip.

Step 3: Mix the Wet Ingredients

In a large bowl, whisk the eggs until lightly beaten.

Add the cottage cheese, garlic, green onions, parsley, and dill.

Stir until evenly combined.

Step 4: Add the Dry Ingredients

Add the flour, Parmesan, baking powder, remaining salt, black pepper, smoked paprika, and optional red pepper flakes.

Mix gently until a thick batter forms.

Step 5: Fold in the Zucchini

Add the squeezed zucchini to the bowl.

Fold everything together until the zucchini is evenly distributed through the batter.

The mixture for Zucchini Fritters should be thick enough to scoop and hold its shape.

Step 6: Rest the Batter

Let the batter rest for 5 minutes.

This gives the flour time to absorb some of the remaining moisture and helps the patties stay together while cooking.

Step 7: Heat the Skillet

Place a large nonstick or cast-iron skillet over medium heat.

Add enough olive oil to lightly coat the bottom.

Let the oil heat for about 1 minute.

Step 8: Portion the Fritters

Scoop about 1/4 cup of batter for each fritter.

Place it in the skillet and flatten gently with the back of a spoon until about 1/2 inch thick.

Do not overcrowd the pan.

Step 9: Cook the First Side

Cook for 3 to 4 minutes, or until the bottom is golden brown and the edges look set.

Keeping the heat at medium gives Zucchini Fritters enough time to cook through without burning the outside.

Step 10: Flip Carefully

Slide a thin spatula underneath each fritter and flip gently.

Cook the second side for another 3 to 4 minutes until golden and firm.

Step 11: Drain and Repeat

Transfer the cooked fritters to a plate lined with paper towels or to a wire rack.

Add a little more oil to the skillet as needed and repeat with the remaining batter.

Step 12: Serve

Serve Zucchini Fritters warm with Greek yogurt, sour cream, lemon wedges, or your favorite fresh toppings.

Serving Suggestions

These fritters are delicious for breakfast with scrambled eggs, sliced avocado, and fresh tomatoes.

For lunch, serve Zucchini Fritters with a crisp green salad, tomato cucumber salad, or a bowl of soup.

They also work well as a side dish with grilled chicken, baked salmon, roasted vegetables, or turkey burgers.

For a simple appetizer, make smaller fritters and serve them with garlic yogurt dip, tzatziki, or a lemon-herb sauce.

For another flavorful Italian-inspired dinner, try our Crispy Parmesan Chicken Cutlets with melted mozzarella, fresh tomatoes, basil, and sweet balsamic glaze.

Recipe Tips

Squeeze the zucchini very well before mixing the batter. Excess moisture is the most common reason fritters become soft.

Use small-curd cottage cheese if you prefer a smoother texture.

Freshly grated Parmesan gives stronger flavor and helps the fritters brown nicely.

For the best Zucchini Fritters texture, cook in batches and avoid overcrowding the skillet.

Keep the heat at medium. High heat can brown the outside too quickly while leaving the center undercooked.

If the batter seems too wet, add 1 to 2 tablespoons flour.

If it seems too dry, add 1 tablespoon cottage cheese or a small splash of milk.

Easy Variations

Zucchini Fritters are easy to customize.

For extra vegetables, add finely grated carrot, chopped spinach, or corn.

For a Mediterranean variation, add crumbled feta, oregano, and chopped sun-dried tomatoes.

You can make Zucchini Fritters with cheddar instead of Parmesan for a richer cheese flavor.

For extra heat, add chopped jalapeño, cayenne, or more red pepper flakes.

A fresh herb version can include basil, mint, chives, or cilantro.

For a gluten-free option, use a suitable gluten-free flour blend or oat flour and adjust the amount as needed.

You may also enjoy our Breakfast Cookies made with oats, banana, peanut butter, egg, and simple wholesome add-ins for an easy make-ahead breakfast or snack.

Make-Ahead Instructions

The zucchini can be grated, salted, squeezed, and refrigerated up to one day in advance.

You can also mix the dry ingredients ahead and store them in a covered container.

For the best texture, combine the full batter shortly before cooking.

Cooked Zucchini Fritters can be made in advance, cooled completely, and refrigerated for quick meals during the week.

Storage and Reheating

Store leftover fritters in an airtight container in the refrigerator for up to 4 days.

For the best texture, reheat them in a skillet over medium-low heat for 2 to 3 minutes per side.

You can also reheat them in a 375°F or 190°C oven until hot and lightly crisp.

Microwaving works for convenience, but the fritters will be softer.

To freeze, arrange cooled fritters in a single layer until firm, then transfer them to a freezer-safe container with parchment between layers.

Freeze for up to 2 months.

Nutrition Information

Approximate nutrition per fritter:

Calories: 105
Protein: 6 g
Carbohydrates: 8 g
Fat: 6 g
Saturated Fat: 2 g
Fiber: 1 g
Sugar: 2 g
Sodium: 210 mg

Nutrition values are estimates and may vary depending on cottage cheese, Parmesan, oil, flour, and fritter size.

Frequently Asked Questions

Why are my fritters falling apart?

The zucchini may still contain too much water, or the batter may need a little more flour. Squeeze the zucchini well and let the batter rest before cooking.

Can I use low-fat cottage cheese?

Yes. Full-fat and reduced-fat cottage cheese both work, although full-fat gives a richer texture.

Can I bake Zucchini Fritters instead of frying them?

Yes. Bake at 425°F or 220°C on a well-greased or parchment-lined baking sheet, flipping once, until golden on both sides.

Can I make them gluten-free?

Yes. Use a gluten-free flour blend or oat flour and adjust the amount if the batter becomes too wet or dry.

Can I add more cheese?

Yes. Extra Parmesan, cheddar, feta, or mozzarella can be added, but very soft cheeses may make the batter wetter.

Can I freeze them?

Yes. Cool completely, freeze in a single layer, then store in a freezer-safe container.

What dip goes best with them?

Greek yogurt, sour cream, tzatziki, garlic yogurt, ranch-style dip, or lemon-herb sauce all work well.

Final Thoughts

Zucchini Fritters are a simple way to turn fresh zucchini and cottage cheese into a warm, savory meal that works at almost any time of day.

Because Zucchini Fritters combine tender vegetables, creamy cottage cheese, eggs, Parmesan, garlic, and fresh herbs, they have a satisfying balance of texture and flavor.

Keep this Zucchini Fritters recipe handy for busy mornings, quick lunches, meal prep, or evenings when you need an easy vegetable-based side.

With golden edges, tender centers, fresh herbs, and plenty of savory flavor, Zucchini Fritters are easy to make, easy to customize, and practical enough to enjoy throughout the week.


High-Protein Breakfast Wrap with Cottage Cheese and Avocado

Cottage Cheese Wrap with eggs, avocado, spinach, tomato, melted cheese, and whole-grain tortilla

High-Protein Breakfast Wrap with Cottage Cheese and Avocado

Cottage Cheese Wrap is a filling, protein-rich breakfast made with fluffy eggs, creamy cottage cheese, avocado, spinach, and a soft whole-grain tortilla. It is quick enough for busy mornings but satisfying enough to keep you full through the first part of the day. Cottage Cheese Wrap also works well for meal prep because the filling can be prepared ahead and assembled in just a few minutes.

The combination of eggs and cottage cheese gives the wrap a soft, creamy texture, while avocado adds healthy fats and a buttery bite. Fresh spinach, tomato, and herbs keep the flavor bright and balanced.

Prep Time: 10 minutes
Cook Time: 10 minutes
Total Time: About 20 minutes
Servings: 2

Ingredients

For the Egg and Cottage Cheese Filling

  • 4 large eggs
  • 1 cup cottage cheese
  • 1 cup baby spinach, chopped
  • 1/4 cup shredded cheddar or mozzarella cheese
  • 2 green onions, thinly sliced
  • 1/4 teaspoon garlic powder
  • 1/4 teaspoon smoked paprika
  • 1/4 teaspoon salt
  • 1/8 teaspoon black pepper
  • 1 teaspoon olive oil or butter

For the Wraps

  • 2 large whole-grain tortillas
  • 1 ripe avocado, sliced
  • 1 small tomato, diced or sliced
  • 2 tablespoons chopped fresh parsley or cilantro
  • 1 tablespoon hot sauce or salsa, optional
  • Lemon or lime wedges, optional

Why You’ll Love This Recipe

Cottage Cheese Wrap is simple, satisfying, and packed with protein from eggs, cottage cheese, and shredded cheese. It combines creamy and fresh textures without needing a long list of ingredients.

Another reason to love Cottage Cheese Wrap is how customizable it is. You can add vegetables, herbs, turkey, smoked salmon, or extra cheese depending on what you have available.

It is also easy to make ahead, which makes it useful for workdays, school mornings, or quick post-workout meals.

How to Make Cottage Cheese Wrap

Step 1: Prepare the Vegetables

Wash and dry the spinach, tomato, and green onions.

Chop the spinach into smaller pieces, slice the green onions, and prepare the tomato and avocado.

Keep the avocado covered until the final assembly so it stays fresh.

Step 2: Whisk the Eggs

Crack the eggs into a medium bowl.

Whisk until the yolks and whites are fully combined.

Add the garlic powder, smoked paprika, salt, and black pepper.

Step 3: Add Cottage Cheese

Stir the cottage cheese into the eggs.

Mix gently until evenly distributed.

The mixture should look creamy and slightly thick.

Step 4: Cook the Spinach

Heat olive oil or butter in a nonstick skillet over medium heat.

Add the spinach and cook for 1 to 2 minutes, stirring frequently, until just wilted.

Step 5: Add the Egg Mixture

Pour the egg and cottage cheese mixture into the skillet.

Reduce the heat to medium-low.

Cook slowly, stirring with a spatula, until the eggs begin to set.

Step 6: Add the Cheese and Green Onions

When the eggs are almost cooked, add the shredded cheese and green onions.

Continue cooking for another minute, stirring gently, until the cheese melts and the eggs are soft but no longer runny.

Avoid overcooking because the filling for Cottage Cheese Wrap should stay tender and creamy.

Step 7: Warm the Tortillas

Warm the tortillas in a dry skillet for about 20 to 30 seconds per side.

You can also microwave them briefly between slightly damp paper towels.

Warm tortillas are more flexible and less likely to tear when folded.

Step 8: Add the Filling

Place the tortillas on a clean work surface.

Divide the egg and cottage cheese mixture evenly between them.

Spoon the filling down the center, leaving space around the edges.

Step 9: Add Avocado and Tomato

Arrange avocado slices and tomato over the eggs.

Sprinkle with fresh parsley or cilantro.

Add salsa or hot sauce if desired.

At this stage, Cottage Cheese Wrap should have a balanced mix of creamy, soft, and fresh ingredients.

Step 10: Fold the Wrap

Fold the left and right sides of the tortilla slightly inward.

Bring the bottom edge up over the filling, then roll tightly away from you.

Keep the filling tucked in as you roll.

Step 11: Toast the Wrap

Place the assembled wrap seam-side down in a dry skillet over medium heat.

Toast for 1 to 2 minutes per side until lightly golden and crisp.

This optional step gives Cottage Cheese Wrap a better texture and helps it hold together.

Step 12: Slice and Serve

Let the wrap rest for 1 minute, then slice it in half.

Serve Cottage Cheese Wrap warm with extra avocado, salsa, fruit, or a simple side salad.

Serving Suggestions

Cottage Cheese Wrap works well as a complete breakfast, but simple sides can make it even more satisfying.

Serve Cottage Cheese Wrap with berries, orange slices, melon, or a small fruit salad for a fresh contrast.

For extra protein, add turkey sausage, smoked salmon, or a boiled egg on the side.

You can also serve the wrap with Greek yogurt, salsa, or a spoonful of hummus.

For another fresh and colorful pasta meal, try our Ravioli with Tomatoes, Asparagus, Garlic, and Zucchini with tender vegetables, garlic, herbs, and Parmesan.

Recipe Tips

Use whole-grain tortillas for extra fiber and a sturdier texture.

Cook the eggs over medium-low heat so they stay soft and creamy.

Do not overfill the tortilla. Too much filling makes rolling difficult and can cause the wrap to tear.

Add avocado near the end so it stays fresh and does not become overly warm.

If your cottage cheese is very watery, drain off some of the excess liquid before mixing it into the eggs.

For the best Cottage Cheese Wrap texture, toast the finished wrap briefly in a dry skillet.

Let the eggs cool for a minute before assembling if you plan to pack the wrap for later.

Easy Variations

Cottage Cheese Wrap is easy to customize with different proteins, vegetables, and sauces.

Add sliced turkey, shredded chicken, or smoked salmon for even more protein.

For extra vegetables, include mushrooms, bell peppers, zucchini, or roasted red peppers.

You can make a Mediterranean-style Cottage Cheese Wrap by adding feta, cucumber, tomatoes, spinach, and a little oregano.

For a spicy version, add jalapeño, chili flakes, salsa, or hot sauce.

Swap cheddar for mozzarella, pepper jack, or feta depending on the flavor you want.

You can also add black beans or chickpeas for extra fiber.

You may also enjoy our No-Bake Chocolate Peanut Clusters for an easy sweet-and-salty treat made with roasted peanuts, smooth chocolate, vanilla, and sea salt.

Make-Ahead Instructions

Cottage Cheese Wrap can be prepared ahead, but the best texture comes from storing the filling and tortillas separately.

Cook the egg and cottage cheese mixture up to 2 days in advance and refrigerate it in an airtight container.

Keep sliced vegetables in separate containers.

Slice the avocado shortly before serving to prevent browning.

When ready to eat, reheat the egg mixture gently, warm the tortilla, assemble the wrap, and toast if desired.

Storage and Reheating

Store leftover Cottage Cheese Wrap in the refrigerator for up to 2 days.

Wrap it tightly in foil or place it in an airtight container.

For the best texture, reheat in a dry skillet over medium-low heat for several minutes, turning once.

You can also microwave it in short intervals, but the tortilla will be softer.

If preparing wraps specifically for meal prep, leave out the avocado and add it fresh after reheating.

Nutrition Information

Approximate nutrition per serving:

Calories: 520
Protein: 35 g
Carbohydrates: 42 g
Fat: 25 g
Saturated Fat: 9 g
Fiber: 10 g
Sugar: 6 g
Sodium: 760 mg

Nutrition values are estimates and may vary depending on the tortilla, cottage cheese, shredded cheese, avocado, and serving size.

Frequently Asked Questions

Can I use low-fat cottage cheese?

Yes. Low-fat cottage cheese works well and still provides a creamy texture and plenty of protein.

Can I make this without eggs?

Yes. You can use tofu scramble or extra cottage cheese with sautéed vegetables, although the texture will be different.

Can I use a low-carb tortilla?

Yes. Any tortilla that folds well can be used.

Can I add meat?

Yes. Turkey sausage, chicken, lean beef, ham, or smoked salmon all work well.

How do I keep the wrap from getting soggy?

Avoid adding too much tomato juice, drain watery cottage cheese, and let the hot egg filling cool slightly before wrapping if you are storing it.

Can I freeze it?

Yes, but avocado does not freeze especially well. For freezing, omit the avocado and tomato, then add them fresh after reheating.

Final Thoughts

Cottage Cheese Wrap is a quick and practical way to build a high-protein breakfast with eggs, cottage cheese, avocado, vegetables, and a whole-grain tortilla.

Because Cottage Cheese Wrap can be customized with different vegetables, cheeses, proteins, and sauces, it works well for breakfast, brunch, meal prep, or a quick lunch.

Keep this Cottage Cheese Wrap recipe handy whenever you need a filling breakfast that comes together quickly and uses simple ingredients.

With creamy cottage cheese, fluffy eggs, avocado, spinach, tomato, melted cheese, and herbs, Cottage Cheese Wrap delivers a satisfying balance of protein, fresh flavor, and texture in every bite.

Baked Cottage Cheese Eggs

Cottage Cheese Eggs with spinach, mozzarella, Parmesan, herbs, and a soft baked texture

Baked Cottage Cheese Eggs

Cottage Cheese Eggs are a soft, protein-rich breakfast bake made with eggs, creamy cottage cheese, spinach, herbs, and a little shredded cheese. The texture is light and tender, while the cottage cheese keeps the eggs moist instead of dry or rubbery. Cottage Cheese Eggs are perfect for breakfast, brunch, meal prep, or an easy high-protein lunch when you want something simple but satisfying.

Prep Time: 10 minutes
Cook Time: 25 minutes
Total Time: About 35 minutes
Servings: 4 to 6

Ingredients

For the Egg Mixture

  • 8 large eggs
  • 1 cup cottage cheese
  • 1/2 cup shredded mozzarella or cheddar cheese
  • 1/4 cup grated Parmesan cheese
  • 2 cups baby spinach, chopped
  • 2 green onions, thinly sliced
  • 2 tablespoons chopped fresh parsley
  • 1/2 teaspoon garlic powder
  • 1/2 teaspoon onion powder
  • 1/2 teaspoon smoked paprika
  • 1/2 teaspoon salt
  • 1/4 teaspoon black pepper

For the Baking Dish

  • 1 teaspoon olive oil or butter
  • Extra chopped herbs for garnish
  • Red pepper flakes, optional

Why You’ll Love This Recipe

Cottage Cheese Eggs are easy to prepare, naturally high in protein, and flexible enough for busy mornings or relaxed weekend brunches. The cottage cheese melts into the eggs as they bake, creating a creamy interior without requiring heavy cream.

Another reason to love this recipe is how easy it is to customize. You can add vegetables, herbs, cooked chicken, turkey, or different cheeses depending on what you have available.

The recipe also reheats well, making it useful for meal prep.

A few simple preparation habits can make the finished bake even better. Bring the eggs and cottage cheese closer to room temperature before mixing if you have time, since very cold ingredients may need a little longer in the oven. Use a ceramic or metal baking dish of similar size so the layer is not too deep. If you add vegetables with high water content, sauté them first and cool them before folding them into the mixture. This keeps the center tender instead of watery and helps the slices hold their shape when served.

How to Make Cottage Cheese Eggs

Step 1: Preheat the Oven

Preheat the oven to 375°F or 190°C.

Lightly grease an 8 x 8-inch baking dish or similar-size casserole dish with olive oil or butter.

Step 2: Prepare the Spinach

If using fresh spinach, chop it into small pieces.

You can add it directly to the egg mixture, but for a softer texture, sauté it briefly in a dry skillet for 1 to 2 minutes until wilted.

Let it cool slightly before adding it to the eggs.

Step 3: Whisk the Eggs

Crack the eggs into a large mixing bowl.

Whisk for about 30 seconds until the yolks and whites are completely combined.

A well-whisked base helps Cottage Cheese Eggs bake evenly and gives the finished dish a lighter texture.

Step 4: Add the Cottage Cheese

Add the cottage cheese to the beaten eggs.

Whisk gently until combined.

Small curds are completely fine and will soften during baking.

Step 5: Add Cheese and Seasonings

Stir in the mozzarella or cheddar, Parmesan, garlic powder, onion powder, smoked paprika, salt, and black pepper.

Mix just until evenly distributed.

Step 6: Add Spinach and Herbs

Fold in the chopped spinach, green onions, and parsley.

At this stage, Cottage Cheese Eggs should have a thick but pourable mixture with the vegetables and cheese evenly distributed.

Step 7: Transfer to the Baking Dish

Pour the mixture into the prepared baking dish.

Use a spatula to spread the spinach and cheese evenly if they settle in one area.

Step 8: Bake

Place the dish in the center of the oven.

Bake for 22 to 28 minutes, or until the center is just set and the edges are lightly golden.

The exact baking time depends on the depth of the dish and your oven.

Step 9: Check for Doneness

Gently shake the baking dish.

The center should no longer look liquid, although a very slight jiggle is fine because the eggs will continue setting as they rest.

Avoid overbaking Cottage Cheese Eggs, since too much heat can make the texture dry.

Step 10: Rest Before Slicing

Remove the dish from the oven and let it rest for 5 to 10 minutes.

This helps the eggs finish setting and makes them easier to slice neatly.

Step 11: Garnish and Serve

Sprinkle with extra parsley, green onions, black pepper, or red pepper flakes.

Serve Cottage Cheese Eggs warm.

Serving Suggestions

Cottage Cheese Eggs can be served on their own or paired with simple breakfast sides.

Serve Cottage Cheese Eggs with avocado slices, fresh tomatoes, fruit, roasted potatoes, whole-grain toast, or a green salad.

For a heartier brunch, pair them with turkey sausage, smoked salmon, grilled vegetables, or a simple yogurt bowl.

For a cozy dessert option, try our Melt-in-Your-Mouth Apple Pie Cake with tender apples, cinnamon, brown sugar, and a soft buttery crumb.

Recipe Tips

Use full-fat or low-fat cottage cheese depending on your preference. Full-fat cottage cheese gives a slightly richer texture.

Whisk the eggs before adding the other ingredients so the mixture stays light.

Do not overbake the eggs. Remove the dish when the center is just set.

If your cottage cheese is very watery, drain off any excess liquid before mixing.

For the best Cottage Cheese Eggs texture, let the baked dish rest before slicing.

Cut vegetables into small pieces so they soften evenly and do not release too much water.

Easy Variations

Cottage Cheese Eggs are easy to customize with different vegetables, proteins, and cheeses.

Add diced bell peppers, mushrooms, tomatoes, zucchini, or broccoli for extra vegetables.

For more protein, add cooked chicken, turkey sausage, ham, or smoked salmon.

Use feta instead of mozzarella for a tangy Mediterranean-style variation.

You can also add dill, basil, chives, or oregano for more herb flavor.

For a spicy version, add diced jalapeño, cayenne pepper, or red pepper flakes.

To make Cottage Cheese Eggs more filling, add a small amount of cooked quinoa or diced roasted potatoes to the mixture.

You may also enjoy our Cheesy Spinach Potato Cakes for a crispy, cheesy dish made with mashed potatoes, spinach, mozzarella, Parmesan, garlic, and herbs.

Make-Ahead Instructions

Cottage Cheese Eggs are excellent for meal prep because they can be baked ahead and reheated quickly.

Bake the dish completely, let it cool, and cut it into individual portions.

Store the portions in airtight containers in the refrigerator.

You can also mix the egg base the night before, cover it, and refrigerate it. Add the spinach and herbs shortly before baking for the freshest texture.

Storage and Reheating

Store leftover Cottage Cheese Eggs in an airtight container in the refrigerator for up to 4 days.

Reheat individual slices in the microwave in short intervals until warmed through.

For the best texture, reheat larger portions in a 325°F or 165°C oven for about 10 minutes.

Avoid overheating because eggs can become rubbery if cooked too long during reheating.

Nutrition Information

Approximate nutrition per serving:

Calories: 245
Protein: 24 g
Carbohydrates: 6 g
Fat: 14 g
Saturated Fat: 7 g
Fiber: 1 g
Sugar: 3 g
Sodium: 620 mg

Nutrition values are estimates and may vary depending on the cottage cheese, shredded cheese, vegetables, and serving size.

Frequently Asked Questions

Can I use low-fat cottage cheese?

Yes. Low-fat cottage cheese works well and still gives the eggs a creamy texture.

Can I make this recipe without spinach?

Yes. Leave it out or replace it with another vegetable such as mushrooms, peppers, or broccoli.

Can I use ricotta instead of cottage cheese?

Yes, but the texture will be slightly different. Cottage cheese gives more protein and a lighter, slightly curdled texture.

Can I bake this in muffin cups?

Yes. Divide the mixture between greased muffin cups and bake for about 18 to 22 minutes.

Can I freeze the baked eggs?

Yes. Cool completely, wrap individual portions well, and freeze for up to 2 months.

How do I keep the eggs from becoming watery?

Drain excess liquid from cottage cheese if necessary and avoid adding too many watery vegetables.

Final Thoughts

Cottage Cheese Eggs are a simple way to make a filling breakfast with plenty of protein and very little preparation.

Because Cottage Cheese Eggs can be customized with vegetables, herbs, cheese, and extra protein, they work well for breakfast, brunch, meal prep, or a quick lunch.

Keep this Cottage Cheese Eggs recipe handy whenever you want an easy baked egg dish that stays soft and creamy.

With fluffy eggs, creamy cottage cheese, spinach, herbs, mozzarella, and Parmesan, Cottage Cheese Eggs deliver a satisfying combination of protein, flavor, and convenience in every serving.

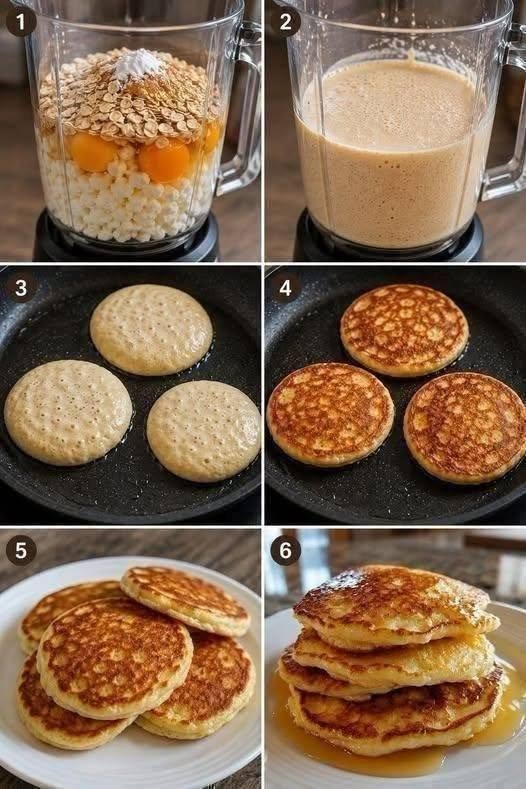
Fluffy Cottage Cheese Oat Pancakes

Cottage Cheese Oat Pancakes with cottage cheese, rolled oats, eggs, golden edges, and a soft fluffy center

Fluffy Cottage Cheese Oat Pancakes

Cottage Cheese Oat Pancakes are a soft, hearty, and protein-rich breakfast made with cottage cheese, rolled oats, eggs, milk, and a few simple pantry ingredients. They have a tender center, lightly golden edges, and a mild flavor that works beautifully with fruit, yogurt, nut butter, or a small drizzle of maple syrup.

The oats provide a hearty base, while cottage cheese adds moisture, protein, and a creamy texture. Everything blends in minutes, making the recipe convenient for busy mornings and meal prep.

Prep Time: 10 minutes
Cook Time: 15 minutes
Total Time: About 25 minutes
Servings: 4

Ingredients

For the Pancake Batter

  • 1 cup cottage cheese
  • 1 1/2 cups rolled oats
  • 3 large eggs
  • 1/2 cup milk
  • 1 tablespoon maple syrup or honey
  • 1 teaspoon vanilla extract
  • 1 1/2 teaspoons baking powder
  • 1/2 teaspoon ground cinnamon
  • 1/4 teaspoon salt

For Cooking

  • 1 to 2 teaspoons butter or neutral oil

Optional Toppings

  • Fresh berries
  • Sliced banana
  • Greek yogurt
  • Peanut butter or almond butter
  • Chopped walnuts or pecans
  • Maple syrup
  • Cinnamon

Why You’ll Love This Recipe

Cottage Cheese Oat Pancakes are easy to prepare and use familiar ingredients that are often already in the kitchen. The blender creates a smooth batter without needing flour, and the cottage cheese keeps the pancakes soft and satisfying.

They are also flexible: serve them with berries and yogurt, or keep them simple with butter and cinnamon. Cooked pancakes refrigerate and freeze well for quick breakfasts.

How to Make Cottage Cheese Oat Pancakes

Step 1: Add the Oats to the Blender

Place the rolled oats in a high-speed blender.

Blend for 15 to 20 seconds until the oats become a coarse flour. This step helps Cottage Cheese Oat Pancakes cook with a smoother, more traditional pancake texture.

Breaking the oats down first creates a more even batter.

Step 2: Add the Wet Ingredients

Add the cottage cheese, eggs, milk, maple syrup or honey, and vanilla extract to the blender.

Blend for about 30 seconds until the mixture looks smooth and creamy.

Scrape down the blender sides if needed.

Step 3: Add the Remaining Ingredients

Add baking powder, cinnamon, and salt.

Blend again for 10 to 15 seconds, just until everything is combined.

The batter for Cottage Cheese Oat Pancakes should be thick but pourable. If it looks too thick, add 1 to 2 tablespoons of milk and blend briefly.

Step 4: Rest the Batter

Let the batter rest for 5 minutes.

The oats absorb liquid during this time, helping the pancakes hold together. If the batter becomes too thick, stir in a splash of milk.

Step 5: Heat the Skillet

Place a large nonstick skillet or griddle over medium-low heat.

Add a small amount of butter or oil and spread it across the surface.

Medium-low heat works best because Cottage Cheese Oat Pancakes are slightly thicker than standard pancakes and need enough time to cook through without burning on the outside.

Step 6: Portion the Batter

Pour about 1/4 cup of batter onto the skillet for each pancake.

Use the back of a spoon to spread the batter gently into a round shape if needed.

Leave enough space for easy flipping.

Step 7: Cook the First Side

Cook for 2 to 3 minutes.

Small bubbles should appear and the edges should look set. Wait until the bottom is golden before flipping.

Step 8: Flip and Finish Cooking

Slide a thin spatula underneath each pancake and flip carefully.

Cook for another 1 to 2 minutes, or until the second side is golden and the center is cooked through.

Transfer the finished Cottage Cheese Oat Pancakes to a plate and loosely cover them to keep warm while cooking the remaining batter.

Step 9: Repeat with the Remaining Batter

Add a little more butter or oil to the skillet if necessary.

Continue cooking the rest of the batter in batches.

If the skillet becomes too hot, reduce the heat slightly so the pancakes do not brown too quickly.

Step 10: Serve Warm

Serve the pancakes while warm with your favorite toppings.

Fresh berries, banana slices, Greek yogurt, nut butter, chopped nuts, or a light drizzle of maple syrup all work well.

Serving Suggestions

Cottage Cheese Oat Pancakes can be served in many different ways depending on whether you want a light breakfast or a more filling meal.

For a simple breakfast, top Cottage Cheese Oat Pancakes with strawberries, blueberries, raspberries, or sliced banana. Cottage Cheese Oat Pancakes also pair well with yogurt.

For extra protein, add a spoonful of Greek yogurt or nut butter.

You can also serve them with scrambled eggs, boiled eggs, or fresh fruit on the side.

For brunch, arrange them on a platter with several toppings.

For a chocolatey breakfast option, try our Fluffy Choco Pancakes with a soft texture and rich cocoa flavor.

Recipe Tips

Use small-curd or blended cottage cheese for the smoothest batter.

Rolled oats work best, but quick oats can also be used if necessary.

Do not use steel-cut oats because they do not soften or blend in the same way.

Let the batter rest before cooking so the oats have time to absorb moisture.

Cook Cottage Cheese Oat Pancakes over medium-low heat. High heat can brown the outside before the center finishes cooking.

Keep the pancakes medium-sized rather than very large because smaller pancakes are easier to flip.

If the batter becomes too thick while sitting, add a small splash of milk and stir well.

Easy Variations

Cottage Cheese Oat Pancakes are easy to customize with different flavors.

For blueberry pancakes, gently fold fresh or frozen blueberries into the batter after blending. Cottage Cheese Oat Pancakes also work well with raspberries.

For chocolate flavor, add 1 tablespoon unsweetened cocoa powder and a small handful of mini chocolate chips.

A banana version can include half a ripe banana blended into the batter.

For a warm-spice variation, add nutmeg, pumpkin pie spice, or extra cinnamon.

You can also add lemon zest for a brighter flavor.

For extra texture, sprinkle chopped pecans or walnuts over the pancakes immediately after pouring the batter into the skillet.

Make-Ahead Instructions

Cottage Cheese Oat Pancakes are a practical make-ahead breakfast.

Cook the full batch, let the pancakes cool completely, and store them in an airtight container in the refrigerator.

You can prepare them on the weekend and reheat individual portions during busy mornings.

The batter can be refrigerated for a few hours. Stir in a little milk before cooking if it thickens.

Storage and Reheating

Store leftover pancakes in an airtight container in the refrigerator for up to 4 days.

To reheat, place them in a toaster, skillet, microwave, or toaster oven.

A toaster or skillet restores lightly crisp edges.

For longer storage, place cooled pancakes in a single layer on a tray and freeze until firm.

Transfer them to a freezer-safe bag with parchment between layers and freeze for up to 2 months.

Reheat directly from frozen or thaw overnight in the refrigerator.

Nutrition Information

Approximate nutrition per serving, before toppings:

Calories: 285
Protein: 18 g
Carbohydrates: 34 g
Fat: 9 g
Saturated Fat: 3 g
Fiber: 4 g
Sugar: 7 g
Sodium: 410 mg

Nutrition values are estimates and may vary by ingredients and serving size.

Frequently Asked Questions

Can I make these without a blender?

Yes. Use oat flour instead of rolled oats and whisk the ingredients together. The cottage cheese may remain slightly textured unless you blend it separately.

Can I use low-fat cottage cheese?

Yes. Low-fat cottage cheese works well, although full-fat cottage cheese usually creates a slightly richer texture.

Why are my pancakes too dense?

The batter may be too thick, or the pancakes may be too large. Add a little milk and keep the portions moderate.

Can I use quick oats?

Yes. Quick oats work, but the batter may become thicker more quickly.

Can I make them gluten-free?

Yes, if you use oats that are certified gluten-free.

Can I freeze them?

Yes. Cottage Cheese Oat Pancakes freeze well for up to 2 months and can be reheated as needed.

Can I make them sweeter?

Yes. Add a little extra maple syrup or honey to the batter, or serve them with fruit and syrup.

Final Thoughts

Cottage Cheese Oat Pancakes are an easy way to turn oats, eggs, and cottage cheese into a warm, satisfying breakfast with a soft texture and plenty of protein.

Because Cottage Cheese Oat Pancakes can be customized with fruit, chocolate, nuts, or spices, they work well for both everyday breakfasts and weekend brunch.

Keep this Cottage Cheese Oat Pancakes recipe handy whenever you want a quick blender breakfast that is filling, simple, and easy to prepare.

With tender centers, golden edges, hearty oats, and creamy cottage cheese, Cottage Cheese Oat Pancakes are a practical homemade breakfast that works well for meal prep, family mornings, or a relaxed brunch.

You may also enjoy our Fluffy Thick Pancakes for a classic, soft, and satisfying breakfast or brunch.

High-Protein Sausage, Cheddar & Cottage Cheese Breakfast Biscuits

Sausage Breakfast Biscuits with sausage, cottage cheese, cheddar, eggs, spinach, peppers, and a soft golden savory crumb

High-Protein Sausage, Cheddar & Cottage Cheese Breakfast Biscuits

Sausage Breakfast Biscuits are savory, filling, and perfect for busy mornings when you want something you can grab and go. These soft breakfast biscuits combine cooked sausage, cottage cheese, sharp cheddar, eggs, vegetables, and simple seasonings in a tender biscuit-style batter. They are satisfying enough for breakfast yet convenient for meal prep, lunchboxes, or a quick afternoon snack.

The browned sausage and cheddar add plenty of flavor, while cottage cheese keeps the centers moist and adds extra protein. They also refrigerate well and reheat in minutes.

Prep Time: 20 minutes
Cook Time: 22–25 minutes
Total Time: About 45 minutes
Servings: 10 biscuits

Ingredients

For the Sausage Mixture

  • 12 ounces breakfast sausage, turkey sausage, or chicken sausage
  • 1/2 cup finely diced red bell pepper
  • 1/3 cup finely diced onion
  • 1 cup baby spinach, finely chopped
  • 1 teaspoon olive oil, if needed

For the Biscuit Batter

  • 1 1/2 cups all-purpose flour
  • 2 teaspoons baking powder
  • 1/2 teaspoon baking soda
  • 1/2 teaspoon garlic powder
  • 1/2 teaspoon smoked paprika
  • 1/4 teaspoon black pepper
  • 1/4 teaspoon salt
  • 2 large eggs
  • 1 cup cottage cheese
  • 1/2 cup plain Greek yogurt
  • 1 cup shredded sharp cheddar cheese
  • 2 tablespoons chopped chives
  • 1 tablespoon melted butter or olive oil

Why You’ll Love This Recipe

Sausage Breakfast Biscuits combine protein, vegetables, cheese, and a tender biscuit base in one portable breakfast. You do not need to cook eggs, toast, and sausage separately, which makes them especially convenient on busy mornings.

They are especially useful for meal prep. Bake once, refrigerate or freeze the extras, and reheat individual portions when needed.

You can also customize them with turkey sausage, extra vegetables, different cheese, or smaller portions for lunchboxes.

How to Make Sausage Breakfast Biscuits

Step 1: Preheat the Oven

Preheat the oven to 375°F or 190°C.

Line a large baking sheet with parchment paper or lightly grease it with cooking spray.

Step 2: Cook the Sausage

Heat a large skillet over medium heat.

Add the sausage and cook for 6 to 8 minutes, breaking it into small crumbles with a wooden spoon.

Cook until no pink remains and the sausage is lightly browned. Transfer it to a paper-towel-lined plate to drain excess grease.

Step 3: Cook the Vegetables

In the same skillet, add the bell pepper and onion.

If the pan is dry, add a teaspoon of olive oil.

Cook for 3 to 4 minutes until the vegetables begin to soften.

Add the chopped spinach and cook for another minute, just until wilted.

Remove the skillet from the heat and let the vegetables cool slightly.

Step 4: Mix the Dry Ingredients

In a large bowl, whisk together the flour, baking powder, baking soda, garlic powder, smoked paprika, black pepper, and salt.

Mixing the dry ingredients first helps the leavening and seasonings distribute evenly.

Step 5: Mix the Wet Ingredients

In a separate bowl, whisk the eggs until smooth.

Add the cottage cheese, Greek yogurt, and melted butter or olive oil.

Stir until combined.

A slightly textured cottage cheese mixture is fine; the curds soften as Sausage Breakfast Biscuits bake.

Step 6: Combine Wet and Dry Mixtures

Pour the wet mixture into the bowl with the dry ingredients.

Use a spatula to fold everything together until only a few streaks of flour remain.

Do not overmix. Too much stirring can make Sausage Breakfast Biscuits dense instead of soft and tender.

Step 7: Add the Fillings

Fold in the cooked sausage, vegetables, shredded cheddar, and chives.

Mix gently until everything is evenly distributed.

The batter should be thicker than muffin batter but softer than traditional biscuit dough. Add a little milk if too dry or flour if unusually loose.

Step 8: Portion the Biscuits

Use a large cookie scoop or two spoons to divide the batter into 10 equal portions on the prepared baking sheet.

Leave about 2 inches between each portion.

Shape the tops lightly with a spoon, but do not press them flat.

Keeping the batter slightly mounded helps Sausage Breakfast Biscuits stay thick and soft in the center.

Step 9: Bake Until Golden

Bake for 22 to 25 minutes, or until the tops are golden and the centers feel set.

A toothpick inserted into the center should come out clean or with a few moist crumbs.

Step 10: Cool Briefly

Remove the baking sheet from the oven and let Sausage Breakfast Biscuits cool on the tray for 5 minutes.

Transfer them to a wire rack.

Allowing Sausage Breakfast Biscuits to rest briefly helps the structure firm up and makes them easier to handle.

Step 11: Serve Warm

Serve Sausage Breakfast Biscuits warm on their own or split them and add a little butter, avocado, hot sauce, or extra cheese.

Serving Suggestions

Sausage Breakfast Biscuits are filling on their own, but simple sides can make breakfast more complete.

Serve with berries, orange slices, melon, or apple for something fresh. For brunch, add scrambled eggs, avocado, roasted potatoes, or a green salad.

They also pair well with Greek yogurt, salsa, coffee, or tea.

For another warm and comforting meal, try our Hearty Chicken and Vegetable Stew with tender chicken, potatoes, carrots, peas, and savory herbs.

Recipe Tips

Cook and drain the sausage well before adding it to the batter.

Dice the vegetables finely so each biscuit holds together easily.

Use sharp cheddar for stronger cheese flavor.

Do not overmix once the flour and wet ingredients come together.

For the softest Sausage Breakfast Biscuits, measure the flour carefully and avoid packing it into the measuring cup.

Full-fat or low-fat cottage cheese both work, but very watery cottage cheese should be drained briefly.

Freshly shredded cheddar usually melts more smoothly. Let Sausage Breakfast Biscuits cool briefly so the centers can finish setting.

Easy Variations

Change the flavor with simple swaps. Add jalapeño, chili flakes, or pepper jack for heat. Mix in mushrooms, broccoli, or roasted red pepper for extra vegetables.

Swap cheddar for mozzarella, Monterey Jack, Swiss, or a cheese blend. Turkey or chicken sausage also works well. Fresh parsley, dill, basil, or extra chives can add more herb flavor.

For mini biscuits, use smaller portions and reduce the baking time.

Make-Ahead Instructions

Sausage Breakfast Biscuits are excellent for meal prep. Bake the full batch, cool completely, and store in an airtight container.

You can also cook the sausage and vegetables one day ahead and refrigerate them separately, then mix and bake the batter the next morning. Wrap cooled portions individually for faster grab-and-go breakfasts.

Storage and Reheating

Store leftover Sausage Breakfast Biscuits in an airtight container in the refrigerator for up to 4 days.

Reheat one biscuit in the microwave for 20 to 30 seconds, or warm several in a 325°F or 165°C oven for about 8 minutes.

For longer storage, freeze the cooled biscuits for up to 2 months. Wrap each biscuit individually and place them in a freezer-safe bag.

Thaw overnight in the refrigerator or reheat from frozen at a lower oven temperature until warmed through.

Nutrition Information

Approximate nutrition per biscuit:

Calories: 245
Protein: 16 g
Carbohydrates: 18 g
Fat: 12 g
Saturated Fat: 5 g
Fiber: 2 g
Sugar: 3 g
Sodium: 480 mg

Nutrition values are estimates and will vary depending on the sausage, cottage cheese, cheddar, and exact portion size.

Frequently Asked Questions

Can I use turkey sausage?

Yes. Turkey sausage is a great choice and keeps Sausage Breakfast Biscuits flavorful while reducing some of the fat.

Can I use small-curd cottage cheese?

Yes. Small-curd or large-curd cottage cheese both work. If your cottage cheese is very watery, drain it briefly before mixing.

Can I make these gluten-free?

Yes. Use a 1:1 gluten-free baking flour designed for quick breads or biscuits.

Can I freeze them?

Yes. Sausage Breakfast Biscuits freeze very well and can be reheated directly from frozen or thawed overnight first.

Why are my biscuits dense?

Overmixing the batter or adding too much flour is usually the cause. Stir gently and stop as soon as the ingredients are combined.

Can I make them without vegetables?

Yes. Leave out the bell pepper, onion, and spinach if you prefer a simpler sausage-and-cheese biscuit.

Can I make mini biscuits?

Yes. Use smaller portions and begin checking them several minutes earlier because they will bake faster.

Final Thoughts

Sausage Breakfast Biscuits are a convenient way to combine sausage, eggs, cottage cheese, cheddar, vegetables, and a tender biscuit base in one filling breakfast.

Because Sausage Breakfast Biscuits can be prepared ahead, refrigerated, frozen, and reheated in minutes, they are especially practical for busy families and weekly meal prep.

Keep Sausage Breakfast Biscuits handy whenever you want a portable breakfast that feels homemade, satisfying, and easy to serve.

With savory sausage, melty cheddar, creamy cottage cheese, and colorful vegetables, Sausage Breakfast Biscuits deliver plenty of flavor and protein in every bite.

If you enjoy rich and hearty one-pot dinners, you may also like our Goulash Recipe with tender beef, paprika, tomatoes, and vegetables.

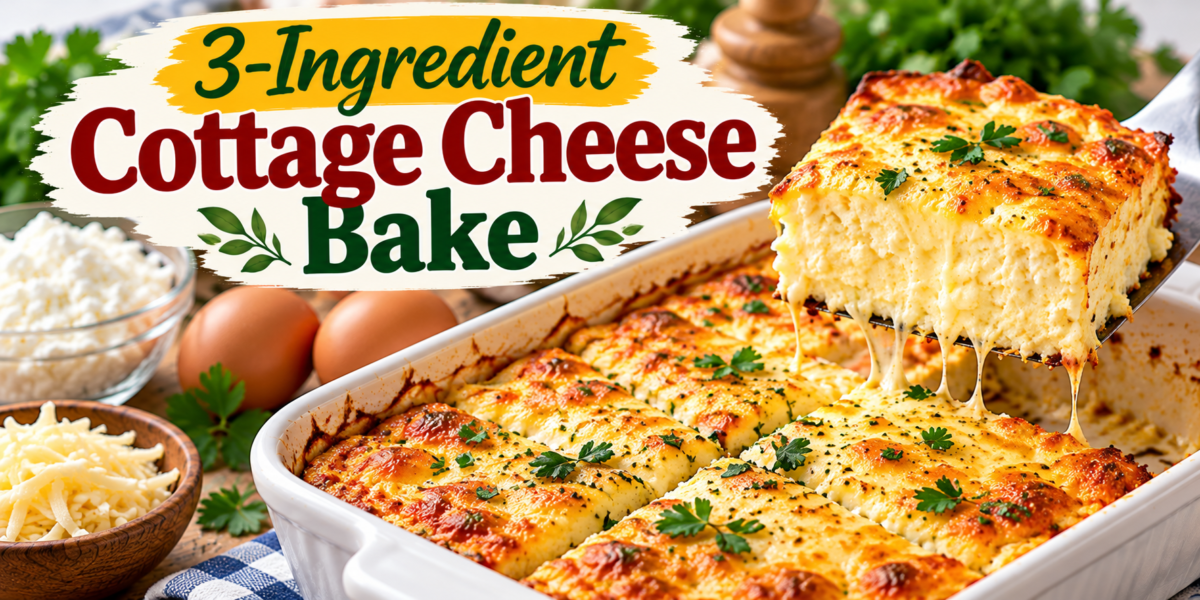
3-Ingredient Cottage Cheese Bake

3-Ingredient Cottage Cheese Bake with cottage cheese, eggs, and melted cheese

3-Ingredient Cottage Cheese Bake

Cottage Cheese Bake is a simple, protein-rich dish made with just cottage cheese, eggs, and shredded cheese. It is soft, creamy, lightly cheesy, and easy to prepare when you want a quick breakfast, light lunch, or simple meal-prep option. Because the ingredient list is so short, Cottage Cheese Bake is also a useful recipe for busy days when you do not want to spend much time cooking.

This recipe is flexible enough to enjoy plain or customize with herbs, vegetables, or seasonings after you master the basic version. Cottage Cheese Bake works especially well for anyone who likes easy, high-protein meals with minimal prep and very little cleanup.

Prep Time: 5 minutes
Cook Time: 30 to 35 minutes
Total Time: 40 minutes
Servings: 4

Ingredients

For the Basic Bake

2 cups cottage cheese

4 large eggs

1 cup shredded mozzarella or cheddar cheese

Optional Seasonings

Salt, to taste

Black pepper, to taste

Garlic powder

Dried oregano

Fresh herbs

Red pepper flakes

These optional ingredients are not required, but they can add extra flavor if desired.

Why You’ll Love This Recipe

Cottage Cheese Bake is one of those recipes that proves a short ingredient list can still create something satisfying. Cottage cheese provides creaminess and protein, eggs help the bake set, and shredded cheese adds richness and flavor.

Another reason to love Cottage Cheese Bake is how easy it is to prepare. You only need one mixing bowl and one baking dish, which makes cleanup simple.

The recipe also works well for meal prep. You can bake it ahead, portion it, refrigerate it, and reheat it when needed.

How to Make 3-Ingredient Cottage Cheese Bake

Step 1: Preheat the Oven

Preheat your oven to 375°F or 190°C.

Lightly grease an 8-inch square baking dish or a similar-sized oven-safe dish.

Using a smaller dish gives Cottage Cheese Bake a thicker, softer texture, while a wider dish creates a thinner bake with more golden edges.

Step 2: Mix the Cottage Cheese and Eggs

Add the cottage cheese and eggs to a large mixing bowl.

Whisk until the eggs are fully combined with the cottage cheese.

You do not need the mixture to become completely smooth. Small curds are perfectly fine and help give Cottage Cheese Bake its soft texture.

If you prefer a smoother result, you can blend the cottage cheese and eggs briefly with an immersion blender or regular blender.

Step 3: Add the Shredded Cheese

Stir in the shredded mozzarella or cheddar.

Mozzarella creates a milder and softer flavor, while cheddar gives the dish a stronger savory taste.

Fold the cheese evenly through the mixture.

At this point, Cottage Cheese Bake is ready for the oven using only the three main ingredients.

Step 4: Transfer to the Baking Dish

Pour the mixture into the prepared baking dish.

Use a spatula to spread the top evenly.

If you want a little more color, sprinkle a small amount of extra shredded cheese over the surface.

This extra cheese is optional and not necessary for the basic recipe.

Step 5: Bake

Place the dish in the center of the oven.

Bake for 30 to 35 minutes, or until the center is set and the top is lightly golden.

The exact cooking time may vary depending on the size and depth of your baking dish.

Cottage Cheese Bake should be firm around the edges with a soft center that no longer looks wet.

Step 6: Rest Before Slicing

Remove the baking dish from the oven and let it rest for 10 minutes.

Resting is important because it allows the eggs and cheese to settle.

If you slice immediately, the dish may appear softer than expected.

After resting, Cottage Cheese Bake will hold its shape better and be easier to serve.

Step 7: Serve

Cut into squares or scoop portions directly from the baking dish.

Serve warm, at room temperature, or chilled.

Cottage Cheese Bake can be eaten on its own or paired with fruit, salad, toast, or roasted vegetables.

Serving Suggestions

Cottage Cheese Bake works well at breakfast with sliced tomatoes, avocado, berries, or fresh fruit.

For brunch, serve it with toast, a green salad, or roasted potatoes.

At lunch, pair it with cucumber salad, soup, or a simple vegetable side.

You can also use Cottage Cheese Bake as a protein-rich base and serve it with grilled vegetables or a fresh tomato salad.

For another easy cottage cheese breakfast, try our Cottage Cheese & Spinach Crustless Quiche for Easy Brunch Bliss.

Recipe Tips

Use full-fat cottage cheese for a creamier texture.

Low-fat cottage cheese also works, but the result may be slightly less rich.

Drain excess liquid from very watery cottage cheese before mixing.

Shred your own cheese if possible because it usually melts more smoothly.

Do not overbake Cottage Cheese Bake, as this can make the eggs rubbery.

Let the finished dish rest before slicing.

Use a glass or ceramic baking dish for even cooking.

If the top is browning too quickly, cover loosely with foil during the last few minutes.

Easy Variations

Although the basic version uses only three ingredients, you can easily build on it once you want more flavor.

For an herby version, add chopped parsley, dill, basil, or chives.

For a vegetable version, stir in cooked spinach, mushrooms, bell peppers, or zucchini.

Cottage Cheese Bake can also be made with pepper Jack cheese for a little heat.

For a Mediterranean twist, add feta, oregano, chopped olives, or sun-dried tomatoes.

If you prefer a breakfast-style version, add cooked turkey sausage or chopped green onions.

Make-Ahead Instructions

Cottage Cheese Bake is excellent for meal prep.

Prepare and bake the recipe as directed.

Once cooled, cut it into portions and store them in airtight containers.

You can make the full dish up to 3 days ahead and reheat individual servings as needed.

If you want to prepare the mixture in advance, whisk the ingredients together, cover, refrigerate, and bake within 12 hours.

Storage and Reheating

Store leftover Cottage Cheese Bake in an airtight container in the refrigerator for up to 4 days.

Reheat individual portions in the microwave for 30 to 60 seconds, depending on size.

You can also reheat slices in a covered skillet over low heat or in a 325°F oven until warmed through.

Freezing is possible, but the texture may become slightly softer after thawing.

For the best results, refrigerate Cottage Cheese Bake and enjoy it within a few days.

Nutrition Information

Approximate nutrition per serving:

Calories: 260
Protein: 27 g
Carbohydrates: 7 g
Fat: 14 g
Saturated Fat: 7 g
Fiber: 0 g
Sugar: 5 g
Sodium: 620 mg

Nutrition values are estimates and will vary depending on the cottage cheese and shredded cheese used.

Frequently Asked Questions

Can I use low-fat cottage cheese?

Yes. Low-fat cottage cheese works well, although the finished texture may be slightly less creamy than when using full-fat cottage cheese.

Can I blend the mixture?

Yes. Blending creates a smoother, more uniform texture. If you like visible cottage cheese curds, simply whisk by hand.

What cheese works best?

Mozzarella creates a mild flavor, while cheddar gives Cottage Cheese Bake a stronger, more savory taste. Colby Jack, Monterey Jack, or pepper Jack also work.

Why is my bake watery?

Some cottage cheese brands contain more liquid than others. If yours looks especially wet, drain off a little liquid before mixing.

Can I add vegetables?

Yes. Cook vegetables first and remove excess moisture before adding them to the mixture.

Can I make this without shredded cheese?

You can, but the recipe will be less rich and less cheesy. The shredded cheese also helps improve the texture and flavor.

Is this good for meal prep?

Yes. Cottage Cheese Bake stores well, reheats easily, and can be portioned into containers for quick breakfasts or lunches.

Final Thoughts

Cottage Cheese Bake is a simple recipe that delivers a soft, cheesy, protein-rich result with only three basic ingredients. Cottage cheese, eggs, and shredded cheese come together quickly and bake into a versatile dish that works for breakfast, lunch, or meal prep.

Cottage Cheese Bake is especially useful when you want something easy, filling, and flexible. You can keep it plain or add vegetables, herbs, or extra seasonings depending on your preference.

Whether you serve Cottage Cheese Bake warm from the oven or prepare it ahead for the week, its short ingredient list and simple method make it a practical recipe worth keeping.

For a hearty protein-packed dinner, you may also like our Mediterranean Baked Chicken Juicy and Flavorful.