Creamy Cheese Veggies

Creamy cheese veggies with broccoli, cauliflower, carrots, green beans, and corn in a smooth homemade cheese sauce

Creamy Cheese Veggies

Creamy Cheese Veggies is an easy vegetable side dish made with broccoli, cauliflower, carrots, green beans, and sweet corn in a smooth homemade cheese sauce. The vegetables stay tender while the creamy sauce adds rich flavor to every bite.

This comforting recipe takes about 25 minutes from start to finish, making it useful for busy weeknight dinners, family meals, or holiday side dishes. It pairs well with rice, pasta, roasted chicken, grilled meat, or warm crusty bread.

The sauce uses simple ingredients such as butter, flour, warm milk, and shredded cheese. You can use cheddar, mozzarella, or a blend of both for a smooth and flavorful finish.

Ingredients

For the Vegetables

  • 1 cup broccoli florets
  • 1 cup cauliflower florets
  • ½ cup carrots, sliced
  • ½ cup green beans, chopped
  • ½ cup sweet corn, optional
  • 1 tablespoon butter
  • Salt to taste
  • Water for boiling or steaming

For the Creamy Cheese Sauce

  • 2 tablespoons butter
  • 2 tablespoons all-purpose flour
  • 1½ cups warm milk
  • ½ cup grated cheddar or mozzarella cheese
  • ¼ teaspoon black pepper
  • ¼ teaspoon nutmeg, optional
  • Salt to taste
  • ½ teaspoon garlic powder, optional
  • 2 tablespoons heavy cream, optional

How to Make Creamy Cheese Veggies

Step 1: Prepare the Vegetables

Wash the broccoli, cauliflower, carrots, green beans, and corn under cool running water. Cut the vegetables into similar-sized pieces so they cook evenly.

Bring a pot of lightly salted water to a boil, then add the vegetables. Cook for about 6–8 minutes, or steam them until they are tender but still slightly firm.

Avoid overcooking the vegetables because they can become soft and watery when mixed with the sauce.

Drain the vegetables well and set them aside.

Step 2: Melt the Butter

Place a medium saucepan over medium heat. Add 2 tablespoons of butter and let it melt completely.

Keep the heat moderate so the butter does not burn before the sauce begins.

Step 3: Add the Flour

Add 2 tablespoons of all-purpose flour to the melted butter. Whisk continuously for about 1–2 minutes.

The flour should become bubbly and smooth. Cooking it briefly helps remove the raw flour taste and creates the base for a thick cheese sauce.

Step 4: Add the Warm Milk

Slowly pour the warm milk into the flour mixture while whisking constantly.

Adding the milk gradually helps prevent lumps and gives the sauce a smoother texture.

Continue cooking for about 2–3 minutes, stirring often, until the mixture becomes creamy and slightly thick.

Step 5: Season the Sauce

Add black pepper, salt, and garlic powder if using. Add a small amount of nutmeg for a subtle warm flavor.

For a richer sauce, stir in 2 tablespoons of heavy cream.

Taste the sauce and adjust the seasoning before adding the cheese.

Step 6: Add the Cheese

Turn the heat to low or remove the saucepan from the burner. Add the grated cheese and stir until completely melted.

Cheddar gives the sauce a stronger flavor, while mozzarella creates a mild and stretchy texture. A combination of both gives you a balanced result.

Do not boil the sauce after adding the cheese because high heat can make the sauce greasy or grainy.

Step 7: Combine the Vegetables and Sauce

Add the cooked vegetables to the cheese sauce.

Gently stir until the broccoli, cauliflower, carrots, green beans, and corn are evenly coated.

Keep the mixture over low heat for about 2 minutes so the vegetables absorb some of the creamy flavor.

Step 8: Garnish and Serve

Transfer the finished dish to a serving bowl.

Top it with fresh chopped parsley, chili flakes, or a little extra shredded cheese.

Serve the dish immediately while the sauce is warm and creamy.

Tips for the Best Creamy Cheese Veggies

Choose fresh vegetables that are firm and brightly colored for the best texture. Frozen vegetables can also work when fresh produce is not available.

Cut larger vegetables into smaller pieces so every bite cooks at the same rate.

Drain the vegetables thoroughly before adding them to the sauce because excess water can thin the cheese mixture.

Use freshly grated cheese when possible because it melts more smoothly than many pre-shredded varieties.

Keep the heat low after adding cheese to help maintain a silky sauce.

If the sauce becomes too thick, add a small splash of warm milk and stir until it reaches the desired consistency.

For extra flavor, add a small amount of Dijon mustard, Italian seasoning, or freshly minced garlic.

Serving Ideas

Creamy Cheese Veggies works well as a side dish for many everyday meals.

Serve it alongside roasted chicken, grilled chicken, baked salmon, steak, or turkey for a complete dinner.

For a simple meatless meal, spoon the vegetables over cooked rice or pasta. Crusty bread is also useful for soaking up the extra cheese sauce.

The recipe can also fit nicely on a holiday dinner table beside roasted meats, mashed potatoes, and other vegetable sides.

Make It a Baked Vegetable Casserole

You can turn this creamy vegetable dish into a simple baked casserole.

Transfer the prepared vegetables and sauce to a lightly greased baking dish. Sprinkle extra shredded cheese over the top.

Place the dish under a broiler until the cheese becomes golden and bubbly.

Watch it closely because the cheese can brown quickly under high heat.

Easy Ingredient Swaps

You can change the vegetables based on what you have available.

Try adding zucchini, bell peppers, mushrooms, spinach, peas, or asparagus for different flavors and textures.

For a stronger cheese flavor, use sharp cheddar. For a milder taste, use mozzarella or Monterey Jack.

To make a lower-carb version, leave out the carrots and sweet corn and use more low-carb vegetables such as broccoli, cauliflower, mushrooms, or zucchini.

For a vegetarian meal, serve the vegetables with pasta, rice, quinoa, or baked potatoes.

How to Store and Reheat

Allow leftovers to cool before transferring them to an airtight container.

Store the dish in the refrigerator for up to 2 days.

Reheat it gently in a saucepan over low heat. Add a small splash of milk while stirring to loosen the sauce and restore its creamy texture.

Avoid very high heat because it can cause the cheese sauce to separate.

Prep and Cook Time

  • Prep Time: 10 minutes
  • Cook Time: 15 minutes
  • Total Time: 25 minutes
  • Serving: Approximately 4 servings

Nutrition Information

Approximate nutrition per 1-cup serving:

  • Calories: 240 kcal
  • Protein: 9 g
  • Carbohydrates: 18 g
  • Fat: 15 g
  • Saturated Fat: 9 g
  • Fiber: 4 g
  • Calcium: 200 mg
  • Sugar: 5 g

Nutrition values are estimates and can change based on the specific cheese, milk, butter, cream, and vegetable brands used.

Frequently Asked Questions

Can I make Creamy Cheese Veggies vegan?

Yes. Replace butter with plant-based butter, use unsweetened plant milk, and choose vegan cheese for a dairy-free version.

What vegetables can I use instead?

Zucchini, mushrooms, bell peppers, spinach, peas, and asparagus can replace or supplement the vegetables in this recipe.

Can I use frozen vegetables?

Yes. Frozen vegetables are convenient, but cook them just until tender and drain them well before adding them to the cheese sauce.

Can I make this recipe ahead of time?

Yes. Prepare the dish ahead, refrigerate it, and gently reheat it with a small splash of milk before serving.

Is this recipe keto-friendly?

The original recipe is not strictly keto because flour, milk, carrots, and corn add carbohydrates; omit those higher-carb ingredients for a lower-carb version.

What cheese works best for the sauce?

Cheddar provides a rich flavor, while mozzarella gives a mild and creamy texture; using a blend gives a balanced result.

Can I bake this vegetable dish?

Yes. Place the prepared vegetables in a baking dish, cover with extra cheese, and broil until the top is golden and bubbly.

How do I prevent the cheese sauce from becoming lumpy?

Add warm milk slowly while whisking the flour and butter mixture, then keep the heat moderate and stir the sauce continuously.
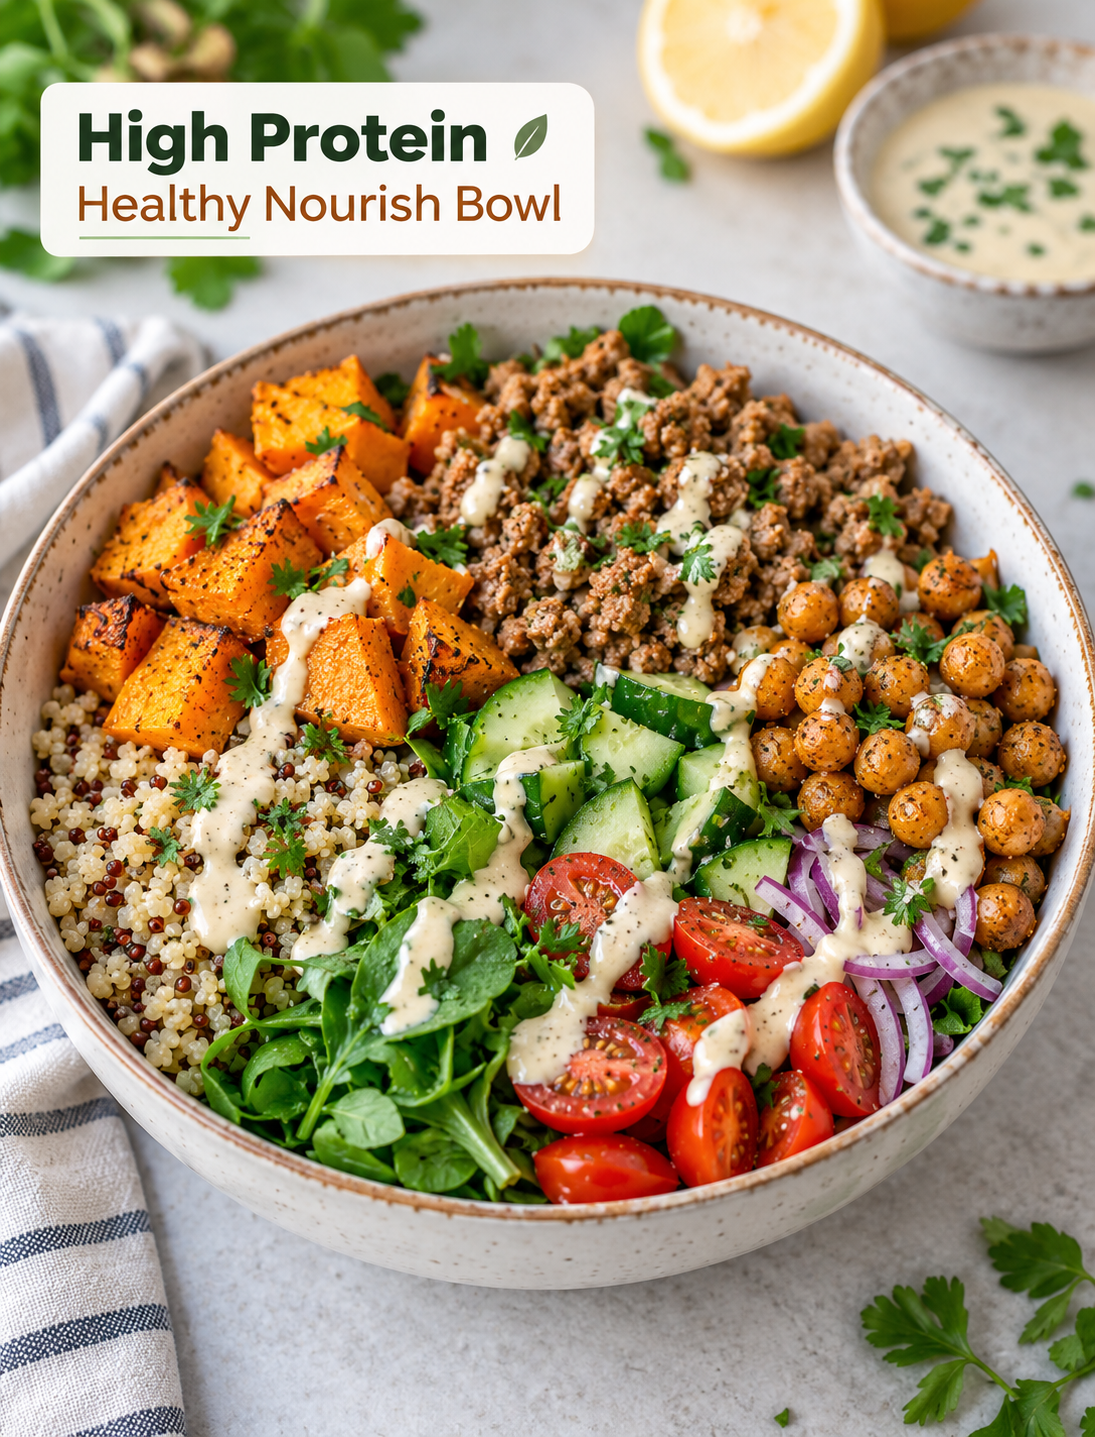
High Protein Healthy Nourish Bowl

High Protein Healthy Nourish Bowl

High Protein Healthy Nourish Bowl

A high protein healthy nourish bowl is an easy way to build a balanced meal with lean protein, whole grains, vegetables, and fiber-rich chickpeas. This bowl combines seasoned ground turkey with roasted pumpkin, quinoa, fresh vegetables, leafy greens, and a creamy lemon tahini dressing.

The roasted pumpkin adds natural sweetness, while cumin and smoked paprika give the turkey and chickpeas a warm, savory flavor. Fresh cucumber, cherry tomatoes, red onion, and herbs add crunch and freshness to every bite.

This healthy nourish bowl works well for lunch or dinner and can also be prepared ahead for busy weekdays. Each serving provides about 35 grams of protein and 9 grams of fiber, making it a filling choice for a balanced meal.

Why You’ll Love This Healthy Nourish Bowl

This recipe brings several useful ingredients together in one simple meal.

  • High in protein: Lean ground turkey provides a strong source of protein to help make the meal satisfying.
  • Rich in fiber: Chickpeas, vegetables, leafy greens, and whole grains add dietary fiber.
  • Colorful and fresh: Pumpkin, tomatoes, cucumber, greens, and herbs create a bright and appealing bowl.
  • Easy to customize: You can use quinoa, brown rice, or couscous as the grain base.
  • Meal prep friendly: Most components can be cooked ahead and stored separately.
  • Balanced flavor: Savory turkey, sweet roasted pumpkin, earthy chickpeas, and lemon tahini work well together.

Ingredients You’ll Need

Ground Turkey

  • 300 g (10 oz) lean ground turkey
  • 1 tablespoon olive oil
  • 1 teaspoon garlic powder
  • 1 teaspoon ground cumin
  • ½ teaspoon smoked paprika
  • ½ teaspoon salt
  • ½ teaspoon black pepper

Roasted Pumpkin

  • 2 cups peeled and cubed pumpkin or butternut squash
  • 1 tablespoon olive oil
  • ½ teaspoon paprika
  • ½ teaspoon salt
  • ¼ teaspoon black pepper

Chickpeas

  • 1 can (15 oz / 425 g) chickpeas, drained and rinsed
  • ½ teaspoon cumin
  • ½ teaspoon paprika
  • Pinch of salt

Bowl Base and Fresh Vegetables

  • 1 cup cooked quinoa, brown rice, or couscous
  • 2 cups spinach, arugula, or kale
  • 1 small cucumber, diced
  • 1 cup cherry tomatoes, halved
  • ¼ red onion, thinly sliced
  • 2 tablespoons chopped fresh parsley or cilantro

Lemon Tahini Dressing

  • 2 tablespoons tahini
  • 1 tablespoon lemon juice
  • 1 tablespoon olive oil
  • 1–2 tablespoons water
  • 1 small garlic clove, minced
  • Salt and black pepper to taste

How to Make a High Protein Nourish Bowl

1: Roast the Pumpkin

  1. Preheat the oven to 400°F (200°C).
  2. Place the pumpkin cubes on a baking tray.
  3. Add olive oil, paprika, salt, and black pepper.
  4. Toss until the pumpkin is evenly coated.
  5. Spread the cubes into a single layer.
  6. Roast for 20–25 minutes, turning once halfway through.
  7. Remove when the pumpkin is tender with lightly caramelized edges.

2: Cook the Ground Turkey

  1. Heat 1 tablespoon of olive oil in a skillet over medium heat.
  2. Add the ground turkey.
  3. Break the turkey into small pieces as it cooks.
  4. Cook for about 6–8 minutes until browned and fully cooked.
  5. Add garlic powder, cumin, smoked paprika, salt, and black pepper.
  6. Stir well and cook for another minute so the spices coat the turkey evenly.

3: Prepare the Chickpeas

  1. Drain and rinse the chickpeas well.
  2. Add them to a skillet over medium heat.
  3. Season with cumin, paprika, and a pinch of salt.
  4. Cook for 5–7 minutes, stirring often.
  5. Continue cooking until the chickpeas are warm with lightly crisp edges.

4: Make the Lemon Tahini Dressing

  1. Add tahini, lemon juice, olive oil, minced garlic, salt, and pepper to a small bowl.
  2. Whisk the ingredients until smooth.
  3. Add water one tablespoon at a time.
  4. Continue whisking until the dressing reaches a pourable consistency.
  5. Taste and adjust the seasoning before serving.

5: Prepare the Fresh Ingredients

  1. Dice the cucumber into bite-sized pieces.
  2. Cut the cherry tomatoes in half.
  3. Thinly slice the red onion.
  4. Chop the parsley or cilantro.
  5. Keep the vegetables fresh until the bowls are ready to assemble.

6: Assemble the Bowl

  1. Divide the cooked quinoa, brown rice, or couscous between serving bowls.
  2. Add the leafy greens.
  3. Arrange the roasted pumpkin and seasoned chickpeas around the bowl.
  4. Add the cooked ground turkey.
  5. Top with cucumber, tomatoes, red onion, and fresh herbs.
  6. Drizzle with lemon tahini dressing.
  7. Serve while the warm ingredients are still fresh and flavorful.

Tips for the Best Nourish Bowl

Use pumpkin cubes that are similar in size so they cook evenly. Smaller pieces will roast faster and develop more caramelized edges.

Choose lean ground turkey for a lighter protein option without losing the savory flavor of the dish.

For extra texture, roast the chickpeas instead of sautéing them. Pat them dry first, season them, and roast until crisp.

Keep the dressing separate when preparing meals ahead. This helps the greens and fresh vegetables stay crisp.

Add chili flakes or a small amount of harissa if you enjoy a spicy flavor.

Easy Ingredient Swaps

Pumpkin can be replaced with butternut squash or sweet potatoes when needed. These options also roast well and provide natural sweetness.

Ground chicken can replace turkey while keeping the bowl high in lean protein.

Quinoa, brown rice, and couscous can each work as the grain base. Quinoa is especially useful when you want additional plant-based protein.

For a plant-based version, replace the turkey with roasted tofu or seasoned lentils.

You can also use spinach, kale, or arugula depending on the flavor and texture you prefer.

Meal Prep and Storage

This bowl is convenient for weekday meal preparation because the main components can be cooked separately.

Prepare the turkey, pumpkin, chickpeas, and grain ahead of time. Store them in separate airtight containers in the refrigerator for up to 3 days.

Keep fresh vegetables and leafy greens separate from the warm ingredients. Store the lemon tahini dressing in a small sealed container.

When ready to eat, reheat the turkey, pumpkin, chickpeas, and grains, then add the fresh vegetables, greens, herbs, and dressing.

For freezing, the cooked turkey and roasted pumpkin are suitable for freezing. Fresh vegetables and greens should be added after reheating for better texture.

Nutrition Information

Approximate nutrition per serving:

  • Calories: 480 kcal
  • Protein: 35 g
  • Fat: 18 g
  • Saturated Fat: 3 g
  • Carbohydrates: 42 g
  • Sugar: 6 g
  • Fiber: 9 g

Nutrition values can vary based on the specific brands, portion sizes, grain choice, and dressing amount used.

Frequently Asked Questions

Can I use ground chicken instead of turkey?

Yes. Ground chicken is an easy substitute and works well with the same garlic, cumin, and paprika seasoning.

Is this nourish bowl good for meal prep?

Yes. Cooked turkey, pumpkin, chickpeas, and grains can be prepared ahead and stored separately for up to 3 days.

Can I make this bowl without grains?

Yes. Skip the quinoa, rice, or couscous and add extra leafy greens or vegetables for a lower-carbohydrate version.

Can I make this recipe vegetarian?

Yes. Replace the turkey with roasted tofu or seasoned lentils for a satisfying plant-based bowl.

Can I freeze the leftovers?

The cooked turkey and roasted pumpkin freeze well, while fresh vegetables and greens are best added after reheating.

What can I use instead of pumpkin?

Butternut squash and sweet potatoes are excellent substitutes because they roast well and provide a naturally sweet flavor.

What dressing goes well with this bowl?

Lemon tahini adds creamy, nutty, and fresh flavors, while yogurt garlic sauce, balsamic vinaigrette, or avocado dressing can also work.

How can I make the bowl more flavorful?

Use fresh herbs, lemon juice, smoked paprika, cumin, chili flakes, or harissa to add more flavor without making the recipe complicated.

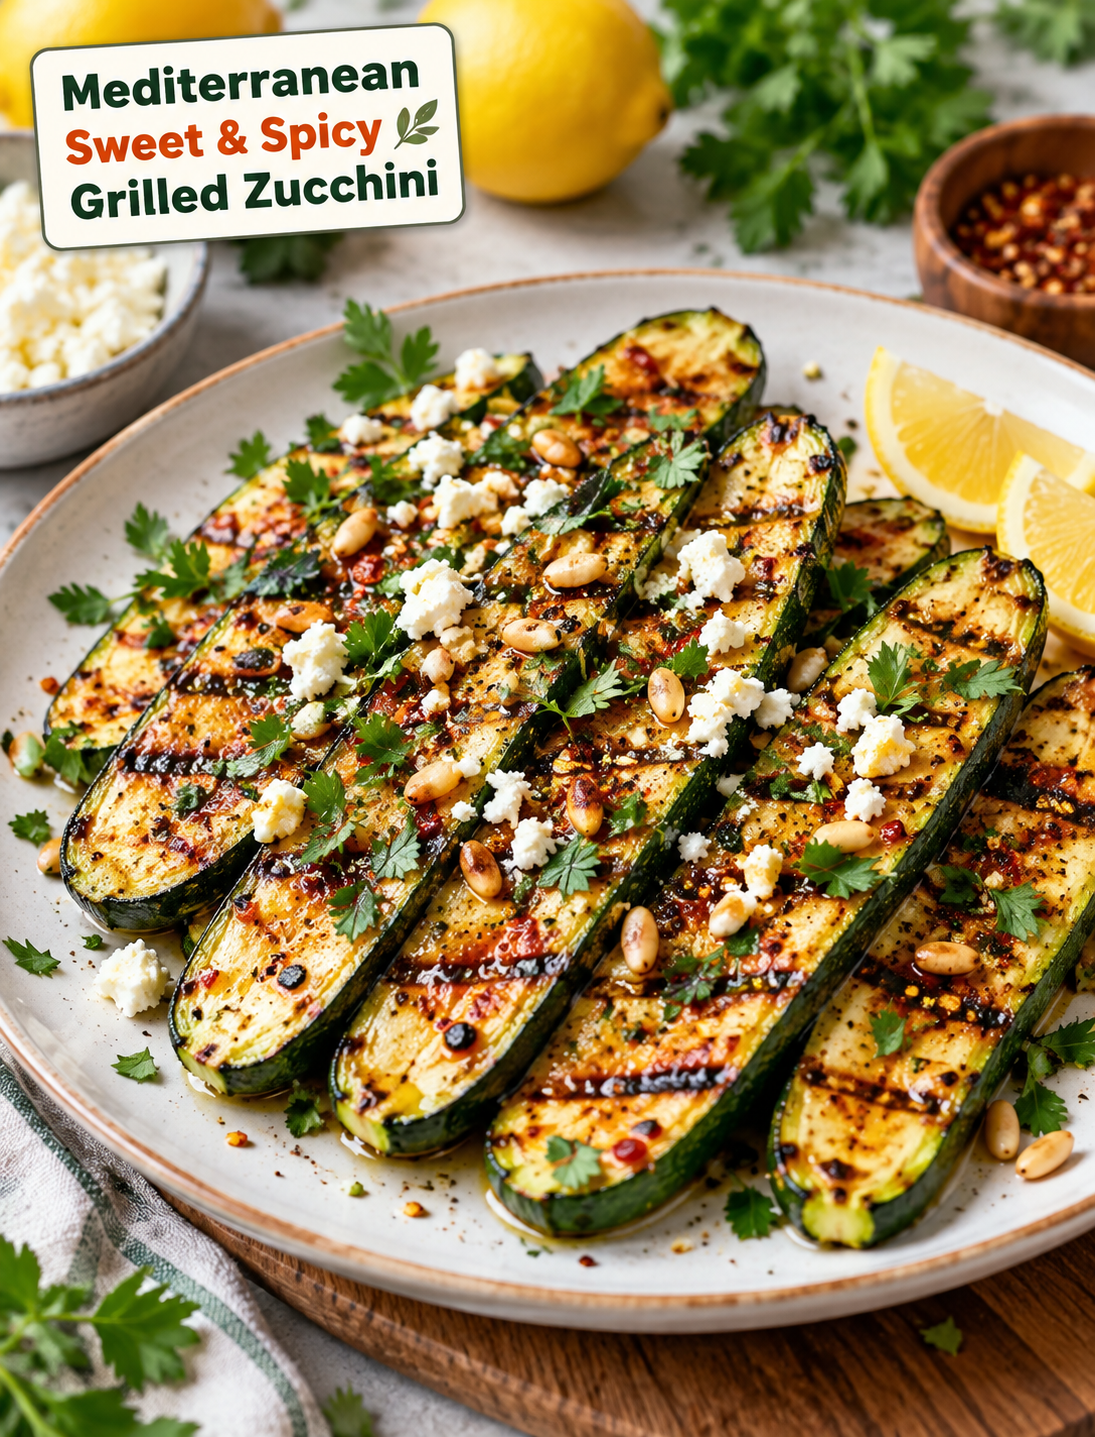
Mediterranean Sweet & Spicy Grilled Zucchini

Mediterranean sweet and spicy grilled zucchini with herbs, feta, lemon wedges, and smoky caramelized grill marks

Mediterranean Sweet & Spicy Grilled Zucchini

Mediterranean Sweet & Spicy Grilled Zucchini is an easy vegetable side dish with smoky, sweet, spicy, and fresh flavors in every bite. Thin zucchini strips are coated in olive oil, lemon juice, smoked paprika, garlic, and chili, then grilled until tender with lightly charred edges.

This grilled zucchini recipe is a simple choice for summer cookouts, weeknight dinners, and Mediterranean-inspired meals. It takes only a few basic ingredients and about 30 minutes from start to finish. Serve it with grilled chicken, fish, lamb, couscous, quinoa, or warm pita for a complete meal.

Why You’ll Love This Grilled Zucchini

  • Quick to make: The zucchini cooks in about 6–8 minutes.
  • Big flavor: Smoked paprika, garlic, lemon, and chili create a bold marinade.
  • Easy ingredients: Most ingredients are common pantry staples.
  • Great for grilling: Outdoor grills and indoor grill pans both work well.
  • Flexible: Add feta, herbs, nuts, tahini, or yogurt sauce before serving.
  • Diet-friendly: Use maple syrup instead of honey to keep the recipe vegan.
  • Meal-prep friendly: Cooked zucchini can be refrigerated for up to 3 days.

Ingredients You’ll Need

The marinade gives this vegetable dish its signature sweet and smoky flavor.

  • 3 medium zucchinis: Slice them lengthwise into thin, even strips.
  • 2 tablespoons olive oil: Helps the zucchini brown and prevents sticking.
  • 1 tablespoon honey or maple syrup: Adds a mild sweetness and helps caramelize the edges.
  • 1 tablespoon lemon juice: Brightens the marinade and balances the sweetness.
  • 1 teaspoon smoked paprika: Adds a deep smoky flavor without requiring extra seasoning.
  • 1 teaspoon chili flakes or Aleppo pepper: Provides mild heat that you can adjust.
  • 1 teaspoon garlic powder: Adds savory flavor throughout the zucchini.
  • Salt and black pepper: Season the vegetables evenly.
  • 1 teaspoon harissa paste, optional: Use it when you want a stronger spicy kick.

Optional Toppings

Fresh toppings make the grilled vegetables even more flavorful.

  • Chopped fresh mint or parsley
  • Crumbled feta or vegan feta
  • Toasted pine nuts or sesame seeds
  • Lemon wedges
  • Tahini sauce
  • Greek yogurt or dairy-free yogurt sauce

How to Make Mediterranean Sweet & Spicy Grilled Zucchini

Step 1: Slice the Zucchini

Wash and dry three medium zucchinis. Slice each one lengthwise into strips about ¼ inch thick.

Keep the slices as even as possible so they cook at the same rate. Very thin slices can become soft quickly, while thick pieces may need extra cooking time.

Step 2: Make the Marinade

Add olive oil, honey or maple syrup, lemon juice, smoked paprika, chili flakes, garlic powder, salt, and black pepper to a small bowl.

Whisk until the ingredients are well combined. Add harissa paste if you prefer more heat.

Step 3: Coat the Zucchini

Place the sliced zucchini in a shallow dish or large food-safe bag. Pour the marinade over the vegetables.

Toss gently until every piece is lightly coated. Let the zucchini rest for 15–30 minutes for more flavor.

If you are short on time, you can grill it immediately.

Step 4: Preheat the Grill

Heat an outdoor grill or indoor grill pan over medium-high heat.

Lightly oil the cooking surface to reduce sticking. The grill should be hot before the zucchini goes on so the slices can develop attractive char marks.

Step 5: Grill the Zucchini

Place the zucchini strips on the hot grill in a single layer.

Cook for about 3–4 minutes on the first side. Turn each piece and grill for another 3–4 minutes.

Look for visible grill marks and tender centers. Remove the zucchini as soon as it is cooked through to prevent a mushy texture.

Step 6: Add Fresh Toppings

Transfer the grilled zucchini to a serving platter.

Top with chopped mint or parsley, crumbled feta, toasted pine nuts, or sesame seeds. Finish with fresh lemon juice or a light drizzle of tahini.

Serve warm or at room temperature.

Tips for Perfect Grilled Zucchini

Slice evenly: Uniform pieces cook more consistently and are easier to turn on the grill.

Do not overcrowd the grill: Leave space between the slices so they grill instead of steam.

Use medium-high heat: A properly heated grill creates caramelized edges while keeping the inside tender.

Pat the zucchini dry: Removing excess moisture helps the vegetables brown more effectively.

Watch the sweet marinade: Honey and maple syrup can brown quickly, so avoid excessive heat.

Do not overcook: Zucchini should be tender with some structure rather than soft and watery.

Adjust the spice: Reduce the chili flakes for mild flavor or add harissa for extra heat.

Easy Ways to Change the Recipe

This recipe works well with different vegetables and toppings.

Try yellow squash: Replace some or all of the zucchini with yellow squash for a colorful vegetable platter.

Add more vegetables: Grill eggplant, bell peppers, mushrooms, or red onions with the same Mediterranean-style marinade.

Change the spice: Use sumac, cayenne, or chipotle powder for a different flavor profile.

Make it creamy: Add whipped feta, labneh, or Greek yogurt after grilling.

Add more sweetness: A small drizzle of balsamic glaze or pomegranate molasses adds sweet-tart flavor.

Make it vegan: Choose maple syrup and plant-based feta instead of honey and dairy feta.

What to Serve With Grilled Zucchini

This flavorful side pairs with many everyday meals.

Serve it alongside grilled chicken or salmon for an easy summer dinner. It also works well with lamb kebabs, falafel, couscous, quinoa bowls, and roasted chickpeas.

For a light lunch, place the zucchini over cooked quinoa with chickpeas, cucumber, tomatoes, herbs, and tahini. Warm pita or flatbread makes an easy addition.

For entertaining, arrange the vegetables on a large platter with feta, olives, lemon wedges, and fresh herbs.

How to Store and Reheat

Allow leftover zucchini to cool before transferring it to an airtight container. Refrigerate for up to 3 days.

For the best texture, serve leftovers cold or at room temperature. If you prefer them warm, reheat them briefly in a skillet or oven until heated through.

Avoid prolonged reheating because zucchini can become soft and watery.

Frequently Asked Questions

Can I make grilled zucchini ahead of time?

Yes. Cook it up to 3 days ahead and refrigerate it in an airtight container until ready to serve.

Can I make this recipe without an outdoor grill?

Yes. Use an indoor grill pan, cast-iron skillet, or roast the zucchini at 425°F for about 15–18 minutes.

Can I use yellow squash instead of zucchini?

Yes. Yellow squash has a similar texture and works well with the same sweet and spicy marinade.

How can I make the zucchini less spicy?

Reduce or omit the chili flakes and skip the harissa for a mild version.

How do I keep grilled zucchini from getting mushy?

Slice it evenly, avoid overcrowding the grill, and remove it as soon as the centers become tender.

Can I make this zucchini recipe vegan?

Yes. Use maple syrup instead of honey and choose vegan feta or another plant-based topping.

What herbs taste best with grilled zucchini?

Fresh mint and parsley pair especially well with the smoky, lemony, and spicy flavors.

Can I marinate zucchini overnight?

It is better to marinate it for 15–30 minutes because a very long marinade can make the zucchini overly soft.

Final Thoughts

Mediterranean Sweet & Spicy Grilled Zucchini is a fast way to turn fresh summer squash into a flavorful side dish. The combination of olive oil, lemon, smoked paprika, garlic, and chili creates a balanced mix of smoky, sweet, spicy, and bright flavors.

With a hot grill and a few simple ingredients, you can have tender zucchini with beautifully caramelized edges in minutes. Add fresh herbs, feta, toasted seeds, or tahini to make it your own, then serve it alongside your favorite grilled or Mediterranean-inspired meal.

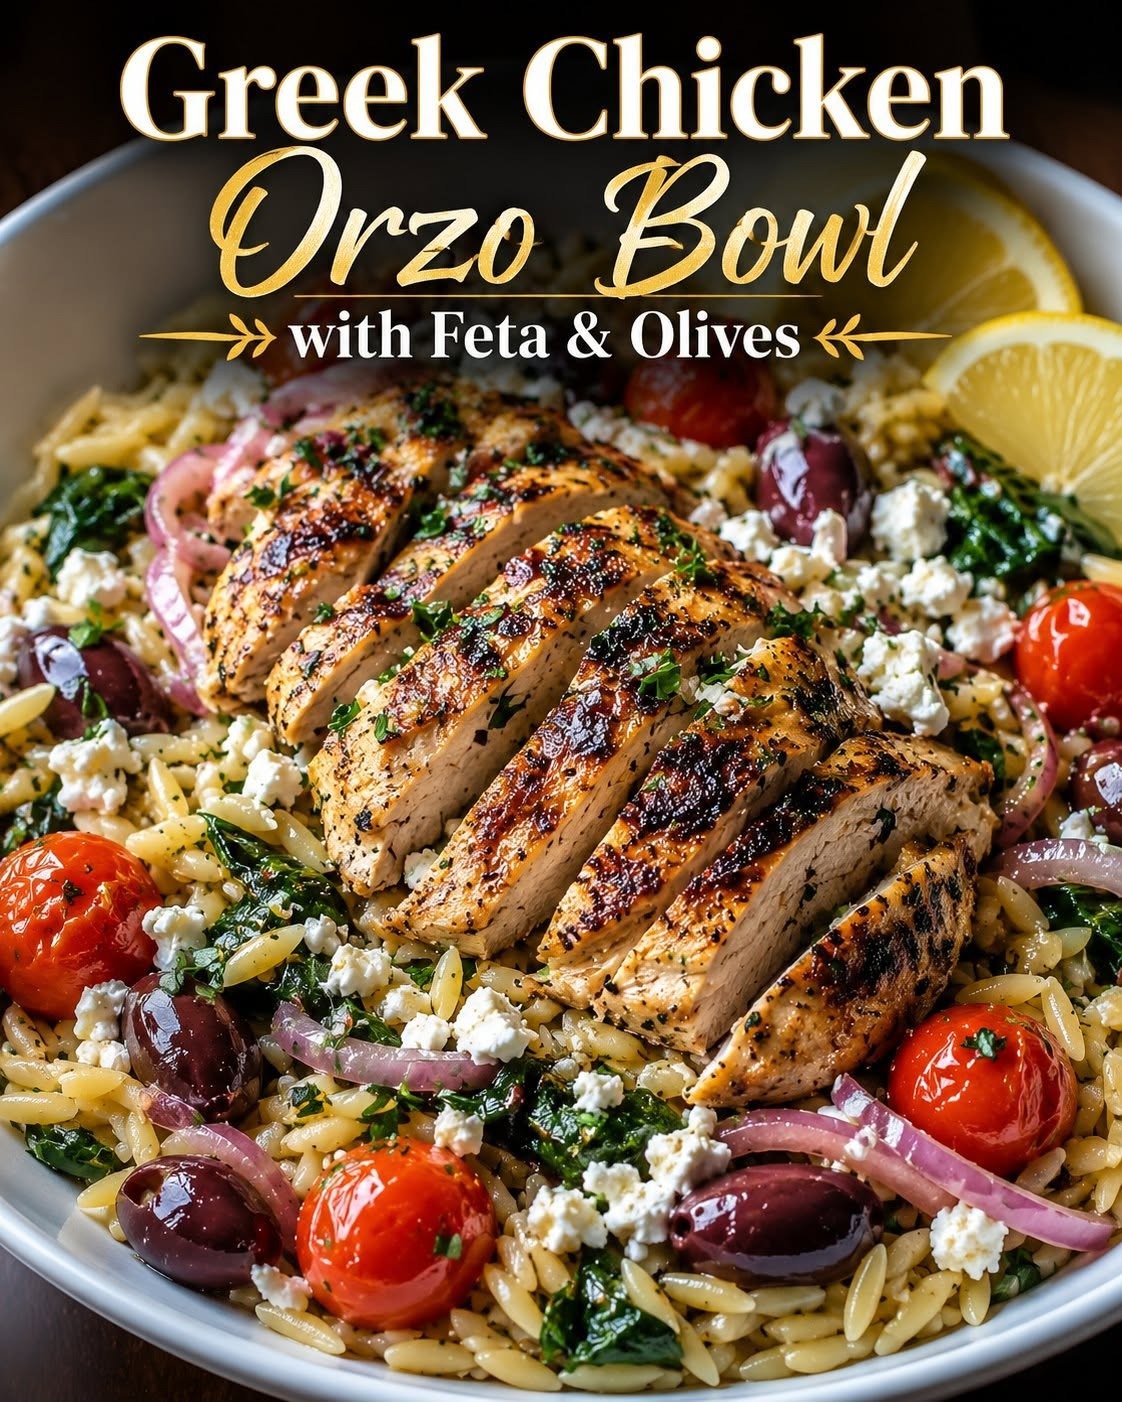
Greek Chicken Orzo Bowl with Feta & Olives

Greek Chicken Orzo Bowl with Feta & Olives

Greek Chicken Orzo Bowl with Feta & Olives

Description

This Greek Chicken Orzo Bowl with Feta & Olives is a fresh, colorful Mediterranean-inspired meal packed with juicy lemon-herb chicken, tender orzo, crisp vegetables, briny Kalamata olives, and creamy feta cheese. Everything comes together with a bright homemade lemon-oregano dressing that gives every bite a delicious balance of savory, tangy, and fresh flavors. The combination of protein-rich chicken, satisfying orzo, vegetables, and olive oil makes these bowls filling enough for dinner while still feeling light and vibrant. They’re perfect for busy weeknights, summer lunches, healthy meal prep, or serving family-style when you want something impressive without complicated cooking.

Ingredients For the Greek Chicken

  • 1½ lbs boneless, skinless chicken breasts or thighs
  • 2 tbsp extra-virgin olive oil
  • 2 tbsp fresh lemon juice
  • 3 garlic cloves, minced
  • 1½ tsp dried oregano
  • 1 tsp smoked paprika
  • ½ tsp ground cumin
  • ¾ tsp salt
  • ½ tsp freshly ground black pepper
  • 1 tsp lemon zest

Orzo

  • 1½ cups dry orzo pasta
  • 4 cups water or low-sodium chicken broth
  • 1 tbsp extra-virgin olive oil
  • 1 tbsp fresh lemon juice
  • 2 tbsp fresh parsley, chopped
  • ¼ tsp salt
  • ¼ tsp black pepper

For the Bowl Toppings

  • 1½ cups cherry tomatoes, halved
  • 1 large cucumber, diced
  • ½ small red onion, thinly sliced
  • ¾ cup Kalamata olives, pitted and halved
  • 1 cup crumbled feta cheese
  • ¼ cup fresh parsley, chopped
  • 2 tbsp fresh dill, chopped, optional
  • Lemon wedges, for serving

Lemon-Oregano Dressing

  • ¼ cup extra-virgin olive oil
  • 3 tbsp fresh lemon juice
  • 1 tbsp red wine vinegar
  • 1 garlic clove, finely minced
  • 1 tsp dried oregano
  • 1 tsp Dijon mustard
  • ½ tsp honey
  • ¼ tsp salt
  • ¼ tsp freshly ground black pepper

Step-by-Step Instructions

Begin by preparing the chicken marinade. In a large bowl, combine olive oil, lemon juice, minced garlic, oregano, smoked paprika, cumin, salt, black pepper, and lemon zest.

Add the chicken and toss thoroughly until every piece is coated in the marinade.

Cover and refrigerate for at least 30 minutes. For deeper flavor, marinate for up to several hours in the refrigerator.

While the chicken marinates, prepare the lemon-oregano dressing.

Add olive oil, lemon juice, red wine vinegar, garlic, oregano, Dijon mustard, honey, salt, and black pepper to a small jar.

Close tightly and shake vigorously until emulsified. Set aside.

Bring water or chicken broth to a boil in a medium saucepan.

Add the orzo and cook according to the package directions until al dente, stirring occasionally.

Drain the orzo thoroughly.

Transfer it to a large bowl and immediately toss with olive oil, lemon juice, parsley, salt, and black pepper.

Set aside and allow it to cool slightly while preparing the chicken.

Heat a large skillet or grill pan over medium-high heat.

Remove the chicken from the marinade, allowing excess marinade to drip away. Discard any marinade that contacted raw chicken.

Place the chicken in the hot skillet.

Cook for approximately 5–7 minutes per side, depending on thickness.

Continue cooking until the thickest part reaches an internal temperature of 165°F (74°C).

Transfer the cooked chicken to a clean cutting board.

Allow it to rest for 5–10 minutes before slicing. This helps keep the chicken juicy.

Meanwhile, prepare the vegetables.

Halve the cherry tomatoes, dice the cucumber, thinly slice the red onion, and halve the Kalamata olives.

For a milder onion flavor, soak the sliced red onion in cold water for approximately 10 minutes, then drain thoroughly.

Divide the warm or room-temperature lemon-herb orzo among four large serving bowls.

Arrange cucumber, cherry tomatoes, red onion, and Kalamata olives around the orzo.

Slice the rested chicken into strips or bite-sized pieces.

Place a generous portion of Greek chicken over each bowl.

Sprinkle crumbled feta generously over the chicken and vegetables.

Add fresh parsley and optional dill.

Drizzle the lemon-oregano dressing over each bowl.

Finish with freshly ground black pepper and an extra squeeze of lemon.

Serve immediately with lemon wedges on the side.

Tips

  • Don’t overcook the chicken. Use an instant-read thermometer and remove it once the center reaches 165°F (74°C).
  • Chicken thighs are an excellent alternative to breasts and tend to remain especially juicy.
  • Cooking orzo in chicken broth instead of water gives it additional savory flavor.
  • Toss warm orzo with lemon juice and olive oil immediately after draining so it absorbs the flavor.
  • Use good-quality Kalamata olives for their rich, briny flavor.
  • Block feta crumbled by hand often has a creamier texture than pre-crumbled feta.
  • Add the dressing shortly before serving if you want the vegetables to remain especially crisp.
  • For additional crunch, add sliced bell peppers or chopped romaine.

Notes

These Greek chicken orzo bowls are excellent for meal prep. Prepare the chicken, orzo, dressing, and vegetables ahead and refrigerate them in separate airtight containers. Assemble the bowls when ready to eat. For the freshest texture, keep the dressing separate and add it immediately before serving. Refrigerate cooked chicken promptly and enjoy leftovers within 3–4 days.
For an even more Mediterranean-style bowl, add hummus, tzatziki, roasted red peppers, chickpeas, artichoke hearts, or pepperoncini. You can also substitute quinoa or brown rice for the orzo if desired.

Q&A

Can I make this bowl ahead of time?
Yes. It is an excellent meal-prep recipe. Store the components separately and assemble when ready to eat.
Can I serve the orzo cold?
Absolutely. This bowl is delicious with warm, room-temperature, or chilled orzo.
Can I use rotisserie chicken?
Yes. For a shortcut, season shredded rotisserie chicken with lemon juice, oregano, olive oil, and black pepper before adding it to the bowls.
Can I make it vegetarian?
Yes. Replace the chicken with chickpeas, grilled tofu, or roasted vegetables.
What can I use instead of Kalamata olives?
Green olives or another Mediterranean-style olive can be substituted, or simply leave them out.
What sauce goes well with this bowl?
The lemon-oregano dressing is excellent, but homemade tzatziki also makes a delicious creamy addition.

Servings

Makes approximately 4 generous servings

Nutrition (Approx. Per Serving)

  • Calories: 620
  • Protein: 45g
  • Carbohydrates: 57g
  • Fat: 25g
  • Saturated Fat: 7g
  • Fiber: 6g
  • Sugar: 7g
  • Sodium: 850mg
  • Cholesterol: 115mg
  • Potassium: 820mg
    Nutritional values are estimates and may vary depending on chicken, feta, olives, orzo, dressing, and portion size.

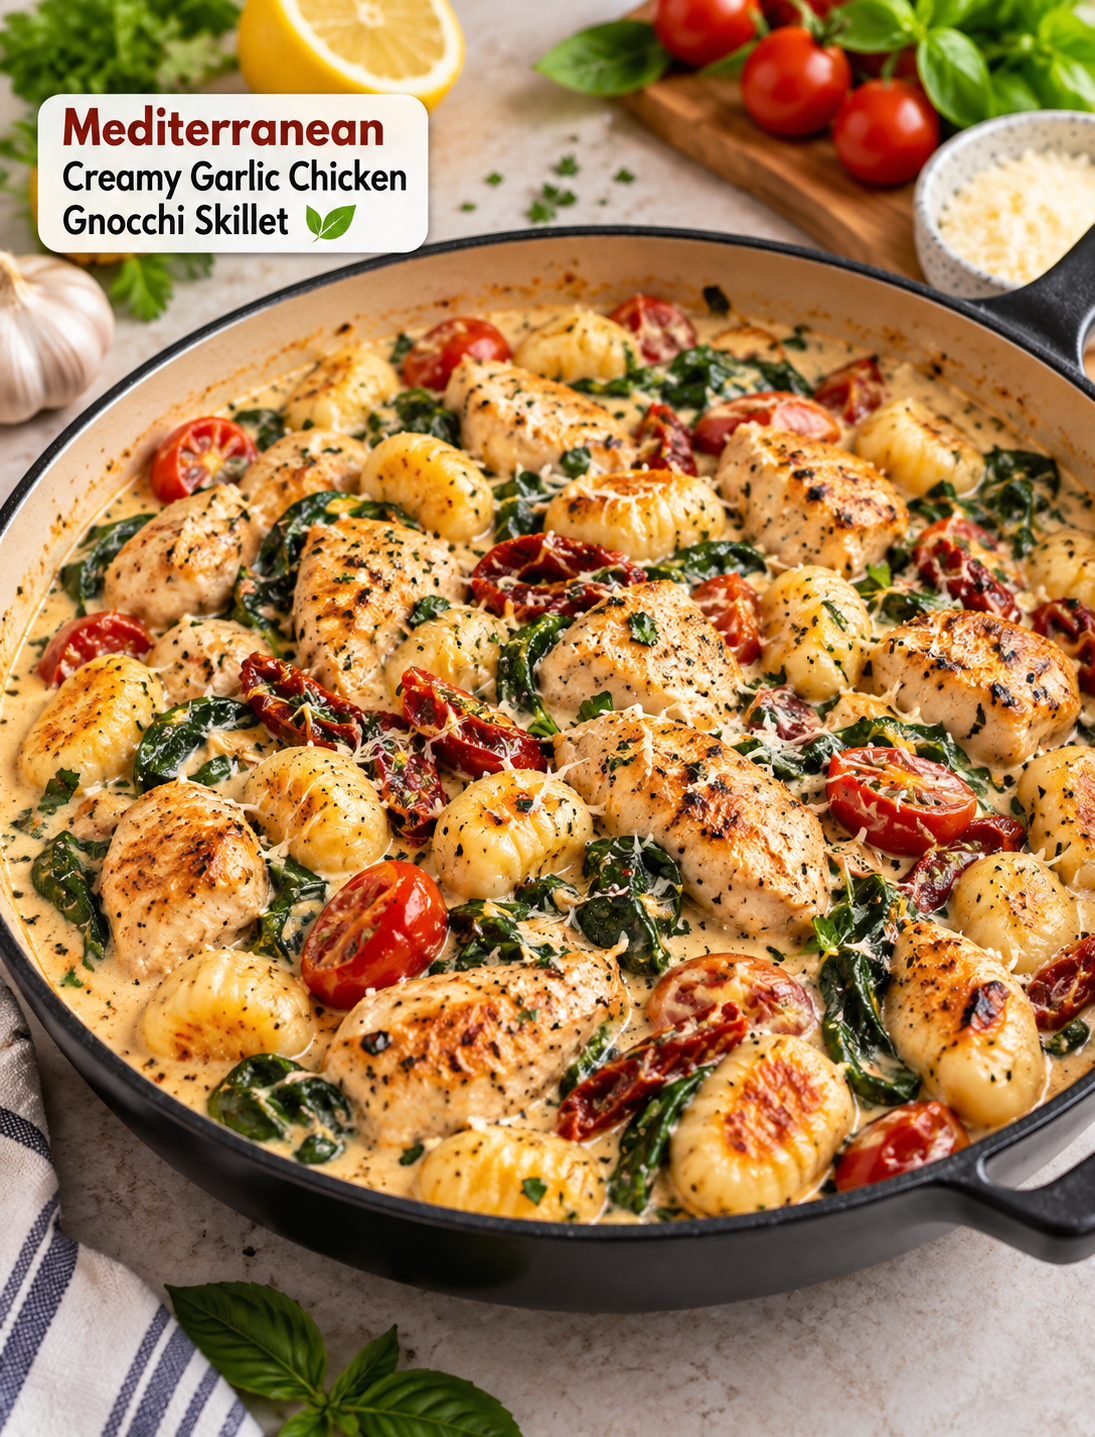
Mediterranean Creamy Garlic Chicken Gnocchi Skillet

Mediterranean creamy garlic chicken gnocchi skillet with golden gnocchi, tender chicken, spinach, cherry tomatoes, and creamy garlic sauce

Mediterranean Creamy Garlic Chicken Gnocchi Skillet

If you need a comforting dinner that feels special without taking all evening, this Mediterranean Creamy Garlic Chicken Gnocchi Skillet is a great choice. It combines tender chicken, golden pan-seared gnocchi, garlic, sun-dried tomatoes, fresh spinach, and a creamy lemon Parmesan sauce in one skillet.

The entire meal comes together in about 30 minutes, making it practical for busy weeknights. The gnocchi develops a lightly crisp outside while staying soft inside, and the creamy sauce brings all the ingredients together.

This recipe also works well for casual dinners with family or guests because it looks colorful and tastes fresh without requiring complicated cooking techniques.

Why You’ll Love This Recipe

  • One-pan meal: Chicken, gnocchi, vegetables, and sauce are prepared in one skillet for easier cleanup.
  • Ready in 30 minutes: The recipe uses simple ingredients and quick cooking methods.
  • Crispy and creamy: Pan-seared gnocchi adds texture to the smooth garlic cream sauce.
  • Mediterranean flavors: Lemon, oregano, tomatoes, garlic, and fresh herbs give the dish a bright finish.
  • Easy to customize: You can use dairy-free cream, gluten-free gnocchi, or another protein.
  • Family-friendly: The mild seasoning can be adjusted easily for different tastes.

Ingredients You’ll Need

For the Chicken and Gnocchi

  • 1 lb boneless, skinless chicken breast or thighs, cut into bite-size strips
  • 1 package (16 oz) potato gnocchi
  • 2 tbsp olive oil, divided
  • 1 tsp dried oregano
  • ½ tsp smoked paprika, optional
  • Salt and black pepper, to taste

For the Creamy Garlic Sauce

  • 4 garlic cloves, finely minced
  • ½ cup sun-dried tomatoes, drained and chopped
  • 1 cup cherry tomatoes, halved
  • 2 cups fresh spinach or chopped kale
  • 1 cup unsweetened cream, regular or plant-based
  • ⅓ cup grated Parmesan cheese or dairy-free alternative
  • Zest and juice of ½ lemon
  • 2 tbsp fresh basil or parsley, chopped

Helpful ingredient note: Shelf-stable or refrigerated gnocchi can be cooked directly in the skillet, so there is no need to boil it first.

How to Make Mediterranean Creamy Garlic Chicken Gnocchi Skillet

Step 1: Season and Cook the Chicken

Pat the chicken dry with a paper towel so it browns more easily. Season it with oregano, smoked paprika, salt, and black pepper.

Heat 1 tablespoon of olive oil in a large skillet over medium heat. Add the chicken in a single layer and cook for about 5–6 minutes, turning occasionally, until browned and cooked through.

Transfer the chicken to a plate and keep it nearby while you prepare the rest of the dish.

Step 2: Crisp the Gnocchi

Add the remaining 1 tablespoon of olive oil to the same skillet. Add the gnocchi in an even layer.

Let it cook undisturbed for 2–3 minutes so the bottoms can turn golden. Stir and continue cooking for another 2–3 minutes, allowing several sides to become lightly crisp.

Remove the gnocchi and place it with the cooked chicken.

Tip: Avoid overcrowding the skillet. If necessary, cook the gnocchi in two batches so it browns instead of steaming.

Step 3: Build the Garlic Tomato Base

Lower the heat to medium-low. Add the minced garlic, chopped sun-dried tomatoes, and halved cherry tomatoes.

Cook for about 2 minutes, stirring frequently. The garlic should become fragrant, while the cherry tomatoes should begin to soften.

If browned bits are stuck to the bottom of the skillet, add a small splash of broth or lemon juice and gently scrape them up. These browned bits add extra flavor to the sauce.

Step 4: Add the Greens

Add the fresh spinach or chopped kale to the skillet. Stir for 1–2 minutes until the greens soften.

Spinach cooks quickly, while kale may need an extra minute or two. Keep the heat moderate to prevent the garlic from burning.

Step 5: Make the Creamy Sauce

Pour the cream into the skillet and stir well. Add the Parmesan and let the mixture simmer gently for 2–3 minutes.

The sauce should become slightly thicker without boiling aggressively. Taste and adjust the salt and black pepper if needed.

Important: Sun-dried tomatoes and Parmesan can already contain plenty of salt, so season the sauce after both ingredients have been added.

Step 6: Bring Everything Together

Return the cooked chicken and crispy gnocchi to the skillet. Gently toss everything through the sauce until the chicken and gnocchi are evenly coated.

Cook for another 1–2 minutes to warm everything through.

If the sauce becomes too thick, add a small splash of milk or broth until it reaches your preferred consistency.

Step 7: Add the Fresh Finish

Turn off the heat and add the lemon zest and lemon juice. Sprinkle with fresh basil or parsley.

Serve the skillet immediately while the gnocchi is warm and the sauce is creamy.

Tips for the Best Results

  • Use a wide skillet: More surface area helps the chicken and gnocchi brown properly.
  • Dry the chicken first: Excess moisture can prevent good browning.
  • Do not boil shelf-stable gnocchi: Pan-searing gives it a better golden texture.
  • Keep the cream at a gentle simmer: High heat can make dairy-based sauces separate.
  • Add lemon at the end: Fresh lemon juice brightens the rich sauce without overpowering it.
  • Taste before adding salt: Parmesan and sun-dried tomatoes provide natural saltiness.
  • Serve right away: The sauce thickens as it sits, while the gnocchi is best when freshly crisped.

Easy Variations

Make It Dairy-Free

Use unsweetened cashew, oat, or coconut cream and replace Parmesan with nutritional yeast or a dairy-free cheese alternative.

Add More Vegetables

Roasted red peppers, artichokes, mushrooms, zucchini, peas, or broccoli can be added for extra vegetables and texture.

Change the Protein

Shrimp, tofu, tempeh, or chickpeas can replace chicken. Cook each alternative according to its texture and cooking time.

Make It Gluten-Free

Choose certified gluten-free gnocchi and check the labels on packaged ingredients such as broth, Parmesan alternatives, and seasonings.

Add More Mediterranean Flavor

A small pinch of chili flakes, za’atar, crumbled feta, or toasted pine nuts can add more flavor and texture.

How to Store and Reheat

Place cooled leftovers in an airtight container and refrigerate for up to 3 days.

Reheat gently in a skillet over low to medium-low heat. Add a splash of milk, cream, or broth while warming to loosen the sauce and help restore its creamy texture.

For the best texture, avoid reheating the dish over very high heat because the sauce may become too thick or separate.

Frequently Asked Questions

Can I cook gnocchi without boiling it first?

Yes. Shelf-stable and refrigerated gnocchi can be pan-seared directly in olive oil until golden and tender.

What type of chicken works best?

Boneless, skinless chicken breast is lean and quick to cook, while boneless thighs provide more moisture and a richer flavor.

Can I make this recipe dairy-free?

Yes. Use plant-based cream and replace Parmesan with nutritional yeast or your preferred dairy-free cheese.

Can I use frozen gnocchi?

Yes, but follow the package directions because frozen gnocchi may require different cooking instructions than refrigerated or shelf-stable varieties.

How can I make the sauce thicker?

Simmer the cream gently for a few extra minutes, or add a small amount of Parmesan to help the sauce thicken naturally.

Can I use kale instead of spinach?

Yes. Chopped kale works well, but cook it a little longer than spinach so it becomes tender.

What can I use instead of sun-dried tomatoes?

Roasted red peppers or chopped fresh tomatoes can replace them, although the final dish will have a milder flavor.

Can I prepare this meal ahead of time?

You can cook the chicken and prepare the vegetables ahead, but pan-sear the gnocchi and finish the sauce close to serving for the best texture.

Nutrition Information

Approximate nutrition per serving, based on four servings:

  • Calories: 480
  • Protein: 32g
  • Fat: 22g
  • Carbohydrates: 38g
  • Fiber: 4g
  • Sugar: 5g
  • Sodium: 520mg

Nutrition values can vary depending on the type of cream, gnocchi, Parmesan, and chicken used.

Final Thoughts

This Mediterranean Creamy Garlic Chicken Gnocchi Skillet brings together everything you want in an easy weeknight dinner: tender chicken, golden gnocchi, colorful vegetables, garlic, herbs, and a smooth lemon Parmesan sauce.

Because everything finishes in one skillet, cleanup stays simple while the flavor remains satisfying. Keep the recipe classic for a quick family meal, or customize it with extra vegetables, a different protein, or dairy-free ingredients.

With only about 30 minutes from start to finish, this creamy chicken and gnocchi dinner is an easy option for busy nights when you want something comforting, flavorful, and homemade.

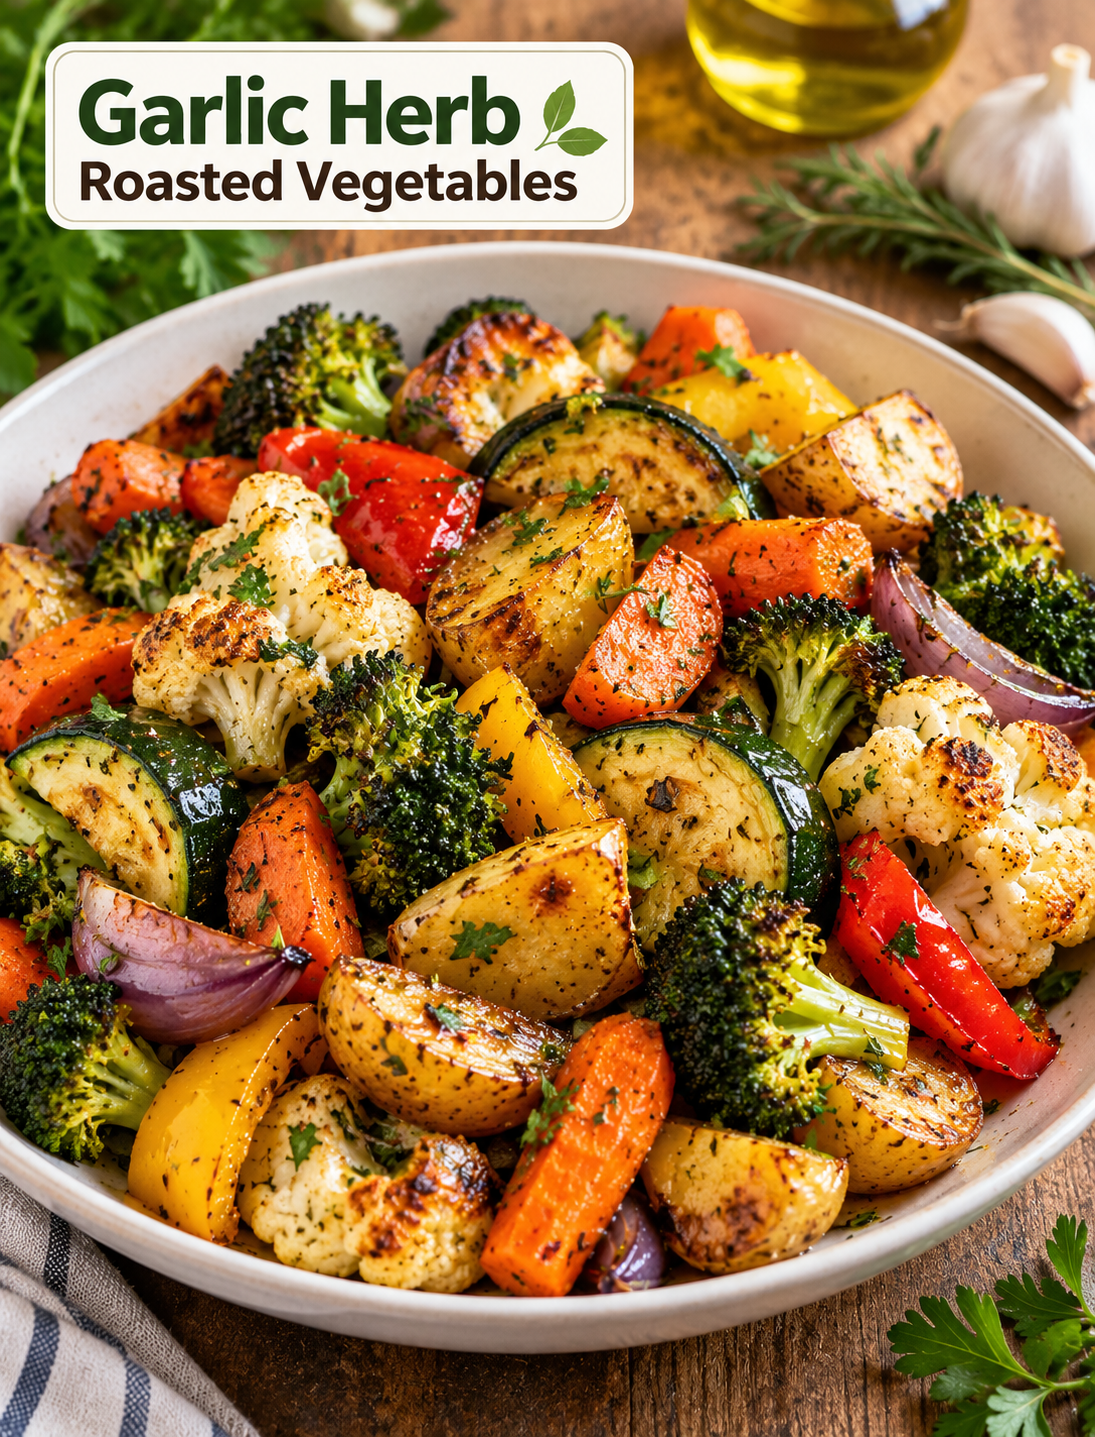
Delicious Garlic Herb Roasted Vegetables

Garlic herb roasted vegetables with carrots, broccoli, cauliflower, peppers, zucchini, onions, and potatoes on a baking sheet

Delicious Garlic Herb Roasted Vegetables

Delicious Garlic herb roasted vegetables are an easy way to turn fresh vegetables into a flavorful side dish. The vegetables are coated with olive oil, garlic, herbs, salt, and pepper, then roasted until tender inside and golden around the edges. The high oven heat helps bring out their natural sweetness while creating lightly crisp, caramelized edges.

This roasted vegetable recipe works well for busy weeknight dinners, family meals, holiday gatherings, and meal prep. It pairs easily with roasted chicken, grilled steak, baked fish, turkey, or a simple grain bowl. You can also change the vegetables based on what you have in your kitchen.

Why You’ll Love This Recipe

This recipe uses simple ingredients and does not require complicated cooking skills. Everything is prepared in one bowl before the vegetables go onto a baking sheet.

Here are a few reasons to add this dish to your weekly meal plan:

  • Easy preparation: Most of the work is chopping and seasoning the vegetables.
  • Full of flavor: Garlic, rosemary, thyme, and olive oil create a savory herb coating.
  • Flexible: You can swap vegetables based on the season or your preferences.
  • Meal-prep friendly: Cooked vegetables can be refrigerated and reheated for several meals.
  • Family-friendly: The mild herb flavor works with many main dishes.
  • Nutrient-rich: A mix of colorful vegetables provides fiber and important vitamins.

Ingredients

Vegetables

For about 4–6 servings, you will need:

  • 2 medium carrots, peeled and sliced
  • 1 red bell pepper, chopped
  • 1 yellow bell pepper, chopped
  • 1 zucchini, sliced
  • 1 red onion, cut into wedges
  • 1 small head broccoli, cut into florets
  • 1 small head cauliflower, cut into florets
  • 200 g baby potatoes, halved

Garlic Herb Seasoning

  • 3 tablespoons olive oil
  • 4 garlic cloves, minced
  • 1 tablespoon fresh rosemary, chopped, or 1 teaspoon dried rosemary
  • 1 tablespoon fresh thyme, chopped, or 1 teaspoon dried thyme
  • 1 tablespoon fresh parsley, chopped
  • 1 teaspoon salt
  • ½ teaspoon black pepper
  • ½ teaspoon red chili flakes, optional
  • 1 tablespoon balsamic vinegar or lemon juice, optional

How to Make Garlic Herb Roasted Vegetables

Step 1: Preheat the Oven

Preheat your oven to 425°F (220°C). Line a large baking sheet with parchment paper to make cleanup easier.

A fully heated oven helps the vegetables roast instead of slowly steaming.

Step 2: Prepare the Vegetables

Wash and dry all vegetables before cutting them. Slice and chop them into similar-sized pieces so they cook more evenly.

Cut the baby potatoes into halves and make sure larger broccoli and cauliflower florets are not oversized.

Helpful tip: Dry vegetables well after washing because excess water can prevent proper browning.

Step 3: Make the Garlic Herb Mixture

Add olive oil, minced garlic, rosemary, thyme, parsley, salt, and black pepper to a large mixing bowl.

Add red chili flakes if you prefer a little heat. Mix everything until the garlic and herbs are evenly distributed through the oil.

Step 4: Toss the Vegetables

Place all prepared vegetables into the bowl with the seasoning mixture.

Toss gently until the vegetables are evenly coated with olive oil, garlic, and herbs.

Make sure the potatoes and larger vegetable pieces receive enough seasoning because they may need more flavor than smaller pieces.

Step 5: Arrange on the Baking Sheet

Spread the vegetables across the prepared baking sheet in a single layer.

Leave a little space between the pieces whenever possible. Crowding the pan can trap steam and make the vegetables soft instead of roasted.

If you have a large amount of vegetables, use two baking sheets.

Step 6: Roast the Vegetables

Place the baking sheet in the preheated oven and roast for 25–30 minutes.

After about 12–15 minutes, carefully flip or stir the vegetables to help them brown evenly.

Continue roasting until the vegetables are tender and the edges are golden and lightly caramelized.

Cooking point to check: Potatoes and carrots should be fork-tender, while broccoli and cauliflower should have browned edges.

Step 7: Add Fresh Flavor and Serve

Remove the vegetables from the oven and let them rest for a minute or two.

For extra brightness, drizzle with balsamic vinegar or fresh lemon juice. Sprinkle with additional fresh parsley before serving.

Serve the vegetables warm as a side dish or add them to a bowl with your favorite protein and grains.

Best Vegetables for Roasting

The best vegetables for this recipe are those that can handle high oven heat without becoming watery.

Good choices include:

  • Carrots
  • Broccoli
  • Cauliflower
  • Bell peppers
  • Zucchini
  • Red onion
  • Baby potatoes
  • Brussels sprouts
  • Sweet potatoes
  • Mushrooms

When mixing different vegetables, consider their cooking times. Dense vegetables such as potatoes and carrots usually need more time than zucchini or bell peppers.

Tips for Perfect Roasted Vegetables

A few simple techniques can make a big difference in the final texture.

  • Do not overcrowd the pan: Space allows hot air to circulate around the vegetables.
  • Cut vegetables evenly: Similar sizes help prevent some pieces from burning while others remain firm.
  • Use enough oil: A light coating helps the vegetables brown and prevents them from drying out.
  • Dry vegetables first: Wet vegetables tend to steam rather than roast.
  • Flip halfway through: Turning the vegetables helps both sides develop golden edges.
  • Use a hot oven: 425°F provides enough heat for browning without requiring a long cooking time.
  • Add delicate herbs carefully: Fresh parsley is best added near the end to preserve its fresh flavor.

Easy Variations

This recipe is flexible enough to fit different meals and tastes.

For a sweeter version, replace some of the baby potatoes with cubed sweet potatoes. For a Mediterranean-style dish, add oregano and finish the vegetables with lemon juice.

You can also add chickpeas for extra plant-based protein. Cubed tofu or cooked chicken sausage can turn the roasted vegetables into a more filling meal.

For extra heat, increase the red chili flakes or add a small pinch of cayenne pepper.

How to Store and Reheat

Allow leftover vegetables to cool before placing them in an airtight container. Store them in the refrigerator for up to 4 days.

For the best texture, reheat them in an oven or air fryer rather than the microwave. Reheating with dry heat helps bring back some of the roasted edges.

You can also use leftovers in:

  • Breakfast omelets
  • Grain bowls
  • Wraps
  • Pasta dishes
  • Salads
  • Rice bowls
  • Chicken or turkey plates

Can You Meal Prep Roasted Vegetables?

Yes, roasted vegetables are a practical meal-prep option. You can wash and cut the vegetables ahead of time and keep them refrigerated until you are ready to cook.

For the best texture, prepare the garlic herb mixture separately and toss it with the vegetables shortly before roasting.

Cooked vegetables can then be divided into individual containers for quick lunches or dinner sides during the week.

Frequently Asked Questions

Can I use frozen vegetables?

Yes. Roast frozen vegetables without thawing them, and use about 450°F (230°C) to help remove excess moisture and improve browning.

What herbs can I use instead of rosemary and thyme?

Oregano, basil, Italian seasoning, or a combination of dried herbs can replace rosemary and thyme without changing the basic cooking method.

How do I keep roasted vegetables from becoming soggy?

Use a hot oven, dry the vegetables well, avoid overcrowding the baking sheet, and spread the pieces into a single layer.

Can I add protein to this recipe?

Yes. Chickpeas, tofu, or cooked chicken sausage can be added to make the roasted vegetables more suitable as a complete meal.

Can I prepare the vegetables ahead of time?

Yes. Chop the vegetables and refrigerate them in an airtight container, then toss them with the herb mixture just before roasting.

Can I make this recipe without olive oil?

Yes. You can use another neutral cooking oil, but a small amount of oil is helpful for browning and keeping the vegetables from drying out.

What temperature is best for roasting vegetables?

425°F (220°C) is a good general temperature because it cooks the vegetables efficiently while encouraging golden, caramelized edges.

What can I serve with roasted vegetables?

Serve them with roasted chicken, grilled steak, baked salmon, turkey, pasta, rice, quinoa, or another favorite main dish.