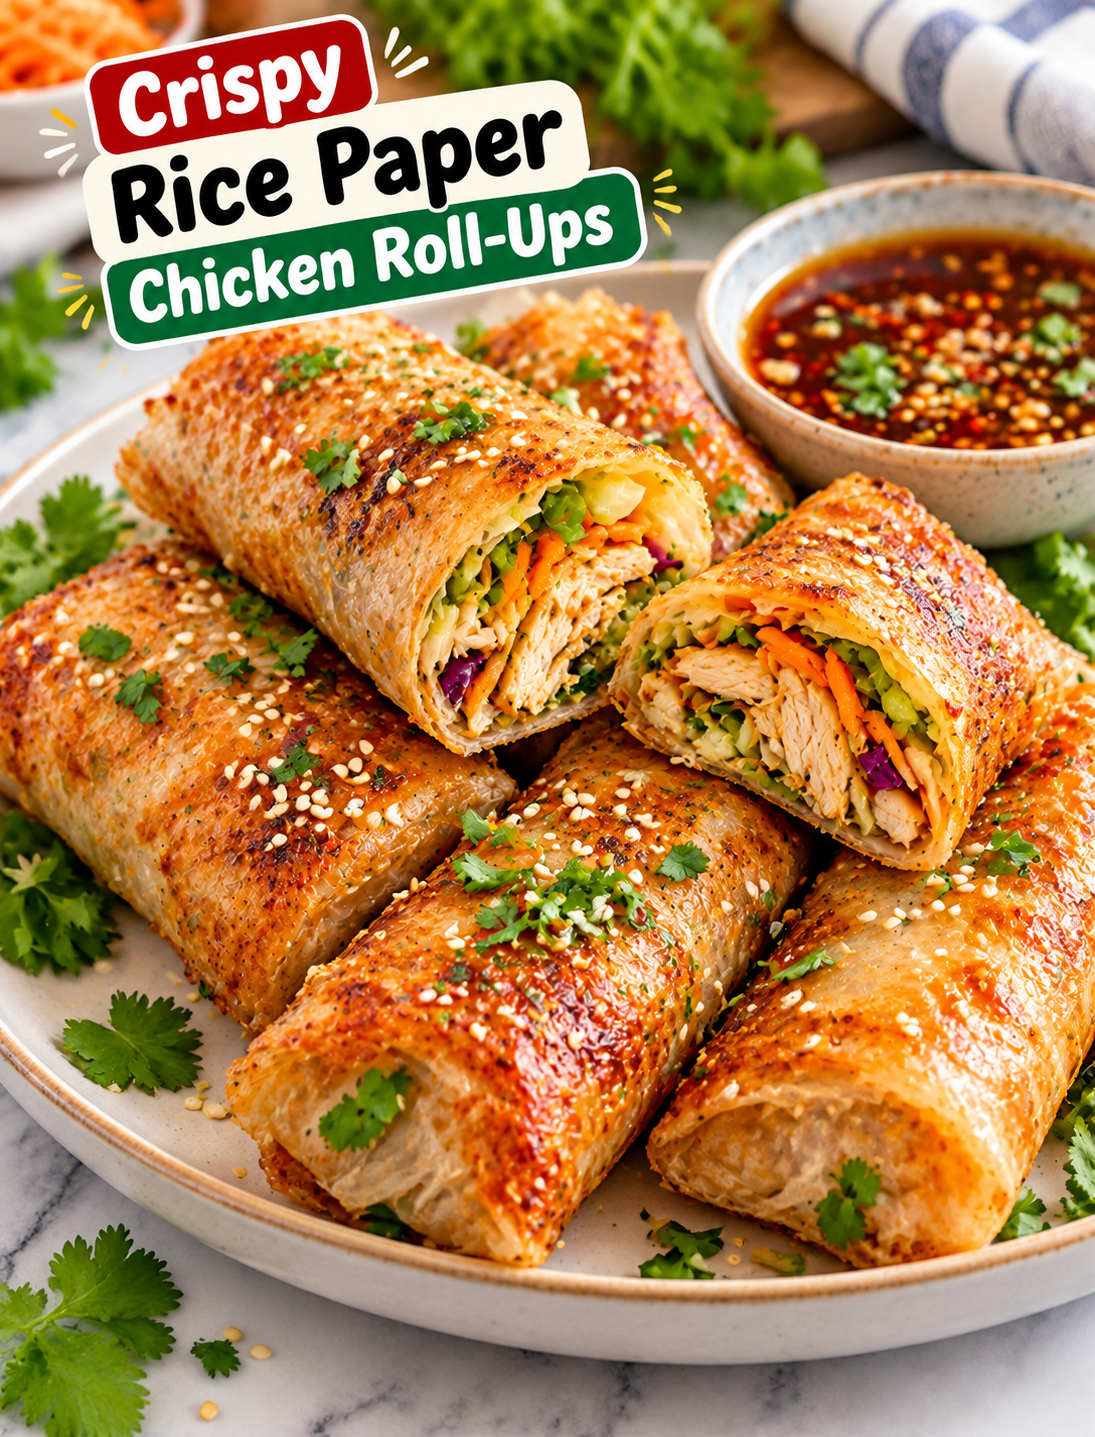
Crispy Rice Paper Chicken Roll-Ups
These Crispy Rice Paper Chicken Roll-Ups are a simple way to turn seasoned chicken and fresh vegetables into a crunchy, satisfying meal. Rice paper wrappers become golden and crisp when cooked, while the chicken filling stays juicy and flavorful inside.
This recipe is inspired by the popular crispy rice paper snack trend, but it uses everyday ingredients that are easy to find at most U.S. grocery stores. You can serve the roll-ups as an appetizer, quick lunch, party snack, or light dinner.
The filling combines cooked chicken, shredded carrots, cabbage, green onions, and simple seasonings. A little soy sauce and sesame oil add savory flavor without making the filling too heavy.
The best part is the texture. The outside becomes crisp and lightly chewy, while the center is warm, tender, and packed with seasoned chicken and vegetables.
Why You’ll Love This Recipe
These chicken roll-ups are easy to prepare and work well for busy weeknights.
- Crispy texture: Rice paper turns golden and crunchy when cooked properly.
- Easy filling: Cooked chicken and fresh vegetables make a quick savory mixture.
- Simple ingredients: Most ingredients are available at regular supermarkets.
- Quick cooking: The assembled rolls only need a few minutes to become crisp.
- Easy to customize: Change the vegetables, sauce, or protein to suit your taste.
- Great for sharing: Cut them in half and serve with dipping sauces for parties.
- Meal-prep friendly: The filling can be prepared ahead of time.
Ingredients You’ll Need
For the Chicken Filling
- 2 cups cooked shredded chicken
- 1 cup finely shredded cabbage
- ½ cup shredded carrots
- 3 green onions, thinly sliced
- 2 cloves garlic, minced
- 1 tablespoon low-sodium soy sauce
- 1 teaspoon sesame oil
- ½ teaspoon grated fresh ginger
- ¼ teaspoon black pepper
- 1 teaspoon rice vinegar
- 1 teaspoon cooking oil
Rotisserie chicken is a convenient choice for this recipe. You can also use leftover roasted chicken or freshly cooked chicken breast.
For the Rice Paper Roll-Ups
- 8 to 10 round rice paper wrappers
- 2 tablespoons cooking oil, if pan-frying
- Water for softening the rice paper
Choose medium or large rice paper sheets so they are easier to fold around the filling.
Optional Dipping Sauce
- 3 tablespoons low-sodium soy sauce
- 1 tablespoon rice vinegar
- 1 teaspoon honey
- ½ teaspoon sesame oil
- ½ teaspoon chili garlic sauce
- 1 teaspoon finely sliced green onion
Mix the ingredients in a small bowl and adjust the chili sauce to your preferred heat level.
How to Make Crispy Rice Paper Chicken Roll-Ups
Step 1: Prepare the Chicken Filling
Place a large skillet over medium heat and add 1 teaspoon of cooking oil.
Add the minced garlic and grated ginger. Cook for about 30 seconds until fragrant.
Add the shredded cabbage and carrots.
Cook the vegetables for 2 to 3 minutes, stirring often. They should soften slightly while keeping some crunch.
Add the shredded chicken, soy sauce, sesame oil, black pepper, and rice vinegar.
Stir everything together and cook for another 2 to 3 minutes.
Turn off the heat and mix in the sliced green onions.
Let the filling cool for several minutes before wrapping.
Important: The filling should be warm rather than very hot when you add it to the rice paper. Excess heat can make the wrappers difficult to handle.
Step 2: Prepare Your Work Surface
Place a clean cutting board or large plate near your cooking area.
Fill a shallow dish with lukewarm water.
Keep the rice paper wrappers, chicken filling, and a clean plate nearby.
Work with one wrapper at a time because soaked rice paper becomes sticky quickly.
Step 3: Soften the Rice Paper
Dip one rice paper wrapper into the lukewarm water for about 5 to 10 seconds.
Remove it while the wrapper is still slightly firm.
Place it flat on your work surface.
Do not soak the wrapper until it becomes completely soft. It will continue to soften as you add the filling.
Step 4: Add the Filling
Place about 2 to 3 tablespoons of the chicken mixture slightly below the center of the wrapper.
Keep the filling compact and avoid adding too much.
Leave enough empty space around the edges to fold the wrapper securely.
If you add too much filling, the rice paper can tear during rolling or cooking.
Step 5: Fold the Roll-Up
Fold the bottom edge of the rice paper over the chicken filling.
Fold both sides toward the center.
Roll the wrapper upward while gently pressing the filling into a compact shape.
Continue rolling until you have a tight cylinder.
Place the finished roll seam-side down on a clean plate.
Repeat with the remaining rice paper and filling.
Step 6: Let the Rolls Set
Allow the wrapped roll-ups to rest for about 2 to 3 minutes.
This gives the rice paper time to become slightly tacky and helps the seam hold together.
Keep the rolls separated so they do not stick to one another.
Step 7: Cook Until Crispy
You can cook the roll-ups in a skillet, air fryer, or oven.
Skillet Method
Heat a nonstick skillet over medium heat and lightly coat it with cooking oil.
Place the roll-ups seam-side down in the pan.
Cook for about 2 to 3 minutes per side.
Turn them carefully with tongs until all sides are golden and crisp.
Avoid high heat because the outside can brown before the wrapper becomes evenly crisp.
Air Fryer Method
Preheat the air fryer to 375°F.
Lightly brush or spray the roll-ups with oil.
Place them in the basket in a single layer with space between each roll.
Air fry for about 8 to 10 minutes, turning halfway through.
Cook until the wrappers are golden and crisp.
Air fryer cooking times can vary, so start checking after 7 minutes.
Oven Method
Preheat the oven to 425°F.
Place the roll-ups on a parchment-lined baking sheet.
Lightly brush them with oil.
Bake for approximately 12 to 16 minutes, turning them halfway through.
Remove them when the wrappers are crisp and lightly golden.
Tips for Perfect Crispy Roll-Ups
A few small details can make these chicken rolls much easier to prepare.
- Do not over-soak the rice paper: A wrapper that is too soft can tear easily.
- Use a moderate amount of filling: Two to three tablespoons are usually enough.
- Keep the filling fairly dry: Excess liquid can weaken the wrapper.
- Roll firmly: A tight roll helps keep the filling inside during cooking.
- Leave space between rolls: This prevents sticking and helps them crisp evenly.
- Use moderate heat: Very high heat can burn the wrapper before the inside warms.
- Cook seam-side down first: This helps seal the roll.
- Serve soon after cooking: The wrappers are crispest when freshly cooked.
Easy Variations
This recipe is flexible, so you can adjust the filling based on what you have available.
Spicy Chicken Roll-Ups
Add chili flakes, sriracha, or chili garlic sauce to the chicken mixture for extra heat.
Teriyaki Chicken Roll-Ups
Replace some of the soy sauce with a small amount of teriyaki sauce for a sweeter flavor.
Chicken and Cheese Roll-Ups
Add a small amount of shredded mozzarella or Monterey Jack cheese before rolling. Keep the filling amount moderate so the wrapper does not split.
Fresh Vegetable Roll-Ups
Add thinly sliced bell peppers, cucumber, or fresh herbs for extra color and crunch.
Ground Chicken Version
Replace shredded chicken with cooked ground chicken. Break the meat into small pieces so it mixes evenly with the vegetables.
Vegetarian Option
Replace the chicken with sautéed mushrooms, shredded cabbage, carrots, edamame, or crumbled tofu.
What to Serve With Chicken Roll-Ups
A flavorful dipping sauce makes these crispy rolls even better.
Try serving them with:
- Sweet chili sauce
- Soy-ginger dipping sauce
- Spicy mayo
- Peanut sauce
- Sriracha mayo
- Sesame dipping sauce
- Garlic chili sauce
For a complete meal, serve the roll-ups with a simple cucumber salad, steamed edamame, or Asian-style slaw.
For a party, cut each roll diagonally and arrange the pieces on a platter with two or three dipping sauces.
How to Store Leftovers
For the best texture, these roll-ups are best eaten immediately after cooking.
If you have leftovers, allow them to cool completely before placing them in an airtight container.
Refrigerate them for up to 3 days.
Avoid stacking many rolls directly on top of one another because the wrappers can stick together.
To reheat, use an air fryer at 350°F for about 3 to 5 minutes.
Avoid the microwave when possible because it can make the rice paper soft and chewy instead of crisp.
Can You Make Them Ahead?
Yes, but it is best to prepare the filling ahead rather than fully assemble the rolls.
Cook and cool the chicken mixture, then refrigerate it in an airtight container for up to 3 days.
When you are ready to cook, prepare fresh rice paper wrappers and assemble the roll-ups.
This method gives you a better texture than storing fully wrapped uncooked rolls for a long period.
Common Mistakes to Avoid
Overfilling the Wrapper
Too much chicken can cause the rice paper to split while rolling or cooking.
Soaking the Rice Paper Too Long
Rice paper becomes softer as it sits, so a short dip in water is usually enough.
Using Watery Filling
Drain excess moisture from vegetables and avoid adding too much sauce to the chicken mixture.
Cooking at Excessive Heat
High heat can burn the wrapper before the filling is heated properly.
Crowding the Pan
Give each roll enough space so hot air or cooking heat can reach the surface evenly.
Frequently Asked Questions
Can I use raw chicken?
Yes, but cook the chicken completely before adding it to the rice paper and confirm it reaches 165°F internally.
Why does my rice paper tear?
Rice paper can tear when it is over-soaked, overfilled, or handled too roughly while wrapping.
Can I make these in an air fryer?
Yes. Lightly oil the rolls and air fry them at 375°F for about 8 to 10 minutes, turning halfway through.
Can I use leftover rotisserie chicken?
Absolutely. Rotisserie chicken is one of the easiest options because the meat is already cooked and seasoned.
How do I make the rolls extra crispy?
Use a light coating of oil, avoid overcrowding, and cook the rolls until the wrapper becomes evenly golden.
Can I freeze rice paper chicken rolls?
Freezing fully assembled rolls is not recommended because the texture of softened rice paper can change after thawing.
What dipping sauce goes best with them?
Sweet chili sauce, spicy mayo, peanut sauce, and soy-ginger sauce all pair well with the savory chicken filling.
Can I make these without chicken?
Yes. Substitute cooked tofu, mushrooms, edamame, or additional vegetables for a vegetarian version.
Final Thoughts
These Crispy Rice Paper Chicken Roll-Ups are a fun way to turn simple chicken and vegetables into a crunchy meal or appetizer. The rice paper creates a light, crisp exterior while the seasoned chicken filling adds plenty of savory flavor.
For the best results, keep the filling fairly dry, avoid over-soaking the wrappers, and cook the rolls in a single layer. Serve them hot with your favorite dipping sauce for a quick lunch, easy dinner, or shareable snack.
Once you have the basic method down, you can change the filling and sauce to create a different version every time.