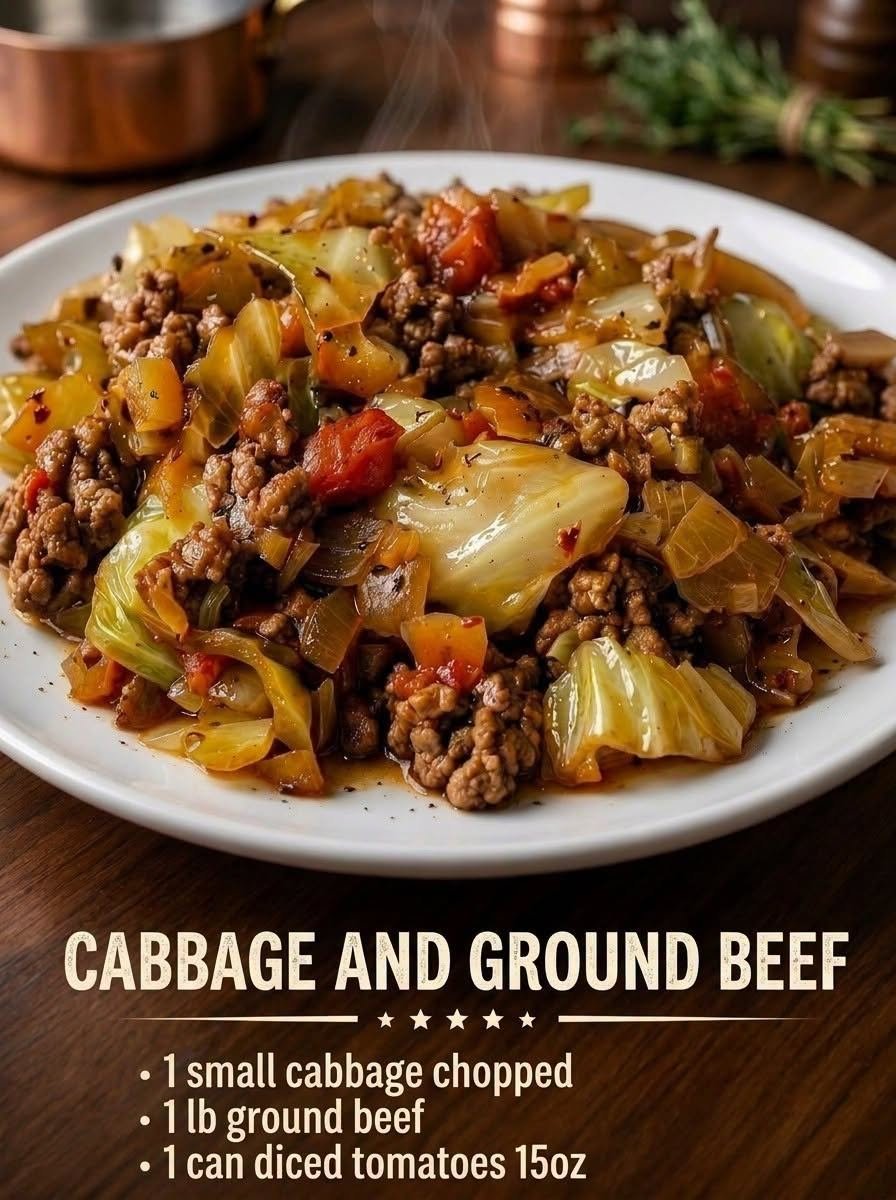
Ground Beef and Chopped Cabbage

Ground Beef and Chopped Cabbage

Ingredients

1 lb ground beef
1 small cabbage, chopped
1 cup onions, chopped
2 cloves garlic, minced
1 can (15 oz) diced tomatoes (undrained)
1 tbsp bouillon powder (beef or vegetable)
Salt & black pepper to taste

Instructions

Brown the Meat: In a large skillet over medium-high heat, cook the ground beef and chopped onions until the beef is fully browned. Drain any excess fat.
Aromatics: Toss in the minced garlic and cook for 1 more minute until fragrant.
Combine: Stir in the diced tomatoes (with their juices), bouillon powder, salt, and pepper.
Wilt the Cabbage: Add the chopped cabbage to the skillet. Cover with a lid, reduce the heat to medium-low, and let it simmer for 15-20 minutes, stirring occasionally, until the cabbage is tender and flavorful.

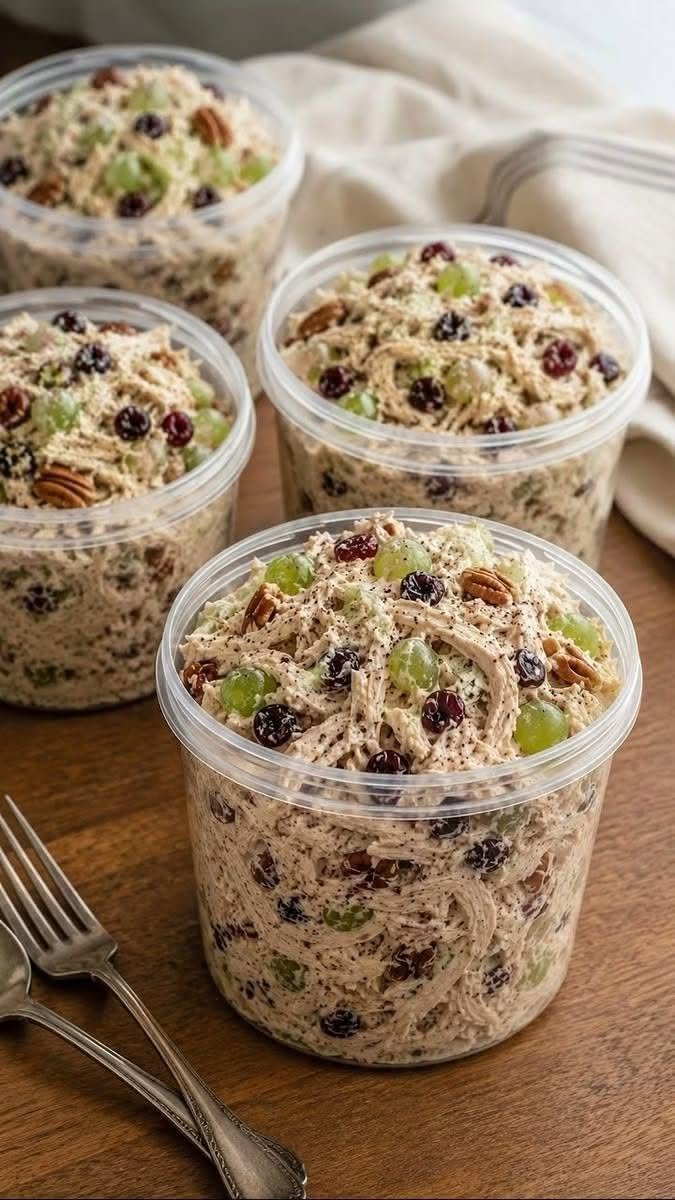
Cranberry Pecan Chicken Salad with Grapes

Cranberry Pecan Chicken Salad with Grapes

Ingredients

For the Chicken Salad
3 cups cooked chicken, shredded or diced
1 cup red or green grapes, halved
½ cup dried cranberries
½ cup pecans, roughly chopped
¼ cup finely diced celery
2 tablespoons finely diced red onion
2 tablespoons fresh parsley, chopped
¼ teaspoon salt
¼ teaspoon black pepper
For the Creamy Dressing
½ cup mayonnaise
½ cup plain Greek yogurt
1 tablespoon honey
1 tablespoon fresh lemon juice
1 teaspoon Dijon mustard
¼ teaspoon garlic powder
Pinch of salt and black pepper

Instructions

1. Prepare the Chicken

Use cooked and cooled chicken breast or thighs. Shred the chicken into bite-sized pieces or dice it into small cubes. Place it in a large mixing bowl.
For extra flavor, you can use leftover roasted chicken or rotisserie chicken.
2. Prepare the Add-Ins
Wash and dry the grapes thoroughly, then cut them in half. Add the grapes, dried cranberries, chopped pecans, celery, red onion, and parsley to the bowl with the chicken.
Toast the pecans in a dry skillet over medium-low heat for 3–5 minutes, stirring frequently. Let them cool before adding them to the salad for extra crunch and flavor.
3. Make the Dressing
In a separate bowl, whisk together mayonnaise, Greek yogurt, honey, lemon juice, Dijon mustard, garlic powder, salt, and black pepper.
The Greek yogurt adds freshness and tanginess, while honey balances the savory ingredients with a subtle sweetness.
4. Combine
Pour the dressing over the chicken mixture. Gently fold everything together until the chicken, grapes, cranberries, and pecans are evenly coated.
Taste and adjust the seasoning. Add more lemon juice for brightness or a little honey if you prefer a sweeter salad.
5. Chill and Serve
Cover the bowl and refrigerate for 30 minutes before serving. This allows the flavors to blend beautifully.
Serve the chicken salad over crisp lettuce, spoon it into croissants or sandwiches, or enjoy it with crackers. It also makes a delicious filling for wraps.
Tips
For the best texture, add the toasted pecans just before serving if you’re preparing the salad several hours ahead. You can substitute walnuts for pecans or use dried cherries instead of cranberries.
For a lighter version, replace more of the mayonnaise with Greek yogurt. Add diced apples or sliced almonds for additional crunch.

Store leftovers in an airtight container in the refrigerator for up to 3 days.

Servings: 6

Prep Time: 20 minutes
Chill Time: 30 minutes
Total Time: About 50 minutes

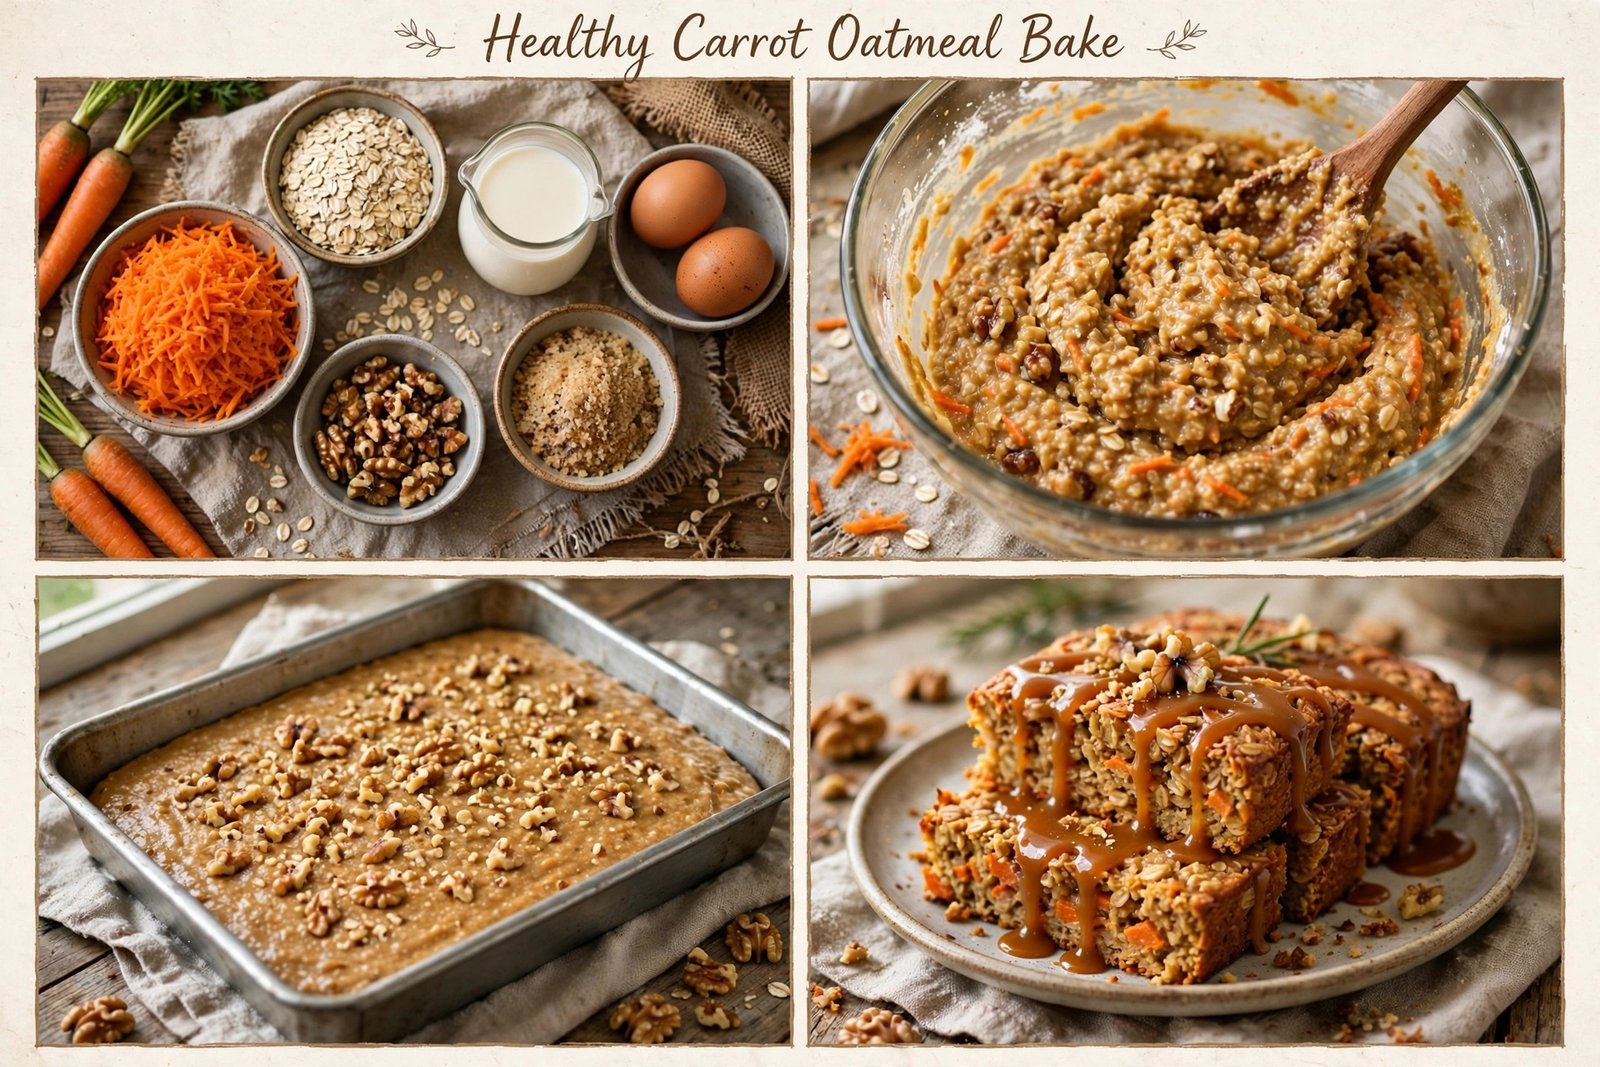
Carrot Oatmeal Cake / Baked Carrot Oatmeal

 *Carrot Oatmeal Cake / Baked Carrot Oatmeal*


 Ingredients:


– *Rolled Oats* – 2 cups

– *Grated Carrots* – 1.5 cups (about 2-3 medium carrots)

– *All-Purpose Flour* – 1/2 cup

– *Milk* – 1 cup

– *Eggs* – 2 large

– *Brown Sugar* – 1/2 cup

– *Vegetable Oil* – 1/3 cup

– *Walnuts, chopped* – 1/2 cup

– *Cinnamon Powder* – 1 tsp

– *Baking Powder* – 1 tsp

– *Salt* – 1/4 tsp

– *For Topping:* Caramel sauce or honey

Instructions:


*1. Mix Wet Ingredients:* In a large bowl, whisk together eggs, milk, oil, and brown sugar until well combined.


*2. Add Dry Ingredients:* Add rolled oats, flour, cinnamon, baking powder, and salt. Mix well.


*3. Add Carrots & Nuts:* Fold in the grated carrots and half of the chopped walnuts. The batter will be thick, like in picture 2. Let it rest for 10 minutes so oats can absorb milk.


*4. Prepare Pan:* Grease a baking tray/pan. Pour the batter in and spread evenly. Sprinkle the remaining walnuts on top.


*5. Bake:* Bake in a preheated oven at 180°C / 350°F for 35-40 minutes, until golden brown on top and a toothpick comes out clean.


*6. Serve:* Let it cool down a bit, cut into slices, and drizzle with caramel sauce or honey. Enjoy!


It’s soft, healthy, and perfect for breakfast or tea time.

Tips to make it perfect:


*1. Don’t squeeze carrots:* After grating, don’t squeeze out the water. That moisture makes the cake super soft.


*2. Use Rolled Oats:* Don’t use instant oats. Rolled oats give a much better, chewy texture.


*3. For extra softness:* Add 2 tbsp of yogurt to the batter.


*4. Sweetness:* You can replace brown sugar with 3 tbsp honey or maple syrup for a healthier version.


*5. No Oven? No problem:* You can make it in a pot. Heat salt in a large pot for 10 mins, put a stand inside, place your pan on it, cover and bake on low flame for 45 mins.


*6. Storage:* Stays good for 2 days outside and 5 days in the fridge. You can reheat a slice in the microwave for 20 seconds.


*7. For kids:* Add some raisins, chocolate chips, or a little coconut – kids will love it more.

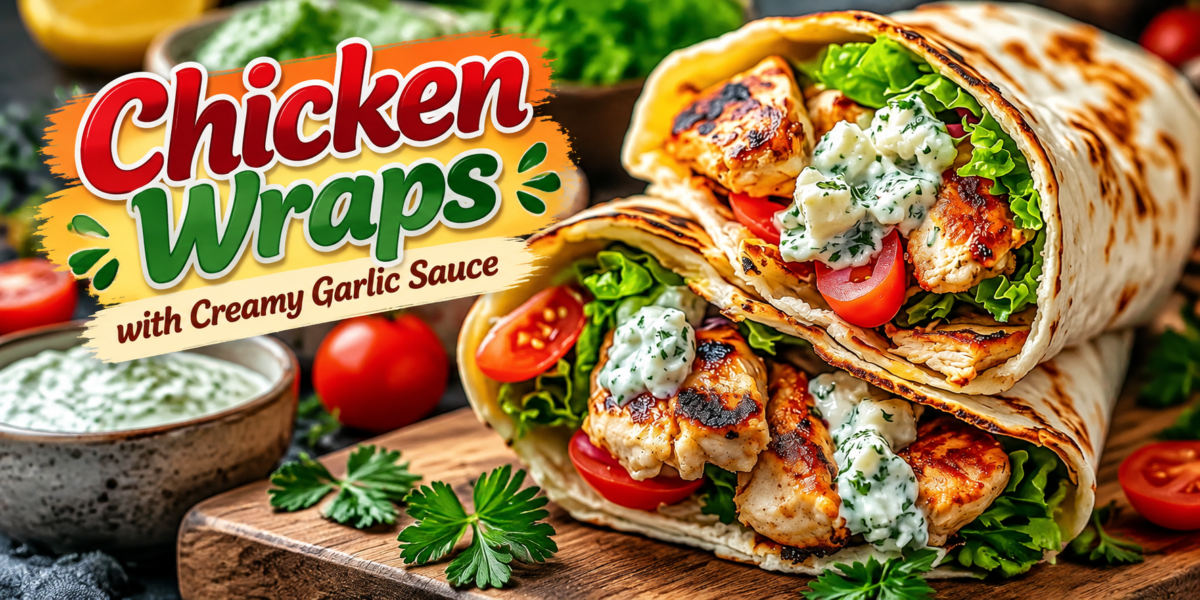
Grilled Chicken Wraps with Creamy Garlic Sauce

Chicken Wraps with creamy garlic sauce, grilled chicken, fresh vegetables, and soft tortilla filling

Grilled Chicken Wraps with Creamy Garlic Sauce

Chicken Wraps are a delicious and satisfying meal made with juicy grilled chicken, fresh vegetables, creamy garlic sauce, and soft tortillas. This recipe combines simple ingredients to create a flavorful wrap that is perfect for lunch, dinner, meal preparation, or a quick family meal.

The grilled chicken provides a rich smoky flavor, while the fresh lettuce, tomatoes, and herbs add crunch and freshness. The creamy sauce brings everything together and creates a balanced combination of textures and flavors.

These Chicken Wraps are inspired by Mediterranean-style flavors, combining seasoned chicken with fresh vegetables and a smooth yogurt-based sauce. They are easy to customize according to your preferences and can be prepared with different fillings.

Whether you need a quick weekday meal or a delicious option for gatherings, this recipe offers a homemade alternative to restaurant-style wraps. The combination of protein, vegetables, and a flavorful sauce makes it both filling and enjoyable.

This recipe is also perfect for meal prep because the chicken and sauce can be prepared ahead of time. Simply assemble the wraps when ready to eat for a fresh and delicious meal. Chicken Wraps are a perfect homemade meal because they combine juicy grilled chicken, fresh vegetables, and creamy flavors in every bite.

Preparation Time: 20 minutes

Marinating Time: 30 minutes

Cooking Time: 15 minutes

Total Time: 1 hour 5 minutes

Servings: 6 wraps

Ingredients

Grilled Chicken

  • 1 and 1/2 pounds boneless chicken breast or thighs
  • 2 tablespoons olive oil
  • 2 tablespoons lemon juice
  • 3 cloves garlic, minced
  • 1 teaspoon paprika
  • 1 teaspoon dried oregano
  • 1/2 teaspoon cumin powder
  • 1/2 teaspoon black pepper
  • Salt according to taste
  • 1/2 teaspoon chili flakes (optional)

Creamy Garlic Sauce

  • 1 cup Greek yogurt
  • 2 tablespoons mayonnaise
  • 2 cloves garlic, minced
  • 1 tablespoon lemon juice
  • 1 tablespoon olive oil
  • 2 tablespoons fresh parsley, chopped
  • Salt according to taste
  • Black pepper according to taste

Wrap Filling

  • 6 large tortillas or flatbreads
  • 2 cups lettuce, chopped
  • 1 cup cherry tomatoes, sliced
  • 1 cucumber, sliced
  • 1 small red onion, thinly sliced
  • 1/2 cup feta cheese (optional)
  • Fresh parsley or cilantro for garnish

Step-by-Step Instructions

Preparing the Chicken Marinade

Start by preparing the chicken marinade. In a bowl, combine olive oil, lemon juice, minced garlic, paprika, oregano, cumin, black pepper, salt, and chili flakes.

Add the chicken pieces and coat them evenly with the marinade. Cover the bowl and allow the chicken to marinate for at least 30 minutes. For deeper flavor, you can leave it in the refrigerator for several hours.

The marinade helps keep the chicken tender while adding delicious Mediterranean-inspired flavors.

Cooking the Chicken

Heat a grill pan or skillet over medium-high heat. Add the marinated chicken and cook for about 6–8 minutes on each side until golden brown and fully cooked.

The chicken should develop a slightly grilled exterior while remaining juicy inside.

Once cooked, remove the chicken from heat and allow it to rest for a few minutes. Slice it into thin strips that are easy to add into the wraps.

Making the Creamy Garlic Sauce

Prepare the sauce by combining Greek yogurt, mayonnaise, garlic, lemon juice, olive oil, parsley, salt, and black pepper in a bowl.

Mix everything until smooth and creamy. Adjust the seasoning according to your taste.

The garlic sauce adds a rich and refreshing flavor that perfectly complements the grilled chicken and fresh vegetables.

Assembling the Wraps

Warm the tortillas slightly in a dry pan to make them soft and flexible.

Spread a generous amount of creamy garlic sauce over each tortilla. Add chopped lettuce, sliced tomatoes, cucumber, and red onion.

Place grilled chicken strips in the center and sprinkle with feta cheese and fresh herbs if desired.

Fold the sides of the tortilla inward and roll tightly to create a secure wrap.

These Chicken Wraps are best served immediately while the chicken is warm and the vegetables are fresh.

Tips for Perfect Results

For the best Chicken Wraps, choose tender chicken pieces and avoid overcooking because dry chicken can affect the final texture.

Marinating the chicken before cooking is an important step because it improves flavor and helps keep the meat juicy.

Warm the tortillas before assembling because soft tortillas are easier to roll and less likely to break.

Do not add too much sauce or filling because it can make the wrap difficult to close.

Use fresh vegetables for the best crunch and flavor. Lettuce, tomatoes, and cucumbers provide freshness that balances the grilled chicken.

To make the best Chicken Wraps, always use freshly prepared ingredients and cook the chicken until perfectly tender

If preparing these wraps ahead, keep the sauce and vegetables separate until serving.

Variations

Chicken Wraps can easily be customized with different ingredients and flavors.

For a spicy version, add hot sauce, jalapeños, or extra chili flakes to the filling.

For a Mediterranean variation, include olives, feta cheese, hummus, and extra herbs.

You can create a healthier version by using whole wheat tortillas and increasing the amount of vegetables.

These Chicken Wraps can be changed easily by adding different vegetables, sauces, or seasonings according to your taste.

For a creamy avocado version, add sliced avocado or a homemade avocado sauce.

You can also replace chicken with grilled shrimp, turkey, or roasted vegetables for different options.

A barbecue-style version can be made by adding barbecue sauce and grilled onions.

Serving Suggestions

Serve Chicken Wraps with fresh salads, roasted vegetables, or crispy potato wedges for a complete meal.

They are perfect for lunch boxes because they are easy to carry and enjoy on the go.

For gatherings, prepare all ingredients separately and allow everyone to build their own wraps.

A side of extra garlic sauce, hummus, or fresh salsa makes the meal even more enjoyable.

These wraps pair well with refreshing drinks such as lemonade, iced tea, or sparkling water.

Serve these Chicken Wraps with a fresh salad, homemade dip, or roasted vegetables for a complete and satisfying meal.

Health Benefits

Chicken Wraps provide a balanced combination of protein, vegetables, and healthy ingredients.

Chicken is an excellent source of lean protein, which supports muscle health and helps keep you satisfied.

Fresh vegetables provide important vitamins, minerals, antioxidants, and fiber.

Greek yogurt in the sauce adds protein and calcium while creating a creamy texture.

Using olive oil provides healthy fats that are commonly used in Mediterranean-style cooking.

Choosing whole wheat tortillas can increase fiber content and make the meal more filling.

Adding colorful vegetables makes these wraps a nutritious and enjoyable meal option.

Chicken Wraps provide a balanced meal option with protein-rich chicken and nutrient-filled vegetables.

Storage and Reheating Instructions

Store the grilled chicken separately in an airtight container in the refrigerator for up to four days.

The creamy garlic sauce can also be stored separately for up to four days.

Preparing Chicken Wraps ingredients separately helps maintain freshness and makes future meals easier.

Avoid storing fully assembled Chicken Wraps for long periods because vegetables can release moisture and make the tortillas soft.

When reheating chicken, warm it gently in a skillet or microwave before assembling fresh wraps.

For meal preparation, prepare all ingredients ahead and assemble the wraps when ready to eat.

Questions and Answers

Can I make these wraps ahead of time?

Yes, you can prepare the chicken and sauce ahead, then assemble the wraps before serving.

What type of tortilla is best?

Large flour tortillas work well, but whole wheat tortillas are also a healthy option.

Can I use leftover chicken?

Yes, leftover grilled or roasted chicken can be used to make quick wraps.

How can I make these wraps healthier?

Use whole grain tortillas, extra vegetables, and a yogurt-based sauce for a lighter version.

Can I freeze these wraps?

It is better to freeze only the cooked chicken and prepare fresh wraps later because vegetables and sauce may change texture.

Nutrition Information

Approximate nutrition per serving:

Calories: 430

Protein: 35 grams

Carbohydrates: 38 grams

Fiber: 5 grams

Fat: 18 grams

Calcium: 180 mg

Nutrition values may vary depending on ingredients and portion sizes.

Final Thoughts

Chicken Wraps are a simple yet flavorful recipe that combines juicy grilled chicken, fresh vegetables, and creamy garlic sauce in a convenient meal. They are easy to prepare, customizable, and perfect for different occasions.

The combination of textures makes every bite enjoyable, from the tender chicken to the crunchy vegetables and soft tortilla.

Whether you prepare them for lunch, dinner, meal prep, or family gatherings, these wraps offer a delicious homemade option full of flavor and freshness.

With simple ingredients and flexible variations, Chicken Wraps can become a regular favorite in your kitchen. They prove that quick meals can still be satisfying, nutritious, and packed with amazing taste.“ These Chicken Wraps can become a regular favorite because they are simple, healthy, and full of flavor.”

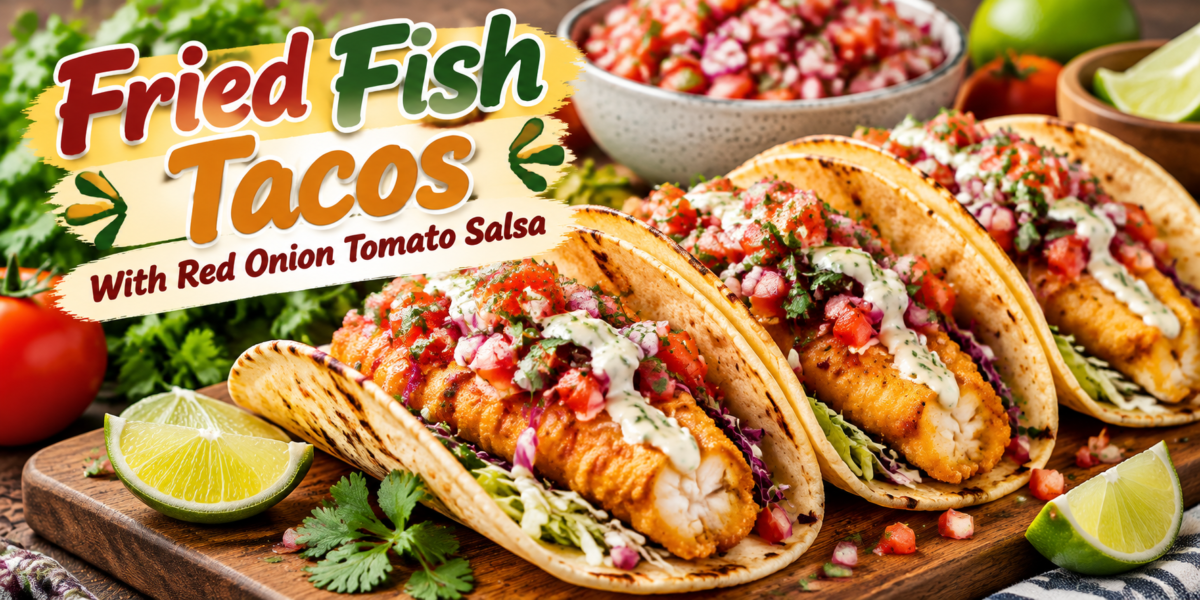
Fried Fish Tacos With Red Onion Tomato Salsa

Fried Fish Tacos with Red Onion Tomato Salsa, crispy fish, fresh vegetables, and lime toppings

Fried Fish Tacos With Red Onion Tomato Salsa

Fried Fish Tacos are a delicious combination of crispy golden fish, soft tortillas, fresh vegetables, and a flavorful red onion tomato salsa. This recipe brings together crunchy textures, juicy seafood, and refreshing toppings to create a perfect homemade meal inspired by coastal flavors.

The crispy fish coating creates a satisfying crunch while keeping the inside tender and flavorful. The fresh salsa made with tomatoes, red onions, cilantro, and lime juice adds brightness and balances the richness of the fried fish.

Fried Fish Tacos are perfect for family dinners, weekend lunches, parties, and casual gatherings. They are easy to customize with different toppings, sauces, and vegetables according to your taste.

This recipe uses simple ingredients but delivers impressive flavor. The combination of seasoned fish, warm tortillas, crunchy cabbage, and fresh salsa creates a restaurant-style dish that can be prepared easily at home.

Whether you are a seafood lover or simply looking for a fun and flavorful meal, this recipe provides a delicious way to enjoy fresh ingredients together.

These Fried Fish Tacos are a perfect choice for anyone who enjoys crispy seafood combined with fresh and flavorful toppings.

Preparation Time: 25 minutes
Cooking Time: 20 minutes
Total Time: 45 minutes
Servings: 8 tacos

Ingredients

For Crispy Fish

  • 1 and 1/2 pounds white fish fillets (cod, tilapia, haddock, or mahi-mahi)
  • 1 cup all-purpose flour
  • 1/2 cup cornstarch
  • 1 teaspoon paprika
  • 1 teaspoon garlic powder
  • 1/2 teaspoon onion powder
  • 1/2 teaspoon cumin powder
  • 1/2 teaspoon black pepper
  • Salt according to taste
  • 1 large egg
  • 3/4 cup cold sparkling water
  • Vegetable oil for frying

For Red Onion Tomato Salsa

  • 2 cups fresh tomatoes, finely chopped
  • 1 medium red onion, finely chopped
  • 1/4 cup fresh cilantro, chopped
  • 1 jalapeño, finely chopped (optional)
  • 2 tablespoons fresh lime juice
  • Salt according to taste
  • 1/4 teaspoon black pepper

For Serving

  • 8 small corn or flour tortillas
  • 1 cup shredded cabbage
  • 1/2 cup sour cream or yogurt sauce
  • Lime wedges
  • Fresh cilantro
  • Avocado slices (optional)

Step-by-Step Instructions

Preparing the Fish

Start by preparing the fish fillets. Wash them gently and pat them completely dry using paper towels. Removing extra moisture helps the coating stick better and creates a crispier finish.

Cut the fish into small taco-sized pieces. Season lightly with salt and black pepper and allow the fish to rest while preparing the batter.

Making the Crispy Batter

In a large bowl, combine flour, cornstarch, paprika, garlic powder, onion powder, cumin, salt, and black pepper. Mix the dry ingredients until the seasoning is evenly distributed.

In another bowl, whisk the egg with cold sparkling water. Slowly add the wet mixture into the dry ingredients and gently mix until a smooth batter forms.

The batter should be thick enough to coat the fish but light enough to create a crispy texture after frying.

Frying the Fish

Heat vegetable oil in a deep pan over medium-high heat. The oil should be hot before adding the fish.

Dip each fish piece into the batter and make sure it is completely coated. Carefully place the coated fish into the hot oil.

Cook until the fish becomes golden brown and crispy, usually around 3–5 minutes depending on the size of the pieces.

Remove the fish and place it on a paper towel-lined plate to remove extra oil.

Freshly fried pieces create the best texture for Fried Fish Tacos, so serve them while they are still warm.

Preparing the Salsa

While the fish cooks, prepare the red onion tomato salsa. Combine chopped tomatoes, red onion, cilantro, jalapeño, lime juice, salt, and black pepper in a bowl.

Mix everything gently and allow the salsa to rest for a few minutes. This helps the flavors combine and creates a fresh topping.

The juicy tomatoes and crunchy onions add freshness that perfectly complements the crispy fish.

Assembling the Tacos

Warm tortillas in a dry skillet until soft and flexible.

Add shredded cabbage to each tortilla, then place crispy fish pieces on top. Add a generous spoonful of red onion tomato salsa.

Finish with yogurt sauce, fresh cilantro, avocado slices, and a squeeze of lime juice.

Serve immediately for the best combination of crispy texture and fresh flavors.

Tips for Perfect Results

For the best Fried Fish Tacos, always choose fresh fish with a firm texture. White fish varieties work especially well because they cook quickly and absorb flavors beautifully.

Dry the fish completely before adding the batter. Moisture can prevent the coating from becoming crispy.

Use cold sparkling water when preparing the batter because it helps create a lighter and crunchier coating.

Avoid overcrowding the frying pan. Cooking too many pieces together lowers the oil temperature and may result in soft coating.

Prepare the salsa close to serving time so the vegetables remain fresh and crunchy.

Serve immediately after frying because the crispy coating is at its best when freshly cooked.

For the best Fried Fish Tacos, focus on crispy coating, fresh ingredients, and proper frying temperature.

Variations

Fried Fish Tacos can be easily changed according to your preferences and available ingredients.

For a healthier option, bake or air fry the fish instead of deep frying. The texture will be lighter while still maintaining delicious flavor.

For a spicy version, add extra jalapeños, chili powder, or hot sauce to the salsa.

You can replace tomato salsa with mango salsa for a sweet and tropical flavor.

A creamy sauce made with yogurt, lime juice, garlic, and herbs can add extra richness.

Add sliced avocado, pickled onions, lettuce, or roasted vegetables for different textures.

Different seafood options such as shrimp or salmon can also be used for creative variations.

The best thing about Fried Fish Tacos is that they can be customized with different sauces, toppings, and seafood options.

Serving Suggestions

Serve Fried Fish Tacos with extra lime wedges and fresh salsa for a complete meal.

They pair well with Mexican rice, black beans, corn salad, or a fresh green salad.

For parties, prepare a taco station with different toppings so everyone can customize their own tacos.

A refreshing drink like lemonade, iced tea, or sparkling water complements the flavors perfectly.

These tacos are also great for weekend dinners because they are fun, colorful, and easy to share.

Serve Fried Fish Tacos with fresh salsa, lime wedges, and your favorite side dishes for a complete meal.

Health Benefits

Fried Fish Tacos provide several nutritional benefits when prepared with fresh ingredients.

Fish is a great source of high-quality protein that supports muscle health and keeps you satisfied.

Many fish varieties also contain omega-3 fatty acids, which are important nutrients for overall wellness.

Tomatoes provide antioxidants and vitamins, while red onions contain beneficial plant compounds.

Fresh cabbage adds fiber and nutrients while creating a crunchy texture.

Cilantro and lime juice add freshness along with additional vitamins and antioxidants.

Although the fish is fried, using quality ingredients and balanced toppings helps create a more complete meal.

Enjoying Fried Fish Tacos with fresh vegetables creates a balanced meal with protein and important nutrients.

Storage and Reheating Instructions

For best results, store each component separately. Keep fried fish, tortillas, and salsa in separate airtight containers.

The cooked fish can be refrigerated for up to two days. Reheat it in an oven or air fryer to help restore crispiness.

Avoid reheating fried fish in the microwave because it can make the coating soft.

The red onion tomato salsa can be stored in the refrigerator for up to three days.

Freshly assembled Fried Fish Tacos always provide the best taste and texture.

Leftover Fried Fish Tacos components can be stored separately to maintain freshness and texture.

Why This Recipe Is Perfect for Every Occasion

Fried Fish Tacos are perfect because they are flavorful, customizable, and enjoyable for different occasions.

They work well for family dinners, celebrations, summer gatherings, and casual weekend meals.

The recipe allows everyone to choose their favorite toppings, making it a fun interactive dining experience.

The combination of crispy fish and fresh salsa creates a balance of comfort and freshness that appeals to many tastes.

This dish is simple enough for beginners but impressive enough to serve guests.

Cooking Notes for Best Results

Always check the oil temperature before frying. Proper heat creates crispy coating without making the fish greasy.

Season the fish and batter well because each layer contributes to the final flavor.

Fresh lime juice should be added just before serving to maintain its bright flavor.

Use good-quality tortillas because they improve the overall eating experience.

Preparing all toppings before frying helps you serve the tacos immediately while they are still crispy.

Small cooking details make Fried Fish Tacos more flavorful, crispy, and enjoyable.

Questions and Answers

What fish is best for tacos?

Cod, tilapia, haddock, and mahi-mahi are excellent choices because they have mild flavor and firm texture.

Can I make these tacos without frying?

Yes, baking or air frying works well for a lighter version.

How do I keep the fish crispy?

Serve immediately and avoid covering the fried fish after cooking.

Can I prepare the salsa ahead?

Yes, prepare it a few hours before serving and keep it refrigerated.

Can frozen fish be used?

Yes, thaw completely and dry well before coating.

Nutrition Information

Approximate nutrition per serving:

Calories: 420

Protein: 28 grams

Carbohydrates: 42 grams

Fiber: 5 grams

Fat: 18 grams

Calcium: 90 mg

Nutrition values may vary depending on ingredients and portion sizes.

Meal Prep and Make-Ahead Tips

Fried Fish Tacos are a great option when you want to prepare parts of the meal ahead of time. To save time, you can prepare the red onion tomato salsa several hours before serving and keep it refrigerated. This allows the flavors of the tomatoes, onions, cilantro, and lime juice to combine beautifully.

The fish can also be prepared in advance by cutting and seasoning the fillets before cooking. However, for the best crispy texture, it is recommended to fry the fish shortly before serving.

When planning a taco night, prepare all toppings beforehand. Shredded cabbage, sauces, lime wedges, and fresh herbs can be arranged so the tacos can be assembled quickly when the fish is ready.

These tacos are also perfect for gatherings because guests can build their own tacos with their favorite toppings. Preparing ingredients separately makes serving easier and keeps everything fresh.

How to Make the Perfect Taco Experience

Creating the perfect Fried Fish Tacos is not only about the fish but also about balancing flavors and textures. The crispy coating provides a crunchy element, while the fresh salsa adds moisture and brightness.

Choosing the right tortilla can improve the overall experience. Soft corn tortillas provide a traditional flavor, while flour tortillas offer a slightly softer texture.

Adding different toppings can create exciting combinations. Creamy sauces, fresh vegetables, spicy toppings, and herbs allow you to customize every taco according to your preference.

A squeeze of fresh lime juice before eating enhances the seafood flavor and brings all the ingredients together.

For an extra special presentation, arrange the tacos on a large serving board with lime wedges, salsa bowls, and fresh cilantro. This creates a beautiful meal for family dinners and celebrations.

Common Mistakes to Avoid

One common mistake when preparing Fried Fish Tacos is not drying the fish properly before coating. Extra moisture can prevent the batter from becoming crispy.

Another mistake is using oil that is not hot enough. Proper oil temperature is important because it creates a golden coating while keeping the fish tender inside.

Avoid preparing the salsa too early because tomatoes release water over time. Freshly prepared salsa provides the best texture and flavor.

Do not overload the tortillas with too many toppings. A balanced amount of fish, salsa, cabbage, and sauce creates the best bite.

Allowing the fried fish to sit covered after cooking can also make the coating lose its crispiness. Serve immediately for the best results.

Final Thoughts

Fried Fish Tacos with Red Onion Tomato Salsa are a delicious homemade meal filled with crispy textures and fresh flavors. The combination of golden fish, colorful salsa, warm tortillas, and flavorful toppings creates a satisfying dish for any occasion.

This recipe shows that homemade tacos can be simple, exciting, and full of restaurant-style flavor. With easy preparation and flexible variations, these tacos can become a favorite meal for family and friends.

Whether prepared for dinner, parties, or weekend gatherings, Fried Fish Tacos deliver the perfect balance of crunch, freshness, and delicious seafood flavor.

Fried Fish Tacos are a delicious homemade recipe that brings restaurant-style flavors to your kitchen.
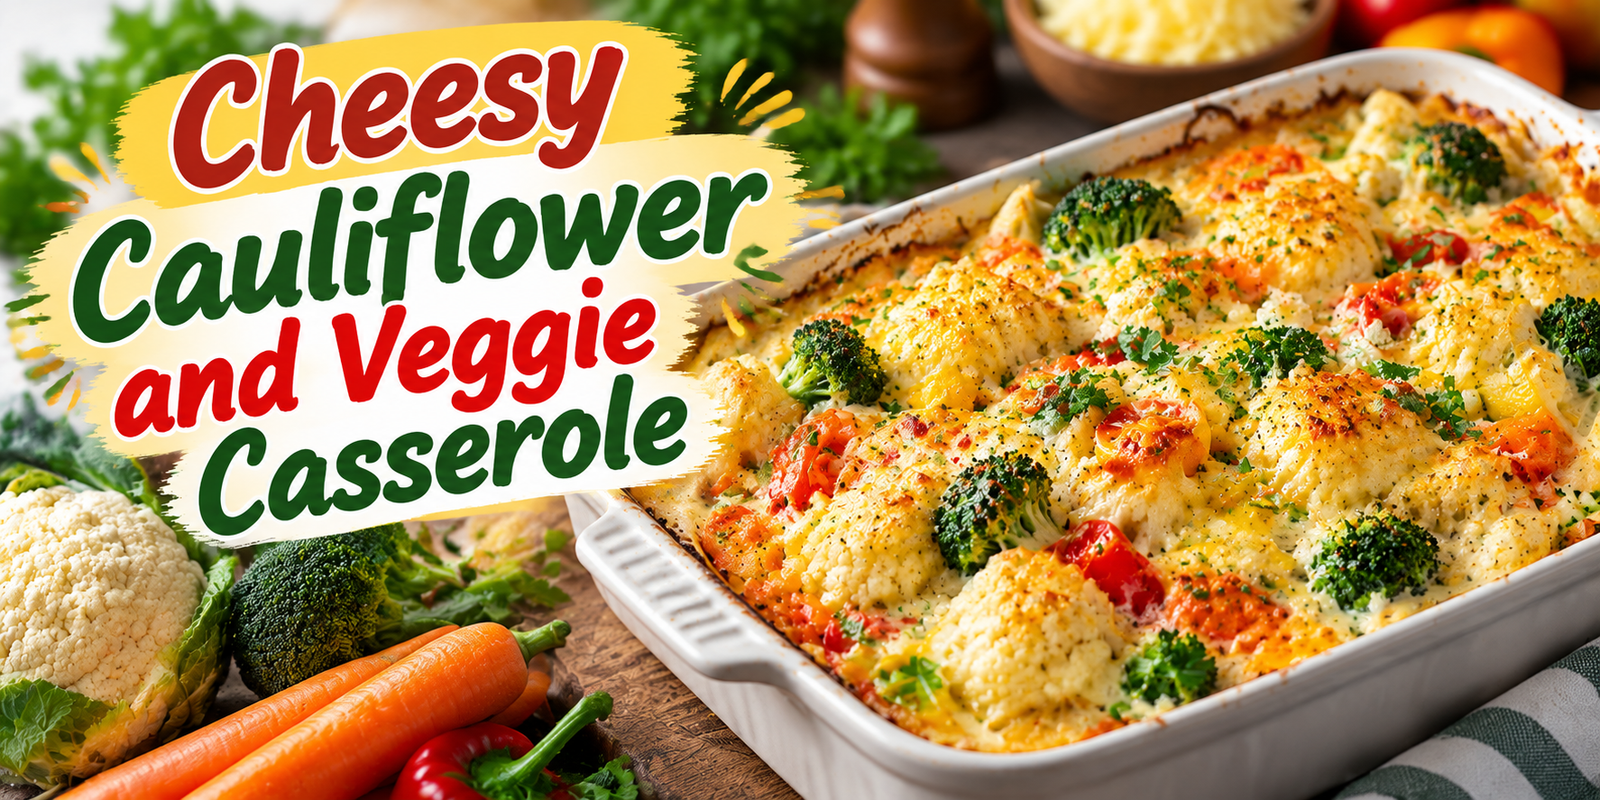
Cheesy Cauliflower and Veggie Casserole

Cheesy Cauliflower Casserole with vegetables, creamy cheese sauce, and golden baked topping

Cheesy Cauliflower and Veggie Casserole

Cheesy Cauliflower Casserole is a comforting, creamy, and flavorful vegetable dish that combines tender cauliflower, colorful vegetables, rich cheese, and a delicious creamy sauce. This recipe is perfect for family dinners, holiday gatherings, or a simple weeknight meal when you want something warm, satisfying, and easy to prepare.

The combination of cauliflower, broccoli, carrots, bell peppers, and melted cheese creates a beautiful balance of textures and flavors. The vegetables provide freshness and nutrients, while the cheesy sauce adds a creamy richness that makes every bite enjoyable.

This Cheesy Cauliflower Casserole is a great way to include more vegetables in your meals while still enjoying a comforting dish. Unlike heavy casseroles that rely only on cream and cheese, this recipe focuses on a balanced combination of wholesome ingredients.

The recipe is versatile and can be adjusted according to your preferences. You can add different vegetables, change the cheese blend, or include extra herbs and spices to create your favorite version.

Whether served as a side dish or a complete vegetarian meal, this casserole is a delicious option for both adults and children. The golden cheesy topping and creamy vegetable filling make it an appealing dish for any occasion.

This Cheesy Cauliflower Casserole is a perfect recipe for anyone who loves creamy, comforting, and vegetable-packed meals.

Preparation Time: 20 minutes
Cooking Time: 35 minutes
Total Time: 55 minutes
Servings: 8 people
Difficulty Level: Easy

Ingredients

For the Vegetable Casserole

  • 1 large cauliflower head, cut into small florets
  • 2 cups broccoli florets
  • 1 large carrot, sliced
  • 1 red bell pepper, chopped
  • 1 yellow bell pepper, chopped
  • 1 medium onion, finely chopped
  • 3 cloves garlic, minced
  • 2 tablespoons olive oil
  • 1 teaspoon dried oregano
  • 1 teaspoon dried basil
  • 1/2 teaspoon paprika
  • 1/2 teaspoon black pepper
  • Salt according to taste

For the Creamy Cheese Sauce

  • 3 tablespoons butter
  • 3 tablespoons all-purpose flour
  • 2 cups milk
  • 1 cup cream cheese
  • 1 cup shredded cheddar cheese
  • 1/2 cup mozzarella cheese
  • 1/4 cup Parmesan cheese
  • 1/2 teaspoon garlic powder
  • 1/4 teaspoon nutmeg (optional)

For Topping

  • 1/2 cup shredded mozzarella cheese
  • 2 tablespoons breadcrumbs
  • Fresh parsley for garnish

Step-by-Step Instructions

Preparing the Vegetables

Start by washing all vegetables thoroughly. Cut the cauliflower into evenly sized florets so they cook at the same rate. Prepare broccoli, carrots, and bell peppers by chopping them into bite-sized pieces.

Bring a large pot of water to a boil and lightly steam or blanch the cauliflower and broccoli for 3–4 minutes. This step softens the vegetables while keeping their texture and nutrients. Drain well and set aside.

Heat olive oil in a large skillet over medium heat. Add chopped onion and cook until softened. Add minced garlic and cook for another minute until fragrant.

Add carrots and bell peppers to the skillet and cook for a few minutes until slightly tender. Season with oregano, basil, paprika, black pepper, and salt.

Making the Cheese Sauce

To prepare the creamy sauce, melt butter in a saucepan over medium heat. Add flour and whisk continuously for about one minute to create a smooth base.

Slowly pour in milk while whisking to prevent lumps. Continue cooking until the mixture begins to thicken.

Add cream cheese and stir until completely melted. Mix in cheddar cheese, mozzarella, Parmesan cheese, garlic powder, and nutmeg.

Continue stirring until the sauce becomes smooth, creamy, and rich. Taste and adjust seasoning if needed.

Assembling the Casserole

Preheat the oven to 375°F (190°C). Grease a baking dish lightly with oil or butter.

Combine the steamed cauliflower, broccoli, cooked vegetables, and cheese sauce in the baking dish. Mix gently until all vegetables are evenly coated.

Spread the mixture evenly and sprinkle mozzarella cheese and breadcrumbs on top. The topping creates a golden, crispy layer after baking.

Baking the Casserole

Place the casserole in the preheated oven and bake for 30–35 minutes until the cheese is melted and bubbling.

For an extra golden top, turn on the broiler for the final 2 minutes while watching carefully.

Remove from the oven and allow the casserole to rest for 5–10 minutes before serving. Garnish with fresh parsley for a beautiful finish.

Tips for Perfect Results

For the best Cheesy Cauliflower Casserole, choose fresh cauliflower with firm florets and avoid vegetables that are soft or discolored.

Do not overcook the vegetables before baking. Light steaming keeps them tender while preventing a mushy texture after baking.

Use freshly shredded cheese whenever possible because it melts more smoothly compared with pre-shredded cheese.

Allow the casserole to rest after baking. This helps the sauce set slightly and makes serving easier.

If you want a crispier topping, add extra breadcrumbs mixed with Parmesan cheese before baking.

Season each layer properly. Good seasoning in the vegetables and sauce creates a deeper flavor.

For the best Cheesy Cauliflower Casserole, always use fresh vegetables and properly season each layer for maximum flavor.

Variations

This Cheesy Cauliflower Casserole can be customized in many different ways.

For a protein-rich version, add cooked chicken, turkey, or shredded rotisserie chicken. These additions make the casserole more filling and suitable as a complete meal.

For a vegetarian protein option, mix in chickpeas, white beans, or lentils.

You can create a low-carb version by replacing breadcrumbs with crushed almonds or skipping the topping completely.

For a spicy version, add chili flakes, jalapeños, or a dash of hot sauce to the cheese sauce.

Different cheese combinations can also change the flavor. Try using Swiss cheese, Monterey Jack, or smoked cheddar for a unique taste.

You can also add mushrooms, spinach, zucchini, or peas depending on what vegetables you have available.

The Cheesy Cauliflower Casserole can be easily customized with different vegetables, proteins, and cheese combinations.

Serving Suggestions

Cheesy Cauliflower Casserole works beautifully as a side dish with roasted chicken, grilled fish, or steak.

For a vegetarian meal, serve it with a fresh salad, garlic bread, or roasted vegetables.

This casserole is also perfect for holiday dinners and family gatherings because it can be prepared ahead and baked before serving.

Serve it warm with fresh herbs sprinkled on top for extra flavor and a beautiful presentation.

For lunch, pair a portion of the casserole with a light soup or salad for a balanced meal.

Serve Cheesy Cauliflower Casserole with salads, roasted meats, or fresh bread for a complete meal.

Health Benefits

Cheesy Cauliflower Casserole provides important nutrients from a variety of vegetables while offering a comforting cheesy flavor.

Cauliflower is rich in vitamins, minerals, antioxidants, and fiber. It supports digestive health and helps increase vegetable intake.

Broccoli provides vitamin C, vitamin K, and beneficial plant compounds that support overall wellness.

The vegetables in this recipe provide natural color, texture, and important nutrients.

Cheese adds calcium and protein, which are important for maintaining strong bones and supporting muscle health.

Using olive oil adds healthy fats, making this dish a balanced combination of vegetables, protein, and fats.

Enjoying vegetable-based dishes like this can help create a more varied and nutritious eating pattern.

Including Cheesy Cauliflower Casserole in your meal plan is an enjoyable way to add more vegetables to your diet.

Storage and Reheating Instructions

Store leftover Cheesy Cauliflower Casserole in an airtight container in the refrigerator for up to four days.

To reheat, place individual portions in the microwave or warm the casserole in the oven until heated through.

For the best texture, reheat in the oven because it helps maintain the crispy cheese topping.

You can also prepare this casserole ahead of time. Assemble everything, cover, and refrigerate before baking. When ready to serve, bake until hot and golden.

Freezing is also possible. Allow the casserole to cool completely before placing it in a freezer-safe container. Thaw overnight before reheating.

Leftover Cheesy Cauliflower Casserole keeps its flavor and texture when stored correctly and reheated gently.

Why This Recipe Is Perfect for Every Occasion

Cheesy Cauliflower Casserole is a recipe that fits both casual dinners and special celebrations.

Its creamy texture and cheesy flavor make it appealing to children, while the vegetables make it a practical choice for families looking for more nutritious meals.

The recipe is easy to prepare, uses simple ingredients, and can be adjusted based on personal preferences.

It is also a great make-ahead dish for busy days when you want a homemade meal without spending hours in the kitchen.

From holiday tables to everyday dinners, this casserole brings comfort and flavor to any occasion.

Cooking Notes for Best Results

For the best flavor, allow the cheese sauce to become smooth before combining it with vegetables.

Avoid adding too much liquid because excess moisture can make the casserole watery.

Fresh herbs added before serving can brighten the flavor and improve the presentation.

Always taste the sauce before baking and adjust seasoning according to your preference.

A combination of different cheeses creates a richer and more satisfying flavor compared with using only one type.

Questions and Answers

Can I make this casserole ahead of time?

Yes, prepare the casserole, cover it, and refrigerate it before baking. Bake when ready to serve.

Can I use frozen cauliflower?

Yes, frozen cauliflower works well. Thaw and drain it properly before adding it to the casserole.

How can I make it healthier?

Use low-fat cheese, add more vegetables, and reduce the amount of cream cheese if desired.

Can I make this recipe gluten-free?

Yes, replace regular flour and breadcrumbs with gluten-free alternatives.

What cheese works best?

Cheddar, mozzarella, and Parmesan create a delicious combination, but you can use your favorite melting cheeses.

Nutrition Information

Approximate nutrition per serving:

Calories: 360

Protein: 16 grams

Carbohydrates: 22 grams

Fiber: 5 grams

Fat: 24 grams

Calcium: 280 mg

Nutrition values may vary depending on ingredients and portion sizes.

Meal Prep and Make-Ahead Tips

Cheesy Cauliflower Casserole is an excellent recipe for meal preparation because it can be prepared in advance and baked when needed. If you have a busy schedule, prepare the vegetables, make the cheese sauce, and assemble the casserole ahead of time. Cover the baking dish and store it in the refrigerator until you are ready to cook.

When preparing this casserole ahead, allow it to sit at room temperature for a few minutes before placing it in the oven. This helps it heat evenly and creates a perfectly melted cheese topping.

This dish is also a great option for leftovers. The flavors often become even richer after resting because the vegetables, herbs, and cheese sauce have more time to combine. Store extra portions in airtight containers and enjoy them for quick lunches or dinners during the week.

Preparing Cheesy Cauliflower Casserole ahead of time makes busy weeknight dinners much easier.

How to Make the Casserole More Flavorful

To create the most delicious Cheesy Cauliflower Casserole, focus on building flavor at every step. Seasoning the vegetables before combining them with the cheese sauce helps create a deeper taste.

Roasting the cauliflower and other vegetables instead of steaming them can add extra flavor and a slightly caramelized texture. This simple step brings out the natural sweetness of the vegetables.

Adding fresh herbs such as parsley, thyme, or basil before serving can make the casserole taste fresher. A small amount of lemon zest can also brighten the creamy cheese flavor.

For a richer topping, combine breadcrumbs with Parmesan cheese and a drizzle of olive oil before baking. This creates a crispy golden layer that contrasts beautifully with the creamy vegetables underneath.

A few simple additions can make Cheesy Cauliflower Casserole even more flavorful and satisfying.

Best Occasions to Serve This Dish

Cheesy Cauliflower Casserole is a versatile recipe that works well for many occasions. It is a wonderful addition to holiday dinners, family gatherings, potlucks, and weekend meals.

During colder months, this warm and comforting casserole makes a satisfying dinner option. The creamy texture and cheesy topping create a cozy meal that everyone can enjoy.

It is also a helpful recipe for introducing more vegetables to children. The combination of cheese and colorful vegetables makes the dish more appealing while still providing important nutrients.

Whether served as a main vegetarian dish or a side dish alongside meat or seafood, this casserole brings comfort and flavor to the table.

Cheesy Cauliflower Casserole is suitable for family dinners, holidays, and casual gatherings.

Final Thoughts

Cheesy Cauliflower Casserole is a comforting and flavorful recipe that transforms simple vegetables into a delicious homemade meal. The creamy cheese sauce, tender vegetables, and golden topping create a dish that everyone can enjoy.

This casserole is easy enough for everyday cooking but impressive enough for family gatherings and celebrations. With flexible variations and wholesome ingredients, it can become a regular favorite in your kitchen.

Whether served as a side dish or a complete vegetarian meal, Cheesy Cauliflower Casserole offers the perfect combination of comfort, nutrition, and amazing flavor.

This Cheesy Cauliflower Casserole recipe proves that vegetables can be transformed into a delicious comfort food.