Key Lime Pie Bars
Key Lime Pie Bars are bright, creamy, tangy, and incredibly easy to make. They combine a buttery graham cracker crust with a smooth lime filling and a refreshing citrus flavor. Each square has a crisp base and a soft, creamy center that makes it perfect for dessert tables, family gatherings, afternoon treats, and summer celebrations.
These Key Lime Pie Bars are inspired by the classic flavors of key lime pie but are easier to portion and serve. Instead of cutting a whole pie, you can chill the dessert, slice it into neat squares, and serve each piece individually.
The combination of sweet condensed milk and fresh lime juice creates a naturally creamy filling. Lime zest adds even more citrus aroma, while the graham cracker crust provides a delicious buttery crunch.
Prep Time: 20 minutes
Bake Time: 25 minutes
Chill Time: 3 hours
Total Time: About 3 hours 45 minutes
Servings: 16 bars
Ingredients
For the Graham Cracker Crust
2 cups finely crushed graham crackers
1/3 cup granulated sugar
1/2 cup unsalted butter, melted
1/4 teaspoon salt
For the Lime Filling
4 large egg yolks
2 cans sweetened condensed milk, 14 ounces each
3/4 cup fresh lime juice
2 tablespoons finely grated lime zest
1 teaspoon vanilla extract
1/4 teaspoon salt
For the Topping
1 cup heavy whipping cream
2 tablespoons powdered sugar
1/2 teaspoon vanilla extract
1 teaspoon fresh lime zest
Lime slices for garnish, optional
Extra graham cracker crumbs, optional
Step-by-Step Instructions
Prepare the Baking Pan
Preheat your oven to 350°F (175°C).
Line a 9-by-13-inch baking pan with parchment paper.
Leave some parchment hanging over the sides. This will make it easier to lift the chilled dessert from the pan later.
Lightly grease the parchment with a small amount of butter or cooking spray.
A lined pan helps you remove the finished Key Lime Pie Bars without damaging the crust.
Make the Graham Cracker Crust
Place the graham crackers in a food processor and pulse until they become fine crumbs.
If you do not have a food processor, place the crackers in a sealed bag and crush them with a rolling pin.
Transfer the crumbs to a mixing bowl.
Add sugar and salt.
Pour in the melted butter.
Stir until the mixture looks evenly moistened.
The crumbs should resemble wet sand.
If the mixture seems too dry, add another tablespoon of melted butter.
Avoid adding too much butter because an overly wet crust can become greasy.
Press the Crust
Transfer the crumb mixture to the prepared pan.
Spread it evenly across the bottom.
Use the flat bottom of a glass or measuring cup to press the crumbs firmly.
Pay special attention to the corners.
A firmly packed crust will hold together better when you slice the finished dessert.
Place the pan in the oven.
Bake the crust for about 8 to 10 minutes.
It should become lightly golden and fragrant.
Remove the pan from the oven.
Allow the crust to cool for several minutes while you prepare the filling.
A properly baked crust gives Key Lime Pie Bars a firm and buttery foundation.
Prepare the Lime Filling
Separate the eggs carefully.
Place the egg yolks in a large mixing bowl.
Add the sweetened condensed milk.
Whisk gently until the mixture becomes smooth.
Add fresh lime juice.
Continue whisking until the ingredients are fully combined.
Add lime zest, vanilla extract, and salt.
Mix again.
The filling should look smooth and creamy.
Avoid vigorous whisking because too much air can create bubbles in the filling.
Fresh lime juice provides the strongest citrus flavor.
Bottled lime juice can work in a pinch, but fresh juice and freshly grated zest give the dessert a brighter aroma.
The creamy filling is what gives Key Lime Pie Bars their smooth and refreshing texture.
Pour the Filling Over the Crust
Make sure the crust is warm rather than extremely hot.
Pour the lime filling slowly over the baked crust.
Spread it gently with a spatula if needed.
Try to create an even layer from edge to edge.
Tap the pan lightly on the counter once or twice to release large air bubbles.
Do not tap it aggressively.
Place the pan back into the oven.
Bake the Bars
Bake for approximately 15 to 18 minutes.
The edges should look set while the center should still have a very slight movement.
Do not wait until the entire surface becomes completely firm.
The filling will continue setting as it cools.
Overbaking can create a dry or cracked filling.
When the bars are finished, remove the pan from the oven.
Place it on a cooling rack.
Allow the dessert to cool at room temperature for about 30 minutes.
The warm filling will gradually become firmer.
Chill Thoroughly
Once the pan has cooled, cover it loosely with plastic wrap or foil.
Place it in the refrigerator.
Chill for at least 3 hours.
For the cleanest slices, chilling overnight works even better.
Do not rush this step.
The filling needs enough time to become firm enough to cut.
Proper chilling also allows the lime flavor to develop.
Well-chilled Key Lime Pie Bars are easier to slice and have a smoother texture.
Make the Whipped Cream
Place the heavy whipping cream in a chilled mixing bowl.
Add powdered sugar and vanilla extract.
Beat with an electric mixer until soft peaks form.
Do not overbeat the cream.
Stop when it is thick enough to hold its shape.
You can spread the whipped cream over the entire chilled dessert or add a small dollop to each individual square.
Finish with fresh lime zest.
For an elegant presentation, add a small lime slice to each serving.
Cut and Serve
Remove the chilled dessert from the refrigerator.
Lift the parchment paper carefully to remove the entire slab from the pan.
Place it on a cutting board.
Use a sharp knife to cut it into squares.
For cleaner cuts, wipe the knife with a warm damp towel between slices.
You can cut the dessert into 12 large pieces or 16 smaller bars.
Add whipped cream just before serving.
A little extra lime zest provides a fresh finishing touch.
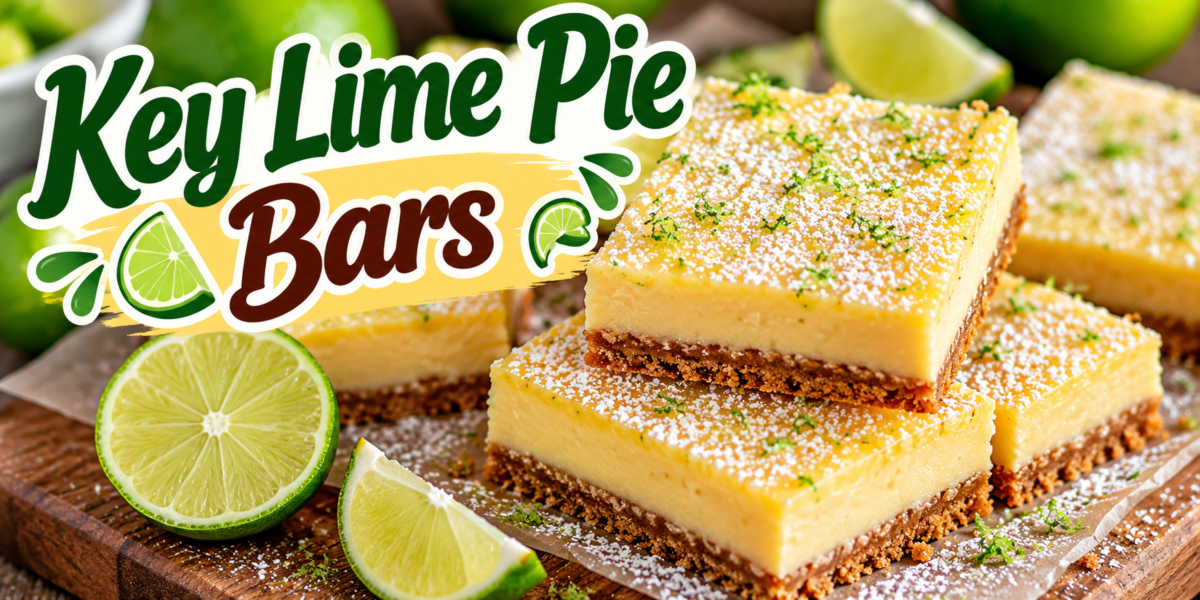
The contrast between the golden crust and pale lime filling makes Key Lime Pie Bars especially attractive on a dessert platter.
Tips for the Best Results
Use fresh limes whenever possible.
Finely grate the lime zest before squeezing the fruit.
Avoid grating the white part of the peel because it can taste bitter.
Press the crust firmly but evenly.
Do not overbake the filling.
The center should have a slight wobble when you remove the pan from the oven.
Always allow the dessert to cool before refrigerating.
Give the bars enough time to chill.
Use a sharp knife for clean slices.
Clean the knife between cuts when you want bakery-style squares.
These simple tips help make Key Lime Pie Bars creamy, neat, and flavorful.
How to Get More Lime Flavor
If you enjoy a stronger citrus flavor, increase the lime zest slightly.
Zest contains aromatic oils that provide a strong lime fragrance.
Fresh juice provides the tartness.
Using both juice and zest creates a more noticeable citrus flavor.
You can also add a small amount of lime zest to the whipped cream.
Another option is to sprinkle fresh zest over each serving.
Avoid adding too much lime juice because excess liquid can change the texture of the filling.
The goal is to create a bright citrus flavor while keeping the creamy consistency.
Easy Variations
Coconut Lime Bars
Add 1/2 cup shredded coconut to the graham cracker crust.
The coconut pairs beautifully with lime.
Berry Lime Bars
Serve each square with fresh strawberries, raspberries, or blueberries.
The berries add natural sweetness and beautiful color.
Chocolate Crust
Replace some of the graham crackers with chocolate cookie crumbs.
The chocolate adds a rich contrast to the tangy lime filling.
Extra Creamy Version
Add a thin layer of whipped cream over the chilled filling.
Finish with lime zest.
Coconut Topping
Sprinkle toasted coconut over the whipped cream.
These variations let you create different versions of Key Lime Pie Bars without changing the basic method.
Serving Suggestions
Serve the bars chilled.
They are delicious on their own, but whipped cream makes them even more special.
Fresh berries provide a colorful side.
A few lime slices can also make the serving plate look attractive.
For a dinner party, arrange the squares on a large white platter.
Dust them lightly with powdered sugar just before serving.
For a summer gathering, serve them alongside fresh fruit and iced tea.
For a holiday dessert table, add small pieces of lime zest and fresh mint around the platter.
The bright citrus flavor makes Key Lime Pie Bars a refreshing alternative to heavier chocolate desserts.
Make-Ahead Instructions
This dessert is excellent for preparing ahead.
You can bake the entire dessert one day before serving.
After the bars have cooled, cover them tightly and refrigerate.
Keep the whipped cream separate until serving.
Add the topping shortly before your guests arrive.
You can also prepare the graham cracker crust earlier in the day.
The filling should be baked and chilled according to the recipe.
Making the dessert ahead allows the filling to become fully set and makes slicing easier.
In fact, overnight chilling often gives Key Lime Pie Bars an even better texture.
Storage Instructions
Keep the finished bars refrigerated.
Store them in an airtight container or cover the baking dish tightly.
They are best enjoyed within 3 to 4 days.
If you add whipped cream, the topping may soften over time.
For the best presentation, add fresh whipped cream just before serving.
Do not leave the dessert at room temperature for extended periods, especially during warm weather.
If transporting the bars, keep them chilled until serving.
Common Mistakes to Avoid
Do not use too much butter in the crust.
Avoid pressing the crust unevenly.
Do not overmix the filling.
Avoid overbaking the lime layer.
Do not skip the chilling time.
Do not cut the bars while they are still warm.
Avoid using a dull knife because it can drag through the filling.
Do not add whipped cream too early if the dessert will be stored for several days.
Avoid using too much lime zest because it can create bitterness.
Following these guidelines helps you create consistent Key Lime Pie Bars with a smooth filling and firm crust.
Frequently Asked Questions
Can I use regular limes instead of key limes?
Yes. Regular Persian limes work very well and are easier to find. The flavor will be slightly different but still delicious.
Why are my bars not firm?
The most common reason is insufficient chilling. Give the dessert at least 3 hours in the refrigerator.
Can I make these bars the night before?
Yes. Overnight chilling is an excellent option.
Can I freeze Key Lime Pie Bars?
Yes. Wrap the chilled bars tightly and freeze them without the whipped cream topping. Thaw them in the refrigerator before serving.
Can I use bottled lime juice?
Yes, but fresh lime juice generally provides a brighter flavor.
Why did my filling crack?
Cracking can happen when the filling is overbaked or exposed to sudden temperature changes.
How do I get clean cuts?
Chill the bars thoroughly and use a sharp knife. Wipe the knife clean between cuts.
Can I make the crust without sugar?
Yes, although sugar helps improve the flavor and texture. You can adjust it according to your preferences.
Can I add fruit to the filling?
It is better to add fresh fruit as a topping rather than mixing a large amount into the filling because additional moisture can affect the texture.
What can I use instead of graham crackers?
Digestive biscuits or similar plain sweet cookies can work as substitutes.
Nutrition Information
Approximate nutrition per bar, based on 16 servings:
Calories: 285 kcal
Protein: 5g
Carbohydrates: 39g
Fat: 13g
Fiber: 1g
Sugar: 27g
Sodium: 170mg
Nutrition values are estimates and may vary depending on the brands and exact ingredients used.
Why You Will Love This Recipe
The recipe combines a few simple ingredients into a dessert with a bright and memorable flavor.
The graham cracker crust provides buttery sweetness and crunch.
The lime filling is creamy and tangy.
The condensed milk adds sweetness and richness.
Fresh lime zest provides a fragrant citrus aroma.
Whipped cream adds a soft and creamy finish.
Another advantage is that the bars are easy to portion.
Instead of serving a whole pie, you can prepare one pan and cut it into individual squares.
The dessert also travels well when kept chilled.
That makes Key Lime Pie Bars useful for picnics, potlucks, birthdays, family dinners, and holiday gatherings.
You can make them a day ahead, which reduces last-minute preparation.
Final Thoughts
Key Lime Pie Bars are a simple and delicious dessert for anyone who loves bright citrus flavors.
The buttery graham cracker crust creates a crunchy foundation, while the creamy lime filling adds a smooth and tangy contrast.
Fresh lime juice and zest provide the characteristic citrus flavor, while whipped cream creates a soft and elegant finish.
The recipe is easy to prepare, but proper chilling is essential for the best texture.
Take your time with the crust, avoid overbaking the filling, and refrigerate the dessert until it is completely set.
For special occasions, decorate each square with whipped cream, lime zest, and a small lime slice.
You can also experiment with coconut, berries, chocolate crumbs, or toasted nuts.
Because the bars can be prepared ahead, they are especially convenient for entertaining.
Keep them refrigerated until serving and use a sharp knife for neat squares.
Whether you are preparing dessert for a family dinner, summer party, holiday table, or weekend treat, Key Lime Pie Bars offer a refreshing combination of creamy texture, buttery crunch, and bright lime flavor.
Once chilled and sliced, these Key Lime Pie Bars are ready to serve and enjoy.