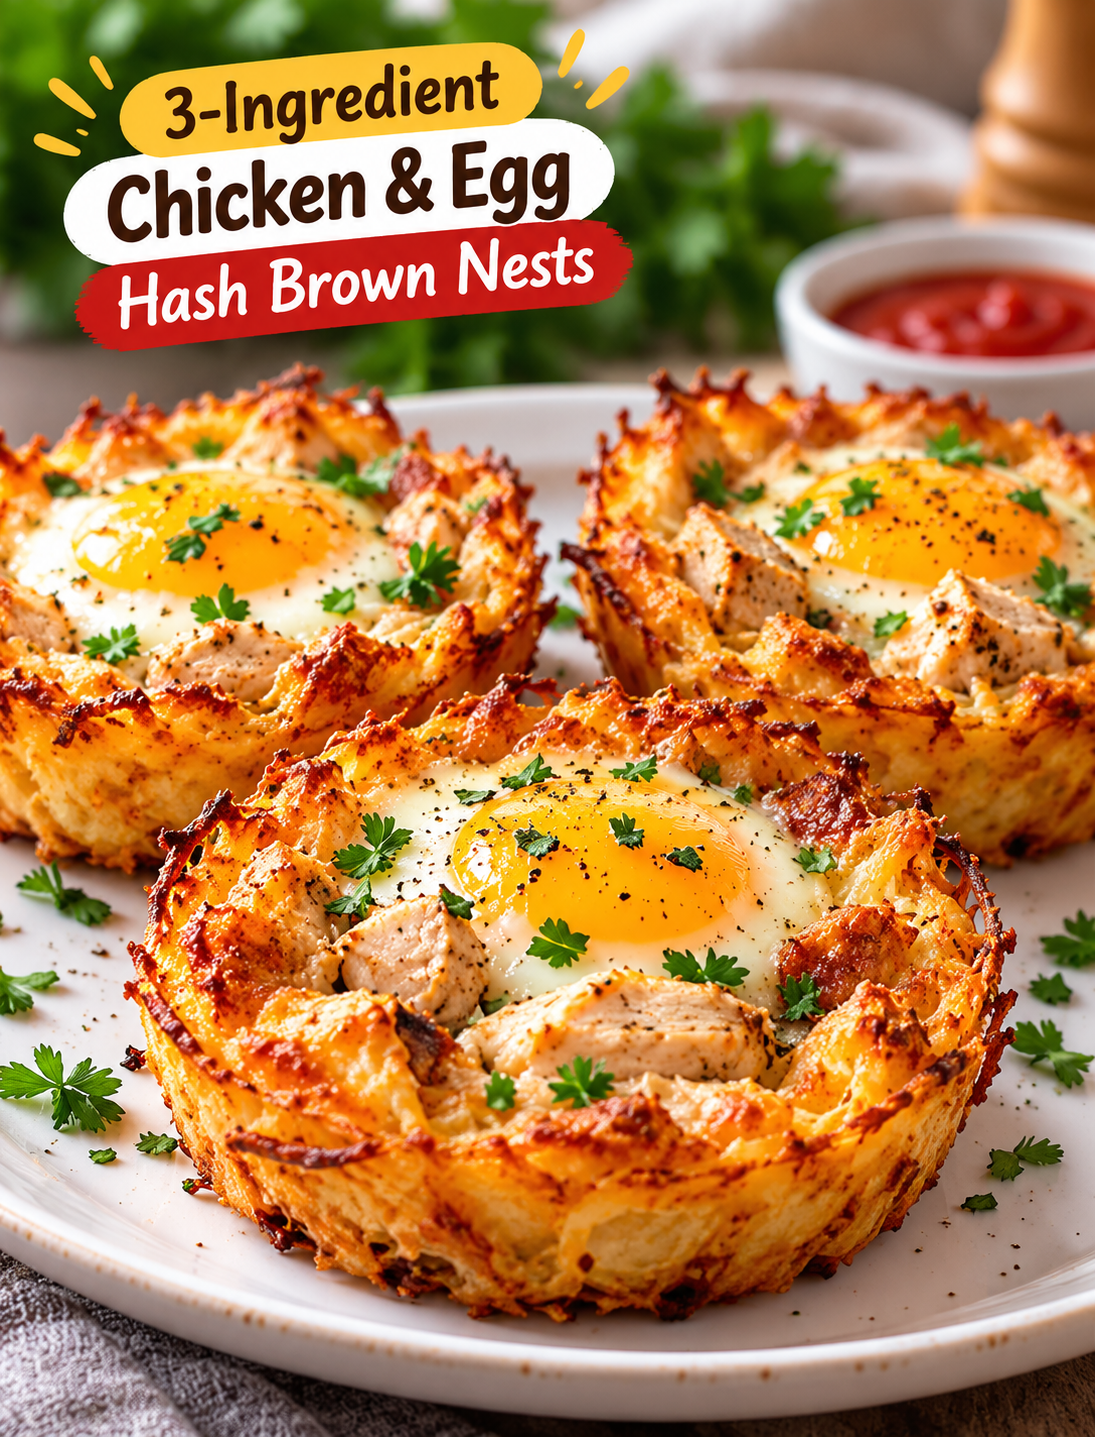
Want a breakfast that is crispy on the outside, tender in the middle, and easy to make with just three main ingredients? These 3-Ingredient Crispy Chicken & Egg Hash Brown Nests turn simple ingredients into a satisfying breakfast that looks impressive without requiring much prep time.
Each nest combines golden hash browns, savory cooked chicken, and an egg baked right in the center. The potatoes develop crispy edges, the chicken adds a hearty bite, and the egg brings everything together in one easy serving.
This recipe is perfect for busy weekday mornings, relaxed weekend brunches, or a quick breakfast meal prep idea. You can prepare the potato nests ahead of time and bake them when you are ready to eat.
The best part is that you do not need a long ingredient list or complicated cooking steps. With a muffin tin, a few basic kitchen tools, and three main ingredients, you can make a breakfast your whole family will enjoy.
Why You Will Love These Chicken & Egg Hash Brown Nests
- Only three main ingredients: Frozen hash browns, cooked chicken, and eggs form the base of this easy recipe.
- Crispy potato edges: Pressing the shredded potatoes into muffin cups helps create golden, crunchy nests.
- Protein-rich breakfast: Chicken and eggs provide protein to help make breakfast more satisfying.
- Easy individual servings: Each nest is portioned separately, making breakfast simple to serve.
- Great for meal prep: Bake the potato shells ahead and add the eggs when you are ready to finish cooking.
- Easy to customize: Add black pepper, garlic powder, paprika, or your favorite herbs if you have them on hand.
- Family-friendly: The mild flavors work well for adults and kids who enjoy eggs, chicken, and crispy potatoes.
Ingredients for 3-Ingredient Crispy Chicken & Egg Hash Brown Nests
You need three main ingredients to make these crispy breakfast nests. Salt, pepper, and cooking spray are optional kitchen basics.
1. Frozen Shredded Hash Browns
Use thawed frozen shredded hash browns for a quick and easy potato base. Removing excess moisture is important because wet potatoes can become soft instead of crispy.
2. Cooked Chicken
Use cooked, shredded or finely chopped chicken breast for a savory filling. Leftover roasted chicken or plain rotisserie chicken works well, provided it has been stored safely.
3. Eggs
Use one egg for each nest. The egg cooks in the center of the potato shell and gives each serving a classic breakfast flavor.
Optional Seasonings
- Salt, to taste
- Black pepper, to taste
- Garlic powder, optional
- Paprika, optional
- Cooking spray or a little oil for greasing the muffin tin
These extras are optional and are not counted among the three main ingredients.
Equipment You Will Need
- A standard 6-cup or 12-cup muffin tin
- A mixing bowl
- A clean kitchen towel or paper towels
- A spoon
- A fork
- An oven
- A food thermometer for checking doneness
A nonstick muffin tin makes it easier to remove the nests without breaking their crispy edges.
How to Make 3-Ingredient Crispy Chicken & Egg Hash Brown Nests
Follow these simple steps to create golden potato nests filled with chicken and baked eggs.
Step 1: Preheat the Oven
Preheat your oven to 400°F (200°C). Lightly grease six muffin cups with cooking spray or a small amount of oil.
Preheating helps the potatoes begin cooking as soon as they enter the oven. Greasing the cups also reduces sticking and helps the nests release more easily.
Step 2: Thaw and Dry the Hash Browns
Place the thawed hash browns in a clean kitchen towel or between layers of paper towels. Press gently to remove as much excess moisture as possible.
Dry potatoes brown more effectively because less water needs to evaporate during cooking. Do not skip this step if you want crispier edges.
Step 3: Prepare the Chicken
Shred or finely chop the cooked chicken into small pieces. Smaller pieces fit better inside the potato nests and make each bite easier to eat.
If you are using leftover chicken, make sure it has been refrigerated properly and reheated or cooked as directed in the recipe. Avoid using chicken that has been left at room temperature for more than two hours.
Step 4: Shape the Potato Nests
Divide the dried hash browns among the six greased muffin cups. Press the potatoes firmly against the bottom and sides of each cup to create a small well in the center.
Keep the potato layer even so the edges cook at a similar rate. Avoid making the bottom too thick because it may stay soft while the top becomes brown.
Step 5: Bake the Potato Shells
Bake the potato nests for 15–20 minutes, or until the edges begin to turn golden and crisp.
Oven temperatures and muffin tins vary, so check the potatoes near the end of this first baking period. If the centers still look very wet, give them a few more minutes before adding the filling.
Step 6: Add the Cooked Chicken
Remove the muffin tin from the oven carefully. Divide the chopped chicken evenly among the potato nests, keeping the center of each nest open for an egg.
Do not pack the chicken too tightly into the cups. Leaving enough space in the center helps the eggs sit securely without spilling over the edges.
Step 7: Crack an Egg into Each Nest
Crack one egg into the center of each potato nest. For smaller muffin cups, you may need to remove a little egg white before adding the egg to prevent overflow.
Season lightly with salt and black pepper if desired. Keep the yolk intact if you prefer a classic sunny-center appearance.
Step 8: Bake Until the Eggs Are Set
Return the muffin tin to the oven and bake for another 10–15 minutes, checking the eggs as they cook.
The exact time depends on the size of your eggs and how firm you like the yolks. For food safety, cook the eggs until the whites and yolks are firm, or use pasteurized eggs if preparing a softer-yolk version.
Step 9: Rest and Remove the Nests
Remove the muffin tin from the oven and let the nests rest for about 3–5 minutes. Carefully loosen the edges with a small silicone spatula or butter knife.
Lift each nest out gently to keep the potato shell intact. Serve while warm for the best contrast between crispy potatoes, savory chicken, and tender egg.
Tips for the Crispiest Hash Brown Nests
- Remove excess water: Wet hash browns are one of the main reasons potato nests turn soft.
- Grease the muffin tin: A light coating helps prevent the potato shells from sticking.
- Press firmly: Compact potatoes hold their shape better after baking.
- Pre-bake the shells: This gives the potatoes time to develop color before the chicken and eggs are added.
- Use cooked chicken: Raw chicken will not cook safely in the short egg-baking stage.
- Leave room for the eggs: Overfilled muffin cups can spill and make removal harder.
- Avoid overcrowding: Leave space between the muffin cups when using a larger baking pan.
- Check the centers: The edges may brown before the thickest part of the potato base is crisp.
Easy Variations to Try
Cheesy Chicken Hash Brown Nests
Sprinkle a small amount of shredded cheddar or mozzarella over the chicken before adding the egg. The cheese melts into the filling and adds a creamy, savory flavor.
Spicy Breakfast Nests
Add a pinch of smoked paprika, black pepper, or chili flakes to the hash browns. Serve with hot sauce if you enjoy a little heat.
Garlic Herb Chicken Nests
Season the cooked chicken with garlic powder and dried parsley before adding it to the potato shells. This gives the filling more flavor without adding much prep time.
Turkey or Ham Nests
Replace the cooked chicken with chopped cooked turkey or ham. Check the salt level before seasoning because some prepared meats are already salty.
Vegetable Breakfast Nests
Add a small amount of finely chopped bell pepper or spinach to the chicken. Cook watery vegetables first so they do not release too much moisture into the potato shells.
These additions change the original three-ingredient recipe, but they are useful options when you want more variety.
What to Serve with Chicken & Egg Hash Brown Nests
These breakfast nests are filling enough to serve on their own, but a few simple sides can turn them into a complete brunch.
- Fresh fruit: Serve with berries, orange slices, or melon for a fresh contrast.
- Avocado slices: Add creamy avocado and a squeeze of lemon for a simple side.
- Green salad: A light salad works well for a breakfast-for-lunch meal.
- Whole-grain toast: Serve with toast when you want a more substantial breakfast.
- Salsa: Add a spoonful of mild or spicy salsa for extra flavor.
- Greek yogurt: Plain Greek yogurt with fruit makes an easy side for a breakfast spread.
For a family brunch, arrange the nests on a platter and serve the sides separately so everyone can build their own plate.
Make-Ahead and Meal Prep Instructions
You can prepare the potato shells ahead of time to save time on busy mornings.
- Bake the hash brown shells until lightly golden.
- Let them cool, then refrigerate them in a covered container.
- Keep the cooked chicken refrigerated in a separate container.
- When ready to serve, add the chicken and eggs to the shells.
- Bake until the potato edges are crisp and the eggs are fully cooked.
For the best texture, assemble and bake the eggs shortly before serving. Fully assembled nests can also be reheated, but the egg texture may become firmer and the potatoes may lose some crispness.
How to Store and Reheat Leftovers
Allow leftover nests to cool promptly, then place them in an airtight container in the refrigerator within two hours of cooking. Store them at 40°F (4°C) or below and eat within three to four days.
To reheat, place the nests in an oven or air fryer at approximately 350°F (175°C) until heated through. Check the center with a food thermometer and make sure leftovers reach 165°F (74°C).
Microwaving is faster, but it usually makes the potato edges softer. Avoid leaving cooked eggs and chicken at room temperature for extended periods.
For longer storage, freeze the fully cooked and cooled nests in a freezer-safe container. Thaw them in the refrigerator before reheating, and use a thermometer to confirm that they are heated safely throughout.
Common Mistakes to Avoid
- Using wet potatoes: Excess moisture prevents proper browning.
- Skipping the first bake: Adding eggs too early can leave the potato base undercooked.
- Using too much filling: Overfilled nests are harder to remove from the muffin tin.
- Adding raw chicken: The chicken should already be fully cooked before assembly.
- Overbaking the eggs: Long baking times can make eggs rubbery and dry.
- Removing nests too quickly: A short resting period helps the potato shells hold together.
- Assuming every oven cooks the same: Check the texture and doneness rather than relying on time alone.
Frequently Asked Questions
1. Can I use fresh potatoes instead of frozen hash browns?
Yes. Peel and shred fresh potatoes, then squeeze out as much moisture as possible before shaping the nests.
2. Can I make these chicken and egg nests without a muffin tin?
Yes. Shape small potato nests on a greased baking sheet, leaving enough space between them to hold the filling.
3. Can I use rotisserie chicken?
Yes. Remove the skin and bones, then shred the cooked chicken into small pieces before adding it to the nests.
4. How do I make hash brown nests extra crispy?
Dry the potatoes well, press them firmly into the muffin cups, and pre-bake the shells until their edges turn golden.
5. Can I prepare these nests the night before?
Yes. Pre-bake the potato shells and refrigerate them with the cooked chicken separately, then add the eggs and finish baking in the morning.
6. Can I freeze cooked hash brown nests?
Yes. Cool them completely, freeze them in a sealed container, and reheat until the centers reach 165°F (74°C).
7. How do I know when the eggs are fully cooked?
The whites and yolks should be firm for the safest preparation. Check the center carefully because cooking times vary by oven and egg size.
8. Are these chicken and egg hash brown nests good for meal prep?
Yes. They provide individual portions of potatoes, chicken, and eggs, and they can be refrigerated and reheated for convenient breakfasts.
Final Thoughts
These 3-Ingredient Crispy Chicken & Egg Hash Brown Nests are a simple way to make breakfast feel special without spending hours in the kitchen. Crispy potato shells, savory cooked chicken, and baked eggs come together in convenient individual portions.
Drying the hash browns, pre-baking the potato shells, and cooking the eggs thoroughly are the most important steps for a successful result. Once you master the basic method, you can try different seasonings, vegetables, and cheeses to suit your taste.
Make a batch for weekend brunch, prepare the potato shells ahead for busy mornings, or serve these nests as part of a hearty breakfast spread. If you try this recipe, share your favorite variation and let us know how your chicken and egg hash brown nests turned out.