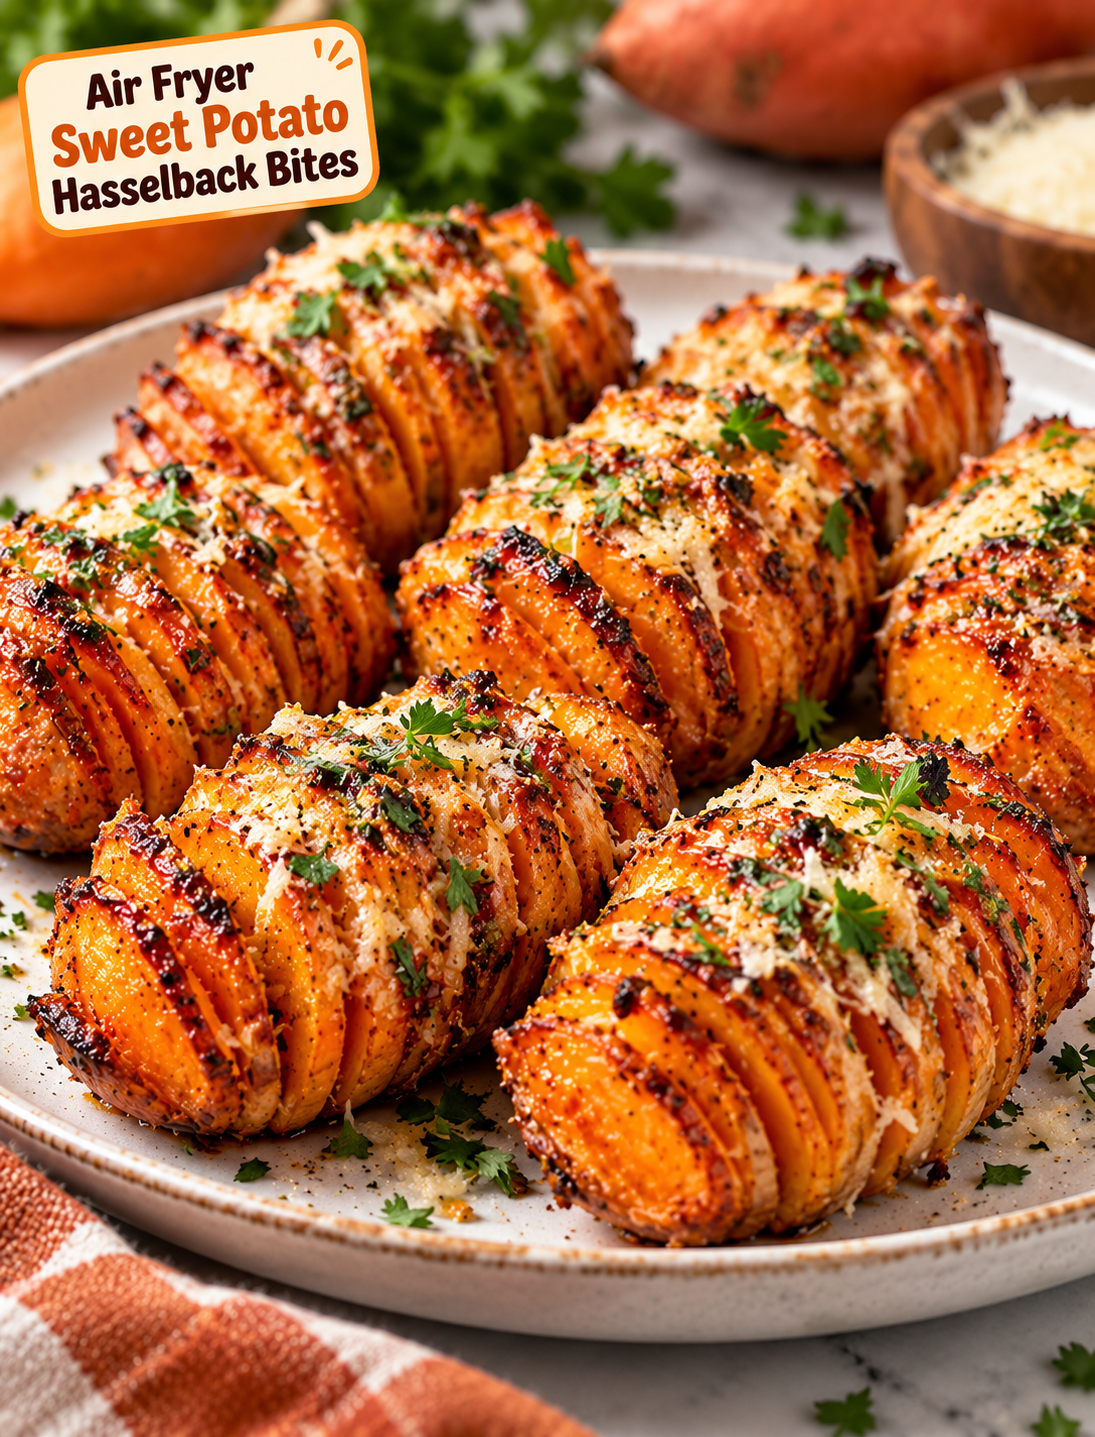
Air Fryer Sweet Potato Hasselback Bites

Air fryer sweet potato Hasselback bites with crispy edges, maple glaze, garlic, Parmesan, and fresh parsley

Air Fryer Sweet Potato Hasselback Bites

Air Fryer Sweet Potato Hasselback Bites are a simple way to turn sweet potatoes into a crispy, flavorful side dish or appetizer. Thin cuts let the edges become golden and crisp while the center stays soft and tender.

This recipe combines sweet potatoes with olive oil, garlic, rosemary, and a touch of maple syrup. The result is a sweet and savory bite with caramelized edges and a soft middle.

These bite-sized potatoes are easy enough for a weeknight meal and special enough for Thanksgiving, Friendsgiving, holiday parties, or fall gatherings. The air fryer also cooks them faster than a traditional oven while giving the outside a delicious roasted texture.

Why You’ll Love These Sweet Potato Bites

  • Crispy edges: Thin Hasselback cuts create plenty of golden, crunchy edges.
  • Tender center: The sweet potato stays soft inside as it cooks.
  • Simple ingredients: You only need a few pantry staples and fresh sweet potatoes.
  • Air fryer friendly: No large baking sheet or long oven preheating is needed.
  • Great for entertaining: The small portions make them easy to serve as finger food.
  • Flexible flavor: You can make them sweet, savory, spicy, or a combination of all three.
  • Naturally colorful: Their golden-orange color makes them stand out on a holiday table.

Ingredients You’ll Need

  • 3 medium sweet potatoes, preferably similar in size
  • 2 tablespoons olive oil
  • 1 tablespoon melted unsalted butter
  • 1 tablespoon pure maple syrup
  • 1 teaspoon garlic powder
  • ½ teaspoon smoked paprika
  • ½ teaspoon dried rosemary
  • ½ teaspoon kosher salt
  • ¼ teaspoon black pepper
  • 2 tablespoons finely grated Parmesan cheese
  • 1 tablespoon chopped fresh parsley

For a slightly spicy version, add a small pinch of cayenne pepper or crushed red pepper flakes.

How to Cut Hasselback Sweet Potatoes

The key to this recipe is making thin slices without cutting completely through each potato.

Place a sweet potato on a cutting board and position a chopstick or the handle of a wooden spoon along each long side. Make thin cuts across the potato about ⅛ inch apart.

The chopsticks stop the knife before it reaches the bottom, keeping the slices connected.

Try to keep the cuts as even as possible. Thin, consistent slices cook more evenly and create better crispy edges.

If your sweet potatoes are large, cut them into smaller sections before making the Hasselback cuts. This creates more manageable bite-sized portions.

Step-by-Step Instructions

Step 1: Prepare the Sweet Potatoes

Wash the sweet potatoes thoroughly and scrub away any dirt.

Pat them completely dry with paper towels. Dry potatoes brown better and help the seasoning stick to the surface.

Cut off any uneven ends, then slice the potatoes into smaller sections if needed.

Step 2: Make the Seasoning Mixture

Add olive oil, melted butter, maple syrup, garlic powder, smoked paprika, rosemary, salt, and black pepper to a small bowl.

Whisk until the mixture is well combined.

The maple syrup adds a mild sweetness, while smoked paprika and garlic balance the flavor.

Step 3: Make the Hasselback Cuts

Place each sweet potato section between two chopsticks or wooden spoon handles.

Use a sharp knife to make thin cuts across the potato.

Leave the bottom intact so the slices remain attached.

Do not cut too deeply because the pieces can separate during cooking.

Step 4: Season the Potatoes

Brush the seasoned oil mixture over the sweet potatoes.

Gently brush between some of the cuts so the seasoning reaches the inside edges.

Avoid forcing the slices apart because they can break.

For extra flavor, reserve a little seasoning mixture for brushing halfway through cooking.

Step 5: Preheat the Air Fryer

Preheat the air fryer to 375°F (190°C) for about 3 minutes.

Preheating helps the potatoes begin cooking immediately and encourages better browning.

Lightly spray the air fryer basket with cooking spray if needed.

Step 6: Air Fry the Sweet Potatoes

Place the prepared sweet potatoes in the air fryer basket with the cut sides facing upward.

Keep the pieces in a single layer and leave space between them for proper air circulation.

Air fry at 375°F for 18–25 minutes, depending on the size and thickness of the potatoes.

After about 10–12 minutes, carefully brush them with the remaining seasoning mixture.

Continue cooking until the edges are crisp and the centers are fork-tender.

Larger pieces may need a few additional minutes.

Step 7: Add Parmesan

Once the potatoes are almost completely cooked, sprinkle the grated Parmesan over the tops.

Return them to the air fryer for 2–3 minutes.

The cheese should melt and develop lightly browned edges.

Watch closely during this final stage because Parmesan can brown quickly.

Step 8: Finish and Serve

Carefully transfer the sweet potato bites to a serving plate.

Sprinkle with fresh parsley and serve while warm.

For an extra fall-inspired finish, drizzle a very small amount of maple syrup over the top just before serving.

Tips for Extra-Crispy Hasselback Bites

Use sweet potatoes that are similar in size so they cook at roughly the same rate.

Keep the slices thin and even to create more crispy edges.

Do not overcrowd the air fryer basket because trapped steam can prevent browning.

Pat the potatoes dry before adding the seasoning mixture.

For deeper browning, brush the exposed edges with a little olive oil halfway through cooking.

If your air fryer runs hot, reduce the temperature slightly and extend the cooking time to prevent the edges from burning before the centers become tender.

Flavor Variations

Maple Cinnamon

Skip the garlic and smoked paprika. Use maple syrup, cinnamon, butter, and a small pinch of salt for a sweeter side dish.

Garlic Parmesan

Leave out the maple syrup and add extra garlic powder, Parmesan, and Italian seasoning.

Spicy Sweet Potato Bites

Add cayenne pepper or crushed red pepper flakes to the seasoning mixture for a sweet-and-spicy flavor.

Honey Herb

Replace maple syrup with honey and use fresh thyme or rosemary for a bright, savory finish.

Bacon Cheddar

Top the cooked potatoes with shredded cheddar cheese and finely crumbled cooked bacon. Air fry for another 1–2 minutes until the cheese melts.

What to Serve With Sweet Potato Hasselback Bites

These crispy sweet potato bites work well with roasted chicken, turkey, pork tenderloin, steak, or grilled salmon.

For a holiday meal, serve them alongside turkey, green beans, cranberry sauce, and a simple salad.

They can also be served as an appetizer with a creamy garlic dip, maple Dijon sauce, or herbed yogurt.

For brunch, pair them with scrambled eggs, turkey sausage, or a vegetable frittata.

How to Store and Reheat

Allow leftovers to cool before placing them in an airtight container.

Refrigerate for up to 3–4 days.

To reheat, place the bites in the air fryer at 350°F for 4–6 minutes, or until heated through and crisp again.

Avoid microwaving when possible because it can make the edges soft.

Frequently Asked Questions

Can I use large sweet potatoes?

Yes. Large sweet potatoes work well, but cut them into smaller sections so they cook more evenly.

Do I need to peel sweet potatoes?

No. The skin is edible and becomes slightly crisp during air frying, but you can peel them if preferred.

Why are my sweet potatoes not crispy?

Overcrowding, excess moisture, or thick slices can reduce crispiness; keep the pieces dry and arrange them in a single layer.

Can I make these without Parmesan?

Yes. Simply omit the Parmesan or replace it with another hard grated cheese that browns well.

Can I prepare them ahead of time?

Yes. Make the Hasselback cuts and seasoning several hours ahead, then refrigerate the prepared potatoes until ready to cook.

What temperature should sweet potatoes reach?

Sweet potatoes should be tender enough to pierce easily with a fork; unlike meat, they do not require a specific internal temperature for safety.

Can I use frozen sweet potatoes?

Fresh sweet potatoes are recommended because frozen pieces can release extra moisture and may not hold the Hasselback cuts well.

Can I make these spicy?

Yes. Add cayenne pepper, chili powder, or crushed red pepper flakes to the seasoning mixture for extra heat.

Final Thoughts

Air Fryer Sweet Potato Hasselback Bites are an easy way to make a simple vegetable feel special. The thin cuts create crispy, caramelized edges while the center stays soft and tender. Maple, garlic, smoked paprika, rosemary, and Parmesan add a balanced sweet-and-savory flavor.

They are a great choice for weeknight dinners, Thanksgiving, Friendsgiving, holiday gatherings, or fall parties. Serve them warm with roasted chicken, turkey, steak, or your favorite dipping sauce.

For the best texture, keep the slices thin, avoid overcrowding the air fryer, and serve the bites soon after cooking. Once you try this method, sweet potatoes may become one of your favorite air fryer side dishes.

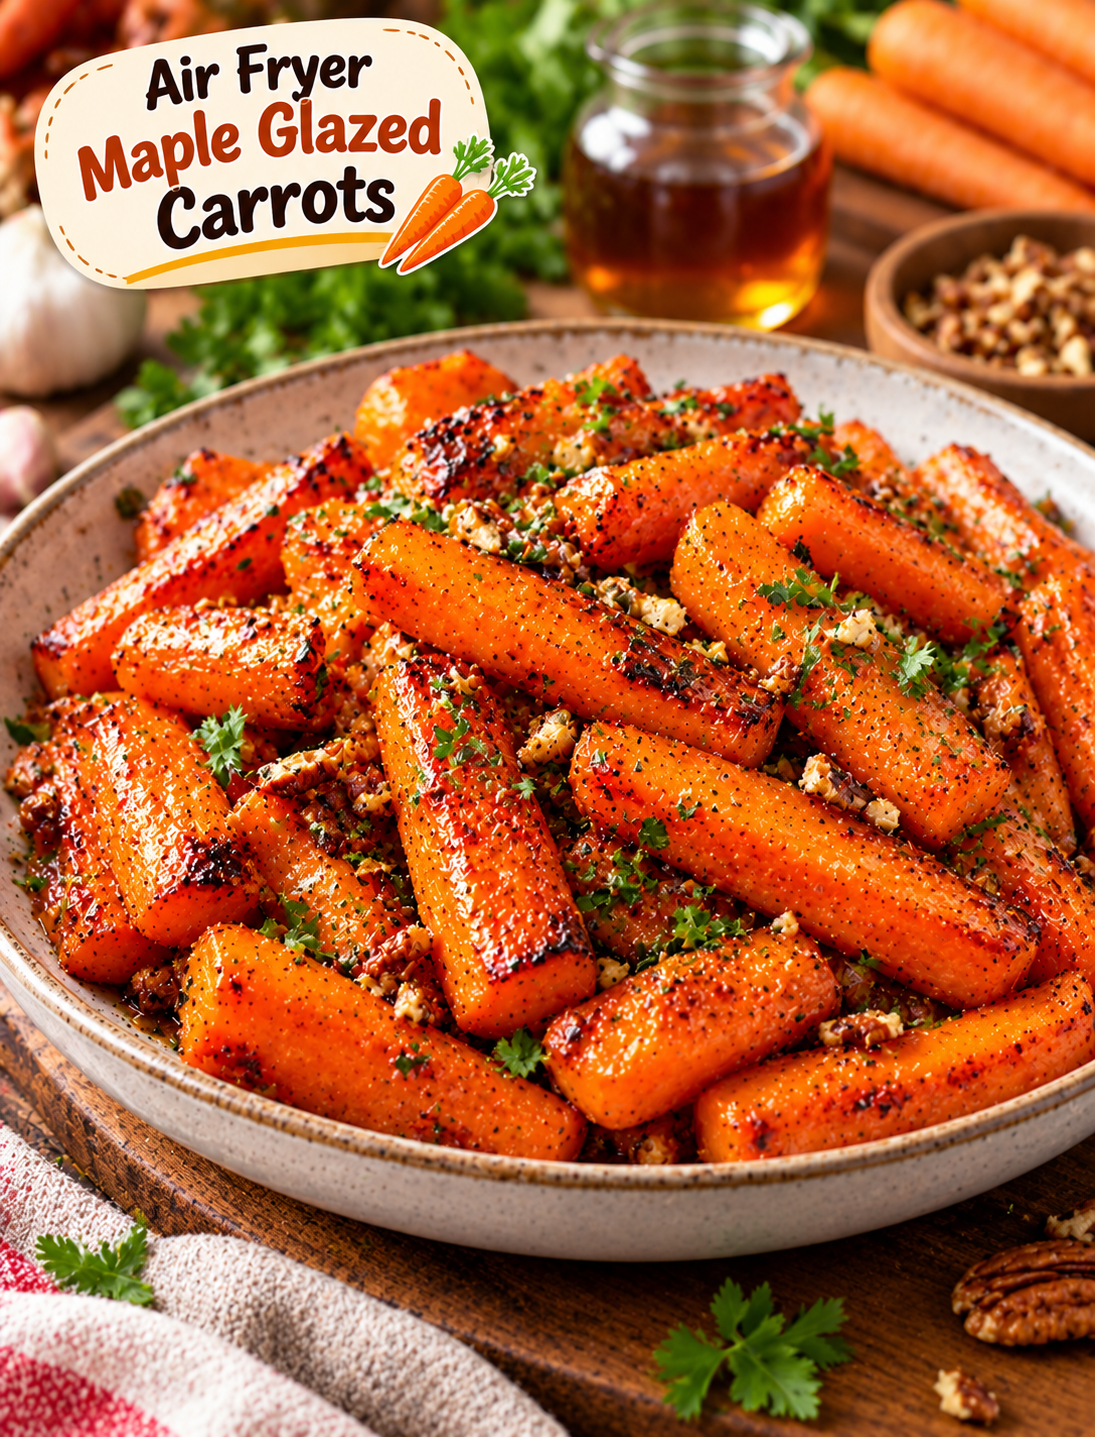
Air Fryer Maple Glazed Carrots

Air Fryer Maple Glazed Carrots with caramelized edges, maple glaze, fresh herbs, and chopped pecans.

Air Fryer Maple Glazed Carrots

Air Fryer Maple Glazed Carrots are a simple side dish with tender centers, caramelized edges, and a sweet maple glaze. The air fryer cooks the carrots quickly while giving them lightly crisp edges that you do not get from steaming.

This recipe uses everyday ingredients and takes about 20 minutes from start to finish. Maple syrup adds gentle sweetness, while butter, garlic, and a touch of thyme keep the flavor balanced.

These carrots are easy enough for a weeknight dinner but special enough for Thanksgiving, Christmas, Easter, or a family gathering. They pair well with roasted chicken, turkey, pork, steak, salmon, and other main dishes.

Why You’ll Love This Recipe

  • Fast side dish: The air fryer cooks the carrots in about 12–16 minutes.
  • Simple ingredients: You only need a few pantry and refrigerator staples.
  • Sweet and savory: Maple syrup adds sweetness without overpowering the carrots.
  • Great texture: Air frying creates caramelized edges while keeping the centers tender.
  • Easy cleanup: Everything can be prepared in one bowl and one air fryer basket.
  • Holiday-friendly: The warm maple flavor fits naturally into fall and winter meals.
  • Easy to customize: You can add herbs, spices, nuts, or a little heat.

Ingredients You’ll Need

  • 1 pound fresh carrots, peeled and cut into 2-inch pieces
  • 1½ tablespoons pure maple syrup
  • 1 tablespoon unsalted butter, melted
  • 1 tablespoon olive oil
  • 1 small garlic clove, finely minced
  • ½ teaspoon dried thyme
  • ½ teaspoon kosher salt
  • ¼ teaspoon black pepper
  • ¼ teaspoon ground cinnamon
  • 1 teaspoon fresh parsley, chopped, for garnish
  • 1 teaspoon fresh thyme leaves, optional
  • 2 tablespoons chopped pecans, optional

For the best flavor, use pure maple syrup rather than pancake syrup. Pure maple syrup has a cleaner flavor and works especially well with roasted vegetables.

How to Make Air Fryer Maple Glazed Carrots

Step 1: Prepare the Carrots

Wash and peel the carrots, then cut them into evenly sized pieces.

For whole carrots, cut them into pieces about 2 inches long and ½ inch thick. If the carrots are very thick, cut them in half lengthwise.

Keeping the pieces similar in size helps them cook evenly.

Step 2: Make the Maple Glaze

Add the maple syrup, melted butter, olive oil, minced garlic, thyme, salt, black pepper, and cinnamon to a small bowl.

Whisk until the mixture is smooth.

The butter adds richness, while olive oil helps the carrots brown in the air fryer.

Step 3: Coat the Carrots

Place the prepared carrots in a large mixing bowl.

Pour the maple mixture over the carrots and toss until every piece is lightly coated.

Do not add an excessive amount of glaze at this stage. Too much liquid can make the carrots steam instead of caramelize.

Step 4: Preheat the Air Fryer

Preheat the air fryer to 380°F (193°C) for about 3 minutes.

Preheating gives the carrots a head start on browning and helps create more consistent results.

Step 5: Arrange the Carrots

Place the glazed carrots in the air fryer basket.

Arrange them in as close to a single layer as possible, leaving a little space between pieces.

Avoid packing the basket tightly. Good airflow helps the carrots develop browned edges.

Step 6: Air Fry

Cook the carrots at 380°F (193°C) for 12–16 minutes.

Shake the basket after about 7 minutes to turn the carrots and encourage even browning.

Start checking the carrots around the 12-minute mark. They are ready when the edges are caramelized and the centers are tender when pierced with a fork.

Larger carrot pieces may need a few additional minutes.

Step 7: Add a Final Maple Finish

For a stronger maple flavor, mix 1 teaspoon maple syrup with ½ teaspoon melted butter.

Brush a very small amount over the hot carrots after cooking.

Do not add a large amount because excess syrup can make the finished carrots sticky rather than lightly glazed.

Step 8: Garnish and Serve

Transfer the carrots to a serving bowl.

Sprinkle with fresh parsley and thyme.

For extra texture, add a small amount of toasted chopped pecans.

Serve immediately while the carrots are warm.

Tips for Perfect Maple Glazed Carrots

Cut evenly: Similar-sized pieces cook at the same rate and prevent some carrots from becoming too soft.

Do not overcrowd: A crowded basket traps steam and reduces browning.

Use pure maple syrup: It gives the glaze a more natural maple flavor.

Watch the final minutes: Maple syrup contains natural sugars that can brown quickly.

Shake halfway through: Turning the carrots helps them caramelize more evenly.

Use fresh carrots: Firm carrots provide a better texture than older carrots that have become soft or dry.

Adjust the sweetness: If you prefer a less sweet side dish, reduce the maple syrup to 1 tablespoon.

How to Make Them Extra Crispy

If you want more caramelized edges, pat the carrots dry after washing them.

Use only enough glaze to coat the pieces lightly. Excess moisture can slow browning.

Keep the carrots in a single layer and avoid opening the air fryer repeatedly during the first several minutes.

For especially browned edges, increase the temperature to 400°F (205°C) for the final 1–2 minutes and watch them closely.

Easy Flavor Variations

Maple Cinnamon Carrots

Increase the cinnamon to ½ teaspoon and add a small pinch of nutmeg for a warmer fall flavor.

Spicy Maple Carrots

Add ¼ teaspoon cayenne pepper or a pinch of crushed red pepper flakes to the glaze.

The mild heat works well with the sweetness of the maple syrup.

Maple Garlic Carrots

Increase the garlic to 2 small cloves for a stronger savory flavor.

This version pairs especially well with roasted chicken or steak.

Maple Pecan Carrots

Add toasted chopped pecans after cooking for a sweet, crunchy finish.

The pecans also make the dish feel more festive for holiday dinners.

Maple Herb Carrots

Add fresh rosemary or thyme after cooking for a more savory herb flavor.

Fresh herbs should be added near the end so their flavor stays bright.

What to Serve With Maple Glazed Carrots

These carrots are versatile enough to serve with many popular American meals.

For a weeknight dinner, pair them with air fryer chicken, roasted turkey breast, baked salmon, or grilled pork chops.

Thanksgiving, serve them alongside turkey, mashed potatoes, stuffing, green beans, and cranberry sauce.

Simple vegetarian meal, serve them with quinoa, wild rice, lentils, or a hearty grain bowl.

Their sweet and savory flavor also works well beside a simple roast beef dinner.

Can You Use Baby Carrots?

Yes, baby carrots can be used in this recipe.

If the baby carrots are large, cut them lengthwise so they cook more evenly.

Very small baby carrots may need slightly less cooking time, so begin checking them around 10–12 minutes.

Can You Use Frozen Carrots?

Fresh carrots provide the best texture for this recipe.

Frozen carrots contain more moisture, so they may become softer and produce less caramelization in the air fryer.

If using frozen carrots, cook them without the maple glaze first, then add the glaze during the final few minutes.

How to Store Leftovers

Allow the cooked carrots to cool before transferring them to an airtight container.

Store them in the refrigerator for up to 4 days.

Keep them refrigerated at or below 40°F (4°C).

How to Reheat Maple Glazed Carrots

The air fryer is the best way to bring back some of the roasted texture.

Preheat the air fryer to 350°F (175°C).

Place the refrigerated carrots in the basket and heat for 3–5 minutes, shaking once halfway through.

You can also reheat them in a skillet over medium heat until warmed through.

Avoid overheating the carrots because the maple glaze can become overly dark or sticky.

Can You Make These Ahead?

Yes. You can peel and cut the carrots several hours ahead and store them covered in the refrigerator.

For the best texture, prepare the maple glaze separately and coat the carrots shortly before air frying.

This keeps the carrots from sitting in excess moisture before cooking.

Frequently Asked Questions

Do I need to boil carrots before air frying?

No. Fresh carrots can go directly into the air fryer after being peeled, cut, and coated with the maple glaze.

Can I use honey instead of maple syrup?

Yes. Honey can replace maple syrup in an equal amount, although it will create a slightly different flavor.

How do I stop the maple glaze from burning?

Cook at 380°F and watch the final minutes closely; avoid using too much glaze before cooking.

Why are my carrots not caramelizing?

Overcrowding, excess moisture, or large pieces can prevent browning; use a single layer and cut the carrots evenly.

Can I make this recipe dairy-free?

Yes. Replace the butter with additional olive oil or a dairy-free butter alternative.

Are maple glazed carrots good for Thanksgiving?

Yes. Their warm maple flavor and caramelized edges make them a simple side dish for Thanksgiving and other holiday meals.

Can I use whole carrots?

Yes. Whole carrots work well when cut into evenly sized sticks or chunks before air frying.

How long do carrots take in the air fryer?

At 380°F, most ½-inch carrot pieces take about 12–16 minutes, depending on their size and the air fryer model.

Final Thoughts

Air Fryer Maple Glazed Carrots turn an everyday vegetable into a flavorful side dish with very little effort. The carrots become tender inside while the maple glaze creates lightly caramelized edges.

The combination of maple syrup, butter, garlic, thyme, and cinnamon gives the dish a balanced sweet-and-savory flavor without requiring a long ingredient list.

Serve them fresh alongside chicken, turkey, pork, fish, or your favorite holiday main course. With a quick preparation time and easy cleanup, this recipe is a useful addition to any weeknight or holiday menu.

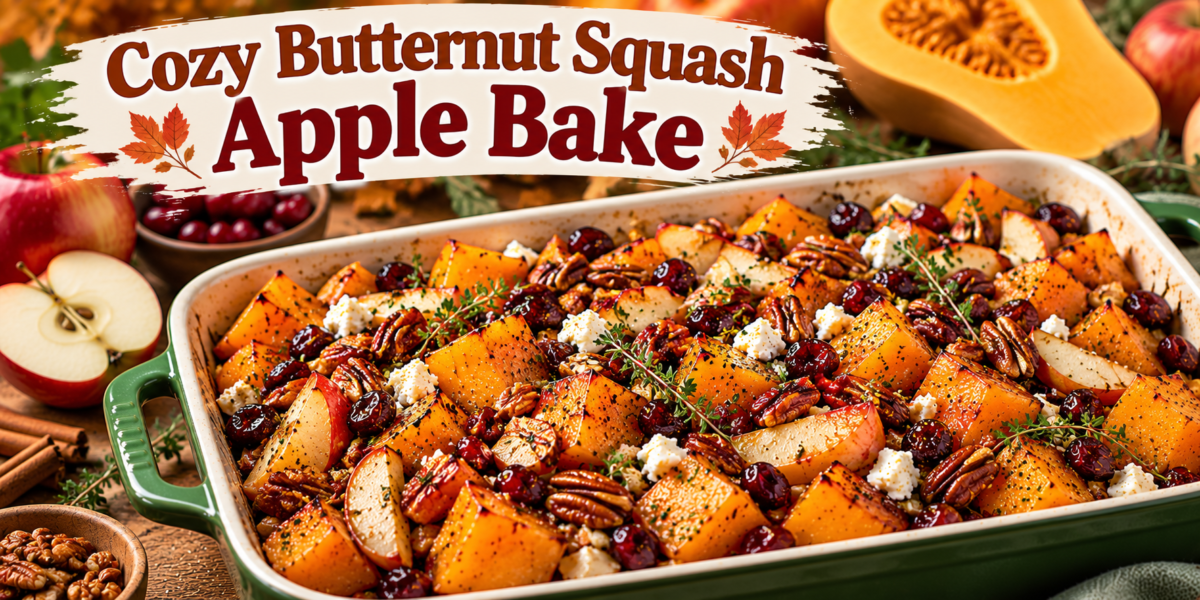
Cozy Butternut Squash Apple Bake

Butternut Squash Apple Bake with roasted squash, apples, cranberries, pecans, cinnamon, and maple glaze

Cozy Butternut Squash Apple Bake

This Butternut Squash Apple Bake is a cozy seasonal dish that combines tender roasted butternut squash, crisp apples, warm cinnamon, fragrant herbs, crunchy pecans, and a light maple glaze. The contrast between savory squash and naturally sweet fruit makes every bite comforting without becoming overly heavy. It is an inviting recipe for autumn dinners, weekend lunches, holiday gatherings, or any meal when you want something warm and colorful on the table.

The beauty of this Butternut Squash Apple Bake is its simplicity. Most of the preparation involves chopping the vegetables and apples, mixing a quick seasoning, and allowing the oven to create caramelized edges. As the ingredients roast, their natural flavors deepen, while the apples soften and release a little juice that blends beautifully with the maple glaze.

This recipe can be served as a vegetarian side dish or as part of a larger meal. It pairs especially well with roasted chicken, turkey, baked salmon, lentils, quinoa, or a crisp green salad. Feta can be added for a salty contrast, while pecans provide a pleasant crunch.

Prep Time: 20 minutes
Cook Time: 40–45 minutes
Total Time: About 1 hour 5 minutes
Servings: 6–8

Ingredients

For the Bake

  • 3 cups peeled butternut squash, cut into bite-sized cubes
  • 3 medium apples, cored and sliced
  • 2 tablespoons extra virgin olive oil
  • 2 tablespoons pure maple syrup
  • 1 teaspoon ground cinnamon
  • ½ teaspoon dried thyme
  • ½ teaspoon garlic powder
  • ½ teaspoon sea salt
  • ¼ teaspoon black pepper
  • ½ teaspoon ground nutmeg
  • ½ cup dried cranberries
  • ½ cup chopped pecans
  • ½ cup crumbled feta cheese, optional
  • 2 tablespoons fresh parsley, chopped

For the Optional Maple Finishing Glaze

  • 1 tablespoon pure maple syrup
  • 1 tablespoon fresh lemon juice
  • 1 teaspoon apple cider vinegar
  • Pinch of cinnamon
  • Small pinch of sea salt

Step-by-Step Instructions

1. Prepare the Oven

First, preheat the oven to 425°F (220°C). Lightly grease a large baking dish or rimmed sheet pan with olive oil.

A hot oven is important because it helps the squash develop caramelized edges instead of simply steaming. Choose a pan large enough to hold the ingredients in a mostly single layer. Overcrowding can trap moisture and prevent proper browning.

2. Prepare the Butternut Squash

Peel the butternut squash carefully and remove the seeds. Cut the flesh into cubes that are approximately the same size.

Place the squash in a large mixing bowl. Add olive oil, maple syrup, cinnamon, thyme, garlic powder, salt, black pepper, and nutmeg. Toss until each piece is evenly coated.

For the best Butternut Squash Apple Bake, make sure the seasoning is distributed evenly. The combination of cinnamon and thyme creates a warm flavor that works with both the sweet apples and savory squash.

3. Begin Roasting

Spread the seasoned squash across the prepared pan. Keep the pieces in a single layer and leave small spaces between them whenever possible.

Roast for 15 minutes. This initial roasting period gives the squash a head start because it generally takes longer to become tender than apples.

After 15 minutes, carefully remove the pan and turn the squash with a spatula.

4. Add the Apples

Add the sliced apples to the partially roasted squash. Toss them gently with the warm squash and seasoning already on the pan.

Return the dish to the oven and roast for another 15 minutes.

Choose apples that hold their shape during baking. Honeycrisp, Pink Lady, Gala, or Granny Smith are all suitable. A slightly tart apple creates a particularly pleasant contrast with maple syrup and dried cranberries.

Adding the apples after the squash has begun roasting helps prevent them from becoming excessively soft.

5. Add Cranberries and Pecans

Remove the pan again after the second roasting period. Scatter the dried cranberries and chopped pecans over the squash and apples.

Return everything to the oven for another 8–12 minutes. The squash should be fork-tender, the apples should be softened but recognizable, and the pecans should smell toasted.

Watch the nuts carefully during the final minutes. If they appear to be browning too quickly, cover the pan loosely with foil.

At this stage, the Butternut Squash Apple Bake should have golden edges and a fragrant cinnamon-maple aroma.

6. Prepare the Optional Finishing Glaze

While the bake finishes, whisk together one tablespoon of maple syrup, lemon juice, apple cider vinegar, cinnamon, and a small pinch of salt.

The lemon juice and vinegar keep the glaze from tasting overly sweet. Instead, they create a bright finishing sauce that complements the roasted fruit and vegetables.

If you prefer a sweeter dish, add another teaspoon of maple syrup. For a more savory result, increase the lemon juice slightly.

7. Finish the Bake

Remove the pan from the oven and let it cool for approximately five minutes.

Drizzle the optional glaze over the warm ingredients. Then sprinkle feta cheese and fresh parsley across the top.

The feta adds a creamy, salty contrast to the naturally sweet apples and squash. If you prefer a dairy-free version, simply omit it or use a suitable plant-based alternative.

8. Rest Before Serving

Allow the Butternut Squash Apple Bake to rest for another five to ten minutes before serving. This gives the juices time to settle and allows the flavors to blend.

Serve directly from the baking dish or transfer the mixture to a wide serving platter. Garnish with additional parsley, pecans, or a few fresh thyme leaves if desired.

Tips for the Best Results

Cut the Squash Evenly

Try to cut the squash into similarly sized cubes. Large pieces take longer to cook, while very small pieces can become soft too quickly.

Consistent pieces help the Butternut Squash Apple Bake cook evenly and make the finished dish look more attractive.

Choose the Right Apples

Firm apples generally work better than very soft varieties. They should become tender while still retaining enough structure to remain visible after roasting.

For a sweeter dish, choose Honeycrisp or Gala. For more tartness, Granny Smith works beautifully.

Avoid Overcrowding

Use a large baking dish or sheet pan. If the ingredients are packed tightly together, the moisture released by the squash and apples can cause steaming.

Roasting with enough space encourages caramelization and gives the finished dish deeper flavor.

Balance the Sweetness

The maple syrup, apples, and cranberries already provide plenty of natural sweetness. The lemon juice, apple cider vinegar, herbs, and feta help balance that sweetness.

For a more savory version, reduce the maple syrup and increase the thyme and black pepper.

Add the Nuts at the End

Pecans can burn if exposed to high heat for too long. Adding them during the later stage of roasting gives them enough time to toast without becoming bitter.

Walnuts, almonds, or pumpkin seeds can also be used.

Serving Suggestions

This Butternut Squash Apple Bake works beautifully beside roasted chicken, turkey, pork, baked salmon, or grilled fish. The combination of tender vegetables and fruit provides a colorful contrast to savory main dishes.

For a vegetarian meal, serve it with quinoa, wild rice, lentils, chickpeas, or a simple arugula salad. Warm crusty bread can also be served alongside the dish to soak up the maple-infused juices.

During a holiday meal, arrange the bake on a large platter and garnish it with extra pecans, cranberries, fresh herbs, and feta. The orange squash, red cranberries, and green herbs create an attractive seasonal presentation.

For brunch, serve smaller portions with eggs, whole-grain toast, and a fresh fruit salad.

Make-Ahead Instructions

The squash can be peeled and cubed several hours before cooking. Store it in an airtight container in the refrigerator.

The apples should preferably be sliced shortly before roasting to maintain their fresh appearance. However, you can slice them earlier and toss them with a little lemon juice to reduce browning.

The seasoning mixture and finishing glaze can both be prepared ahead. Keep the glaze refrigerated and bring it close to room temperature before using.

For the best texture, roast the dish shortly before serving. The Butternut Squash Apple Bake can be assembled in stages, which makes it convenient for entertaining.

Storage and Reheating

Store leftovers in an airtight container in the refrigerator for up to four days.

To reheat, place the leftovers in an oven-safe dish and warm them at 350°F (175°C) for approximately 10–15 minutes. Reheating in the oven helps preserve the roasted edges better than microwaving.

If using a microwave, heat individual portions in short intervals until warmed through. Add a few fresh pecans or herbs after reheating to restore some texture.

The Butternut Squash Apple Bake can be served warm or at room temperature. It is also suitable for packed lunches when stored and transported safely.

Freezing is not recommended because the apples and squash can become noticeably softer after thawing.

Frequently Asked Questions

Can I use frozen butternut squash?

Yes. Thaw it completely and drain excess moisture before roasting. Frozen squash may soften faster, so begin checking it earlier than fresh squash.

Can I use pears instead of apples?

Yes. Firm pears can replace apples. They provide a softer, slightly floral sweetness that pairs nicely with squash, cinnamon, and maple.

Can I make this recipe vegan?

Yes. Use maple syrup instead of honey if you make any substitutions involving sweeteners, and omit the feta or use a plant-based alternative.

Can I use another type of squash?

Yes. Acorn squash, delicata squash, or pumpkin can be substituted. Cooking time may vary depending on the variety and size of the pieces.

Can I add onions?

Absolutely. Thinly sliced red or yellow onion can be roasted with the squash. The onion becomes sweet and caramelized and adds a savory layer.

Can I make it less sweet?

Yes. Reduce the maple syrup and dried cranberries, then increase the thyme, black pepper, and lemon juice slightly. The result will be more savory.

Can I use walnuts instead of pecans?

Yes. Walnuts are an excellent substitute. Toast them lightly before adding them to the finished dish.

Nutrition Information

Approximate nutrition per serving:

Calories: 285 kcal
Protein: 5g
Carbohydrates: 42g
Fat: 12g
Fiber: 6g
Sugar: 24g
Sodium: 260mg

Nutrition values are estimates and can vary depending on ingredient brands, portion sizes, and optional toppings.

Flavor Variations

For a warmer autumn flavor, add a small pinch of ground cloves or allspice to the seasoning. Use these spices sparingly because their flavors can become strong after roasting.

For a savory variation, add thinly sliced red onion and a little fresh rosemary. The combination works especially well with feta.

For extra crunch, add toasted pumpkin seeds along with the pecans. Sunflower seeds can also be used.

If you enjoy a little heat, add a pinch of red pepper flakes before roasting. The gentle heat creates an interesting contrast with the maple and fruit.

For a brighter finish, add fresh orange zest with the parsley. Orange pairs beautifully with cranberry, apple, and roasted squash.

Final Thoughts

This Butternut Squash Apple Bake is a simple seasonal recipe that turns familiar ingredients into a warm and inviting dish. Roasted squash provides a creamy, earthy foundation, while apples contribute freshness and natural sweetness.

Cranberries bring a tart, chewy element, and toasted pecans provide satisfying crunch. Cinnamon and thyme add warmth, while lemon juice and apple cider vinegar keep the flavors balanced.

The optional feta is especially useful when you want a stronger sweet-and-savory contrast. Its salty creaminess works beautifully with the maple glaze and roasted fruit.

Another advantage of this recipe is its flexibility. You can adjust the fruit, nuts, herbs, cheese, and spices according to the ingredients you already have. The Butternut Squash Apple Bake can therefore fit easily into weeknight dinners as well as festive meals.

For the best result, keep the vegetables spread out, roast the squash before adding the apples, and add the pecans during the final stage. These simple techniques encourage caramelization while protecting the delicate ingredients.

Serve the finished dish warm alongside your favorite protein, grain, or salad. For a holiday table, add extra cranberries, pecans, feta, and fresh herbs just before serving.

With its golden roasted edges, tender vegetables, sweet apples, tart cranberries, and crunchy nuts, this Butternut Squash Apple Bake offers a comforting balance of flavors and textures. It is easy to prepare, attractive enough for entertaining, and versatile enough for everyday meals.

This Butternut Squash Apple Bake looks inviting. The Butternut Squash Apple Bake suits weeknights. Serve the Butternut Squash Apple Bake with grains. The Butternut Squash Apple Bake travels well. Keep the Butternut Squash Apple Bake warm. Fresh salad makes the Butternut Squash Apple Bake lighter. Feta gives the Butternut Squash Apple Bake savory flavor. Fresh herbs make the Butternut Squash Apple Bake festive. Leftovers make the Butternut Squash Apple Bake convenient. The Butternut Squash Apple Bake works for potlucks. Enjoy the Butternut Squash Apple Bake with family and friends.

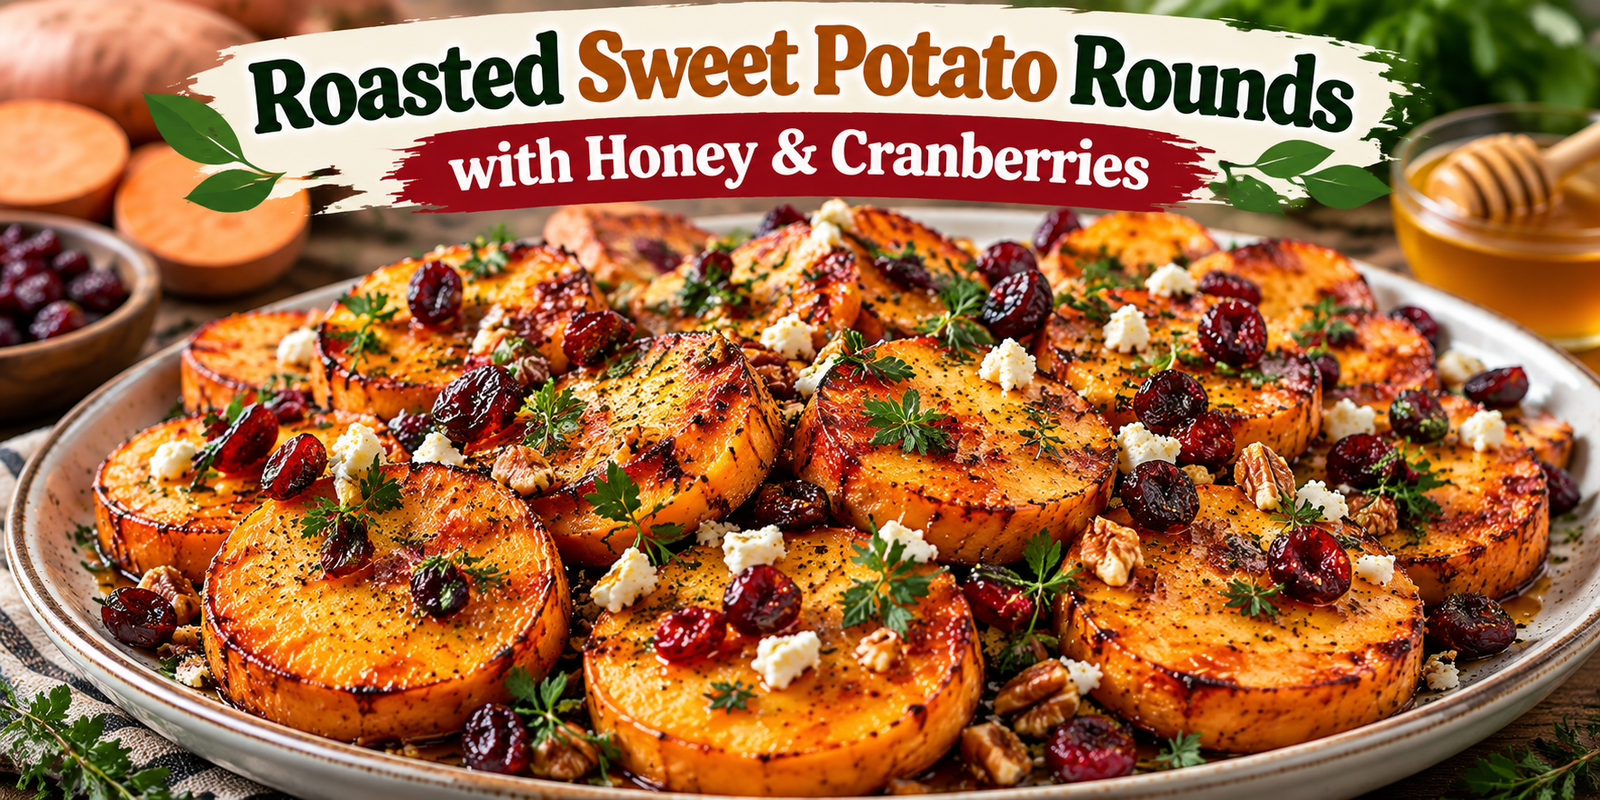
Roasted Sweet Potato Rounds with Honey & Cranberries

Roasted Sweet Potato Rounds with honey, dried cranberries, fresh herbs, feta, and toasted pecans

Roasted Sweet Potato Rounds with Honey & Cranberries

Roasted Sweet Potato Rounds are a colorful, naturally sweet side dish that combines tender roasted sweet potatoes with honey, dried cranberries, warm spices, and fresh herbs. The edges become beautifully caramelized while the centers stay soft and creamy. A light honey glaze adds sweetness, while cranberries provide a pleasant tart contrast. The finished dish feels festive enough for a holiday table but remains simple enough for an ordinary family dinner.

These Roasted Sweet Potato Rounds are useful when you want a side dish that looks impressive without requiring complicated cooking techniques. The ingredients are easy to find, preparation is straightforward, and most of the work happens in the oven. Because the slices are roasted in a single layer, they develop browned edges and a richer flavor than boiled sweet potatoes.

The combination of sweet potato, honey, cranberries, cinnamon, and herbs creates a balance of sweet, savory, tangy, and aromatic flavors. You can serve the dish beside roasted chicken, turkey, grilled fish, or a vegetarian main course. It also works beautifully as part of a Mediterranean-inspired spread with grains, salads, roasted vegetables, and creamy dips.

Prep Time: 15 minutes
Cook Time: 30–35 minutes
Total Time: 45–50 minutes
Servings: 6

Ingredients

For the Sweet Potato Rounds

  • 3 large sweet potatoes, about 2½ pounds total
  • 2 tablespoons extra virgin olive oil
  • 2 tablespoons honey
  • 1 tablespoon fresh lemon juice
  • 1 teaspoon lemon zest
  • ½ teaspoon ground cinnamon
  • ½ teaspoon smoked paprika
  • ½ teaspoon garlic powder
  • ½ teaspoon sea salt
  • ¼ teaspoon freshly ground black pepper

For the Cranberry Topping

  • ¾ cup dried cranberries
  • 2 tablespoons honey
  • 1 tablespoon fresh lemon juice
  • 1 tablespoon warm water
  • ¼ teaspoon cinnamon
  • 2 tablespoons chopped fresh parsley
  • 1 tablespoon chopped fresh mint
  • 2 tablespoons toasted pecans or walnuts, optional

Optional Finishing Ingredients

  • 2 tablespoons crumbled feta cheese
  • 1 teaspoon sesame seeds
  • Fresh orange zest
  • A small drizzle of extra virgin olive oil
  • Freshly chopped parsley for garnish

Step-by-Step Instructions

1. Prepare the Oven and Baking Sheet

First, preheat the oven to 425°F (220°C). Line a large baking sheet with parchment paper or lightly grease it with olive oil.

High heat is important because it helps the sweet potatoes caramelize rather than simply steam. Leave enough space between the slices so hot air can circulate around each piece.

For Roasted Sweet Potato Rounds, overcrowding the baking sheet can cause the potatoes to release steam and become soft without developing browned edges.

2. Slice the Sweet Potatoes

Wash and dry the sweet potatoes thoroughly. Using a sharp chef’s knife, slice them into rounds approximately ½ inch thick.

Try to keep the slices as uniform as possible. Consistent thickness allows every piece to finish cooking at approximately the same time.

If some slices are significantly thinner than others, remove them a few minutes earlier if necessary. Uniform slices also make the final presentation more attractive.

3. Prepare the Honey Seasoning

In a small bowl, whisk together the olive oil, honey, lemon juice, lemon zest, cinnamon, smoked paprika, garlic powder, sea salt, and black pepper.

The mixture should be smooth and well combined. If the honey is thick, warm it slightly so it spreads more easily over the potatoes.

This seasoning creates the foundation for Roasted Sweet Potato Rounds by combining caramelizing honey with bright citrus and savory spices.

4. Coat the Sweet Potato Slices

Place the sweet potato slices in a large bowl. Pour the honey mixture over them and gently toss until each slice is coated.

Make sure the seasoning reaches both sides of the slices. However, avoid using too much liquid because excess moisture can slow down browning.

Arrange the slices in a single layer on the prepared baking sheet. Leave a small amount of space between them whenever possible.

5. Roast the First Side

Place the baking sheet in the preheated oven. Roast the potatoes for approximately 18 minutes.

After this time, check the underside of a slice. It should be beginning to brown around the edges and feel tender when pierced with a fork.

Cooking time can vary with slice thickness and potato size. Keep an eye on them toward the end of the first roasting period.

6. Flip and Continue Roasting

Carefully flip each slice using a thin spatula. Return the baking sheet to the oven and roast for another 10–15 minutes.

The Roasted Sweet Potato Rounds should become golden brown around the edges and tender in the center. If you prefer deeper caramelization, roast them for a few additional minutes while watching carefully.

Avoid burning the honey glaze. If the edges are browning very quickly, reduce the oven temperature slightly during the final minutes.

7. Prepare the Cranberry Glaze

While the sweet potatoes roast, place the dried cranberries in a small bowl.

Add honey, lemon juice, warm water, and cinnamon. Stir gently and allow the mixture to sit for 5–10 minutes.

This short soaking period softens the cranberries and allows them to absorb some of the citrus flavor. Drain any excess liquid if necessary.

8. Add the Cranberries

Once the potatoes are roasted, transfer them carefully to a serving platter.

Scatter the softened cranberries over the warm slices. The heat from the potatoes helps the cranberries become slightly softer while their tart flavor contrasts with the honey glaze.

For Roasted Sweet Potato Rounds with an especially attractive presentation, arrange the slices slightly overlapping on the platter and distribute the cranberries evenly.

9. Add Fresh Herbs

Sprinkle chopped parsley and mint over the potatoes. Fresh herbs provide color and balance the honey and cranberries.

If desired, add toasted pecans or walnuts for crunch. Chopped nuts also make the dish more filling and introduce a pleasant contrast to the soft sweet potatoes.

10. Finish and Serve

Add optional feta cheese, sesame seeds, or fresh orange zest. A small drizzle of extra virgin olive oil can be added just before serving.

Taste one slice and adjust the seasoning with a tiny pinch of salt or an extra squeeze of lemon juice if needed.

Serve the Roasted Sweet Potato Rounds warm or at room temperature. Serve these Sweet Potato Rounds warm.

Tips for the Best Results

Slice Evenly

Uniform slices are essential for even cooking. If the rounds vary greatly in thickness, some may become dry while others remain firm.

For the most consistent Roasted Sweet Potato Rounds, use a sharp knife and take your time while slicing.

Do Not Overcrowd the Pan

Give every slice enough room to roast properly. When potatoes are packed too closely together, moisture becomes trapped between them.

As a result, the potatoes may soften without developing the golden caramelized edges that make roasted vegetables so appealing.

Use High Heat

A temperature of 425°F allows the natural sugars in sweet potatoes to caramelize. The honey also helps create a glossy, browned exterior.

Nevertheless, honey can darken quickly, so check the potatoes during the final minutes of cooking.

Balance the Sweetness

If you prefer a less sweet dish, reduce the honey slightly and increase the lemon juice. The cranberries already contribute sweetness, so the glaze does not need to be heavy.

For Roasted Sweet Potato Rounds with a more savory profile, increase the smoked paprika and add a small pinch of chili flakes.

Add Crunch at the End

Nuts and seeds are best added immediately before serving. This keeps them crisp and prevents them from becoming soft from the glaze.

Toasted pecans, walnuts, pumpkin seeds, or sunflower seeds all work well.

Serving Suggestions

These Roasted Sweet Potato Rounds pair beautifully with roasted chicken, turkey, baked salmon, grilled shrimp, or roasted vegetables. Their sweetness also complements savory grain dishes.

For a vegetarian meal, serve them with quinoa, lentils, chickpea salad, or a warm white bean dish. A simple green salad with lemon vinaigrette makes a refreshing contrast.

During a holiday meal, place the slices on a serving platter and garnish them with cranberries, herbs, nuts, and orange zest. These Sweet Potato Rounds look beautiful on a platter. The bright colors make the dish especially attractive on a buffet table.

For a Mediterranean-inspired spread, serve Roasted Sweet Potato Rounds alongside hummus, feta, olives, cucumber salad, roasted peppers, and warm pita.

Make-Ahead Instructions

You can prepare the sweet potato slices several hours before roasting. Wash, dry, and slice the potatoes, then store them in an airtight container in the refrigerator.

The honey seasoning can also be mixed ahead of time and kept covered in the refrigerator. Before using it, let it sit at room temperature briefly and whisk again.

For the best texture, roast the potatoes close to serving time. However, the finished Roasted Sweet Potato Rounds can be gently reheated in the oven.

Prepare the cranberry mixture separately and add it after reheating. This keeps the topping bright and prevents the cranberries from becoming overly soft.

Storage Instructions

Allow leftovers to cool before placing them in an airtight container. Refrigerate for up to four days.

To reheat, arrange the slices on a baking sheet and warm them at 375°F (190°C) for approximately 8–12 minutes. Avoid microwaving when possible because it can soften the roasted edges.

The Roasted Sweet Potato Rounds can be served warm, but they can also be enjoyed at room temperature as part of a buffet or packed lunch. Pack these Sweet Potato Rounds for lunch.

Freezing is not recommended because the texture of the sweet potatoes and cranberry topping may become softer after thawing.

Frequently Asked Questions

Can I use fresh cranberries?

Fresh cranberries are much more tart than dried cranberries. If using them, cook them briefly with honey and a small amount of water until they soften.

Why are my sweet potatoes not browning?

The most common reason is overcrowding. Spread the slices into a single layer with space around them. Also make sure the oven is fully preheated before the tray goes inside.

Can I use an air fryer?

Yes. Arrange the slices in a single layer and cook at approximately 380°F (193°C), turning halfway through. Because air fryers vary, check them frequently during the final minutes.

Can I make the slices thinner?

Yes, but thinner slices will cook more quickly. Watch them carefully because the honey can caramelize rapidly.

How do I keep the dish from becoming too sweet?

Use less honey, increase the lemon juice slightly, and add savory ingredients such as feta, smoked paprika, black pepper, and fresh herbs.

Nutrition Information

Approximate nutrition per serving:

Calories: 250 kcal
Protein: 3g
Carbohydrates: 43g
Fat: 9g
Fiber: 6g
Sugar: 20g
Sodium: 260mg

Final Thoughts

Roasted Sweet Potato Rounds are a simple way to turn everyday sweet potatoes into a colorful and flavorful side dish. The combination of caramelized potato edges, soft centers, honey, cranberries, lemon, and herbs creates a balance that works with both casual and special meals.

The recipe is flexible enough to adapt to your preferences. You can add feta for saltiness, nuts for crunch, orange zest for brightness, or red pepper flakes for gentle heat. Even with these changes, the basic preparation remains straightforward.

For the best result, focus on three things: slice the sweet potatoes evenly, avoid overcrowding the baking sheet, and watch the honey during the final roasting stage. Those small details make a noticeable difference in texture and flavor.

These Roasted Sweet Potato Rounds can be served as a holiday side, weeknight vegetable dish, or colorful addition to a Mediterranean-inspired dinner. Their attractive presentation also makes them suitable for potlucks and family gatherings.

Once the potatoes are golden and tender, finish them with cranberries, fresh herbs, and your favorite optional toppings. Serve them warm or at room temperature, and add a final squeeze of lemon if you want a brighter finish.

With minimal preparation and simple ingredients, Roasted Sweet Potato Rounds offer a satisfying combination of sweet, savory, tangy, and aromatic flavors. Enjoy these Sweet Potato Rounds fresh. They are easy to customize, convenient to prepare, and attractive enough to become a centerpiece on the side-dish table.

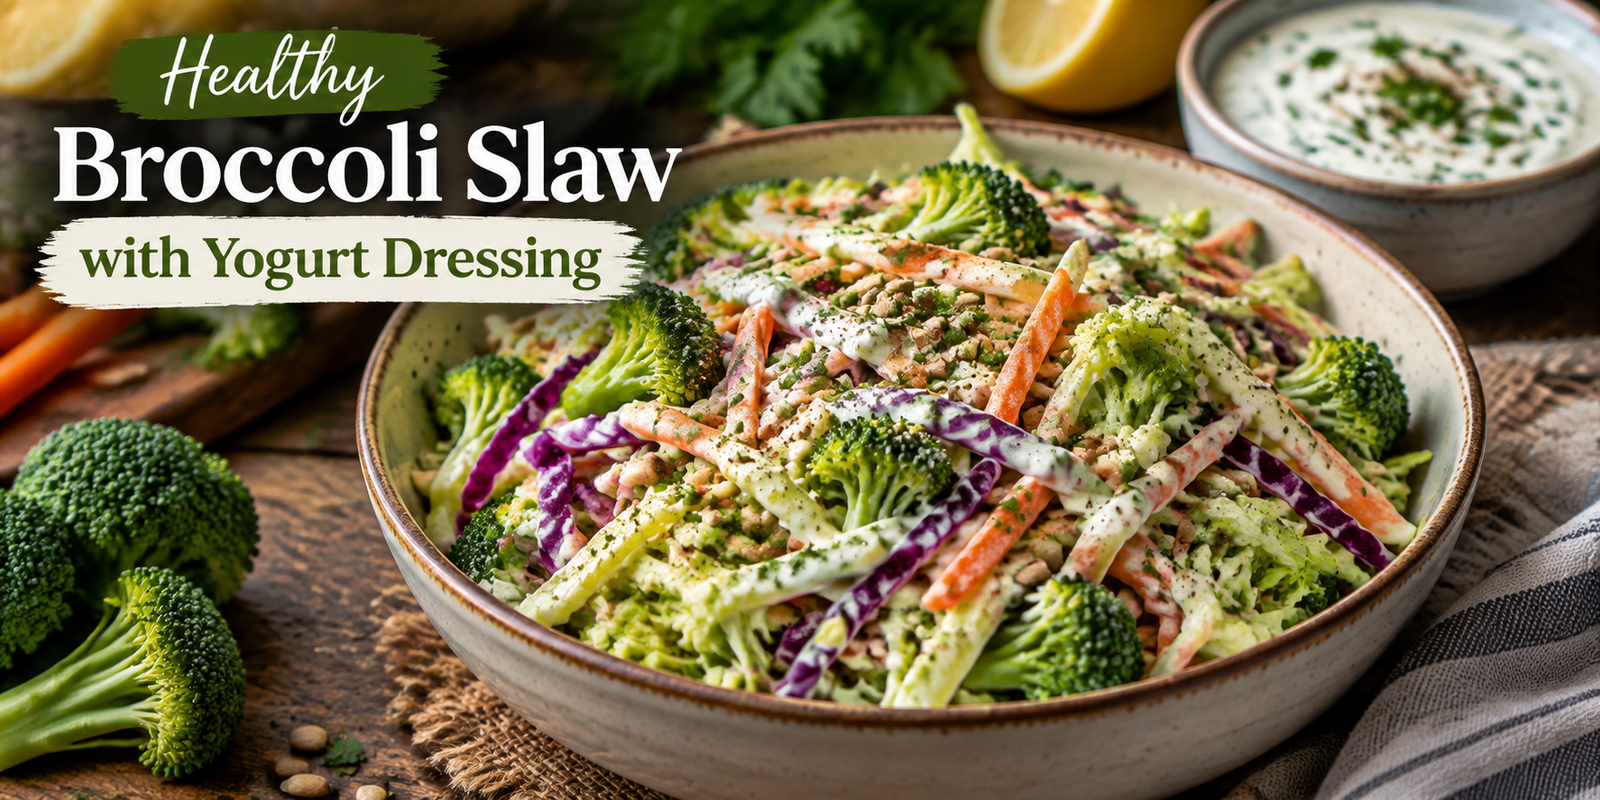
Healthy Broccoli Slaw with Yogurt Dressing

Healthy Broccoli Slaw with Yogurt Dressing made with fresh broccoli carrots cabbage and creamy yogurt sauce

Healthy Broccoli Slaw with Yogurt Dressing

(Creamy & Nutritious Salad)

Introduction

Broccoli Slaw with Yogurt Dressing is a fresh, crunchy, and healthy salad that combines colorful vegetables with a creamy homemade yogurt dressing. It is a lighter alternative to traditional creamy slaws because it uses Greek yogurt instead of heavy mayonnaise while still delivering a rich and satisfying flavor.

This easy recipe is perfect for lunch, meal prep, family dinners, picnics, or as a healthy side dish. Packed with fiber-rich broccoli, carrots, cabbage, and fresh herbs, this slaw provides a delicious way to add more vegetables to your daily meals.

The creamy yogurt dressing brings together tangy, sweet, and savory flavors, making this salad both nutritious and enjoyable. Whether you are following a healthy lifestyle or simply looking for a quick vegetable recipe, this Broccoli Slaw with Yogurt Dressing is a perfect choice.

Why You’ll Love This Healthy Broccoli Slaw

Light Yet Creamy

The Greek yogurt dressing creates a creamy texture without making the salad feel heavy.

Full of Fresh Vegetables

Broccoli, cabbage, and carrots provide crunch, color, and important nutrients.

Easy Meal Prep Recipe

Prepare it ahead of time and enjoy a ready-to-eat healthy meal.

Quick to Make

This recipe requires minimal cooking and can be prepared in less than 20 minutes.

Perfect for Any Occasion

Serve it with grilled chicken, sandwiches, wraps, or enjoy it as a refreshing snack.

Ingredients for Broccoli Slaw with Yogurt Dressing

For the Slaw

  • 4 cups broccoli slaw mix (shredded broccoli stems, carrots, and cabbage)
  • 1 cup purple cabbage, thinly sliced
  • 1 large carrot, shredded
  • ½ cup red bell pepper, thinly sliced
  • ¼ cup green onions, chopped
  • 2 tablespoons fresh parsley, chopped
  • 2 tablespoons sunflower seeds or almonds (optional)

For the Yogurt Dressing

  • 1 cup Greek yogurt
  • 2 tablespoons lemon juice
  • 1 tablespoon honey
  • 1 teaspoon Dijon mustard
  • 1 garlic clove, minced
  • ½ teaspoon salt
  • ½ teaspoon black pepper
  • 1 tablespoon olive oil

Step-by-Step Instructions

1. Prepare the Vegetables

Wash all vegetables thoroughly.

Shred the broccoli stems, carrots, and cabbage if you are not using a pre-made broccoli slaw mix.

Slice the bell pepper and chop the green onions and parsley.

Place all vegetables in a large mixing bowl.

2. Make the Yogurt Dressing

In a small bowl, combine:

  • Greek yogurt
  • Lemon juice
  • Honey
  • Dijon mustard
  • Garlic
  • Olive oil
  • Salt
  • Black pepper

Whisk everything together until smooth and creamy.

Taste the dressing and adjust seasoning if needed.

For a sweeter flavor, add a little extra honey. For more freshness, add extra lemon juice.

3. Combine the Slaw and Dressing

Pour the yogurt dressing over the prepared vegetables.

Mix gently until all ingredients are evenly coated.

Add sunflower seeds or almonds for extra crunch.

4. Chill Before Serving

For the best flavor, refrigerate the slaw for 30 minutes before serving.

This allows the vegetables to absorb the creamy dressing while maintaining their crunch.

Tips for the Best Broccoli Slaw

Keep It Crunchy

Do not add the dressing too early if you want maximum crunch. Add it shortly before serving.

Use Fresh Vegetables

Fresh broccoli and cabbage provide the best texture and flavor.

Adjust the Dressing

You can make the dressing:

  • More tangy with extra lemon
  • Sweeter with more honey
  • Thicker with extra yogurt

Add More Protein

Turn this salad into a complete meal by adding:

  • Grilled chicken
  • Boiled eggs
  • Chickpeas
  • Tuna
  • Grilled salmon

Healthy Variations

Mediterranean Broccoli Slaw

Add:

  • Feta cheese
  • Olives
  • Cucumber
  • Fresh herbs

for a Mediterranean-inspired version.

Apple Broccoli Slaw

Add:

  • Thinly sliced apples
  • Raisins
  • Walnuts

for a sweet and crunchy flavor.

Spicy Yogurt Slaw

Add:

  • Chili flakes
  • Jalapeños
  • Extra black pepper

for a spicy twist.

Storage and Meal Prep Tips

Store leftover Broccoli Slaw with Yogurt Dressing in an airtight container.

Refrigerator:

Keeps fresh for up to 3 days.

Meal Prep:

Prepare the vegetables and dressing separately, then combine before eating for the freshest texture.

Avoid freezing because yogurt dressing can change texture after thawing.

Prepare your chicken in advance using our 7 Easy Chicken Marinades to Freeze Ahead for Quick Dinners for quick and delicious wraps throughout the week.

What to Serve With Broccoli Slaw

This healthy slaw pairs well with:

  • Grilled chicken
  • Turkey sandwiches
  • Fish dishes
  • Wraps
  • Burgers
  • Mediterranean bowls
  • Roasted vegetables

It is a refreshing side dish that balances heavier meals.

Nutritional Information (Approximate)

Serving Size: 1 cup
Servings: 6

Calories: 120 kcal
Protein: 6g
Carbohydrates: 12g
Fat: 6g
Fiber: 4g

(Nutrition values may vary depending on ingredients used.)

Frequently Asked Questions

Can I make broccoli slaw ahead of time?

Yes. You can prepare it several hours before serving. Keep it refrigerated for the best taste.

Can I use regular yogurt instead of Greek yogurt?

Yes, but Greek yogurt provides a thicker and creamier dressing.

Is broccoli slaw good for weight management?

This recipe is high in vegetables and fiber while using a lighter yogurt dressing, making it a nutritious option.

Can I add chicken to this recipe?

Yes. Adding grilled chicken makes it a complete high-protein meal.

If you enjoy comforting Mediterranean meals, try our Mediterranean Creamy Baked Gnocchi for a creamy and flavorful dinner option.

Final Thoughts

Broccoli Slaw with Yogurt Dressing is a simple, healthy, and flavorful recipe that makes eating vegetables more enjoyable. With crunchy broccoli, fresh vegetables, and a creamy homemade yogurt dressing, this salad is perfect for busy days, meal prep, and family meals.

Whether served as a side dish or upgraded with protein for a complete meal, this refreshing slaw is an easy way to enjoy a nutritious recipe full of flavor and texture.

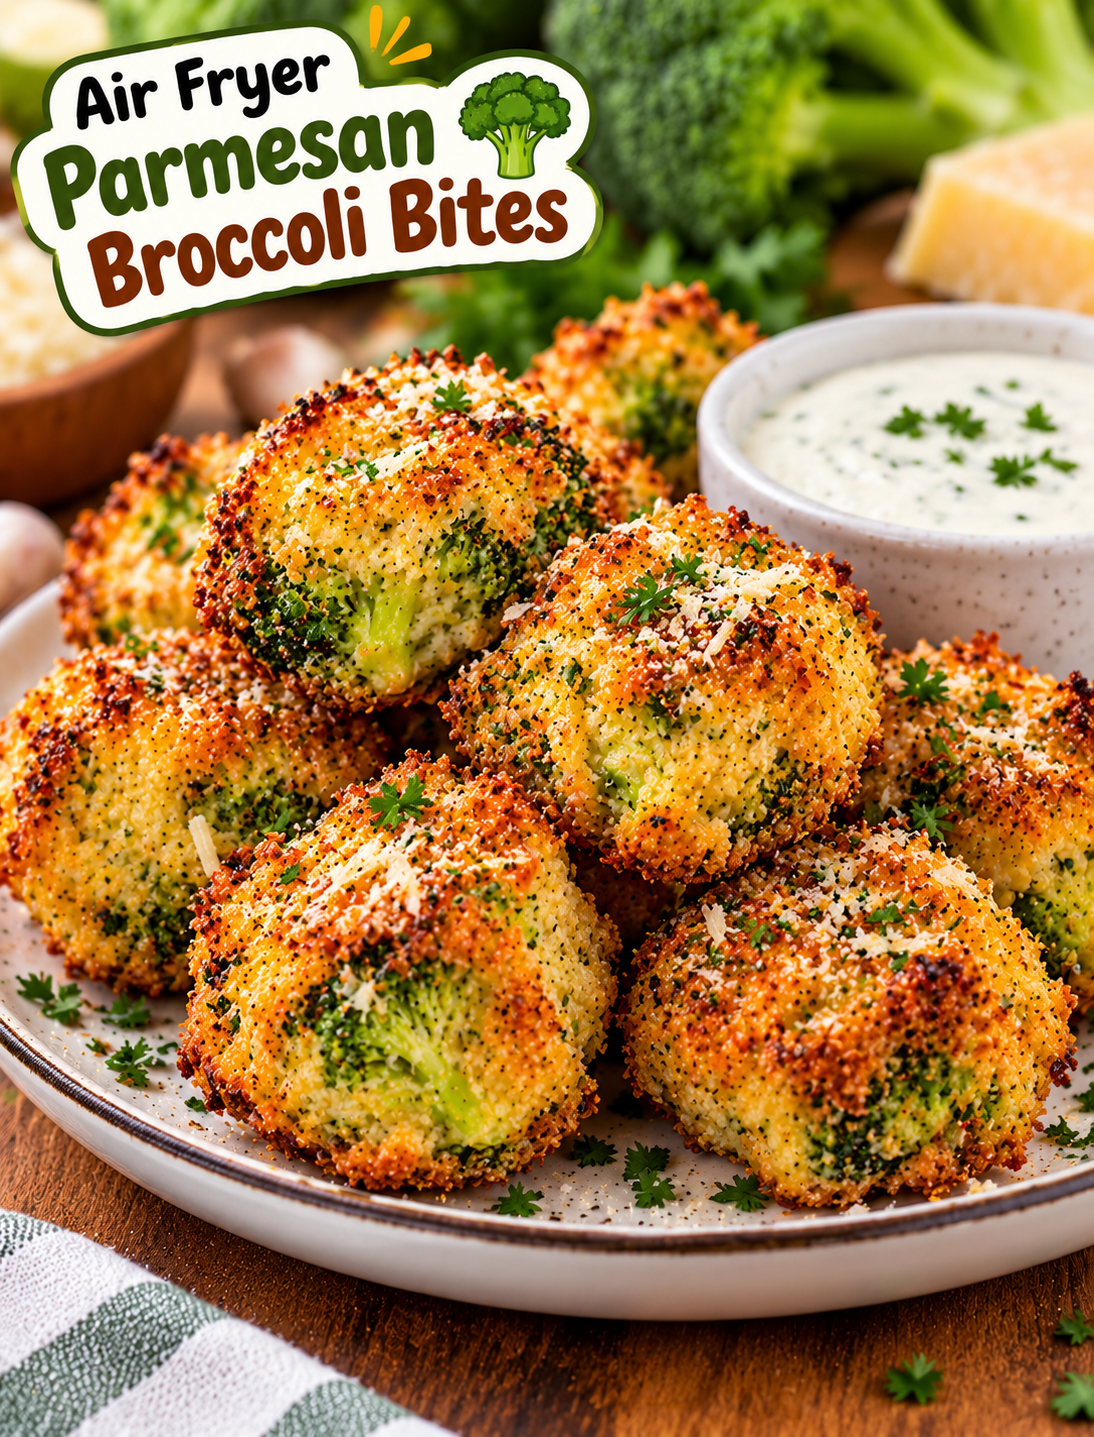
Air Fryer Parmesan Broccoli Bites

Crispy Air Fryer Parmesan Broccoli Bites with golden edges, grated Parmesan, parsley, and dipping sauce

Air Fryer Parmesan Broccoli Bites

These Air Fryer Parmesan Broccoli Bites turn simple broccoli into crispy, cheesy little bites with a tender center. They are easy to prepare, use everyday ingredients, and cook quickly in the air fryer.

Fresh broccoli is chopped into small pieces, mixed with Parmesan, breadcrumbs, egg, and simple seasonings, then shaped into bite-size portions. The air fryer gives them golden edges without the need for deep frying.

Serve these broccoli bites as a vegetable side, snack, appetizer, or easy addition to a family dinner. They also pair well with ranch, marinara, garlic yogurt sauce, or a creamy dipping sauce.

Why You’ll Love This Recipe

  • Crispy outside: The air fryer creates golden edges with a light crunch.
  • Tender inside: Finely chopped broccoli keeps the center soft and flavorful.
  • Cheesy flavor: Parmesan adds a rich, savory taste.
  • Easy ingredients: Most items are common pantry and refrigerator staples.
  • Quick cooking: The bites are ready in less time than many baked vegetable snacks.
  • Kid-friendly: The small shape and cheesy coating make broccoli more approachable.
  • Versatile: Serve them as a side dish, appetizer, snack, or meatless option.
  • Easy to customize: Add herbs, spices, or another cheese to change the flavor.

Ingredients You’ll Need

For the Broccoli Bites

  • 3 cups fresh broccoli florets
  • ½ cup finely grated Parmesan cheese
  • ½ cup plain panko breadcrumbs
  • 1 large egg
  • 2 tablespoons finely chopped onion
  • 1 clove garlic, minced
  • ½ teaspoon garlic powder
  • ½ teaspoon Italian seasoning
  • ¼ teaspoon paprika
  • ¼ teaspoon black pepper
  • ¼ teaspoon salt
  • 1 tablespoon olive oil
  • Cooking spray

For Serving

  • Grated Parmesan, optional
  • Fresh parsley, optional
  • Lemon wedges, optional
  • Ranch dressing
  • Marinara sauce
  • Garlic yogurt dip

Step-by-Step Instructions

1. Prepare the Broccoli

Wash the broccoli florets and pat them dry.

Cut the broccoli into small pieces. You can use a sharp knife or pulse the florets briefly in a food processor.

Do not puree the broccoli. Small pieces give the bites better texture and help them hold their shape.

2. Steam or Blanch the Broccoli

Bring a small pot of water to a boil.

Add the broccoli and cook for about 2 minutes.

Drain immediately and transfer the broccoli to a bowl of cold water.

Drain again and squeeze out as much moisture as possible.

You can also steam the broccoli until just tender.

The broccoli should be softened but not mushy.

3. Remove Excess Moisture

Place the cooked broccoli on a clean kitchen towel or several layers of paper towels.

Press gently to remove excess water.

This step is important because wet broccoli can make the mixture too soft and prevent the bites from becoming crisp.

4. Combine the Ingredients

Add the chopped broccoli to a large mixing bowl.

Add Parmesan, panko breadcrumbs, egg, onion, garlic, garlic powder, Italian seasoning, paprika, black pepper, salt, and olive oil.

Mix until the ingredients are evenly combined.

The mixture should hold together when pressed between your fingers.

5. Adjust the Mixture

If the mixture feels too wet, add another 1–2 tablespoons of panko.

If it feels too dry and does not hold together, add a small amount of beaten egg.

Avoid adding too much liquid because a firm mixture produces better-shaped bites.

6. Shape the Broccoli Bites

Scoop about 1½ tablespoons of the mixture into your hands.

Press and shape it into a small round or oval bite.

Continue until all the mixture has been used.

Keep the pieces similar in size so they cook evenly.

7. Chill the Bites

Place the shaped bites on a plate or small baking sheet.

Refrigerate them for about 15 minutes.

Chilling helps the bites firm up and reduces the chance of them breaking apart during cooking.

8. Preheat the Air Fryer

Preheat the air fryer to 375°F (190°C) for about 3 minutes.

Lightly spray the basket with cooking spray.

A preheated basket helps the outside begin crisping quickly.

9. Arrange the Broccoli Bites

Place the bites in the air fryer basket in a single layer.

Leave space between each piece.

Do not overcrowd the basket because proper airflow helps create crisp, golden edges.

Cook in batches if necessary.

10. Air Fry Until Golden

Lightly spray the tops with cooking spray.

Air fry at 375°F for 10–14 minutes.

Carefully flip the bites around the halfway point.

Continue cooking until both sides are golden brown and the edges look crisp.

11. Check for Doneness

The broccoli bites should feel firm on the outside and hold their shape when lifted.

If you want a deeper golden crust, cook for another 1–2 minutes.

Keep an eye on the Parmesan during the final minutes because it can brown quickly.

12. Finish and Serve

Transfer the cooked bites to a serving plate.

Sprinkle with a little extra Parmesan and fresh parsley if desired.

Serve warm with your favorite dipping sauce.

Tips for Extra Crispy Broccoli Bites

  • Remove excess water: Moisture is one of the main reasons vegetable bites become soft.
  • Use panko: Panko creates a lighter and crunchier coating than fine breadcrumbs.
  • Grate Parmesan finely: Fine cheese distributes more evenly through the mixture.
  • Keep the bites small: Smaller portions cook more evenly and develop better browning.
  • Chill before cooking: A short chill helps the bites maintain their shape.
  • Don’t overcrowd: Air needs room to circulate around each piece.
  • Spray lightly with oil: A small amount helps the exterior turn golden.
  • Flip halfway: This gives both sides an even texture.

How to Make the Bites Without Steaming

You can use raw broccoli if you chop it very finely.

Pulse the florets in a food processor until they resemble small crumbs, then mix them directly with the other ingredients.

Raw broccoli produces a slightly firmer texture, while briefly cooked broccoli creates a softer center.

Easy Variations

Cheddar Broccoli Bites

Replace half of the Parmesan with finely shredded sharp cheddar for a stronger cheesy flavor.

Garlic Herb Broccoli Bites

Add extra minced garlic, dried parsley, and a small amount of dried basil to the mixture.

Spicy Broccoli Bites

Add ¼ teaspoon crushed red pepper flakes or cayenne pepper for extra heat.

Mozzarella Broccoli Bites

Mix a small amount of shredded mozzarella into the mixture for a softer, stretchy cheese texture.

Lemon Parmesan Bites

Add ½ teaspoon fresh lemon zest to the mixture and serve with lemon wedges.

Ranch Broccoli Bites

Add 1 teaspoon ranch seasoning to the mixture and serve with ranch dressing.

What to Serve With Broccoli Bites

These crispy vegetable bites work with many meals and sauces.

Try serving them with:

  • Grilled chicken
  • Air fryer salmon
  • Turkey burgers
  • Baked chicken breast
  • Roasted potatoes
  • Tomato soup
  • Vegetable soup
  • Garden salad
  • Pasta
  • Rice bowls

For a snack or appetizer, serve them with ranch, marinara, garlic aioli, or a lemon yogurt dip.

For dinner, pair them with grilled protein and a fresh salad for a simple balanced plate.

How to Store Leftovers

Allow the cooked bites to cool completely before storing them.

Place them in an airtight container and refrigerate for up to 3 days.

Keep them in a single layer when possible to prevent the crispy coating from becoming too soft.

How to Reheat Broccoli Bites

The air fryer is the best option for reheating these bites.

Preheat the air fryer to 350°F (175°C) and cook the refrigerated bites for about 3–5 minutes.

Turn them once during reheating if needed.

Avoid using the microwave when possible because it can make the breadcrumb coating soft.

Can You Freeze Them?

Yes. Freeze the shaped, uncooked bites on a parchment-lined tray until firm.

Transfer them to a freezer-safe container or bag and freeze for up to 2 months.

You can cook them from frozen, adding a few extra minutes to the cooking time.

Check the center before serving to make sure the bites are fully heated.

Common Mistakes to Avoid

Using wet broccoli: Excess water can make the mixture loose and difficult to shape.

Making large bites: Large portions take longer to cook and may not become crisp before the center is heated.

Skipping the chill: Soft bites can break apart more easily during cooking.

Overcrowding the basket: Too many pieces reduce airflow and can lead to uneven browning.

Adding too much cheese: Excess cheese can melt out before the broccoli mixture becomes firm.

Overcooking: Cooking too long can make the bites dry and overly brown.

Frequently Asked Questions

Can I use frozen broccoli?

Yes. Thaw it completely and squeeze out as much moisture as possible before chopping and mixing.

How long do broccoli bites take in an air fryer?

They usually take 10–14 minutes at 375°F, depending on their size and your air fryer.

Why are my broccoli bites falling apart?

The mixture may contain too much moisture or need more breadcrumbs to hold together properly.

Can I make these without breadcrumbs?

Yes. Use finely ground oats or almond flour as an alternative, adjusting the amount until the mixture holds together.

Can I prepare broccoli bites ahead of time?

Yes. Shape them up to one day ahead and refrigerate them in a covered container until ready to cook.

What dipping sauce goes best with broccoli bites?

Ranch, marinara, garlic aioli, and lemon yogurt sauce all pair well with the Parmesan flavor.

Can I freeze cooked broccoli bites?

Yes. Freeze cooled bites in an airtight freezer-safe container for up to 2 months and reheat them in the air fryer.

Can I use another cheese instead of Parmesan?

Yes. Sharp cheddar, mozzarella, or Pecorino Romano can be used for different flavors and textures.

Final Thoughts

These Air Fryer Parmesan Broccoli Bites are a simple way to turn fresh broccoli into a crispy, cheesy snack or side dish. The combination of Parmesan, panko, garlic, and Italian seasoning gives the bites plenty of flavor without making the recipe complicated.

For the best texture, remove as much moisture as possible from the broccoli, keep the bites evenly sized, and avoid overcrowding the air fryer basket.

Serve them hot with ranch, marinara, or a creamy dipping sauce, or add them beside your favorite chicken, fish, or vegetable dinner.

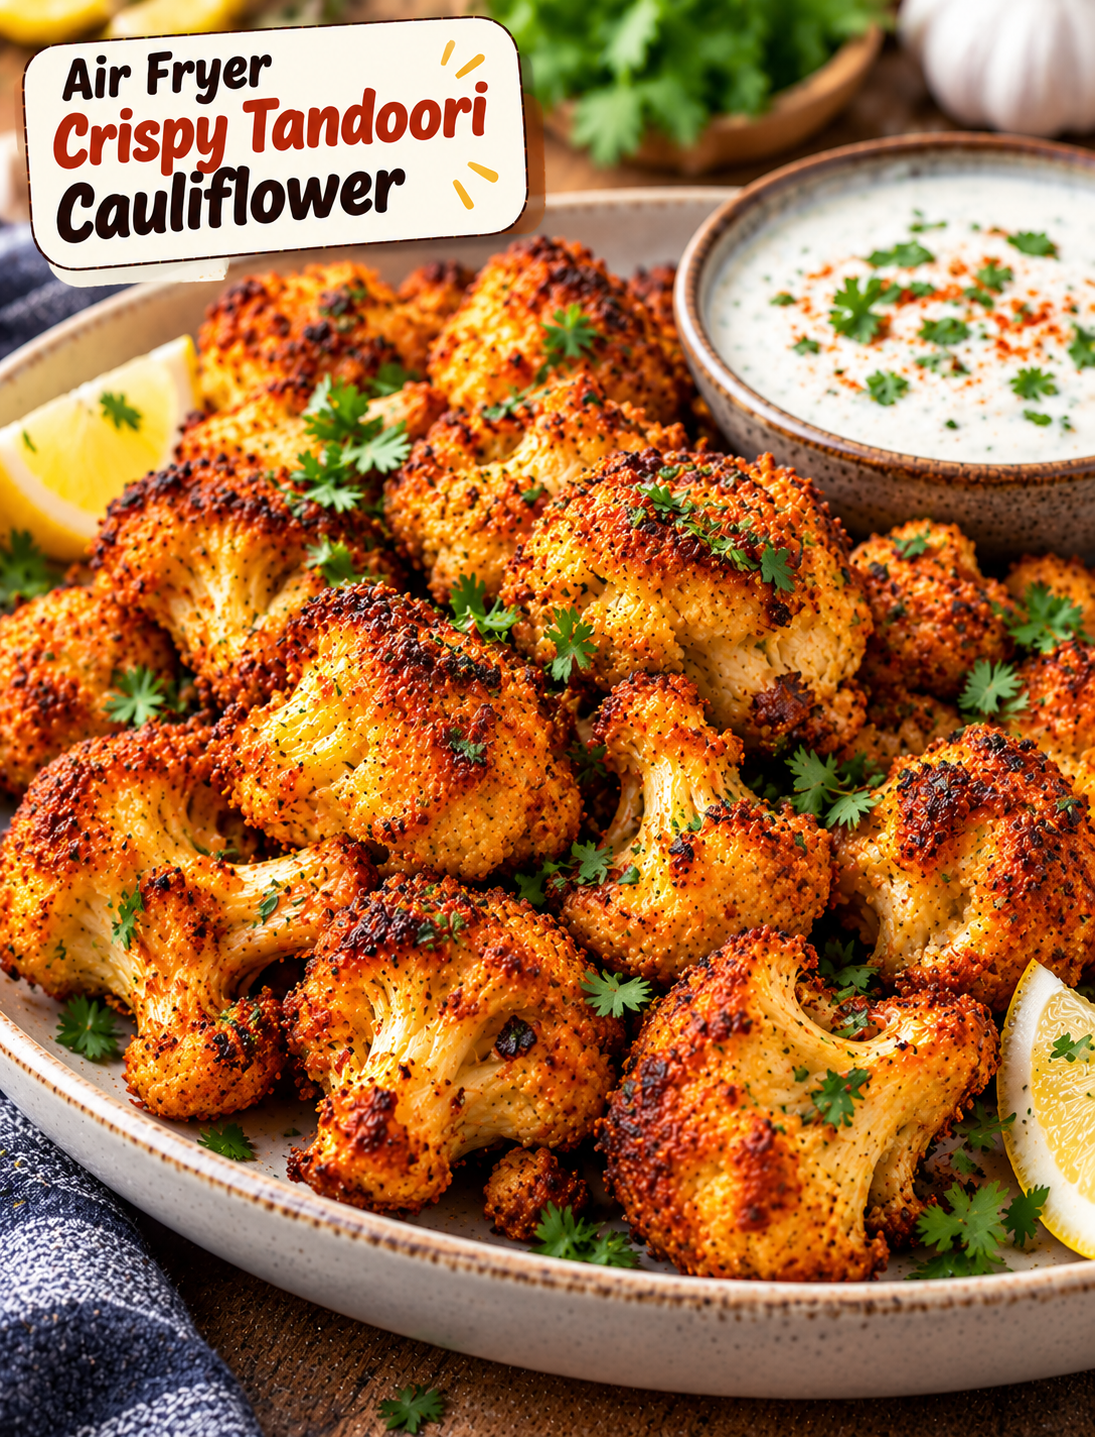
Air Fryer Crispy Tandoori Cauliflower

Crispy air fryer tandoori cauliflower with golden spiced edges, cilantro, and lemon wedges

Air Fryer Crispy Tandoori Cauliflower

If you love bold Indian-inspired flavors and crispy vegetables, this Air Fryer Crispy Tandoori Cauliflower is an easy recipe to add to your dinner rotation. Tender cauliflower florets are coated in a spiced yogurt marinade, then air fried until the edges become browned, crisp, and slightly charred.

The air fryer gives this cauliflower a roasted texture without deep frying. It also makes the recipe quick enough for a weeknight meal, snack, appetizer, or side dish.

The marinade combines Greek yogurt, lemon juice, ginger, garlic, paprika, cumin, coriander, and garam masala for a rich tandoori-style flavor. A small amount of cornstarch helps create a crisp coating while the cauliflower stays tender inside.

Why You’ll Love This Recipe

  • Crispy texture: Air frying creates browned and crunchy edges without deep frying.
  • Bold flavor: Tandoori spices add warmth, smokiness, and a mild kick.
  • Easy preparation: The marinade comes together in one bowl.
  • Weeknight friendly: The cauliflower cooks quickly after marinating.
  • Versatile: Serve it as a side dish, appetizer, snack, or meatless meal.
  • Less oil: You only need a light coating of oil for browning.
  • Naturally vegetarian: The recipe works well for vegetarian meals and meat-free gatherings.
  • Easy to customize: Adjust the spice level and toppings to suit your taste.

Ingredients You’ll Need

For the Cauliflower

  • 1 large head cauliflower, cut into bite-size florets
  • ¾ cup plain Greek yogurt
  • 1 tablespoon lemon juice
  • 1 tablespoon olive oil
  • 1 tablespoon cornstarch
  • 1 teaspoon grated fresh ginger
  • 2 cloves garlic, finely minced
  • 1 teaspoon paprika
  • 1 teaspoon ground cumin
  • 1 teaspoon ground coriander
  • 1 teaspoon garam masala
  • ½ teaspoon turmeric
  • ½ teaspoon chili powder
  • ½ teaspoon salt
  • ¼ teaspoon black pepper
  • ¼ teaspoon smoked paprika, optional
  • Cooking spray or a small amount of oil

For Serving

  • Fresh cilantro, chopped
  • Lemon wedges
  • Plain yogurt or raita
  • Sliced red onion, optional
  • Chaat masala, optional

Step-by-Step Instructions

1. Prepare the Cauliflower

Wash the cauliflower and dry it thoroughly with paper towels.

Cut it into small, evenly sized florets so the pieces cook at the same rate.

Patting the cauliflower dry is important because excess moisture can prevent the coating from becoming crisp.

2. Make the Tandoori Marinade

Add the Greek yogurt, lemon juice, olive oil, cornstarch, ginger, garlic, paprika, cumin, coriander, garam masala, turmeric, chili powder, salt, black pepper, and smoked paprika to a large bowl.

Stir until the mixture becomes smooth and evenly combined.

The yogurt adds moisture and tang, while the spices create the signature tandoori-style flavor.

3. Coat the Cauliflower

Add the dry cauliflower florets to the marinade.

Toss gently until every piece is covered with a thin, even layer.

Avoid adding an overly thick coating because too much yogurt mixture can make the cauliflower soft instead of crisp.

4. Marinate the Cauliflower

Cover the bowl and let the cauliflower marinate for at least 20 minutes.

For deeper flavor, refrigerate it for up to 2 hours.

If you are short on time, you can cook it after a short 10-minute rest, but a longer marinade gives the spices more time to flavor the florets.

5. Preheat the Air Fryer

Preheat your air fryer to 380°F (193°C) for about 3–5 minutes.

A preheated basket helps the coating start browning quickly and promotes a crisp exterior.

6. Arrange the Cauliflower

Lightly spray the air fryer basket with cooking spray.

Place the marinated cauliflower florets in a single layer.

Leave some space between the pieces so hot air can circulate around them.

Do not overcrowd the basket. Cook in batches if necessary.

7. Air Fry Until Crispy

Air fry the cauliflower at 380°F for 12–16 minutes.

Shake the basket or turn the florets halfway through cooking.

Continue cooking until the edges are golden brown and slightly charred.

The exact cooking time can vary depending on the size of the florets and your air fryer model.

8. Check for Doneness

The cauliflower should be tender when pierced with a fork, while the outside should have browned edges and a lightly crisp coating.

If you want darker, more roasted edges, air fry for another 2–3 minutes.

Watch closely during the final minutes because the spices can darken quickly.

9. Add Fresh Toppings

Transfer the cooked cauliflower to a serving plate.

Sprinkle with fresh cilantro and a small amount of chaat masala if desired.

Serve with lemon wedges so everyone can add fresh citrus flavor to their portion.

10. Serve Immediately

For the crispiest texture, serve the cauliflower while it is hot.

Pair it with mint yogurt, cucumber raita, or your favorite dipping sauce.

It also works well inside wraps, grain bowls, or naan sandwiches.

Tips for Extra Crispy Tandoori Cauliflower

  • Dry the cauliflower well: Water left on the florets can make the coating less crisp.
  • Use small florets: Smaller pieces cook faster and develop more browned edges.
  • Do not overcrowd: Air circulation is essential for crisping.
  • Use cornstarch: A small amount helps create a lighter, crispier coating.
  • Preheat the air fryer: Starting with a hot basket improves browning.
  • Flip halfway: Turning the pieces helps them cook evenly.
  • Avoid excessive marinade: A thin coating works better than a thick layer.
  • Serve immediately: Air-fried vegetables soften as they sit.

How to Make It Spicier

For a hotter version, increase the chili powder or add a pinch of cayenne pepper to the marinade.

You can also add finely chopped jalapeño or red chili before serving.

For a milder version, reduce the chili powder and use sweet paprika instead.

Easy Variations

Tandoori Cauliflower Bites

Cut the cauliflower into smaller florets and cook until deeply browned. These smaller bites are perfect for appetizers and party snacks.

Cheesy Tandoori Cauliflower

Sprinkle a small amount of shredded cheddar or Monterey Jack cheese over the cooked cauliflower. Return it to the air fryer for 1–2 minutes until the cheese melts.

Tandoori Cauliflower Wrap

Place the crispy cauliflower inside warm naan or a flatbread with lettuce, sliced onion, cucumber, and yogurt sauce.

Tandoori Cauliflower Bowl

Serve the roasted florets over cooked basmati rice or quinoa with cucumber, tomatoes, greens, and a spoonful of raita.

Extra Smoky Version

Add a little smoked paprika to the marinade for a deeper roasted flavor without needing a traditional clay tandoor.

What to Serve With Tandoori Cauliflower

This cauliflower pairs well with many simple sides and sauces.

Try serving it with:

  • Basmati rice
  • Garlic naan
  • Cucumber raita
  • Mint yogurt sauce
  • Fresh green salad
  • Roasted vegetables
  • Lentil soup
  • Chickpea curry
  • Mango chutney
  • Lemon wedges

For a light meal, combine the cauliflower with a fresh salad and yogurt-based dipping sauce.

For a more filling dinner, serve it with rice, naan, and a vegetable or lentil dish.

How to Store Leftovers

Allow the cooked cauliflower to cool before placing it in an airtight container.

Refrigerate leftovers for up to 3 days.

For the best texture, reheat the cauliflower in the air fryer at 350°F for 3–5 minutes.

Avoid reheating it in the microwave if you want to maintain the crisp edges because microwaving can make the coating soft.

Common Mistakes to Avoid

Using wet cauliflower: Extra water prevents the marinade from coating properly and reduces browning.

Overcrowding the basket: Too many florets trap steam and can leave the cauliflower soft.

Adding too much yogurt marinade: A heavy coating takes longer to crisp and can become soggy.

Skipping the preheat: A cold basket can delay browning and change the cooking time.

Cutting uneven florets: Large pieces may remain firm while small pieces become overcooked.

Walking away during the final minutes: The spice coating can brown quickly once the cauliflower is nearly finished.

Frequently Asked Questions

Can I make tandoori cauliflower without yogurt?

Yes. Use an unsweetened dairy-free yogurt or a thick plant-based yogurt as a substitute.

How long does cauliflower take in an air fryer?

At 380°F, bite-size florets usually take about 12–16 minutes, depending on their size and the air fryer.

Why is my cauliflower not crispy?

Excess moisture, too much marinade, overcrowding, or insufficient cooking time can prevent the coating from crisping.

Can I prepare the cauliflower ahead of time?

Yes. Marinate the cauliflower up to 2 hours ahead and keep it refrigerated until ready to air fry.

Can I use frozen cauliflower?

Fresh cauliflower gives the best texture, but frozen florets can work if thawed and dried thoroughly before marinating.

Is tandoori cauliflower spicy?

It can range from mild to hot depending on the chili powder and cayenne used in the marinade.

Can I reheat leftover tandoori cauliflower?

Yes. Reheat it in an air fryer at 350°F for 3–5 minutes to help restore some of the crisp texture.

What dipping sauce goes with tandoori cauliflower?

Mint yogurt, cucumber raita, garlic yogurt sauce, and mango chutney all pair well with the spiced cauliflower.

Final Thoughts

This Air Fryer Crispy Tandoori Cauliflower is an easy way to turn everyday cauliflower into a flavorful, crispy dish. The yogurt-based marinade keeps the florets seasoned and tender, while the air fryer creates browned edges with very little oil.

Serve it as an appetizer, side dish, snack, or meatless dinner with rice, naan, salad, or a cooling yogurt sauce. For the best results, keep the florets dry, avoid overcrowding the basket, and serve the cauliflower while it is hot and crisp.

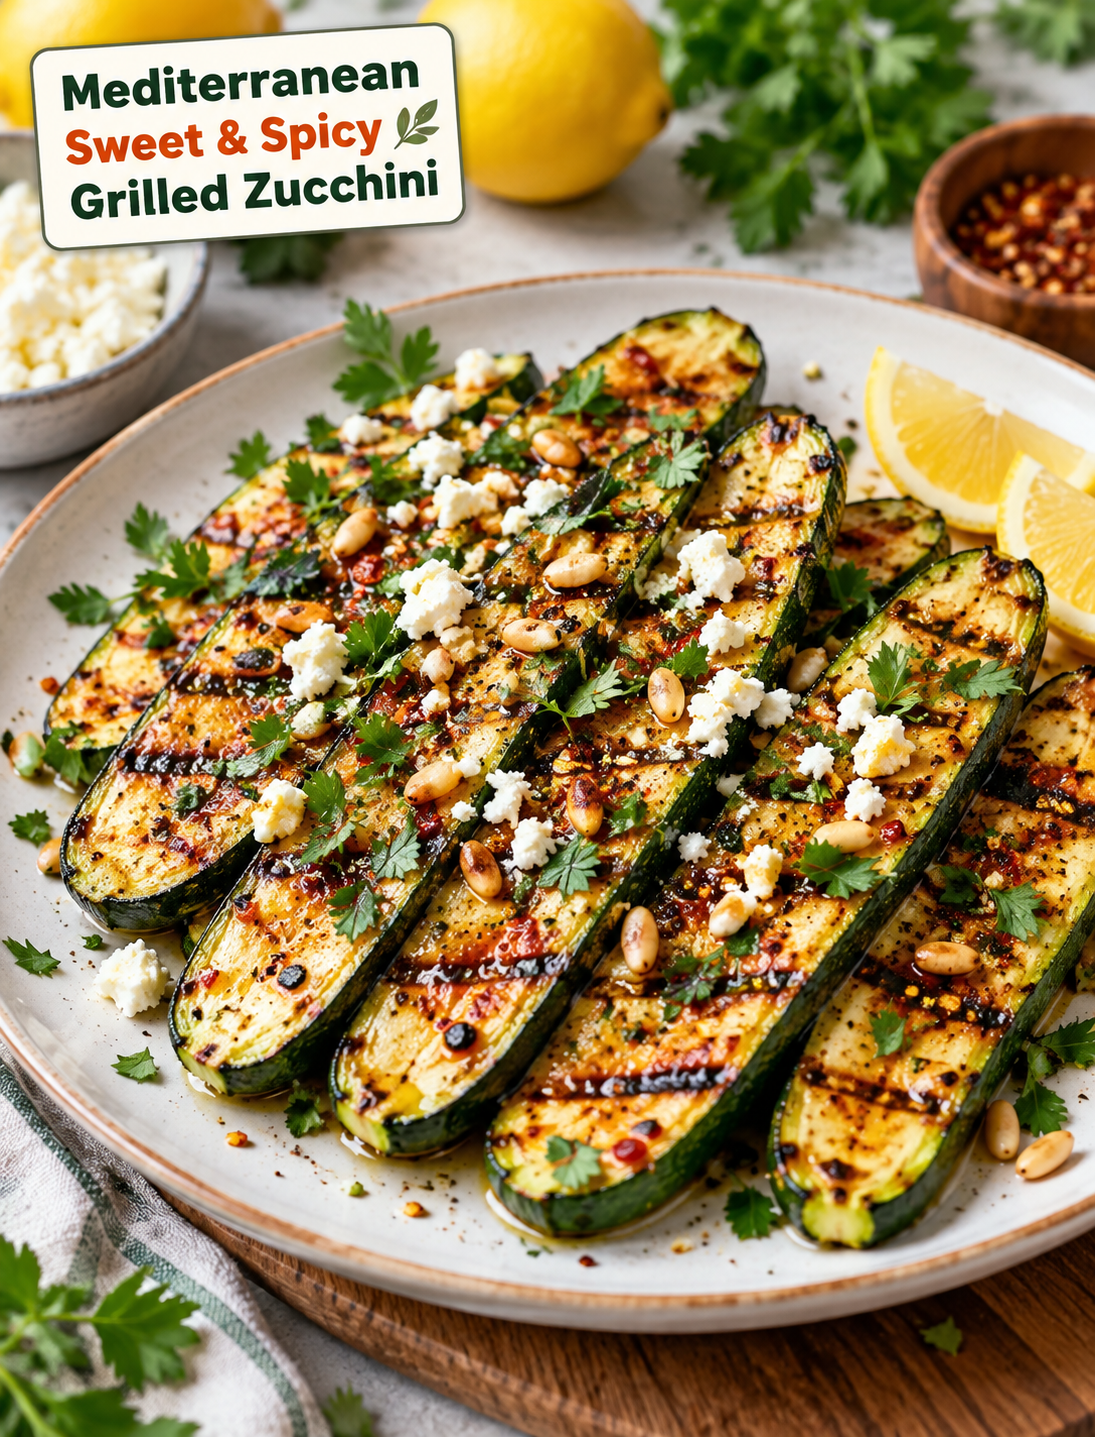
Mediterranean Sweet & Spicy Grilled Zucchini

Mediterranean sweet and spicy grilled zucchini with herbs, feta, lemon wedges, and smoky caramelized grill marks

Mediterranean Sweet & Spicy Grilled Zucchini

Mediterranean Sweet & Spicy Grilled Zucchini is an easy vegetable side dish with smoky, sweet, spicy, and fresh flavors in every bite. Thin zucchini strips are coated in olive oil, lemon juice, smoked paprika, garlic, and chili, then grilled until tender with lightly charred edges.

This grilled zucchini recipe is a simple choice for summer cookouts, weeknight dinners, and Mediterranean-inspired meals. It takes only a few basic ingredients and about 30 minutes from start to finish. Serve it with grilled chicken, fish, lamb, couscous, quinoa, or warm pita for a complete meal.

Why You’ll Love This Grilled Zucchini

  • Quick to make: The zucchini cooks in about 6–8 minutes.
  • Big flavor: Smoked paprika, garlic, lemon, and chili create a bold marinade.
  • Easy ingredients: Most ingredients are common pantry staples.
  • Great for grilling: Outdoor grills and indoor grill pans both work well.
  • Flexible: Add feta, herbs, nuts, tahini, or yogurt sauce before serving.
  • Diet-friendly: Use maple syrup instead of honey to keep the recipe vegan.
  • Meal-prep friendly: Cooked zucchini can be refrigerated for up to 3 days.

Ingredients You’ll Need

The marinade gives this vegetable dish its signature sweet and smoky flavor.

  • 3 medium zucchinis: Slice them lengthwise into thin, even strips.
  • 2 tablespoons olive oil: Helps the zucchini brown and prevents sticking.
  • 1 tablespoon honey or maple syrup: Adds a mild sweetness and helps caramelize the edges.
  • 1 tablespoon lemon juice: Brightens the marinade and balances the sweetness.
  • 1 teaspoon smoked paprika: Adds a deep smoky flavor without requiring extra seasoning.
  • 1 teaspoon chili flakes or Aleppo pepper: Provides mild heat that you can adjust.
  • 1 teaspoon garlic powder: Adds savory flavor throughout the zucchini.
  • Salt and black pepper: Season the vegetables evenly.
  • 1 teaspoon harissa paste, optional: Use it when you want a stronger spicy kick.

Optional Toppings

Fresh toppings make the grilled vegetables even more flavorful.

  • Chopped fresh mint or parsley
  • Crumbled feta or vegan feta
  • Toasted pine nuts or sesame seeds
  • Lemon wedges
  • Tahini sauce
  • Greek yogurt or dairy-free yogurt sauce

How to Make Mediterranean Sweet & Spicy Grilled Zucchini

Step 1: Slice the Zucchini

Wash and dry three medium zucchinis. Slice each one lengthwise into strips about ¼ inch thick.

Keep the slices as even as possible so they cook at the same rate. Very thin slices can become soft quickly, while thick pieces may need extra cooking time.

Step 2: Make the Marinade

Add olive oil, honey or maple syrup, lemon juice, smoked paprika, chili flakes, garlic powder, salt, and black pepper to a small bowl.

Whisk until the ingredients are well combined. Add harissa paste if you prefer more heat.

Step 3: Coat the Zucchini

Place the sliced zucchini in a shallow dish or large food-safe bag. Pour the marinade over the vegetables.

Toss gently until every piece is lightly coated. Let the zucchini rest for 15–30 minutes for more flavor.

If you are short on time, you can grill it immediately.

Step 4: Preheat the Grill

Heat an outdoor grill or indoor grill pan over medium-high heat.

Lightly oil the cooking surface to reduce sticking. The grill should be hot before the zucchini goes on so the slices can develop attractive char marks.

Step 5: Grill the Zucchini

Place the zucchini strips on the hot grill in a single layer.

Cook for about 3–4 minutes on the first side. Turn each piece and grill for another 3–4 minutes.

Look for visible grill marks and tender centers. Remove the zucchini as soon as it is cooked through to prevent a mushy texture.

Step 6: Add Fresh Toppings

Transfer the grilled zucchini to a serving platter.

Top with chopped mint or parsley, crumbled feta, toasted pine nuts, or sesame seeds. Finish with fresh lemon juice or a light drizzle of tahini.

Serve warm or at room temperature.

Tips for Perfect Grilled Zucchini

Slice evenly: Uniform pieces cook more consistently and are easier to turn on the grill.

Do not overcrowd the grill: Leave space between the slices so they grill instead of steam.

Use medium-high heat: A properly heated grill creates caramelized edges while keeping the inside tender.

Pat the zucchini dry: Removing excess moisture helps the vegetables brown more effectively.

Watch the sweet marinade: Honey and maple syrup can brown quickly, so avoid excessive heat.

Do not overcook: Zucchini should be tender with some structure rather than soft and watery.

Adjust the spice: Reduce the chili flakes for mild flavor or add harissa for extra heat.

Easy Ways to Change the Recipe

This recipe works well with different vegetables and toppings.

Try yellow squash: Replace some or all of the zucchini with yellow squash for a colorful vegetable platter.

Add more vegetables: Grill eggplant, bell peppers, mushrooms, or red onions with the same Mediterranean-style marinade.

Change the spice: Use sumac, cayenne, or chipotle powder for a different flavor profile.

Make it creamy: Add whipped feta, labneh, or Greek yogurt after grilling.

Add more sweetness: A small drizzle of balsamic glaze or pomegranate molasses adds sweet-tart flavor.

Make it vegan: Choose maple syrup and plant-based feta instead of honey and dairy feta.

What to Serve With Grilled Zucchini

This flavorful side pairs with many everyday meals.

Serve it alongside grilled chicken or salmon for an easy summer dinner. It also works well with lamb kebabs, falafel, couscous, quinoa bowls, and roasted chickpeas.

For a light lunch, place the zucchini over cooked quinoa with chickpeas, cucumber, tomatoes, herbs, and tahini. Warm pita or flatbread makes an easy addition.

For entertaining, arrange the vegetables on a large platter with feta, olives, lemon wedges, and fresh herbs.

How to Store and Reheat

Allow leftover zucchini to cool before transferring it to an airtight container. Refrigerate for up to 3 days.

For the best texture, serve leftovers cold or at room temperature. If you prefer them warm, reheat them briefly in a skillet or oven until heated through.

Avoid prolonged reheating because zucchini can become soft and watery.

Frequently Asked Questions

Can I make grilled zucchini ahead of time?

Yes. Cook it up to 3 days ahead and refrigerate it in an airtight container until ready to serve.

Can I make this recipe without an outdoor grill?

Yes. Use an indoor grill pan, cast-iron skillet, or roast the zucchini at 425°F for about 15–18 minutes.

Can I use yellow squash instead of zucchini?

Yes. Yellow squash has a similar texture and works well with the same sweet and spicy marinade.

How can I make the zucchini less spicy?

Reduce or omit the chili flakes and skip the harissa for a mild version.

How do I keep grilled zucchini from getting mushy?

Slice it evenly, avoid overcrowding the grill, and remove it as soon as the centers become tender.

Can I make this zucchini recipe vegan?

Yes. Use maple syrup instead of honey and choose vegan feta or another plant-based topping.

What herbs taste best with grilled zucchini?

Fresh mint and parsley pair especially well with the smoky, lemony, and spicy flavors.

Can I marinate zucchini overnight?

It is better to marinate it for 15–30 minutes because a very long marinade can make the zucchini overly soft.

Final Thoughts

Mediterranean Sweet & Spicy Grilled Zucchini is a fast way to turn fresh summer squash into a flavorful side dish. The combination of olive oil, lemon, smoked paprika, garlic, and chili creates a balanced mix of smoky, sweet, spicy, and bright flavors.

With a hot grill and a few simple ingredients, you can have tender zucchini with beautifully caramelized edges in minutes. Add fresh herbs, feta, toasted seeds, or tahini to make it your own, then serve it alongside your favorite grilled or Mediterranean-inspired meal.