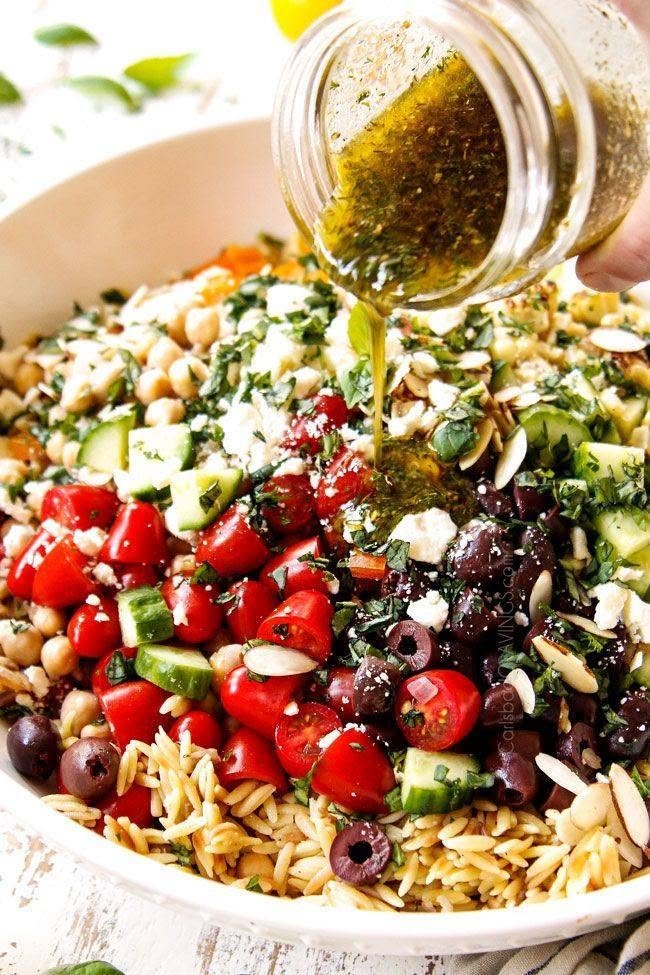
Mediterranean Orzo Salad with Chickpeas, Feta, Tomatoes & Olives

Mediterranean Orzo Salad with Chickpeas, Feta, Tomatoes & Olives

Description

This Mediterranean Orzo Salad is a colorful, fresh, and satisfying dish packed with tender orzo pasta, juicy cherry tomatoes, crisp cucumber, creamy chickpeas, Kalamata olives, feta cheese, fresh herbs, and crunchy sliced almonds. Everything is tossed in a bright homemade lemon-herb dressing made with extra-virgin olive oil, fresh lemon juice, garlic, oregano, and herbs.

The combination of creamy, crunchy, tangy, and savory ingredients makes this salad perfect for lunch, meal prep, picnics, potlucks, or as a side dish for grilled chicken, fish, or shrimp. It can be served chilled or at room temperature and is especially delicious after the flavors have had time to blend.

Ingredients

For the Orzo Salad

  • 1½ cups dry orzo pasta
  • 1½ cups cherry tomatoes, halved
  • 1½ cups cooked chickpeas, drained and rinsed
  • 1 large cucumber, diced
  • ¾ cup Kalamata olives, pitted and sliced
  • ¾ cup crumbled feta cheese
  • ½ cup sliced almonds
  • ¼ cup red onion, finely diced
  • ¼ cup fresh parsley, chopped
  • ¼ cup fresh basil, chopped
  • 2 tablespoons fresh mint, chopped
  • Salt and black pepper, to taste

For the Lemon Herb Dressing

  • ⅓ cup extra-virgin olive oil
  • 3 tablespoons fresh lemon juice
  • 1 tablespoon red wine vinegar
  • 1 teaspoon lemon zest
  • 2 cloves garlic, finely minced
  • 1 teaspoon dried oregano
  • 1 teaspoon Dijon mustard
  • ½ teaspoon honey or maple syrup
  • ½ teaspoon salt
  • ¼ teaspoon black pepper

Instructions

1. Cook the Orzo

Bring a large pot of salted water to a boil. Add the orzo and cook according to the package directions, usually about 8–10 minutes, until tender but still slightly firm.

Avoid overcooking the pasta because soft orzo can become mushy when mixed with the dressing.

Drain the orzo thoroughly and rinse briefly under cold water to stop the cooking process. Transfer it to a large bowl and toss with a small drizzle of olive oil. Allow it to cool while you prepare the remaining ingredients.

2. Toast the Almonds

Place the sliced almonds in a dry skillet over medium-low heat.

Toast for approximately 3–5 minutes, stirring frequently, until lightly golden and fragrant.

Keep a close eye on them because almonds can burn quickly.

Remove them from the skillet and allow them to cool.

3. Prepare the Vegetables

Wash the cherry tomatoes and cut them in half.

Dice the cucumber into bite-sized pieces. Finely dice the red onion and slice the Kalamata olives.

Drain and rinse the chickpeas thoroughly.

Place the tomatoes, cucumber, chickpeas, olives, and red onion into the bowl with the cooled orzo.

4. Add the Herbs and Feta

Add the chopped parsley, basil, and mint.

Gently toss everything together.

Add the crumbled feta cheese and toasted almonds, reserving a small amount of both for garnishing the finished salad.

The feta adds a creamy, salty flavor, while the almonds provide a satisfying crunch.

5. Prepare the Dressing

In a small bowl or jar, combine the olive oil, lemon juice, red wine vinegar, lemon zest, minced garlic, oregano, Dijon mustard, honey, salt, and black pepper.

Whisk vigorously until the dressing is smooth and well combined.

Taste and adjust the seasoning. Add more lemon juice if you prefer a sharper flavor or a little more honey for additional sweetness.

6. Dress the Salad

Pour approximately two-thirds of the dressing over the orzo mixture.

Gently toss until the pasta, vegetables, chickpeas, and herbs are evenly coated.

Add more dressing as desired.

Avoid adding all the dressing at once because the orzo will absorb some of it as it rests.

7. Chill and Serve

Cover the bowl and refrigerate the salad for at least 20–30 minutes.

This resting time allows the lemon, garlic, herbs, olives, and feta to blend together.

Before serving, gently toss the salad again. Sprinkle the reserved feta and toasted almonds over the top and finish with fresh parsley or basil.

Serve chilled or allow it to sit at room temperature for several minutes before serving.

Tips for the Best Mediterranean Orzo Salad

Don’t overcook the orzo: Slightly firm orzo holds its texture much better in a cold salad.

Cool the pasta completely: Hot pasta can wilt the herbs and vegetables.

Toast the almonds: This small step adds significantly more flavor and crunch.

Use fresh lemon juice: Freshly squeezed lemon provides a brighter flavor than bottled juice.

Choose good feta: A block of feta crumbled by hand usually has a creamier texture than pre-crumbled feta.

Dress gradually: Start with two-thirds of the dressing and add more according to taste.

Let it rest: Allowing the salad to sit before serving gives the ingredients time to absorb the dressing.

Optional Variations

For extra Mediterranean flavor, add sun-dried tomatoes, roasted red peppers, artichoke hearts, or chopped avocado.

You can replace almonds with toasted pine nuts, walnuts, or pecans.

For additional protein, add grilled chicken, shrimp, salmon, or extra chickpeas.

If you prefer a creamier salad, add a few spoonfuls of plain Greek yogurt to the dressing.

For a spicy version, add crushed red pepper flakes or finely chopped fresh chili.

Serving Suggestions

This salad makes an excellent light lunch served with warm pita bread and hummus.

For dinner, serve it alongside grilled chicken, Mediterranean baked fish, garlic butter shrimp, roasted vegetables, or grilled lamb.

It is also an excellent side dish for summer gatherings, picnics, barbecues, and holiday meals.

Storage

Store leftover salad in an airtight container in the refrigerator for up to 3–4 days.

The orzo will absorb some of the dressing as it sits. Before serving leftovers, add a small splash of lemon juice and olive oil and toss gently to refresh the flavors.

If preparing the salad in advance, keep some almonds separate and add them immediately before serving so they remain crunchy.

Servings

Serves 6–8

Approximate Nutritional Information

Per serving:

  • 390 calories
  • 11g protein
  • 48g carbohydrates
  • 18g fat
  • 7g fiber

Nutrition will vary depending on the exact amount of feta, olive oil, almonds, and orzo used.

Benefits

This Mediterranean-inspired salad combines several nutritious ingredients in one satisfying dish. Chickpeas provide plant-based protein and fiber, while tomatoes and herbs contribute vitamins and beneficial plant compounds.

Cucumber adds freshness and hydration, while feta provides protein and calcium. Almonds and extra-virgin olive oil contribute predominantly unsaturated fats, making the salad both flavorful and satisfying.

Frequently Asked Questions

Can I make this salad ahead of time?

Yes. It can be prepared several hours ahead or the day before. For the best texture, add the toasted almonds shortly before serving.

Can I use another pasta?

Yes. Small shells, pearl couscous, or another small pasta can replace orzo. Adjust the cooking time according to the package directions.

Can I make it vegetarian?

The recipe is already vegetarian as written.

Can I make it vegan?

Yes. Omit the feta or replace it with a plant-based feta alternative. Use maple syrup instead of honey in the dressing.

Can I use canned chickpeas?

Absolutely. Drain and rinse them thoroughly before adding them to the salad.

Can I serve it warm?

Yes, although it is traditionally best chilled or served at room temperature. It can also be served slightly warm immediately after preparing the orzo.

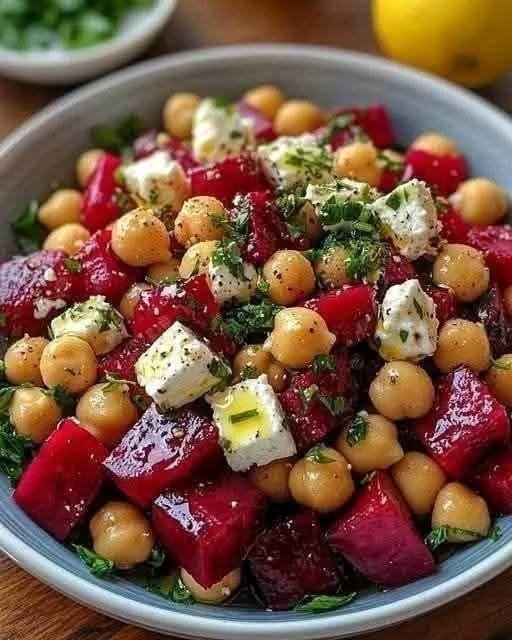
Beetroot, Chickpea & Feta Mediterranean Salad

Beetroot, Chickpea & Feta Mediterranean Salad

Description

This Beetroot, Chickpea & Feta Mediterranean Salad is a colorful, nutritious, and refreshing dish made with tender roasted beets, creamy chickpeas, salty feta cheese, fresh herbs, and a bright lemon-garlic dressing. Inspired by the ingredients visible in the photo, this salad combines earthy roasted beetroot with creamy feta and protein-rich chickpeas for a satisfying meal or side dish.

The combination of sweet beets, tangy feta, fresh parsley, and zesty lemon creates a wonderful balance of flavors. It can be served chilled or at room temperature and is perfect for lunch, meal prep, picnics, potlucks, or as a side dish with grilled chicken or fish.

Ingredients

For the Salad

  • 4 medium fresh beets, peeled and cut into bite-sized cubes
  • 1½ cups cooked chickpeas, drained and rinsed
  • ¾ cup feta cheese, cut into cubes or crumbled
  • ¼ cup fresh parsley, finely chopped
  • 2 tablespoons fresh mint, chopped
  • ¼ cup red onion, finely diced
  • 1 tablespoon pumpkin seeds, optional
  • 1 tablespoon fresh dill, optional
  • Salt and freshly ground black pepper, to taste

For the Lemon-Garlic Dressing

  • ¼ cup extra-virgin olive oil
  • 3 tablespoons fresh lemon juice
  • 1 teaspoon lemon zest
  • 1 tablespoon red wine vinegar
  • 1 garlic clove, finely minced
  • 1 teaspoon Dijon mustard
  • 1 teaspoon honey or maple syrup
  • ½ teaspoon dried oregano
  • ¼ teaspoon salt
  • ¼ teaspoon black pepper

Instructions

1. Prepare the Beets

Preheat your oven to 400°F (200°C).

Wash and peel the beets. Cut them into approximately 1-inch cubes so they cook evenly. Place the beet cubes on a large baking sheet lined with parchment paper.

Drizzle with 1 tablespoon olive oil and season lightly with salt and black pepper. Toss until the pieces are evenly coated.

Spread the beets into a single layer. Roast for approximately 30–40 minutes, turning them halfway through cooking.

The beets are ready when they are tender when pierced with a fork and slightly caramelized around the edges.

Remove from the oven and allow them to cool for approximately 10–15 minutes.

2. Prepare the Chickpeas

While the beets are roasting, drain and rinse the chickpeas thoroughly under cool running water.

Pat them dry with a clean kitchen towel or paper towels. Removing excess moisture helps the dressing cling better to the chickpeas.

For extra flavor and texture, you can lightly roast the chickpeas with a drizzle of olive oil, oregano, salt, and pepper for about 15–20 minutes. However, using them directly from the can is perfectly fine for a quick salad.

3. Make the Dressing

In a small bowl, whisk together the olive oil, fresh lemon juice, lemon zest, red wine vinegar, minced garlic, Dijon mustard, honey, oregano, salt, and black pepper.

Continue whisking until the dressing becomes smooth and slightly emulsified.

Taste and adjust according to your preference. Add additional lemon juice for more brightness, honey for sweetness, or black pepper for a stronger flavor.

4. Assemble the Salad

Place the cooled roasted beets in a large serving bowl.

Add the chickpeas, diced red onion, chopped parsley, fresh mint, and dill if using.

Gently toss the ingredients together.

Add the feta cheese last and fold it through carefully so the cubes remain intact.

5. Add the Dressing

Pour the lemon-garlic dressing over the salad.

Gently toss until the beets and chickpeas are evenly coated.

Be careful not to overmix because the beetroot will naturally color the feta and other ingredients. If you prefer the feta to remain bright white, reserve some feta and add it on top just before serving.

6. Garnish and Serve

Sprinkle the salad with additional fresh parsley and mint.

Add pumpkin seeds for extra crunch if desired.

Finish with a little freshly cracked black pepper and a drizzle of extra-virgin olive oil.

For the best flavor, allow the salad to rest for 15–20 minutes before serving. This gives the dressing time to soak into the chickpeas and roasted beets.

Tips for the Best Salad

Roast instead of boiling the beets: Roasting concentrates the natural sweetness and gives the beetroot a deeper flavor.

Don’t overcook the beets: They should be tender but still hold their shape.

Use good-quality feta: A block of feta has a creamier texture than pre-crumbled varieties.

Dry the chickpeas: This helps the dressing stick and prevents the salad from becoming watery.

Add feta at the end: Gently folding it in keeps the feta pieces attractive.

Balance the dressing: Beetroot is naturally sweet, so lemon juice and vinegar are important for balancing the flavors.

Optional Variations

For additional Mediterranean flavor, add Kalamata olives, cucumber, cherry tomatoes, roasted red peppers, or sun-dried tomatoes.

You can also add toasted walnuts or pecans instead of pumpkin seeds.

For a heartier meal, add grilled chicken, roasted salmon, or cooked quinoa.

If you enjoy a creamy dressing, replace part of the olive oil with plain Greek yogurt and add extra lemon juice.

For a spicy version, add a pinch of crushed red pepper flakes to the dressing.

Serving Suggestions

This beet and chickpea salad makes an excellent light lunch served with warm pita bread or crusty whole-grain bread.

It also works beautifully as a side dish alongside Mediterranean grilled chicken, baked fish, garlic shrimp, roasted vegetables, or lamb.

For meal prep, divide the salad into individual containers and keep the dressing separate until serving. This helps maintain the freshest texture.

Storage

Store leftover salad in an airtight container in the refrigerator for up to 3 days.

The flavors become even more developed after the salad rests, although the feta may gradually become pink from the beet juice.

If preparing the salad ahead of time, keep the feta, herbs, and dressing separate until shortly before serving for the best presentation.

Servings

Serves 4–6

Approximate Nutritional Information

Per serving, depending on the exact ingredients:

  • 320 calories
  • 10g protein
  • 32g carbohydrates
  • 17g fat
  • 7g fiber

The nutritional values will vary depending on the amount of feta, olive oil, and chickpeas used.

Benefits

Beets provide naturally occurring antioxidants and fiber, while chickpeas contribute plant-based protein and additional fiber. Feta adds protein and calcium, while extra-virgin olive oil provides predominantly unsaturated fats.

Fresh parsley, mint, lemon, and garlic add flavor without requiring a heavy sauce, making this a colorful and satisfying Mediterranean-inspired dish.

Frequently Asked Questions

Can I use pre-cooked beets?

Yes. Pre-cooked or vacuum-packed beets can save time. Simply cut them into cubes and continue with the recipe. Roasted fresh beets, however, provide a deeper caramelized flavor.

Can I use canned chickpeas?

Absolutely. Drain and rinse them well before adding them to the salad.

Can I prepare this salad ahead of time?

Yes. The beets and chickpeas can be prepared a day ahead. For the freshest result, add the herbs, feta, and dressing closer to serving time.

Can I make it vegan?

Yes. Replace the feta with a plant-based feta alternative or omit it and add toasted nuts or seeds for extra texture.

Can I serve it warm?

Yes. The salad is delicious with warm roasted beets and room-temperature chickpeas, although it can also be chilled.

Cinnamon-Roasted Sweet Potato & Cranberry Lasagna Rolls with Ricotta

Cinnamon-Roasted Sweet Potato & Cranberry Lasagna Rolls with Ricotta

Ingredients

12 lasagna noodles
2 medium sweet potatoes, peeled and cubed
1½ tablespoons olive oil
½ teaspoon ground cinnamon
½ teaspoon salt
¼ teaspoon black pepper
1½ cups ricotta cheese
½ cup grated Parmesan cheese
½ cup dried cranberries
1 egg
1 teaspoon fresh thyme leaves
½ teaspoon garlic powder
1½ cups Alfredo sauce or creamy white sauce
1 cup shredded mozzarella cheese
2 tablespoons fresh parsley, chopped

Instructions

1. Roast the Sweet Potatoes
Preheat the oven to 400°F (200°C). Place the cubed sweet potatoes on a baking sheet. Toss with olive oil, cinnamon, salt, and black pepper. Roast for 25–30 minutes, turning once, until tender and lightly caramelized.
Allow the sweet potatoes to cool slightly, then mash them roughly with a fork.
2. Cook the Lasagna Noodles
Bring a large pot of salted water to a boil. Cook the lasagna noodles according to the package directions until flexible but not overly soft. Drain and lay the noodles flat on a lightly oiled baking sheet to prevent sticking.
3. Make the Filling
In a bowl, combine ricotta, Parmesan, egg, thyme, garlic powder, and dried cranberries. Gently fold in the roasted sweet potato until combined. Taste and adjust the seasoning if needed.
4. Assemble the Rolls
Spread about ¾ cup of Alfredo sauce across the bottom of a baking dish.
Lay each lasagna noodle flat and spread an even layer of the sweet potato-ricotta mixture over the surface. Carefully roll each noodle from one end to the other.
Place the rolls seam-side down in the prepared baking dish.
5. Add Sauce and Cheese
Pour the remaining Alfredo sauce over the lasagna rolls, making sure the noodles are well covered. Sprinkle mozzarella evenly over the top.
6. Bake
Cover the dish loosely with foil and bake at 375°F (190°C) for 20 minutes. Remove the foil and bake for another 10–15 minutes, until the cheese is melted, bubbly, and lightly golden.
Let the rolls rest for 5 minutes before serving. Garnish with fresh parsley and additional Parmesan if desired.

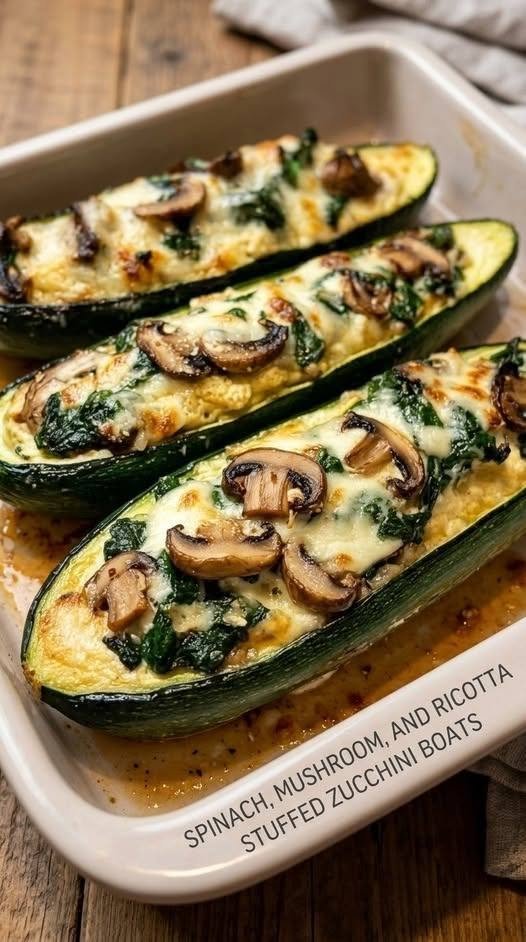
Spinach, Mushroom, and Ricotta Stuffed Zucchini Boats

Spinach, Mushroom, and Ricotta Stuffed Zucchini Boats

Description

Spinach, Mushroom, and Ricotta Stuffed Zucchini Boats are a delicious, comforting, and beautifully satisfying way to turn simple vegetables into an impressive meal. Fresh zucchini is halved lengthwise, gently hollowed out, and filled with a creamy mixture of ricotta cheese, sautéed mushrooms, wilted spinach, garlic, Parmesan, herbs, and seasonings. The stuffed zucchini is then baked until tender, creamy, and golden on top.

This recipe combines several wonderful textures in one dish. The zucchini becomes tender and juicy while remaining sturdy enough to hold the filling. The mushrooms provide a savory, meaty texture, spinach adds freshness and color, and ricotta creates a rich, creamy center. Parmesan adds a salty, nutty finish, while garlic and Italian herbs bring everything together.

These zucchini boats are versatile enough to serve as a vegetarian main course, a hearty side dish, or an elegant appetizer. They are particularly delicious during zucchini season when fresh zucchini is abundant, but they can be enjoyed throughout the year.

The recipe is also easy to customize. You can add sun-dried tomatoes, roasted red peppers, artichokes, herbs, mozzarella, feta, or even cooked chicken if you want additional protein. For a Mediterranean-inspired version, add Kalamata olives and a little lemon zest. For a richer holiday-style dish, add toasted walnuts or pecans to the filling.

Whether you’re preparing a weeknight dinner, a family gathering, a vegetarian meal, or a beautiful side dish for guests, these stuffed zucchini boats are an excellent choice.

Ingredients

For the Zucchini Boats

  • 6 medium zucchini
  • 2 tablespoons extra-virgin olive oil
  • ½ teaspoon salt
  • ¼ teaspoon black pepper
  • ½ teaspoon Italian seasoning

For the Spinach, Mushroom, and Ricotta Filling

  • 2 tablespoons extra-virgin olive oil
  • 12 ounces fresh mushrooms, finely chopped
  • 5 ounces fresh baby spinach
  • 1 small yellow onion, finely diced
  • 4 cloves garlic, minced
  • 1½ cups whole-milk ricotta cheese
  • ½ cup freshly grated Parmesan cheese
  • 1 large egg
  • 1 teaspoon Italian seasoning
  • ½ teaspoon dried oregano
  • ½ teaspoon garlic powder
  • ¼ teaspoon red pepper flakes, optional
  • ½ teaspoon salt
  • ¼ teaspoon black pepper
  • 2 tablespoons fresh parsley, chopped
  • 1 tablespoon fresh basil, chopped
  • 1 teaspoon lemon zest

For the Topping

  • 1 cup shredded mozzarella cheese
  • ¼ cup grated Parmesan cheese
  • 1 tablespoon fresh parsley
  • A small drizzle of olive oil

Optional Additions

  • ½ cup sun-dried tomatoes, finely chopped
  • ¼ cup Kalamata olives, chopped
  • ½ cup roasted red peppers, chopped
  • ½ cup crumbled feta cheese
  • ¼ cup chopped walnuts or pecans
  • 1 tablespoon fresh lemon juice
  • 1 tablespoon fresh thyme
  • ¼ teaspoon crushed red pepper

Choosing the Best Zucchini

The zucchini is the foundation of this recipe, so selecting the right size and texture makes a noticeable difference.

Medium-sized zucchini are ideal because they are large enough to hold plenty of filling but small enough to cook evenly. Look for zucchini that feel firm and heavy for their size. The skin should be smooth, glossy, and free from major bruises or soft spots.

Avoid extremely large zucchini if possible. Oversized zucchini can contain large seeds and a watery interior, and their texture may be less tender.

If your zucchini are particularly thick, you can use four large zucchini instead of six medium ones. The important thing is that the zucchini halves fit comfortably in your baking dish.

Before preparing them, wash the zucchini thoroughly and dry them with a clean kitchen towel.

There is no need to peel zucchini. The skin helps the boats hold their shape while baking and contributes color and nutrients to the finished dish.

Preparing the Zucchini Boats

Step 1: Preheat the Oven

Preheat your oven to 400°F (200°C).

Lightly grease a large baking dish with olive oil. A dish approximately 9 x 13 inches works well for six medium zucchini boats.

Step 2: Cut the Zucchini

Place each zucchini on a cutting board.

Using a sharp knife, carefully slice each zucchini in half lengthwise.

You should now have twelve long zucchini halves.

Arrange them cut-side up.

Step 3: Scoop Out the Centers

Using a small spoon, melon baller, or teaspoon, gently scoop out the soft interior of each zucchini half.

Leave approximately ¼ inch of zucchini flesh around the edges and bottom.

Do not scoop all the way through the skin. The goal is to create a sturdy boat that can hold the filling.

Place the zucchini flesh in a bowl instead of throwing it away. It can be chopped and incorporated into the filling.

Step 4: Season the Zucchini

Brush the inside and outside of the zucchini boats lightly with olive oil.

Sprinkle with salt, black pepper, and Italian seasoning.

Place them cut-side up in the prepared baking dish.

At this stage, do not over-season the zucchini because the filling and cheese will also contain salt.


Preparing the Mushroom Filling

The mushrooms are one of the most important ingredients in this recipe. Properly cooking them before adding them to the filling prevents excess moisture from making the zucchini boats watery.

Step 1: Clean the Mushrooms

Wipe the mushrooms clean with a damp paper towel or quickly rinse them and dry them thoroughly.

Finely chop them.

You can use white button mushrooms, cremini mushrooms, baby bella mushrooms, or a combination.

For a deeper flavor, add a few chopped shiitake mushrooms or oyster mushrooms.

Step 2: Heat the Pan

Place a large skillet over medium-high heat.

Add two tablespoons of olive oil.

Allow the oil to become hot but not smoking.

Step 3: Cook the Onion

Add the finely diced onion.

Cook for approximately 3–4 minutes, stirring occasionally, until the onion becomes soft and translucent.

Step 4: Add the Mushrooms

Add the chopped mushrooms.

Cook for approximately 7–10 minutes.

At first, the mushrooms will release quite a bit of water. Continue cooking until most of that moisture evaporates.

This step is extremely important.

If you remove the mushrooms too early, the excess water can make the ricotta filling loose and watery.

Continue cooking until the mushrooms become tender, lightly browned, and fragrant.

Step 5: Add the Garlic

Add the minced garlic.

Cook for approximately 30–60 seconds.

Do not cook the garlic for too long because it can burn and become bitter.

Adding the Spinach

Once the mushrooms and garlic are cooked, add the fresh spinach.

You may need to add the spinach in two batches because it initially takes up a lot of space.

Stir gently.

Within a few minutes, the spinach will wilt.

Cook until the spinach is completely wilted and most of its moisture has evaporated.

If there is visible liquid in the bottom of the skillet, continue cooking until the mixture becomes relatively dry.

Remove the skillet from the heat.

Allow the mushroom and spinach mixture to cool for approximately 5–10 minutes.

This helps prevent the hot vegetables from overheating the ricotta and egg when they are mixed together.

Preparing the Ricotta Filling

While the vegetables cool, prepare the creamy cheese mixture.

In a large bowl, add:

  • Ricotta cheese
  • Parmesan cheese
  • Egg
  • Italian seasoning
  • Oregano
  • Garlic powder
  • Salt
  • Black pepper
  • Red pepper flakes
  • Fresh parsley
  • Fresh basil
  • Lemon zest

Mix gently until everything is evenly combined.

The ricotta should remain creamy rather than becoming overly smooth.

The Parmesan adds savory depth, while the herbs give the filling a fresh Italian flavor.

The lemon zest may seem like a small addition, but it provides brightness that balances the richness of the cheese.

Combining the Filling

Once the mushroom and spinach mixture has cooled slightly, add it to the ricotta mixture.

If you saved the scooped zucchini flesh, finely chop it and add approximately ½–1 cup to the filling.

Mix everything together gently.

Do not overmix.

The final filling should be creamy but thick enough to sit inside the zucchini boats without running.

Taste the filling before stuffing the zucchini.

Adjust the salt, black pepper, herbs, or red pepper flakes according to your preference.

If you want a stronger Mediterranean flavor, add chopped sun-dried tomatoes or Kalamata olives.

Stuffing the Zucchini Boats

Using a spoon, generously fill each zucchini boat with the ricotta, spinach, and mushroom mixture.

Do not worry if the filling rises slightly above the edge.

As the zucchini cooks, the vegetables soften and the filling settles.

Divide the filling evenly among all twelve zucchini halves.

Try to avoid packing the filling too tightly because a gentle, even layer cooks more consistently.

Arrange the stuffed zucchini boats in the baking dish.

Make sure they are close enough to support each other but not so tightly packed that they become difficult to remove after baking.

Adding the Cheese Topping

Sprinkle shredded mozzarella evenly over each stuffed zucchini boat.

Follow with a light sprinkling of Parmesan cheese.

The mozzarella creates a creamy, stretchy topping, while Parmesan helps develop a golden, savory crust.

For an extra flavorful finish, drizzle a very small amount of olive oil over the cheese.

Do not use too much because the cheese already contains fat.

Baking the Zucchini Boats

Cover the baking dish loosely with aluminum foil.

Place it in the preheated 400°F (200°C) oven.

Bake for approximately 20 minutes.

The foil helps the zucchini steam gently and become tender without allowing the cheese to brown too quickly.

After 20 minutes, carefully remove the foil.

Return the baking dish to the oven.

Continue baking for another 10–15 minutes.

The cheese should become melted, bubbly, and lightly golden.

The zucchini should be tender when pierced with a fork but should still hold its shape.

If you prefer a deeper golden topping, switch the oven to broil for the final 1–2 minutes.

Watch carefully during broiling because the cheese can brown very quickly.

Resting Before Serving

Remove the zucchini boats from the oven.

Allow them to rest for approximately 5–10 minutes before serving.

This short resting period allows the filling to settle and makes the zucchini easier to serve without falling apart.

Sprinkle fresh parsley or basil over the top.

For an extra bright finish, add a small squeeze of fresh lemon juice.

How to Make the Filling Extra Flavorful

The filling is the heart of this recipe, and several small adjustments can make it even more delicious.

Add Sun-Dried Tomatoes

Finely chopped sun-dried tomatoes bring concentrated tomato flavor and a slightly sweet, tangy taste.

Add approximately ½ cup to the filling.

Add Kalamata Olives

Chopped Kalamata olives add a salty Mediterranean character.

Use approximately ¼ cup.

Because olives and Parmesan are already salty, reduce the additional salt slightly.

Add Feta

For a stronger Mediterranean flavor, add ½ cup crumbled feta.

Feta works beautifully with spinach and zucchini.

Add Fresh Herbs

Fresh basil, parsley, thyme, and oregano can all be used.

Fresh herbs generally provide a brighter flavor than dried herbs, but dried herbs are convenient and work well in the filling.

Add Nuts

For crunch, add chopped toasted walnuts or pecans.

Approximately ¼ cup is enough.

Make sure the nuts are finely chopped so the filling remains easy to spoon into the zucchini.

Vegetarian Main Course

These zucchini boats are substantial enough to serve as a vegetarian main course.

For a complete meal, pair them with:

  • Greek salad
  • Tomato cucumber salad
  • Lemon rice
  • Quinoa
  • Couscous
  • Roasted potatoes
  • Crusty whole-grain bread
  • Lentil salad
  • White bean salad

The creamy filling provides richness, while a fresh salad or roasted vegetables balance the meal.

Serving as a Side Dish

These stuffed zucchini boats are also excellent as a side dish.

Serve them alongside:

  • Roast chicken
  • Grilled chicken
  • Baked salmon
  • Mediterranean baked fish
  • Turkey
  • Grilled shrimp
  • Herb-roasted potatoes

One zucchini boat can be served as a side, while two or three can form the main portion of a vegetarian meal.

Mediterranean-Style Variation

For a Mediterranean version, make the following changes:

Add:

  • ½ cup sun-dried tomatoes
  • ¼ cup Kalamata olives
  • ½ cup crumbled feta
  • 1 teaspoon lemon zest
  • 1 tablespoon fresh oregano
  • 1 tablespoon chopped parsley

Reduce the Parmesan slightly if using feta.

This version has a brighter, saltier flavor and pairs beautifully with a simple Greek salad.

Italian-Style Variation

For a more classic Italian flavor, add:

  • Extra Parmesan
  • Fresh basil
  • Tomato sauce
  • Mozzarella
  • Italian seasoning

Before adding the zucchini boats to the baking dish, spread a thin layer of marinara sauce across the bottom.

Bake the stuffed zucchini over the sauce.

The tomato sauce creates additional moisture and adds a rich Italian character.

-Rich Variation

If you want to increase the protein content, you can add cooked chicken to the filling.

Use approximately 1 cup of finely diced cooked chicken.

Ground turkey or cooked Italian chicken sausage can also work.

For a vegetarian protein boost, add cooked lentils, white beans, or chickpeas.

If adding additional ingredients, make sure the filling remains thick enough to sit inside the zucchini boats.

Low-Carbohydrate Meal Idea

Zucchini boats are naturally suited to a lower-carbohydrate meal because zucchini replaces traditional pasta or bread-based components.

For a lower-carbohydrate version:

  • Use full-fat ricotta or a preferred lower-carbohydrate cheese
  • Add extra spinach and mushrooms
  • Keep the filling free of breadcrumbs
  • Use Parmesan and mozzarella in moderate amounts
  • Serve with a leafy green salad

Always consider your individual dietary needs when modifying recipes.

Crispy Topping Variation

If you enjoy a crunchy topping, combine:

  • ¼ cup Parmesan
  • ¼ cup breadcrumbs
  • 1 tablespoon olive oil
  • 1 tablespoon chopped parsley

Sprinkle this mixture over the mozzarella before baking.

The breadcrumbs become golden and crisp while the cheese underneath remains creamy.

For a gluten-free version, use certified gluten-free breadcrumbs.


How to Prevent Watery Zucchini Boats

Zucchini naturally contains a large amount of water.

There are several ways to prevent the finished dish from becoming watery.

Cook the mushrooms thoroughly

Do not stop cooking the mushrooms while they are still releasing liquid.

Drain spinach if necessary

If using frozen spinach, thaw it completely and squeeze out as much water as possible before adding it.

Fresh spinach should simply be cooked until excess moisture evaporates.

Don’t over-scoop the zucchini

Leaving approximately ¼ inch of flesh gives the zucchini enough structure and prevents excessive moisture from accumulating.

Avoid excessive sauce

This recipe does not require a large amount of sauce. Too much liquid can make the boats soggy.

Bake uncovered at the end

Removing the foil during the final stage allows excess moisture to evaporate and gives the cheese a beautiful golden finish.

Make-Ahead Instructions

These zucchini boats are excellent for meal preparation.

You can prepare the filling up to one day in advance.

Store the filling in an airtight container in the refrigerator.

When ready to cook, prepare the zucchini boats and fill them immediately before baking.

You can also assemble the entire dish several hours before dinner.

Cover tightly and refrigerate.

Remove from the refrigerator approximately 15–20 minutes before baking.

You may need to add a few extra minutes to the baking time if the zucchini and filling are very cold.

Freezing Instructions

Zucchini contains a lot of water, so freezing can slightly change its texture.

For best results, freeze the cooked filling separately rather than freezing fully assembled zucchini boats.

Prepare the filling, cool it completely, and store it in a freezer-safe container.

Freeze for up to approximately 2–3 months.

Thaw overnight in the refrigerator before using.

Fresh zucchini boats are best prepared and baked rather than frozen.

Storage

Place leftover zucchini boats in an airtight container.

Refrigerate for up to 3–4 days.

To reheat, place them in a baking dish and cover loosely with foil.

Warm in a 350°F (175°C) oven for approximately 10–15 minutes, or until heated through.

You can also reheat individual portions in the microwave, although the cheese topping may not remain as crisp.

For the best texture, reheating in the oven is recommended.

Meal Prep

These zucchini boats work well for meal preparation because they can be portioned individually.

After cooking and cooling, place two zucchini boats in each meal-prep container.

Add a side salad, roasted vegetables, quinoa, or another preferred side.

Store refrigerated and reheat as needed.

If adding a fresh salad, keep the dressing separate until serving.

Nutritional Information

Approximate nutrition will vary depending on the exact ingredients, cheese quantities, and serving size.

For one stuffed zucchini boat, the approximate nutritional values may be:

  • 180–220 calories
  • 10–13g protein
  • 10–13g carbohydrates
  • 11–14g fat
  • 2–3g fiber

Two zucchini boats make a more substantial serving and can be paired with a salad or whole grain for a complete meal.

Nutritional Benefits

Zucchini

Zucchini provides water, fiber, vitamin C, and other micronutrients while adding very few calories.

Spinach

Spinach is a nutrient-dense leafy green containing folate, vitamin K, vitamin A, and other beneficial plant compounds.

Mushrooms

Mushrooms contribute savory flavor while providing nutrients such as selenium, riboflavin, and niacin.

Ricotta

Ricotta provides protein and calcium and gives the filling its creamy texture.

Parmesan

Parmesan contributes protein and calcium along with a concentrated savory flavor.

Olive Oil

Extra-virgin olive oil provides predominantly unsaturated fat and is a staple of Mediterranean-style cooking.

The combination makes these zucchini boats flavorful and satisfying while incorporating several different vegetables and nutrient-rich ingredients.

Frequently Asked Questions

Can I use frozen spinach?

Yes.

Thaw the spinach completely and squeeze it firmly to remove excess water.

Frozen spinach can actually be convenient because it is already chopped.

Can I use cottage cheese instead of ricotta?

Yes.

Cottage cheese can be substituted for ricotta, although the texture will be slightly different.

For a smoother filling, blend the cottage cheese briefly before mixing it with the other ingredients.

Can I use another cheese?

Absolutely.

Feta, goat cheese, mozzarella, fontina, provolone, or additional Parmesan can all work.

For the creamiest filling, ricotta is still an excellent base.

Can I make this without eggs?

Yes.

The egg helps the filling set as it bakes, but you can omit it.

The filling will be slightly softer but should still work well.

You can compensate by adding a little extra Parmesan or shredded mozzarella.

Can I use baby bella mushrooms?

Yes.

Baby bella mushrooms have a deeper flavor than white button mushrooms and are particularly good in this recipe.

Can I add chicken?

Yes.

Cooked diced chicken is an easy way to turn the recipe into a higher-protein meal.

Can I add tomato sauce?

Yes.

A thin layer of marinara sauce underneath the zucchini boats is delicious.

Avoid using too much because zucchini naturally releases moisture.

Can I make the recipe spicy?

Yes.

Add red pepper flakes, cayenne pepper, or finely chopped fresh chili to the filling.

How do I know when the zucchini is done?

The zucchini should be tender enough to pierce easily with a fork but firm enough to maintain its boat shape.

If it is still very firm after the recommended cooking time, continue baking for another 5 minutes.

Why did my zucchini become watery?

The most common causes are excess moisture from mushrooms, spinach, or zucchini.

Cook the mushrooms until their liquid evaporates, drain spinach thoroughly, and avoid over-scooping the zucchini.
Lamb’s Quarters Identify & Use This Edible Green

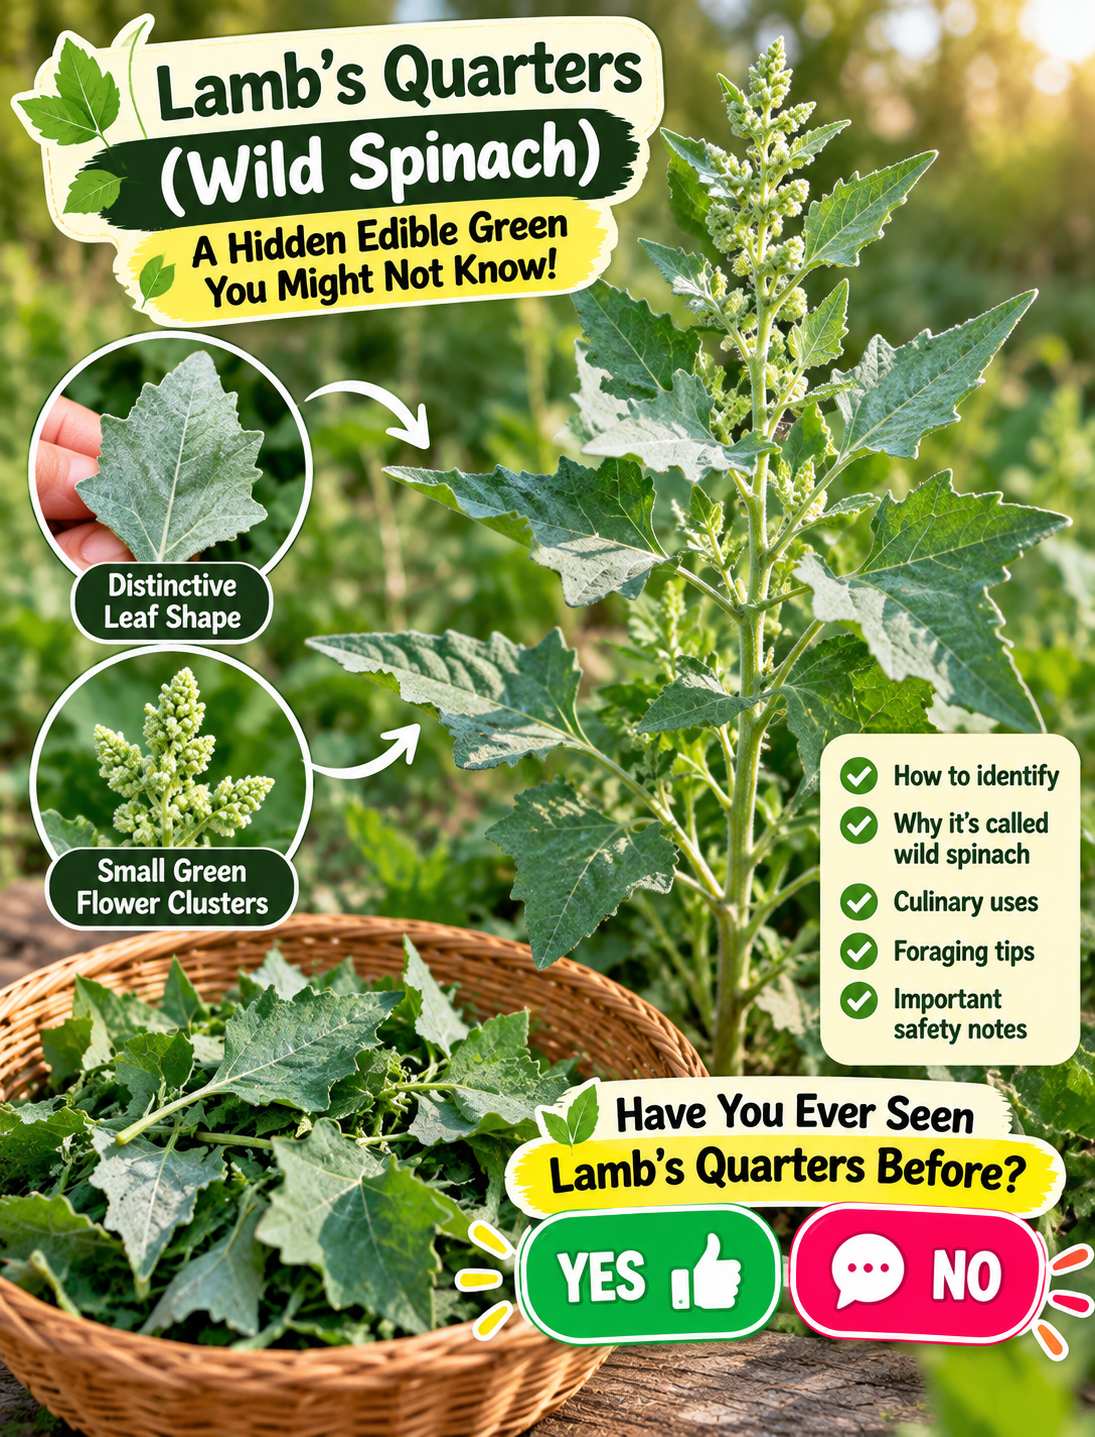
Fresh lamb’s quarters wild spinach leaves with identification and safe foraging tips

Lamb’s Quarters / Wild Spinach: What Is This Wild Green?

Have you ever seen this plant growing and didn’t know it could be used as a leafy green? 

If you have ever pulled a leafy weed from a garden and wondered whether it was useful, you may have come across lamb’s quarters.

Common lambsquarters (Chenopodium album) is a widespread annual plant that is sometimes called wild spinach, goosefoot, or pigweed.

Young leaves and tender stems have traditionally been used as cooked greens, and some foragers use the plant in ways similar to spinach. However, identifying a wild plant correctly is essential before eating it.

A plant that looks similar is not automatically the same plant, and growing conditions also matter. Lambsquarters can accumulate nitrates, and wild plants may be exposed to pesticides, fertilizers, animal waste, or other contaminants.

What Are Lamb’s Quarters?

Lamb’s quarters is a leafy annual weed found across much of the United States. It can grow in gardens, cropland, disturbed ground, lawns, and other open areas.

The scientific name most commonly associated with common lambsquarters is Chenopodium album.

You may also hear several different names for this plant, including:

  • Wild spinach
  • Goosefoot
  • Lamb’s quarter
  • Lambsquarters
  • Pigweed

The name “wild spinach” describes how the young leaves can be prepared, rather than meaning the plant is actually a type of cultivated spinach.

Utah State University Extension notes that young lambsquarters can be used similarly to spinach or other green vegetables.

Why Is It Called Wild Spinach?

The comparison comes mainly from the way the young leaves are eaten.

Tender lambsquarters can be used as a leafy green in salads or cooked dishes, although older plants become tougher. University extension resources describe young plants as suitable for salad greens or as a cooked pot herb.

The flavor is generally mild enough to work with familiar ingredients.

You can use properly identified young leaves in:

  • Cooked vegetable dishes
  • Soups
  • Egg dishes
  • Grain bowls
  • Savory pies
  • Mixed greens
  • Simple sautéed greens

Think of it as a wild leafy green, not a miracle plant or medicinal cure.

How Can You Identify Lamb’s Quarters?

Correct identification is the most important part of wild-plant foraging.

Common lambsquarters usually has an upright, branching growth pattern. Its leaves vary in shape, but younger leaves often have a noticeable white or mealy-looking coating, while mature leaves can become more toothed and variable in shape.

The plant also produces small greenish flower clusters that are not showy.

Look for these identifying features:

  1. Upright growth — The plant commonly grows vertically with several branches.
  2. Green leaves — Leaf shape changes as the plant matures.
  3. White mealy appearance — Young leaves often have a distinctive pale or powdery-looking surface.
  4. Toothed leaves — Lower leaves may have noticeable shallow teeth.
  5. Small green flowers — Flowers appear in compact clusters.
  6. Annual growth — Common lambsquarters completes its life cycle in one growing season.

These features can help, but a written description alone is not enough to confirm a wild plant for eating.

Why Proper Identification Matters

Many wild plants can look similar when you first see them.

That makes casual identification risky.

Even experienced gardeners should avoid eating a plant when they are uncertain about its identity.

Follow this basic rule:

If you cannot confidently identify the plant using a reliable field guide or knowledgeable local expert, do not eat it.

Do not identify a plant based only on:

  • A social media photograph
  • A short video
  • A comment from a stranger
  • A general resemblance
  • The fact that animals appear to eat it

Plant appearance can vary with age, growing conditions, and location.

Where Should You NOT Harvest Lamb’s Quarters?

Finding the correct plant is only half of the safety question.

You also need to consider where it grew.

Lambsquarters commonly grows in disturbed areas, agricultural settings, gardens, and other places where the soil may have been exposed to chemicals or contamination.

Avoid harvesting from:

  • Roadsides
  • Areas treated with herbicides or pesticides
  • Recently fertilized areas
  • Industrial or contaminated land
  • Places near chemical runoff
  • Manure piles
  • Areas contaminated by animal feces
  • Locations where you cannot determine the soil history

Oregon State University Extension advises avoiding produce contaminated with animal feces because wildlife and animals can introduce human pathogens.

Wild does not automatically mean clean.

Step-by-Step: How to Handle Lamb’s Quarters Safely

If you have positively identified the plant and know that it grew in a suitable, uncontaminated location, use a careful preparation routine.

Step 1: Confirm the Plant

Compare several features rather than relying on one leaf.

Check the growth pattern, leaf shape, pale mealy coating, stem structure, and flower clusters.

Step 2: Choose Young, Tender Growth

Young leaves and tender tops are generally more suitable for eating because older growth becomes tougher.

Step 3: Inspect the Leaves

Discard leaves that are:

  • Damaged
  • Moldy
  • Diseased-looking
  • Heavily insect-damaged
  • Covered with dirt or animal contamination

Step 4: Wash Thoroughly

Rinse the greens carefully under clean running water.

Remove visible soil, insects, and debris.

Washing cannot make a plant safe if it was harvested from contaminated soil, so location matters before washing.

Step 5: Consider Cooking

Lambsquarters can be prepared similarly to spinach, including steaming or cooking as a pot herb.

Cooking can also reduce some of the oxalic acid present in leafy greens, although it does not make contaminated plants safe.

Step 6: Start With a Modest Portion

Lambsquarters contains oxalic acid, so it is sensible to treat it like a leafy green rather than eating large quantities. Research reviewing wild edible plants identified oxalic acid as an important precaution for common lambsquarters.

People who have been advised to limit dietary oxalates should discuss wild greens with their healthcare professional before adding them regularly.

Simple Ways to Eat Lamb’s Quarters

Once properly identified, cleaned, and prepared, young leaves can fit into familiar meals.

1. Sautéed Greens

  1. Wash the young leaves.
  2. Remove tougher stems.
  3. Heat a small amount of olive oil in a skillet.
  4. Add the greens.
  5. Cook until tender.
  6. Season with garlic, lemon, or black pepper.

2. Egg and Greens Skillet

  1. Lightly cook the greens.
  2. Add chopped tomatoes or onions.
  3. Make small spaces in the mixture.
  4. Add eggs.
  5. Cover and cook until the eggs reach your preferred doneness.

3. Add to Soup

Chop tender leaves and add them toward the end of cooking so they retain some texture.

4. Mix With Other Greens

Combine a small amount with familiar greens such as spinach, kale, or chard.

This can make the flavor more familiar while introducing a different leafy green.

What About the Nutrition?

Lambsquarters contains nutrients and plant compounds, and extension resources describe the foliage as containing vitamin C, carotenoids, and minerals.

However, nutrition can vary with:

  • Plant age
  • Growing conditions
  • Soil
  • Weather
  • Plant part
  • Preparation method

For that reason, it is better to think of lambsquarters as one possible leafy green rather than relying on it as a special source of a particular nutrient.

A varied diet containing many different vegetables and other whole foods remains a more practical approach to nutrition.

Traditional Food Use

Wild greens have been used as food in different cultures for generations.

Lambsquarters has been prepared as a cooked green and used in dishes similar to those made with spinach or other leafy vegetables. University and agricultural sources document its use as a salad green or pot herb.

Traditional food use is different from a medical claim.

You may enjoy lambsquarters as a food, but it should not be promoted as a treatment for disease or as a substitute for medical care.

Important Safety Points Before You Try It

Keep these points in mind before adding any wild green to your meal.

  • Never eat an unidentified wild plant.
  • Use several reliable identification features.
  • Harvest only from areas known to be free from chemical and animal contamination.
  • Wash greens thoroughly.
  • Prefer young, tender leaves.
  • Consider cooking rather than eating large quantities raw.
  • Avoid making large amounts of wild greens a daily habit.
  • Consider oxalate content if you have been told to limit oxalates.
  • Do not assume cooking removes pesticides, heavy metals, or other environmental contaminants.
  • When in doubt, leave the plant where it is.

Lambsquarters can also accumulate nitrates under certain growing conditions, particularly with drought stress or high nitrogen availability.

That is another reason to avoid plants growing in questionable locations or under unknown conditions.

Lamb’s Quarters vs. Regular Spinach

Although lambsquarters is sometimes called wild spinach, the two plants are not the same.

Regular spinach is a cultivated vegetable grown specifically as a food crop.

Lambsquarters is a wild or weedy plant that can be harvested as a leafy green when correctly identified and grown in a suitable location.

The cooking idea is similar, but the safety considerations are different because wild plants have unknown growing histories.

That distinction is especially important for beginners.

A Simple Beginner’s Approach

If you are interested in learning about wild edible plants, start slowly.

Try this approach:

  1. Learn one plant at a time.
  2. Use a reputable regional field guide.
  3. Compare multiple identification characteristics.
  4. Learn the plant’s common look-alikes.
  5. Start with a small culinary use after proper identification.
  6. Keep notes about where and when you found it.
  7. Never eat a plant simply because someone online called it edible.

This approach makes foraging more thoughtful and reduces avoidable mistakes.

Frequently Asked Questions

1. Is lamb’s quarters really edible?

properly identified common lambsquarters has a history of use as a leafy green, particularly when the leaves are young and tender.

2. Why is lamb’s quarters called wild spinach?

Because young leaves can be prepared and cooked in ways similar to spinach.

3. Can you eat lamb’s quarters raw?

Young leaves may be eaten raw, but cooking is another common preparation method and may reduce some oxalic acid.

4. How do you identify lamb’s quarters?

Look for its upright branching form, variable toothed leaves, white mealy appearance on young leaves, and small green flower clusters.

5. Can lamb’s quarters grow near roads?

Grow in disturbed areas and roadsides, but roadside plants should not be harvested because contamination may be difficult to assess.

6. Does lamb’s quarters contain oxalic acid?

Common lambsquarters can contain oxalic acid, which is one reason moderation and appropriate preparation are recommended.

7. Can I eat any plant that looks like lamb’s quarters?

No. Similar-looking plants can be difficult to distinguish, so never eat a wild plant unless its identity is confirmed.

8. Should lamb’s quarters be washed before eating?

Properly identified edible leaves should be washed thoroughly with clean running water before preparation.

Final Takeaway

Lamb’s quarters is more than just a garden weed. 🌿

Common lambsquarters (Chenopodium album) is a widespread wild plant that has been used as a leafy green and is sometimes called wild spinach.

Young leaves can be prepared much like spinach, making this an interesting discovery for people who enjoy learning about traditional foods and wild edibles.

But the most important part of the story is identification and safety.

Never eat an unknown wild plant. Avoid questionable harvesting locations, wash properly identified greens, and remember that cooking does not remove environmental contaminants.

If you are new to foraging, learning one plant carefully is much safer than trying several unfamiliar plants at once.

Red Onion + Olive Oil for Cloudy Vision: Myth or Fact?

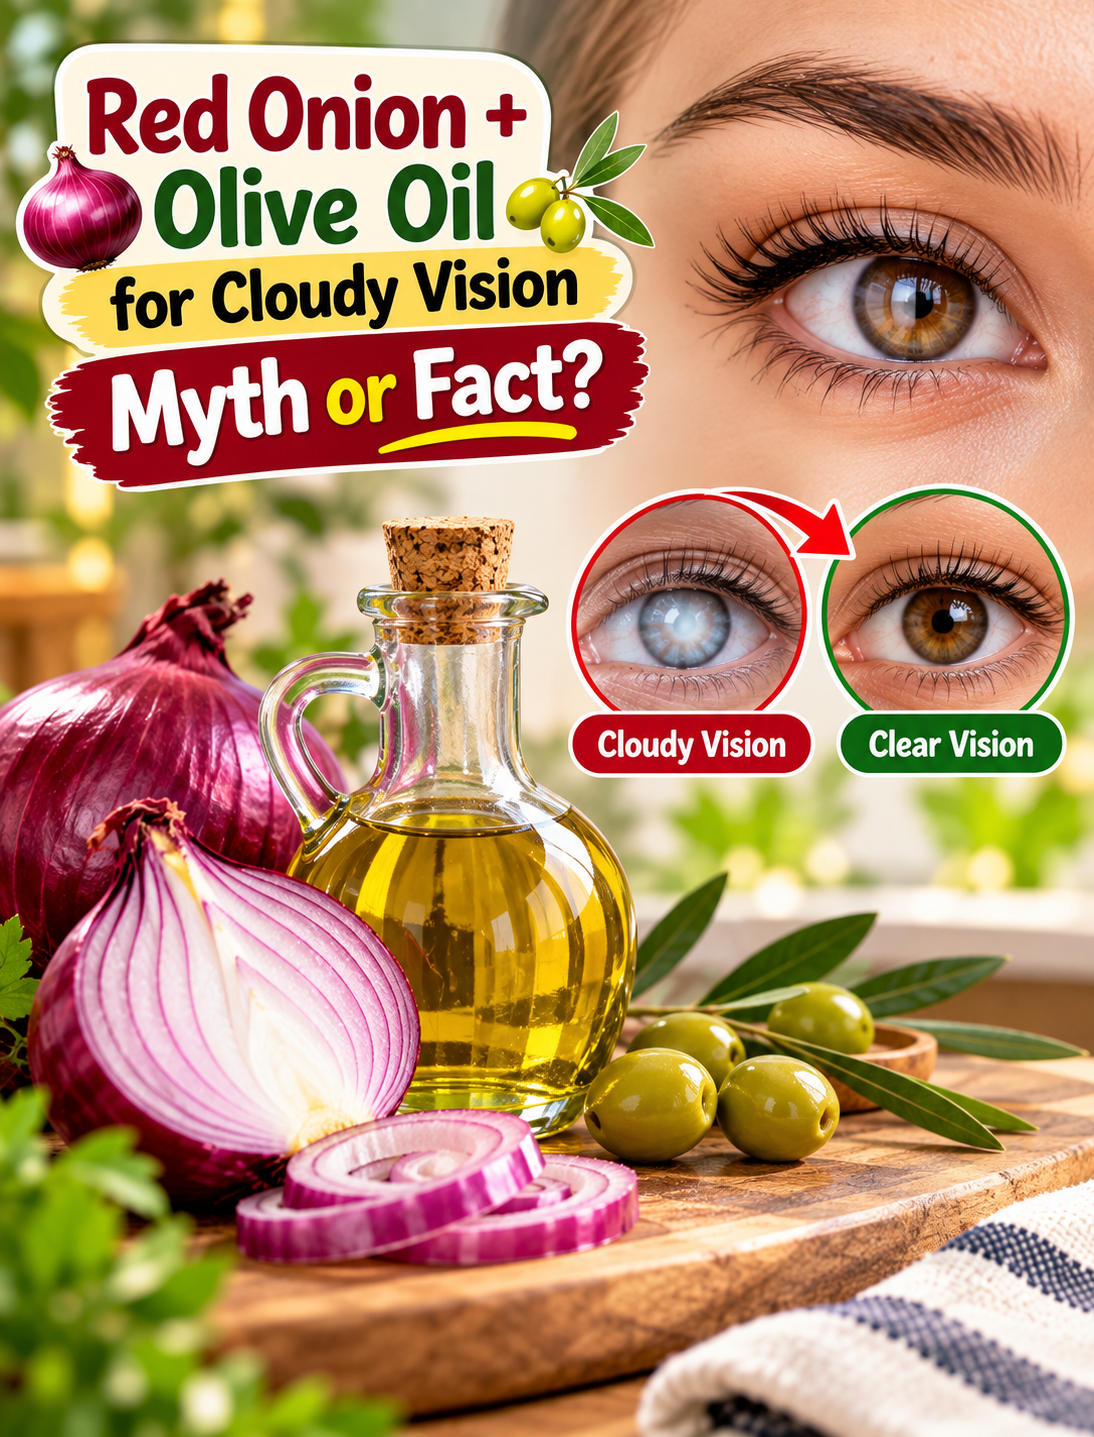
Red onion and olive oil beside an eye-health illustration explaining cloudy vision and cataract safety

Red Onion + Olive Oil for Cloudy Vision Myth or Fact?

Cloudy or blurry vision can be unsettling, especially when it develops gradually. You may come across traditional home remedies that combine common kitchen ingredients such as red onion and olive oil and claim to make vision clearer.

But when a remedy involves the eyes, it is important to separate a traditional claim from established eye care.

Red onion and olive oil should not be placed directly into the eyes. Homemade mixtures are not sterile, and products used in the eye need special safety controls because contamination can cause serious harm. The FDA notes that products used in the eyes must be sterile to reduce the risk of infection.

This article looks at where the claim comes from, what cloudy vision can mean, what medical sources say about cataracts, and what you can safely do instead.

What Is the Red Onion + Olive Oil Claim?

The claim suggests that combining red onion with olive oil and using the mixture around or in the eyes may help improve cloudy vision.

The idea is often presented as an old-fashioned natural remedy. Red onion contains plant compounds, while olive oil contains monounsaturated fat and other naturally occurring compounds, so the combination may sound appealing as a wellness idea.

However, a food’s nutritional value does not mean that putting it directly into the eye will improve vision.

There is an important difference between:

  • Eating nutritious foods as part of a balanced diet
  • Using an ingredient on the skin
  • Putting a homemade substance directly into the eye

The third situation requires much greater caution.

There is no established eye-care treatment guidance supporting homemade red onion and olive oil mixtures as a way to clear a cloudy lens or treat cataracts.

Why Can Vision Become Cloudy?

“Cloudy vision” is a symptom rather than a diagnosis.

Several different eye problems can cause blurry, hazy, dim, or distorted vision. Cataracts are one important cause.

A cataract develops when the normally clear lens inside the eye becomes cloudy. As the clouding increases, vision can become blurry or hazy, colors may appear faded, and bright lights may cause more glare.

Other vision problems can also cause blurred or changing vision, so it is not safe to assume that every cloudy-looking view is caused by a cataract.

Common changes that deserve attention include:

  • Blurry or hazy vision
  • Trouble seeing clearly at night
  • Increased glare from headlights or bright lights
  • Faded or less vivid colors
  • Double or ghosted images
  • Frequent changes in your glasses prescription
  • Gradual loss of sharpness

If these changes continue, an eye examination can help identify the actual cause.

Can Red Onion and Olive Oil Clear a Cataract?

No established medical evidence shows that eating or applying a red onion and olive oil mixture can remove a cataract.

A cataract is clouding inside the eye’s natural lens. It is not simply a layer of dirt or dryness that can be wiped away.

The National Eye Institute explains that cataracts form when proteins in the lens break down and clump together, making the lens cloudy.

The treatment that removes a cataract is cataract surgery. During the procedure, the cloudy natural lens is removed and replaced with an artificial lens.

That does not mean everyone with a cataract needs surgery immediately. Early cataracts may cause only mild symptoms, and an eye doctor can help determine when treatment is appropriate.

Why You Should Never Put Onion or Olive Oil Into Your Eyes

This is the most important safety point in this topic.

Do not put raw onion juice, olive oil, onion-and-oil mixtures, or other homemade food mixtures directly into your eyes.

Your eye has delicate tissues that can be irritated or injured by substances that were not designed or prepared for ophthalmic use.

The FDA explains that eye products carry a higher risk because they bypass some of the body’s natural defenses, and products used in the eyes need to be sterile to reduce infection risk.

Avoid these homemade eye applications:

  • Raw onion juice
  • Olive oil drops
  • Onion and oil mixtures
  • Herbal juices
  • Homemade “eye drops”
  • Unsterile food-based mixtures
  • Essential oils near or inside the eye

A natural ingredient is not automatically safe for the eye.

What About Eating Red Onion and Olive Oil?

Eating red onion and using olive oil as normal foods is very different from putting them into your eyes.

Both can fit into a balanced eating pattern.

Red onions can add flavor and plant foods to meals, while olive oil can be used as a source of unsaturated fat. You can include them in salads, roasted vegetables, grain bowls, beans, fish, or other balanced meals.

A simple food idea:

  1. Slice red onion thinly.
  2. Add it to a vegetable or bean salad.
  3. Drizzle with olive oil.
  4. Add herbs, lemon, or vinegar for flavor.
  5. Pair the meal with another source of protein and whole foods.

This can be part of a nutritious diet, but it should not be presented as a treatment for cloudy vision.

What Does the Evidence Say About Cataracts?

The National Eye Institute identifies surgery as the treatment that removes a cataract. It also notes that early cataracts may sometimes be managed with practical changes such as brighter lighting, anti-glare sunglasses, or updated glasses.

Cataracts are common with aging, although other factors can increase risk.

Factors associated with cataract risk include:

  • Getting older
  • Diabetes
  • Smoking
  • Heavy alcohol use
  • Family history
  • Previous eye injury
  • Certain eye surgeries
  • Some steroid use
  • Long-term ultraviolet exposure

These factors do not mean that someone will definitely develop cataracts, but they are recognized risk factors.

Step-by-Step: What to Do If Your Vision Looks Cloudy

If you notice cloudy or blurry vision, focus on finding the cause rather than trying an unproven eye remedy.

Step 1: Do Not Put Homemade Mixtures Into Your Eyes

Avoid onion juice, olive oil, herbal mixtures, and other kitchen ingredients as eye drops.

Step 2: Notice When the Vision Change Happens

Write down whether the problem is:

  • Constant
  • Occasional
  • Worse at night
  • Worse in bright light
  • Present in one eye
  • Present in both eyes
  • Gradually getting worse

This information can be useful during an eye examination.

Step 3: Arrange an Eye Examination

An eye-care professional can examine the lens and other parts of the eye to determine what is causing the vision change.

A dilated eye examination can help detect cataracts and other eye conditions.

Step 4: Protect Your Eyes From UV Exposure

When outdoors, use sunglasses that provide appropriate UV protection and consider a wide-brimmed hat.

The National Eye Institute recommends UV protection as part of reducing cataract risk.

Step 5: Support Overall Eye Health

Build meals around a variety of vegetables, fruits, whole grains, nuts, and other nutrient-rich foods.

Avoid smoking and manage health conditions according to advice from your healthcare team.

Step 6: Follow Professional Treatment Advice

If an eye doctor identifies a cataract or another eye condition, follow the recommended monitoring or treatment plan rather than relying on an unproven home remedy.

Can You Prevent Cataracts Naturally?

There is no guaranteed natural method that completely prevents age-related cataracts.

However, several healthy habits may help protect eye health and reduce certain risk factors.

Practical habits include:

  • Wear UV-protective sunglasses outdoors.
  • Avoid smoking.
  • Eat a varied, nutrient-rich diet.
  • Protect your eyes during activities that could cause injury.
  • Manage diabetes if you have it.
  • Keep regular eye examinations when recommended.
  • Tell your eye doctor about medications and supplements you use.

The National Eye Institute specifically recommends UV protection, quitting smoking, eye protection from injury, and healthy food choices as ways to help protect against cataracts.

When Should Cloudy Vision Be Checked Quickly?

Not every change in vision is an emergency, but some symptoms need prompt medical attention.

Seek urgent eye care if you develop sudden vision loss, sudden blurred vision with eye pain, a painful red eye, new flashes of light, a sudden increase in floaters, or a curtain-like shadow over your vision.

Sudden vision loss should not be treated at home while waiting to see whether a natural remedy works.

Red Onion + Olive Oil: Myth or Fact?

The simplest answer is:

The traditional claim should not be confused with an established eye treatment.

Red onion and olive oil can be nutritious foods, but there is no established medical guidance showing that a homemade mixture can clear cataracts or restore cloudy vision.

Most importantly, do not put the mixture directly into your eyes.

If your vision has become cloudy, the useful next step is to identify the cause through appropriate eye care.

A Safer Way to Think About Natural Eye Health

Natural wellness can have a place in everyday life, but it should not replace diagnosis when a body part as sensitive as the eye develops a new symptom.

A better approach is simple:

  1. Eat a varied, nutrient-rich diet.
  2. Protect your eyes from UV exposure.
  3. Avoid smoking.
  4. Protect your eyes from injury.
  5. Get appropriate eye examinations.
  6. Never use homemade food mixtures as eye drops.
  7. Get urgent care for sudden or severe vision changes.

This approach keeps the useful part of traditional wellness—healthy everyday habits—without turning an unproven remedy into a medical treatment.

Frequently Asked Questions

1. Can red onion and olive oil cure cloudy vision?

There is no established evidence that this mixture clears cataracts or treats the underlying causes of cloudy vision.

2. Can I put red onion juice in my eyes?

No. Raw onion juice is not a sterile ophthalmic product and may irritate or harm the eye.

3. Can olive oil be used as homemade eye drops?

Olive oil should not be used as homemade eye drops because substances placed in the eye need appropriate sterile preparation and safety testing.

4. Does cloudy vision always mean cataracts?

No. Cataracts can cause cloudy or blurry vision, but other eye conditions can produce similar symptoms.

5. What is the treatment for cataracts?

Cataract surgery removes the cloudy natural lens and replaces it with an artificial lens; an eye doctor determines when treatment is appropriate.

6. Can healthy foods support eye health?

A varied diet containing vegetables, fruits, whole grains, nuts, and other nutrient-rich foods can support overall health and is part of healthy eye-care habits.

7. When should blurry vision be treated as an emergency?

Sudden vision loss, painful blurred vision, a painful red eye, flashes, many new floaters, or a curtain-like shadow require urgent medical attention.

8. Should I try a natural remedy before seeing an eye doctor?

If vision is persistently cloudy or changing, do not delay an eye examination while trying an unproven remedy.

Final Takeaway

Red onion + olive oil may be an interesting traditional wellness claim, but it should not be presented as a treatment for cloudy vision.

Red onion and olive oil can be enjoyed as foods, but neither should be placed directly into the eyes. If cloudy or blurry vision continues, an eye examination can help determine whether cataracts or another condition is responsible.

For cataracts, the National Eye Institute states that surgery is the only treatment that removes the cataract itself.