Custard Cream Bomboloni / Berliner Donuts*

 *Custard Cream Bomboloni / Berliner Donuts* – super soft, fluffy inside.


Here is the FULL RECIPE:


*INGREDIENTS*


*For The Dough:*

– All-purpose Flour  – 500g (4 cups)

– Warm Milk – 250ml (1 cup)

– Sugar – 60g (1/4 cup)

– Dry Yeast – 7g (2.25 tsp)

– Eggs – 2 whole, room temp

– Butter – 60g (4 tbsp), soft

– Salt – 1 tsp

– Vanilla essence – 1 tsp

– Oil for deep frying


*For The Custard Cream (Pastry Cream):*

– Milk – 500ml (2 cups)

– Egg Yolks – 4

– Sugar – 100g (1/2 cup)

– Cornstarch / Cornflour – 40g (3 tbsp)

– Butter – 30g (2 tbsp)

– Vanilla essence – 1 tsp


*For Coating:*

– Granulated Sugar – 1 cup


*METHOD:*


*1. MAKE THE CUSTARD FIRST:*

In a bowl whisk egg yolks + sugar + cornstarch until pale. Heat milk in a pan till hot but not boiling. Pour half hot milk into yolk mix, whisk fast. Pour that back into the pan. Cook on low heat stirring non-stop for 4-5 mins till very thick like custard. Turn off heat, add butter + vanilla. Mix. Transfer to a bowl, cover with cling film touching the custard, and refrigerate for 2 hours.


*2. MAKE THE DOUGH:*

In a large bowl add warm milk + 1 tbsp sugar + yeast. Mix and let sit 5 mins till foamy. Add remaining sugar, eggs, vanilla, flour, salt. Mix to make a sticky dough. Now add soft butter and knead for 10-12 minutes by hand (or 7-8 min in stand mixer) until smooth, soft, elastic. It will be sticky but don’t add too much flour.


*3. FIRST PROOFING:*

Make a ball, put in oiled bowl, cover. Let rise for 1.5 – 2 hours until double as in your top-left picture.


*4. SHAPE:*

Punch down dough. Roll on lightly floured surface to 1/2 inch thickness. Cut circles with a 3-inch cookie cutter. You will get 12-14 donuts. Place each on a small butter paper square. Cover with cloth and proof again for 30-40 minutes until puffy.


*5. FRY:*

Heat oil in a deep pan to 170C / 340F (medium heat). Oil should not be too hot. Fry 2-3 donuts at a time, 2-3 mins per side until golden brown . The white ring in the middle means your dough is perfect.


Take out and roll immediately in granulated sugar while hot.


*6. FILL:*

Whisk your cold custard to make it creamy again. Put in a piping bag with a small nozzle. Make a small hole on side of each donut with a knife. Pipe in generous custard until you see it pop .


*TIPS FOR PERFECT DONUTS:*

1. Milk must be warm, not hot, or yeast will die.

2. Don’t over-proof after cutting, or they will absorb oil.

3. Fry on medium-low, if oil is too hot they will be raw inside.


Serve fresh and warm! They stay soft for 2 days in fridge.


Want me to send you a baked (no-oil) version of this also?

Body Reset Tricks

3 simple body reset tricks for everyday wellness

5 Simple Body Reset Tricks to Feel More Refreshed and Relaxed

Sometimes you do not need an expensive supplement, complicated morning routine, or hour-long wellness session to feel a little better.

A few simple habits can help you slow down, refresh your mind, or become more aware of your body.

You may have seen viral posts calling these habits “body reset buttons.” While your body does not literally have hidden reset switches, some simple actions can still help you feel calmer, more alert, or refreshed.

The important thing is to separate helpful wellness habits from exaggerated internet claims.

Below are five easy body reset tricks you can try during your normal day.

What Are Body Reset Tricks?

“Body reset” is not an official medical term.

On social media, people often use the phrase to describe small habits that may help them relax, wake up, refocus, or temporarily step away from stress.

Think of these techniques as simple wellness breaks rather than medical treatments.

They cannot cure anxiety, insomnia, fatigue, or other health conditions. However, some habits—especially controlled breathing—have been studied for their potential effects on relaxation and the autonomic nervous system. Research reviews have found that slow breathing can influence heart-rate variability and other processes connected with relaxation and stress regulation.

Here are five easy ideas to try.

1. Try a 60-Second Eye and Screen Reset

If you spend hours looking at your phone, laptop, or television, your eyes may feel tired by the end of the day.

Instead of aggressively blinking for a full minute, try a gentler version.

Put your phone down.

Close your eyes for about 20 to 60 seconds.

Relax your forehead, jaw, and shoulders.

Take several comfortable breaths.

Then slowly open your eyes.

This simple pause gives you a short break from visual stimulation.

Try It Before Bed

Dim the lights and put your phone away.

Close your eyes and breathe slowly for approximately one minute.

Think of this as a relaxation routine rather than a trick that will instantly make you fall asleep.

There is no good reason to promise that blinking rapidly will “trick your brain” into sleep within a certain number of minutes.

Instead, use the moment as a signal that your day is winding down.

2. Brush Your Teeth With Your Non-Dominant Hand

Here is one of the more fun body reset tricks.

If you normally brush your teeth with your right hand, try using your left hand occasionally.

If you are left-handed, try your right.

It will probably feel awkward at first.

That is exactly what makes it interesting.

You suddenly have to pay attention to an activity that normally happens almost automatically.

Why Try It?

The main benefit is not that switching hands magically “activates” your brain.

Instead, it changes an ordinary routine into something that requires more concentration.

You have to think about:

  • How you hold the toothbrush
  • How much pressure you use
  • Where you move your hand
  • What direction you brush
  • How carefully you perform the task

It can be a fun mindfulness-style challenge in the morning.

However, brushing properly is more important than completing the challenge.

If your teeth are not being cleaned effectively with your opposite hand, switch back.

3. Use Cool Water for a Morning Refresh

Feeling sleepy when you first get up?

Try splashing comfortable cool water on your face.

The sudden temperature change can feel refreshing and may temporarily increase feelings of alertness.

Cold exposure has been associated with increased alertness in some research, although evidence for full-body cold-water exposure should not automatically be applied to a simple facial splash. Cleveland Clinic similarly notes that cold exposure may help people feel more alert while distinguishing a simple splash from stronger cold-water exposure.

How to Try It

Use cool—not painfully icy—water.

Splash your face gently several times.

Pat your skin dry with a clean towel.

Then continue your normal morning routine.

You can also simply wash your face with cool water if splashing feels uncomfortable.

Remember

Cold water is not a replacement for sufficient sleep.

If you constantly feel exhausted despite getting enough rest, it is worth discussing the problem with a healthcare professional rather than repeatedly trying to “hack” tiredness.

4. Try the Slow-Breathing Reset

Of all the body reset tricks in this article, controlled slow breathing has some of the strongest scientific support.

Breathing patterns interact with the autonomic nervous system, which helps regulate processes such as heart rate and the body’s stress response.

Reviews of slow-breathing research have reported changes in heart-rate variability, respiratory sinus arrhythmia, and other measures related to autonomic function. Some studies also report improvements in relaxation and reduced feelings of arousal or anxiety.

Try This Simple Version

Sit comfortably.

Relax your shoulders.

Breathe in gently through your nose.

Then breathe out slowly and comfortably.

Repeat for several breaths.

There is no need to force yourself to take extremely deep breaths.

The goal is comfortable, controlled breathing.

A Simple Pattern

You might try:

Breathe in for about 4 seconds.

Breathe out for about 5 or 6 seconds.

Repeat several times.

A slightly longer exhale feels relaxing for many people.

A recent review of slow breathing and heart-rate variability also highlighted breathing patterns involving longer exhalations, although research is still developing.

Stop if you become dizzy or uncomfortable.

5. Try a Gentle Ear Massage

After spending hours at a desk or looking at screens, a quick self-massage can simply feel pleasant.

Using clean hands, gently massage the outside of your ears.

Start near the top and move downward.

You can also gently massage the area immediately around the ears.

Continue for approximately 20 to 30 seconds.

What Does It Do?

The safest reason to recommend this habit is simple:

It may feel relaxing.

Avoid claims that rubbing your ears will dramatically boost circulation, detox your body, balance hormones, or treat medical conditions.

Those claims require much stronger evidence.

Think of an ear massage as a short self-care break rather than a medical treatment.

A 2-Minute Body Reset Routine

You can also combine several of these body reset tricks into one short routine.

First 30 Seconds

Put your phone down and close your eyes.

Relax your jaw and shoulders.

Next 30 Seconds

Take several slow, comfortable breaths.

Keep your exhale slightly longer than your inhale if that feels natural.

Next 30 Seconds

Splash cool water on your face or gently wash your face.

Final 30 Seconds

Massage your ears, temples, or shoulders gently.

Then return to your day.

The goal is not to create a magical biological reset.

The goal is simply to interrupt a stressful or tiring moment with a short period of intentional self-care.

When These Tricks May Be Most Useful

You could try a short reset:

  • After working at a computer for several hours
  • During a stressful afternoon
  • Before beginning an important task
  • After scrolling on your phone for too long
  • During your morning routine
  • Before your evening wind-down routine
  • Whenever you need a brief mental break

Consistency can be more valuable than trying to make any one wellness trick perfect.

What These Tricks Cannot Do

Social media wellness videos often turn simple habits into dramatic medical claims.

You may see statements such as:

“Do this for 10 seconds to instantly stop anxiety.”

“This pressure point resets your nervous system.”

“This trick knocks you out in five minutes.”

“This activates your brain instantly.”

Those statements should be treated cautiously.

Slow breathing, relaxation, and other simple behaviors can influence how you feel, but they are not guaranteed treatments for medical conditions.

Breathing research is promising, but researchers also note that more evidence is needed to fully understand how different techniques should be used in different health conditions.

How to Make Your Daily Reset More Effective

Simple habits work best when they support the basics rather than replace them.

Get Enough Sleep

A cold-water splash can make you feel refreshed temporarily, but it cannot replace healthy sleep.

Drink Enough Water

Dehydration can contribute to tiredness and difficulty concentrating.

Move Regularly

If you have been sitting for a long time, stand up and walk for a few minutes.

Step Away From Screens

Taking occasional screen breaks can help you mentally disconnect from constant notifications and information.

Slow Your Breathing

If you are feeling tense, controlled breathing is one of the simplest techniques you can practice almost anywhere.

A systematic review of breathing practices suggests that regulated breathing techniques may support stress and anxiety reduction through effects involving the autonomic nervous system, although breathing exercises should not be considered a substitute for professional treatment when it is needed.

Frequently Asked Questions

Do body reset tricks really work?

It depends on what you mean by “work.”

Simple actions such as slow breathing or taking a sensory break may help you feel calmer or more refreshed.

However, there is no literal reset button that instantly changes every system in your body.

Can slow breathing help with stress?

Research suggests that controlled slow breathing can affect autonomic processes and may promote relaxation

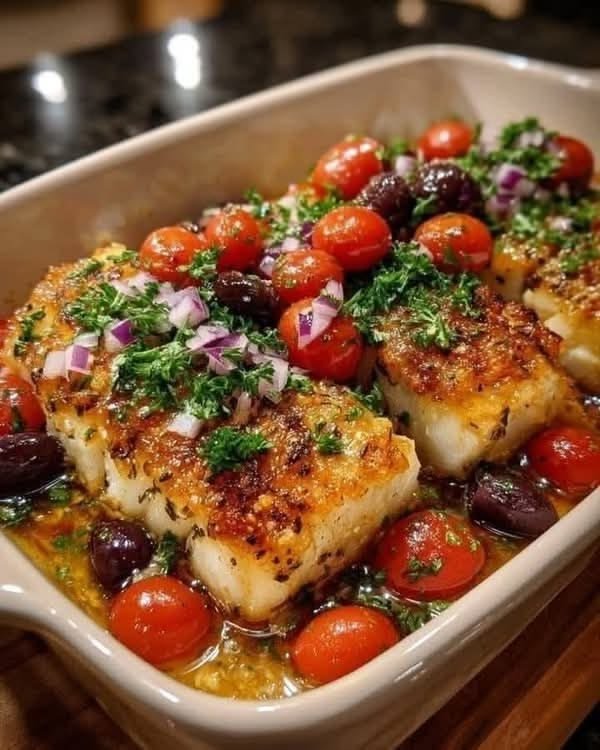
Mediterranean Baked Cod with Tomato & Olive Relish

Mediterranean Baked Cod with Tomato & Olive Relish

Description

Mediterranean Baked Cod with Tomato & Olive Relish is a fresh, colorful, and incredibly flavorful seafood dinner that brings together tender baked cod, juicy tomatoes, briny olives, garlic, lemon, herbs, and extra-virgin olive oil. The cod is baked until perfectly flaky while the tomato and olive relish creates a bright, savory topping that keeps every bite moist and flavorful.

This recipe is inspired by the simple cooking style of the Mediterranean, where fresh ingredients do most of the work. There is no heavy cream or complicated sauce. Instead, the combination of ripe tomatoes, Kalamata olives, garlic, lemon, oregano, parsley, and olive oil creates a naturally delicious topping for mild white fish.

The entire meal comes together quickly, making it perfect for busy weeknights, healthy family dinners, or an elegant meal for guests. Serve it with roasted potatoes, warm crusty bread, rice, couscous, quinoa, or a simple green salad for a complete Mediterranean-inspired dinner.

Recipe Details

Prep Time: 15 minutes
Cook Time: 15–20 minutes
Total Time: About 35 minutes
Servings: 4
Course: Main Course
Cuisine: Mediterranean
Difficulty: Easy

Ingredients

For the Cod

  • 4 cod fillets, about 5–6 ounces each
  • 2 tablespoons extra-virgin olive oil
  • 2 garlic cloves, finely minced
  • 1 teaspoon dried oregano
  • ½ teaspoon paprika
  • ½ teaspoon sea salt
  • ¼ teaspoon freshly ground black pepper
  • Zest of 1 lemon
  • 1 tablespoon fresh lemon juice

For the Tomato & Olive Relish

  • 1½ cups cherry tomatoes, halved
  • ½ cup Kalamata olives, pitted and sliced
  • ¼ cup finely diced red onion
  • 2 garlic cloves, minced
  • 2 tablespoons extra-virgin olive oil
  • 1 tablespoon fresh lemon juice
  • 1 teaspoon red wine vinegar
  • 1 teaspoon dried oregano
  • 2 tablespoons fresh parsley, chopped
  • 1 tablespoon fresh basil, chopped
  • ¼ teaspoon red pepper flakes, optional
  • Salt and black pepper to taste

Optional Garnishes

  • Fresh parsley
  • Fresh basil
  • Lemon wedges
  • Crumbled feta cheese
  • A drizzle of extra-virgin olive oil
  • Additional Kalamata olives

How to Make Mediterranean Baked Cod

Step 1: Prepare the Oven

Preheat your oven to 400°F (200°C). Lightly grease a medium baking dish or line a rimmed baking sheet with parchment paper.

Pat the cod fillets dry with paper towels. This simple step is important because removing excess moisture helps the fish roast instead of becoming watery.

Place the cod fillets in the prepared baking dish, leaving a little space between each piece.

Step 2: Season the Cod

In a small bowl, combine the olive oil, minced garlic, dried oregano, paprika, salt, black pepper, lemon zest, and lemon juice.

Mix until everything is well combined.

Brush the mixture generously over the top of each cod fillet. Try to distribute the garlic and herbs evenly so every piece gets plenty of Mediterranean flavor.

Let the fish sit for about 5 minutes while you prepare the relish.

Step 3: Make the Tomato & Olive Relish

Add the halved cherry tomatoes, sliced Kalamata olives, diced red onion, and minced garlic to a bowl.

Add the olive oil, lemon juice, red wine vinegar, oregano, parsley, basil, and red pepper flakes if using.

Season lightly with salt and freshly ground black pepper.

Gently toss everything together.

The relish should taste bright, fresh, slightly acidic, savory, and salty. Remember that Kalamata olives are naturally salty, so avoid adding too much salt before tasting.

For an even more flavorful relish, allow it to sit for 10–15 minutes before adding it to the fish. This gives the tomatoes time to release some of their juices and allows the flavors to blend.

Step 4: Add the Relish

Spoon about two-thirds of the tomato and olive relish around and over the cod fillets.

Keep some of the relish aside for serving.

The tomatoes will release their juices during baking, creating a delicious natural sauce around the fish. The olives add a deep savory flavor that balances the sweetness of the tomatoes.

Step 5: Bake the Cod

Place the baking dish in the preheated oven.

Bake for approximately 15–20 minutes, depending on the thickness of your cod fillets.

The fish is ready when it becomes opaque in the center and flakes easily when gently pressed with a fork. For food safety, the internal temperature should reach 145°F (63°C).

Avoid overbaking the cod. Because cod is a lean fish, it can become dry if cooked too long.

If your fillets are particularly thick, they may need a few additional minutes.

Step 6: Finish and Serve

Remove the baked cod from the oven and let it rest for 2–3 minutes.

Spoon the remaining fresh tomato and olive relish over the top.

Garnish with fresh parsley, basil, and lemon wedges.

For an extra Mediterranean touch, crumble a small amount of feta over the fish and finish with a light drizzle of extra-virgin olive oil.

Serve immediately while the cod is warm and flaky.

Why This Recipe Works

The beauty of this recipe is its balance of flavors and textures.

Cod has a naturally mild flavor, so it works beautifully with strong Mediterranean ingredients. The juicy tomatoes provide sweetness and acidity, while Kalamata olives add saltiness and richness.

Garlic creates depth, lemon brightens the entire dish, oregano provides an unmistakable Mediterranean aroma, and fresh parsley and basil bring a fresh herbal finish.

The olive oil ties everything together while helping the fish remain moist during baking.

Another advantage is the contrast between the warm baked cod and the fresh relish. The cooked tomatoes become tender and juicy, while the reserved relish maintains some of its fresh textur

Choosing the Best Cod

Fresh or frozen cod can be used for this recipe.

When buying fresh cod, look for fillets that are firm, moist, and have a clean, mild smell. The flesh should appear white or slightly translucent.

Frozen cod is also an excellent option. If using frozen fish, thaw it completely in the refrigerator before cooking and pat it thoroughly dry.

Cod loin pieces are particularly good because they are thicker and tend to remain juicy during baking.

Other white fish can also be substituted. Haddock, halibut, pollock, or sea bass can work well, although cooking times may vary depending on thickness.

Tips for Perfect Baked Cod

1. Pat the Fish Dry

This is one of the easiest ways to improve baked fish. Excess moisture can prevent proper roasting and dilute the seasoning.

2. Don’t Overbake

Cod cooks quickly. Start checking it around the 15-minute mark.

3. Use Good Olive Oil

Because olive oil is a major flavor component, use a good-quality extra-virgin olive oil when possible.

4. Don’t Over-Salt

Kalamata olives already provide plenty of saltiness. Taste the relish before adding additional salt.

5. Let the Relish Rest

Allowing the relish to sit for 10–15 minutes helps the flavors develop.

6. Use Fresh Lemon

Fresh lemon juice gives the dish a much brighter flavor than bottled lemon juice.

7. Add Feta Carefully

Feta is delicious with this recipe, but it can make the dish quite salty. Use a small amount.

Easy Recipe Variations

Mediterranean Feta Cod

Add crumbled feta cheese over the cod during the final 3–5 minutes of baking. The feta becomes warm and slightly softened while adding creamy, tangy flavor.

Spicy Mediterranean Cod

Increase the red pepper flakes or add a pinch of smoked paprika to the seasoning mixture.

For even more heat, add finely chopped Calabrian chilies to the relish.

Lemon Herb Cod

Skip the olives and increase the fresh parsley, basil, and lemon. Add a little fresh thyme for a lighter herb-forward version.

Mediterranean Cod with Capers

Add 1–2 tablespoons of capers to the tomato relish. Their briny flavor pairs beautifully with lemon and fish.

Greek-Style Cod

Add cucumber, parsley, feta, Kalamata olives, and oregano to the finished dish for a Greek-inspired variation.

Garlic Butter Cod

For a richer version, replace half of the olive oil with melted butter and add extra garlic.

Sun-Dried Tomato Cod

Add chopped sun-dried tomatoes to the relish for an intense, slightly sweet flavor.

What to Serve with Mediterranean Baked Cod

This recipe pairs with many simple side dishes.

Roasted Potatoes

Toss baby potatoes with olive oil, garlic, oregano, salt, and pepper and roast until golden.

Lemon Rice

Fluffy rice flavored with lemon zest, parsley, and olive oil makes an easy side.

Couscous

Couscous cooks quickly and absorbs the flavorful tomato juices from the fish.

Quinoa

For a higher-fiber option, serve the cod with fluffy quinoa and fresh herbs.

Greek Salad

A crisp salad made with cucumber, tomatoes, red onion, olives, feta, and oregano complements the warm cod beautifully.

Crusty Bread

Don’t forget the bread. The tomato, olive, garlic, and lemon juices left in the baking dish are perfect for soaking up with warm crusty bread.

Roasted Vegetables

Roasted zucchini, bell peppers, asparagus, broccoli, or green beans make excellent additions.

Make-Ahead Instructions

You can prepare the tomato and olive relish several hours ahead of time.

Combine the tomatoes, olives, onion, garlic, herbs, lemon juice, vinegar, and olive oil. Cover and refrigerate.

Take the relish out of the refrigerator about 15–20 minutes before cooking so it isn’t extremely cold when added to the fish.

The cod is best prepared just before baking.

For meal preparation, you can also portion the fish and prepare the relish separately. Keep both refrigerated until you’re ready to cook.

Storage

Store leftover baked cod in an airtight container in the refrigerator for up to 2–3 days.

Store extra relish separately when possible.

To reheat, place the cod in a covered baking dish and warm gently at 300°F (150°C) until heated through.

Avoid high heat because it can dry out the fish.

The leftovers can also be flaked and used in salads, wraps, grain bowls, or sandwiches.

Can You Freeze Baked Cod?

Yes, although the texture is best when the cod is eaten fresh.

Allow cooked cod to cool completely before placing it in a freezer-safe container. Freeze for up to 2 months for best quality.

The tomato and olive relish is better prepared fresh because tomatoes can become softer after freezing and thawing.

For the best texture, freeze the cooked cod separately and make a fresh relish when you’re ready to serve it.

Nutritional Information

The following nutrition estimate is approximate and will vary depending on the exact ingredients and serving sizes.

Calories: Approximately 320–360
Protein: 35–40g
Carbohydrates: 9–12g
Fat: 15–18g
Fiber: 2–3g
Sugar: 4–5g
Sodium: Approximately 550–750mg

Using less olive oil, fewer olives, or low-sodium ingredients can reduce the overall sodium and calorie content.

Potential Benefits

Cod is a lean source of protein and provides several important nutrients, including vitamin B12, selenium, and phosphorus.

Tomatoes provide antioxidants such as lycopene, while extra-virgin olive oil contributes monounsaturated fats.

Olives provide healthy fats and plant compounds, while fresh herbs, garlic, and lemon add flavor without requiring heavy sauces.

Because the recipe is baked rather than fried, it provides a lighter way to enjoy a satisfying seafood dinner.

For an even more balanced meal, serve the cod with plenty of vegetables and a moderate portion of whole grains such as quinoa or whole-grain couscous.

Frequently Asked Questions

Can I use frozen cod?

Yes. Thaw the cod completely in the refrigerator and pat it very dry before seasoning.

How do I know when cod is done?

The cod should be opaque and should flake easily with a fork. For food safety, cook it to an internal temperature of 145°F (63°C).

Can I use another fish?

Absolutely. Haddock, halibut, pollock, sea bass, or another firm white fish can work well.

Can I use regular black olives?

Yes. Kalamata olives provide a particularly Mediterranean flavor, but black olives can be substituted.

Can I make the relish ahead?

Yes. The relish can be prepared several hours in advance and stored covered in the refrigerator.

Should I cover the cod while baking?

Usually, no. Leaving the fish uncovered allows the top to roast gently and helps the tomatoes develop flavor.

Can I add feta?

Yes. Feta is an excellent addition. Sprinkle it over the finished fish or add it during the final few minutes of baking.

Can I make this recipe dairy-free?

Yes. Simply omit the optional feta. The dish is naturally flavorful without dairy.

Is this recipe gluten-free?

Yes, the cod and relish are naturally gluten-free. Just make sure any side dishes and packaged ingredients are certified gluten-free if necessary.

Can I make it spicy?

Definitely. Add red pepper flakes, chopped chili peppers, or a small amount of Calabrian chili paste.

Spinach, Mushroom & Cheese Crustless Quiche

Spinach, Mushroom & Cheese Crustless Quiche

Description

This Spinach, Mushroom & Cheese Crustless Quiche is a deliciously fluffy, savory egg bake loaded with tender spinach, earthy mushrooms, fresh green onions, colorful vegetables, and plenty of melted cheese. Baked until beautifully golden on top and soft and creamy in the center, this comforting dish is perfect for breakfast, brunch, lunch, or a light dinner.

The beauty of this recipe is that it delivers all the satisfying flavors of a traditional quiche without the pastry crust. That makes it easier to prepare and allows the vegetables, eggs, and cheese to become the stars of the dish. The top develops a gorgeous golden-brown finish while the inside stays tender and flavorful.

This recipe is also extremely flexible. You can use mushrooms, spinach, bell peppers, green onions, zucchini, tomatoes, or other vegetables you have available. Cheddar, mozzarella, Monterey Jack, Swiss, feta, or Parmesan can be used individually or combined for extra flavor.

It is an excellent make-ahead recipe because slices can be refrigerated and reheated throughout the week. Serve it warm with a fresh green salad, roasted vegetables, fruit, or toasted bread for a complete and satisfying meal.

Recipe Details

Prep Time: 20 minutes
Cook Time: 40–50 minutes
Total Time: About 1 hour
Servings: 8
Course: Breakfast, Brunch, Lunch or Dinner
Cuisine: American-inspired
Difficulty: Easy

Ingredients

For the Egg Mixture

  • 8 large eggs
  • 1 cup whole milk
  • ½ cup heavy cream
  • 1 cup shredded cheddar cheese
  • ½ cup shredded mozzarella cheese
  • ¼ cup grated Parmesan cheese
  • ½ teaspoon salt
  • ½ teaspoon black pepper
  • ½ teaspoon garlic powder
  • ½ teaspoon Italian seasoning
  • ¼ teaspoon paprika
  • ¼ teaspoon onion powder

For the Vegetables

  • 2 cups fresh spinach, roughly chopped
  • 8 ounces mushrooms, thinly sliced
  • 3 green onions, sliced
  • ½ small red bell pepper, diced
  • ½ small yellow or green bell pepper, diced
  • 2 garlic cloves, minced
  • 1 tablespoon olive oil
  • ½ teaspoon salt
  • ¼ teaspoon black pepper

For the Top

  • ½ cup shredded mozzarella or cheddar
  • 2 tablespoons grated Parmesan
  • 1 tablespoon chopped fresh parsley
  • Optional: extra sliced green onions

Choosing the Right Vegetables

The vegetables are an important part of this recipe because they provide flavor, color, texture, and moisture.

Fresh spinach works particularly well because it wilts quickly and blends beautifully with eggs and cheese. Mushrooms provide an earthy, savory flavor that makes the quiche feel hearty and substantial.

Green onions add a mild onion flavor without overpowering the other ingredients. Bell peppers bring natural sweetness and attractive color.

You can also add zucchini, broccoli, asparagus, tomatoes, or cooked onions.

However, vegetables contain water, and too much moisture can prevent the egg mixture from setting properly. For that reason, vegetables should be cooked before being added to the eggs.

Preparing the Vegetables

Begin by washing the spinach thoroughly and drying it as much as possible.

Clean the mushrooms and slice them thinly.

Dice the bell peppers into small, evenly sized pieces.

Slice the green onions and separate some of the green tops for garnish if desired.

Mince the garlic.

Heat 1 tablespoon of olive oil in a large skillet over medium-high heat.

Add the sliced mushrooms.

Cook for approximately 5–7 minutes, stirring occasionally.

At first, the mushrooms will release quite a bit of moisture. Continue cooking until most of the liquid evaporates and the mushrooms begin to turn golden.

This step is important because it concentrates their flavor and prevents excess moisture from ending up in the quiche.

Add the diced bell peppers and cook for another 2–3 minutes.

Add the minced garlic and cook for about 30 seconds.

Finally, add the chopped spinach.

Cook for 1–2 minutes, stirring frequently, until the spinach wilts.

Season lightly with salt and black pepper.

Remove the skillet from the heat.

If the vegetable mixture looks particularly moist, transfer it to a plate lined with paper towels and allow it to cool slightly

Why Cooking the Vegetables First Matters

It may be tempting to add raw vegetables directly to the egg mixture, but cooking them first produces a much better result.

Mushrooms release water as they cook. Spinach also contains a considerable amount of moisture. Bell peppers and onions contribute additional liquid.

If all of these vegetables are added raw, that moisture can collect inside the baking dish and create a watery quiche.

Sautéing the vegetables first removes excess moisture and gives them a deeper, more concentrated flavor.

It also ensures that the vegetables become perfectly tender by the time the eggs are fully cooked.

Preparing the Egg Mixture

While the vegetables cool slightly, preheat your oven to 375°F (190°C).

Lightly grease a deep 9-inch pie dish, 10-inch quiche dish, or similar baking dish with butter or nonstick cooking spray.

Crack the eggs into a large mixing bowl.

Add the whole milk and heavy cream.

Whisk until the eggs and dairy are fully combined.

Add salt, black pepper, garlic powder, Italian seasoning, paprika, and onion powder.

Whisk again.

Add 1 cup shredded cheddar, ½ cup mozzarella, and ¼ cup Parmesan.

Stir gently to distribute the cheese evenly.

The mixture should look creamy and well combined.

For an even richer quiche, you can replace some of the milk with additional cream.

For a lighter version, use all milk instead of cream.

Combining the Filling

Allow the cooked vegetables to cool for several minutes.

This is important because adding extremely hot vegetables directly to the eggs can begin cooking the egg mixture prematurely.

Add the sautéed mushrooms, spinach, peppers, garlic, and green onions to the egg mixture.

Stir gently until the vegetables are evenly distributed.

At this stage, taste a tiny amount of the mixture if desired and adjust the seasoning.

Remember that the cheese will add additional saltiness, so avoid oversaltin

Preparing the Baking Dish

Grease the baking dish thoroughly.

For an especially easy cleanup, you can also line the bottom with parchment paper, although this is optional.

Pour the egg and vegetable mixture into the prepared dish.

Use a spatula to distribute the vegetables evenly.

Sprinkle the remaining mozzarella or cheddar over the surface.

Finish with the grated Parmesan.

The cheese topping is what helps create the beautiful golden crust seen on top of the baked dish.

Baking the Quiche

Place the baking dish in the center of the preheated oven.

Bake uncovered for approximately 40–50 minutes.

The exact cooking time will depend on the depth and size of your baking dish.

The quiche is ready when the edges are firm, the center is mostly set, and the top is golden brown.

A slight movement in the center is normal when the dish first comes out of the oven. It should not look liquid or excessively loose.

If the top begins browning too quickly while the center still needs more time, loosely cover the dish with aluminum foil.

Continue baking until fully set.

For food safety, the center should reach approximately 160°F (71°C).

Resting the Quiche

Do not slice the quiche immediately after removing it from the oven.

Allow it to rest for approximately 10–15 minutes.

During this time, the eggs will finish setting and the melted cheese will stabilize.

Resting also makes it much easier to cut clean, attractive slices.

Sprinkle the top with fresh parsley and reserved green onion before serving.

Tips for the Perfect Crustless Quiche

1. Cook the Mushrooms Properly

Don’t rush the mushrooms.

Allow them enough time to release their moisture and become lightly browned. This creates a richer flavor and helps prevent a watery quiche.

2. Squeeze Wet Spinach

If you use frozen spinach instead of fresh, thaw it completely and squeeze out as much liquid as possible.

Excess water is one of the most common causes of watery egg bakes.

3. Don’t Overfill the Dish

Leave a little room at the top of the baking dish because the eggs will puff slightly during baking.

4. Use Good-Quality Cheese

Freshly shredded cheese generally melts more smoothly than packaged pre-shredded cheese.

5. Don’t Overbake

Overbaking can cause the eggs to become rubbery.

Remove the quiche when the center is just set.

6. Let It Rest

A short resting period makes a big difference in texture.

Cheese Variations

This recipe works with many different cheeses.

Cheddar

Sharp cheddar gives the quiche a classic savory flavor and beautiful color.

Mozzarella

Mozzarella creates a soft, stretchy texture and mild flavor.

Swiss Cheese

Swiss cheese adds a slightly nutty flavor that pairs especially well with mushrooms.

Feta

Feta gives the recipe a salty Mediterranean-style flavor.

Goat Cheese

Soft goat cheese creates a creamy, tangy filling.

Monterey Jack

Monterey Jack melts beautifully and creates a mild, creamy flavor.

Parmesan

Parmesan adds concentrated salty, nutty flavor and helps the top brown beautifully.

For the best results, combine two or three cheeses.

Vegetable Variations

One of the best things about this recipe is how easily it can be customized.

Try adding:

  • Zucchini
  • Broccoli
  • Asparagus
  • Roasted red peppers
  • Cherry tomatoes
  • Caramelized onions
  • Corn
  • Kale
  • Artichoke hearts
  • Sun-dried tomatoes

If using tomatoes, remove excess seeds and moisture when possible.

If using broccoli or asparagus, lightly steam or sauté them before adding them to the egg mixture.

Protein Variations

The recipe is delicious as a vegetarian dish, but you can also add cooked protein.

Bacon

Cooked, crumbled bacon adds smoky, salty flavor.

Sausage

Cooked breakfast sausage creates a hearty breakfast casserole.

Ham

Diced cooked ham works particularly well with spinach and cheese.

Chicken

Chopped cooked chicken transforms the dish into a satisfying lunch or dinner.

Turkey

Cooked turkey is especially useful after holidays when leftovers are available.

Always cook meat completely before adding it to the egg mixture.

Mediterranean-Inspired Version

For a Mediterranean twist, replace some of the cheddar with feta cheese.

Add chopped Kalamata olives, sun-dried tomatoes, spinach, red onion, and fresh oregano.

You can also add a small amount of crumbled feta to the top before baking.

Serve with a tomato cucumber salad dressed with lemon juice and olive oil.

The combination of spinach, mushrooms, feta, herbs, and vegetables makes a particularly flavorful version.

How to Serve

This crustless quiche is incredibly versatile.

For breakfast, serve it with fresh fruit, avocado, or roasted potatoes.

For brunch, pair it with a simple green salad and fresh berries.

For lunch, serve a warm slice alongside tomato cucumber salad.

For dinner, add roasted vegetables, steamed broccoli, or a crisp side salad.

You can also serve it with:

  • Avocado slices
  • Fresh tomatoes
  • Toasted bread
  • Roasted potatoes
  • Mixed green salad
  • Fresh fruit
  • Sautéed vegetables
  • Greek yogurt
  • Salsa

A small spoonful of sour cream or Greek yogurt on the side is also delicious.

Make-Ahead Instructions

This recipe is excellent for making ahead.

Prepare the entire quiche according to the recipe and allow it to cool completely.

Cover it tightly and refrigerate.

When ready to serve, gently reheat individual slices in the microwave or warm the entire dish in a 325°F oven.

If reheating the whole quiche, cover it loosely with foil to prevent the top from becoming too dark.

You can also prepare the vegetable mixture one day ahead and refrigerate it.

The next day, prepare the egg mixture, combine everything, and bake.

Meal Prep Instructions

Cut the cooled quiche into 8 portions.

Place individual slices into airtight containers.

Store them in the refrigerator and reheat portions as needed.

Pair a slice with fresh fruit for breakfast or a green salad for lunch.

The recipe works particularly well for busy mornings because it can be prepared once and enjoyed for several days.

Storage

Store leftover quiche in an airtight container in the refrigerator.

It will generally keep well for 3–4 days.

Allow the quiche to cool before refrigerating.

For best texture, reheat gently rather than at very high heat.

Microwave individual portions in short intervals until warmed through.

Alternatively, place a slice in a 325°F oven for approximately 10–15 minutes.

Can You Freeze Crustless Quiche?

Yes, this quiche can be frozen.

Allow it to cool completely before freezing.

You can freeze the entire quiche or cut it into individual portions.

Wrap each portion tightly in plastic wrap and place it inside a freezer-safe container or bag.

Freeze for up to approximately 2–3 months.

Thaw overnight in the refrigerator.

Reheat in a moderate oven until hot.

The texture may be slightly different after freezing because eggs and vegetables can release some moisture, but it remains a convenient make-ahead option.

Nutritional Information

Nutrition will vary depending on the cheese, milk, cream, and vegetables used.

Approximate nutrition per serving:

Calories: 300–350
Protein: 20–24g
Carbohydrates: 7–10g
Fiber: 1–2g
Fat: 21–25g
Saturated Fat: 9–12g
Sugar: 3–4g
Sodium: 500–700mg
Calcium: Approximately 250–350mg

Using reduced-fat cheese and milk can lower the calorie and fat content.

Adding more vegetables can increase the fiber and nutrient content without significantly increasing calories.

Benefits of This Recipe

Protein-Rich

Eggs and cheese provide protein that helps make this dish filling and satisfying.

Vegetable-Focused

Spinach, mushrooms, peppers, and green onions contribute flavor, color, fiber, vitamins, and minerals.

No Pastry Crust

Skipping the traditional crust makes this recipe easier to prepare and naturally reduces the amount of refined flour.

Versatile

You can easily change the vegetables, cheese, herbs, and protein according to what you have available.

Meal-Prep Friendly

The baked quiche stores and reheats well, making it practical for busy households.

Family-Friendly

The mild flavors and creamy cheesy texture make vegetables more appealing to both adults and children.

Frequently Asked Questions

Can I use frozen spinach?

Yes.

Thaw the spinach completely and squeeze out as much water as possible before using it.

Can I use only milk?

Yes.

Replace the heavy cream with additional whole milk for a lighter version.

The finished quiche will still be delicious but slightly less rich.

Why is my quiche watery?

The most common reason is excess moisture from vegetables.

Make sure mushrooms are cooked until their moisture evaporates and spinach is thoroughly drained.

Tomatoes and zucchini should also be cooked or drained before being added.

Can I make this without mushrooms?

Absolutely.

Simply replace the mushrooms with another vegetable such as zucchini, broccoli, peppers, or additional spinach.

Can I add meat?

Yes.

Cooked bacon, sausage, ham, chicken, or turkey can be added.

Can I use cottage cheese?

Yes.

Cottage cheese can make the filling extra creamy and add protein.

Blend it slightly if you prefer a smoother texture.

Can I use a different baking dish?

Yes.

A 9-inch pie dish, 10-inch quiche dish, square baking dish, or similar oven-safe dish can work.

Remember that deeper dishes may require additional baking time.

How do I know when it is done?

The edges should be firm, the center should be set but slightly tender, and the top should be golden.

A thermometer should register approximately 160°F in the center.

Greek Grilled Lemon Chicken Pita Wraps with Dill Yogurt Feta Sauce

Greek Grilled Lemon Chicken Pita Wraps with Dill Yogurt Feta Sauce

Description

Greek Grilled Lemon Chicken Pita Wraps with Dill Yogurt Feta Sauce are a fresh, flavorful, and satisfying Mediterranean-inspired meal made with juicy grilled chicken, warm pita bread, crisp vegetables, creamy feta, and a bright dill yogurt sauce. The chicken is marinated with lemon juice, olive oil, garlic, oregano, and Mediterranean herbs, then grilled until beautifully charred on the outside while remaining tender and juicy inside.

The creamy dill yogurt feta sauce brings everything together. Greek yogurt provides a tangy, creamy base, while feta adds a salty richness and fresh dill gives the sauce a bright herbal flavor. A little lemon juice and garlic balance the richness and make the sauce incredibly refreshing.

These pita wraps are perfect for lunch, dinner, meal prep, casual gatherings, or summer grilling. They are also easy to customize with cucumber, tomatoes, red onion, lettuce, olives, roasted peppers, or fresh herbs.

Instead of relying on heavy sauces or complicated ingredients, this recipe uses simple Mediterranean flavors to create a colorful meal that feels fresh and homemade. The combination of warm grilled chicken, cool creamy sauce, crunchy vegetables, and soft pita makes every bite satisfying.

Recipe Details

Prep Time: 25 minutes
Marinating Time: 30 minutes to 4 hours
Cook Time: 12–15 minutes
Total Time: About 1 hour, excluding longer marinating time
Servings: 6 large pita wraps
Course: Lunch or Dinner
Cuisine: Greek/Mediterranean-inspired
Difficulty: Easy

Ingredients

For the Lemon Chicken

  • 2 pounds boneless, skinless chicken breasts or thighs
  • 3 tablespoons extra-virgin olive oil
  • 3 tablespoons fresh lemon juice
  • 1 tablespoon lemon zest
  • 4 garlic cloves, minced
  • 2 teaspoons dried oregano
  • 1 teaspoon dried thyme
  • 1 teaspoon paprika
  • 1 teaspoon salt
  • ½ teaspoon freshly ground black pepper
  • ½ teaspoon onion powder
  • ¼ teaspoon red pepper flakes, optional

For the Dill Yogurt Feta Sauce

  • 1 cup plain Greek yogurt
  • ½ cup crumbled feta cheese
  • 2 tablespoons fresh dill, finely chopped
  • 1 tablespoon fresh lemon juice
  • 1 small garlic clove, finely grated
  • 1 tablespoon extra-virgin olive oil
  • 1–2 tablespoons water, as needed
  • ¼ teaspoon salt
  • ¼ teaspoon black pepper

For the Wraps

  • 6 pita breads or Greek flatbreads
  • 2 cups shredded romaine lettuce
  • 1 large cucumber, diced
  • 1½ cups cherry tomatoes, halved
  • ½ small red onion, thinly sliced
  • ½ cup crumbled feta cheese
  • ½ cup Kalamata olives, optional
  • Fresh dill or parsley, for garnish
  • Lemon wedges, for serving

Preparing the Chicken

The chicken is the heart of these pita wraps, so taking a little extra time with the marinade makes a noticeable difference.

If using chicken breasts, place each breast on a cutting board and gently pound it to an even thickness. This helps the chicken cook evenly and prevents thinner sections from drying out before the thickest part is fully cooked.

Chicken thighs can be used without pounding, although trimming away large pieces of excess fat is recommended.

In a large bowl, combine olive oil, fresh lemon juice, lemon zest, minced garlic, oregano, thyme, paprika, salt, black pepper, onion powder, and optional red pepper flakes.

Whisk everything together until evenly combined.

Add the chicken and turn each piece several times so the marinade completely coats the surface.

Cover the bowl and refrigerate for at least 30 minutes.

For deeper flavor, marinate the chicken for 2–4 hours.

Avoid marinating chicken in a highly acidic lemon mixture for excessively long periods because the texture can become less pleasant. A few hours is plenty for this recipe.

Why Lemon and Herbs Work So Well

Greek-style cooking relies on simple ingredients that complement rather than overpower one another.

Lemon adds acidity and brightness. Olive oil carries the flavors of the herbs and helps the chicken remain juicy during grilling. Garlic provides savory depth, while oregano gives the chicken its unmistakable Mediterranean character.

Paprika adds subtle warmth and helps the chicken develop an attractive golden-brown color.

The combination creates a marinade that is fresh, aromatic, savory, and slightly tangy

Making the Dill Yogurt Feta Sauce

While the chicken marinates, prepare the sauce.

Add Greek yogurt to a medium bowl.

Stir in the crumbled feta, fresh dill, lemon juice, grated garlic, olive oil, salt, and black pepper.

Mix thoroughly until the feta is evenly distributed.

For a smoother sauce, mash some of the feta into the yogurt with the back of a spoon.

If the sauce is too thick for spreading, add 1 tablespoon of water and stir. Add another tablespoon if necessary until the sauce reaches a creamy, spreadable consistency.

Taste and adjust the seasoning.

If you want more brightness, add another squeeze of lemon juice.

If you prefer a stronger feta flavor, add another tablespoon or two of crumbled feta.

Cover and refrigerate the sauce until ready to assemble the wraps.

Chilling the sauce for at least 15–20 minutes allows the garlic, dill, lemon, and feta flavors to blend.

Preparing the Vegetables

Fresh vegetables provide the crunch and freshness that balance the warm grilled chicken.

Wash and dry the lettuce, cucumber, and tomatoes thoroughly.

Shred the romaine into thin strips.

Dice the cucumber into small pieces.

Halve the cherry tomatoes.

Thinly slice the red onion.

If you find raw red onion too strong, place the slices in cold water for 5–10 minutes, then drain and pat dry. This softens the sharpness while keeping the onion crisp.

Keep all the vegetables refrigerated until you’re ready to assemble the wraps.

Grilling the Chicken

Preheat a grill or grill pan over medium-high heat.

Lightly oil the grill grates if necessary to prevent sticking.

Remove the chicken from the marinade and allow excess marinade to drip off.

Place the chicken on the hot grill.

Cook for approximately 5–7 minutes per side, depending on thickness.

The chicken should develop attractive grill marks and a lightly charred exterior.

The most reliable way to check doneness is with an instant-read thermometer. The thickest part of the chicken should reach 165°F (74°C).

Do not rely solely on cooking time because chicken pieces vary in size and thickness.

Once cooked, transfer the chicken to a clean cutting board.

Allow it to rest for 5–10 minutes before slicing.

Resting allows the juices to redistribute throughout the meat, resulting in more tender chicken.

Slice the chicken into thin strips or bite-sized pieces.

Warming the Pita Bread

Warm pita bread makes these wraps much easier to fold and significantly improves the eating experience.

You can warm pita in a dry skillet over medium heat for approximately 20–30 seconds per side.

Alternatively, wrap several pita breads in foil and place them in a 300°F oven for about 5–8 minutes.

You can also microwave individual pita breads for approximately 10–15 seconds.

The pita should be warm and flexible but not crispy.

If the pita becomes too crisp, it may crack when folded.

How to Assemble the Wraps

Place one warm pita on a clean work surface.

Spread 1–2 tablespoons of the dill yogurt feta sauce across the center of the pita.

Do not spread the sauce all the way to the edges because the filling will be folded inside.

Add a handful of shredded romaine lettuce.

Top with several slices of grilled lemon chicken.

Add diced cucumber, cherry tomatoes, and red onion.

Sprinkle with crumbled feta.

Add a few Kalamata olives if desired.

Finish with another spoonful of dill yogurt feta sauce.

For extra freshness, sprinkle the filling with chopped dill or parsley.

Squeeze a little fresh lemon juice over the top.

How to Fold a Pita Wrap

Fold the bottom portion of the pita upward slightly over the filling.

Fold the left and right sides toward the center.

Then roll the pita forward tightly, keeping the filling tucked inside.

For an easier serving option, wrap the bottom half in parchment paper or foil.

This helps keep the filling inside and makes the pita easier to eat.

Avoid overfilling the pita.

A wrap that is packed too tightly can split, while a properly balanced wrap will hold together beautifully.

Tips for Juicy Grilled Chicken

Use Chicken Thighs

Chicken thighs contain slightly more fat than chicken breasts, making them especially forgiving on the grill.

Pound Chicken Breasts Evenly

An even thickness helps prevent the thinner portions from becoming dry.

Don’t Skip the Resting Time

Resting the chicken after grilling is one of the easiest ways to improve texture.

Use a Thermometer

Chicken is safely cooked when the thickest portion reaches 165°F.

Don’t Overcook

Once the chicken reaches the proper temperature, remove it from the grill.

Overcooking is one of the main reasons grilled chicken becomes dry.

Tips for the Best Dill Yogurt Feta Sauce

Use thick Greek yogurt rather than regular yogurt.

Full-fat Greek yogurt creates the richest texture, but low-fat Greek yogurt can also work.

Fresh dill is highly recommended because it provides a much brighter flavor than dried dill.

If using dried dill, start with approximately 1 teaspoon and adjust to taste.

For extra creaminess, blend the sauce briefly with an immersion blender.

For a stronger garlic flavor, add another small clove.

For a milder sauce, use roasted garlic instead of raw garlic.

Recipe Variations

Greek Chicken and Hummus Wraps

Add 2–3 tablespoons of hummus to each pita before adding the chicken.

The creamy hummus pairs beautifully with the lemon chicken and vegetables.

Spicy Greek Chicken Wraps

Add extra red pepper flakes to the marinade and drizzle the finished wrap with your favorite hot sauce.

You can also add thinly sliced pickled jalapeños.

Mediterranean Chicken Wraps

Add roasted red peppers, Kalamata olives, artichoke hearts, and a few chopped sun-dried tomatoes.

Low-Carb Bowl

Skip the pita and serve the grilled chicken, vegetables, feta, and dill yogurt sauce over chopped romaine or cauliflower rice.

Chicken Souvlaki-Style Wraps

Cut the chicken into bite-sized pieces before marinating and thread them onto skewers for grilling.

Serve the cooked chicken inside warm pita with the same vegetables and sauce.

Vegetarian Version

Replace the chicken with grilled halloumi cheese, roasted chickpeas, or grilled vegetables.

Zucchini, eggplant, mushrooms, and bell peppers work particularly well.

Serving Suggestions

These pita wraps are filling enough to serve as a complete meal, but they also pair well with Mediterranean-inspired side dishes.

Serve them with:

  • Greek salad
  • Lemon roasted potatoes
  • Hummus
  • Tzatziki
  • Marinated olives
  • Grilled vegetables
  • Cucumber tomato salad
  • Roasted chickpeas
  • Lentil salad
  • Fresh fruit

For a casual dinner, create a Mediterranean wrap bar.

Arrange the warm pita, sliced grilled chicken, vegetables, feta, olives, dill yogurt sauce, hummus, and lemon wedges on a large serving platter.

Allow everyone to build their own wrap.

This is especially convenient when serving guests because people can customize their meal.

Make-Ahead Instructions

Several components can be prepared in advance.

The chicken can be marinated up to 4 hours before grilling.

The dill yogurt feta sauce can be prepared up to 2 days in advance and stored in a sealed container in the refrigerator.

The vegetables can be washed and chopped several hours before serving.

The chicken can also be grilled ahead of time and refrigerated.

When ready to serve, slice the chicken and gently reheat it in a skillet or microwave.

For the freshest texture, assemble the pita wraps immediately before serving.

Meal Prep Instructions

These wraps are excellent for meal preparation.

Cook the chicken and allow it to cool.

Slice it into strips and divide it between meal-prep containers.

Store the vegetables separately when possible to keep them crisp.

Place the dill yogurt feta sauce in small sealed containers.

Keep pita bread wrapped separately.

When ready to eat, warm the pita and chicken, then assemble the wrap.

For best quality, consume prepared components within 3–4 days when stored properly in the refrigerator.

Storage

Store leftover grilled chicken in an airtight container in the refrigerator for up to 4 days.

Keep the dill yogurt feta sauce refrigerated in a sealed container.

Store chopped vegetables separately from the sauce and chicken whenever possible.

Fully assembled pita wraps are best eaten immediately because the vegetables and sauce can eventually make the pita soggy.

If you have leftover assembled wraps, wrap them tightly and refrigerate them, but consume them as soon as possible for the best texture.

Freezing the fully assembled wraps is not recommended because the yogurt sauce and fresh vegetables can change texture after freezing.

Nutritional Information

Nutrition will vary depending on the size of the pita, chicken cut, amount of feta, and type of Greek yogurt used.

Approximate nutrition per wrap:

Calories: 520–600
Protein: 45–50g
Carbohydrates: 38–45g
Fat: 22–27g
Fiber: 4–6g
Sugar: 5–7g
Calcium: Approximately 250–350mg
Sodium: Approximately 800–1,000mg

Using smaller pita breads, low-fat Greek yogurt, and less feta can reduce calories and fat.

For a lower-carbohydrate option, serve the chicken and toppings over salad greens instead of pita.

Benefits of This Recipe

High in Protein

Chicken and Greek yogurt make this meal naturally protein-rich and satisfying.

Provides Fresh Vegetables

Cucumber, tomatoes, lettuce, and onion add freshness, texture, vitamins, and minerals.

Uses Mediterranean Ingredients

Olive oil, lemon, herbs, yogurt, feta, vegetables, and lean protein create a balanced Mediterranean-inspired combination.

Customizable

The ingredients can easily be adjusted according to dietary preferences.

Great for Meal Prep

Chicken and sauce can be prepared in advance, making this recipe convenient for busy schedules.

Family-Friendly

The wrap format makes it easy for everyone to choose their favorite toppings.

Frequently Asked Questions

Can I use chicken thighs instead of breasts?

Yes. Chicken thighs are an excellent choice because they remain juicy and flavorful on the grill.

Cook them until the thickest part reaches 165°F.

Can I cook the chicken in a skillet?

Absolutely.

Heat a large skillet over medium-high heat and cook the marinated chicken for approximately 5–7 minutes per side, depending on thickness.

Can I bake the chicken?

Yes.

Place the marinated chicken on a lightly greased baking sheet and bake at 425°F for approximately 18–25 minutes, depending on thickness.

Always check the internal temperature.

Can I use regular yogurt?

Greek yogurt is preferred because it is thicker and creamier.

If using regular yogurt, the sauce may be thinner. Reduce the added water accordingly.

Can I prepare the sauce ahead?

Yes. The sauce can be prepared up to 2 days in advance and kept refrigerated.

In fact, allowing the sauce to rest can improve the flavor.

What can I use instead of feta?

You can use goat cheese or a mild crumbly cheese, although feta provides the most traditional Mediterranean flavor.

Can I make these wraps gluten-free?

Yes. Use certified gluten-free pita or gluten-free flatbread.

Alternatively, serve the ingredients as a salad bowl.

How can I make the wraps lower in calories?

Use lean chicken breast, low-fat Greek yogurt, smaller pita bread, and a moderate amount of feta.

Increase the amount of lettuce and cucumber for additional volume.

Can I make these vegetarian?

Yes. Replace the chicken with grilled halloumi, roasted chickpeas, grilled vegetables, or a combination of all three.

Common Mistakes to Avoid

One common mistake is marinating the chicken for too long in a strongly acidic lemon mixture. A few hours is enough to develop excellent flavor.

Another mistake is overcrowding the grill. Give the chicken enough space so it can brown properly.

Do not constantly flip the chicken. Let it cook undisturbed for several minutes so it can develop attractive grill marks.

Avoid cutting the chicken immediately after grilling. Resting is essential for juicy meat.

Another mistake is making the sauce too thin. Add water gradually rather than all at once.

Finally, don’t overfill the pita. A moderate amount of filling makes a much easier and cleaner wrap.


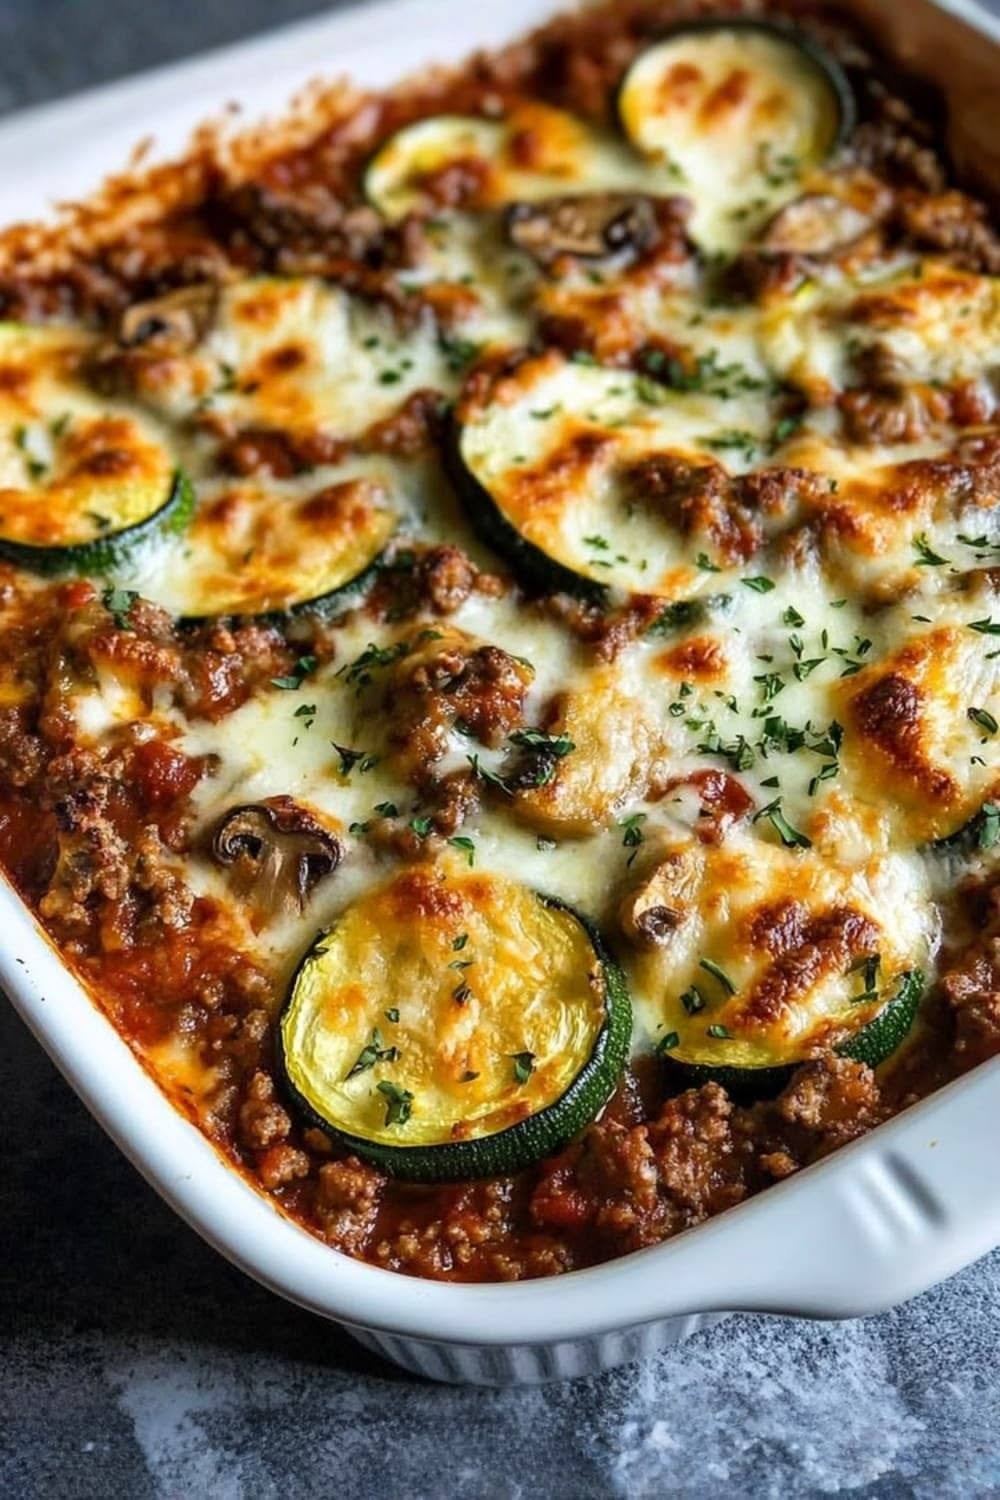
Low-Carb Zucchini, Mushroom, and Ground Meat Casserole

Low-Carb Zucchini, Mushroom, and Ground Meat Casserole

Description

Low-Carb Zucchini, Mushroom, and Ground Meat Casserole is a hearty, satisfying dinner that combines tender zucchini, savory mushrooms, seasoned ground meat, creamy sauce, and plenty of melted cheese. It is the kind of comforting casserole that feels indulgent while keeping carbohydrates relatively low, making it an excellent choice for anyone looking for a filling weeknight meal without relying on pasta, rice, potatoes, or breadcrumbs.

The combination of zucchini and mushrooms gives this casserole plenty of texture and flavor. The ground meat adds protein and richness, while garlic, onion, Italian seasoning, paprika, and Parmesan create a deeply savory flavor base. A generous layer of mozzarella melts beautifully over the top and becomes golden and bubbly during baking.

This casserole is also wonderfully flexible. You can use ground beef, turkey, chicken, or pork depending on your preference. Add spinach, bell peppers, or a little red pepper for additional vegetables and flavor. It can be prepared ahead of time, making it especially convenient for busy families.

Whether you’re following a low-carb lifestyle or simply want a delicious vegetable-forward dinner, this casserole is an easy recipe worth adding to your regular meal rotation.

Recipe Details

Prep Time: 25 minutes
Cook Time: 35–40 minutes
Total Time: About 1 hour
Servings: 6
Course: Main Course
Cuisine: American-inspired
Difficulty: Easy
Calories: Approximately 390–450 per serving, depending on ingredients

Ingredients

For the Casserole

  • 1½ pounds ground beef, turkey, or chicken
  • 3 medium zucchini, sliced into thin half-moons
  • 8 ounces mushrooms, cleaned and sliced
  • 1 small yellow onion, finely diced
  • 3 garlic cloves, minced
  • 1 tablespoon olive oil
  • 1 teaspoon Italian seasoning
  • 1 teaspoon paprika
  • ½ teaspoon dried oregano
  • ½ teaspoon salt
  • ½ teaspoon black pepper
  • ¼ teaspoon red pepper flakes, optional
  • ½ cup low-sodium beef or chicken broth
  • ½ cup cream cheese, softened
  • ½ cup sour cream
  • ½ cup grated Parmesan cheese
  • 1½ cups shredded mozzarella cheese
  • ¼ cup chopped fresh parsley

Optional Additions

  • 1 cup fresh spinach
  • ½ cup diced bell pepper
  • ¼ teaspoon chili flakes
  • ½ teaspoon onion powder
  • ¼ teaspoon garlic powder
  • Extra Parmesan for topping

Why This Recipe Works

A great low-carb casserole needs more than simply removing pasta or potatoes. It needs layers of flavor and enough richness to remain satisfying.

This recipe works because every ingredient contributes something important.

The zucchini provides a tender vegetable base with a mild flavor that absorbs the seasonings beautifully. Mushrooms add an earthy, meaty quality that makes the casserole feel substantial. Ground meat provides protein and savory richness, while cream cheese and sour cream create a creamy sauce without requiring a flour-based thickener.

Parmesan brings salty, nutty flavor, while mozzarella creates the stretchy, golden topping everyone loves.

The result is a casserole that is creamy, cheesy, savory, and filling without depending on high-carb ingredients.

How to Prepare the Zucchini

Zucchini contains a considerable amount of water, so preparing it correctly is one of the most important steps in this recipe.

Begin by washing and drying the zucchini thoroughly. Slice each zucchini into thin half-moons, approximately ¼ inch thick. Try to keep the slices relatively uniform so they cook evenly.

Place the sliced zucchini in a large bowl and sprinkle lightly with salt. Let it sit for about 10 minutes. You may notice water collecting in the bottom of the bowl.

Pat the zucchini very dry with paper towels or a clean kitchen towel.

This simple step helps prevent the casserole from becoming watery.

For an even firmer casserole, you can quickly sauté the zucchini before assembling the dish. Cook it in a large skillet over medium-high heat for about 3–4 minutes, just until it begins to soften. Avoid cooking it until completely tender because it will continue cooking in the oven.

Prepare the Mushrooms

Heat the olive oil in a large skillet over medium-high heat.

Add the sliced mushrooms in a relatively even layer. Let them cook for several minutes without stirring too frequently. This allows them to develop a golden-brown color.

Cook for approximately 5–7 minutes, or until most of their moisture has evaporated.

Add the diced onion and cook for another 3–4 minutes until softened.

Stir in the minced garlic and cook for approximately 30–60 seconds.

Be careful not to burn the garlic because burnt garlic can make the entire casserole taste bitter.

Transfer the mushroom mixture to a bowl and set aside.

Cook the Ground Meat

Using the same skillet, add the ground meat.

Cook over medium-high heat for approximately 7–9 minutes, breaking it apart with a wooden spoon or spatula as it cooks.

If you’re using ground beef, drain excess grease if necessary. If you’re using lean ground turkey or chicken, you may need another small drizzle of olive oil.

Season the meat with Italian seasoning, paprika, oregano, salt, black pepper, and optional red pepper flakes.

Stir well and cook for another 1–2 minutes.

The seasoning should coat the meat evenly and create a fragrant, savory mixture.

Make the Creamy Sauce

Lower the heat to medium-low.

Add the broth to the skillet with the cooked meat and stir to loosen any flavorful browned bits from the bottom of the pan.

Add the softened cream cheese and stir until it begins to melt.

Next, add the sour cream and Parmesan cheese.

Continue stirring gently until the ingredients form a smooth, creamy sauce.

Do not boil the mixture aggressively after adding the sour cream because excessive heat can cause the sauce to separate.

Taste the mixture and adjust the seasoning if needed.

If you want a slightly richer flavor, add another tablespoon or two of Parmesan cheese.

Assemble the Casserole

Preheat your oven to 375°F (190°C).

Lightly grease a 9×13-inch baking dish.

Arrange approximately half of the zucchini across the bottom of the dish.

Spread half of the mushroom mixture over the zucchini.

Add half of the seasoned creamy ground meat mixture.

Repeat the layers with the remaining zucchini, mushrooms, and meat mixture.

Finish by spreading the mixture evenly across the top.

Sprinkle the shredded mozzarella cheese generously over the entire surface.

For extra flavor, sprinkle a small amount of Parmesan over the mozzarella.

The cheese will melt into a golden, bubbling topping during baking.

Bake the Casserole

Place the baking dish in the preheated oven.

Bake uncovered for approximately 30–35 minutes.

The casserole should be hot and bubbling around the edges, while the cheese should be completely melted and lightly golden.

If you want a deeper golden crust, switch the oven to broil for the final 1–2 minutes.

Watch it carefully during broiling because cheese can go from golden to burnt very quickly.

Remove the casserole from the oven and let it rest for approximately 10 minutes before serving.

This resting time is important because it allows the creamy filling to settle and makes the casserole easier to portion.

Garnish with freshly chopped parsley before serving.

Tips for the Best Casserole

1. Remove Excess Zucchini Water

This is probably the most important tip.

If the zucchini releases too much water during baking, the casserole can become soupy. Salting, resting, and thoroughly drying the zucchini helps prevent this problem.

2. Brown the Mushrooms

Do not rush the mushrooms. Allowing their moisture to evaporate gives them a much richer flavor.

Golden-brown mushrooms are far more flavorful than mushrooms that have simply been steamed.

3. Use Freshly Shredded Cheese

Freshly shredded mozzarella usually melts more smoothly than pre-shredded cheese because many packaged shredded cheeses contain anti-caking ingredients.

4. Don’t Overcook the Zucchini

Zucchini should become tender but should not completely fall apart.

A short sauté before baking is enough.

5. Let It Rest

Allow the casserole to rest for about 10 minutes after baking. This makes it easier to cut and serve while allowing the sauce to thicken slightly.

6. Season in Layers

Season the vegetables, meat, and sauce separately rather than adding all the seasoning at the end. Layered seasoning creates much better flavor.

Variations

Low-Carb Italian Version

Add chopped fresh basil, oregano, extra Parmesan, and a few chopped sun-dried tomatoes.

For an even stronger Italian flavor, replace some of the ground beef with Italian sausage.

Spicy Version

Add red pepper flakes, diced jalapeño, or a pinch of cayenne pepper to the meat mixture.

You can also use pepper Jack cheese instead of mozzarella.

Chicken Version

Replace ground beef with ground chicken or turkey.

Because poultry can be leaner, add an extra tablespoon of olive oil or a little additional cream cheese to maintain richness.

Mediterranean Version

Use ground lamb or beef and season it with oregano, garlic, cumin, and a small amount of smoked paprika.

Add chopped olives and feta cheese before baking for a Mediterranean-inspired variation.

Vegetable-Loaded Version

Add spinach, bell peppers, broccoli, or cauliflower.

If adding extra vegetables, sauté them first to remove excess moisture.

Bacon Cheeseburger Version

Cook 4–5 slices of bacon until crisp and crumble them into the ground meat mixture.

Add cheddar cheese alongside the mozzarella for a delicious cheeseburger-inspired casserole.

What to Serve With It

Because this casserole already contains protein, vegetables, and cheese, it can easily stand alone as a complete meal.

For a fresh contrast, serve it with a simple green salad dressed with olive oil and lemon juice.

You can also serve it with:

  • Roasted asparagus
  • Steamed broccoli
  • Green beans
  • Cauliflower rice
  • Fresh cucumber salad
  • Avocado salad
  • Roasted Brussels sprouts
  • Garlic sautéed spinach

For those who are not strictly low-carb, crusty bread or a small portion of roasted potatoes can also be served alongside the casserole.

Make-Ahead Instructions

This casserole is excellent for meal preparation.

You can assemble the entire casserole up to 24 hours before baking.

Prepare the zucchini, mushrooms, meat, and creamy sauce according to the recipe. Assemble everything in the baking dish, but wait to add the final cheese topping if possible.

Cover tightly with foil or plastic wrap and refrigerate.

When ready to bake, remove the casserole from the refrigerator and allow it to sit at room temperature for approximately 20–30 minutes.

Add the mozzarella and bake at 375°F.

Because the casserole is starting cold, it may require an additional 5–10 minutes of baking time.

Always make sure the center is thoroughly hot before serving.

Storage

Allow leftover casserole to cool before transferring it to an airtight container.

Store in the refrigerator for up to 4 days.

Individual portions can be reheated in the microwave, but reheating in the oven usually produces better texture.

To reheat in the oven, place a portion in an oven-safe dish and cover loosely with foil. Heat at 350°F until warmed through.

If the top looks dry, add a small sprinkle of mozzarella before reheating.

Can You Freeze It?

Yes, but zucchini has a high water content, so freezing can slightly change the texture.

For best results, freeze individual portions in airtight freezer-safe containers.

Allow the casserole to cool completely before freezing.

It can generally be frozen for up to 2–3 months.

Thaw overnight in the refrigerator before reheating.

For the best texture, avoid repeatedly freezing and thawing the casserole.

Nutritional Information

The following values are estimates and will vary depending on the ground meat, cheese, and dairy products used.

Calories: Approximately 390–450
Protein: 30–35g
Carbohydrates: Approximately 10–13g
Fiber: 2–3g
Net Carbohydrates: Approximately 7–10g
Fat: 25–30g
Saturated Fat: 10–14g
Sodium: Approximately 650–850mg
Calcium: Approximately 250–350mg

For a lower-calorie version, use lean ground turkey, reduced-fat cheese, and light sour cream.

For an even lower-carbohydrate version, reduce the onion slightly and check the carbohydrate content of your dairy products.

Benefits of This Recipe

Protein-Rich

Ground meat, cheese, and dairy ingredients provide substantial protein, which can help make the meal satisfying.

Vegetable-Focused

Zucchini and mushrooms provide important nutrients while adding flavor, texture, and volume.

Lower in Carbohydrates

Instead of pasta, rice, or potatoes, this casserole uses zucchini and mushrooms as the primary vegetable base.

Easy Weeknight Dinner

Most of the preparation can be completed in one skillet before everything is transferred to the baking dish.

Family-Friendly

The creamy sauce and melted cheese make vegetables more appealing, especially for family members who may not normally choose zucchini or mushrooms.

Customizable

You can easily change the meat, vegetables, cheese, and seasonings to suit your preferences.

Frequently Asked Questions

Can I use frozen zucchini?

Fresh zucchini is recommended because frozen zucchini contains more water and can make the casserole watery.

If using frozen zucchini, thaw it completely and squeeze out as much liquid as possible before adding it.

Can I use ground turkey?

Absolutely. Ground turkey works very well and creates a lighter casserole.

Choose ground turkey with enough fat to keep the dish moist, or add a little extra olive oil.

Can I use cheddar instead of mozzarella?

Yes. Cheddar provides a stronger flavor and melts beautifully.

You can also combine cheddar and mozzarella for both flavor and stretchiness.

How do I prevent the casserole from becoming watery?

The key is controlling moisture.

Salt and drain the zucchini, pat it dry, brown the mushrooms thoroughly, and avoid adding excessive liquid to the sauce.

Letting the casserole rest after baking also helps.

Can I make this without cream cheese?

Yes.

You can replace cream cheese with additional sour cream, ricotta, or a little heavy cream combined with Parmesan.

The final texture will be slightly different but still delicious.

Can I add tomatoes?

Yes, but use them carefully because tomatoes contain additional moisture.

Cherry tomatoes work especially well. Roast or sauté them first to remove some of their moisture.

Can I make it spicy?

Definitely.

Add red pepper flakes, cayenne, diced jalapeño, or hot sauce to the meat mixture.

Pepper Jack cheese is also excellent for a spicy version.

Can I prepare it in advance?

Yes. The casserole can be assembled and refrigerated for up to 24 hours before baking.

Add the cheese topping shortly before baking for the best results.

How long do leftovers last?

Stored properly in the refrigerator, leftovers should be enjoyed within 4 days.

Always reheat leftovers thoroughly before serving.