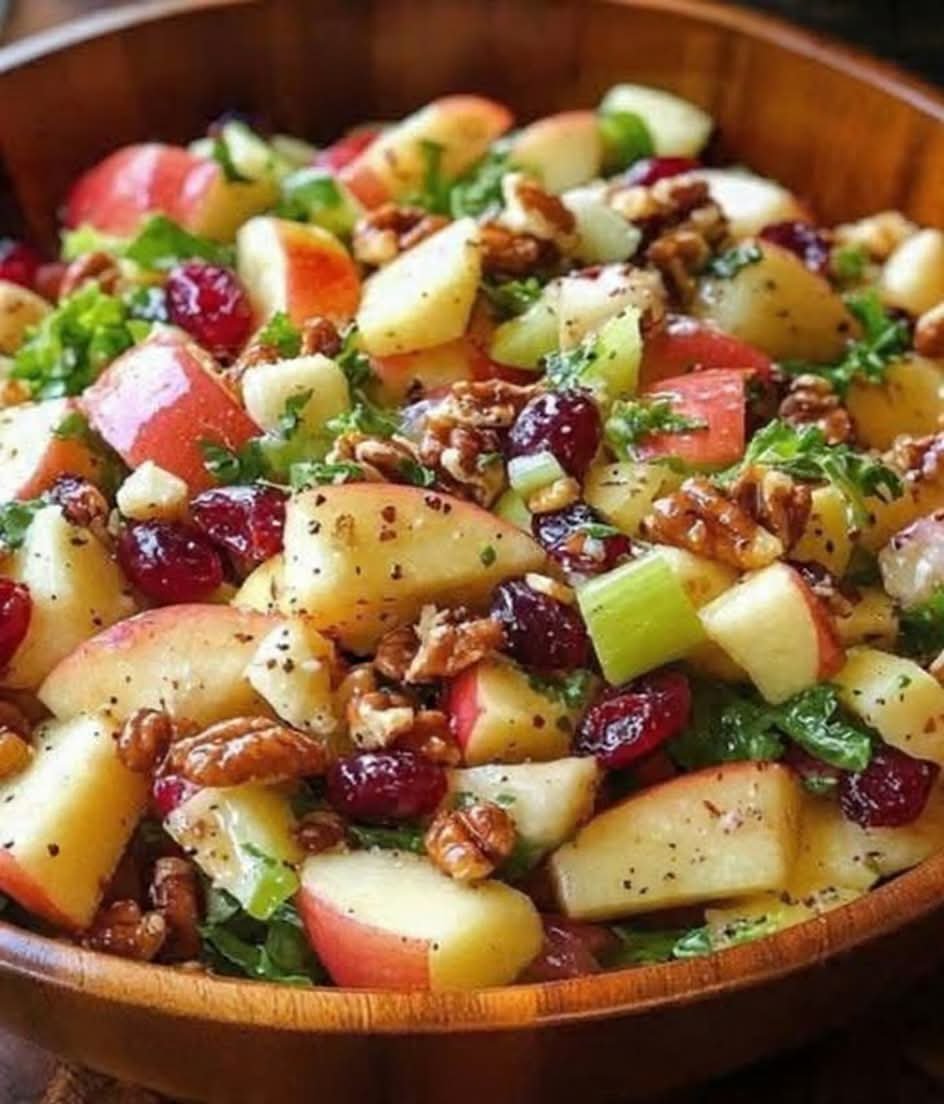
Crunchy Apple Cranberry Walnut Salad

 Crunchy Apple Cranberry Walnut Salad

sweet, tart, and crunchy. It’s great as a side or light lunch.

*Recipe – Serves 4-6*

*Ingredients:*

– *Apples*: 3 medium, diced. Honeycrisp or Fuji work well

– *Celery*: 2 stalks, diced

– *Dried cranberries*: ½ cup

– *Walnuts*: ½ cup, roughly chopped and toasted

– *Fresh parsley*: ¼ cup, chopped

– *Lemon juice*: 2 tbsp

– *Olive oil*: 3 tbsp

– *Honey*: 1 tbsp

– *Dijon mustard*: 1 tsp

– *Salt & pepper*: To taste

*Instructions:*

1. *Toast walnuts*: Dry toast in a skillet over medium heat 2-3 min until fragrant. Let cool.

2. *Prep fruit*: Dice apples and toss immediately with lemon juice to prevent browning.

3. *Make dressing*: Whisk olive oil, honey, Dijon mustard, salt, and pepper in a bowl.

4. *Combine*: In a large bowl, mix apples, celery, cranberries, walnuts, and parsley. Pour dressing over and toss.

5. *Serve*: Eat right away for max crunch, or chill 20 min if you want the flavors to meld.

*Tip*: Use a mix of red and green apples for color and flavor contrast. Toasting the walnuts makes a big difference, don’t skip it.
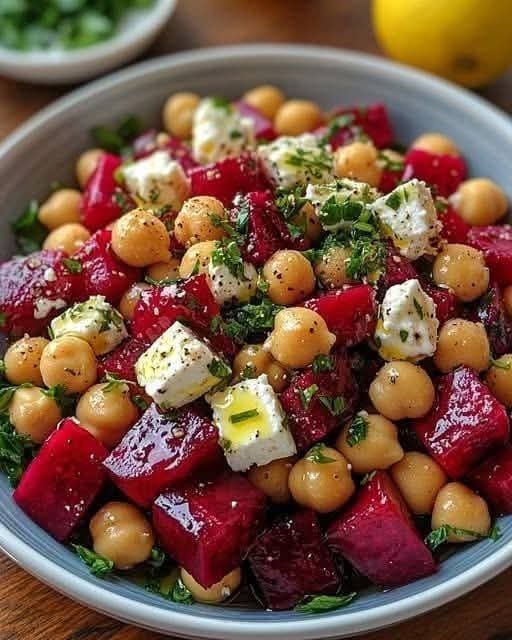



Roasted Beet and Chickpea Salad with Feta*.

Roasted Beet and Chickpea Salad with Feta

Earthy, tangy, and holds up well in the fridge.

*Recipe – Serves 3-4*

*Ingredients:*

– *Beets*: 3 medium, roasted and diced

– *Chickpeas*: 1 can, 15 oz, rinsed, drained, patted dry

– *Feta cheese*: 4 oz, cubed

– *Fresh parsley*: ¼ cup, chopped

– *Olive oil*: 3 tbsp

– *Lemon*: 1 large, juiced

– *Garlic*: 1 clove, minced

– *Salt & pepper*: To taste

*Instructions:*

1. *Roast beets*: Wrap whole beets in foil and roast at 400°F for 45-60 min until tender. Let cool, peel, and dice into 1-inch cubes. If you’re short on time, use pre-cooked beets from the store.

2. *Prep chickpeas*: Pat chickpeas dry so they soak up the dressing better. Toss with 1 tbsp olive oil, salt, and pepper.

3. *Make dressing*: Whisk remaining olive oil, lemon juice, garlic, salt, and pepper in a bowl.

4. *Assemble*: In a large bowl, combine beets, chickpeas, feta, and parsley. Pour dressing over and toss gently so the feta doesn’t break up too much.

5. *Rest*: Let it sit 10-15 min before serving so flavors blend.

*Tip*: Roast chickpeas 10 min in the oven at 400°F if you want them a bit crispy.

*Storage*: Keeps 3-4 days in the fridge. The beets will stain everything red, but it still tastes great.


Turkish Pogaca

Turkish Pogaca

soft, savory pastries usually stuffed with cheese and herbs. The golden tops come from an egg wash before baking.

Makes 12 pastries

*Dough:*

– *Flour*: 3 ½ cups

– *Yogurt*: 1 cup, plain

– *Vegetable oil*: ½ cup

– *Milk*: ½ cup, lukewarm

– *Egg*: 1, plus 1 egg yolk for brushing

– *Baking powder*: 2 tsp

– *Salt*: 1 tsp

– *Sugar*: 1 tsp

*Filling:*

– *Feta or beyaz peynir*: 1 ½ cups, crumbled

– *Parsley*: ½ cup, finely chopped

– *Optional*: 1 tbsp black cumin seeds or nigella seeds

*Instructions:*

1. *Make dough*: In a bowl mix yogurt, oil, milk, 1 egg, sugar, and salt. Add flour and baking powder gradually. Knead until soft and slightly sticky but not sticking to hands. Cover and rest 15 min.

2. *Make filling*: Mix crumbled cheese with parsley. Taste and adjust salt – feta is already salty.

3. *Shape*: Take a golf ball sized piece of dough. Flatten it, put 1 tbsp filling in center, then seal and shape into a ball or crescent. Place seam side down on a lined baking tray.

4. *Bake*: Brush tops with egg yolk mixed with 1 tsp milk. Sprinkle nigella seeds if using. Bake at 375°F for 20-25 min until golden brown.

5. *Serve*: Best warm when the cheese is melty.

*Tip*: Don’t overfill or they’ll burst open. The dough should be soft, not stiff – that’s what makes them fluffy inside.


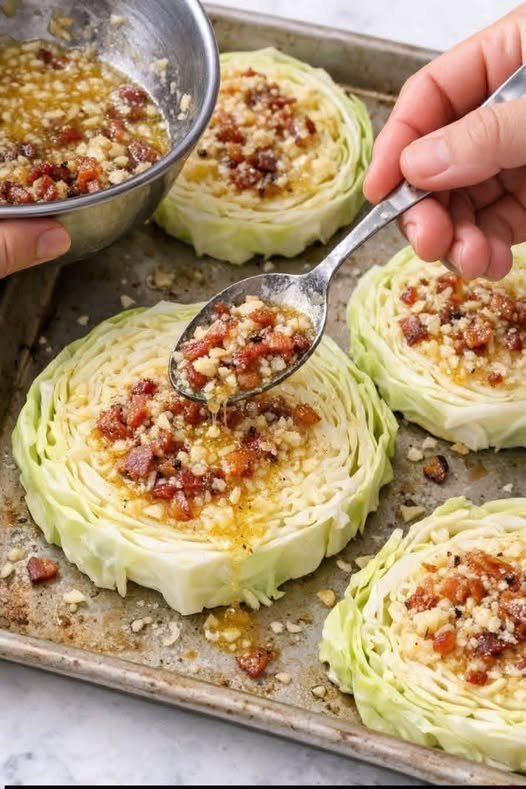
Garlic Bacon Roasted Cabbage Steaks

Garlic Bacon Roasted Cabbage Steaks

These savory roasted cabbage steaks are topped with crispy bacon,  garlic butter, and Parmesan cheese. The cabbage becomes tender in the center with delicious caramelized edges, making this an easy low-carb side dish or light main course.

Cheese

Discover more
salad
Cookware & Diningware
Slow Cooker

Description

Thick cabbage slices are roasted until golden and tender, then brushed with a rich mixture of garlic, crispy bacon, butter, and Parmesan. The result is a flavorful dish with smoky, buttery, and slightly sweet roasted cabbage flavor.

Preparation Time

  • Prep Time: 15 minutes
  • Cook Time: 35–40 minutes
  • Total Time: 50–55 minutes

Servings

  • Serves: 4–6 people

Ingredients

  • 1 large green cabbage
  • 6 slices bacon, diced
  • 4 tablespoons butter, melted
  • 4 cloves garlic, minced
  • 1/3 cup grated Parmesan cheese
  • 1 tablespoon olive oil
  • 1 teaspoon paprika
  • Salt, to taste
  • Black pepper, to taste
  • Fresh parsley for garnish (optional)

Instructions

Discover more
Dry Pasta & Noodles
Snacks
slow cooker

Step 1: Prepare the Cabbage

  1. Preheat oven to 400°F (200°C).
  2. Remove damaged outer cabbage leaves.
  3. Slice cabbage into 1-inch thick steaks.
  4. Arrange steaks on a parchment-lined baking sheet.
  5. Brush both sides lightly with olive oil.

Step 2: Cook the Bacon

  1. In a skillet over medium heat, cook diced bacon until crispy.
  2. Remove bacon and place on paper towels.
  3. Reserve 1 tablespoon bacon grease for extra flavor if desired.

Step 3: Make the Garlic Butter Topping

In a small bowl combine:

    • Melted butter
    • Garlic
    • Parmesan cheese
    • Bacon
    • Paprika
    • Bacon grease (optional)
Cheese

Discover more
Pasta
Slow Cookers
Herbs & Spices

Mix well.

Step 4: Roast

  1. Spoon mixture onto each cabbage steak.
  2. Season with salt and pepper.
  3. Roast for 30–40 minutes until cabbage is tender and edges are browned.

Step 5: Serve

  • Garnish with parsley.
  • Serve hot.

Recipe Notes

  • Keep the cabbage core intact so steaks stay together while roasting.
  • Thicker slices hold shape better.
  • Parmesan creates a crispy golden crust.
  • Bacon grease adds extra smoky flavor.

Tips for Best Results

Discover more
slow-cooked
pasta
Dairy & Eggs

1. Use Fresh Cabbage

Firm cabbage gives the best texture and cleaner slices.

2. Don’t Overcrowd

Leave space between steaks for caramelization.

3. Flip Halfway (Optional)

For even browning, carefully flip after 20 minutes.

4. Add Heat

Sprinkle red pepper flakes for spicy flavor.

5. Make It Vegetarian

Skip bacon and use smoked paprika instead.

Nutritional Information (Per Serving Approx.)

Nutrient Amount
Calories 220
Protein 8g
Carbohydrates 9g
Fiber 4g
Fat 17g
Saturated Fat 8g
Sodium 420mg

Health Benefits

Discover more
Salads
drink
bacon

Cabbage Benefits

  • Rich in vitamin C and K
  • High in antioxidants
  • Supports digestion with fiber
  • Low in calories and carbs

Garlic Benefits

  • Supports immune health
  • Contains natural anti-inflammatory compounds

Bacon & Parmesan

  • Add protein and savory flavor
  • Make the dish satisfying and hearty

Variations

Discover more
Beverages
Fruits & Vegetables
cheesy

Cheesy Version

Add mozzarella or cheddar during the last 10 minutes.

Spicy Version

Mix hot sauce into the butter mixture.

Keto-Friendly

Perfect low-carb side for keto meals.

Air Fryer Method

Cook at 375°F for 15–18 minutes.

Storage & Reheating

Refrigerator

Discover more
Food
muffins
Grains & Pasta

Store in airtight container for up to 3 days.

Reheating

  • Oven: 350°F for 10 minutes
  • Air fryer: 5 minutes
  • Microwave: 1–2 minutes

Frequently Asked Questions

Q1: Why are my cabbage steaks falling apart?

Keep part of the core attached when slicing.

Q2: Can I make this ahead?

Yes. Assemble ahead and roast when ready.

Q3: Can I use red cabbage?

Yes, though texture and sweetness differ slightly.

Q4: Is this recipe keto?

Yes, it is naturally low in carbohydrates.

Q5: What pairs well with cabbage steaks?

  • Grilled chicken
  • Steak
  • Roasted potatoes
  • Salmon

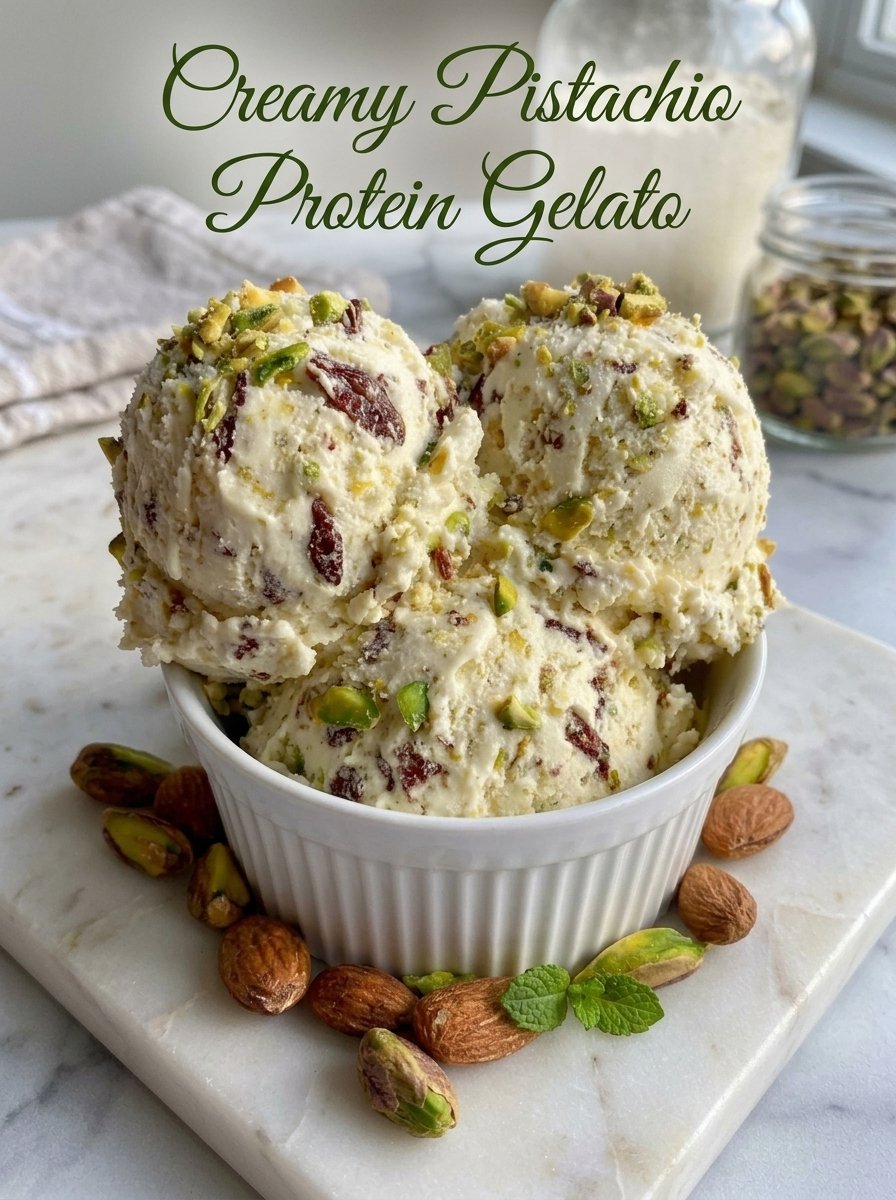
Creamy Pistachio Protein Gelato

Creamy Pistachio Protein Gelato

This creamy pistachio gelato is rich, nutty, high in protein, and incredibly refreshing 💚✨
Perfect for a healthy dessert without feeling heavy!

🛒 Ingredients

  • 2 cups Greek yogurt
  • 1 scoop vanilla protein powder
  • ½ cup pistachios (chopped)
  • 2 tbsp honey or maple syrup
  • ½ tsp vanilla extract
  • ¼ cup almond milk
  • Optional: chopped almonds for topping

👩‍🍳 Instructions

🥣 Step 1: Blend the Base

  • In a blender add:
    • Greek yogurt
    • Protein powder
    • Honey
    • Vanilla
    • Almond milk
  • Blend until smooth and creamy.

💚 Step 2: Add Pistachios

  • Stir in chopped pistachios gently.
  • Save a few for topping later.

❄️ Step 3: Freeze

  • Pour mixture into a freezer-safe container.
  • Freeze for 3–4 hours.
  • Stir once every hour for a smoother texture.

🍨 Step 4: Scoop & Serve

  • Let gelato sit for 5 minutes before scooping.
  • Top with extra pistachios and almonds 😍

💡 Tips

  • Use roasted pistachios for deeper flavor.
  • Add a few drops of pistachio extract for stronger taste.
  • Freeze overnight for firmer gelato texture.

🌟 Nutritional Benefits

  • High in protein 💪
  • Rich in healthy fats 🌰
  • Great energy-boosting dessert
  • Lower sugar than regular ice cream

❓Q/A

❓Can I make it dairy-free?

✅ Yes! Use dairy-free yogurt and plant protein powder.

❓How long does it last?

✅ Store in freezer for up to 1 week.

❓Can I use another nut?

✅ Yes! Almonds or cashews work well too.

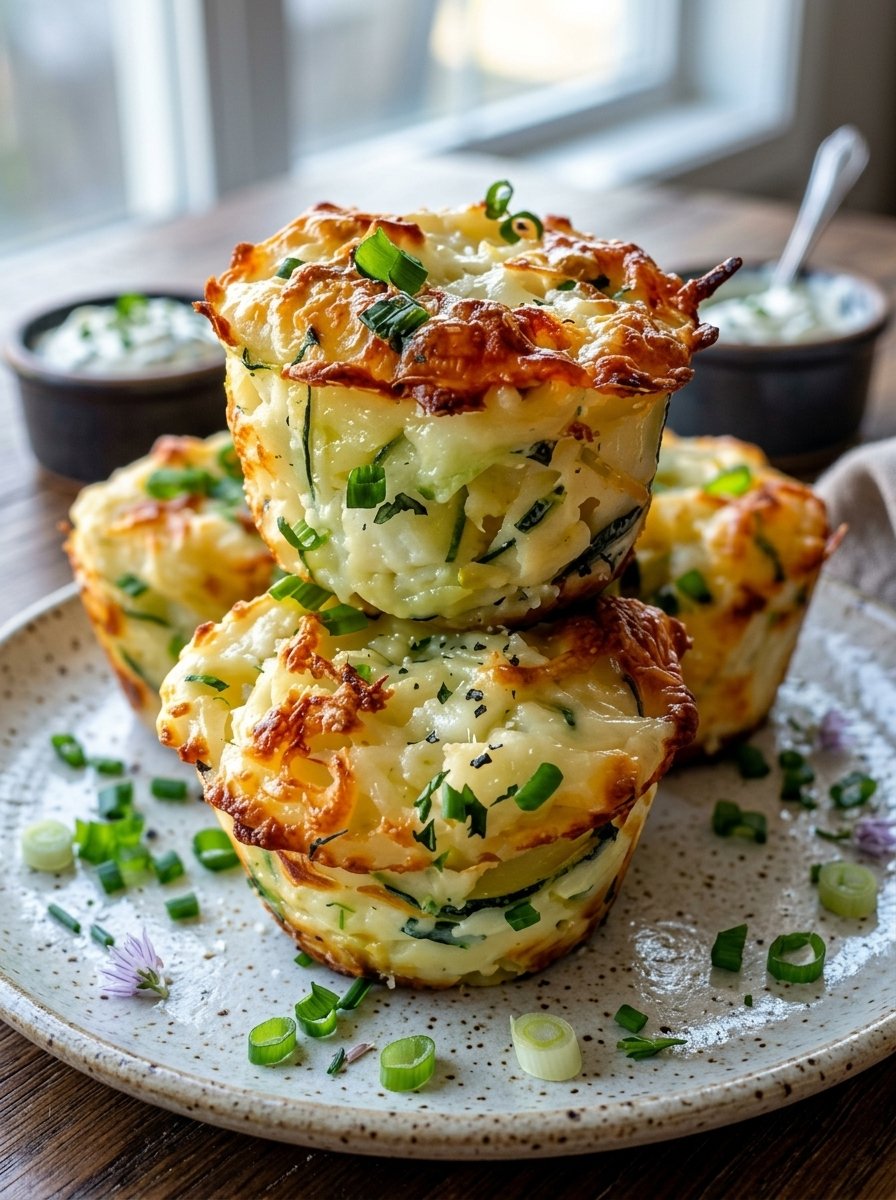
Crispy Cheesy Zucchini Cups

🧀 Crispy Cheesy Zucchini Cups

These golden zucchini cups are cheesy, creamy, and perfectly crispy around the edges 😍 A delicious low-carb snack, appetizer, or side dish that’s easy to make and packed with flavor!

🛒 Ingredients

  • 2 medium zucchini, grated 🥒
  • 1 cup shredded mozzarella cheese 🧀
  • ½ cup grated Parmesan cheese
  • 2 eggs 🥚
  • 2 cloves garlic, minced
  • 2 tbsp chopped green onions 🌿
  • ½ tsp Italian seasoning
  • Salt & black pepper to taste 🧂
  • Butter or oil for greasing muffin tin

👩‍🍳 Instructions

🥒 1. Prep the Zucchini

Grate the zucchini and squeeze out as much moisture as possible using a clean towel.

➡️ Removing excess water helps the cups become crispy instead of soggy.


🧀 2. Make the Mixture

In a bowl, combine:

  • Grated zucchini
  • Mozzarella cheese
  • Parmesan cheese
  • Eggs
  • Garlic
  • Green onions
  • Italian seasoning
  • Salt & pepper

Mix until fully combined.


🧁 3. Fill the Muffin Tin

Grease a muffin tin lightly with butter or oil.

Spoon the mixture evenly into each cup and gently press down.


🔥 4. Bake

Bake at 190°C (375°F) for 20–25 minutes or until golden brown and crispy on top.

✨ For extra crispiness, broil for 1–2 minutes at the end.


🍽️ 5. Serve

Let cool slightly before removing from the muffin tin.

Serve warm with sour cream, garlic yogurt dip, or marinara sauce 😋


💡 Tips for Best Results

✅ Squeeze zucchini very well
✅ Use freshly shredded cheese for better melting
✅ Don’t overfill muffin cups
✅ Add chili flakes for a spicy kick 🌶️


🌟 Variations

🥓 Loaded Version

Add cooked turkey bacon bits or sautéed onions.

🌶️ Spicy Cheesy Cups

Mix in jalapeños or red pepper flakes.

🧄 Garlic Herb Style

Add extra garlic and fresh parsley.


❓FAQ

Can I make them ahead?

Yes! Store in the fridge for up to 3 days and reheat in the oven or air fryer.

Can I freeze them?

Absolutely — freeze in an airtight container for up to 2 months.

Why are my zucchini cups watery?

The zucchini likely wasn’t drained enough before mixing.