No-Bake Coconut Truffles with Sweet Raspberry Centers

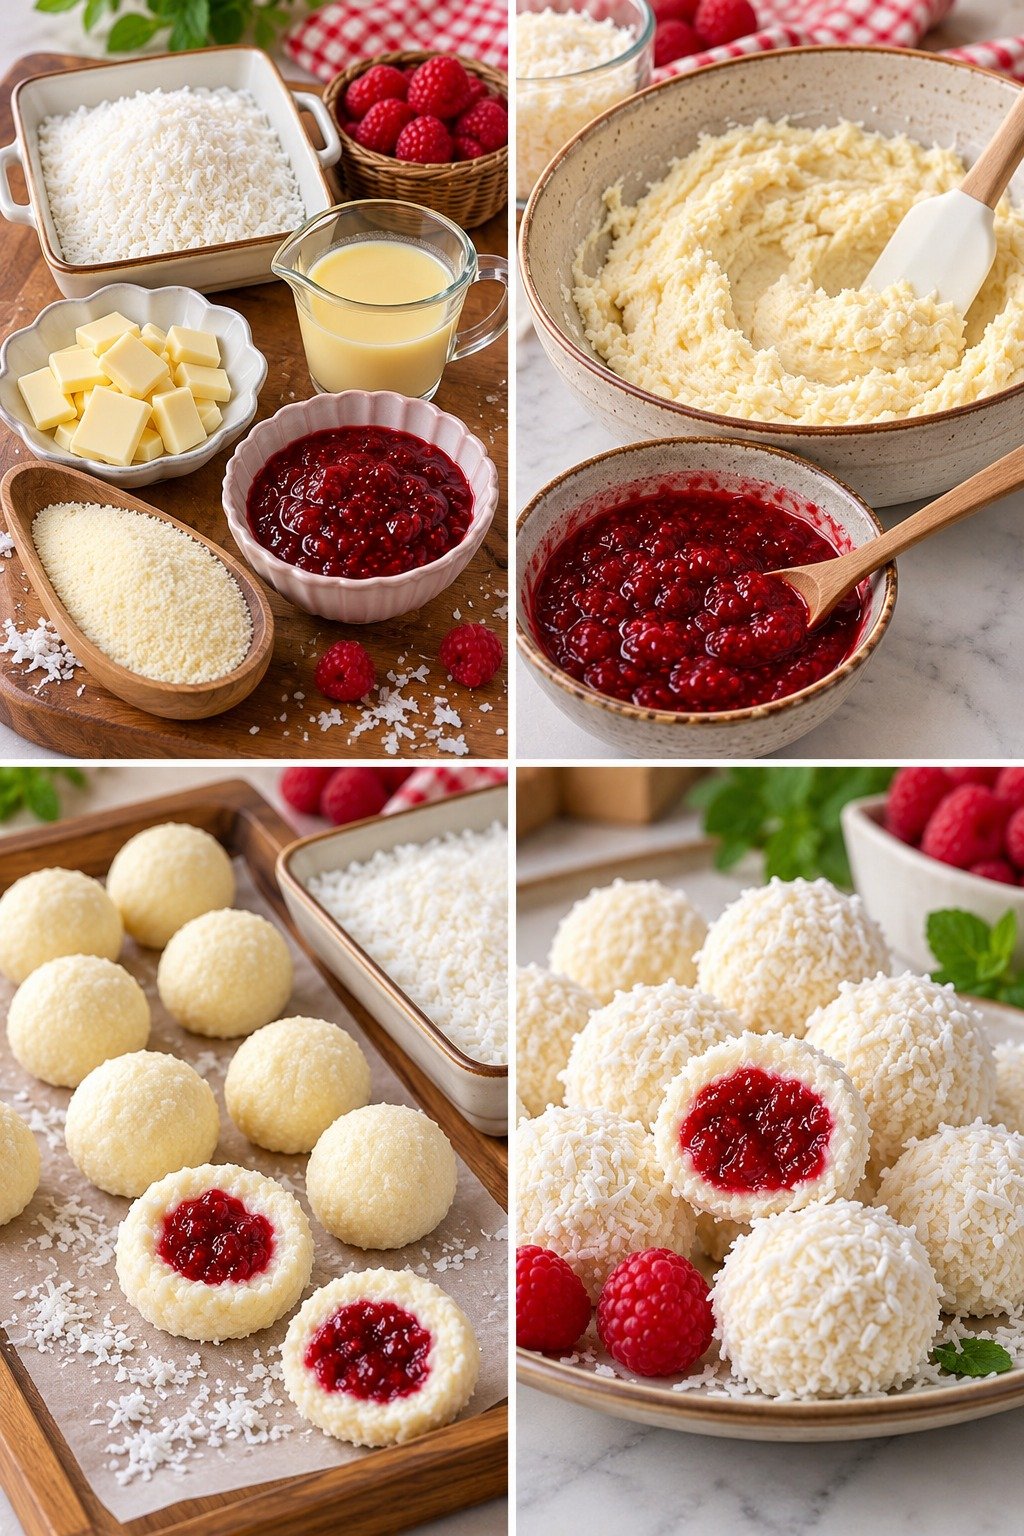
Coconut Raspberry Truffles with creamy coconut coating, sweet raspberry centers, shredded coconut, and a soft no-bake texture

No-Bake Coconut Truffles with Sweet Raspberry Centers

Coconut Raspberry Truffles are soft, creamy, and naturally pretty no-bake treats made with shredded coconut, creamy coconut mixture, and a sweet raspberry center. Each bite has a chewy coconut exterior and a bright fruity filling, making these truffles perfect for holidays, parties, gifting, or an easy make-ahead dessert.

This Coconut Raspberry Truffles recipe is simple to prepare and does not require an oven. The coconut mixture comes together quickly, the raspberry filling adds a fresh contrast, and the finished truffles can be rolled in extra coconut for a snowy, elegant appearance.

Prep Time: 25 minutes
Chill Time: 1 hour
Total Time: About 1 hour 25 minutes
Servings: 18 truffles

Ingredients

For the Coconut Mixture

  • 2 cups finely shredded unsweetened coconut
  • 1 cup sweetened condensed milk
  • 1/2 cup coconut flour
  • 1 teaspoon vanilla extract
  • 1/4 teaspoon salt

For the Raspberry Centers

  • 1 cup fresh or frozen raspberries
  • 2 tablespoons granulated sugar or honey
  • 1 teaspoon lemon juice
  • 1 teaspoon cornstarch mixed with 1 teaspoon water, optional

For Coating

  • 1 cup shredded coconut
  • Melted white chocolate, optional
  • Freeze-dried raspberry powder, optional

Why You’ll Love This Recipe

Coconut Raspberry Truffles are easy to make, require no baking, and look beautiful with very little decorating. The creamy coconut shell and tart-sweet raspberry center create a balanced flavor that feels more special than a basic candy.

Another reason to love Coconut Raspberry Truffles is that they can be prepared ahead and store well in the refrigerator for parties, dessert trays, and edible gifts.

They are also easy to customize with white chocolate, lemon zest, different berries, or toasted coconut.

How to Make Coconut Raspberry Truffles

Step 1: Prepare the Raspberry Filling

Add the raspberries, sugar or honey, and lemon juice to a small saucepan.

Cook over medium-low heat for 5 to 7 minutes, stirring and gently mashing the berries as they soften.

The mixture should become thick and jammy.

If your raspberries release a lot of liquid, stir in the cornstarch mixture and cook for another minute.

Step 2: Cool the Raspberry Mixture

Transfer the cooked raspberry filling to a small bowl.

Let it cool to room temperature, then refrigerate for 20 to 30 minutes.

The filling needs to be thick and cold before assembling Coconut Raspberry Truffles because a warm center can make the coconut mixture too soft.

Step 3: Make the Coconut Mixture

In a large bowl, combine the shredded coconut, sweetened condensed milk, coconut flour, vanilla, and salt.

Stir until a thick, sticky dough forms.

The mixture should hold together when pressed between your fingers.

If it feels too soft, add another tablespoon of coconut flour.

If it feels too dry, add a small spoonful of condensed milk.

Step 4: Chill the Coconut Mixture

Cover the bowl and refrigerate the coconut mixture for about 20 minutes.

Chilling makes Coconut Raspberry Truffles easier to shape and keeps the dough from sticking excessively to your hands.

Step 5: Portion the Dough

Scoop about 1 tablespoon of coconut mixture and roll it gently into a ball.

Flatten the ball in your palm to create a small round disc.

Step 6: Add the Raspberry Center

Place about 1/2 teaspoon of chilled raspberry filling in the middle of the flattened coconut disc.

Do not overfill it.

Bring the edges of the coconut mixture up and around the filling, pinch them together, and gently roll the piece into a smooth ball.

The raspberry should be completely enclosed.

Step 7: Repeat with the Remaining Mixture

Continue filling and shaping until all the coconut mixture is used.

If the dough becomes too soft while working, return it to the refrigerator for 10 minutes.

This helps Coconut Raspberry Truffles stay round and neat.

Step 8: Coat in Coconut

Place the extra shredded coconut in a shallow bowl.

Roll each truffle in the coconut until evenly coated.

Press lightly so the flakes adhere to the surface.

Step 9: Chill Until Firm

Arrange Coconut Raspberry Truffles on a parchment-lined tray.

Refrigerate for at least 30 minutes before serving.

This final chill helps the exterior become firmer while keeping the center soft and fruity.

Step 10: Decorate if Desired

For a more elegant finish, drizzle the chilled truffles with melted white chocolate.

You can also sprinkle a small amount of freeze-dried raspberry powder over the top for extra color and berry flavor.

Serving Suggestions

Coconut Raspberry Truffles are ideal for dessert boards, holiday trays, afternoon tea, or small after-dinner treats.

Serve them with fresh raspberries, strawberries, or blueberries for a colorful presentation.

For parties, arrange Coconut Raspberry Truffles in mini paper candy cups for easy serving.

They also pair well with coffee, tea, hot chocolate, or a glass of cold milk.

For gifting, place the truffles in a small box lined with parchment paper and keep them chilled until ready to give.

For a bold and savory dinner, try our Cowboy Butter Chicken with garlic, lemon, herbs, and a rich buttery sauce.

Recipe Tips

Use finely shredded coconut for the smoothest texture and easiest shaping.

Cook the raspberry filling until thick. A runny center can leak through the coconut shell.

Let the raspberry mixture cool completely before assembling.

Chill the coconut mixture if it feels too sticky.

Do not make the raspberry centers too large. A small amount gives enough fruity flavor while keeping the truffle easy to seal.

For neat Coconut Raspberry Truffles, lightly dampen or grease your hands before rolling.

If using frozen raspberries, thawing is not necessary, but the cooking time may be slightly longer.

Easy Variations

Coconut Raspberry Truffles are easy to customize with different flavors.

For a white chocolate version, dip the finished chilled truffles halfway into melted white chocolate and let them set on parchment.

For extra citrus flavor, add lemon zest or orange zest to the coconut mixture.

You can replace raspberries with strawberries, blackberries, or blueberries, although the cooking time may vary depending on how juicy the fruit is.

A chocolate variation can include cocoa powder in the coconut mixture or a drizzle of dark chocolate over the finished truffles.

For extra crunch, place a toasted almond or hazelnut in the center with a tiny amount of raspberry filling.

You can also roll the truffles in toasted coconut for a deeper, nuttier flavor.

You may also enjoy our Homemade Creamy Vanilla Ice Cream for a smooth, classic dessert with rich vanilla flavor and a creamy texture.

Make-Ahead Instructions

Coconut Raspberry Truffles are excellent for making ahead because they need time to chill and become firm.

Prepare the raspberry filling up to 3 days in advance and keep it refrigerated in an airtight container.

The coconut mixture can also be made one day ahead and stored covered in the refrigerator.

You can assemble the full truffles up to 2 days before serving.

Storage and Freezing

Store Coconut Raspberry Truffles in an airtight container in the refrigerator for up to 5 days.

Place parchment paper between layers if stacking them.

For longer storage, freeze the finished truffles on a tray until firm, then transfer them to a freezer-safe container.

Freeze for up to 2 months.

Thaw in the refrigerator before serving.

If the outer coconut coating looks slightly moist after thawing, roll the truffles in a little fresh shredded coconut before serving.

Nutrition Information

Approximate nutrition per truffle:

Calories: 145
Protein: 2 g
Carbohydrates: 19 g
Fat: 7 g
Saturated Fat: 6 g
Fiber: 2 g
Sugar: 14 g
Sodium: 55 mg

Nutrition values are estimates and may vary depending on the coconut, condensed milk, raspberry filling, and optional toppings.

Frequently Asked Questions

Can I use store-bought raspberry jam?

Yes. Use a thick raspberry jam or preserves. Avoid very runny jam because it may be harder to seal inside the truffles.

Can I make these without coconut flour?

Yes. Add extra shredded coconut a little at a time until the mixture is firm enough to shape.

Can I use frozen raspberries?

Yes. Frozen raspberries work well and can be cooked directly from frozen.

Why are my truffles too soft?

The coconut mixture may need more chilling or a little extra coconut flour. Warm hands can also soften the mixture while shaping.

Can I make them dairy-free?

Yes. Use sweetened condensed coconut milk instead of traditional condensed milk.

Can I dip them in chocolate?

Yes. White, milk, or dark chocolate can all be used for dipping or drizzling.

Can I freeze them?

Yes. Coconut Raspberry Truffles freeze well for up to 2 months when stored in an airtight container.

Final Thoughts

Coconut Raspberry Truffles are an easy no-bake dessert that combines creamy coconut with a bright, sweet raspberry center in every bite.

Because Coconut Raspberry Truffles can be made ahead, customized, and stored easily, they are ideal for holidays, parties, gifting, and simple family desserts.

Keep this Coconut Raspberry Truffles recipe handy whenever you want a small treat that looks elegant without requiring complicated baking.

With chewy coconut, creamy sweetness, and a fruity raspberry center, Coconut Raspberry Truffles are a colorful homemade dessert that is easy to prepare and enjoyable to share.
Raspberry Pistachio Cheesecake Parfait

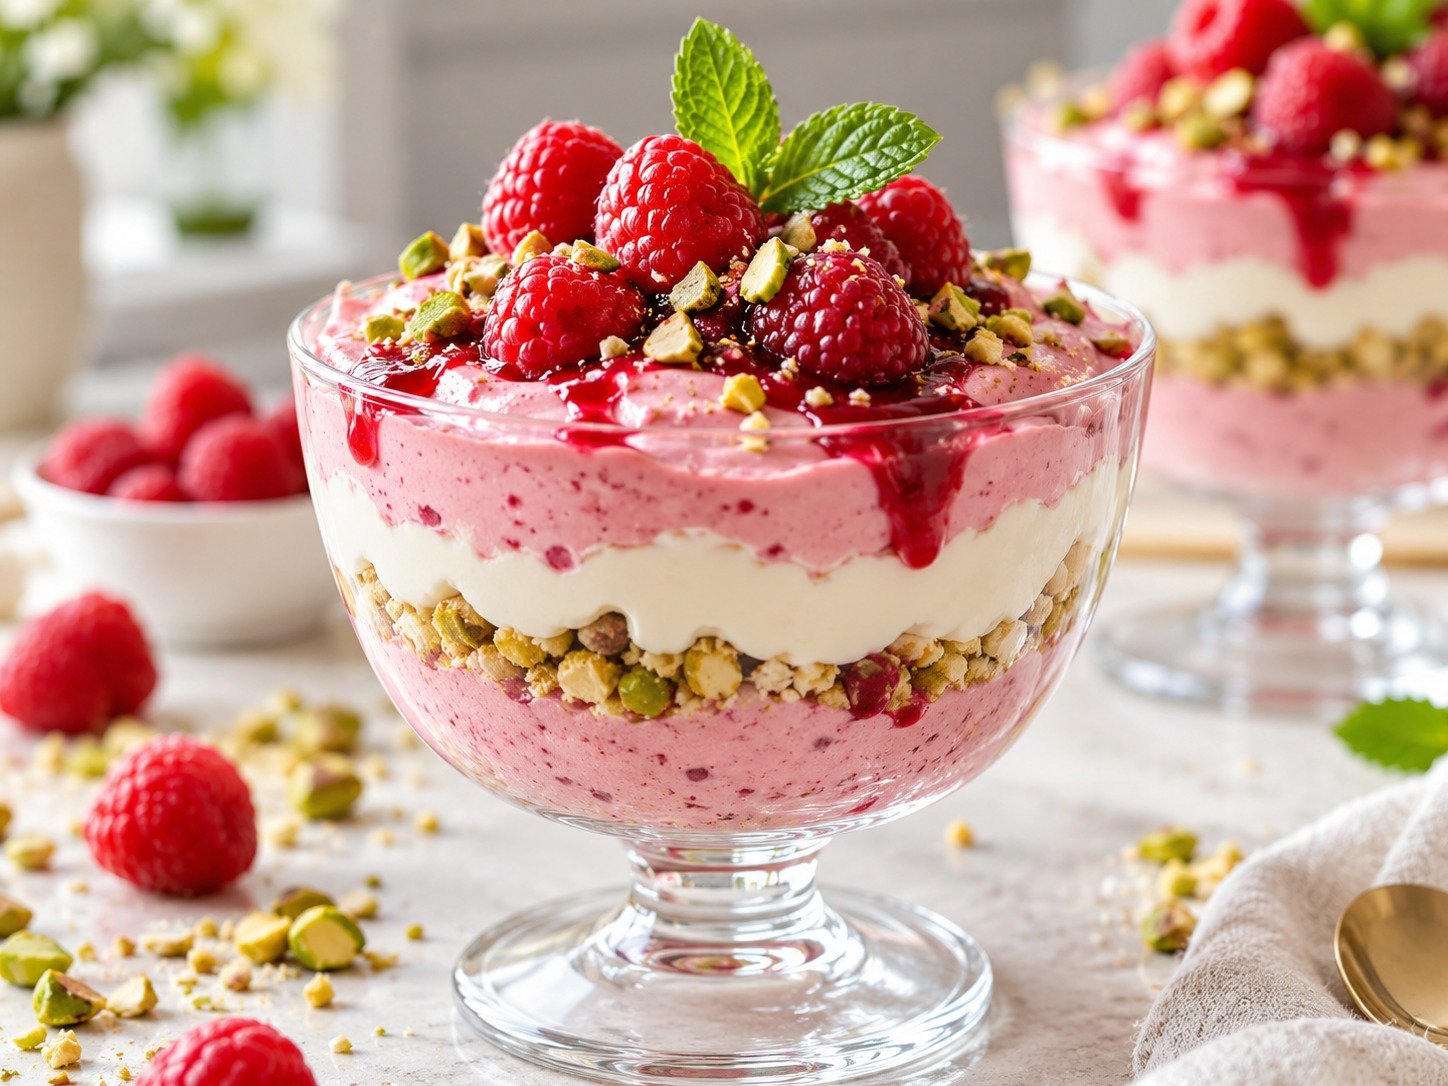
Raspberry Pistachio Cheesecake Parfait with creamy layers, raspberries, pistachios, and cookie crumbs

Raspberry Pistachio Cheesecake Parfait

Raspberry Pistachio Cheesecake Parfait is a creamy, colorful no-bake dessert made with layers of whipped cheesecake filling, juicy raspberries, crunchy pistachios, and buttery cookie crumbs. It looks elegant in individual glasses but is simple enough for an everyday treat. If you enjoy desserts that feel rich without requiring an oven, Cheesecake Parfait is an easy recipe to keep in your collection.

The contrast of tart raspberries, smooth cream cheese, and nutty pistachios makes every spoonful balanced and satisfying. Cheesecake Parfait is also easy to prepare ahead, which makes it a smart choice for holidays, dinner parties, birthdays, or warm-weather gatherings.

Prep Time: 20 minutes
Chill Time: 1 hour
Total Time: 1 hour 20 minutes
Servings: 6

Ingredients

For the Cheesecake Layer

8 ounces cream cheese, softened

1 cup heavy whipping cream

1/2 cup powdered sugar

1 teaspoon vanilla extract

1 teaspoon fresh lemon juice

1/2 teaspoon lemon zest

Pinch of salt

For the Raspberry Layer

2 cups fresh or frozen raspberries

2 tablespoons granulated sugar

1 tablespoon fresh lemon juice

1 teaspoon cornstarch

1 tablespoon water

For the Pistachio Crumb Layer

1 cup graham cracker crumbs

2 tablespoons melted butter

1/3 cup finely chopped pistachios

1 tablespoon brown sugar

Pinch of salt

For Garnish

Fresh raspberries

Chopped pistachios

Whipped cream

Lemon zest

Mint leaves, optional

Why You’ll Love This Recipe

Cheesecake Parfait gives you the flavor of classic cheesecake without baking, water baths, or waiting hours for a full cake to cool. The filling is light, creamy, and smooth, while the raspberry layer adds a bright fruit flavor.

Another reason to love Cheesecake Parfait is the texture. Buttery crumbs, soft cream cheese filling, fresh berries, and crunchy pistachios create a dessert that feels interesting from the first bite to the last.

It is also easy to portion. Individual glasses make serving simple and help the dessert look polished with very little extra effort.

How to Make Raspberry Pistachio Cheesecake Parfait

Step 1: Prepare the Raspberry Sauce

Add raspberries, sugar, and lemon juice to a small saucepan over medium heat.

Cook for 4 to 5 minutes, stirring gently, until the berries begin to break down and release their juices.

Mix the cornstarch and water in a small bowl, then stir the mixture into the raspberries.

Cook for another 1 to 2 minutes until the sauce thickens slightly.

Remove from the heat and allow it to cool completely before assembling Cheesecake Parfait.

Step 2: Make the Pistachio Crumbs

In a medium bowl, combine graham cracker crumbs, melted butter, chopped pistachios, brown sugar, and a small pinch of salt.

Stir until the mixture resembles damp sand.

The pistachio crumbs give the dessert a buttery base with a subtle nutty flavor and a pleasant crunch.

Set the crumbs aside while you prepare the cheesecake filling.

Step 3: Beat the Cream Cheese

Place softened cream cheese in a large mixing bowl.

Beat with an electric mixer for about 1 to 2 minutes until completely smooth.

Add powdered sugar, vanilla, lemon juice, lemon zest, and salt.

Continue beating until the mixture is creamy and no lumps remain.

A smooth cream cheese base is important because it gives Cheesecake Parfait its classic cheesecake texture.

Step 4: Whip the Cream

In a separate chilled bowl, beat the heavy cream until medium-stiff peaks form.

Avoid overbeating because the cream can become grainy.

Gently fold the whipped cream into the cream cheese mixture in two or three additions.

Use a spatula and fold slowly to keep the filling light and airy.

The finished cheesecake mixture should be thick enough to hold soft layers in the serving glasses.

Step 5: Start Layering

Add about 2 tablespoons of pistachio crumb mixture to the bottom of each serving glass.

Press lightly with the back of a spoon, but do not pack it too firmly.

Spoon or pipe a layer of cheesecake filling over the crumbs.

Add a small spoonful of raspberry sauce.

Repeat the layers until the glasses are nearly full.

Layering the ingredients carefully gives Cheesecake Parfait its attractive striped appearance.

Step 6: Add the Final Toppings

Finish each glass with a small spoonful of cheesecake filling.

Top with fresh raspberries, chopped pistachios, and a little whipped cream if desired.

A small amount of lemon zest or fresh mint can add extra color.

The toppings make the finished dessert look elegant while reinforcing the raspberry and pistachio flavors.

Step 7: Chill Before Serving

Cover the parfait glasses and refrigerate for at least 1 hour.

Chilling allows the filling to firm slightly and gives the flavors time to blend.

For the best texture, serve Cheesecake Parfait cold but not frozen.

Serving Suggestions

This dessert is beautiful enough to serve on its own, especially when prepared in clear glasses that show the layers.

For a dinner party, arrange the glasses on a tray and garnish each one with raspberries, pistachios, and a small mint leaf.

You can also serve Cheesecake Parfait with coffee, espresso, or tea for an elegant finish to a meal.

For a larger dessert table, pair it with fresh fruit, chocolate-covered strawberries, small cookies, or other individual desserts.

For a savory brunch option, try our Spinach, Mushroom & Cheese Crustless Quiche.

Recipe Tips

Make sure the cream cheese is fully softened before mixing so the filling stays smooth.

Use chilled heavy cream because cold cream whips more easily.

Cool the raspberry sauce completely before layering. Warm sauce can soften the cheesecake filling.

Fresh raspberries give the prettiest garnish, but frozen raspberries work well for the sauce.

Toast the pistachios lightly for a deeper nutty flavor.

Do not crush the graham crackers too finely if you want more texture.

Pipe the cheesecake filling with a pastry bag for cleaner layers.

Cheesecake Parfait tastes best after at least one hour of chilling.

Easy Variations

For a chocolate version, add a tablespoon of cocoa powder to the cheesecake filling and use chocolate cookie crumbs.

A strawberry version can be made by replacing the raspberries with chopped strawberries.

For extra pistachio flavor, stir a spoonful of pistachio butter into the filling.

You can also make Cheesecake Parfait with blueberries, blackberries, or mixed berries.

For a citrus variation, increase the lemon zest and add a little orange zest to the filling.

If you love creamy no-bake desserts, you may also like our Cheesecake Fluff Recipe.

Make-Ahead Instructions

This is an excellent make-ahead dessert.

Prepare the raspberry sauce and pistachio crumbs up to 2 days ahead and store them separately.

The cheesecake filling can be made 1 day in advance and kept covered in the refrigerator.

For the best presentation, assemble Cheesecake Parfait up to 12 hours before serving. This gives the layers time to settle without making the crumbs overly soft.

Storage

Store assembled Cheesecake Parfait covered in the refrigerator for up to 2 days.

If you want to keep the crumb layer especially crisp, store the components separately and assemble shortly before serving.

Freezing is not recommended because the whipped cheesecake filling can lose some of its smooth texture after thawing.

Keep the dessert refrigerated until you are ready to serve.

Nutrition Information

Approximate nutrition per serving:

Calories: 460
Protein: 7 g
Carbohydrates: 36 g
Fat: 33 g
Saturated Fat: 17 g
Fiber: 4 g
Sugar: 23 g
Sodium: 260 mg

Nutrition values are estimates and may vary depending on the cream cheese, cookies, pistachios, and serving size.

Frequently Asked Questions

Can I use frozen raspberries?

Yes. Frozen raspberries are excellent for the sauce. There is no need to thaw them first; simply cook them a little longer until they break down.

Can I use another type of cookie crumb?

Yes. Digestive biscuits, vanilla wafers, shortbread cookies, or even crushed chocolate cookies can replace graham crackers.

Can I make this without pistachios?

Yes. Replace the pistachios with almonds, pecans, walnuts, or extra cookie crumbs. The dessert will have a different flavor but will still work well.

Can I make it less sweet?

Yes. Reduce the powdered sugar in the filling and the sugar in the raspberry sauce slightly. The natural tartness of the berries helps keep Cheesecake Parfait balanced.

Can I use mascarpone instead of cream cheese?

Yes. Mascarpone creates a softer, richer filling. You can use it alone or combine half mascarpone and half cream cheese.

Can I serve this in one large dish?

Yes. Layer all the components in a trifle bowl or glass serving dish. Individual glasses are prettier for parties, but a large dish is quicker to assemble.

Final Thoughts

Raspberry Pistachio Cheesecake Parfait is an easy no-bake dessert that combines creamy cheesecake filling, bright raspberry sauce, and crunchy pistachio crumbs in beautiful individual layers.

Cheesecake Parfait is ideal when you want a dessert that looks impressive without complicated baking techniques. It can be prepared ahead, adjusted with different fruits, and served in small or large portions.

Whether you make Cheesecake Parfait for a holiday, dinner party, birthday, or simple family dessert, the combination of tart berries, creamy filling, and nutty pistachios makes it a recipe worth repeating.