Tuna Salad Dip
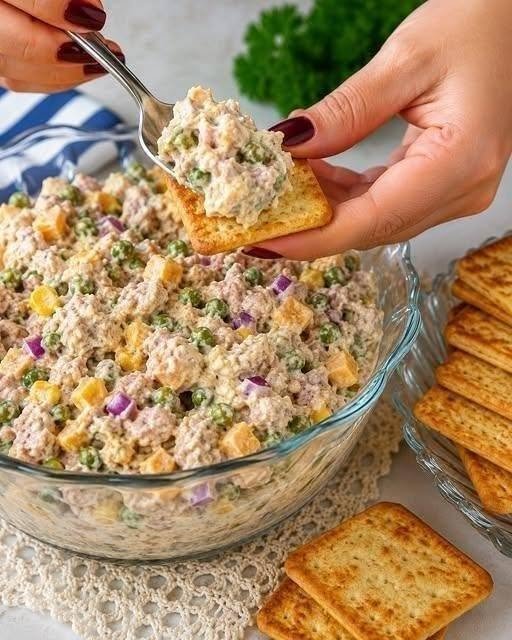
Tuna Salad Dip is a creamy, protein-packed appetizer or light meal made with tuna, Greek yogurt, mayonnaise, celery, red onion, lemon, herbs, and simple seasonings. It has all the familiar flavor of classic tuna salad, but the texture is made slightly creamier so it works perfectly as a dip with crackers, cucumber slices, pita chips, or fresh vegetables.
If you need a quick recipe for lunch, parties, meal prep, or an easy snack, Tuna Salad Dip is a practical choice. It requires no cooking, comes together in minutes, and can be adjusted easily depending on how creamy, tangy, or herby you like it.
Prep Time: 10 minutes
Chill Time: 20 minutes
Total Time: 30 minutes
Servings: 4
Ingredients
For the Tuna Mixture
- 2 cans tuna in water, about 5 ounces each, drained very well
- 1/3 cup plain Greek yogurt
- 2 tablespoons mayonnaise
- 1 tablespoon fresh lemon juice
- 1 teaspoon Dijon mustard
- 1 teaspoon lemon zest
- 1 small celery stalk, finely diced
- 2 tablespoons red onion, finely chopped
- 2 tablespoons fresh parsley, chopped
- 1 tablespoon fresh dill, chopped
- 1 tablespoon chopped chives, optional
- 1/4 teaspoon garlic powder
- 1/4 teaspoon paprika
- 1/4 teaspoon black pepper
- Salt, to taste
Optional Mediterranean Add-Ins
- 2 tablespoons Kalamata olives, chopped
- 2 tablespoons feta cheese, crumbled
- 2 tablespoons roasted red peppers, chopped
- 1 tablespoon capers, drained
- 1 tablespoon extra virgin olive oil
For Serving
Whole-grain crackers
Pita chips
Cucumber slices
Bell pepper strips
Carrot sticks
Celery sticks
Cherry tomatoes
Toasted baguette slices
Why You’ll Love This Recipe
Tuna Salad Dip is quick, simple, and made with ingredients that are easy to keep on hand. Canned tuna provides plenty of protein, while Greek yogurt gives the dip a creamy texture without relying only on mayonnaise.
Another advantage is how easy the recipe is to customize. You can keep it simple for a classic taste or add olives, feta, capers, and roasted peppers for more Mediterranean flavor.
Tuna Salad Dip also works well for meal prep because the flavor becomes even better after chilling. It can be packed with crackers and vegetables for an easy lunch or served as a party dip.
How to Make Tuna Salad Dip
Step 1: Drain the Tuna Well
Open the tuna cans and drain off as much liquid as possible.
Press the tuna gently with the back of a spoon if necessary. Removing excess water is important because too much moisture can make Tuna Salad Dip thin and watery.
Transfer the drained tuna to a medium mixing bowl and break it into smaller pieces with a fork.
Step 2: Make the Creamy Base
In a separate small bowl, combine Greek yogurt, mayonnaise, Dijon mustard, lemon juice, lemon zest, garlic powder, paprika, black pepper, and a small pinch of salt.
Whisk until smooth.
This creamy base gives Tuna Salad Dip its tangy, balanced flavor while keeping the texture light enough for dipping.
Step 3: Add the Fresh Ingredients
Add celery, red onion, parsley, dill, and chives to the bowl with the tuna.
Pour the yogurt mixture over the top and gently fold everything together.
Avoid overmixing if you prefer some texture in Tuna Salad Dip. The tuna should remain slightly chunky rather than becoming completely mashed.
Step 4: Add Mediterranean Extras
If using them, stir in chopped Kalamata olives, feta, roasted red peppers, or capers.
These ingredients add salty and tangy notes that pair especially well with tuna and lemon.
For an extra-rich Tuna Salad Dip, drizzle in a tablespoon of good-quality olive oil and fold it through the mixture.
Step 5: Adjust the Texture
Check the consistency.
If the dip seems too thick, stir in another spoonful of Greek yogurt or a teaspoon of lemon juice.
If it seems too loose, add a little more drained tuna or refrigerate it for 20 to 30 minutes.
Tuna Salad Dip should be creamy enough for crackers to scoop easily without becoming runny.
Step 6: Chill Before Serving
Cover the bowl and refrigerate for about 20 minutes.
This short resting time gives the herbs, lemon, onion, and seasonings time to blend.
Although you can serve Tuna Salad Dip immediately, chilling improves both the flavor and texture.
Step 7: Garnish and Serve
Transfer the dip to a serving bowl.
Top with extra parsley, dill, a sprinkle of paprika, lemon zest, or a few crumbled pieces of feta.
Serve Tuna Salad Dip with crackers, pita chips, cucumber slices, carrots, celery, or toasted bread.
Serving Suggestions
This creamy dip works well as an appetizer, snack, or light meal.
At parties, place it in the center of a platter with fresh vegetables, crackers, and pita chips.
A quick lunch can include the dip with whole-grain crackers, cucumber slices, cherry tomatoes, and a small green salad.
Another easy option is to spoon it into lettuce cups or spread it inside pita bread.
Create a Mediterranean-style platter by adding hummus, olives, feta, roasted peppers, cucumber, and warm pita.
For a fresh side salad, try our Olive Garden Salad Dressing Recipe: Make the Famous Dressing at Home.
Recipe Tips
Drain the tuna very well before mixing.
Use tuna packed in water for a lighter result or tuna packed in olive oil for richer flavor.
Finely chop the celery and onion so they blend evenly into the dip.
Use fresh lemon juice rather than bottled lemon juice for the best flavor.
Greek yogurt adds tanginess and protein, while mayonnaise gives a smoother finish.
Taste before adding extra salt because tuna, capers, olives, and feta can already contain plenty of sodium.
Let the dip chill before serving whenever possible.
Use fresh parsley and dill to give Tuna Salad Dip a brighter flavor.
Easy Variations
Add a pinch of cayenne, hot sauce, or finely chopped jalapeño if you prefer extra heat.
Olives, feta, roasted red peppers, and capers create a stronger Mediterranean flavor.
Mash half a ripe avocado into the mixture and reduce the mayonnaise for a creamy avocado version.
Finely chopped cucumber, radish, or bell pepper adds refreshing crunch.
To boost the protein, increase the Greek yogurt slightly and serve the dip with boiled eggs or high-protein crackers.
Make-Ahead Instructions
Tuna Salad Dip can be made several hours before serving.
Prepare the recipe as directed, cover tightly, and refrigerate. The flavors will continue to develop as it chills.
If making it a day ahead, wait to add delicate garnishes such as fresh herbs or extra feta until just before serving.
Give the dip a quick stir before transferring it to the serving bowl.
Storage
Keep leftovers in an airtight container in the refrigerator for up to 3 days.
When serving at a party, avoid leaving the dip at room temperature for an extended period.
Freezing is not recommended because Greek yogurt, mayonnaise, and fresh vegetables may separate after thawing.
For meal prep, portion the dip into small containers and keep crackers or vegetables separate until serving.
Nutrition Information
Approximate nutrition per serving, based on 4 servings:
Calories: 180
Protein: 21 g
Carbohydrates: 4 g
Fat: 9 g
Saturated Fat: 2 g
Fiber: 1 g
Sugar: 2 g
Sodium: 430 mg
Nutrition values are estimates and may change depending on the tuna, yogurt, mayonnaise, and optional add-ins used.
Frequently Asked Questions
Can I make this without mayonnaise?
Yes. Replace the mayonnaise with extra Greek yogurt. Tuna Salad Dip will taste slightly tangier but will still be creamy.
What type of tuna works best?
Solid white albacore gives a firmer texture, while chunk light tuna creates a softer mixture. Either one works well.
Can I use tuna packed in oil?
Yes. Drain it thoroughly before mixing. Oil-packed tuna creates a richer flavor.
How do I make the dip smoother?
Mash the tuna more thoroughly with a fork before adding the other ingredients. You can also pulse the finished mixture briefly in a food processor, although Tuna Salad Dip is usually best when it still has some texture.
Can I serve it as a sandwich filling?
Yes. Spread it inside pita, wraps, croissants, or whole-grain bread. Add lettuce and tomato for a quick lunch.
What can I use instead of Greek yogurt?
Sour cream can be used as a substitute, although the flavor and nutrition will be slightly different.
Final Thoughts
Tuna Salad Dip is a simple way to turn pantry tuna into a creamy, flavorful dish that works for snacks, lunches, meal prep, and entertaining. Greek yogurt, lemon, herbs, celery, and onion keep the mixture fresh, while optional Mediterranean ingredients such as olives, feta, and roasted peppers make it easy to customize.
Because Tuna Salad Dip takes only a few minutes to prepare, it is a useful recipe for busy days when you want something filling without cooking. Pair it with crisp vegetables for a lighter option or serve it with pita and crackers for a more satisfying snack.
Keep Tuna Salad Dip chilled until serving, add your favorite toppings, and enjoy it as an easy high-protein recipe that fits into many different meals.
If you enjoy light Mediterranean seafood meals, you may also like our Mediterranean Lemon Garlic Cod with Roasted Vegetables.