5-Minute Apple Oatmeal Walnut Healthy Dessert

5-Minute Apple Oatmeal Walnut Healthy Dessert

Description

This easy Apple Oatmeal Walnut Dessert is a simple homemade treat made with rolled oats, fresh apples, warm milk, eggs, vanilla, butter, and crunchy walnuts or almonds. It comes together with just a few everyday ingredients and is a wonderful option when you want something naturally sweet and comforting without complicated preparation.

The grated apples bring moisture and natural sweetness to the mixture, while the oats provide a hearty texture. Warm milk helps soften the oats, eggs give the dessert structure, and vanilla adds a lovely aroma. Butter contributes richness, while walnuts or almonds provide a satisfying nutty crunch.

The finished dessert is soft, moist, lightly sweet, and delicious served warm. It can be enjoyed for breakfast, as an afternoon snack, or as a simple dessert after dinner. It is especially convenient when you have a few apples that need to be used.

This recipe does not require refined sugar in the ingredient list because the apples provide natural sweetness. However, the exact sweetness will depend on the apples you use. If you prefer a sweeter dessert, you can add a small amount of honey, maple syrup, or another sweetener according to your taste.

Despite its simple ingredients, the combination of warm apples, oats, vanilla, and toasted nuts gives this dessert a cosy, homemade flavour that makes it feel much more indulgent than it actually is.

Ingredients

  • 1 cup rolled oats
  • ⅔ cup warm milk (150 ml)
  • 2 apples, grated or finely chopped
  • 2 tablespoons butter or margarine, melted
  • 2 large eggs
  • ½ teaspoon vanilla extract
  • ½ cup chopped walnuts or almonds
  • Vegetable oil or cooking spray, for greasing

Optional Additions

  • ½ teaspoon cinnamon
  • Pinch of nutmeg
  • 1 tablespoon honey or maple syrup
  • 1 tablespoon raisins
  • Pinch of salt
  • Extra chopped walnuts for topping
  • Apple slices for decoration
  • Greek yoghurt for serving

Instructions

1. Prepare the apples.

Wash the apples thoroughly and remove the cores.

You can either grate the apples using the large holes of a box grater or chop them very finely.

There is no need to peel the apples unless you prefer a smoother texture. Leaving the skin on adds texture and keeps preparation quick.

If your apples release a lot of liquid after grating, gently squeeze out a little excess juice, but don’t remove all of it. The natural moisture helps keep the dessert soft.

2. Soften the oats.

Place the rolled oats in a large mixing bowl.

Pour the warm milk over the oats and stir gently.

Allow the mixture to sit for approximately 3–5 minutes. This gives the oats time to absorb some of the milk and soften.

Don’t use boiling milk. Warm milk is enough to soften the oats while keeping the preparation simple.

3. Add the eggs.

Crack the eggs into a separate small bowl and whisk lightly.

Add the eggs to the softened oat mixture.

Stir well until the eggs are evenly incorporated.

4. Add apples and flavourings.

Add the grated or finely chopped apples, melted butter, and vanilla extract.

If you’re using cinnamon, nutmeg, honey, maple syrup, or a pinch of salt, add them now.

Stir everything together until the ingredients are evenly distributed.

The mixture should be moist and fairly thick. The apples will provide additional moisture as they cook.

5. Add the nuts.

Fold in the chopped walnuts or almonds.

Reserve a small amount if you’d like to sprinkle some over the top before baking.

Walnuts provide a rich, buttery flavour, while almonds give the dessert a slightly firmer crunch.

6. Prepare the baking dish.

Preheat the oven to 375°F (190°C).

Lightly grease a small baking dish with vegetable oil or cooking spray.

A baking dish approximately 8 x 8 inches works well for this quantity, although a similar-sized dish can also be used.

Pour the mixture into the prepared dish and spread it evenly.

Sprinkle the reserved nuts over the top if desired.

7. Bake

Place the baking dish in the preheated oven.

Bake for approximately 25–35 minutes, or until the centre is set and the top is lightly golden.

The exact cooking time will depend on the size and depth of your baking dish.

To check for doneness, gently press the centre. It should feel set rather than liquid.

8. Rest before serving

Remove the dessert from the oven and allow it to rest for approximately 5–10 minutes.

This gives the oats time to finish absorbing moisture and makes the dessert easier to slice or scoop.

Serve warm on its own or with a spoonful of Greek yoghurt.

Notes

The original ingredient list makes a naturally sweet dessert without added refined sugar. However, the sweetness will depend heavily on the variety and ripeness of your apples.

Sweet apples such as Honeycrisp, Fuji, Gala, or Pink Lady will produce a sweeter result, while Granny Smith apples will create a more tart dessert.

Rolled oats are recommended because they provide a pleasant texture. Quick oats can be used, but the finished texture will be softer.

Avoid using steel-cut oats for this particular recipe because they require considerably more liquid and cooking time.

You can use dairy milk, unsweetened almond milk, oat milk, or another milk of your choice. The texture may vary slightly depending on the milk used.

Butter gives the dessert a richer flavour, while margarine can be substituted if preferred.

Walnuts and almonds are interchangeable. You can also use pecans, hazelnuts, or a combination of nuts.

Tips for the Best Results

Choose flavourful apples:
Since there is no large amount of added sugar, the apples provide much of the dessert’s flavour and sweetness.

Don’t make the oats too wet:
Apples naturally release moisture during baking. If the mixture is extremely wet before baking, the finished dessert may take longer to set.

Soak the oats briefly:
Allowing the oats to sit in warm milk for several minutes creates a softer and more cohesive texture.

Chop the nuts evenly:
Smaller pieces distribute throughout the dessert more evenly and give you some crunch in nearly every bite.

Add cinnamon:
Cinnamon pairs beautifully with apples, oats, and walnuts and can make the dessert taste sweeter without adding sugar.

Don’t overbake:
Bake just until the centre is set. Overbaking can make the oats dry and firm.

Let it rest:
The dessert continues to firm slightly as it cools, so give it a few minutes before cutting.

Toast the nuts:
For even more flavour, lightly toast the walnuts or almonds in a dry skillet before adding them.

Make individual portions:
Instead of using one large baking dish, divide the mixture between small oven-safe ramekins for individual servings.

Serving Suggestions

This apple oatmeal dessert can be served in several different ways.

For breakfast, serve a warm portion with plain Greek yoghurt and a few fresh apple slices.

For dessert, add a small spoonful of yoghurt and a sprinkle of chopped walnuts.

For a cosy fall-inspired version, dust the top with cinnamon and add a few thin apple slices before baking.

You can also serve it with a small amount of nut butter for additional richness.

For a more indulgent dessert, serve it warm with a scoop of vanilla ice cream.

For a lighter snack, enjoy a smaller portion on its own with tea or coffee.

The dessert can also be cut into squares once cooled, making it convenient to pack for a snack.

Servings

Serves: 6

Prep Time: 5–10 minutes

Cook Time: 25–35 minutes

Total Time: Approximately 35–45 minutes

Approximate Nutritional Information

Per serving, based on 6 servings:

Calories: approximately 220–260

Protein: 6–8 g

Carbohydrates: 25–30 g

Fat: 11–14 g

Fibre: 3–4 g

Sugar: 7–10 g

Sodium: approximately 80–150 mg

Nutrition will vary depending on the type of milk, butter or margarine, apples, and nuts used.

Benefits

This dessert combines several whole-food ingredients that can contribute useful nutrients to your diet.

Rolled oats provide complex carbohydrates and dietary fibre. They also contain a type of soluble fibre called beta-glucan.

Apples provide fibre, vitamin C, water, and naturally occurring plant compounds. Keeping the apple skin on can contribute additional fibre.

Walnuts and almonds provide healthy unsaturated fats, protein, fibre, vitamins, minerals, and other beneficial plant compounds.

Eggs contribute high-quality protein and several important nutrients, while milk contributes protein and calcium depending on the variety used.

Because the recipe contains oats, apples, nuts, eggs, and milk, it can be more satisfying than many highly processed sweet snacks.

That said, this is still a calorie-containing dessert, particularly because it includes butter and nuts. Portion size matters, and eating a varied diet is more important than relying on any single food for weight management.

Storage

Allow the baked dessert to cool completely before storing.

Place leftovers in an airtight container and refrigerate for up to 3–4 days.

For convenient meal preparation, divide the dessert into individual portions before refrigerating.

Reheat individual portions in the microwave for approximately 20–40 seconds, or warm them gently in the oven.

The texture may become slightly softer after refrigeration, but the flavour remains delicious.

Freezing

This dessert can be frozen.

Allow it to cool completely, then cut it into individual portions.

Wrap each portion well and place it in a freezer-safe container or bag.

Freeze for up to approximately 2–3 months for the best quality.

Thaw overnight in the refrigerator and reheat before serving.

Q&A

Can I make this dessert without butter?

Yes. You can reduce or omit the butter, although the finished dessert will be less rich and slightly less moist.

Can I use almond milk?

Yes. Unsweetened almond milk works well. You can also use oat milk, soy milk, or another milk you enjoy.

Can I use quick oats?

Yes. Quick oats will work, but they create a softer texture than traditional rolled oats.

Can I use steel-cut oats?

Steel-cut oats aren’t recommended for this version because they need considerably more liquid and a longer cooking time.

Do I have to peel the apples?

No. You can leave the peel on for additional texture and fiber. If you prefer a smoother dessert, peel them first.

Can I use different nuts?

Absolutely. Pecans, hazelnuts, cashews, or a combination of nuts can be used.

Can I add cinnamon?

Yes. Cinnamon is one of the best additions to this recipe and pairs especially well with apples and walnuts.

Can I make it sweeter?

Yes. If your apples aren’t sweet enough, add a small amount of honey, maple syrup, or your preferred sweetener.

Can I make individual servings?

Yes. Divide the mixture between greased ramekins and reduce the baking time. Begin checking them early because smaller portions cook faster.

Why is my dessert too wet?

The apples may have released a lot of liquid, or the baking dish may be deeper than recommended. Continue baking until the center is set. Next time, gently squeeze excess juice from very wet grated apples.

Why is my dessert dry?

It may have been baked too long or your oats may have absorbed more liquid than expected. Reduce the baking time slightly next time and check the dessert as it approaches the minimum cooking time.

Can I eat this cold?

Yes. It can be enjoyed cold straight from the refrigerator, although many people prefer it warm.

Can I serve it with yogurt?

Absolutely. Plain Greek yogurt provides a creamy, tangy contrast to the warm apples and oats.

Can I make this gluten-free?

Oats are naturally gluten-free, but they can be contaminated during processing. If gluten-free is important for you, use oats specifically labeled certified gluten-free.

Can I make it dairy-free?

Yes. Use plant-based milk and a dairy-free butter or suitable oil.

Is this a weight-loss dessert?

No single recipe guarantees weight loss. This dessert can be included in a balanced eating pattern, and its oats, apples, and nuts provide fiber and nutrients. If you’re managing your weight, portion size and your overall dietary pattern matter.

Final Thoughts

This 5-Minute Apple Oatmeal Walnut Dessert is a wonderful example of how simple ingredients can create something warm, comforting, and satisfying. Sweet apples, hearty oats, creamy milk, vanilla, eggs, and crunchy walnuts come together in an easy baked treat that requires very little preparation.

It is flexible enough for breakfast, a snack, or dessert and can easily be customized with cinnamon, different nuts, or your favorite milk. Serve it warm with Greek yogurt for a simple everyday treat, or dress it up with fresh apple slices and a sprinkle of toasted walnuts when serving guests.

With no complicated techniques and no long list of ingredients, this is the kind of homemade recipe that is easy to make whenever you’re craving something sweet and cozy. 🍎🥣🌰


Cucumber Salad Benefits

Cucumber Salad Benefits with fresh cucumber slices, cherry tomatoes, red onion, parsley, and lemon dressing

Doctors Reveal What Eating Cucumber in Salads May Cause

Description

Cucumber salad is a refreshing, crunchy, and hydrating side dish made with crisp cucumbers, tomatoes, red onion, fresh herbs, and a simple lemon dressing. While cucumber is generally a nutritious food that can fit easily into a balanced diet, some people may notice bloating, burping, or digestive discomfort after eating cucumber, especially in large amounts or when it is combined with heavy dressings and other ingredients that may be harder to digest. These effects are not experienced by everyone, and cucumber itself is not generally considered harmful when eaten as part of a normal diet.
This simple cucumber salad keeps the ingredients fresh and light while adding plenty of flavor. It is ideal for lunch, dinner, picnics, summer meals, or as a quick side dish. The lemon and herbs brighten the cucumbers, while tomatoes and red onion add color and texture. If you have a sensitive stomach, start with a smaller serving and see how your body responds.

Ingredients For the Salad

3 medium cucumbers, thinly sliced
1 cup cherry tomatoes, halved
¼ small red onion, very thinly sliced
2 tablespoons fresh parsley, chopped
1 tablespoon fresh dill, chopped

For the Dressing

2 tablespoons extra-virgin olive oil
1 tablespoon fresh lemon juice
1 teaspoon apple cider vinegar
½ teaspoon dried oregano
¼ teaspoon garlic powder
¼ teaspoon black pepper
¼ teaspoon salt, or to taste

Step-by-Step Instructions

  1. Wash the cucumbers thoroughly under cool running water. Pat them dry with a clean kitchen towel. You can leave the peel on for extra color and texture, or peel them partially if you prefer a milder texture.
  2. Slice the cucumbers thinly and evenly. Very thin slices absorb the dressing beautifully, while slightly thicker slices provide more crunch.
  3. Place the cucumber slices in a large mixing bowl. Add the halved cherry tomatoes and thinly sliced red onion.
  4. Add the chopped parsley and fresh dill. Toss the vegetables gently so the herbs are distributed throughout the salad without crushing the tomatoes.
  5. In a small bowl, whisk together the olive oil, lemon juice, apple cider vinegar, oregano, garlic powder, black pepper, and salt.
  6. Pour the dressing over the cucumber mixture. Use salad tongs or two large spoons to gently toss everything together until the vegetables are lightly coated.
  7. Allow the salad to rest for approximately 10 minutes before serving. This gives the flavors time to blend while keeping the cucumbers pleasantly crisp.
  8. Taste and adjust the seasoning if needed. Add a little more lemon juice for brightness or a small amount of olive oil for a smoother flavor.
  9. Serve immediately or refrigerate briefly before serving. For the best texture, avoid leaving the salad dressed for too many hours because cucumbers naturally release water over time.

Tips & Notes

If cucumber seems to cause you bloating or discomfort, try eating a smaller portion and observe whether your symptoms improve. Some people find that removing the peel or seeds makes cucumber easier to tolerate, although this varies from person to person.
The dressing can also make a difference. Large amounts of onion, garlic, vinegar, or rich creamy dressings may contribute to digestive discomfort in sensitive individuals. Keeping the dressing light can make the salad easier to enjoy.
For a crunchier salad, use fresh, firm cucumbers and serve shortly after dressing. If your cucumbers contain a lot of water, lightly salt the slices and let them sit for 10 minutes, then gently drain before adding the dressing.
Fresh herbs make a noticeable difference. Dill and parsley complement cucumber particularly well and give the salad a fresh Mediterranean-style flavor.

Q&A

Can eating cucumber in a salad cause bloating?
It can in some people. Cucumbers contain water and fiber, and certain individuals may experience gas, bloating, or digestive discomfort after eating them. Large portions may be more likely to cause symptoms.
Is cucumber unhealthy?
For most people, cucumber is a nutritious food that can be part of a balanced diet. It provides water, some fiber, and several vitamins and minerals.
Should I remove the cucumber skin?
You do not have to. The skin is edible and contributes texture and nutrients. However, if you find peeled cucumber easier to digest, peeling it is a reasonable option.
Why does my cucumber salad become watery?
Cucumbers naturally contain a large amount of water. Salting and draining them briefly before dressing can reduce excess liquid.
Can I make this salad ahead of time?
Yes, but for the best crunch, prepare the vegetables ahead and add the dressing shortly before serving.
What if cucumber consistently causes digestive problems?
If you repeatedly experience significant discomfort after eating cucumber or other foods, consider discussing the pattern with a qualified healthcare professional rather than assuming cucumber is the cause.

Servings

This recipe makes approximately 4 servings as a side dish.

Nutrition

Approximate nutrition per serving: Calories: 105, Protein: 2g, Carbohydrates: 8g, Fat: 8g, Fiber: 2g, Sugar: 4g, Sodium: 170mg. Nutrition values are estimates and can vary depending on the size of the vegetables and the amount of dressing used.

Creamy Chicken Mushroom Soup

Creamy Chicken Mushroom Soup with tender chicken pieces, sautéed mushrooms, garlic, fresh herbs, and rich creamy broth

Creamy Chicken Mushroom Soup – Easy, Rich & Comforting Homemade Recipe

Creamy Chicken Mushroom Soup is a delicious, rich, and comforting homemade soup featuring tender chicken, golden sautéed mushrooms, fresh garlic, aromatic herbs, and a smooth, creamy broth. This easy chicken soup recipe combines simple ingredients to create a satisfying meal that’s perfect for cozy family dinners, busy weeknights, and chilly evenings.

The combination of juicy chicken and earthy mushrooms creates a deep, savory flavor, while the creamy broth adds a luxurious texture. Fresh thyme, garlic, and a touch of Parmesan cheese bring everything together beautifully, making every spoonful warm, flavorful, and satisfying.

Unlike canned soups, homemade Creamy Chicken Mushroom Soup allows you to control the ingredients, seasonings, and consistency. You can make it extra creamy, add more vegetables, or adjust the herbs to suit your family’s preferences.

Whether you’re looking for a quick lunch, a comforting dinner, or a delicious meal to prepare ahead of time, this creamy chicken and mushroom soup is a wonderful addition to your recipe collection.

Prep Time: 15 minutes Cook Time: 30–35 minutes Total Time: 45–50 minutes Servings: 6

Ingredients for Creamy Chicken Mushroom Soup

For the Chicken

  • 1½ pounds boneless, skinless chicken breasts or thighs

  • 1 tablespoon olive oil

  • ½ teaspoon salt

  • ½ teaspoon black pepper

  • ½ teaspoon garlic powder

  • ½ teaspoon paprika

For the Mushroom and Vegetable Base

  • 12 oz (340 g) cremini or white button mushrooms, sliced

  • 2 tablespoons unsalted butter

  • 1 medium yellow onion, finely diced

  • 2 medium carrots, peeled and diced

  • 2 celery stalks, finely chopped

  • 4 garlic cloves, minced

  • 1 teaspoon dried thyme

  • ½ teaspoon dried rosemary

  • ½ teaspoon Italian seasoning

 Creamy Soup Broth

  • 4 cups low-sodium chicken broth

  • 1 cup heavy cream

  • ½ cup whole milk

  • 3 tablespoons all-purpose flour

  • ¼ cup freshly grated Parmesan cheese

  • 1 tablespoon Worcestershire sauce

  • 1 teaspoon Dijon mustard, optional

  • 1 tablespoon fresh lemon juice

  • Salt and black pepper to taste

For Garnishing

  • 2 tablespoons fresh parsley, chopped

  • Fresh thyme leaves

  • Extra Parmesan cheese

  • Freshly cracked black pepper

How to Make Creamy Chicken Mushroom Soup

Step 1: Prepare the Ingredients

Begin by washing and preparing all the vegetables.

Slice the mushrooms into even pieces, finely dice the onion, chop the carrots and celery, and mince the garlic.

Pat the chicken dry using paper towels and cut it into bite-sized pieces.

Season the chicken with salt, black pepper, garlic powder, and paprika.

Preparing everything before cooking makes the soup easier to assemble and ensures the ingredients cook evenly.

Step 2: Brown the Chicken

Heat olive oil in a large heavy-bottomed pot or Dutch oven over medium-high heat.

Add the seasoned chicken in a single layer.

Cook for approximately 4–5 minutes, stirring occasionally, until lightly golden on the outside.

The chicken does not need to be completely cooked at this stage because it will finish cooking in the soup.

Transfer the chicken to a plate and set aside.

Browning the chicken first creates a richer flavor and adds savory depth to the finished Creamy Chicken Mushroom Soup.

Step 3: Sauté the Mushrooms

Reduce the heat to medium and add butter to the same pot.

Once melted, add the sliced mushrooms.

Cook for approximately 6–8 minutes, stirring occasionally.

The mushrooms will initially release moisture before beginning to brown.

Allow most of the liquid to evaporate so the mushrooms develop a golden color.

Avoid overcrowding the pot, as mushrooms need enough space to brown rather than steam.

Golden mushrooms provide the earthy flavor that makes this soup especially delicious.

Step 4: Cook the Vegetables

Add the diced onion, carrots, and celery to the pot.

Cook for approximately 4–5 minutes until the vegetables begin to soften.

Stir occasionally to prevent sticking.

Add the minced garlic and cook for another 30–60 seconds until fragrant.

The combination of onion, carrots, celery, and garlic creates a flavorful foundation for the creamy broth.

Step 5: Add Herbs and Seasonings

Sprinkle the dried thyme, rosemary, and Italian seasoning over the vegetables.

Stir gently to coat the mushrooms and vegetables.

Cook for approximately 30 seconds to release the aroma of the dried herbs.

Fresh thyme can also be used if available.

Step 6: Thicken the Soup Base

Sprinkle the all-purpose flour evenly over the mushroom and vegetable mixture.

Stir continuously for 1–2 minutes.

The flour will combine with the butter and vegetable juices, creating a light roux that helps thicken the soup.

Avoid adding all the liquid immediately because the flour needs time to cook.

Step 7: Add the Chicken Broth

Slowly pour in the chicken broth while stirring continuously.

Start with a small amount and whisk until smooth before adding the remaining broth.

This helps prevent flour lumps.

Add the Worcestershire sauce and optional Dijon mustard.

Stir everything together until the broth is smooth and well combined.

Scrape the bottom of the pot to release any flavorful browned bits.

Step 8: Simmer the Chicken

Return the browned chicken and any accumulated juices to the pot.

Bring the soup to a gentle simmer.

Reduce the heat to medium-low and cook uncovered for approximately 10–12 minutes.

Stir occasionally until the chicken is fully cooked and the vegetables are tender.

The chicken must reach an internal temperature of 165°F (74°C).

During simmering, the soup will begin to thicken naturally.

Step 9: Add the Cream and Milk

Reduce the heat to low.

Slowly pour in the heavy cream and whole milk while stirring.

Allow the soup to warm gently for approximately 3–5 minutes.

Avoid boiling vigorously after adding the dairy because high heat can affect the smooth texture of the soup.

The broth should become creamy, velvety, and rich.

Step 10: Stir in Parmesan Cheese

Add freshly grated Parmesan cheese.

Stir until the cheese melts into the broth.

The Parmesan enhances the savory flavor and adds a slightly nutty richness.

Taste the soup and adjust the salt and black pepper as needed.

Because Parmesan and chicken broth both contain sodium, add additional salt gradually.

Step 11: Add Lemon Juice

Remove the pot from the heat.

Stir in 1 tablespoon of fresh lemon juice.

The lemon juice helps brighten the rich flavors of the chicken, mushrooms, and cream.

Start with a smaller amount if you prefer a milder flavor.

Step 12: Garnish and Serve

Ladle the warm Creamy Chicken Mushroom Soup into serving bowls.

Sprinkle with freshly chopped parsley, thyme leaves, and extra Parmesan cheese.

Finish with freshly cracked black pepper.

Serve immediately with crusty bread, garlic toast, crackers, or a fresh green salad.

Tips for the Best Creamy Chicken Mushroom Soup

1. Brown the Mushrooms Properly

Allow mushrooms to cook until their moisture evaporates and they develop golden edges.

This creates a richer, deeper flavor than simply simmering raw mushrooms in the broth.

2. Use Chicken Thighs for Extra Tenderness

Boneless chicken thighs remain tender and juicy during simmering.

Chicken breasts work equally well but should not be overcooked.

3. Choose Fresh Mushrooms

Cremini mushrooms provide an earthy flavor, while white button mushrooms taste milder.

You can also combine different mushroom varieties for additional depth.

4. Add Cream Over Low Heat

Reduce the heat before stirring in the cream and milk.

Avoid rapid boiling to maintain a smooth, creamy consistency.

5. Adjust the Thickness

If the soup becomes too thick, add a little warm chicken broth.

For a thicker consistency, simmer briefly before adding the cream or use a slightly larger amount of flour.

6. Use Freshly Grated Parmesan

Freshly grated Parmesan melts smoothly and adds rich savory flavor.

Pre-shredded cheese may not incorporate as evenly.

7. Taste Before Adding Salt

Broth, cheese, and Worcestershire sauce contain sodium.

Adjust seasoning at the end to avoid making the soup excessively salty.

8. Add Fresh Herbs Before Serving

Fresh parsley and thyme add brightness and make the finished soup more aromatic.

Delicious Recipe Variations

Creamy Chicken Mushroom and Spinach Soup

Add 2 cups of fresh baby spinach during the final 3 minutes of cooking.

Stir until wilted.

Spinach adds color, flavor, and additional vegetables without changing the creamy base significantly.

Creamy Chicken Mushroom Rice Soup

Stir in 1 cup of cooked white or brown rice before serving.

Add extra broth if needed because rice absorbs liquid.

This creates a heartier soup suitable for a complete family dinner.

Creamy Chicken Mushroom Potato Soup

Add 2 small diced potatoes along with the broth.

Simmer until the potatoes become tender before adding the cream.

Potatoes give the soup a thicker texture and make it more filling.

Garlic Parmesan Chicken Mushroom Soup

Increase the garlic to 6 cloves and add an additional ¼ cup Parmesan cheese.

This version offers a stronger garlic and cheese flavor.

Low-Carb Chicken Mushroom Soup

Omit the flour and milk, and use a small amount of cream cheese to help thicken the broth.

Adjust the quantity according to your preferred consistency.

Dairy-Free Chicken Mushroom Soup

Replace butter with olive oil and use unsweetened dairy-free cooking cream instead of heavy cream and milk.

Omit the Parmesan cheese or use a suitable dairy-free alternative.

Choose a neutral-flavored cream to prevent overpowering the mushrooms.

What to Serve with Creamy Chicken Mushroom Soup

Creamy Chicken Mushroom Soup is satisfying on its own, but pairing it with a simple side dish creates a complete and delicious meal.

Crusty Artisan Bread: Warm bread is perfect for dipping into the creamy broth.

Garlic Bread: Crispy garlic bread complements the savory mushroom flavors.

Fresh Garden Salad: A simple salad with lettuce, tomatoes, cucumber, and lemon vinaigrette adds freshness.

Roasted Vegetables: Roasted broccoli, carrots, or asparagus provide a nutritious accompaniment.

Grilled Cheese Sandwich: A warm cheese sandwich turns this soup into a comforting lunch or dinner.

Homemade Dinner Rolls: Soft dinner rolls are ideal for serving alongside a warm bowl of soup.

For a cozy family meal, serve this creamy soup with freshly baked bread and a colorful green salad.

Health Benefits of Creamy Chicken Mushroom Soup

A Good Source of Protein

Chicken provides high-quality protein that supports muscle maintenance and tissue repair.

Including chicken in soup makes the meal more satisfying and filling.

Mushrooms Provide Important Nutrients

Mushrooms contain B vitamins and minerals such as selenium and copper.

They also add rich savory flavor without requiring large amounts of additional seasoning.

Includes Nutritious Vegetables

Carrots, celery, onions, and garlic contribute vitamins, minerals, and plant compounds.

Adding vegetables improves the nutritional variety of the soup.

Provides Comforting Warmth

Warm soups can be especially enjoyable during colder weather.

Their combination of broth, protein, vegetables, and seasonings creates a satisfying meal.

Easy to Customize

You can reduce the cream, add additional vegetables, or choose lower-sodium broth to suit your dietary preferences.

Because the recipe is homemade, you have more control over the ingredients.

Storage and Reheating Instructions

Refrigerator Storage

Allow leftover soup to cool slightly before transferring it into shallow airtight containers.

Refrigerate within 2 hours of cooking.

Store for up to 3–4 days.

Freezer Storage

Cream-based soups can be frozen, although the dairy may separate slightly when thawed.

For best quality, freeze in airtight containers for up to 2 months.

If preparing specifically for freezing, consider adding the cream after reheating instead of before freezing.

Reheating on the Stovetop

Transfer the soup to a saucepan.

Warm over medium-low heat while stirring occasionally.

Add a small splash of broth or milk if the soup has thickened.

Reheat until the center reaches 165°F (74°C).

Avoid prolonged boiling to help preserve the creamy texture.

Microwave Reheating

Place the soup in a microwave-safe bowl.

Cover loosely and heat in short intervals, stirring between intervals.

Continue until thoroughly heated.

Frequently Asked Questions

Can I use cooked chicken instead of raw chicken?

Yes. Leftover cooked chicken or shredded rotisserie chicken works well.

Skip the initial chicken browning step and add the cooked chicken during the final 5–10 minutes of simmering.

Can I make Creamy Chicken Mushroom Soup ahead of time?

Absolutely.

You can prepare the soup one day in advance and store it in the refrigerator.

Reheat gently before serving.

What mushrooms work best?

Cremini, white button, and baby bella mushrooms are excellent choices.

For a richer flavor, you can also add shiitake mushrooms.

Can I use half-and-half instead of heavy cream?

Yes. Half-and-half creates a slightly lighter soup.

The broth may be thinner, so allow the flour mixture to thicken properly before adding the dairy.

How do I make the soup thicker?

You can use a small additional flour slurry or simmer the soup longer before adding the cream.

If using a slurry, mix 1 tablespoon flour with 2 tablespoons cold water until smooth, then stir it into the simmering broth and cook thoroughly before adding cream.

Can I make this recipe gluten-free?

Yes. Replace all-purpose flour with a suitable gluten-free thickener.

Also, use gluten-free Worcestershire sauce and check all packaged ingredients carefully.

Can I add pasta?

Yes. Small pasta shapes such as orzo, ditalini, or elbow macaroni work well.

Cook the pasta separately and add it before serving to prevent it from absorbing too much broth.

Why did my creamy soup separate?

Creamy soups may separate when heated too aggressively or when acidic ingredients are added during vigorous boiling.

Keep the heat low after adding cream and stir gently.

Can I make this soup in a slow cooker?

Yes. Cook the chicken, mushrooms, vegetables, and broth in the slow cooker until the chicken is fully cooked and the vegetables are tender.

Use a suitable thickener near the end, then stir in the cream and Parmesan during the final 20–30 minutes.

Can I make this soup without Parmesan cheese?

Yes. Parmesan is optional.

The soup will still be creamy and flavorful because of the mushrooms, herbs, chicken broth, and heavy cream.

Nutritional Information (Per Serving)

Estimated values based on six servings. Actual nutrition depends on chicken cuts, cream, cheese, broth, and ingredient brands.

Nutrient Amount
Calories 405 kcal
Protein 33 g
Carbohydrates 15 g
Total Fat 24 g
Saturated Fat 12 g
Fiber 2 g
Sugar 5 g
Sodium 650 mg

Final Thoughts

Creamy Chicken Mushroom Soup is a comforting homemade recipe filled with tender chicken, golden mushrooms, aromatic garlic, fresh vegetables, and a rich, velvety broth.

Its simple ingredients and easy cooking method make it perfect for family dinners, meal preparation, or chilly evenings when you want something warm and satisfying.

Whether enjoyed with crusty bread, a fresh green salad, or homemade dinner rolls, this delicious soup delivers rich flavor and comforting texture in every spoonful.

With its creamy consistency, savory mushroom flavor, and tender chicken pieces, Creamy Chicken Mushroom Soup is a recipe worth making again and again.

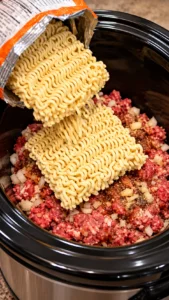
Slow Cooker Ground Beef Ramen

Slow Cooker Beef Ramen with tender ramen noodles, seasoned ground beef, savory sauce, and fresh green onions

Slow Cooker Ground Beef Ramen

Description

Slow Cooker Ground Beef Ramen is an easy, comforting dinner made with seasoned ground beef, onions, tender ramen noodles, and a rich savory sauce. It is a budget-friendly meal that comes together with simple pantry ingredients and requires very little hands-on preparation. The beef becomes tender and flavorful as it cooks with the onions and sauce, while the ramen noodles add a satisfying texture and make the dish hearty enough for a complete family meal. This recipe is perfect for busy weeknights when you want something warm, filling, and easy without spending hours in the kitchen. Add your favorite vegetables, a little cheese, or fresh green onions to customize it for your family.

Ingredients For the Beef Mixture

1½ pounds ground beef
1 small yellow onion, finely diced
3 cloves garlic, minced
1 teaspoon salt
½ teaspoon black pepper
1 teaspoon paprika
½ teaspoon garlic powder

For the Sauce

2 cups beef broth
½ cup tomato sauce
¼ cup low-sodium soy sauce
1 tablespoon Worcestershire sauce
1 tablespoon brown sugar
1 teaspoon Italian seasoning
½ teaspoon crushed red pepper flakes, optional

For the Ramen

3 packages plain ramen noodles, seasoning packets removed
1 cup sliced mushrooms, optional
1 cup frozen peas or mixed vegetables, optional
2 green onions, sliced, for garnish

Step-by-Step Instructions

  1. Heat a large skillet over medium-high heat. Add the ground beef and cook until browned, breaking it apart with a spatula as it cooks. Drain excess grease if necessary. Browning the beef first gives the finished dish better flavor and also ensures the meat is thoroughly cooked before it enters the slow cooker.
  2. Add the diced onion and minced garlic to the skillet. Cook for about 2–3 minutes, stirring occasionally, until the onion begins to soften and the garlic becomes fragrant.
  3. Season the beef mixture with salt, black pepper, paprika, and garlic powder. Stir well so the seasonings are evenly distributed.
  4. Transfer the cooked beef and onion mixture to the slow cooker.
  5. In a separate bowl, whisk together the beef broth, tomato sauce, soy sauce, Worcestershire sauce, brown sugar, Italian seasoning, and optional crushed red pepper flakes. Pour the sauce over the beef and stir gently.
  6. If using mushrooms or frozen vegetables, add them now and mix lightly. Cover the slow cooker with the lid.
  7. Cook on LOW for about 3–4 hours or until the onions and vegetables are tender and the flavors have developed. Avoid cooking the ramen noodles for the entire slow-cooking period because they can become overly soft.
  8. Break the ramen noodle blocks into smaller pieces and add them during the final 15–25 minutes of cooking. Gently press them into the hot liquid and cover again.
  9. Check the noodles after several minutes and gently stir them so they cook evenly. Continue until they are tender but still have a little bite.
  10. Turn off the slow cooker and let the dish rest for about 5 minutes. The noodles will continue absorbing some of the flavorful sauce as they rest.
  11. Garnish with sliced green onions and serve while warm. For extra flavor, sprinkle with sesame seeds or a small amount of chili flakes before serving.

Tips & Notes

Use plain ramen noodles whenever possible and discard the seasoning packets so you can control the flavor and sodium. If you only have flavored ramen, you can still use the noodles, but the finished dish may be saltier.
Do not add the ramen noodles at the beginning. They cook much faster than the beef and vegetables and can become mushy if left in the slow cooker for several hours.
For a richer flavor, use ground beef with a moderate fat content and drain excess grease after browning.
You can add sliced bell peppers, shredded carrots, mushrooms, peas, spinach, or broccoli for extra vegetables.
For a spicy version, add red pepper flakes, chili garlic sauce, or a small amount of hot sauce.
If the sauce becomes too thick after the noodles are added, stir in a few tablespoons of warm beef broth until the desired consistency is reached.

Q&A

Can I use ground turkey instead of ground beef?
Yes. Ground turkey works well as a lighter alternative. Because turkey is leaner, you may want to add an extra teaspoon of oil when cooking the onion and garlic.
Can I use different noodles?
Yes. Egg noodles, spaghetti, or other quick-cooking noodles can be substituted, but cooking times will vary. Add them near the end and cook according to their texture.
Can I make this recipe spicy?
Absolutely. Crushed red pepper flakes, chili sauce, hot sauce, or sliced fresh chilies can add a nice kick.
Can I prepare it ahead of time?
The beef and sauce can be prepared ahead and refrigerated. For the best noodle texture, add and cook the ramen shortly before serving.
How should leftovers be stored?
Allow leftovers to cool promptly, then refrigerate them in an airtight container for up to 3–4 days. Reheat gently with a splash of beef broth or water because the noodles will absorb sauce as they sit.

Servings

This recipe makes approximately 5–6 servings.

Nutrition

Estimated per serving: 390–450 calories, 25–30 g protein, 38–45 g carbohydrates, 15–20 g fat, 3–5 g fiber, 5–7 g sugar, and 900–1,100 mg sodium. Nutrition will vary depending on the ground beef, ramen noodles, soy sauce, and optional vegetables used.

Crispy Cottage Cheese Parmesan Rings

Crispy Cottage Cheese Parmesan Rings baked until golden brown and served with creamy garlic dipping sauce

Crispy Cottage Cheese Parmesan Rings – Easy High-Protein Baked Snack

Crispy Cottage Cheese Parmesan Rings are a delicious, golden, cheesy snack with crunchy edges and a savory Parmesan flavor. Made with creamy cottage cheese, freshly grated Parmesan, and simple seasonings, these homemade rings are a satisfying alternative to traditional fried snacks.

Whether you need an afternoon snack, a party appetizer, or a protein-rich treat, this easy recipe delivers incredible flavor with minimal ingredients. The rings bake until lightly browned and crisp around the edges while retaining a slightly tender, cheesy center.

One of the best things about Crispy Cottage Cheese Parmesan Rings is their versatility. You can serve them with marinara sauce, Greek yogurt dip, garlic sauce, or your favorite homemade dressing. They are also easy to customize with herbs, spices, and different cheeses.

Ingredients for Crispy Cottage Cheese Parmesan Rings

Main Ingredients

  • 1 cup cottage cheese, preferably small-curd

  • ¾ cup freshly grated Parmesan cheese

  • ½ cup shredded low-moisture mozzarella cheese

  • 1 large egg

  • ⅓ cup almond flour

  • 1 tablespoon cornstarch

  • ½ teaspoon garlic powder

  • ½ teaspoon onion powder

  • ½ teaspoon dried Italian seasoning

  • ¼ teaspoon smoked paprika

  • ¼ teaspoon freshly ground black pepper

  • ⅛ teaspoon salt, or to taste

  • 1 teaspoon olive oil, optional, for brushing

  • 1 tablespoon chopped fresh parsley, optional

Optional Dipping Sauce

  • ½ cup plain Greek yogurt

  • 1 teaspoon lemon juice

  • ½ teaspoon garlic powder

  • 1 teaspoon chopped fresh dill

  • Salt and black pepper to taste

How to Make Crispy Cottage Cheese Parmesan Rings

Step 1: Preheat the Oven

Preheat your oven to 400°F (200°C). Line a large baking sheet with parchment paper or a silicone baking mat.

Lightly grease the surface if needed to prevent sticking.

A properly preheated oven is important because high heat encourages the cheese to develop a golden crust.

Step 2: Remove Excess Moisture

Place the cottage cheese in a fine-mesh strainer for approximately 10 minutes.

If your cottage cheese contains a lot of liquid, gently press it with the back of a spoon to remove excess moisture.

This step is especially important when preparing Crispy Cottage Cheese Parmesan Rings because too much moisture can prevent the rings from becoming crispy.

Step 3: Prepare the Cheese Mixture

Transfer the drained cottage cheese to a medium mixing bowl.

Add the Parmesan cheese, shredded mozzarella, and egg.

Mix thoroughly with a spoon until the ingredients are evenly combined.

For a smoother texture, briefly blend the cottage cheese before mixing it with the remaining ingredients. However, blending is optional.

Step 4: Add the Dry Ingredients

Add the almond flour, cornstarch, garlic powder, onion powder, Italian seasoning, smoked paprika, black pepper, and salt.

Stir until a thick, slightly sticky mixture forms.

Allow the mixture to rest for approximately 5 minutes so the almond flour can absorb some moisture.

The mixture should hold its shape when spooned onto the baking sheet. If it spreads too easily, add another tablespoon of almond flour.

Step 5: Shape the Rings

Divide the mixture into approximately 12 equal portions.

Spoon each portion onto the prepared baking sheet, leaving at least 2 inches between the rings.

Using the back of a spoon or lightly dampened fingers, shape each portion into a circle about 3 inches wide.

Create a hole in the center of each circle, approximately 1 inch wide, so the mixture resembles a small doughnut.

Keep the rings approximately ¼ inch thick. Make the center openings slightly larger than needed because the cheese may spread during baking.

Step 6: Bake Until Golden

Place the baking sheet in the preheated oven.

Bake for 22–28 minutes, checking after 18 minutes, until the edges are deeply golden and the centers look set.

Baking time may vary depending on the moisture content of the cottage cheese, ring thickness, and oven performance.

If the edges brown too quickly, reduce the temperature slightly.

Step 7: Cool for Better Crispiness

Remove the baking sheet from the oven and allow the rings to cool on the pan for approximately 5 minutes.

Carefully transfer them to a wire rack.

As the cheese cools, the rings become firmer and develop a crispier texture.

For an even crunchier result, return them to the oven for another 2–3 minutes if necessary.

Step 8: Prepare the Dipping Sauce

In a small bowl, combine Greek yogurt, lemon juice, garlic powder, dill, salt, and black pepper.

Whisk until smooth.

Refrigerate until ready to serve.

Step 9: Serve and Enjoy

Arrange your Crispy Cottage Cheese Parmesan Rings on a serving platter.

Sprinkle with chopped parsley and serve with the prepared yogurt dip or warm marinara sauce.

These rings taste best when freshly baked and slightly warm.

Tips for Perfect Crispy Cottage Cheese Parmesan Rings

1. Use Freshly Grated Parmesan

Freshly grated Parmesan melts and browns beautifully. Pre-shredded cheese may contain anti-caking ingredients that affect the texture.

2. Drain the Cottage Cheese

Removing extra moisture helps the mixture hold its shape and prevents a soggy texture.

3. Make Thin Rings

Thinner rings develop more crispy surface area. Avoid making them too thick, as the centers may remain soft.

4. Leave Enough Space

The cheese mixture may spread slightly during baking. Leave sufficient room between each ring to prevent them from sticking together.

5. Avoid Excess Salt

Parmesan cheese naturally contains a significant amount of sodium. Taste and adjust seasonings carefully.

6. Let Them Cool

Cooling is essential for the best texture. Freshly baked cheese rings may seem soft at first but become firmer as they cool.

Delicious Recipe Variations

Spicy Parmesan Rings

Add ¼ teaspoon crushed red pepper flakes and a pinch of cayenne pepper for a spicy twist.

Garlic Herb Rings

Mix in fresh basil, parsley, and oregano for a fragrant Mediterranean-inspired version.

Everything Bagel Rings

Sprinkle everything bagel seasoning over the rings before baking for extra crunch and flavor.

Extra Cheesy Rings

Replace a portion of the mozzarella with shredded sharp cheddar for a stronger cheese flavor.

Gluten-Free Rings

The recipe uses almond flour and cornstarch rather than wheat flour. Choose certified gluten-free seasonings and other ingredients if needed.

What to Serve with Cottage Cheese Parmesan Rings

Crispy Cottage Cheese Parmesan Rings pair beautifully with many sauces and dishes.

  • Marinara sauce: A classic tomato-based dip that complements the cheesy flavor.

  • Garlic yogurt dip: Adds refreshing creaminess and tanginess.

  • Avocado dip: A smooth, flavorful option with healthy fats.

  • Fresh garden salad: Turns the rings into part of a light lunch.

  • Tomato soup: A comforting combination for cooler days.

For parties, serve the rings alongside vegetable sticks, hummus, olives, or roasted cherry tomatoes.

Health Benefits of Cottage Cheese Parmesan Rings

A Good Source of Protein

Cottage cheese, Parmesan, mozzarella, and eggs contribute protein, which supports muscle maintenance and helps make snacks more satisfying.

Lower in Carbohydrates Than Traditional Breaded Rings

Unlike many conventional breaded snacks, this recipe uses almond flour and a small amount of cornstarch.

This can make it a useful alternative for people who prefer snacks with fewer carbohydrates, although the exact amount depends on the ingredients used.

Provides Calcium

Cottage cheese and Parmesan contain calcium, an important mineral for maintaining healthy bones and teeth.

Baked Instead of Deep-Fried

These rings are baked in the oven rather than submerged in cooking oil, reducing the need for added frying fat.

Keep in mind that the cheese still contributes saturated fat and sodium, so portion size remains important.

Storage and Reheating Instructions

Refrigerator: Store completely cooled rings in an airtight container for up to 3–4 days.

Freezer: Arrange cooled rings in a single layer on a baking sheet and freeze until firm. Transfer them to a freezer-safe container for up to 2 months.

Oven Reheating: Place the rings in a preheated 375°F (190°C) oven for 5–8 minutes until hot and crispy.

Air Fryer Reheating: Reheat at 350°F (175°C) for approximately 3–5 minutes, checking frequently.

Microwave: Although possible, microwaving can make the rings soft instead of crispy.

For the best texture, use the oven when reheating leftovers.

If you enjoy homemade savory treats, don’t miss our No-Knead Rustic Rosemary Garlic Bread. This easy, aromatic bread has a beautifully crispy crust and a soft, fluffy center, making it perfect for serving alongside your favorite dips and Mediterranean dishes.

Frequently Asked Questions

Can I make Crispy Cottage Cheese Parmesan Rings without almond flour?

Yes. You can experiment with a small amount of oat flour or all-purpose flour instead. However, these flours absorb moisture differently, so adjust the quantity until the mixture holds its shape.

Why are my Parmesan rings not crispy?

Excess moisture, thick rings, or insufficient baking time are common reasons.

Drain your cottage cheese thoroughly and make the rings thin enough for even browning.

Can I make this recipe without eggs?

You can experiment with an egg substitute, but the texture and structure may change. Eggs help bind the cheese mixture together and prevent the rings from breaking.

Can I prepare the mixture ahead of time?

Yes. Prepare the mixture and refrigerate it in an airtight container for up to 24 hours.

Stir before shaping, and add a little almond flour if extra moisture develops.

Are these rings suitable for a keto diet?

They may fit some lower-carbohydrate eating plans, but almond flour and cottage cheese still contribute carbohydrates.

Check the nutritional information and your specific dietary requirements before including them in a strict keto meal plan.

Can I use low-fat cottage cheese?

Yes. Low-fat cottage cheese works, although the texture and flavor may be slightly different.

Choose a thick variety and remove excess liquid before mixing.

How do I prevent the rings from sticking?

Use quality parchment paper or a silicone baking mat. Allow the baked rings to cool slightly before lifting them with a thin spatula.

Nutritional Information

Approximate nutrition per serving, based on 4 servings (3 rings each), excluding optional dipping sauce. Values vary by cheese brands and ingredient quantities.

Nutrient Amount
Calories 295 kcal
Protein 23 g
Total Carbohydrates 9 g
Total Fat 19 g
Saturated Fat 8 g
Fiber 2 g
Sugar 3 g
Sodium 690 mg

For a complete Mediterranean-inspired meal, pair these cheesy rings with our Mediterranean Skillet Fish with Roasted Red Peppers, Baby Potatoes, and Green Olives, a flavorful dish packed with fresh ingredients.

Final Thoughts

Crispy Cottage Cheese Parmesan Rings are an easy way to transform everyday ingredients into a flavorful homemade snack. Their golden cheesy edges, protein-rich ingredients, and customizable seasonings make them suitable for everything from casual snacking to entertaining guests.

With proper moisture control, thin shaping, and sufficient baking time, you can achieve deliciously crispy results without deep-frying. Serve them fresh with your favorite dip, and enjoy a savory snack that’s simple to make and easy to share.

Stuffed Cabbage Rolls in Creamy Mushroom Sauce

Stuffed Cabbage Rolls in Creamy Mushroom Sauce

Introduction

Stuffed Cabbage Rolls in Creamy Mushroom Sauce are a comforting homemade meal featuring tender cabbage leaves wrapped around a flavorful ground beef and rice filling, then gently simmered in a rich, velvety mushroom cream sauce. Every roll is packed with savory flavor, while the creamy sauce adds earthy mushroom notes, garlic, herbs, and a touch of tanginess.

This recipe is perfect for cozy family dinners, weekend cooking, or preparing a satisfying meal ahead of time. Unlike traditional cabbage rolls served with tomato sauce, this version offers a creamy, savory twist that pairs beautifully with mashed potatoes, rice, buttered noodles, or crusty bread.

The ingredients are simple, and the preparation is straightforward. Once the cabbage leaves are softened and the filling is mixed, the rolls are assembled, arranged in a baking dish, and covered with homemade mushroom sauce. The oven does most of the work, leaving you with tender cabbage, juicy filling, and a delicious sauce.

Recipe Details

  • Preparation Time: 35 minutes
  • Cooking Time: 60–75 minutes
  • Total Time: Approximately 1 hour 50 minutes
  • Servings: 6 people
  • Cuisine: European-inspired comfort food
  • Course: Main course
  • Cooking Method: Stovetop preparation and oven baking
  • Difficulty: Moderate

Ingredients

For the Cabbage Rolls

  • 1 large green cabbage
  • 1 pound ground beef
  • ½ pound ground pork, or additional ground beef
  • ¾ cup uncooked long-grain white rice
  • 1 small onion, finely diced
  • 2 cloves garlic, minced
  • 1 large egg
  • 2 tablespoons chopped fresh parsley
  • 1 teaspoon paprika
  • ½ teaspoon dried thyme
  • 1 teaspoon salt, or to taste
  • ½ teaspoon black pepper
  • ½ cup beef broth

For the Creamy Mushroom Sauce

  • 12 ounces fresh mushrooms, sliced
  • 3 tablespoons butter
  • 1 tablespoon olive oil
  • 1 medium onion, finely chopped
  • 3 cloves garlic, minced
  • 3 tablespoons all-purpose flour
  • 2 cups beef broth or chicken broth
  • 1 cup heavy cream
  • ½ cup sour cream
  • 1 teaspoon Dijon mustard
  • ½ teaspoon dried thyme
  • ½ teaspoon paprika
  • Salt and black pepper, to taste
  • 2 tablespoons chopped fresh parsley
  • ¼ cup grated Parmesan cheese, optional

Optional Garnishes

  • Fresh parsley
  • Extra Parmesan cheese
  • A pinch of freshly ground black pepper
  • A few sautéed mushroom slices

Instructions

Step 1: Prepare the Cabbage

Remove any damaged outer leaves from the cabbage and rinse the head under cool running water. Carefully cut out the hard core using a sharp knife.

Bring a large pot of water to a boil. Lower the cabbage into the water, core-side down, and simmer gently for approximately 5–8 minutes.

As the outer leaves soften, carefully remove them with tongs. Return the cabbage to the water as needed to soften additional leaves. You will need approximately 12–14 large leaves, depending on their size.

Place the softened leaves on a clean tray and allow them to cool enough to handle. Use a small knife to trim the thick central rib of each leaf without cutting completely through it. This makes the leaves easier to roll.

Helpful tip: Avoid overcooking the leaves. They should be flexible enough to fold without tearing but still strong enough to hold the filling.

Step 2: Cook the Rice

Rinse the rice under cold water until the water runs mostly clear. Place it in a saucepan with water and cook until partially tender, following the package instructions but reducing the cooking time slightly.

Drain any excess water and let the rice cool.

Partially cooking the rice helps it soften during baking while absorbing the flavor of the meat and sauce. Avoid using fully overcooked rice because it may become mushy inside the cabbage rolls.

Step 3: Prepare the Filling

In a large mixing bowl, combine the ground beef, ground pork, partially cooked rice, diced onion, minced garlic, egg, parsley, paprika, thyme, salt, black pepper, and beef broth.

Mix gently with clean hands or a spoon until the ingredients are evenly distributed.

Do not overmix the filling. Excessive mixing can make the meat mixture dense instead of tender.

The egg helps bind the ingredients, while the broth keeps the filling moist as it cooks. If the mixture seems unusually wet, add a tablespoon of breadcrumbs. If it feels too dry, add another small splash of broth.

For a lighter variation, use ground turkey or chicken instead of beef and pork.

Step 4: Fill the Cabbage Leaves

Lay one softened cabbage leaf flat on a cutting board with the stem end facing you.

Place approximately 2–3 tablespoons of filling near the base of the leaf, adjusting the amount according to its size.

Fold the bottom edge over the filling, tuck in both sides, and roll the cabbage forward to create a compact parcel.

Repeat with the remaining leaves and filling. If a leaf is very small or torn, overlap two smaller leaves to create a stronger wrapper.

Arrange the finished rolls seam-side down on a plate.

Try to make the rolls similar in size so they cook evenly. Do not pack the filling too tightly because the rice and meat need room to cook.

Step 5: Sauté the Mushrooms

Preheat your oven to 350°F (175°C).

Heat the butter and olive oil in a large skillet over medium heat. Add the sliced mushrooms in a single layer, working in batches if necessary.

Cook for 5–8 minutes, stirring occasionally, until the mushrooms release their moisture and become golden brown.

Allowing the mushrooms to brown properly develops a deeper, richer flavor. If the skillet is overcrowded, the mushrooms may steam instead of caramelizing.

Add the chopped onion and cook for another 3–4 minutes until softened. Stir in the minced garlic and cook for approximately 30 seconds, just until fragrant.

Step 6: Make the Creamy Mushroom Sauce

Sprinkle the flour over the mushroom and onion mixture. Stir continuously for 1–2 minutes to coat the vegetables and cook away the raw flour taste.

Gradually pour in the broth while whisking or stirring. Add the liquid slowly to prevent lumps from forming.

Bring the mixture to a gentle simmer and cook for 3–5 minutes, stirring regularly, until the sauce begins to thicken.

Reduce the heat to low. Stir in the heavy cream, Dijon mustard, thyme, paprika, salt, and black pepper.

Let the sauce warm gently for another 2–3 minutes. Avoid boiling it vigorously after adding the cream, as high heat can affect its texture.

Remove the skillet from the heat and stir in the sour cream. If using Parmesan, add it now and stir until incorporated.

Taste the sauce and adjust the seasoning. Add a little more broth if it is too thick; add a small amount of cream if you prefer a richer flavor.

The sauce should be creamy and pourable rather than extremely thick because it will continue to reduce during baking.

Step 7: Assemble the Cabbage Rolls

Spread a thin layer of mushroom sauce across the bottom of a large baking dish. This prevents the cabbage rolls from sticking and adds flavor to the bottom layer.

Arrange the cabbage rolls seam-side down in the dish. Place them close together without crushing them.

Pour the remaining creamy mushroom sauce over the rolls, making sure the tops and sides are coated.

If the sauce is very thick, add up to ½ cup of extra broth around the edges of the dish. This helps create enough moisture for the rolls to cook gently.

Cover the dish tightly with aluminum foil or a lid.

Step 8: Bake Until Tender

Transfer the covered baking dish to the preheated oven and bake for 60–75 minutes.

The exact cooking time depends on the size of the rolls, the depth of the dish, and how tightly they are packed.

After approximately 50 minutes, carefully check the cabbage for tenderness. If the rolls are still firm, cover the dish again and continue baking.

The meat filling must be fully cooked. For food safety, check the center of a representative roll with a food thermometer. Ground beef and pork should reach at least 160°F (71°C); ground poultry should reach 165°F (74°C).

When the cabbage is tender and the filling is cooked through, remove the foil. Spoon some of the sauce over the rolls and bake uncovered for another 5–10 minutes if you would like a slightly thicker, more concentrated sauce.

Do not bake uncovered for too long, as the sauce may reduce excessively and the cabbage edges may dry out.

Step 9: Rest and Garnish

Remove the baking dish from the oven and allow the cabbage rolls to rest for 10 minutes.

Resting allows the filling to settle and the sauce to thicken slightly. It also makes the rolls easier to transfer to serving plates.

Sprinkle with freshly chopped parsley, extra Parmesan, and a little black pepper.

Serve each portion with plenty of creamy mushroom sauce spooned over the top.

Tips for Perfect Stuffed Cabbage Rolls

1. Choose a large cabbage. Large, flexible leaves are easier to fill and roll. Green cabbage is a reliable choice because its leaves soften well.

2. Trim the thick ribs. Carefully shaving down the central rib prevents the leaves from splitting during rolling.

3. Partially cook the rice. This gives the rice enough time to finish cooking without becoming overly soft.

4. Brown the mushrooms well. Golden mushrooms provide deeper flavor and prevent the sauce from tasting bland.

5. Add cream over low heat. Gentle heating helps the sauce remain smooth and creamy.

6. Keep the rolls seam-side down. This helps them retain their shape during baking.

7. Cover the baking dish. Covered baking traps steam and helps the cabbage become tender without drying out.

8. Allow the dish to rest. A short resting period improves the texture and makes serving easier.

Delicious Recipe Variations

Cheesy Mushroom Cabbage Rolls

Add ½ cup shredded mozzarella or Gruyère to the sauce and stir until melted. Sprinkle a little extra cheese over the rolls during the final 10 minutes of baking for a richer finish.

Chicken and Rice Cabbage Rolls

Replace the beef and pork with ground chicken. Use chicken broth in the sauce and make sure the center of the filling reaches 165°F (74°C).

Vegetarian Stuffed Cabbage Rolls

Replace the meat with a mixture of cooked lentils, rice, finely chopped mushrooms, grated carrots, and onions. Add an egg to bind the filling if desired, or use a suitable plant-based binder. Vegetable broth works well in the sauce.

Garlic Parmesan Mushroom Sauce

Increase the garlic to four cloves and add extra Parmesan cheese. Finish with chopped parsley and a small squeeze of lemon juice to balance the richness.

Herb-Infused Cream Sauce

Add fresh thyme, chopped chives, or a small amount of rosemary to the sauce. Use rosemary sparingly because its flavor can be strong.

Turkey Cabbage Rolls

Use ground turkey instead of beef and pork. A little olive oil and additional broth can help keep the leaner filling moist. Cook the filling to an internal temperature of 165°F (74°C).

What to Serve with Creamy Mushroom Cabbage Rolls

These cabbage rolls are rich and satisfying, so they pair beautifully with simple side dishes.

  • Mashed potatoes: Creamy potatoes soak up the mushroom sauce and make the meal especially comforting.
  • Buttered egg noodles: Their soft texture complements the tender cabbage and savory sauce.
  • Steamed rice: Rice provides a simple base for the extra sauce.
  • Crusty bread: Use warm bread to enjoy every last spoonful of the creamy mushroom sauce.
  • Roasted green beans: Their freshness and slight crispness balance the richness of the dish.
  • Fresh cucumber salad: A light salad with vinegar, herbs, and a little olive oil adds a refreshing contrast.
  • Roasted carrots: Their natural sweetness pairs well with the earthy mushrooms.

For a complete family dinner, serve two cabbage rolls per person with a vegetable side and a modest portion of mashed potatoes or noodles.

Storage and Reheating

Allow leftovers to cool slightly, then refrigerate them in airtight containers within two hours of cooking.

Store the cabbage rolls and sauce together to help keep the filling moist. Refrigerated leftovers are generally best used within 3–4 days.

To reheat in the oven, place the rolls in an oven-safe dish and spoon extra sauce over them. Cover and heat at 325°F (165°C) until the center reaches 165°F (74°C).

For a quicker option, reheat individual portions in the microwave in a covered microwave-safe container, stirring or repositioning the sauce as needed. Heat until steaming hot throughout.

If the sauce has thickened during storage, stir in a tablespoon or two of broth or milk before reheating.

Can You Freeze Stuffed Cabbage Rolls?

Yes. For the best texture, freeze the cooked rolls with their mushroom sauce in a freezer-safe container. Cool promptly, leaving as little empty space as practical, and freeze for up to 2–3 months for best quality.

Thaw overnight in the refrigerator before reheating, then heat until the center reaches 165°F (74°C). The sauce may separate slightly after freezing; gently stirring it during reheating can help bring it back together.

Make-Ahead Instructions

This recipe is convenient for preparing ahead of time.

You can blanch the cabbage leaves, cook the rice, and prepare the filling a day in advance. Store each component separately in covered containers in the refrigerator.

You can also assemble the rolls and place them in the baking dish with the sauce, then cover and refrigerate before baking. For food safety, keep the dish refrigerated rather than leaving it at room temperature.

When baking directly from the refrigerator, allow extra time for the dish to heat through. Check the center of the filling with a thermometer instead of relying on time alone.

For the smoothest sauce, you may prefer to prepare the mushroom sauce shortly before assembling the dish, although it can also be made ahead and gently reheated.

Nutritional Information

The following values are estimates for one serving, assuming the recipe makes six servings and includes the meat filling and creamy mushroom sauce.

  • Calories: 450–600
  • Protein: 25–35 grams
  • Carbohydrates: 25–35 grams
  • Fat: 25–40 grams
  • Fiber: 4–7 grams
  • Sodium: Varies according to broth, salt, and cheese

Actual values will depend on the meat used, the fat content of the cream, the size of the cabbage leaves, and the amount of sauce served.

To reduce calories and saturated fat, use lean ground beef or turkey, replace some heavy cream with milk, and use plain Greek yogurt in place of some sour cream. Add salt gradually, particularly when using salted broth or Parmesan cheese.

Ingredient Benefits

Cabbage: Cabbage provides fiber, vitamin C, vitamin K, and other plant compounds. It adds texture and bulk to the meal.

Ground beef: Beef provides protein, iron, zinc, and vitamin B12. Leaner varieties can help reduce the overall fat content.

Rice: Rice supplies carbohydrates that provide energy and gives the filling its tender texture.

Mushrooms: Mushrooms contribute an earthy flavor and provide fiber and several micronutrients.

Onions and garlic: These ingredients build savory flavor and contain beneficial plant compounds.

Fresh parsley and thyme: Fresh herbs add color, fragrance, and small amounts of vitamins and other plant compounds.

Cream and sour cream: These ingredients create the signature rich texture and contribute calcium, although they also add fat and calories.

This is a hearty comfort-food recipe, so enjoying it alongside vegetables and appropriate portions can help make it part of a balanced meal.

Frequently Asked Questions

1. Why are my cabbage rolls falling apart?

The cabbage leaves may be too firm, torn, or overfilled. Blanch them until flexible, trim the thick ribs, and roll the filling snugly without packing it too tightly. Place each roll seam-side down in the baking dish.

2. Can I use uncooked rice in the filling?

Partially cooking the rice is recommended for this recipe because it gives you more predictable results. Uncooked rice requires additional moisture and cooking time, so using it without adjusting the recipe may leave the rice firm.

3. Can I make the sauce without flour?

Yes. You can use a suitable cornstarch slurry to thicken the sauce. Mix 1 tablespoon of cornstarch with 2 tablespoons of cold water, then gradually stir it into the simmering broth before adding the cream. Adjust the amount as needed.

4. How do I stop the mushroom sauce from becoming too thin?

Brown the mushrooms until their excess moisture evaporates, cook the flour briefly with the butter and vegetables, and simmer the broth until it begins to thicken before adding the cream. If necessary, simmer the finished sauce gently for a few additional minutes.

5. Can I use canned mushrooms?

Yes, although fresh mushrooms usually provide a better texture and deeper flavor. Drain canned mushrooms thoroughly and sauté them until excess moisture evaporates before making the sauce.

6. What can I use instead of heavy cream?

Half-and-half or evaporated milk can provide a lighter alternative, although the sauce may be less rich. You can also use milk thickened with flour or cornstarch. Add dairy over low heat and avoid vigorous boiling.

7. Can I prepare this recipe without pork?

Absolutely. Use all ground beef, ground turkey, or ground chicken. Season the filling well and ensure the meat reaches its safe internal temperature.

8. How do I know when the cabbage rolls are ready?

The cabbage should be tender enough to cut easily with a fork, and the filling should be fully cooked. Check the center with a food thermometer: ground beef or pork should reach 160°F (71°C), while ground poultry should reach 165°F (74°C).

9. Is the sauce supposed to cover the rolls completely?

The sauce does not need to submerge every roll, but it should generously coat the tops and sides. Add a little extra broth if needed to maintain moisture during baking.

10. Can I make this recipe in a slow cooker?

Yes. Place the assembled rolls and sauce in the slow cooker and cook on LOW for approximately 6–8 hours or until the cabbage is tender and the filling is fully cooked. Timing varies with the appliance and roll size, so check the center temperature. For a thicker sauce, transfer it to a saucepan and simmer gently after cooking.