Mexican Ground Beef Casserole with Rice

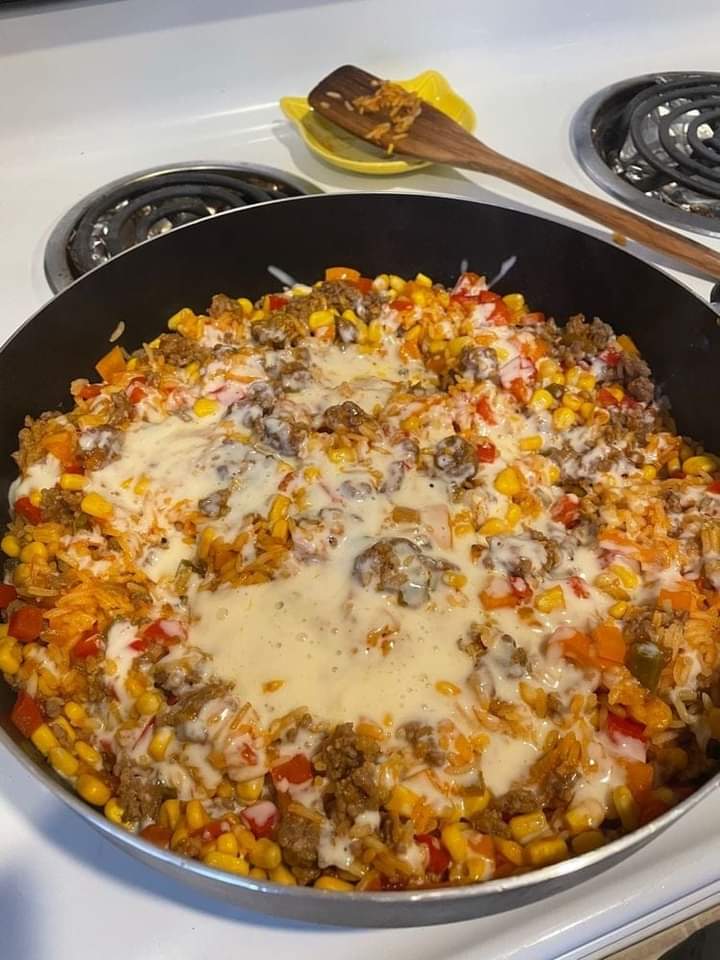
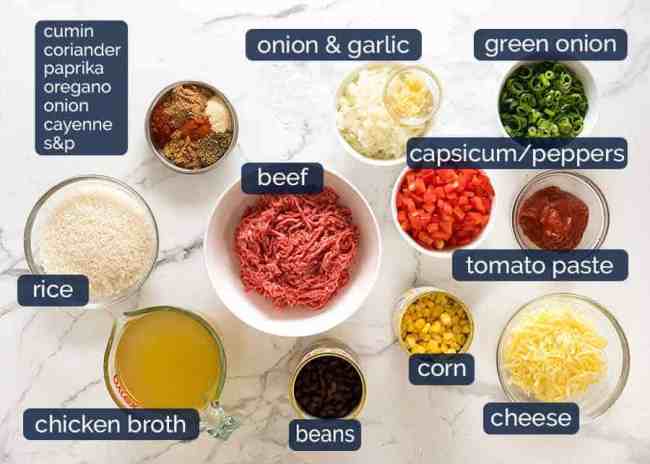
No more boring beef mince recipes….. Kick off the week with THIS flavour packed Mexican Ground Beef Casserole!! With corn, capsicum/bell peppers and black beans, this rice casserole is juicy, cheesy, and packed with big Mexican flavours.

One pot, quick dinner idea that’s on the table in 30 minutes! 

 Big juicy pot of beef and rice loaded with Mexican flavours! The rice is tender and perfectly cooked, and the tomato sauce is generously flavoured with a Mexican Spice mix. A quick dinner made in one pot with not much prep!

Prep Time: 10mins

Cook Time: 20mins

Total Time: 30mins

Servings: 5 

Ingredients:

  • 2 tbsp olive oil
  • 1 onion , finely chopped
  • 3 garlic cloves , minced
  • 500g (1 lb) ground beef (mince), lean
  • 1/3 cup tomato paste
  • 1 1/4 cup long grain white rice , uncooked (Note 1)
  • 2.5 cups (625 ml) chicken broth/stock , low sodium
  • 400g (14oz) can corn kernels , drained (Note 2)
  • 400g (14oz) can black beans , drained (or other beans)
  • 1 capsicum/bell pepper , diced
  • 1 cup green onions/shallots
  • 2 cups (200g) cheese , shredded (anything that melts! Note 3)

MEXICAN SPICES:

  • 0.5 tsp cayenne pepper (Note 4)
  • 1.5 tbsp dried oregano
  • 3 tsp cumin
  • 3 tsp coriander
  • 3 tsp onion powder
  • 2 tsp paprika
  • 1.5 tsp salt

Instructions:

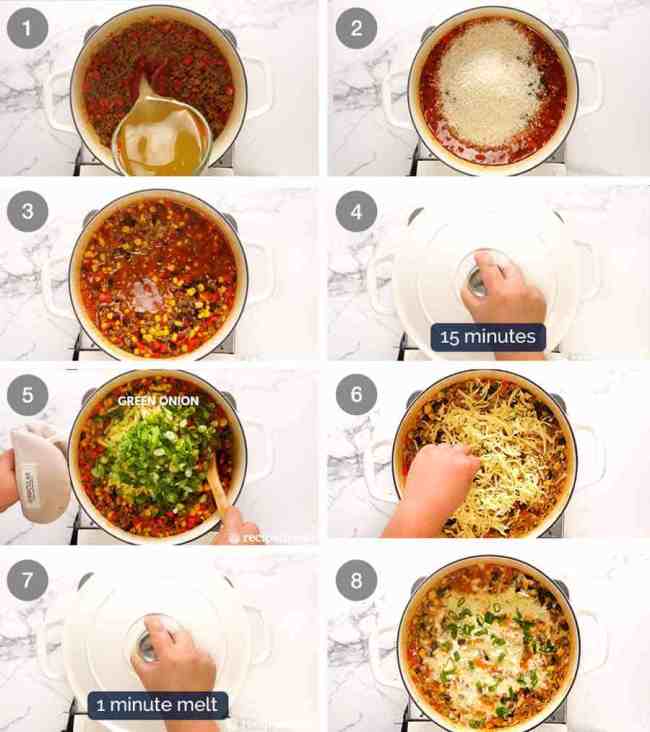
  1. Heat oil in a large pot over high heat. Add garlic and onion, cook 1 1/2 minutes until onion is translucent.
  2. Add beef and cook, breaking it up as you go, until you no longer see raw meat (about 2 minutes).
  3. Add Mexican Spices and cook for 30 seconds.
  4. Add capsicum and cook for 1 minute.
  5. Add tomato paste and broth, stir to mix in.
  6. Add rice, corn and black beans.
  7. Stir, bring to simmer then cover and lower heat to medium low (simmering gently). Cook 15 minutes.
  8. Remove lid, quickly stir through green onion and HALF the cheese.
  9. Smooth top then sprinkle on remaining cheese. Cover and leave for 1 minute just to melt cheese.
  10. Remove from stove and serve immediately, garnished with more green onion if desired.

Notes:

1. Rice – recipe works best with long grain white rice. Will also work with medium or short white rice grain, “standard” (unspecified) white rice, jasmine* or basmati rice*. Recipe as written won’t work with: brown rice, wild rice, risotto, paella rice, quinoa.

2. Corn – can also use frozen, 1 3/4 cups.

3. Cheese – use anything that melts! Cheddar, mozzarella, tasty, Monterey Jack, Colby.

4. Cayenne adds spiciness, this amount across a vast volume of rice is barely noticeable. Increase or eliminate if desired.

5. Leftovers will keep for 3 days in the fridge, reheat in microwave. I haven’t tried freezing but I don’t see why it wouldn’t freeze ok!

6. Nutrition per serving, this is quite a generous serving (about 2 packed cups, and it’s dense so very filling!). Every cup of cheese adds 100 calories per serving, so if you want to cut back on calories, halve the cheese (don’t skip completely!).

Nutritional Info:

Calories: 715cal | Carbohydrates: 73g | Protein: 45g | Fat: 28g | Saturated Fat: 13g | Cholesterol: 109mg | Sodium: 2039mg | Potassium: 1258mg | Fiber: 10g | Sugar: 7g | Vitamin A: 2254IU | Vitamin C: 54mg | Calcium: 437mg | Iron: 7mg


Italian Bomboloni Recipe

These Italian Donuts better known as a Bomboloni are made with a soft yeast dough, fried, rolled in sugar then filled with your favourite pastry cream filling. Served for breakfast and snack or just about anytime you want.

What is the Difference Between Doughnuts and Bomboloni?

Though bomboloni can is a type of doughnut, they’re a little different because they use fresher ingredients. They’re also a bit thicker and deep-fried rather than baked.

How to Serve Italian Bomboloni?

Try to serve bomboloni as a dessert or a snack when your kids are good. They go well with milk and other refreshing drinks, so try to mix them up a little in this way.

Italian Bomboloni Cooking Tips:
  • Make sure you brown each side before flipping
  • Add the Nutella slowly to avoid overstuffing
  • Plan for at least three bomboloni per family member
Variations of Italian Bomboloni:
  • Add a chocolate cream instead of Nutella
  • Top with a whipped cream for more flavor
  • Let the dough rise longer to produce thicker doughnuts

Prep Time: 1hr 30min

Cook Time: 1hr 7min

Total Time: 2hrs 37mins

Servings: 12 Donuts

Looking for a delicious dessert that goes above and beyond your traditional doughnut? You need to try out this Italian bomboloni recipe. Decided to blend well with fantastic pasta dishes and other Italian favorites, it’s a relatively simple and tasty dessert your family will adore.

Ingredients:

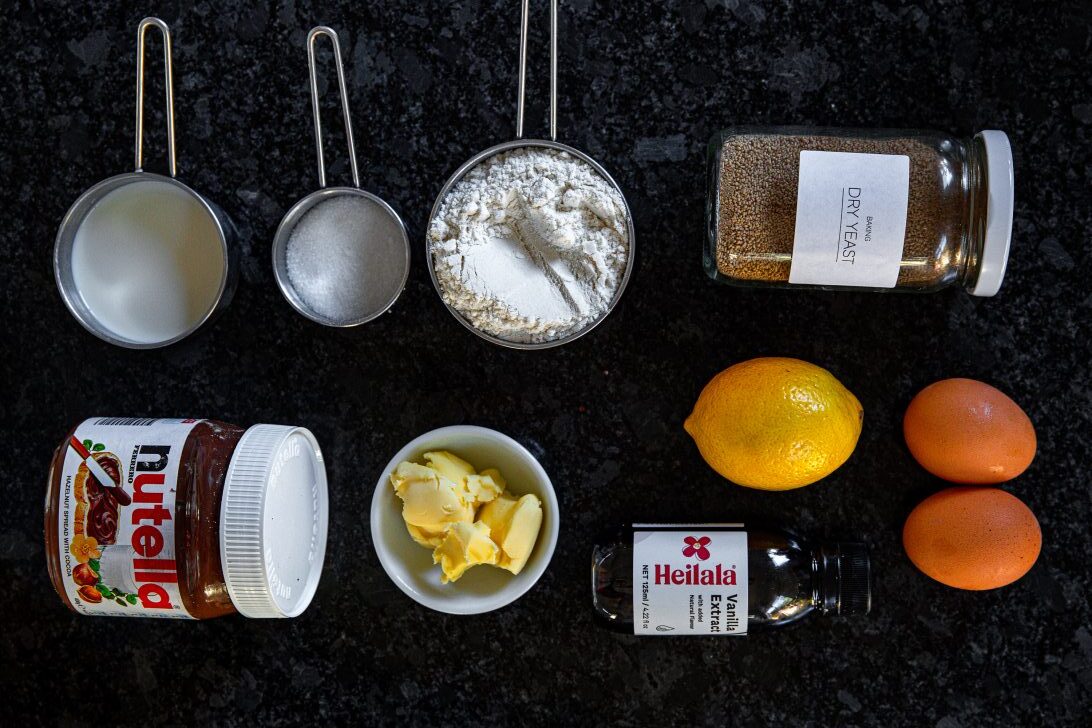
  • 3 c Flour
  • 2 ¼ tsp Dry Yeast
  • 2 tsp Salt
  • ¼ c Sugar
  • 1 lemon zested
  • 2 eggs
  • ¾ c Milk
  • 4 tbsp Butter
  • 1 tsp Vanilla
  • Nutella

Instructions:

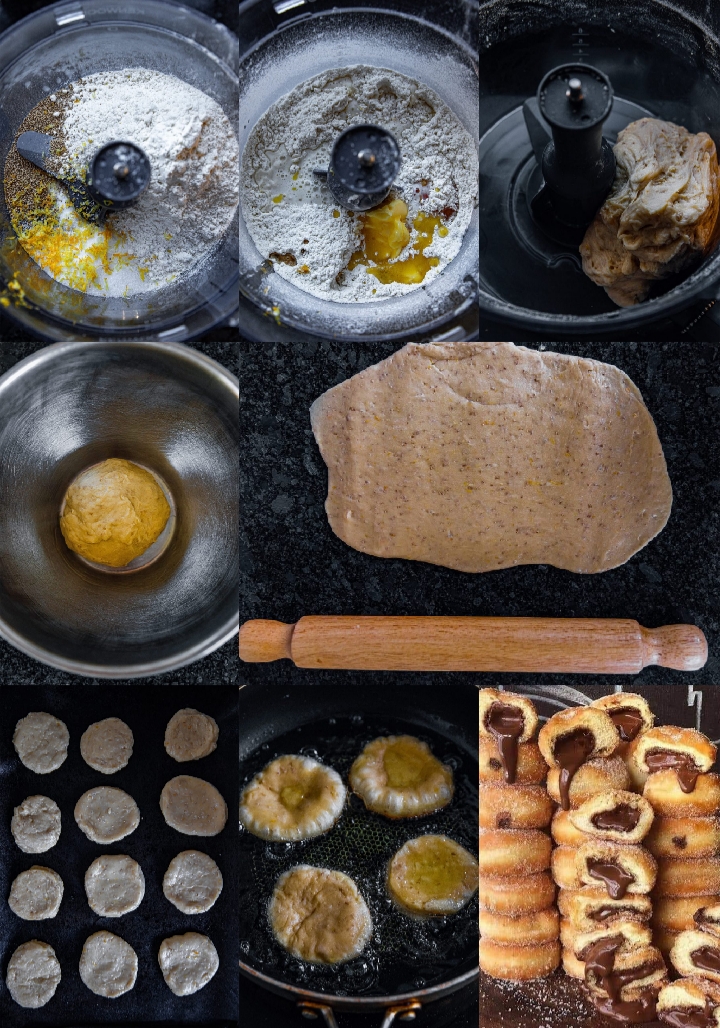
  1. In a mixer combine the flour, yeast, salt, sugar, and lemon zest.
  2. Add in eggs one at a time, then the milk, butter, and vanilla and knead for 2 minutes.
  3. Put dough on a floured bench and knead until a bit sticky, yet smooth and stretchy. About 5 minutes.
  4. Place dough in a greased bowl and cover. Let rise for an 1hr until doubled in size.
  5. Roll out the dough to ¾ thick and use a cup sized cutter to cut them into circles.
  6. Cover on a baking sheet and let rise for another hour.
  7. Heat oil in a deep pan until 175 degrees C and fry in batches until golden brown. Flipping halfway.
  8. Remove and place on paper towels to remove excess oil.
  9. Use a piping bag to fill each with Nutella then top with icing sugar.
  10. Serve and enjoy!

Nutritional Info:

Serving: 1g | Calories: 204kcal | Carbohydrates: 31g | Protein: 5g | Fat: 6g | Saturated Fat: 4g | Polyunsaturated Fat: 2g | Cholesterol: 42mg | Sodium: 440mg | Fiber: 1g | Sugar: 6g

Apple Dumplings Recipe

Is there anything better than warm Homemade Apple Dumplings? Not today there isn’t! I am obsessed with this apple dumplings recipe! I was management in a family style restaurant in the town I lived in many years ago. I worked 5 days a week. During the Fall I would take one of my days off and go to the restaurant and make triple batches of these apple dumplings.

These apple dumplings are delicious and so easy to make. The homemade dough is easy to make, the recipe comes together fast, the results are wonderful.

Prep Time: 20mins

Cook Time: 35mins

Total Time: 55mins

Servings: 6

Ingredients

Sauce Ingredients

  • 1 cup sugar
  • 1 cup water
  • 1 tsp cinnamon
  • 2 Tbls butter

Dough Ingredients

  1. 2 cups all flour
  2. 2 tsps baking powder
  3. 1 tsp salt
  4. 2/3 cup Crisco shortening
  5. 1/2 cup milk
  6. 6 small Macintosh or Gala Apples about 3 inches in diameter Peeled and cored. Do not cut in half I used Gala, leave them whole.

Instructions:

  1. Make the sauce first so it has time to cool down.
  2. Make the dough and refrigerate it until you have peeled and cored your apples.

Sauce Directions

  1. I put all the sauce ingredients together in a medium saucepan. When it comes to a boil, I let it boil a minute or two to thicken a little bit.

For the dough

  1. Place the flour, baking powder and salt into a large bowl. Cut the shortening into the flour mixture with a pastry blender. Add milk all at once.
  2. Stir with a fork until the dough just forms a ball. Place in the refrigerator until you have peeled and cored the apples.
  3. Peel and core the apples. You can keep the apples from turning brown by placing them in cold water while you work.
  4. I divide the dough into six equal portions and roll them out on a lightly floured surface individually.
  5. You can also roll the dough out on a lightly floured surface long enough to fit 6 apples on it and cut the dough into six squares.
  6. Place the apples on a dough square, fill the center with butter, sprinkle sugar over top then sprinkle cinnamon over top.
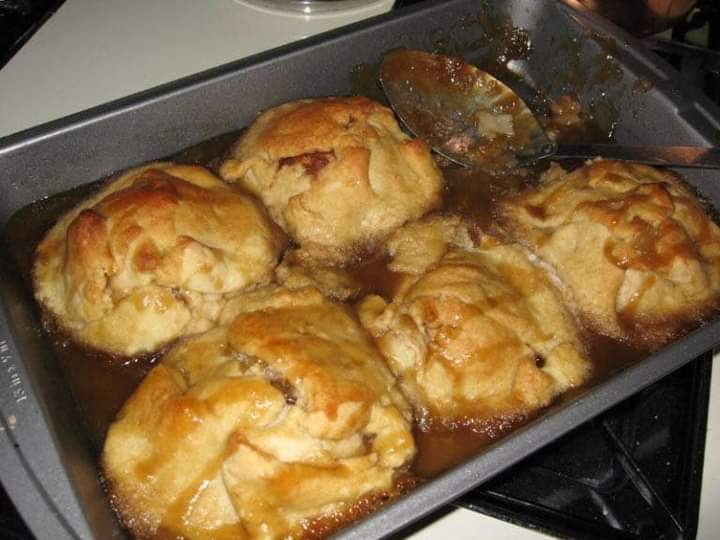
  7. Mold the dough around the apple, making sure there are no opening for the filling to escape from.
  8. Place the apples in a 13×9 inch baking pan. Spacing them about an inch apart.
  9. Pour the sauce over the dumplings , then sprinkle with sugar. Bake in a preheated 375 degree oven for 35 minutes.
  10. Spoon the sauce on the bottom of the pan over the apple dumplings after they come out of the oven.
Nutritional Info:

Calories: 121kcal, Carbohydrates: 26g, Fat: 2g, Saturated Fat: 1g, Polyunsaturated Fat: 1g, Cholesterol: 6mg, Sodium: 18mg, Fiber: 1g, Sugar: 23g

Baked Barbeque Back Ribs Recipe

Fall-off-the-bone, tender bbq back ribs made with a flavorful homemade dry rub and baked in the oven to juicy perfection.

PREP TIME: 20mins

COOK TIME: 3 hrs

TOTAL TIME: 3 hrs 20mins

SERVINGS: 4 servings

INGREDIENTS:

Dry Rub
  • 2 tablespoons brown sugar
  • 2 tablespoons smoked paprika
  • 2 tablespoons garlic powder
  • 1 tablespoon onion powder
  • 1 tablespoon cumin
  • 1 tablespoon kosher salt
  • 1 teaspoon black pepper
  • 1 teaspoon cayenne powder
Baby Back Ribs
  • 2 1/2 lbs baby back ribs thawed
  • 1 tablespoon liquid smoke
  • 2 tablespoons apple cider vinegar

INSTRUCTIONS:

  1. Preheat oven to 300 degrees F. Place a wire rack inside a large baking sheet. Set aside.
  2. Gently remove the thin membrane from the back of the rack of ribs with a knife or your hands. It should pull right off.
  3. In a bowl, mix together all your dry rub ingredients.
  4. Generously season your ribs with the dry rub on both sides making sure to coat every inch of the rack.
  5. Place the ribs on a large piece of aluminum foil, top side down, then splash them with the apple cider vinegar and liquid smoke.
  6. Fold the aluminum foil all around the ribs, sealing it entirely and securely, so no liquid leaks out.
  7. Place in the oven and bake for 3 hours or until very tender. Remove them from the oven.
  8. Remove the aluminum foil from the ribs and generously brush them with bbq sauce.
  9. Place the ribs back in the oven and broil them for 5 minutes until caramelized. Serve and enjoy!

NUTRITIONAL INFO:

Serving: 1 serving

Calories: 462 kcal/Carbohydrates: 13 g/Protein: 36 g/Fat: 30 g/Saturated Fat: 10 g/Cholesterol: 123 mg/Sodium: 1919 mg/Potassium: 623 mg/Fiber: 2 g/Sugar: 7 g/Vitamin A: 1990 IU/Vitamin C: 1 mg/Calcium: 92 mg/Iron: 3 mg

Did You Make This?


Japanese Cheesecake Recipe

Light, jiggly, and fluffy, Japanese Cheesecake (Soufflé Cheesecake) is seriously the most delicious treat to serve for a crowd. It has the melt-in-your-mouth combination of creamy cheesecake and airy soufflé. A second (or more) serving is a guarantee!

Japanese cheesecake (also goes by soufflé cheesecake) is a glorious dessert known for its ultra-creamy, super luxurious, slightly tangy flavor and airy, soufflé-like character. It has swept the food world by storm and almost every dessert fanatic goes wild for it.

Why is it so popular? What’s the difference between Japanese cheesecake and regular cheesecake? For a start, I think it has the ideal texture that appeals to everyone. With elements of both a rich velvety custard and a cottony sponge cake, the dessert simply hits all the right notes. It is not heavy and a lot less sweet than typical Western-style cheesecakes. Even those who are not into cheesecake will fall head over heels for this delicious treat.

What is Japanese Cheesecake?

This particular Japanese cheesecake recipe is a soufflé-style cheesecake that incorporates whipped egg whites in the cake mixture and is baked in a bain-marie (water bath), which results in its characteristically light and fluffy texture. Yes, it is basically the cheesecake version of the Japanese soufflé pancakes!

As there are a few varieties of cheesecakes in Japan, we call this cheese soufflé or soufflé cheesecake. Outside of Japan, however, it becomes synonymous with the generic “Japanese cheesecake”. Because of its unique texture, it is also called jiggly cake or Japanese cotton cheesecake. I agree, that’s a lot of names for a cheesecake!
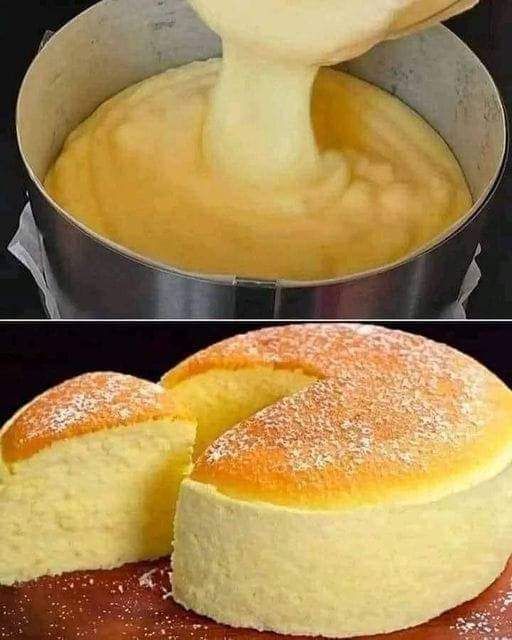
Light, jiggly, and fluffy, Japanese Cheesecake is seriously the most delicious treat to serve for a crowd. 

Prep Time: 25mins

Cook Time: 1hr 25mins

Chilling Time: 2hrs

Total Time: 1hr 50mins

 Servings: 1 9-inch (23-cm) cake

Ingredients:

  • 1 Tbsp unsalted butter (for greasing the pan and parchment paper)
  • 6 large eggs (50 g each w/o shell) (10.6 oz, 300 g without shell)
  • 10.6 oz cream cheese
  • 4 Tbsp unsalted butter
  • ¾ cup heavy (whipping) cream (¾ cup + 4 tsp, to be precise)
  • 4½ Tbsp sugar (for the cream cheese mixture)
  • ⅔ cup cake flour (weigh your flour or use the “fluff and sprinkle“ method and level it off; you can make your own Homemade Cake Flour)
  • ½ lemon (for the zest)
  • 2 Tbsp lemon juice (from ½ large lemon)
  • ½ cup sugar (for beating the egg whites)
  • 2 Tbsp apricot jam (for the glaze)
  • 2 tsp hot water (for the glaze)

Instructions:

Before You Start

I highly encourage you to weigh your ingredients in metric using a kitchen scale for this recipe. Click on the “Metric” button at the top of the recipe to convert the ingredient measurements to metric. If you‘re using a cup measurement, please follow the “fluff and sprinkle“ method: Fluff your flour with a spoon, sprinkle the flour into your measuring cup, and level it off. Otherwise, you may scoop more flour than you need. Please read the blog post for more detailed information that I shared about this recipe.

To Prepare the Cake Pan

Use a 9-inch (23-cm) cake pan that is 4 inches (10 cm) high. Cut parchment paper to line the bottom and sides of the cake pan. Cut one circle 9 inches (23 cm) in diameter for the bottom and one rectangular strip 4 x 30 inches (10 x 76 cm) for the sides of the cake pan. In addition, cut two strips of paper 2 x 30 inches (5 x 76 cm) each. We will use these as “straps” to lift the baked cake from the pan.

With 1 Tbsp unsalted butter, grease the cake pan and the parchment paper (for the bottom and the sides only; grease the paper on one side). You don‘t need to use all the butter.

Place the two parchment paper “straps” crisscross on the bottom of the cake pan so they form an “X.” Allow the excess paper to hang over the sides. Then, line the bottom and sides with the greased parchment paper. The greased side of the paper circle should face up, and the greased side of the rectangular strip should face in toward the center of the pan.

To Preheat the Oven and Prepare a Double Boiler

Preheat the oven to 350ºF (180ºC). For a convection oven, reduce the cooking temperature by 25ºF (15ºC). Note: You will be baking at 320ºF (160ºC). However, when you open the oven to place the cheesecake, you’ll lose some heat, so we’ll start off a bit higher.

Prepare a double boiler: Set a medium saucepan filled with 2 inches (5 cm) of water over high heat and bring to a simmer. Once simmering, cover and reduce the heat to maintain a steady simmer.

To Gather the Ingredients

Gather all the ingredients. Please note that it is very important to measure all your ingredients before starting. Separate 6 large eggs (50 g each w/o shell) into yolks and whites. Refrigerate the egg whites.

To Make the Cake Batter

In a large bowl, add 10.6 oz cream cheese, 4 Tbsp unsalted butter, ¾ cup heavy (whipping) cream, and 4½ Tbsp sugar. Rest the bowl on the saucepan above the simmering water.

Using a silicone spatula, mash the cream cheese and butter. Once they are melted, use a whisk to blend everything together. Remove from the heat.

While whisking, add the egg yolks into the warm cream cheese mixture, one at a time. Make sure each yolk is blended well with the cream cheese mixture before adding the next one.

Using a fine-mesh strainer, sift ⅔ cup cake flour into the batter. Whisk and blend together.

Then, pass the batter through the same fine-mesh strainer into a clean large bowl. This creates a silky texture for the batter.

Add the zest of ½ lemon into the batter. Make sure you only zest the flavorful yellow part and not the bitter white pith. Into a separate small bowl, squeeze the juice from the lemon. Measure 2 Tbsp lemon juice and add it to the batter. Whisk well to blend and set aside.

To Set Up the Bain-Marie

Put the baking sheet inside the preheating oven and pour in hot water until it is halfway up the sides or ½ inch deep. Close the oven door.

To Beat and Incorporate the Egg Whites

Add the cold egg whites into the dry, clean mixing bowl of a stand mixer. Make sure there is no oil or water in the bowl. If you have space in your refrigerator, I highly recommend keeping the mixing bowl cold until you’re ready to use it. Start whisking on medium speed (Speed 4) until the egg whites become opaque, foamy, and bubbly, about 2 minutes. Then, slowly add ½ cup sugar, one-third of it at a time, while the mixer runs.

Once you’ve added all the sugar, increase the mixer speed to high (Speed 8–9) and beat the egg whites until you have firm peaks. When you lift the whisk and turn it upside down, the egg whites should still cling to the whisk and hold their shape fairly well, but the tip of the peak folds back on itself.

Using a hand whisk, mix one-third of the egg whites into the cream cheese mixture until incorporated. Then, gently fold another one-third into the mixture.

Lastly, pour the mixture back into the mixer bowl (with the last one-third of the egg whites still in it) and fold very gently until just combined.

Pour the mixture into the cake pan all at once, avoiding air pockets while pouring. Tap the cake pan a few times on the kitchen counter to release any air pockets in the batter.

To Bake the Cheesecake

Open the oven and place the cake pan onto the baking sheet with the bain-marie. Reduce the oven temperature to 320ºF (160ºC)—25ºF (15ºC) lower for a convection oven—and bake for 70–75 minutes. Then, reduce the oven temperature to 300ºF (150ºC) and bake for another 10 minutes, or until the top is golden brown. To test if the cake is done, open the oven door slightly and insert a skewer into the cake. If it comes out without a wet liquid batter, it‘s done.

To Cool

Turn off the oven and leave the oven door slightly ajar for 15–20 minutes with the cake inside. If you take the cake out immediately to the kitchen counter, the sudden change in temperature could cause the cake to collapse. You want the cake to slowly shrink down to half the height, roughly from 4 inches to 2 inches high. After 15–20 minutes, remove the pan from the oven. Gently pull out the cake from the cake pan using the two parchment paper straps (with help from another set of hands).

Place the cake on a plate. Remove the parchment paper around the sides of the cake (but leave the bottom paper). Combine 2 Tbsp apricot jam and 2 tsp hot water in a small bowl. Brush the apricot mixture over the top of the cheesecake. Let cool to room temperature.

To Serve

You can serve the cake at room temperature (fluffiest!) or chill the cake for 1–2 hours before serving.

To Store

You can store the cake in the refrigerator for up to 3–4 days or in the freezer for 3–4 weeks. Defrost the cake overnight in the refrigerator. The cold cheesecake is dense, so leave it on the counter until just chilled or at room temperature before serving.

Notes:

All-Purpose Flour vs. Cake Flour:

All-purpose flour and cake flour do not perform the same. Cake flour is more delicate, and if you use all-purpose flour instead of cake flour, the texture will be dense and tough. If you can’t find cake flour, use this substitutions

To Make Cake Flour:

Take one level cup of all-purpose flour, remove 2 Tbsp, and then add 2 Tbsp of corn starch back in. (1 cup of AP flour – 2 Tbsp of AP flour + 2 Tbsp of cornstarch = 1 cup of cake flour).

Be sure to sift the flour 3–4 times to distribute the cornstarch well.

Tips for Beating Egg Whites:

Make sure your beaters and mixing bowl are clean and dry. A speck of oil, water, or egg yolk on either one can minimize the volume of the beaten egg whites.

Avoid plastic bowls—even clean ones may hold oily residue that can affect the successful whipping of the egg whites.

Use a bowl that’s wide enough to keep the beaters from being buried in the egg whites.

Nutritional Info:

Serving: 9 inch cake · Calories: 3560 kcal · Carbohydrates: 266 g · Protein: 70 g · Fat: 252 g · Saturated Fat: 142 g · Trans Fat: 2 g · Cholesterol: 1838 mg · Sodium: 1488 mg · Potassium: 1137 mg · Fiber: 3 g · Sugar: 189 g · Vitamin A: 10053 IU · Vitamin C: 21 mg · Calcium: 631 mg · Iron: 8 mg
Cheesy Chicken Pasta Bake

Chicken Pasta Bake – Pasta, chicken and a variety of veggies baked in a creamy tomato sauce with a tasty cheesy topping.

WHY CHICKEN PASTA BAKE IS A FAMILY-FRIENDLY DISH

Make-Ahead: This dish can be prepared the night before or earlier in the day to make dinner time a breeze!

5 Different Veggies: Although it may not appear to have a lot of veggies, it does actually contain quite a few (onion, bell pepper (capsicum), spinach, tomatoes and peas) Serve with a side of vegetables for an extra nutritional boost!

Easy to Adapt: This recipe is pretty flexible. Mix up the veggies and miss out the chicken, depending on what you have available or to suit your family’s tastes.

Prep Time: 20mins

Cook Time: 40mins

Total Time: 1 hr

 Servings: 6

Ingredients:

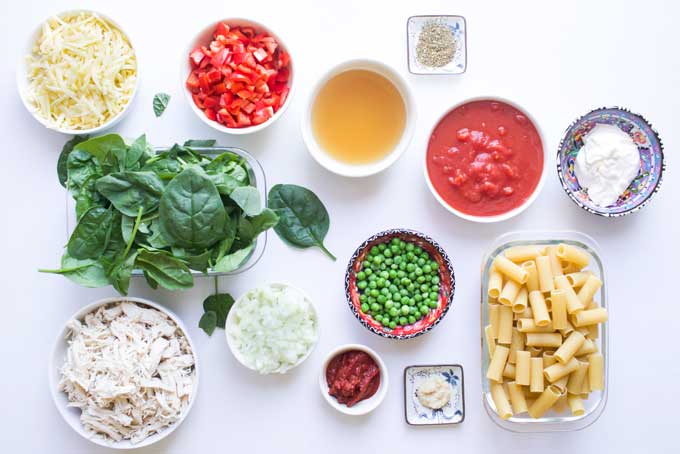
  • 400g (14 oz) Dried Rigatoni Pasta
  • 1 tablespoon Olive Oil
  • 1 Onion, finely chopped
  • 1 teaspoon Garlic, minced
  • 1 Red Capsicum (Bell Pepper), finely chopped
  • 2 tablespoon Tomato Paste (Puree)
  • 1 teaspoon Dried Oregano
  • 400g (14oz) Canned Chopped Tomatoes
  • 250ml (1 cup) Chicken Stock
  • 125ml (½ cup) Double Cream (thickened cream)
  • 120g (4.2 oz) Spinach Leaves
  • 380g (3 cups) Cooked Shredded Chicken *See notes if you would prefer measurements and cooking instructions for using raw chicken.
  • 75g (½ cup) Peas
  • 80g (½ cup) Mozzarella, grated
  • 80g (½ cup) Cheddar, grated
Instructions:

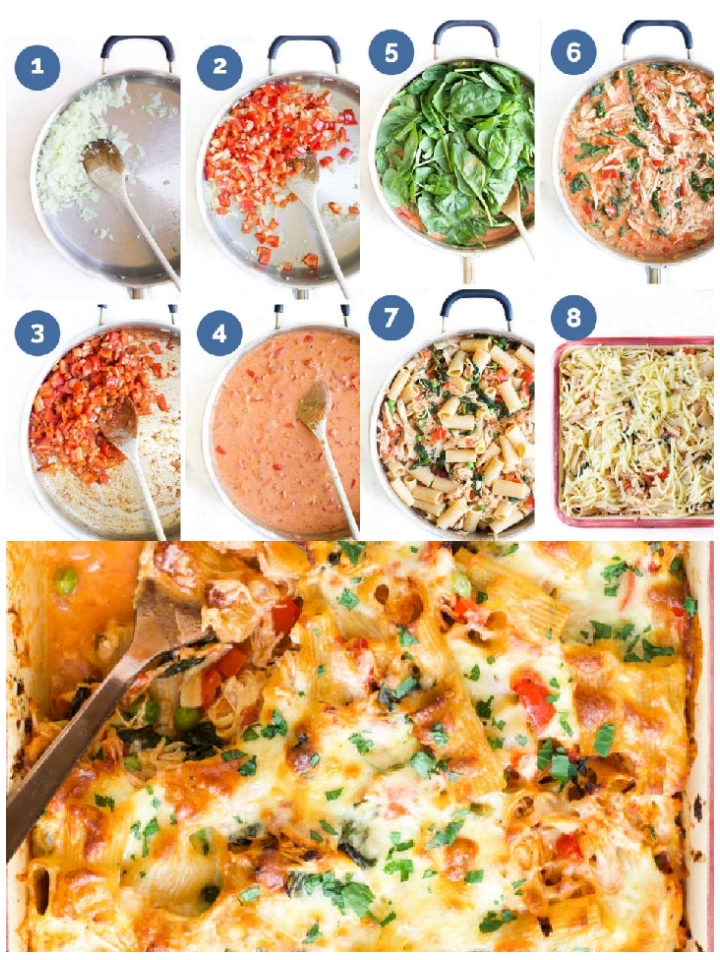
  1. Pre-heat oven to 190C/ 375F
  2. Bring a large pot of water to the boil. Add pasta and cook per packet directions MINUS 1 minute, drain.
  3. In a large frying pan, or saucepan, heat the oil over medium heat. Add the onion and cook for 2 minutes.
  4. Then add the garlic and capsicum (bell pepper) and gently saute until onion is translucent (around 3 mins.)
  5. Add the tomato paste and dried oregano and stir for a further minute.
  6. Add the chopped tomatoes and chicken stock and bring to a gentle bubble.
  7. Then stir in the double cream. Add the spinach and continue to stir until the spinach has wilted.
  8. Taste and season accordingly. (do not season for babies and young children)
  9. Add the chicken, cooked pasta and peas.
  10. Gently stir to combine and then transfer to a large baking dish.
  11. Top with the grated mozzarella and cheddar. Place in the oven for 20-25 minutes.
  12. The dish should be hot throughout and the cheese golden and bubbly.

Notes:

PASTA: Rigatoni is used but you can substitute with most pasta shapes (e.g penne, fusilli, shells etc)

CHICKEN: This recipe uses cooked shredded chicken. If you prefer the texture of chicken pieces or only have raw chicken available then chop two large (or 3 smaller) raw chicken breasts into bite sized pieces. Before cooking the sauce, saute the chicken pieces in a little olive oil over medium heat until sealed, around 5 mins. Remove from the pan and add back into the dish at the same point you add the pasta.

STOCK: I used chicken stock but you can also use vegetable stock. If serving a baby make sure to use homemade stock to reduce sodium levels. Alternatively you can replace with a second can of chopped tomatoes.

CHEESE: A mix of mozzarella and mature cheddar is used for the topping. Mozarella melts really well and has that nice stretch, and isn’t as oily. You can replace the cheddar with other cheeses such as Gruyere, Monterey Jack, Colby, Provolone & Tasty. A little grated parmesan will also add good flavour. Bee mindful of sodium content when cooking for babies / young children. You may wish to reduce the cheese or serve a portion with less cheese topping.

Refrigeration: This chicken pasta bake can be stored, covered, in the refrigerator for 2-3 days.

Freezing: Assemble and allow to cool. Do not bake, just cover and freeze it.

Nutritional Information is a ROUGH guide only, calculated using an online nutrition calculator.

Nutritional Info:

Calories: 592kcal | Carbohydrates: 61g | Protein: 35g | Fat: 23g | Saturated Fat: 11g | Cholesterol: 101mg | Sodium: 394mg | Potassium: 758mg | Fiber: 5g | Sugar: 7g | Vitamin A: 3307IU | Vitamin C: 45mg | Calcium: 254mg | Iron: 4mg