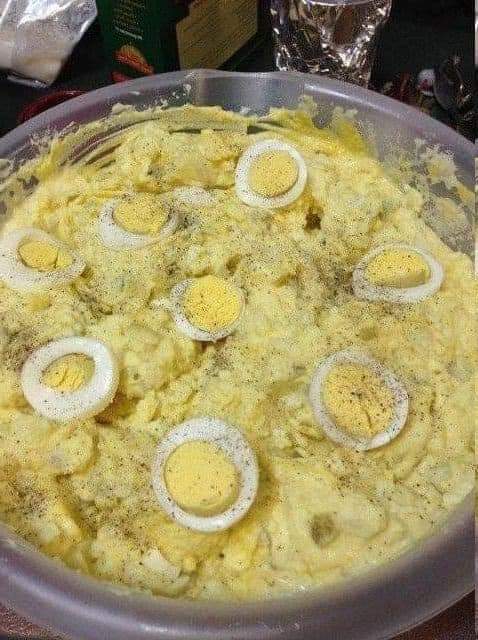
Creamy Mashed Potato Salad Recipe

Creamy Mashed Potato Salad is a deliciously different way to enjoy leftover Mashed Potatoes!

Need a last-minute salad but all you have are leftovers? This take on a favorite Potato Salad uses up your leftovers and a handful of ingredients you likely have on hand.

Recipe Tips:
  • No leftover mashed potatoes? Use leftover roasted potatoes and give them a little squish with a masher.
  • Make hard-boiled eggs the day before and keep them in the refrigerator until they are ready to use (the air fryer is the easiest way to do this). This will help keep the salad cold!
  • Make an extra batch of the dressing, it’s great on macaroni salad too!
  • The dressing will keep in the refrigerator for up to 2 weeks in a salad dressing cruet or mason jar


PREP TIME: 15minutes

COOK TIME: 9minutes

TOTAL TIME: 24minutes

SERVINGS: 6

This flavorful Mashed Potato Salad is the perfect way to use up leftover mashed potatoes. Sour cream & vinegar, plus mayo give it a delicious creamy tang!

INGREDIENTS:

  • 3-4 cups prepared mashed potatoes leftover
  • 4 hard-boiled eggs chopped (optional)
  • 1 cup celery diced
  • 3 green onions sliced
  • ¼ teaspoon paprika for garnish, optional

Dressing

  • ½ cup mayonnaise
  • ¼ cup sour cream
  • ¼ cup relish (sweet or dill pickle)
  • 2 tablespoons cider vinegar
  • 1 ½ tablespoons yellow mustard or dijon
  • 1 teaspoon sugar
  • ½ teaspoon salt or to taste
  • ½ teaspoon pepper or to taste
  • ¼ teaspoon garlic powder

INSTRUCTIONS:

  1. Mix all dressing ingredients in a bowl.
  2. Combine mashed potatoes with dressing & remaining ingredients. Mix well.
  3. Refrigerate at least one hour before serving.

Notes:

This recipe is intended to be made with leftover mashed potatoes which have a creamy consistency from the addition of butter & milk with seasonings.

If you are making mashed potatoes for this recipe specifically, cook about 1 ½ to 2 pounds potatoes. Peel & boil 15 minutes or until tender. Add butter, milk, seasonings & mash. Cool completely in the fridge before using in this recipe.

NUTRITIONAL INFO:

Calories: 324, Carbohydrates: 30g, Protein: 8g, Fat: 20g, Saturated Fat: 4g, Trans Fat: 1g, Cholesterol: 137mg, Sodium: 561mg, Potassium: 471mg, Fiber: 3g, Sugar: 3g, Vitamin A: 445IU, Vitamin C: 26mg, Calcium: 52mg, Iron: 1mg

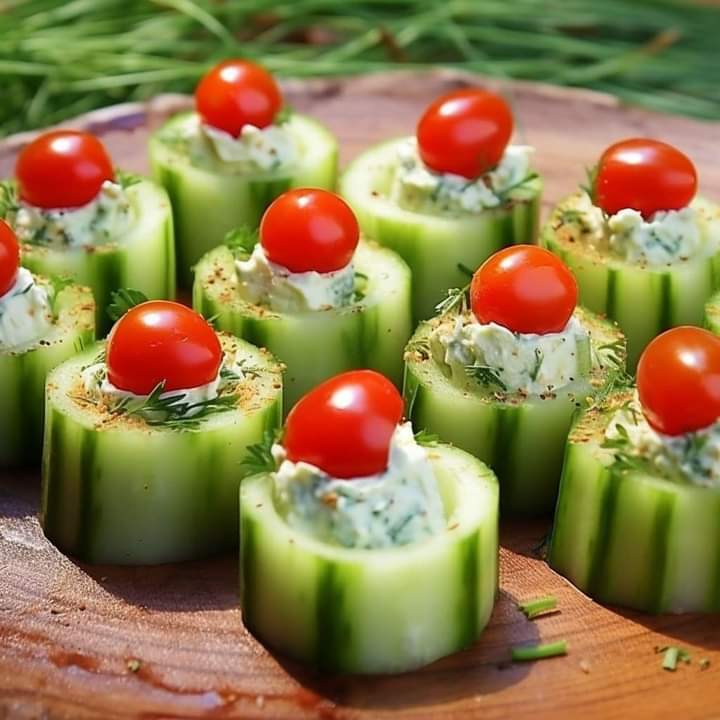
Cucumber Bites Recipe

Quick, easy, and fresh, these cucumber bites are the perfect cold appetizer with a dill cream cheese mixture piped on top of cucumber slices and topped with juicy tomatoes.

Prep Time: 15mins

Cook Time: 0mins

Total Time: 15mins

Servings: 24 

INGREDIENTS:

  • 2 cucumbers
  • 4 ounces cream cheese, softened
  • 1 tablespoon mayonnaise
  • 3 tablespoons Ranch dressing
  • 1 tablespoon fresh dill, minced fine
  • ¼ teaspoon garlic salt
  • ¼ teaspoon Italian seasoning
  • 12 cherry or grape tomatoes
  • Black pepper, for garnish

INSTRUCTIONS:

  1. Wash, peel, and slice the cucumbers into half-inch slices discarding the ends.
  2. Remove a little of the center of the cucumber with a small measuring spoon making a divot in the cucumber.
  3. Mix together the cream cheese, mayonnaise, and ranch dressing until smooth and creamy.
  4. Add dill, garlic salt, and Italian seasoning and mix until combined.
  5. Place the filling into a piping bag with a star tip and pipe about 1 tablespoon of filling onto each cucumber.
  6. Slice the tomatoes in half and place a piece onto each cucumber filling.
  7. Sprinkle with black pepper and serve.

Notes: 

A small melon baller would also work to make the divots in the center of the cucumbers.

Make sure your cream cheese is at room temperature so that it blends well with the rest of the ingredients and doesn’t leave lumps.

No piping or pastry bag? Fill a sandwich baggie and clip the corner off.

SUBSTITUTIONS AND ADDITIONS:

MAYONNAISE: You could also substitute the mayonnaise for plain Greek yogurt or sour cream in this easy recipe if you’d like.

TOMATOES: You could also top them with red bell peppers.

CREAM CHEESE: If you want to change up the flavor of the cream cheese mixture on top or to save time and eliminate the fresh herbs and spices (you’ll still need to add the ranch dressing and mayo to thin it out), there are plenty of herbed cream cheese flavors available that would be delicious

GARNISH: You could top these bites with sesame seeds, poppy seeds, or chives as well. If you like a little kick, you could add finely chopped jalapeno or crushed red pepper flakes.

VARIATIONS: Cucumbers are the perfect base for lots of yummy toppings. You could also top them with buffalo chicken dip, smoked salmon, hummus, egg salad, or tuna salad.

NUTRITIONAL INFO:

Calories: 33.79kcal | Carbohydrates: 1.21g | Protein: 0.53g | Fat: 3.08g | Saturated Fat: 1.14g | Cholesterol: 6.06mg | Sodium: 64.55mg | Potassium: 60.67mg | Fiber: 0.29g | Sugar: 0.78g | Vitamin A: 152.26IU | Vitamin C: 2.03mg | Calcium: 9.56mg | Iron: 0.12mg

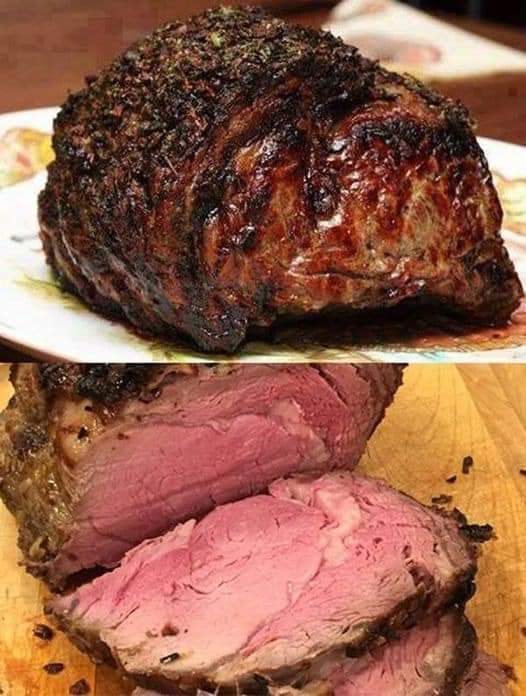
Prime Rib Recipe

The only prime rib recipe you’ll ever need. Follow our step-by-step instructions for a prime rib roast that’s cooked to perfection. It’s a must for holidays and special gatherings!

PREP TIME: 5 mins

COOK TIME: 2 hrs 30 mins

BRING TO ROOM TEMP: 3 hrs

TOTAL TIME: 5 hrs 35 mins

SERVINGS: 10 servings

YIELD: 1 (10-pound) rib roast

Older cookbooks will sometimes instruct you to remove excess fat from the roast. “Excess” fat is any fat more than an inch thick on the roast. Fat is what you need to give the roast flavor and to make it juicy and tender. Prime rib is expensive and you are paying good money for that fat, so leave it on. Your butcher should have removed any excess fat already.

The most important piece of advice I can give you regarding cooking a prime rib roast is to use a good meat thermometer! With a remote thermometer, you can tell exactly what the temperature of the meat is without having to open the oven door.

Ingredients:

For the prime rib roast
  • 1 (10-pound) standing rib roast, 3 to 7 ribs (estimate serving 2-3 people per rib), bones cut away from the roast and tied back to the roast with kitchen string (ask your butcher to prepare the roast this way)
  • Salt
  • Freshly ground black pepper
For the gravy
  • 1/4 cup fat and drippings from the pan
  • 1/4 cup all-purpose flour
  • 3 to 4 cups water, milk, stock, or beer
  • Salt, to taste
  • Freshly ground black pepper, to taste

Method:

Salt the roast and let sit at room temp:

Remove the beef roast from the refrigerator 3 hours before you start to cook it. Sprinkle it with salt all over and let it sit, loosely wrapped in butcher paper. Roasts should be brought close to room temperature before they go into the oven to ensure more even cooking.

Tie with kitchen string:

If your butcher hasn’t already done so, cut the bones away from the roast and tie them back on to the roast with kitchen string. This will make it much easier to carve the roast, while still allowing you to stand the roast on the rib bones while cooking.

Preheat the oven and season the roast:

Preheat your oven to 500°F (or the highest temp your oven reaches, if it’s less than 500°F). Pat the roast dry with paper towels (pre-salting should have made the roast release some moisture), and sprinkle the roast all over with salt and pepper.

Place the roast fat-side-up in a roasting pan:

Insert an ovenproof meat thermometer into the thickest part of the roast, making sure that the thermometer isn’t touching a bone.

There are so many variables involved that affect cooking time, this is why you should use a meat thermometer. A prime rib roast is too expensive to “wing it”. Err on the rare side, you can always put the roast back in the oven to cook it a bit longer, if it’s too rare for your tastes.

Brown the roast at high temperature:

Brown the roast at 500°F (or as high as your oven will go) for 15 minutes.

Lower the oven to 325°F to finish roasting:

Reduce the oven temperature to 325°F. Roast in the oven until the thermometer registers 115°F for rare or 120° for medium rare, and 130°F for medium.

To estimate the total cooking time, allow about 11 to 12 minutes per pound for rare and 13 to 15 minutes per pound for medium rare. The actual cooking time will depend on the shape of the roast, how chilled your roast still is when it goes into the oven, and your particular oven. A flatter roast will cook more quickly than a thicker one. A chilled roast will take more time than one closer to room temp.

Check the temperature of the roast using a meat thermometer an hour before you expect the roast to be done. For example, with a 10 pound roast, you would expect 2 hours of total cooking time for rare (15 minutes at 500° and 1 3/4 hours at 325°). In this case, check after 1 hour 15 minutes of total cooking time, or 1 hour after you lowered the oven temp to 325°. (A benefit of using a remote thermometer is that you don’t have to keep checking the roast, you’ll be able to see exactly what the temperature is by looking at the thermometer outside of the oven.)

Simple Tip!

If the roast is cooking too quickly, lower the oven temperature to 200°F.

Let the roast rest:

Once the roast has reached the temperature you want, remove it from the oven and place it on a carving board. Cover it with foil and let it rest for 15 to 30 minutes before carving. The internal temperature of the roast will continue to rise while the roast is resting.

Slice the roast:

Cut away the strings that were used to hold the roast to the rack of rib bones. Remove the bones (you can save them to make stock for soup later.)

Then, using a sharp carving knife, slice meat across the grain for serving, making the slices about 1/2-inch to 3/4-inch thick.

Make the gravy:

To make the gravy, remove the roast from the pan. Remove excess fat, leaving 1/4 cup of fat plus the browned drippings and meat juices in the roasting pan.

Place the roasting pan on the stovetop on medium high heat. Use a metal spatula to scrape up drippings that might be sticking to the pan.

When the fat is bubbly, sprinkle 1/4 cup of flour over the fat and drippings in the pan.

Stir with a wire whisk to incorporate the flour into the fat. Let the flour brown (more flavor that way and you don’t have the taste of raw flour in your gravy.)

Slowly add 3 to 4 cups of water, milk, stock, or beer to the gravy. Continue to cook slowly and whisk constantly, breaking up any flour lumps.

The gravy will simmer and thicken, resulting in about 2 cups of gravy.

Season the gravy with salt and pepper and herbs to taste.

Nutrition Facts (per serving)

|677|CALORIES|54g|FAT|0gCARBS|0g|PROTEIN|45g|
Cranberry Salad Recipe

This creamy cranberry salad is a blend of fresh cranberries, pineapple, marshmallows, pecans, coconut and apples, all tossed in a creamy dressing. A unique and colorful salad that’s perfect for the holidays!

I’m always looking for fun ways to serve cranberries other than your standard cranberry sauce. This cranberry salad is perfectly sweet and full of different flavors and textures. If you are a cranberry fan, make sure to also bake up a loaf of fresh cranberry bread to celebrate the season!

HOW DO YOU MAKE CRANBERRY SALAD?

This recipe starts with a bag of fresh cranberries. The cranberries are chopped, then mixed with sugar. The cranberries need to sit in the sugar for at least 3 hours to temper some of the natural tart flavor of the berries.

Cranberry salad garnished with cranberries, marshmallows, pecans and apples.

This creamy cranberry salad is a blend of fresh cranberries, pineapple, marshmallows, pecans, coconut and apples, all tossed in a creamy dressing. A unique and colorful salad that’s perfect for the holidays!

Prep Time: 10mins

Cook Time: 1mins

Chill Time: 3hrs

Total Time: 11mins

Servings: 10

Ingredients:

  • 12 ounces fresh cranberries chopped
  • 2/3 cup granulated sugar
  • 1 cup chopped apple I use Granny Smith
  • 1 cup chopped pineapple fresh or canned
  • 1 cup miniature marshmallows
  • 1/2 cup chopped pecans
  • 1/4 cup shredded coconut
  • 8 ounces frozen whipped topping thawed
  • fresh cranberries, apples and marshmallows for garnish optional

Instructions:

  1. Place the cranberries and sugar in a glass or plastic bowl (do not use metal). Stir to combine.
  2. Cover the bowl and chill for at least 3 hours.
  3. Add the apple, pineapple, marshmallows, pecans and coconut to the bowl.
  4. Add the whipped topping to the bowl and fold gently to combine all the ingredients. Garnish with additional cranberries, apples and marshmallows if desired, then serve.

Nutritional Info:

Calories: 178kcal | Carbohydrates: 27g | Protein: 1g | Fat: 7g | Saturated Fat: 3g | Sodium: 27mg | Potassium: 99mg | Fiber: 2g | Sugar: 22g | Vitamin A: 45IU | Vitamin C: 12.4mg | Calcium: 25mg | Iron: 0.3mg

Chicken Fitters Recipe

If you’re looking for some delicious chicken snacks, these Chicken Fritters are perfect for you! They’re fried chicken patties that are crispy on the outside, and soft, juicy, and tender on the inside with a hint of garlic! You’re going to instantly fall in love with them as soon as you have a bite!

This chicken fritters recipe is special because it combines the classic flavors of fried chicken with a unique twist. The fritters are made with a combination of chicken breasts, garlic, onion, and seasonings that give them an amazing flavor.

These Chicken Fritters are quick and easy to make and are crispy on the outside, and soft, juicy, and tender on the inside with a hint of Garlic

Ingredients:

  • 5 lbs. – chicken breast
  • 2 large – eggs
  • 1 small – yellow onion
  • 2 large – garlic cloves
  • ¼ cup – mayonnaise
  • 1 tsp. – Mrs. Dash seasoning
  • 1 tsp. – salt (or to taste)
  • ¼ tsp. – black ground pepper (or to taste)
  • ½ cup – flour
  • Olive oil for sautéing

Instructions:

How to Prep Chicken for Chicken Fritters
  1. Start by soaking clean chicken breasts in cold water for a couple of hours, and changing the water periodically. This is certainly optional, but it’s my preferred way to cook meat while ensuring that it’s thoroughly clean.
  2. Cut all fat off the chicken breasts and rinse well, again. Place clean beasts into a strainer for excess water to drain.
  3. Then cut the chicken into tiny cubes, about ¼”. Place chicken cubes into a large mixing bowl for easier mixing.
How to Make Chicken Mixture for Chicken Fritters
  1. Next, add eggs, shredded yellow onion, crushed garlic, mayonnaise, Mrs. Dash seasoning, salt, and black ground pepper to the chicken.
  2. Stir everything together, then add flour and mix it again. The mixture should thicken a little after adding the flour.
How to Cook Chicken Fritters
  1. Now heat a large non-stick skillet or large frying pan over medium-low heat. That will be 3.5 if your stove is digital.
  2. Add 2-3 tablespoons of olive oil to the pan. When oil gets hot, place one large ice cream scoop of chicken mix onto the pan and pat down to flatten into a fritter.
  3. I like to cover the pan with a Frying Pan Splatter Screen Guard as the fritters splatter during sautéing, the guard contains most of the splatter. A regular lid traps the steam while a screen guard releases the steam but contains the splattering.
  4. This is an optional step but I love the results with it; I’ve noticed that covering with a pan lid causes the fritters to water, release their juice, then later become too dry.
  5. Sauté fritters for 5 minutes on each side. I prefer sautéing a tad longer on a lower temp to ensure the meat is well done. Then flip the fritters over and sauté for 5 more minutes.
  6. Once done, place sautéed fritters onto a plate or cutting board lined with paper towels to soak in excess oil, then place the fritters onto a serving dish of your choice before transferring another set of sautéed fritters to the lined paper towel surface.
  7. You may need to replace the paper towels every couple of batches as they get oily fast.

Banana Bread Recipe

PREP TIME: 10 mins

COOK TIME: 60 mins

TOTAL TIME: 70 mins

SERVINGS: 8 to 10 servings

YIELD: 1 loaf

No need for a mixer for this recipe! Clean-up is easy, too. If you want, you can mix everything in one bowl.

This recipe calls for an 8- x 4-inch loaf pan. If you are baking in an 8 1/2- x 4 1/2-inch pan, bake for 47 to 57 minutes. If baking in a 9- x 5-inch pan, bake for 45 to 55 minutes. Note that the larger pan size will produce a flatter loaf.

The best bananas to use for banana bread are those that are over-ripe. The yellow peels should be at least half browned, and the bananas inside squishy and browning.

Ingredients:

  • 2 to 3 medium (7″ to 7-7/8″ long) very ripe bananas, peeled (about 1 1/4 to 1 1/2 cups mashed)
  • 1/3 cup (76g) butter, unsalted or salted, melted
  • 1/2 teaspoon baking soda (not baking powder)
  • 1 pinch salt
  • 3/4 cup (150g) sugar (1/2 cup if you would like it less sweet, 1 cup if more sweet)
  • 1 large egg, beaten
  • 1 teaspoon vanilla extract
  • 1 1/2 cups (205g) all-purpose flour

Method:

Preheat the oven and prepare the pan:

Preheat the oven to 350°F (175°C), and butter an 8 x 4-inch loaf pan.

Mash the bananas and add the butter:

In a mixing bowl, mash the ripe bananas with a fork until completely smooth. Stir the melted butter into the mashed bananas.

Mix in the remaining ingredients:

Mix in the baking soda and salt. Stir in the sugar, beaten egg, and vanilla extract. Mix in the flour.

Bake the bread:

Pour the batter into your prepared loaf pan.

Bake for 55 to 65 minutes at 350°F (175°C), or until a toothpick or wooden skewer inserted into the center comes out clean. A few dry crumbs are okay; streaks of wet batter are not. If the outside of the loaf is browned but the center is still wet, loosely tent the loaf with foil and continue baking until the loaf is fully baked.

Cool and serve:

Remove from oven and let cool in the pan for a few minutes. Then remove the banana bread from the pan and let cool completely before serving. Slice and serve. (A bread knife helps to make slices that aren’t crumbly.)

Wrapped well, the banana bread will keep at room temperature for 4 days. For longer storage, refrigerate the loaf up to 5 days, or freeze it.

Nutritional Info:

220/CALORIES/7g/FAT/37g/CARBS/3g/PROTEIN