Pineapple Cream-Cheese Pound Cake Recipe

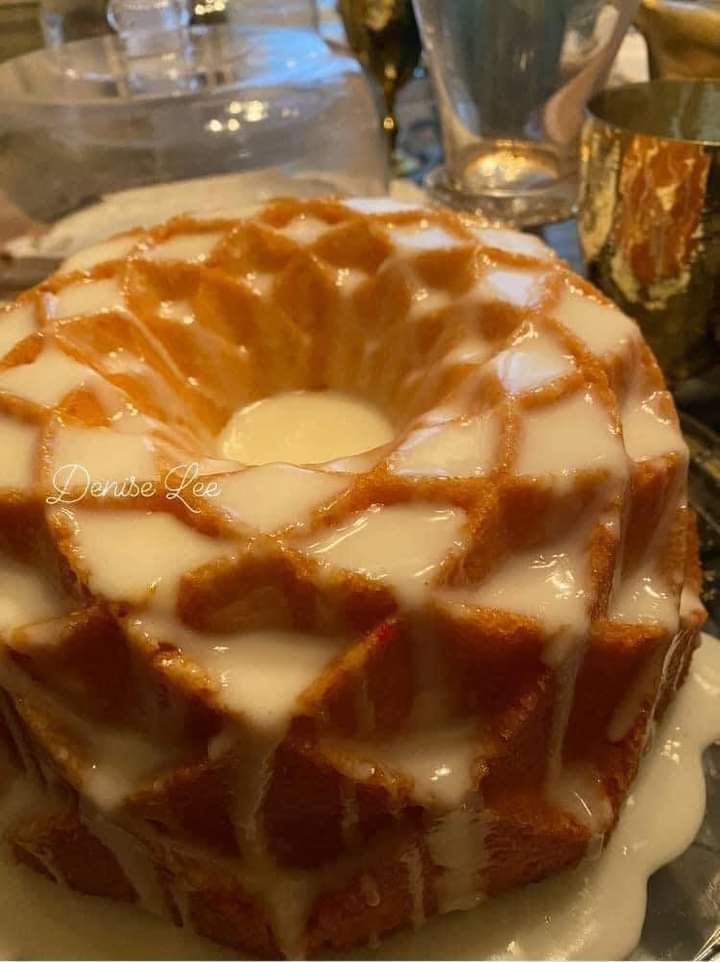
This pineapple pound cake is elevated with sweet tropical flavor, just enough to complement the richly dense pound cake base. Top with a delicate pineapple-vanilla glaze to take it even further.

Deliciously moist and dense pineapple pound cake is dressed with a sweet pineapple vanilla glaze. This supple pineapple cake has the perfect crumb and is great for breakfast, dessert, or as a snack.

Why this recipe works

This pineapple pound cake is elevated with sweet tropical flavor, just enough to complement the richly dense pound cake base. The texture of a good pound cake should be dense, moist, soft and tender – and that’s exactly what you’ll get with this recipe! Top with a delicate pineapple-vanilla glaze to take it even further.

Pound cakes are often made in bundt pans, after all, almost any kind of cake can be made in a bundt pan. Baking this pineapple quick bread in a bundt pan will yield an overall prettier presentation compared to a basic loaf. Let’s get started!


Prep Time: 20mins

Cook Time: 1hr 15mins

Total Time: 1hr 35mins

 Servings: 10 servings

Equipment
  • Stand mixer or hand mixer
  • Mixing bowls
  • 9 inch bundt pan
  • Whisk
  • Wire cooling rack

INGREDIENTS:

Cake
  • 3 cups all-purpose flour
  • 1 teaspoon baking powder
  • 1 cup unsalted Cream Cheese softened
  • 1/2 cup shortening
  • 2 3/4 cups granulated sugar
  • 4 eggs at room temperature*
  • 1/2 cup buttermilk at room temperature*
  • 1 cup crushed pineapple 1 – 8 ounce can drained, juices reserved
  • 1 teaspoon vanilla extract

Glaze

4 Tablespoons cream cheese

2 cups powdered sugar

1/2 teaspoon vanilla extract

1/4 cup reserved pineapple juice

INSTRUCTIONS:

  1. Preheat oven to 325°F. Spray a 9-inch bundt cake pan with nonstick baking spray (the kind with flour) and set aside.
  2. *We recommend a nonstick cooking spray with flour rather than greasing and flouring the bundt pan, but you can grease it well with butter or shortening and then lightly flour the pan.
  3. In a medium-sized bowl, combine the flour and the baking powder. Set aside.
  4. Cream together cream cheese, shortening, and sugar in the bowl of a standing mixer or large mixing bowl.
  5. Add eggs one at a time, beating on high speed for 30 seconds after each addition.
  6. Do not overbeat the eggs, this can cause the cake to be crumbly.
  7. Rotate between adding the flour mixture and the buttermilk, mixing only a little between each addition.
  8. Add in the pineapple and vanilla extract and beat just until the pineapple is evenly distributed.
  9. Pour batter into the prepared bundt pan and bake for 75-85 minutes, until a toothpick inserted in the center comes out with a few moist crumbs. Cool for 30 minutes, then turn out onto a wire rack to cool completely.
  10. Whisk together the glaze ingredients until smooth. Drizzle over the top of the cooled cake.

Notes:

  • Be sure to measure your flour using the scoop and sweep method. You never want to pack flour into a measuring cup. If you add too much flour, you’ll end up with a dry, crumbly cake.
  • The moisture comes from the buttermilk and the pineapple. Drain the pineapple before adding it to the cake batter, but it’s not necessary to really strain it; some of the juices can be added in. Because this cake is so dense and moist, it takes at least 75 minutes to cook. Test the center with a toothpick to make sure there is not still wet batter before removing from the oven.
  • Shortening has a higher melting point than butter, which provides and fluffier and moister cake. You can substitute a third stick of butter for the shortening if you wish.
  • Be sure the eggs and buttermilk are a room temperature and that you beat them well when adding to the batter – this is going to give you more volume in your bundt cake. Room temperature eggs hold more volume than cold eggs.
  • I recommend a nonstick cooking spray with flour rather than greasing and flouring the bundt pan, but you can grease it well with butter or shortening and then lightly flour the pan.
  • For removing the cake from the pan: Uneven baking temperatures in ovens can cause the cake to rise on one side more. If your cake is uneven, you can cut a thin layer off the bottom of the cake so it sits properly when turned out of the bundt pan. Uneven distribution of weight can cause pressure points which in turn can cause crumbling on the bottom in the areas that aren’t supported by an equal weight of cake.
NUTRITIONAL INFO:

Serving: 1slice | Calories: 767cal | Carbohydrates: 113g | Protein: 7g | Fat: 34g | Saturated Fat: 17g | Polyunsaturated Fat: 4g | Monounsaturated Fat: 10g | Trans Fat: 2g | Cholesterol: 122mg | Sodium: 43mg | Potassium: 167mg | Fiber: 1g | Sugar: 83g | Vitamin A: 764IU | Vitamin C: 3mg | Calcium: 58mg | Iron: 2mg
Farmer’s Casserole Recipe

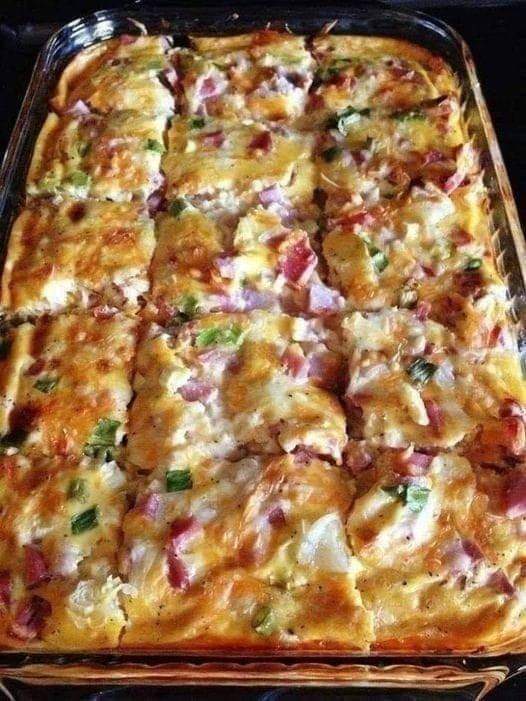
This farmer’s casserole recipe is loaded with deliciousness. It has crispy hash brown potatoes, bacon, fluffy eggs, and a flavorful, creamy sauce with melted shredded cheese. Each bite is unforgettable, and this is a breakfast egg casserole even the picky eaters will love!

This farmers breakfast casserole is a hearty, comforting, and satisfying breakfast you won’t be able to get enough of.

Every bite is filled with a combination of flavors and textures that you just can’t get in any other breakfast casserole. From the crispy hash browns, salty bacon, melted cheddar cheese, and creamy egg mixture, there’s a whole lot to love about this casserole. 

It’s the perfect recipe to make if you need a delicious Christmas morning breakfast, weekend brunch, or even a nutritious dinner. You can serve it with something like these Bisquick pancake recipe or Krusteaz waffles for a breakfast-style spread everyone won’t be able to stop talking about!

TIPS TO MAKE THE BEST RECIPE
  • Substitute bacon for breakfast sausage, cooked diced ham, or Canadian bacon.
  • Use a blend of monterey jack cheese, pepper jack cheese, mozzarella cheese, or any shredded cheese you want.
  • Add a teaspoon of onion powder to the egg mixture for a savory flavor.

PREP TIME: 10 minutes

COOK TIME: 45 minutes

TOTAL TIME: 55 minutes

INGREDIENTS:

  • 6 cups shredded hash brown potatoes
  • 2 cups cheddar cheese
  • 2 cups bacon, diced
  • ¼ cup green onion, sliced
  • 4 eggs
  • ¾ cup milk
  • 2 Tablespoons Dijon mustard
  • Salt and pepper, to taste
  • ½ cup sour cream

INSTRUCTIONS:

  1. Preheat the oven to 350°F (180°C). Grease a 3-quart baking dish with nonstick cooking spray. Arrange potatoes evenly in the bottom of the dish.
  2. Sprinkle with the bacon, 1 cup of cheddar cheese, and green onions.
  3. In the bowl, whisk eggs, salt and pepper, milk, sour cream, and Dijon mustard.
  4. Pour egg mixture over the hash browns.
  5. Sprinkle with remaining shredded cheese and bake uncovered for 40-45 minutes or until a knife inserted near the center comes out clean.
  6. Remove from the oven and let rest for 10 minutes before serving.

NUTRITION INFORMATION:

SERVING SIZE: 1 cup

Amount Per Serving: CALORIES: 592TOTAL FAT: 38gSATURATED FAT: 0gTRANS FAT: 0gUNSATURATED FAT: 0gCHOLESTEROL: 0mgSODIUM: 0mgCARBOHYDRATES: 31gFIBER: 3gSUGAR: 0gPROTEIN: 32g

Garlic Butter Steak and Potato Foil Packets

These Garlic Butter Steak and Potato Foil Packets are an easy family dinner recipe for summer. They turn out so delicious with plenty of buttery and garlicky flavor.

Cook them on the grill/campfire or in the oven for a simple dinner at home or on the road!

These Garlic Butter Steak and Potato Foil Packets are an easy family dinner recipe for summer. Cook them on the grill/campfire or in the oven!

Prep Time: 15 mins

Cook Time: 25 mins

Total Time: 40 mins

INGREDIENTS:

  • 1 ½ pounds steak sirloin is my favorite cut here
  • 1 pound baby potatoes cut into ½ inch pieces (halving or quartering usually does it for me)
  • 1 onion peeled, halved and then thinly sliced
  • 1 tablespoon olive oil
  • 2 tablespoons chopped fresh parsley
  • 1 tablespoon minced garlic or more to taste
  • 1 tablespoon Italian seasoning
  • salt and pepper to taste
  • 2 tablespoons butter cubed

INSTRUCTIONS:

Par-boil the potatoes (highly recommended):

Place the sliced potatoes in a pot of boiling, salted water and cook for 5 minutes. Drain immediately and place in a large bowl. Allow to sit until cool enough to handle, about 10 minutes.

Make the foil packets:

Prep the steak: Cut the steak into pieces (2.5 – 3 inches for well done, 3 – 4 inches for medium, 5 inches for rarer steak). Marinate it if you like.

Combine ingredients: Place the steak, potatoes, onion, olive oil, parsley, garlic, Italian seasoning, salt and pepper in a large bowl and toss well.

Assemble foil packets: Set out 4 pieces of aluminum foil, at least 12×12 inches. Evenly divide the steak and potatoes between the middles of the foil sheets. Top with butter cubes, then fold the foil over the steak and potatoes and seal well.

Cook the foil packets:

  1. On the grill/fire: On a HOT grill, cook the foil packets for 8-10 minutes per side, or until the potatoes are tender (exact grilling time can vary depending on type of foil used, exact oven temperature, size of steak, etc.! I recommend an oven thermometer to check on the steak after about 10 minutes to gauge how much longer it will need!)
  2. If you’re cooking the packets on a fire without a grilling rack, place them on a 2-inch bed of coal.
  3. In the oven: Bake the steak foil packets at 425°F for around 20 minutes, or until done to your liking (exact baking time can vary depending on type of foil used, exact oven temperature, size of steak, etc.! I recommend an oven thermometer to check on the steak after about 15 minutes to gauge how much longer it will need!). If you want a char on the steaks, open the packets and broil for 1-2 minutes at the end.
  4. Careful when opening the packets – hot steam and juices ahead!

Notes:

Steak: It’s important to use a cut that stays tender when cooked this way. Top sirloin is definitely my preferred cut for foil packets – and what I usually use when I make these.

Potatoes: I use fingerling or baby potatoes, or smaller Yukon Golds. I prefer these over others, because they don’t need to be peeled and are quicker/easier to prep.

Olive oil: This is my preferred oil for this recipe, but feel free to use a different vegetable oil you use in your kitchen.

Garlic: For a more intense garlic flavor (my amount is on the kid-friendly side ?), double the amount of garlic used.

More flavor: If you want to make the potatoes more decadent, mix some chopped bacon and/or shredded cheddar cheese into them before sealing the packets.

Vegetables? If you want to cook some vegetables right along the steak and potatoes in the foil packets, green peppers, asparagus or green beans can be added.

Best steak cuts

It’s important to use a cut that stays tender when cooked this way.

Top sirloin is definitely my preferred cut for foil packets – and what I usually use when I make them. But cuts like ribeye or porterhouse work great, too. They are less lean though!

Recipe tips

  • Careful when opening the foil packets! There are a lot of juices in the packets, and there will be steam escaping from them when you open them up. Make sure you place each on a plate and open them on a table surface, or place them all on a sheet pan to open. Never open/eat foil packets holding them in your lap, not even when camping!
  • I highly recommend pre-boiling the potatoes. It’s an extra step, but it’s worth it to avoid ending up with overcooked steak and/or raw potatoes.
  • Please be aware that this is meant to be used as a quick/easy dinner or to make when camping, not as a way to cook the perfect steak. The perfect steak, I believe, is only achieved when you cook a steak by itself and can solely focus on getting the perfect doneness on your meat. I still love this recipe for its ease and simplicity, but again, it’s not a recipe for perfectly cooked steak.
If your potatoes aren’t cooked through
  • If your steak is done way ahead of your potatoes (this can happen due to several factors; happens less if you parboil the potatoes), carefully remove the steak from the foil packets and place it on a plate and cover with a fresh piece of foil to rest. Continue cooking the potatoes until they’re done.

Make ahead tips

  • You can make these ahead, but not too long because the potatoes tend to start oxidizing.
  • I would only recommend making them ahead a few hours before you’re planning to cook them.
  • They’re great to assemble at home and then transport in your cooler to eat when you arrive at your campsite!
About the foil

Foil packets are definitely one of my favorite easy summer meals, even though I mostly avoid using foil in my kitchen otherwise. I do buy recycled aluminum foil from If You Care.

Nutritional Info:

Serving: 1foil packet | Calories: 402kcal | Carbohydrates: 24g | Protein: 41g | Fat: 15g | Saturated Fat: 6g | Cholesterol: 115mg | Sodium: 155mg | Potassium: 1152mg | Fiber: 4g | Sugar: 2g | Vitamin A: 365IU | Vitamin C: 28mg | Calcium: 84mg | Iron: 4mg

Creamy Potato Soup Recipe

An easy and delicious creamy potato soup recipe that can be made in just one pot! Loaded with bacon and creamy potato goodness, this is a favorite comfort food in my household. Tips for Perfect Creamy Potato Soup Cut your potatoes into pieces no larger than ¾″ and try to keep them around the same … Read more

HasselBack Scalloped Potatoes Recipe

An easy and delicious recipe for cheesy, garlicky, crazy-delicious Hasselback Scalloped Potatoes. They are the perfect side dish for a family dinner!

 Prep Time: 10minutes

 Cook Time: 1hour

 Total Time: 1hour 10minutes

 Servings8 servings

Ingredients:

For the potatoes
  • 2 pounds Yukon gold potatoes
  • 2 tablespoons butter melted
  • 2 tablespoons olive oil
  • 1/4 teaspoon salt
  • 1/4 teaspoon black pepper ground
For the sauce
  • 3 tablespoons butter
  • 3 tablespoons all-purpose flour
  • 3 cups milk
  • 2 medium garlic cloves minced
  • 1/2 teaspoon salt adjust to your tastes
  • 1/2 teaspoon black pepper ground
  • 2 cups cheddar and Colby cheese grated

Instructions:

For the potatoes
  1. Place a potato between the handles of 2 wooden spoons or 2 chopsticks.
  2. Slice the potato into thin slices, leaving 1/4 inch at the bottom unsliced. (The spoon handles will prevent you from slicing the potato all the way through.)
  3. Cut all the potatoes this way and place in a 7×11-inch casserole dish, skillet, or another oven-safe dish.
For the sauce
  1. Combine melted butter, oil, salt, and pepper and brush or pour over the potatoes.
  2. Bake in a 425-degree oven for 40 to 50 minutes. Baking time will depend on how large your potatoes are.
  3. Meanwhile, in a medium saucepan on medium heat melt 3 tablespoons butter.
  4. Add the flour and minced garlic and cook, stirring for 1 minute.
  5. Add the milk, whisking while you slowly add it. Bring to a boil and simmer until the sauce is thick.
  6. Remove the sauce from the heat and stir in 1 cup of the cheese, salt, and pepper. Stir until the cheese is melted.
  7. When potatoes are fork tender, remove them from the oven and pour the sauce over the potatoes.
  8. Sprinkle the remaining cheese on top of the potatoes and return to the oven at 350 degrees for 15 to 20 minutes.
  9. Cool 10 minutes before serving.
NUTRITIONAL INFO:

Calories: 330kcal | Carbohydrates: 30.2g | Protein: 10.1g | Fat: 18.2g | Saturated Fat: 8.9g | Sodium: 200mg | Fiber: 2.3g | Sugar: 1.1g

Garlic Chicken Stir Fry Recipe

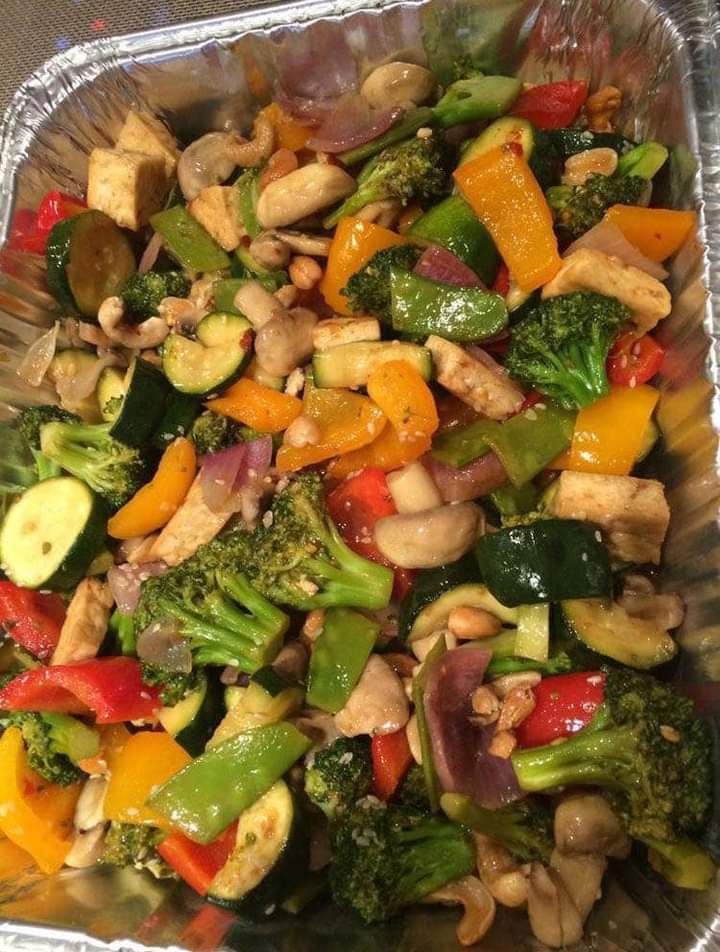
This garlic chicken stir fry is a quick and easy dinner that’s perfect for those busy weeknights. Cubes of chicken are cooked with colorful veggies and tossed in a flavorful garlic sauce for a meal that’s way better than take out!

Stir fry is almost a complete meal by itself. Just add some Egg Rolls, a Fruit Salad and some Cream Cheese Wontons for a complete meal!

When I am looking for a speedy dinner, I often turn to stir fry. It’s so easy to make and super versatile. It is fast and easy and curbs that temptation to hit the drive-thru. Stir fry is also a guarantee that I can get my kids to eat their vegetables. They love the combination of chicken and sauce. It is always a meal I can count on to feed the masses and they will leave the table with full bellies and smiles.

This garlic chicken stir fry is a quick and easy dinner that’s perfect for those busy weeknights! Cubes of chicken are cooked with colorful veggies and tossed in a flavorful garlic sauce for a meal that’s way better than take out!

PREP TIME: 5MINS

COOK TIME: 15MINS

TOTAL TIME: 20MINS

SERVINGS: 4 PEOPLE

Ingredients:

  • 1 lb. Boneless skinless chicken breast cut into cubes
  • 1 tbsp + 1 tsp Olive oil divided
  • 1 Yellow bell pepper sliced
  • 1 c Sliced mushrooms
  • 2-3 c Broccoli Florets
  • 4 Cloves garlic minced
  • Salt and pepper to taste
  • 1 tbsp Soy sauce
  • ¾ c. Chicken broth
  • 1 ½ tsp Sugar
  • 2 tsp Sesame oil
  • 2 tsp Cornstarch
How To Make Garlic Chicken Stir Fry
  1. Heat 1 tbsp of olive oil in a skillet over medium-high heat.
  2. Add the broccoli, sliced mushrooms and yellow bell pepper to the heated skillet, and cook for 5-6 minutes until the vegetables begin to become tender. Remove the vegetables, cover them and set aside for later.
  3. Place one teaspoon of olive oil in the heated skillet, and add the chicken breast pieces. Cook until the chicken is no longer pink in the center and cooked through. Add salt and pepper to taste.
  4. Mix the vegetables back into the skillet.
  5. In a separate bowl, combine the soy sauce, sugar, chicken broth, sesame oil and cornstarch, and mix well.
  6. Pour the sauce over the chicken and vegetables in the skillet, and stir to coat. Cook for 2-3 minutes until everything is coated well and the sauce has thickened.
  7. Serve over white rice if you desire.
NUTRITIONAL INFO:

Serves: 4

Calories183kcal (9%)

Carbohydrates 7g (2%)

Protein 26g (52%)

Fat 5g (8%)

Saturated Fat1g (5%)

Cholesterol 73mg (24%)

Sodium554mg (23%)

Potassium676mg (19%)

Fiber 1g (4%)

Sugar 2g (2%)

Vitamin A235IU (5%)

Vitamin C79.9mg (97%)

Calcium 22mg (2%)

Iron 1mg (6%)