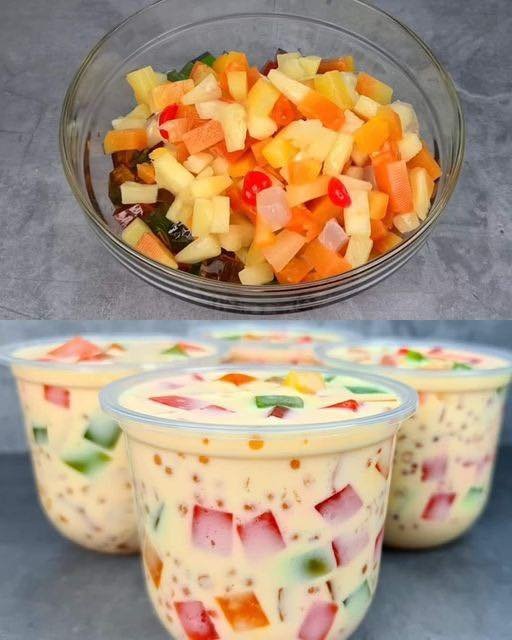
Tropical Delight: Fruity Tapioca Jelly Drink

🌴 Tropical Delight: Fruity Tapioca Jelly Drink

A colorful, creamy chilled drink with fruit, jelly cubes, and soft tapioca pearls

Introduction

Tropical Delight is a vibrant and refreshing dessert-style drink made with creamy milk, tender tapioca pearls, fruity jelly cubes, and mixed fruit. It’s visually beautiful, lightly sweet, and wonderfully textured—perfect for warm days, gatherings, or as a fun treat for the whole family.


đź§ľ Ingredients

For the Jelly

  • 4 cups water

  • ÂĽ cup white sugar

  • 25 grams white unflavored jelly powder

  • Red food coloring

  • Yellow food coloring

  • Green food coloring

For the Drink Base

  • 835 grams fruit cocktail, well-drained
    (or an equal amount of chopped fresh fruits such as mango, pineapple, papaya, grapes, or strawberries)

  • 250 ml all-purpose cream or heavy cream

  • 300 ml condensed milk

  • 2 cups evaporated milk or fresh milk

  • 1 cup cooked small tapioca pearls


⏱️ Time Breakdown

  • Preparation Time: 20 minutes

  • Cooking Time: 15 minutes

  • Chilling Time: 1 hour

  • Total Time: 1 hour 35 minutes


👩‍🍳 Step-by-Step Instructions

1. Prepare the Jelly

In a medium pot, bring 4 cups of water to a full boil.
Add the ÂĽ cup white sugar and 25 grams jelly powder, stirring continuously until fully dissolved and clear.

Remove from heat and carefully divide the hot jelly mixture evenly into three separate heat-safe bowls.

Add:

  • Red food coloring to the first bowl

  • Yellow food coloring to the second bowl

  • Green food coloring to the third bowl

Stir each bowl until the color is evenly mixed.

Pour each colored mixture into separate shallow containers.
Allow them to cool at room temperature, then refrigerate until completely set.

Once firm, cut the jelly into small, even cubes. Set aside.


2. Prepare the Creamy Milk Base

In a large mixing bowl, combine:

  • All-purpose cream (or heavy cream)

  • Condensed milk

  • Evaporated milk (or fresh milk)

Whisk gently until smooth and well blended.


3. Assemble the Drink

Add the drained fruit cocktail (or fresh fruit mixture) into the milk base. Stir gently.

Fold in:

  • Cooked tapioca pearls

  • Colored jelly cubes

Mix carefully to avoid breaking the jelly pieces.


4. Chill and Serve

Transfer the mixture into serving glasses or a large pitcher.

Refrigerate for at least 1 hour to allow the flavors and textures to come together.

Serve well chilled.


🍹 Serving Suggestions

  • Serve as a cold dessert drink or sweet snack

  • Garnish with fresh fruit pieces or mint leaves for presentation

  • Best enjoyed cold with a spoon or wide straw


đź’ˇ Helpful Tips

  • Ensure the jelly is fully set before cutting for clean cubes

  • Drain canned fruits well to prevent excess liquid

  • Adjust sweetness by adding more or less condensed milk

  • Stir gently to keep the jelly cubes intact


🥛 Dietary Notes

  • Contains dairy

  • Can be prepared gluten-free by using certified gluten-free ingredients


đź§Š Storage

Store leftovers in a covered container in the refrigerator and enjoy within 2 days. Stir gently before serving again.

Ginger & Turmeric Honey Tonic

Ginger & Turmeric Honey Tonic

A flavorful homemade concentrate perfect for stirring into warm water or tea

Introduction

This Ginger & Turmeric Honey Tonic is a vibrant, golden infusion made with fresh roots, citrus, and raw honey. The ingredients slowly blend together in the refrigerator, creating a fragrant syrup with a balanced mix of warmth, gentle spice, and natural sweetness. It’s easy to prepare, stores well, and can be enjoyed daily as a comforting addition to your routine.


Ingredients

  • Fresh Ginger Root: 3–4 inches, washed, peeled if desired, and thinly sliced

  • Fresh Turmeric Root: 2–3 inches, washed, peeled if desired, and thinly sliced

  • Lemons: 2–3 whole lemons, thinly sliced into rounds or freshly juiced

  • Black Peppercorns: ½ teaspoon, whole or lightly crushed

  • Raw Honey: About 1 cup, or enough to fully cover and submerge all ingredients

Tip: Black pepper adds depth of flavor and complements the turmeric beautifully.


Step-by-Step Instructions

1. Prepare the Fresh Roots

Rinse the ginger and turmeric thoroughly under cool water. If you prefer, peel them using the edge of a spoon. Slice both roots into thin, even coins to help release their natural flavors into the honey.

Note: Turmeric may stain hands and surfaces—using gloves or parchment paper can help.


2. Prepare the Lemons

Wash the lemons well. Slice them into thin rounds, removing any visible seeds.
Alternatively, you may juice the lemons if you prefer a smoother tonic without fruit slices.


3. Layer the Ingredients

In a clean, dry glass mason jar:

  • Add a layer of ginger slices

  • Follow with turmeric slices

  • Add lemon slices or a portion of lemon juice
    Repeat the layers until all ingredients are used.


4. Add Black Pepper

Sprinkle the black peppercorns evenly throughout the layers to distribute flavor.


5. Cover with Honey

Slowly pour the raw honey over the layered ingredients.
Use a spoon or butter knife to gently press the ingredients down, releasing air bubbles and ensuring everything is fully coated and submerged in honey.


6. Seal and Infuse

Close the jar tightly with a lid.
Place it in the refrigerator and allow it to rest for at least 24 hours. Over time, the honey will become thinner as it blends with the natural juices from the roots and lemon.


7. Storage

Store the jar in the refrigerator.
For best quality and flavor, use within 2–3 weeks. Always use a clean spoon when serving.


How to Enjoy

  • Warm Drink: Stir 1–2 tablespoons of the infused honey syrup into a mug of warm (not boiling) water.

  • Tea Booster: Add to herbal or green tea for extra warmth and aroma.

  • Flavor Add-In: Spoon a little over oatmeal, yogurt, or warm lemon water.

  • Optional: Add a few slices of the infused ginger or turmeric for a stronger taste.


Helpful Tips

  • Avoid boiling water to preserve the natural flavor of the honey

  • Adjust sweetness by adding more or less honey

  • Shake or gently stir the jar every few days to redistribute flavors

Easy No-Bake Biscoff Cheesecake

Easy No-Bake Biscoff Cheesecake

Creamy • Smooth • No Oven Required

Preparation Time

  • Prep time: 30 minutes

  • Chilling time: Minimum 6 hours (overnight recommended)

  • Yield: 10–12 slices


Ingredients

Biscuit Base

  • 300 g (10.6 oz) Lotus Biscoff biscuits

  • 125 g (4.4 oz) unsalted butter, melted

Cheesecake Filling

  • 500 g (about 2 cups) full-fat cream cheese, room temperature

  • 100 g (3.5 oz) icing sugar

  • 250 g (8.8 oz) Biscoff spread (smooth or crunchy)

  • 1 teaspoon vanilla extract

  • 300 ml (1ÂĽ cups) cold double cream (heavy whipping cream)

Topping

  • 150 ml (â…” cup) double cream

  • 2 tablespoons icing sugar

  • 125 g (4.2 oz) Biscoff spread, gently melted

  • Extra Biscoff biscuits for decoration (optional)


Detailed Instructions

1. Prepare the Biscuit Base

  1. Place the Biscoff biscuits in a food processor and blend until fine crumbs form.
    Alternatively, place biscuits in a sealed bag and crush using a rolling pin.

  2. Transfer the crumbs to a bowl and pour in the melted butter.

  3. Mix thoroughly until the texture resembles damp sand.

  4. Press the mixture firmly into the base of a 20 cm (8-inch) springform pan, packing it down evenly.

  5. Place the pan in the refrigerator to chill while preparing the filling.


2. Make the Cheesecake Filling

  1. In a large mixing bowl, beat the cream cheese until smooth and lump-free.

  2. Add the icing sugar, Biscoff spread, and vanilla extract.

  3. Beat again until fully combined and creamy.

  4. In a separate bowl, whip the cold double cream until stiff peaks form.

  5. Gently fold the whipped cream into the Biscoff mixture using a spatula.
    Fold slowly to keep the filling light and airy.

  6. Pour the filling over the chilled biscuit base and smooth the top evenly.

  7. Cover and refrigerate for at least 6 hours, preferably overnight, until fully set.


3. Prepare the Topping

  1. Gently warm the Biscoff spread until pourable (microwave in short intervals).

  2. Pour the melted spread over the chilled cheesecake, allowing it to naturally spread.

  3. Whip the remaining double cream with icing sugar until stiff.

  4. Pipe or spoon the whipped cream around the edges of the cheesecake.

  5. Decorate with whole or crushed Biscoff biscuits if desired.


4. Serve

  1. Run a knife around the edge of the pan before releasing the springform.

  2. Slice using a sharp knife, wiping the blade clean between cuts.

  3. Serve chilled.


Helpful Tips

  • Use full-fat cream cheese for the best texture and structure.

  • Ensure all dairy ingredients are cold when whipping for proper consistency.

  • For clean slices, chill the cheesecake overnight.

  • Store leftovers covered in the refrigerator for up to 3 days.

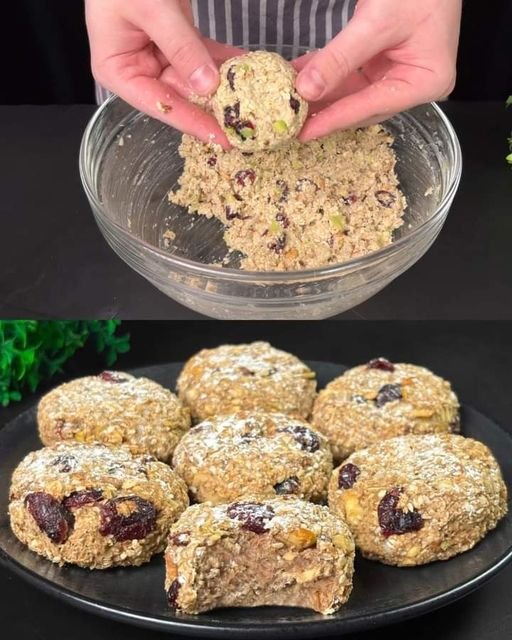
No-Sugar Healthy Oatmeal Cookies

No-Sugar Healthy Oatmeal Cookies

Naturally Sweet • Wholesome • Easy to Make

These no-sugar oatmeal cookies are gently sweetened with fruit and stevia, making them a great option for everyday snacking. They are soft, lightly chewy, and full of natural texture from oats, nuts, and dried fruit. No refined sugar, no butter, and no flour are needed.

Prep Time

10 minutes

Bake Time

15–20 minutes

Yield

8–10 cookies


Ingredients

  • 1 cup (90 g) rolled oats

  • 50 g oat flakes (for added texture)

  • 1 medium apple, peeled, cored, and finely diced

  • 1 ripe banana

  • 80 g nuts (almonds, walnuts, or pecans), roughly chopped

  • 50 g dried cranberries

  • 1 tablespoon stevia (adjust to taste)

  • 1 tablespoon sesame seeds

  • 1 teaspoon vanillin or vanilla powder (optional)


Instructions

1. Prepare the Oven

Preheat your oven to 350°F (180°C).
Line a baking sheet with parchment paper or lightly grease it.

2. Mash the Banana

Place the banana in a large mixing bowl and mash thoroughly with a fork until smooth and creamy. This will act as the main binder for the cookies.

3. Combine the Base

Add the diced apple, rolled oats, oat flakes, and vanillin (if using) to the mashed banana.
Stir well until everything is evenly coated and the mixture begins to hold together.

4. Add Texture and Flavor

Fold in the chopped nuts, dried cranberries, stevia, and sesame seeds.
Mix gently until fully combined. The mixture should be thick and slightly sticky. If it feels too dry, add 1–2 teaspoons of water.

5. Shape the Cookies

Scoop about 2 tablespoons of the mixture for each cookie.
Roll gently into a ball, then flatten slightly into a thick disc.
Place cookies on the prepared baking sheet, leaving a little space between each one.

6. Bake

Bake for 15–20 minutes, or until the edges turn lightly golden and the cookies feel set when touched.

7. Cool

Remove from the oven and let the cookies cool on the baking sheet for 5 minutes, then transfer to a plate or cooling rack.
They will firm up more as they cool.


Helpful Tips

  • For softer cookies, bake closer to 15 minutes.

  • For firmer, slightly crisp edges, bake closer to 20 minutes.

  • You can replace cranberries with raisins or chopped dates if preferred.

  • Store cookies in an airtight container at room temperature for up to 2 days, or refrigerate for up to 5 days.

Carrot Cake with Cream Cheese Frosting

Carrot Cake with Cream Cheese Frosting

Prep Time: 25 minutes
Bake Time: 25–35 minutes
Cooling & Assembly: 60 minutes
Yield: 1 two-layer 8-inch cake or one 9Ă—13-inch cake

This carrot cake has a moist crumb, balanced spice flavor, and a smooth cream cheese frosting. It is suitable for gatherings, celebrations, or everyday desserts.


Ingredients

For the Carrot Cake

  • 2 cups (250 g) all-purpose flour

  • 1½ cups (300 g) granulated sugar or brown sugar

  • 1 teaspoon baking powder

  • 1 teaspoon baking soda

  • ½ teaspoon salt

  • 1 tablespoon ground cinnamon

  • ½ teaspoon ground nutmeg

  • ½ teaspoon ground ginger

  • ÂĽ teaspoon ground cloves (optional)

  • 3 large eggs, room temperature

  • Âľ cup (180 ml) vegetable oil

  • ½ cup (120 ml) buttermilk or milk

  • 1 teaspoon vanilla extract

  • 2½ cups (260 g) finely grated carrots

  • ½ cup chopped walnuts or pecans (optional)

  • ½ cup raisins, sultanas, or dried cranberries (optional)

  • Zest of 1 orange (optional)


For the Cream Cheese Frosting

  • 200 g cream cheese, softened

  • ½ cup (113 g) unsalted butter, softened

  • 2½ cups (300 g) powdered sugar

  • 1 teaspoon vanilla extract

  • ½ teaspoon orange zest (optional)


Detailed Instructions

1. Prepare the Oven and Pans

Preheat the oven to 350°F (175°C).

Grease and line:

  • Two 8-inch round cake pans, or

  • One 9Ă—13-inch baking pan

Set aside.


2. Mix Dry Ingredients

In a large bowl, whisk together:

  • Flour

  • Sugar

  • Baking powder

  • Baking soda

  • Salt

  • Cinnamon

  • Nutmeg

  • Ginger

  • Cloves

Whisk until evenly combined and free of lumps.


3. Mix Wet Ingredients

In a separate bowl, whisk together:

  • Eggs

  • Vegetable oil

  • Buttermilk

  • Vanilla extract

Mix until smooth and fully combined.


4. Combine Batter

Pour the wet ingredients into the dry ingredients.

Using a spatula, gently fold until just combined.

Add:

  • Grated carrots

  • Nuts (if using)

  • Dried fruit (if using)

  • Orange zest

Fold gently. Do not overmix, as this can affect texture.


5. Bake

Divide the batter evenly between prepared pans.

Bake for 25–35 minutes, or until:

  • The center springs back lightly when touched

  • A toothpick inserted in the center comes out clean

Remove from the oven and allow cakes to cool in pans for 10 minutes. Transfer to a wire rack and cool completely before frosting.


Cream Cheese Frosting

6. Prepare the Frosting

In a large bowl, beat the softened cream cheese and butter until smooth and creamy.

Gradually add powdered sugar, mixing on low speed until incorporated.

Add vanilla extract and orange zest (if using).

Increase speed and beat until light and smooth.


7. Assemble the Cake

If using layered pans:

  • Place one cake layer on a serving plate

  • Spread frosting evenly on top

  • Place the second layer on top

Frost the top and sides evenly.

For a sheet cake:

  • Spread frosting evenly over the cooled cake


Optional Garnishes

  • Chopped nuts

  • Dried fruit

  • Thin carrot curls

  • Light dusting of powdered sugar


Storage

  • Store refrigerated in an airtight container for 3–4 days

  • Bring to room temperature before serving

  • Cake layers can be frozen (unfrosted) for up to 2 months

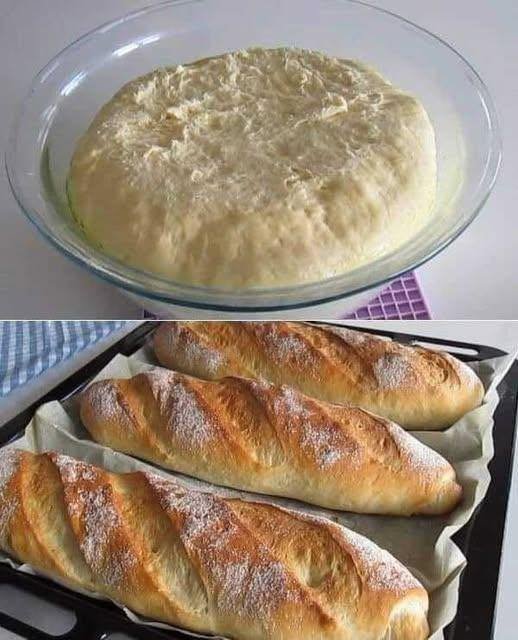
Homemade White Bread

Homemade White Bread

Soft, fluffy loaf with a tender golden crust

Prep Time: 20 minutes
Rise Time: 1½–2½ hours
Bake Time: 30–35 minutes
Total Time: About 3 hours
Yield: 1 standard loaf

This homemade white bread is light, soft, and versatile. It works well for sandwiches, toast, or serving warm with butter. The recipe uses simple pantry ingredients and straightforward techniques suitable for beginners.


Ingredients

For the Bread

  • 4 cups all-purpose flour

  • 2 teaspoons instant yeast

  • 2 teaspoons salt

  • 2 tablespoons sugar

  • 2 tablespoons unsalted butter, softened

  • 1½ cups warm water (about 105–110°F / 40–43°C)

Optional Topping

  • 1 tablespoon milk

  • 1 tablespoon unsalted butter, melted


Step-by-Step Instructions

1. Activate the Yeast

In a small bowl, combine the warm water, sugar, and yeast. Stir gently and let sit for 5–10 minutes, until the mixture becomes foamy. This indicates the yeast is active.


2. Prepare the Dough

In a large mixing bowl, add:

  • Flour

  • Salt

  • Softened butter

Pour in the yeast mixture. Mix until a shaggy dough forms.

Transfer the dough to a lightly floured surface and knead for 8–10 minutes, until smooth, elastic, and slightly tacky but not sticky.

(If using a stand mixer, knead with a dough hook on medium speed for 6–7 minutes.)


3. First Rise

Lightly grease a clean bowl and place the dough inside, turning once to coat. Cover with a clean kitchen towel or plastic wrap.

Let rise in a warm, draft-free place for 1–2 hours, or until doubled in size.


4. Shape the Loaf

Gently press the dough to release excess air. Shape it into a loaf by rolling it tightly and pinching the seam closed.

Place the shaped dough seam-side down into a greased 9 Ă— 5-inch loaf pan.


5. Second Rise

Cover the pan and allow the dough to rise again for 30–45 minutes, until it rises slightly above the edge of the pan.


6. Preheat the Oven

Preheat oven to 375°F (190°C).

If using the topping, mix the milk and melted butter in a small bowl.


7. Bake

Brush the top of the loaf with the milk-butter mixture if desired.

Bake for 30–35 minutes, until:

  • The top is golden brown

  • The loaf sounds hollow when tapped

For accuracy, the internal temperature should reach 190–200°F (88–93°C).


8. Cool

Remove the bread from the pan and place it on a wire rack. Allow to cool completely before slicing to ensure the best texture.


Storage

  • Store at room temperature in an airtight container for 2–3 days

  • Refrigeration is not recommended

  • Freeze sliced bread for up to 2 months


Helpful Tips

  • Warm water should not be hot, as high heat can damage yeast.

  • For a softer crust, brush the loaf with butter after baking.

  • Measure flour accurately by spooning into the cup and leveling off.