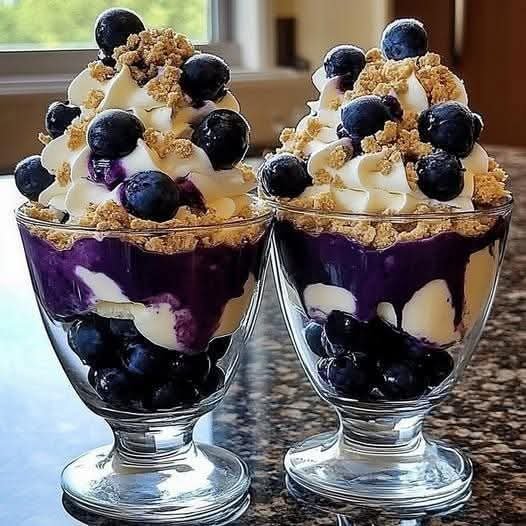
Blueberry Cheesecake Parfait

Blueberry Cheesecake Parfait

Prep time: 15 mins | Chill time: 30 mins | Servings: 4

Ingredients

The Crust:

  • 1 cup graham cracker crumbs

  • 2 tbsp melted butter

The Cheesecake Filling:

  • 8 oz (225g) cream cheese, softened

  • 1/2 cup powdered sugar

  • 1 cup heavy cream, whipped

  • 1 tsp vanilla extract

The Blueberry Layer:

  • 2 cups fresh or frozen blueberries

  • 2 tbsp sugar

  • 1 tbsp lemon juice


Instructions

  1. Prepare the Blueberries: In a small saucepan, combine blueberries, sugar, and lemon juice. Simmer over medium heat for 5–8 minutes until the berries burst and the sauce thickens slightly. Let it cool completely.

  2. Make the Crust: Mix graham cracker crumbs and melted butter in a small bowl until it looks like wet sand.

  3. Cream the Cheese: In a large bowl, beat the softened cream cheese and powdered sugar until smooth and creamy. Fold in the vanilla extract.

  4. Fold in Cream: Gently fold the whipped heavy cream into the cream cheese mixture until light and airy.

  5. Assemble the Parfaits: * Spoon a layer of the graham cracker mixture into the bottom of 4 glass jars or ramekins.

    • Add a thick layer of the cheesecake filling.

    • Spoon the cooled blueberry sauce over the top.

    • Repeat the layers if your jars are tall enough.

  6. Chill: Refrigerate for at least 30 minutes before serving to allow the flavors to meld.


Your Growing Recipe Book

  • Seafood Luxury: Crispy Copycat Joe’s Crab Shack Crab Cakes.

  • Holiday Tradition: Old-World Christmas Fruit Cake with cherries and pecans.

  • Indulgent Dessert: Chocolate Mousse Cake with a glossy ganache and nuts.

Creamy Baked Broccoli & Chicken (Diabetic-Friendly)

Creamy Baked Broccoli & Chicken (Diabetic-Friendly)

A comforting, low-glycemic baked dish made with tender chicken, fiber-rich broccoli, and a creamy sauce without refined flour or excess carbs. Perfect for blood-sugar control while still feeling indulgent.

Description

This Creamy Baked Broccoli and Chicken recipe replaces traditional pasta and heavy sauces with lean protein, vegetables, and a light dairy-based cream sauce. It’s oven-baked until golden and bubbly, delivering comfort food flavor without glucose spikes.

 Time & Yield

  • Prep Time: 15 minutes

  • Cook Time: 30 minutes

  • Total Time: 45 minutes

  • Servings: 4

 Ingredients

Main

  • 2 cups cooked chicken breast, cubed (skinless)

  • 3 cups broccoli florets (fresh or lightly steamed)

  • 1 tbsp olive oil

Creamy Sauce

  • 1 cup unsweetened almond milk (or low-fat milk)

  • ½ cup plain Greek yogurt (or low-fat cream cheese)

  • ½ cup shredded mozzarella or cheddar (reduced-fat)

  • 2 cloves garlic, minced

  • ½ tsp black pepper

  • ½ tsp paprika

  • ½ tsp Italian seasoning

  • Salt to taste

Optional Topping

  • 2 tbsp grated Parmesan

  • Fresh parsley or chives

 Instructions

  1. Preheat oven to 375°F (190°C). Lightly grease a baking dish.

  2. Steam broccoli for 2–3 minutes until just tender. Set aside.

  3. In a pan, heat olive oil, sauté garlic for 30 seconds.

  4. Stir in almond milk and Greek yogurt. Cook on low heat until smooth.

  5. Add seasonings and half the cheese. Stir until creamy.

  6. Combine chicken and broccoli with the sauce.

  7. Transfer to baking dish, top with remaining cheese and Parmesan.

  8. Bake uncovered for 25–30 minutes until golden and bubbly.

  9. Rest 5 minutes before serving.

 Notes

  • No refined flour or sugar

  • Naturally gluten-free

  • Can be made ahead and refrigerated

  • Sauce thickens naturally without cornstarch

 Tips for Diabetics

  • Use chicken breast, not thigh, for lower fat

  • Keep portion size to 1–1¼ cups

  • Pair with a leafy green salad instead of bread

  • Avoid processed cheeses for better insulin response

 Serving Suggestions

  • Serve alone as a complete meal

  • Pair with cauliflower rice or zucchini noodles

  • Add chili flakes for metabolism support

 Nutritional Information (Per Serving – Approx.)

  • Calories: 320 kcal

  • Protein: 34 g

  • Carbohydrates: 9–11 g

  • Fiber: 3 g

  • Fat: 15 g

  • Glycemic Load: Low

(Values may vary slightly by brand used)

Health Benefits

  • 🩸 Supports blood sugar control

  • 💪 High protein for satiety

  • 🥦 Broccoli improves insulin sensitivity

  • 🧀 Calcium & probiotics for gut health

  • ❤️ Heart-friendly fats

Q & A

Q: Can I add pasta?
A: For diabetics, avoid regular pasta. Use chickpea pasta or konjac noodles if needed.

Q: Can I freeze it?
A: Yes, freeze up to 2 months. Reheat gently to avoid sauce separation.

Q: Is this keto-friendly?
A: Nearly. Swap almond milk for heavy cream and remove yogurt.

Q: Can I make it dairy-free?
A: Yes—use coconut milk and dairy-free cheese alternatives.

Morning Citrus Detox Drink –

Morning Citrus Detox Drink –

This refreshing lemon-ginger morning drink is designed to boost hydration, support digestion, and gently energize your body before breakfast. The ingredients are natural and commonly used for digestive wellness. Drink it on an empty stomach for 5 days to feel lighter, refreshed, and less bloated.


🌿 Ingredients

  • 1 cup warm water (not boiling)

  • 2 tablespoons fresh lemon juice

  • 1 tablespoon freshly grated ginger or ½ teaspoon ginger powder

  • 1 tablespoon raw honey (optional but recommended)

  • 1 teaspoon apple cider vinegar (optional)

  • 1–2 slices of lemon or lime for garnish


🍋 How to Prepare

  1. Warm 1 cup of water until it is pleasantly warm — not too hot.

  2. Add fresh lemon juice and stir.

  3. Add grated ginger; let it steep for 2 minutes.

  4. Stir in raw honey until melted.

  5. (Optional) Add apple cider vinegar for a stronger detox effect.

  6. Strain if you want a smooth drink.

  7. Pour into a glass and garnish with lemon or lime slices.

Drink 1 cup before breakfast every morning.


✨ Benefits (Realistic & Safe)

  • Hydrates the body after overnight fasting

  • Supports digestion and reduces bloating

  • Ginger may help soothe the stomach

  • Lemon provides vitamin C

  • Honey offers mild energy and antioxidants

This drink can support overall wellness, but no drink alone burns fat; healthy eating and activity matter too.


Q&A Section

1. Can this drink reduce belly fat?

It cannot “melt fat,” but it helps reduce bloating, improves digestion, and may support weight-management efforts when paired with healthy habits.

2. Should I drink it hot or cold?

Warm is best — it activates digestion gently.

3. Can I drink it more than once a day?

Once daily is enough. Too much lemon or ginger may irritate the stomach in some people.

4. Can diabetics drink this?

Yes, but skip the honey and consult a healthcare provider if unsure.

5. Can I prepare it at night?

Fresh is best, but you can prepare it up to 8 hours ahead and store it in the fridge.

6. How long should I use it?

You can drink it for 5 days or even daily as a general morning wellness ritual.

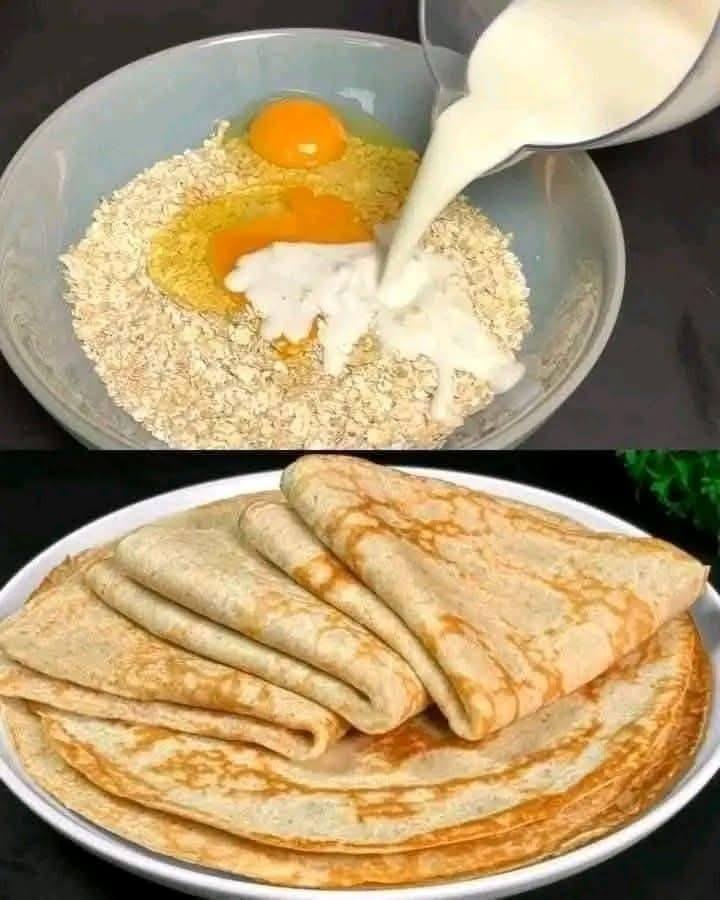
Healthy Oat Pancakes in 5 Minutes (No Sugar, No Flour)

Healthy Oat Pancakes in 5 Minutes (No Sugar, No Flour)

Soft, naturally sweet, and packed with protein and fiber, these healthy oat pancakes come together in minutes using simple pantry ingredients. No refined sugar, no flour — just wholesome goodness that keeps you full and energized.


Description

These oat pancakes are a nutritious alternative to traditional pancakes. Sweetened naturally with banana and made with oats instead of flour, they’re ideal for breakfast, post-workout meals, or a light dinner. The texture is tender and slightly nutty, similar to crepes or thin pancakes.


Ingredients

  • 1 ripe banana

  • 100 g Greek yogurt (plain, unsweetened)

  • 2 large eggs

  • 1 cup old-fashioned oats

  • A pinch of salt


Instructions

  1. Blend Batter
    Add banana, Greek yogurt, eggs, oats, and salt to a blender or food processor.
    Blend until smooth.

  2. Heat Pan
    Heat a non-stick pan over medium heat. Lightly grease if needed.

  3. Cook Pancakes
    Pour small ladles of batter into the pan.
    Cook 1–2 minutes per side until golden and set.

  4. Serve Warm
    Stack and enjoy immediately.


Tips for Best Results

  • Use a very ripe banana for natural sweetness

  • Let batter rest 1–2 minutes if too thick

  • Cook on medium-low heat to avoid burning

  • Blend oats fully for smoother pancakes

  • Works well as thin pancakes or crepes


Servings

  • Makes: 6–8 small pancakes

  • Serves: 2


Nutritional Information (Approx. per serving)

  • Calories: 220

  • Protein: 14 g

  • Carbohydrates: 26 g

  • Fiber: 4 g

  • Fat: 7 g

  • Sugar: 6 g (from banana only)

(Values may vary depending on yogurt brand)


Health Benefits

  • ✔ No refined sugar

  • ✔ No white flour

  • ✔ High in protein & fiber

  • ✔ Supports digestion

  • ✔ Keeps you full longer

  • ✔ Kid-friendly & diabetic-friendly (in moderation)


Q & A

Q: Can I make these without a blender?
A: Yes—use oat flour and mash the banana very well.

Q: Can I make them dairy-free?
A: Replace Greek yogurt with coconut or almond yogurt.

Q: Are these gluten-free?
A: Yes, if you use certified gluten-free oats.

Q: Can I store leftovers?
A: Refrigerate up to 3 days or freeze up to 2 months.

Q: What toppings go well with these?
A: Fresh berries, nut butter, honey, yogurt, or cinnamon.

Spinach Artichoke Crescent Roll Bake

Spinach Artichoke Crescent Roll Bake

A Golden, Cheesy Twist on the Classic Dip

Introduction

If you’re a fan of creamy spinach artichoke dip, you’re going to fall in love with this Spinach Artichoke Crescent Roll Bake. It takes all the rich, cheesy flavors you know and love and wraps them in soft, buttery crescent roll dough, baked until golden and irresistible.

This dish is not just an appetizer—it’s a showstopper. Whether you serve them at a holiday gathering, a game-day party, or as a cozy weekend snack, these warm rolls will disappear in minutes.

The best part? It’s incredibly easy to make, even for beginner bakers. The filling comes together in one bowl, the rolls assemble in minutes, and the oven does the rest.

Ingredients Breakdown

For the Filling:

  • 1 cup frozen chopped spinach—thawed and well-drained. Make sure to squeeze out excess water to prevent soggy rolls.

  • 1 cup canned artichoke hearts—chopped. You can use marinated or plain, but drain them well.

  • 4 oz cream cheese (softened)—gives creaminess and binds the filling.

  • ¼ cup sour cream—adds tanginess and a silky texture.

  • ¼ cup mayonnaise—enhances richness and helps keep the filling moist.

  • ½ cup shredded mozzarella cheese—for stretchiness and mild cheese flavor.

  • ¼ cup grated Parmesan cheese—for sharp, nutty flavor.

  • 1 clove garlic, minced—for aromatic depth.

  • Salt & pepper—to taste. Adjust based on your preference.

For the Rolls:

  • 1 can (8 oz) refrigerated crescent roll dough—you can use the sheet version or regular crescent rolls (pinch seams if needed).

  • 1 egg, beaten (optional)—for brushing to give a glossy, golden finish.

  • Extra shredded cheese & parsley—optional toppings for extra flavor and presentation.


Step-by-Step Instructions

Step 1—Preheat & Prepare the Dish

  1. Preheat your oven to 375°F (190°C).

  2. Lightly grease a baking dish or oven-safe skillet with butter or cooking spray. This prevents sticking and gives the rolls a slightly crispy bottom.


Step 2—Make the Filling

  1. In a medium mixing bowl, add softened cream cheese, sour cream, and mayonnaise.

  2. Beat with a spatula or hand mixer until smooth.

  3. Stir in mozzarella, Parmesan, and garlic.

  4. Add the spinach and artichokes, making sure both are well-drained. Mix until all ingredients are evenly distributed.

  5. Taste the mixture and adjust with salt and pepper as needed.

Tip: For extra flavor, you can add a pinch of red pepper flakes or Italian seasoning.


Step 3—Prepare the Dough

  1. Unroll the crescent dough onto a clean surface. If using perforated crescent rolls, gently pinch the seams to form a solid rectangle.

  2. Spread the spinach artichoke filling evenly across the dough, leaving about ½ inch from the edges.

  3. Starting from one long edge, gently roll the dough into a tight log, similar to a jelly roll.

  4. Using a sharp knife or unflavored dental floss, slice into 1-inch pieces—you should get about 8–10 rolls.


Step 4—Assemble & Bake

  1. Arrange the rolls cut side up in your prepared baking dish.

  2. If desired, brush the tops with beaten egg for extra shine.

  3. Sprinkle with a little extra mozzarella or Parmesan for an extra cheesy crust.

  4. Bake for 18–22 minutes, or until the rolls are puffed and golden brown.


Step 5—Garnish & Serve

  1. Remove from the oven and let them cool for about 5 minutes before serving—the filling will be very hot.

  2. Sprinkle with fresh chopped parsley for color and freshness.

  3. Serve warm as a party appetizer, game-day snack, or side dish for soups and salads.

Tips for Success

  • Drain Well: Excess liquid from spinach or artichokes can make the filling watery. Squeeze out as much as possible.

  • Cheese Variations: Try Monterey Jack, cheddar, or Gruyère for different flavor profiles.

  • Make Ahead: Assemble the rolls and refrigerate for up to 8 hours before baking. Just add 2–3 minutes to the baking time.

  • Freezing: Bake, cool, and freeze in an airtight container for up to 1 month. Reheat in the oven at 350°F until warmed through.


Serving Ideas

  • Pair with tomato soup for a cozy meal.

  • Serve alongside a fresh garden salad for a lighter lunch.

  • Offer with a marinara or creamy garlic dip for extra indulgence.

Summary Table

Step Time Key Notes
Preheat Oven 5 min Grease baking dish
Make Filling 10 min Drain spinach well
Prepare Dough 5 min Roll tightly for neat slices
Bake 18–22 min Golden brown top
Serve — Best warm

This recipe will give you soft, cheesy, golden-baked rolls with a creamy spinach artichoke center—the perfect bite-sized comfort food.

Sugar-Free Banana & Chocolate Chip Breakfast Parfaits

Sugar-Free Banana & Chocolate Chip Breakfast Parfaits

A simple, no-added-sugar layered breakfast or snack

Introduction

These Banana & Chocolate Chip Breakfast Parfaits are an easy, make-ahead option made with creamy yogurt, ripe bananas, and chocolate chips. They’re naturally sweet, quick to assemble, and ideal for busy mornings. Layered in jars, they also look beautiful and are great for both adults and kids.


⏱️ Time & Yield

  • Prep Time: 15 minutes

  • Chill Time: Optional

  • Total Time: 15 minutes

  • Servings: 4 parfaits


🧾 Ingredients

  • 1 kg (about 4 cups) plain Greek yogurt, unsweetened

  • 4 large ripe bananas

  • 1 cup oats or low-sugar granola
    (rolled oats or crushed whole-grain biscuits work well)

  • ½ cup sugar-free chocolate chips
    (or dark chocolate chips, finely chopped)

  • 1 teaspoon vanilla extract (optional)

  • Ground cinnamon, a small pinch for each jar


👩‍🍳 Step-by-Step Instructions

1. Prepare the Base

Place four clean jars or containers on your counter.
Divide the oats, granola, or crushed biscuits evenly among them, spreading the base evenly at the bottom of each container.


2. Flavor the Yogurt

In a large mixing bowl, add the Greek yogurt.
Stir in the vanilla extract and a light pinch of cinnamon until smooth.

Optional natural sweetness:
Mash one very ripe banana until smooth and stir it directly into the yogurt for extra flavor without adding sugar.


3. Add the Yogurt Layer

Spoon the yogurt mixture evenly over the oat base in each jar, filling the containers about ¾ full. Smooth the tops gently with the back of a spoon.


4. Prepare the Bananas

Slice the remaining bananas into thin rounds.
Arrange a generous layer of banana slices over the yogurt in each jar.


5. Finish with Chocolate

Sprinkle the chocolate chips evenly over the banana layer, pressing them lightly so they stay in place.


6. Chill and Store

Seal the jars with lids and place them in the refrigerator.
They can be enjoyed right away or chilled for later.

For best appearance and texture, enjoy within 2–3 days, as bananas may darken slightly over time.


🍽️ Serving Ideas

  • Enjoy straight from the jar for breakfast or a snack

  • Add a drizzle of nut butter before serving

  • Serve chilled or slightly softened at room temperature


💡 Helpful Tips

  • Use very ripe bananas for the best natural sweetness

  • Layer just before serving if you prefer firmer banana slices

  • Swap oats for crushed biscuits for a dessert-style version

  • Mini chocolate chips distribute more evenly


🧊 Storage

Keep sealed in the refrigerator and consume within 2–3 days. Stir gently before eating if desired.


👧 Kid-Friendly Option

If the yogurt flavor is too plain for children, stir a small spoonful of peanut butter or almond butter into the yogurt before layering. It adds richness and a familiar taste kids enjoy.