Italian Lemon Yogurt Cake (Sugar-Free)

Italian Lemon Yogurt Cake (Sugar-Free)

Moist, fragrant, and naturally sweetened

Prep Time: 15 minutes
Bake Time: 45–50 minutes
Total Time: 1 hour
Yield: 1 loaf (8–10 slices)

This Italian-style lemon yogurt cake is light, moist, and full of bright citrus flavor. It’s sweetened with stevia instead of refined sugar, making it a better option for those reducing sugar intake while still enjoying a classic homemade cake.


Ingredients

Dry Ingredients

  • 1½ cups all-purpose flour

  • 2 teaspoons baking powder

  • ½ teaspoon kosher salt

Wet Ingredients

  • 1 cup plain coconut yogurt (or whole milk yogurt)

  • Stevia powder, to taste
    (use the amount equivalent to ¾–1 cup sugar, depending on brand strength)

  • 3 large eggs

  • 2 teaspoons finely grated lemon zest (from about 2 lemons)

  • ⅓ cup freshly squeezed lemon juice

  • ½ teaspoon pure vanilla extract

  • ½ cup olive oil

Lemon Soaking Syrup (Sugar-Free)

  • ¼ cup lemon juice

  • Stevia powder, equivalent to ¼ cup sugar

Sugar-Free Lemon Glaze (Optional)

  • Juice of 1 lemon

  • Powdered stevia sweetener, to taste
    (or sugar-free confectioner’s sweetener blend)


Step-by-Step Instructions

1. Prepare the Pan

Preheat oven to 350°F (180°C).
Grease an 8½ × 4¼ × 2½-inch loaf pan and line the bottom with parchment paper, or lightly coat with baking spray.


2. Mix Dry Ingredients

In a large bowl, sift together:

  • Flour

  • Baking powder

  • Salt

Set aside.


3. Mix Wet Ingredients

In a separate bowl, whisk together:

  • Yogurt

  • Stevia powder

  • Eggs

  • Lemon zest

  • Lemon juice

  • Vanilla extract

Whisk until smooth and well combined.


4. Combine Batter

Gradually whisk the dry ingredients into the wet mixture until just combined.
Do not overmix.


5. Add Oil

Gently fold in the olive oil using a spatula until fully incorporated.
The batter should be smooth and slightly thick.


6. Bake

Pour the batter into the prepared loaf pan and smooth the top.

Bake for 45–50 minutes, or until a toothpick inserted into the center comes out clean.


7. Prepare the Lemon Syrup

While the cake bakes, combine:

  • ¼ cup lemon juice

  • Stevia powder

Heat gently in a small saucepan just until dissolved. Do not boil. Set aside.


8. Soak the Cake

Allow the cake to cool in the pan for 10 minutes.
While still warm, slowly pour the lemon syrup over the cake so it absorbs evenly.

Let the cake cool completely.


9. Prepare the Sugar-Free Glaze (Optional)

Mix powdered stevia with lemon juice until a pourable glaze forms.
Drizzle over the cooled cake.

Allow glaze to set for about 1 hour before slicing.


Tips for Best Results

  • Use fine powdered stevia for smooth texture.

  • Olive oil gives authentic Italian flavor; use light olive oil if preferred.

  • For extra moisture, wrap the cooled cake and rest overnight before serving.

  • Skip the glaze for a lighter, breakfast-style cake.


Storage

  • Store covered at room temperature for 2 days

  • Refrigerate for up to 5 days

  • Freeze slices for up to 2 months

Crunchy Cabbage & Cucumber Light Dinner Salad

Crunchy Cabbage & Cucumber Light Dinner Salad

Description

This fresh cabbage and cucumber salad is crunchy, hydrating, and easy to digest. It’s a great light dinner option or side dish that helps you feel full without being heavy. While it doesn’t magically burn belly fat, it supports healthy weight management when paired with balanced meals and an active lifestyle.

Ingredients

  • 2 cups shredded cabbage (green or Napa)

  • ½ cucumber, thinly sliced

  • ½ red bell pepper, thinly sliced

  • 2 green onions, chopped

Simple Dressing (Optional but Recommended)

  • 1 tablespoon olive oil

  • 1 tablespoon lemon juice or apple cider vinegar

  • Pinch of salt and black pepper

Instructions

  1. Add cabbage, cucumber, bell pepper, and green onions to a large bowl.

  2. Toss gently to combine.

  3. Whisk dressing ingredients and pour over salad.

  4. Mix well and serve fresh.

Servings

  • 1–2 servings

Nutritional Information (Approx. per serving)

  • Calories: 80–120

  • Fiber: 3–4 g

  • Fat: 4–5 g (from olive oil)

  • Sugar: Very low

  • Water content: High (hydrating)

Benefits

✔ Low calorie
✔ High fiber (supports digestion)
✔ Helps reduce overeating
✔ Hydrating and refreshing
✔ Good for gut health

Important Reality Check

  • ❌ Spot fat loss is not possible

  • ❌ Eating only this every night is not balanced

  • ✅ Fat loss happens from:

    • overall calorie balance

    • regular movement

    • enough protein

    • sleep and consistency

Tips to Make It Better for Dinner

  • Add protein to stay full:

    • grilled chicken

    • boiled eggs

    • chickpeas or tofu

  • Add healthy fats:

    • avocado slices

    • seeds or nuts

Notes

  • Napa cabbage is softer and easier to digest

  • Massage cabbage lightly if it feels too firm

  • Best eaten fresh

Q & A

Q: Will this burn belly fat?
❌ No food burns belly fat directly.

Q: Can this help with weight loss?
✔ Yes, as part of a balanced routine.

Q: Is this okay for teens?
✔ Yes, but it should not replace full meals long-term.

Q: Can I eat this every day?
✔ Yes, but rotate ingredients and add protein.

Homemade Vanilla Ice Cream (No Machine Needed!)

A timeless, creamy dessert that tastes just like summer in a bowl — smooth, rich, and bursting with real vanilla flavor. The best part? You don’t even need an ice cream maker!


 Ingredients

  • 2 cups (480ml) heavy cream

  • 1 cup (240ml) whole milk

  • ¾ cup (150g) sugar

  • 1 tablespoon vanilla extract (or 1 vanilla bean, scraped)

  • A pinch of salt


 Instructions (No Ice Cream Maker Method)

  1. Mix the Base:
    In a large mixing bowl, whisk together milk, sugar, vanilla, and salt until the sugar is completely dissolved.

  2. Add Cream:
    Pour in the heavy cream and whisk again until the mixture is smooth and creamy.

  3. Freeze:
    Transfer to a freezer-safe container, cover tightly, and freeze for 2 hours.

  4. Stir & Repeat:
    After 2 hours, stir the mixture with a fork or whisk to break up ice crystals.
    Return it to the freezer and repeat this step 2–3 times every 30 minutes until thick and creamy.

  5. Final Freeze:
    Freeze completely for at least 6 hours or overnight for that perfect scoopable texture.

 Optional (Ice Cream Maker Method)

Pour the chilled mixture into your ice cream maker and churn according to the manufacturer’s directions (usually 20–25 minutes). Transfer to a container and freeze until firm.

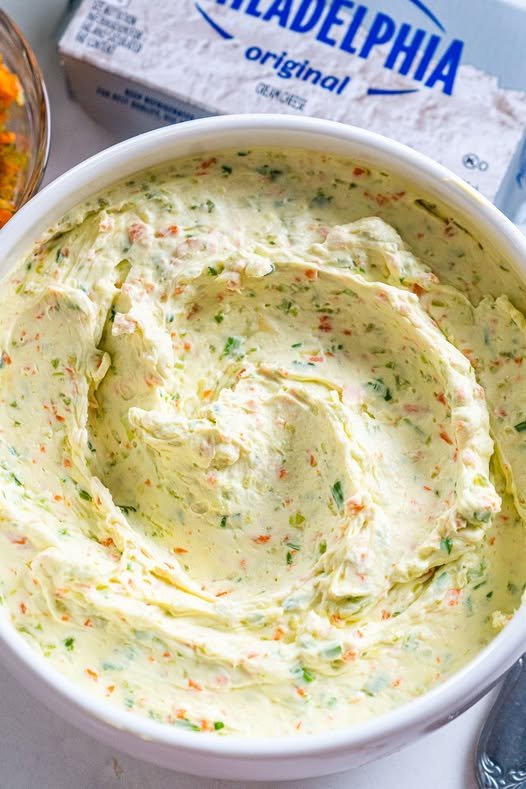
Homemade Garden Vegetable Spread

Homemade Garden Vegetable Spread

This creamy, tangy spread is packed with crunchy carrots, celery, and zesty green onions. It’s the perfect companion for toasted bagels, crackers, or even as a dip for fresh bell pepper strips.

  • Prep time: 15 minutes

  • Inactive time: 1–2 hours (chilling)

  • Yields: Serves 8

  • Dietary Info: Vegetarian, Contains Milk

Ingredients

  • 2 (8 oz) packages cream cheese, softened to room temperature

  • ¼ cup carrots, chopped

  • ½ cup celery, chopped

  • 2 green onions, chopped

  • ½ tsp salt

  • ½ tsp garlic powder

  • ¼ tsp onion powder

Preparation

  1. Prep the Veggies: Place the chopped carrots, celery, and green onions into a food processor. Pulse several times until the vegetables are broken down into very small bits.

    Tip: Be careful not to over-process; you want distinct texture, not a watery paste.

  2. Mix: In a medium-sized mixing bowl, combine the softened cream cheese, the pulsed vegetable mixture, salt, garlic powder, and onion powder. Stir vigorously until the vegetables and seasonings are evenly distributed throughout the cream cheese.

  3. Chill: Spoon the spread into an airtight container or a glass jar. Place it in the refrigerator for at least 1 to 2 hours. This allows the cream cheese to firm back up and the flavors from the onion and garlic to meld.

  4. Serve: Spread generously on toasted bagels or crusty bread.

Storage

Keep the spread refrigerated in an airtight container. It will stay fresh and delicious for 7–10 days.

Creamy Blender Dessert: Easy and quick — just blend and chill!

Hello, everyone! Welcome back to our cooking blog, where we share delicious recipes every week. Today, we’re preparing a Creamy Dessert. So, grab your pen and paper to jot down the ingredients and let’s dive into this easy, step-by-step recipe that’s perfect for breakfast, appetizers or even to accompany fresh salads!

How to Make Creamy Blender Dessert

With just a few ingredients and no cooking required, this easy dessert wins everyone over with its taste and texture. A true treat. You don’t need cooking classes or costly meal delivery services to prepare something delicious at home. With a bit of planning and our detailed meal prep guide, you can create amazing dishes with confidence and ease.

Recipe Ingredients:

  • 1 can of sweetened condensed milk (typically 395 g / ~14 oz)
  • 1 small carton of heavy cream or table cream (200 ml / ~¾ cup)
  • ⅖ cup of milk (100 ml)
  • ¾ cup of cold whipped cream (200 ml)
  • 1 packet of passion fruit powdered drink mix
  • 1 packet of chocolate sprinkles (90 g / ~3.2 oz)

Instructions:

First, begin by adding the heavy cream, sweetened condensed milk, chilled whipped topping, passion fruit powdered juice mix, and milk into a blender.
Next, blend everything for about 5 minutes, until the mixture becomes smooth and creamy.

Then, add the chocolate sprinkles to the blended mixture.
After that, gently fold them in using a spatula or spoon, being careful not to crush the sprinkles, so they stay crunchy and well distributed.

Afterwards, divide the dessert into individual 8 oz (250 ml) cups.
This presentation not only looks charming, but also makes serving easier.

Then, refrigerate the cups for at least 1 hour.
This step is essential for the dessert to set properly and reach the perfect chilled consistency.

Finally, once it’s firm and cold, serve and enjoy this easy and delicious treat — ideal for after a meal or any special moment.

Tips:

Try different flavors: You can replace the passion fruit juice mix with strawberry, lemon, or pineapple flavors.

Extra decoration: Add a layer of whipped topping or garnish with chocolate shavings before serving.

Smaller portions: Use 5 oz (150 ml) cups if you prefer more delicate servings — perfect for parties and gatherings.

Apple Salad with Honeycrisp Apples, Celery, Grapes, Pecans, and Dried Cranberries

⏱ Time

Prep: 15 minutes
Chill: 20 minutes (optional)
Serves: 4–6


🧾 Ingredients

Salad

  • 3 medium Honeycrisp apples, cored & diced

  • 1 cup seedless red or green grapes, halved

  • ½ cup celery, thinly sliced

  • ½ cup pecans, roughly chopped (toasted optional)

  • ⅓ cup dried cranberries

Creamy Dressing

  • ½ cup Greek yogurt (plain) or mayonnaise

  • 2 tbsp honey or maple syrup

  • 1 tbsp fresh lemon juice

  • ½ tsp vanilla extract (optional but lovely)

  • Pinch of salt


👩‍🍳 Instructions

1️⃣ Prep produce
Dice apples and toss with lemon juice to prevent browning.

2️⃣ Toast pecans (optional)
Toast in dry pan over medium heat 3–4 minutes until fragrant. Cool.

3️⃣ Make dressing
In a bowl, whisk yogurt/mayo, honey, lemon juice, vanilla, and salt until smooth.

4️⃣ Assemble salad
In a large bowl, combine apples, grapes, celery, pecans, and cranberries.

5️⃣ Dress
Pour dressing over salad and toss gently until evenly coated.

6️⃣ Chill & serve
Refrigerate 15–30 minutes for best flavor, or serve immediately.


⭐ Tips for Best Results

  • Use Honeycrisp for the perfect sweet-crunch balance

  • Toasting pecans adds deep flavor

  • Add lemon immediately to apples to keep them bright

  • Chill slightly before serving for crisp texture


🔥 Delicious Variations

  • Add mini marshmallows for classic potluck style

  • Swap pecans for walnuts or almonds

  • Add chicken for a protein salad meal

  • Use light mayo or yogurt for a healthier version


❓ Q & A

Q: Can I make this ahead?
A: Yes — best within 12 hours for crisp apples.

Q: Can I make it dairy-free?
A: Use vegan mayo or coconut yogurt.

Q: How long does it last?
A: Up to 2 days refrigerated.

Q: Is this Weight Watchers friendly?
A: Yes — use Greek yogurt and reduce nuts for lower points.

WW Points (Per Serving – makes 6 servings)

Using Greek Yogurt Dressing

  • WW US: 3–4 points

  • WW UK: 3–4 points

Using Regular Mayonnaise

  • WW US: 6–7 points

  • WW UK: 6–7 points

(Main points come from pecans, cranberries, and honey.)