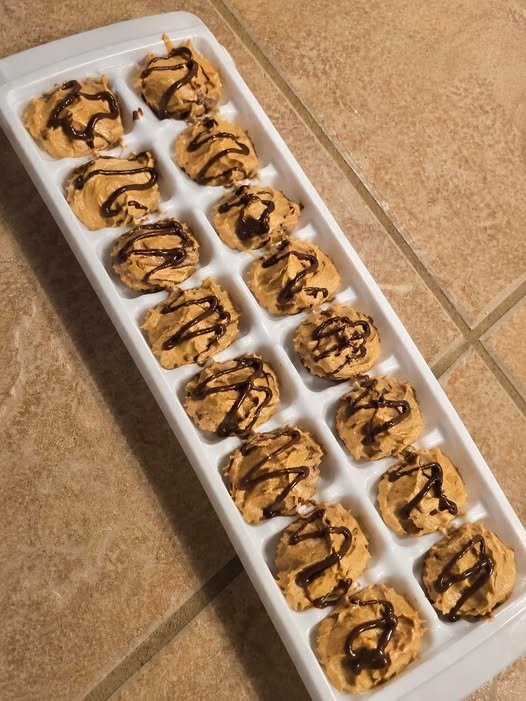
Frozen Peanut Butter Chocolate Bites 🍫πŸ₯œ

These creamy frozen treats are super easy to make and perfect for a quick dessert or snack!

Ingredients

  • 1 cup creamy peanut butter
  • 1/4 cup honey or maple syrup
  • 1 teaspoon vanilla extract
  • 1 cup whipped topping or Greek yogurt
  • 1/4 cup mini chocolate chips
  • 1/4 cup melted chocolate (for drizzle)

Instructions

  1. In a mixing bowl, combine peanut butter, honey, and vanilla extract.
  2. Fold in whipped topping (or Greek yogurt) until smooth and creamy.
  3. Stir in mini chocolate chips.
  4. Spoon the mixture into an ice cube tray or silicone mold.
  5. Freeze for about 2–3 hours until firm.
  6. Drizzle melted chocolate over the top.
  7. Freeze again for 10 minutes before serving.

Optional Add-Ins

  • Crushed peanuts
  • Crushed Oreos
  • Coconut flakes
  • Protein powder for extra protein

Storage

Keep frozen in an airtight container for up to 2 weeks.

Enjoy these creamy peanut butter chocolate bites straight from the freezer!

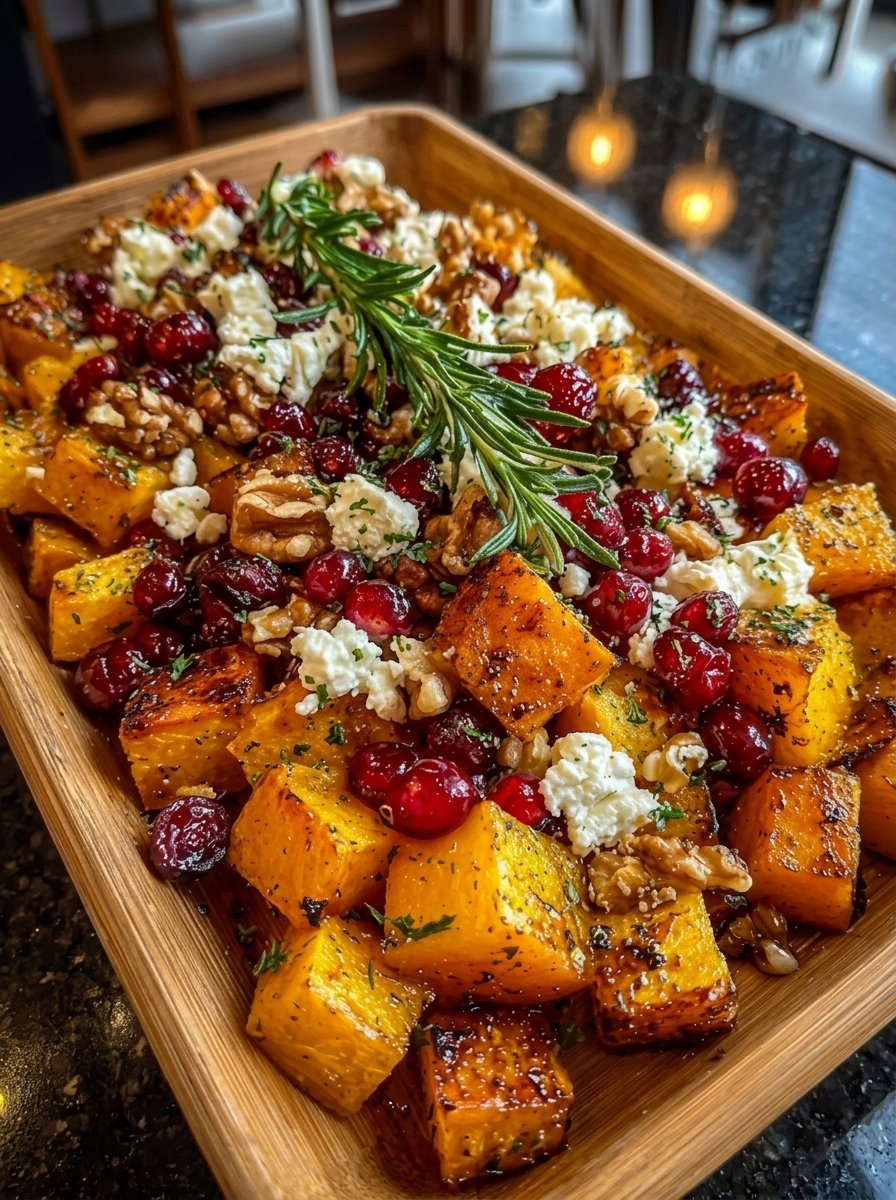
Roasted Butternut Squash with Cranberries, Walnuts, and Feta πŸŽƒπŸ’

Roasted Butternut Squash with Cranberries, Walnuts, and Feta πŸŽƒπŸ’

This stunning dish combines roasted, caramelized squash with tart cranberries, crunchy walnuts, and creamy feta. It’s a beautiful medley of textures and flavors that makes a perfect side dish for a family dinner or a festive gathering!

  • Yields: 4 servings πŸ‘₯

  • Prep time: 15 minutes πŸ”ͺ

  • Cook time: 25–30 minutes ⏲️


Ingredients πŸ›’

  • 1 large Butternut Squash (peeled and cubed into bite-sized pieces) πŸŽƒ

  • Β½ cup Dried Cranberries or Pomegranate seeds πŸ’

  • Β½ cup Walnuts (halved or roughly chopped) πŸ₯œ

  • Β½ cup Feta cheese (crumbled) πŸ§€

  • 2 tbsp Olive oil πŸ«’

  • 1 tbsp Honey or Maple syrup (for caramelization) 🍯

  • Fresh Rosemary or Thyme (for aromatics) 🌿

  • Seasoning: Β½ tsp garlic powder, salt, and black pepper. πŸ§‚


Step-by-Step Instructions πŸ“

  1. Roast the Squash ➑️ Preheat your oven to 200Β°C (400Β°F). Toss the butternut squash cubes with olive oil, honey, garlic powder, salt, and pepper. Spread them in a single layer on a baking sheet. ➑️ Bake for 20–25 minutes until tender and golden brown on the edges.

  2. Toast the Walnuts ➑️ In the last 5 minutes of roasting, add the walnuts to the same tray to lightly toast them and bring out their nutty aroma. πŸ₯œ

  3. Combine the Flavors ➑️ Transfer the warm roasted squash and walnuts to a serving dish.

  4. Add the Toppings ➑️ While the squash is still warm, sprinkle the dried cranberries and crumbled feta cheese over the top. ➑️ The warmth of the squash will slightly soften the cheese, making it extra delicious! πŸ§€

  5. Garnish ➑️ Place a fresh sprig of rosemary on top or sprinkle with chopped fresh herbs for a bright, aromatic finish. 🌿

  6. Serve ➑️ This dish is best served warm, but it is also delightful at room temperature. πŸ˜‹


Common Questions & Answers ❓

Q: Can I use Sweet Potato instead of Butternut Squash? A: Yes! ➑️ Sweet potatoes or even roasted carrots work perfectly with these same toppings.

Q: How do I keep the squash from getting mushy? A: Make sure your oven is hot before putting the tray in, and don’t crowd the pan. ➑️ If the pieces are too close together, they will steam instead of roasting.

Q: Can I make this ahead of time? A: You can roast the squash in advance. ➑️ When ready to serve, reheat the squash and then add the fresh feta, walnuts, and cranberries so they stay fresh and crunchy! πŸ₯—


Success Tips ✨

  • Uniform Cubes: Try to cut your squash into equal-sized pieces so they all finish cooking at the same time. πŸ”ͺ

  • Balance the Sweetness: If you prefer a more savory dish, you can skip the honey and add a little extra rosemary or a pinch of red pepper flakes for heat. 🌢️

  • Added Crunch: For an extra layer of flavor, try using candied walnuts or pecans! 🌟
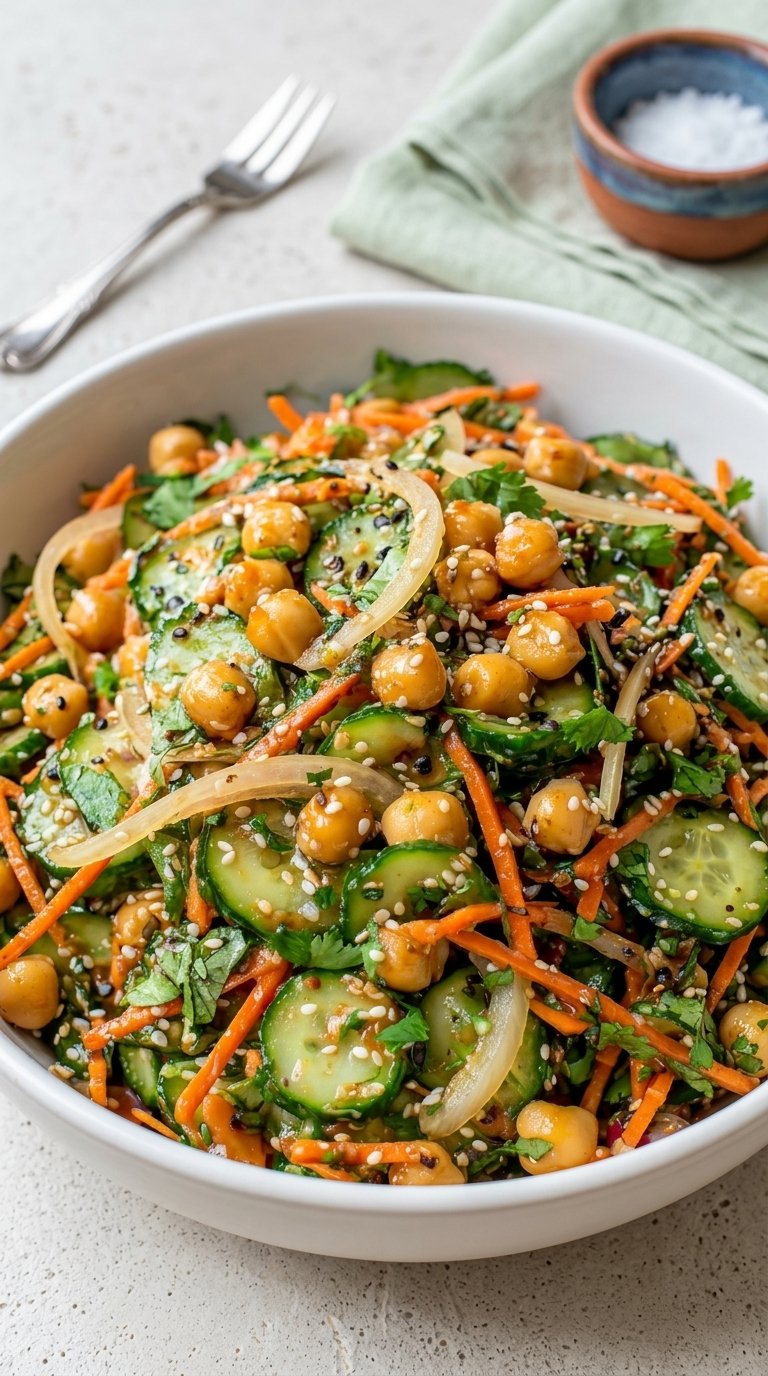
Crunchy Cucumber & Carrot Salad with Roasted Chickpeas πŸ₯—βœ¨

Crunchy Cucumber & Carrot Salad with Roasted Chickpeas πŸ₯—βœ¨

This vibrant salad is a refreshing blend of crisp vegetables and protein-packed chickpeas, tossed in a light, savory dressing. It’s a wonderful choice for a light lunch or a colorful side dish!

  • Yields: 2–4 servings πŸ‘₯

  • Prep time: 15 minutes πŸ”ͺ

  • Total time: 15 minutes ⏲️


Ingredients πŸ›’

  • 1 can (15 oz) Chickpeas (rinsed and drained) 🫘

  • 2 large Cucumbers (thinly sliced into rounds) πŸ₯’

  • 1 cup Carrots (shredded or julienned) πŸ₯•

  • Β½ White or Red Onion (thinly sliced) πŸ§…

  • ΒΌ cup Fresh Cilantro or Parsley (chopped) 🌿

  • 2 tbsp Sesame Seeds (for a nutty crunch) πŸ₯―

  • Dressing: 2 tbsp olive oil, 1 tbsp rice vinegar (or lemon juice), 1 tsp honey (optional), salt, and black pepper to taste. πŸ―πŸ§‚


Step-by-Step Instructions πŸ“

  1. Prepare the Vegetables ➑️ Slice the cucumbers into thin rounds and shred the carrots. Thinly slice the onion into half-moons. Place them all into a large mixing bowl.

  2. Add the Chickpeas ➑️ Add the rinsed and drained chickpeas to the bowl with the vegetables. ➑️ Pro-Tip: If you want extra crunch, you can lightly toast the chickpeas in a pan with a drop of oil for 5 minutes before adding them! 🍳

  3. Mix the Dressing ➑️ In a small jar or bowl, whisk together the olive oil, vinegar, honey, salt, and pepper until well combined.

  4. Toss the Salad ➑️ Pour the dressing over the vegetables and chickpeas. Add the fresh chopped herbs. 🌿

  5. The Final Garnish ➑️ Toss everything gently until the vegetables are evenly coated. ➑️ Sprinkle a generous amount of sesame seeds over the top for a beautiful finish. πŸ₯―

  6. Chill and Serve ➑️ For the best flavor, let the salad sit in the fridge for about 10–15 minutes before serving to let the dressing soak in. πŸ˜‹


Common Questions & Answers ❓

Q: Can I add more protein to this? A: Yes! ➑️ Sliced grilled chicken or even some crumbled feta cheese would pair beautifully with these flavors.

Q: How long will this stay fresh? A: This salad is best enjoyed fresh, but it will stay crisp in an airtight container in the fridge for up to 2 days. 🧊

Q: What if I don’t like cilantro? A: No problem! ➑️ Fresh mint or flat-leaf parsley are excellent substitutes that keep the salad tasting bright and fresh. 🌿


Success Tips ✨

  • Slice Thinly: Using a mandoline or a very sharp knife to get the cucumbers and onions extra thin makes the texture of this salad much more enjoyable. πŸ”ͺ

  • Toasted Seeds: Briefly toasting your sesame seeds in a dry pan for 1–2 minutes before garnishing will unlock a much deeper, nuttier aroma! 🌟

  • Keep it Crisp: If you are making this ahead of time, keep the dressing on the side and toss it just before serving to ensure the vegetables stay perfectly crunchy. πŸ₯—

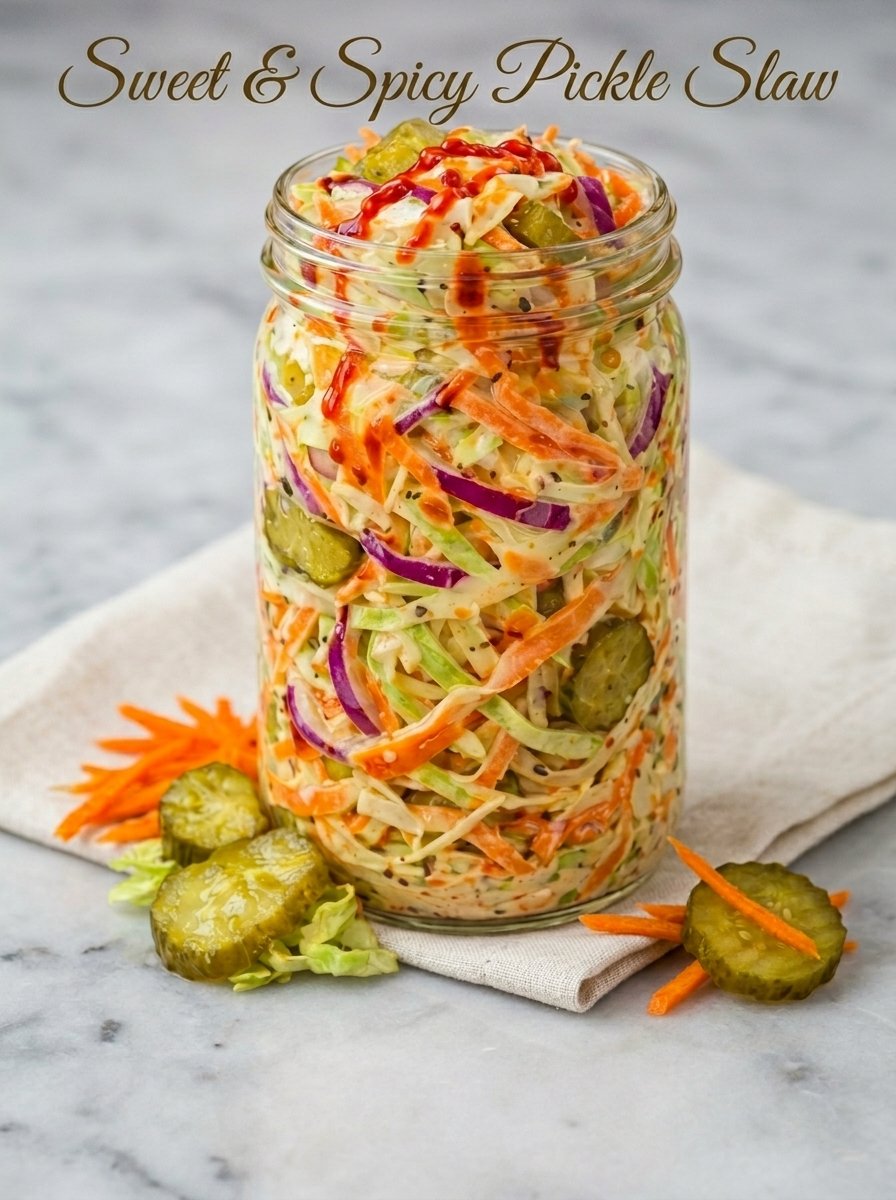
Sweet & Spicy Pickle Slaw

πŸ₯’ Sweet & Spicy Pickle Slaw

This refreshing slaw is perfect for topping sandwiches or serving at a barbecue.

πŸ›’ Ingredients

  • 4 cups Shredded cabbage mix (green and red cabbage with carrots) πŸ₯•

  • 1 cup Dill pickles, chopped or sliced into thin rounds πŸ₯’

  • ΒΌ cup Red onion, thinly sliced πŸ§…

  • Β½ cup Mayonnaise or Greek yogurt

  • 2 tablespoons Pickle juice (straight from the jar!)

  • 1 tablespoon Honey or maple syrup 🍯

  • 1–2 teaspoons Sriracha or hot sauce (adjust to your spice level) πŸ”₯

  • Β½ teaspoon Celery seeds and black pepper πŸ§‚


πŸ‘©β€πŸ³ Step-by-Step Instructions

  1. Prep the Base ➑️ In a large mixing bowl, toss together the shredded cabbage, carrots, red onion, and chopped pickles. πŸ₯£

  2. Whisk the Dressing ➑️ In a separate small bowl, whisk together the mayonnaise, pickle juice, honey, Sriracha, celery seeds, and pepper until smooth and creamy. πŸ₯„

  3. Combine ➑️ Pour the creamy dressing over the vegetable mixture. ➑️ Tip: Use a large spoon to fold everything together until every shred of cabbage is well-coated. πŸ₯—

  4. The Spicy Finish ➑️ For that beautiful look in the photo, drizzle a little extra Sriracha over the top once it’s in the jar or bowl. πŸ”₯πŸŒ€

  5. Chill for Flavor ➑️ Let the slaw sit in the refrigerator for at least 20–30 minutes. This softens the cabbage slightly and lets the spicy and sweet flavors meld together. 🧊


❓ Common Questions & Answers

Q: Can I make this ahead of time? A: Yes! You can prep the veggies and the dressing separately a day early. Mix them about an hour before serving to keep the maximum crunch. ⏱️

Q: Is there a way to make it less spicy? A: Simply reduce the amount of Sriracha or omit it entirely. You can replace it with a pinch of paprika for color without the heat. 🌢️➑️✨

Q: What does this pair well with? A: It is incredible on top of pulled chicken sandwiches, burgers, or served alongside grilled fish. πŸ”πŸŸ

Golden Crispy Cheesy Potato Cakes

πŸ₯” Golden Crispy Cheesy Potato Cakes

This recipe makes about 8–10 cakes and is perfect as a side dish or a light snack.

πŸ›’ Ingredients

  • 2 cups Cold mashed potatoes (plain or seasoned)

  • 1 cup Shredded cheddar or mozzarella cheese πŸ§€

  • 1 Large egg (lightly beaten) πŸ₯š

  • ΒΌ cup All-purpose flour (plus extra for coating)

  • 2 tablespoons Fresh parsley or green onions, finely chopped 🌿

  • Β½ teaspoon Garlic powder

  • Salt and Black pepper to taste πŸ§‚

  • 2-3 tablespoons Olive oil or butter for pan-frying 🍳


πŸ‘©β€πŸ³ Step-by-Step Instructions

  1. Mix the Base ➑️ In a large bowl, combine the cold mashed potatoes, shredded cheese, chopped parsley (or green onions), garlic powder, and the beaten egg. πŸ₯£

  2. Bind it Together ➑️ Stir in the flour. The mixture should be firm enough to hold its shape. ➑️ Tip: If the mixture feels too sticky, add another tablespoon of flour. πŸ₯„

  3. Shape the Cakes ➑️ Scoop about ΒΌ cup of the mixture and roll it into a ball. Flatten it gently with your palms to form a patty about Β½ inch thick. βœ‹

  4. Light Coating ➑️ Lightly dredge each patty in a little bit of extra flour. This is the secret to getting that extra crispy crust! ✨

  5. Heat the Pan ➑️ Heat the oil or butter in a large non-stick skillet over medium heat. 🍳

  6. Fry until Golden ➑️ Place the cakes in the pan (don’t crowd them!). Fry for 3–4 minutes per side until they are deep golden brown and crispy. ➑️ πŸ”ƒ

  7. Drain & Garnish ➑️ Remove the cakes and place them on a plate lined with a paper towel to remove excess oil. Sprinkle with a little extra fresh parsley. 🌿


❓ Common Questions & Answers

Q: Can I make these in the air fryer? A: Yes! Lightly spray the cakes with oil and air fry at 400Β°F (200Β°C) for about 10–12 minutes, flipping halfway through until crispy. πŸ’¨

Q: My potato cakes are falling apart in the pan. Why? A: This usually happens if the potatoes are too warm or the mixture is too wet. Make sure to use cold mashed potatoes and add enough flour to create a dough-like consistency. πŸ’‘

Q: Can I add other ingredients? A: Definitely! Finely diced cooked turkey or small pieces of steamed broccoli work great inside these cakes for extra flavor. πŸ₯¦

Q: What should I serve these with? A: They are delicious with a dollop of sour cream, Greek yogurt, or even a little bit of spicy ranch dip on the side! 🍯


✨ Pro Tip

If you have leftover mashed potatoes from dinner, store them in the fridge overnight. Cold potatoes contain more starch, which helps these cakes stay together perfectly without needing too much flour! πŸ₯”πŸ”₯

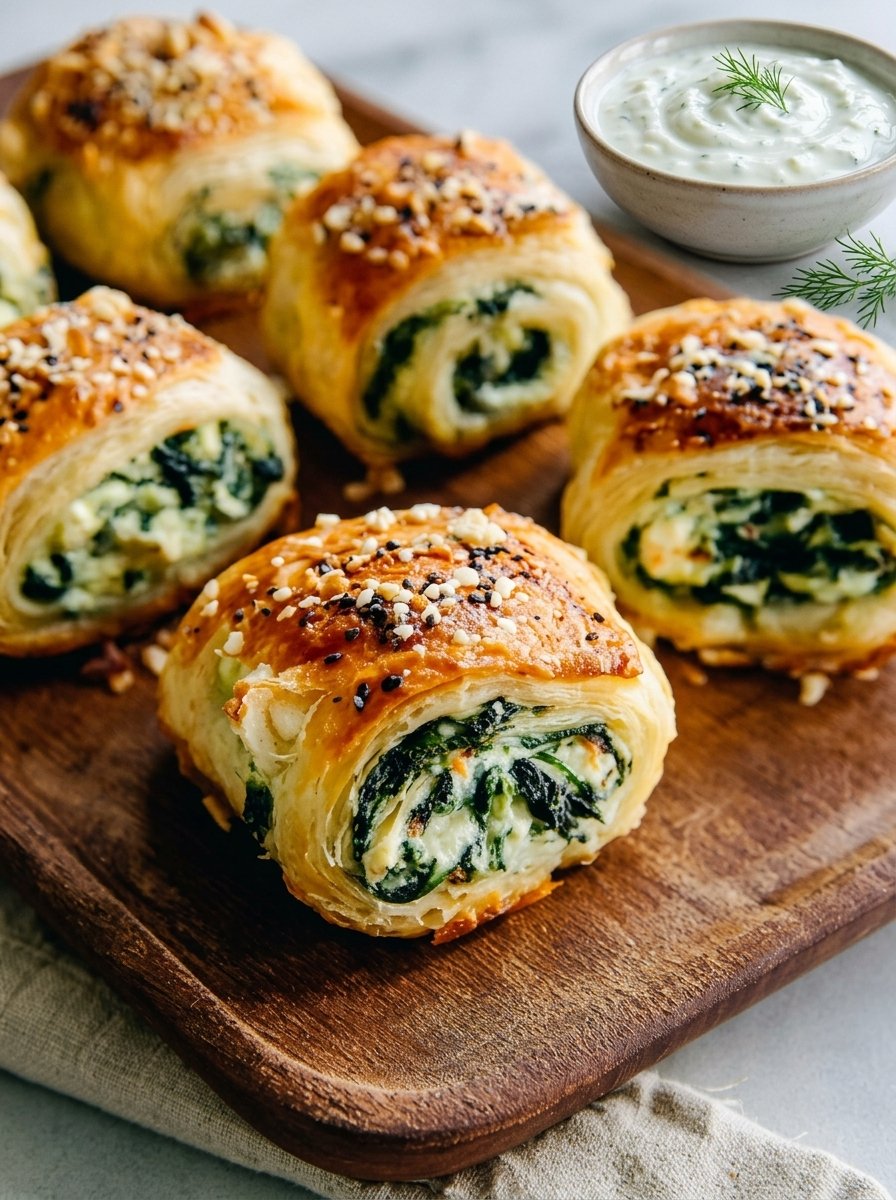
Cheesy Spinach Puff Pastry Bites

✨ Cheesy Spinach Puff Pastry Bites ✨

If you’re looking for a crowd-pleasing appetizer that looks fancy but is incredibly simple to make, these Cheesy Spinach Puff Pastry Bites are a perfect choice. They are crispy, creamy, and packed with flavor!


πŸ›’ Ingredients

  • Puff Pastry: 1 pack (usually 2 sheets), thawed

  • Fresh Spinach: 2 cups, chopped

  • Cream Cheese: 4 oz (half a block), softened

  • Mozzarella Cheese: 1 cup, shredded

  • Garlic: 2 cloves, minced

  • Egg Wash: 1 egg beaten with 1 tbsp water

  • Topping: Everything bagel seasoning or sesame seeds


πŸ‘©β€πŸ³ Step-by-Step Recipe

πŸ₯¬ 1. Prepare the Filling

  1. Heat a pan over medium heat.

  2. Add the chopped spinach and sautΓ© for 2–3 minutes until wilted.

  3. Stir in the minced garlic and cook for another minute until fragrant.

  4. Remove from heat and transfer to a bowl. Mix in the softened cream cheese and mozzarella until the mixture is smooth and creamy.

πŸ“œ 2. Prepare the Puff Pastry

  1. Lightly flour your work surface and roll out the puff pastry sheets.

  2. Cut the pastry into equal rectangles or squares (about 3×3 inches works well).

πŸ§€ 3. Fill the Pastry

  1. Spoon about 1 tablespoon of the spinach-cheese mixture onto the center of each pastry piece.

  2. Fold the pastry over the filling (into a triangle or rectangle) and press the edges with a fork to seal them tightly.

✨ 4. Add Topping

  1. Place the pastries on a baking tray lined with parchment paper.

  2. Brush the tops evenly with the egg wash to ensure a beautiful golden finish.

  3. Sprinkle with everything bagel seasoning or sesame seeds.

πŸ”₯ 5. Bake

  1. Bake in a preheated oven at 400Β°F (200Β°C) for 18–22 minutes.

  2. Remove when they are puffed up and have turned a deep, golden brown.

🍽️ 6. Serve

  1. Allow them to cool for a few minutes so the cheese sets slightly.

  2. Serve warm! These pair beautifully with a side of garlic aioli or a tangy dill yogurt dip.


❓ Quick Tips & Q/A

  • Frozen Spinach: If using frozen, make sure to thaw it completely and squeeze out every bit of excess water to prevent the pastry from getting soggy.

  • Make-Ahead: You can assemble these a few hours in advance. Keep them covered in the fridge and simply brush with egg wash right before you pop them in the oven.

  • Cheese Variations: For a sharper bite, swap half the mozzarella for Feta or Parmesan. For extra creaminess, a dollop of Ricotta works wonders.