Mediterranean Recipes
Hearty Chicken and Vegetable Stew
Instructions
8. Finish & serve
Bite into Bliss: Garlic Parmesan Cheeseburger Bombs
Ingredients
Dough
Directions
Nutritional Information
Asparagus Stuffed Chicken Fillet
Mediterranean grilled salmon with couscous lemon and spinach salad
Mediterranean Grilled Salmon with Couscous, Lemon & Spinach Salad
Fresh grilled salmon, fluffy lemon couscous, and a crisp spinach salad come together in this easy Mediterranean-inspired meal. With garlic, oregano, olive oil, tomatoes, cucumber, olives, and feta, every component adds freshness and flavor without making the recipe complicated.
Prep Time: 15 minutes
Marinating Time: 15 minutes
Cook Time: 20 minutes
Total Time: 50 minutes
Servings: 4
Ingredients
For the Salmon & Marinade
4 salmon fillets, about 5 to 6 ounces each, skin-on or skinless
2 tablespoons extra virgin olive oil
2 tablespoons fresh lemon juice
1 teaspoon lemon zest
3 garlic cloves, minced
1 teaspoon dried oregano
½ teaspoon dried thyme
1 teaspoon paprika
½ teaspoon salt
½ teaspoon freshly cracked black pepper
2 tablespoons fresh parsley or chives, finely chopped
Lemon wedges, for serving
For the Couscous
1 cup dry couscous
1 cup vegetable broth or water
1 tablespoon extra virgin olive oil
¼ teaspoon salt
2 tablespoons fresh parsley, chopped
1 tablespoon fresh lemon juice
½ teaspoon lemon zest
For the Spinach & Lemon Salad
5 cups fresh baby spinach
1 cup cherry tomatoes, halved
½ cucumber, diced
¼ small red onion, thinly sliced
¼ cup Kalamata olives, sliced
2 tablespoons extra virgin olive oil
1 tablespoon fresh lemon juice
1 small garlic clove, finely minced
½ teaspoon dried oregano
¼ teaspoon salt
¼ teaspoon black pepper
2 tablespoons crumbled feta cheese, optional
Instructions
Marinate the Salmon
Pat the salmon dry and place the fillets in a shallow dish.
Combine olive oil, lemon juice, lemon zest, garlic, oregano, thyme, paprika, salt, black pepper, and fresh herbs.
Coat the salmon evenly with the mixture and allow it to marinate for about 15 minutes.
Cook the Couscous
Bring vegetable broth or water to a boil. Add olive oil and salt.
Stir in the couscous, remove from the heat, and cover.
Allow it to stand for about 5 minutes until the liquid is absorbed.
Fluff with a fork and mix in lemon juice, lemon zest, and fresh parsley.
Make the Spinach Salad
Combine spinach, tomatoes, cucumber, red onion, and Kalamata olives in a large bowl.
Whisk together olive oil, lemon juice, garlic, oregano, salt, and pepper.
Pour the dressing over the vegetables and toss gently.
Add feta if desired and set the salad aside until serving.
Grill the Salmon
Preheat the grill or grill pan over medium-high heat and lightly oil the surface.
Place the salmon on the grill and cook for about 4 to 5 minutes.
Carefully turn and cook for another 3 to 4 minutes, adjusting the time according to the thickness of the fish.
The salmon should be opaque and flaky when finished. For food safety, check that the thickest portion reaches 145°F or 63°C.
Assemble the Plates
Spoon the lemon-herb couscous onto each plate.
Add the fresh spinach salad alongside it.
Place a grilled salmon fillet over the couscous or beside it.
Garnish with fresh parsley or chives and serve with lemon wedges.
Add an extra drizzle of olive oil or a little feta if desired.
Tips
Keep the Marinade Fresh
Use freshly squeezed lemon juice, fresh garlic, and fresh herbs whenever possible. These simple ingredients make a noticeable difference in the final flavor.
Avoid Excess Lemon During Marination
The lemon is meant to flavor the fish, not cook it. A short marinade gives the salmon plenty of flavor without changing its texture too much.
Grill Skin-Side Down First
If using skin-on salmon, starting skin-side down provides a protective layer between the delicate fish and the hot grill. It also helps the skin become nicely browned.
Do Not Flip Repeatedly
Salmon is delicate. Turn it only once if possible, using a wide spatula to support the entire fillet.
Let the Fish Rest
A few minutes of resting after grilling helps the salmon retain its moisture and makes it easier to serve without breaking apart.
Make Couscous Fluffy
Let the couscous steam undisturbed with the lid on, then fluff it gently with a fork. This gives you light grains instead of a dense or sticky texture.
Add Fresh Herbs at the End
Fresh parsley or chives provide a clean finishing flavor. Adding them after cooking helps preserve their freshness.
Keep the Salad Crisp
Wash and dry the spinach and vegetables thoroughly. Excess water can dilute the dressing and make the salad less crisp.
Use Freshly Cracked Pepper
Fresh black pepper adds a subtle bite that works particularly well with lemon, garlic, salmon, and olive oil.
Serve With Lemon Wedges
Even with lemon in the marinade and salad dressing, fresh lemon at the table gives everyone the option to brighten their own portion.
Variations
Lemon Dill Salmon
Replace the thyme with fresh dill or add dill alongside the parsley. Dill and salmon create a classic combination that works beautifully with lemon.
Quinoa Mediterranean Bowl
Use cooked quinoa instead of couscous and add chickpeas, cucumber, tomatoes, parsley, olives, and feta.
Feta and Olive Couscous
Mix crumbled feta and sliced Kalamata olives directly into the warm couscous. Add lemon zest and parsley for a flavorful side.
Honey Lemon Salmon
Add 1 teaspoon honey to the salmon marinade for a subtle sweet note. The honey also encourages beautiful browning on the grill.
Spicy Garlic Salmon
Add red pepper flakes, cayenne, or a little chili powder to the marinade for a spicy Mediterranean-inspired version.
Roasted Tomato Spinach Salad
Roast the cherry tomatoes briefly before adding them to the spinach salad. Their sweetness pairs beautifully with the grilled salmon.
Chickpea Spinach Salad
Add ¾ cup drained chickpeas to the salad for extra texture and a more substantial meal.
Creamy Tzatziki Finish
Serve the grilled salmon with a spoonful of tzatziki made from Greek yogurt, cucumber, garlic, lemon, and fresh dill.
Warm Vegetable Couscous
Add sautéed zucchini, bell peppers, spinach, and red onion to the couscous. This creates a hearty warm grain base for the salmon.
Q&A
Can I use skinless salmon?
Yes. Skinless salmon works perfectly. Just handle the fillets gently when turning them on the grill because the skin is not there to provide extra support.
Can I cook the salmon in a skillet?
Yes. Heat a lightly oiled skillet over medium-high heat and cook the salmon until browned outside and cooked through. Adjust the cooking time according to thickness.
Can I use quinoa instead of couscous?
Yes. Quinoa is a nutritious alternative and works especially well with lemon, parsley, cucumber, tomatoes, and feta.
Can I use pearl couscous?
Yes. Pearl couscous gives the dish a slightly chewier texture. Cook it according to package instructions before adding the lemon and herbs.
Can I add avocado to the salad?
Absolutely. Avocado adds creaminess and healthy fats while complementing the grilled salmon and lemon dressing.
What vegetables work best in the spinach salad?
Cucumber, cherry tomatoes, red onion, olives, roasted peppers, radishes, and avocado all work well.
Can I make the salad without feta?
Yes. Feta is optional. The salad remains flavorful from the lemon, olive oil, garlic, oregano, and fresh vegetables.
Can I use dried parsley instead of fresh?
Fresh parsley provides a brighter flavor, but dried parsley can be used in the couscous or marinade if fresh herbs are unavailable.
How do I know when salmon is done?
The safest method is checking the thickest part with a food thermometer. Salmon should reach 145°F or 63°C for food safety.
Can I use leftover salmon in this recipe?
Yes. Leftover cooked salmon can be flaked over the couscous and spinach salad for an easy next-day lunch.
Nutrition
Estimated Nutrition Per Serving
Calories: 520–590
Protein: 39–45g
Carbohydrates: 38–45g
Fat: 24–29g
Fiber: 5–7g
Sugar: 5–7g
Sodium: 650–850mg
Nutrition information is approximate and depends on the exact salmon portion, couscous, olive oil, olives, feta, and dressing quantities.
Conclusion
This Mediterranean grilled salmon meal is an easy combination of bright flavors, wholesome ingredients, and satisfying textures. Tender garlic-lemon salmon served with fluffy couscous and a fresh spinach salad makes a balanced dinner that is perfect for both family meals and casual entertaining.
#HealthySalmon #MediterraneanFood #LemonSalmon #HealthyMeal #EasyDinner
Butternut Squash Fries with Feta & Rosemary Honey
These Butternut Squash Fries turn simple winter squash into a colorful and irresistible side dish. Roasted until tender and golden, the fries are topped with tangy feta and finished with a sweet rosemary honey drizzle for the perfect balance of savory and sweet.
Prep Time: 20 minutes
Cook Time: 25–30 minutes
Total Time: 45–50 minutes
Servings: 4
Ingredients
For the Butternut Squash Fries
1 medium butternut squash, about 2 pounds, peeled and seeds removed
2 tablespoons extra virgin olive oil
1 tablespoon cornstarch
1 teaspoon garlic powder
½ teaspoon smoked paprika
½ teaspoon dried rosemary
½ teaspoon salt
¼ teaspoon black pepper
¼ teaspoon red pepper flakes, optional
For the Rosemary Honey
⅓ cup honey
1 teaspoon fresh rosemary, finely chopped
1 teaspoon fresh lemon juice
1 tablespoon water
Pinch of salt
For the Topping
½ cup crumbled feta cheese
1 tablespoon fresh rosemary, finely chopped
1 tablespoon fresh parsley, chopped
½ teaspoon flaky sea salt, optional
Freshly ground black pepper, to taste
Instructions
Cut the Butternut Squash
Preheat the oven to 425°F or 220°C.
Peel the squash, cut it in half, remove the seeds, and slice the flesh into fry-shaped pieces approximately ½ inch thick.
Pat the squash dry with paper towels to remove as much surface moisture as possible.
Season the Squash
Place the squash in a large bowl. Add olive oil and toss well.
Add cornstarch, garlic powder, paprika, rosemary, salt, black pepper, and optional red pepper flakes.
Toss until the fries are evenly coated.
Roast Until Golden
Spread the squash fries on a large baking sheet in a single layer.
Roast for about 15 minutes, then carefully turn the pieces.
Continue roasting for another 10 to 15 minutes until the fries are tender and the edges are deeply golden.
For extra browning, broil briefly at the end while watching carefully.
Make the Rosemary Honey
Warm honey, rosemary, lemon juice, water, and a pinch of salt in a small saucepan over low heat.
Heat gently for 2 to 3 minutes without boiling. Remove from the heat and allow the rosemary flavor to infuse.
Add Feta and Herbs
Transfer the hot squash fries to a serving platter.
Scatter crumbled feta, fresh rosemary, and parsley over the top.
Drizzle and Serve
Drizzle the warm rosemary honey over the finished fries.
Add black pepper and a small amount of flaky sea salt if desired.
Serve warm for the best combination of caramelized edges, tender squash, creamy feta, and sweet rosemary honey.
Tips
Dry Before Seasoning
Surface moisture is one of the biggest challenges when roasting squash. Patting the fries dry gives the oil and cornstarch a better chance to create a browned exterior.
Avoid a Crowded Pan
Give each fry enough room for hot air to circulate. Crowding traps steam and prevents proper caramelization.
Do Not Use Too Much Oil
A light coating of olive oil is enough. Excess oil can make the squash greasy without necessarily making it crispier.
Use Cornstarch Lightly
A tablespoon is enough to coat the squash without creating a thick crust. Toss well so there are no large white patches of cornstarch remaining.
Flip Halfway Through
Turning the fries helps both sides contact the hot baking sheet. This encourages even browning.
Choose the Right Feta
Creamy, tangy feta provides an excellent contrast to the naturally sweet squash and honey. If your feta is very salty, you may want to reduce the additional salt.
Add Honey After Cooking
The honey is intended as a finishing drizzle. Adding it before roasting can cause excessive browning or burning.
Adjust the Rosemary
Rosemary has a strong flavor, so start with a small amount. You can always add more fresh rosemary at the end if desired.
Add Acid for Balance
Fresh lemon juice keeps the rosemary honey from tasting flat or overly sweet. A little acidity is especially useful when paired with sweet roasted squash.
Variations
Honey Chili Squash Fries
Add extra chili flakes to the squash seasoning and stir a pinch of crushed red pepper into the rosemary honey. The sweet heat pairs wonderfully with feta.
Feta and Pistachio Fries
Top the roasted squash with feta and finely chopped toasted pistachios. Finish with rosemary honey and fresh parsley.
Lemon Herb Fries
Increase the lemon zest and add dried oregano to the seasoning. Finish with fresh parsley and lemon juice for a brighter Mediterranean-style dish.
Cinnamon Rosemary Version
For a sweeter side or dessert-inspired variation, add a tiny pinch of cinnamon to the squash seasoning. Keep the feta for a sweet-savory contrast.
Tahini Drizzle
Replace some of the rosemary honey with a creamy tahini-lemon sauce. Drizzle it over the roasted squash and finish with feta and parsley.
Crispy Chickpea Topping
Add roasted chickpeas over the finished fries for extra texture and a more substantial plant-based meal.
Air Fryer Version
Cook the squash fries in batches at approximately 380°F for 15 to 20 minutes. Shake or turn them halfway through and continue until tender with browned edges.
Q&A
Does butternut squash become as crispy as potatoes?
Butternut squash has more natural moisture, so it generally becomes caramelized and lightly crisp rather than exactly like a deep-fried potato fry. Cornstarch and proper spacing help maximize the crispness.
Can I use frozen butternut squash?
Fresh squash is preferable for this recipe because frozen squash contains additional moisture and may become softer. If using frozen, thaw and drain it very well before roasting.
Can I use maple syrup instead of honey?
Yes. Maple syrup makes an excellent substitute and pairs beautifully with rosemary and roasted squash.
What other cheese can I use?
Goat cheese, Parmesan, ricotta salata, or a mild crumbly cheese can replace feta. Goat cheese gives the dish a particularly creamy finish.
Can I make these fries spicy?
Yes. Add red pepper flakes, cayenne, or smoked chili powder to the seasoning. A little spice creates a great contrast with the sweet rosemary honey.
How do I stop the squash from sticking?
Use parchment paper or lightly grease the baking sheet. Allow the fries to roast undisturbed for several minutes before flipping so they can develop a browned surface.
Can I serve these as an appetizer?
Absolutely. Arrange the roasted fries on a large platter, add feta and rosemary, and drizzle the honey over the top. They make an attractive appetizer for gatherings.
What protein goes well with these fries?
Grilled chicken, roasted chicken, salmon, shrimp, turkey, or even grilled lamb pair nicely with the sweet and savory flavors.
Can I make the recipe vegan?
Yes. Replace the honey with maple syrup and use a vegan feta alternative. The remaining ingredients are naturally plant-based.
Nutrition
Estimated Nutrition Per Serving
Calories: 290–340
Protein: 5–7g
Carbohydrates: 48–54g
Fat: 10–13g
Fiber: 6–8g
Sugar: 22–27g
Sodium: 500–650mg
Nutrition information is approximate and depends on the exact amount of squash, honey, olive oil, feta, and seasoning used.
Conclusion
Sweet roasted butternut squash, creamy feta, aromatic rosemary, and a delicate honey drizzle come together beautifully in this easy recipe. These fries are perfect when you want a vegetable side that is colorful, flavorful, and a little different from the usual roasted vegetables.
#ButternutSquashFries #RoastedVegetables #FetaRecipes #HealthySideDish #FallRecipes
CRISPY AIR FRYER APPLE FRIES
Crispy Air Fryer Apple Fries
Crispy Air Fryer Apple Fries are a fun and easy way to turn fresh apples into a golden, crunchy snack or dessert. Coated with warm cinnamon and a light crispy coating, they are delicious served with yogurt, caramel sauce, or enjoyed straight from the air fryer.
Prep Time: 15 minutes
Cook Time: 10–14 minutes
Total Time: 25–29 minutes
Servings: 4
Ingredients
For the Apple Fries
4 medium firm apples, such as Honeycrisp, Granny Smith, or Pink Lady
1 tablespoon fresh lemon juice
½ cup all-purpose flour
2 large eggs
1 cup Panko breadcrumbs
¼ cup granulated sugar
1 teaspoon ground cinnamon
¼ teaspoon ground nutmeg
¼ teaspoon salt
Cooking spray or 1 tablespoon melted butter
For Serving
¼ cup caramel sauce, optional
½ cup Greek yogurt or vanilla yogurt, optional
1 tablespoon powdered sugar, optional
Extra cinnamon for sprinkling
Instructions
Prepare the Apples
Wash and dry the apples thoroughly. You can peel them if you prefer a softer texture, but leaving the skin on adds color, texture, and extra fiber.
Cut each apple into quarters and remove the core and seeds. Slice each quarter into thick fry-shaped pieces, approximately ½ inch thick.
Place the apple slices in a bowl and gently toss them with lemon juice. This helps reduce browning while you prepare the coating.
Avoid cutting the apples too thin because very thin slices can soften quickly during air frying.
Prepare the Coating Station
Set up three shallow bowls.
Place the flour in the first bowl.
Beat the eggs in the second bowl until smooth.
In the third bowl, combine Panko breadcrumbs, granulated sugar, cinnamon, nutmeg, and salt.
Mix the breadcrumb mixture thoroughly so the cinnamon and sugar are distributed evenly.
Coat the Apple Slices
Take one apple slice and lightly coat it in flour. Shake off the excess.
Dip it into the beaten egg, making sure it is lightly coated.
Transfer the apple to the seasoned Panko mixture and gently press the crumbs onto all sides.
Repeat with the remaining apple slices.
Try not to leave large areas uncovered because the coating is what creates the crispy exterior.
Preheat the Air Fryer
Preheat the air fryer to 375°F or 190°C for approximately 3 minutes if your model requires preheating.
Preheating helps the coating begin crisping immediately when the apples enter the basket.
Air Fry the Apple Fries
Lightly spray the air fryer basket with cooking spray.
Arrange the coated apple slices in a single layer, leaving a little space between them. Do not overcrowd the basket because proper air circulation is essential for crispiness.
Lightly spray the tops of the apple fries with cooking spray or brush them with a small amount of melted butter.
Air fry at 375°F for approximately 5 to 7 minutes. Carefully turn the apple fries and continue cooking for another 5 to 7 minutes.
The exact cooking time depends on the thickness of the apple slices and the air fryer model. They should become golden and crisp on the outside while remaining tender inside.
Finish and Serve
Remove the apple fries from the air fryer and allow them to rest for 2 to 3 minutes.
Sprinkle with a little extra cinnamon or powdered sugar if desired.
Serve warm with caramel sauce, Greek yogurt, vanilla yogurt, or your favorite dipping sauce.
For the best texture, enjoy them shortly after cooking while the coating is still crisp.
Tips
Choose Firm Apples
Firm apples hold their shape better during air frying. Honeycrisp and Pink Lady provide a naturally sweet flavor, while Granny Smith adds a pleasant tart contrast.
Avoid very soft or overripe apples because they can become too tender during cooking.
Cut the Apples Evenly
Try to cut all the apple pieces to a similar thickness. This helps them cook at the same rate and prevents some pieces from becoming overcooked while others remain firm.
Do Not Skip the Flour
The flour creates a dry surface that helps the beaten egg stick to the apple. Without it, the breadcrumb coating may slide off more easily.
Press the Breadcrumbs On
After dipping the apples into the breadcrumb mixture, gently press the crumbs against the surface. This helps create a thicker, more consistent crispy coating.
Do Not Overcrowd the Basket
Air needs to circulate around every apple fry. Arrange them in a single layer with a little space between pieces.
If you have a small air fryer, cook in batches rather than stacking the apple fries.
Use Panko for Extra Crispiness
Panko breadcrumbs are lighter and airier than traditional breadcrumbs, which helps create a crunchier coating.
Regular breadcrumbs can be substituted, but the finished texture may be slightly less crisp.
Lightly Spray the Coating
A small amount of cooking spray helps the Panko coating brown evenly. You do not need to soak the apple fries in oil.
Watch the Sugar
Because the coating contains sugar, it can brown quickly. Keep an eye on the apple fries during the final few minutes, especially if your air fryer runs hot.
Let Them Rest Briefly
The coating becomes slightly firmer as the apple fries cool for a couple of minutes. Allowing them to rest also makes them easier to handle.
Serve Them Fresh
Air fryer apple fries are at their crispiest when freshly cooked. If they sit for a long time, moisture from the apples can gradually soften the coating.
Variations
Cinnamon Sugar Apple Fries
For a simpler dessert-style version, increase the cinnamon to 1½ teaspoons and add an extra tablespoon of sugar to the Panko mixture.
After cooking, toss the warm apple fries with a small amount of cinnamon sugar for an extra sweet finish.
Maple Cinnamon Apple Fries
Replace some or all of the granulated sugar with maple sugar if available. Serve the finished apple fries with warm maple syrup for dipping.
Caramel Apple Fries
Serve the crispy apple fries with homemade or store-bought caramel sauce. Add a pinch of flaky salt to the caramel for a sweet and salty combination.
Chocolate Apple Fries
Serve the warm apple fries with melted dark chocolate or chocolate yogurt for dipping. A light sprinkle of chopped nuts adds extra crunch.
Nutty Apple Fries
Add 2 tablespoons finely chopped pecans or walnuts to the Panko mixture. Press the mixture gently onto the apples before air frying.
Make sure the nuts are chopped finely enough to adhere to the coating.
Ginger Apple Fries
Add ½ teaspoon ground ginger to the cinnamon coating. Ginger gives the apple fries a warmer, slightly spicy flavor that works especially well with sweet apples.
Gluten-Free Apple Fries
Use gluten-free all-purpose flour and gluten-free Panko breadcrumbs. Check the labels of your ingredients if you need the entire recipe to be gluten-free.
Dairy-Free Version
Use cooking spray or neutral oil instead of butter. Serve with dairy-free yogurt or a dairy-free caramel-style dip.
Savory Apple Fries
For a completely different flavor, reduce the sugar and cinnamon and season the coating with a pinch of salt, paprika, and dried herbs. These can be served alongside roasted meats or sandwiches as a unique side.
Q&A
What apples are best for air fryer apple fries?
Firm apples such as Honeycrisp, Granny Smith, Pink Lady, Fuji, or Gala work well. Choose an apple that holds its shape and has a flavor you enjoy.
Do I need to peel the apples?
No. The peel can be left on and provides additional texture. If you prefer softer apple fries or a smoother appearance, you can peel them first.
Why are my apple fries not crispy?
Overcrowding is one of the most common reasons. Too many apple slices in the basket can trap moisture and prevent the coating from becoming crisp. Cook in smaller batches and lightly spray the coating before air frying.
Can I make these without eggs?
Yes. You can replace the beaten eggs with milk, buttermilk, or a suitable dairy-free milk. Another option is a thin flour-and-water mixture that can help the breadcrumbs adhere.
Can I use regular breadcrumbs instead of Panko?
Yes. Regular breadcrumbs work, although Panko generally creates a lighter and crunchier coating.
Can I prepare the apple fries ahead of time?
You can cut the apples and prepare the coating ingredients ahead, but it is best to coat and air fry them shortly before serving for the crispiest result.
How should I store leftover apple fries?
Allow them to cool completely and store them in an airtight container in the refrigerator. Reheat them in the air fryer for a few minutes to restore some of the crispness.
Can I freeze air fryer apple fries?
They are best enjoyed fresh. Freezing can change the texture of the apples and coating, making them softer after reheating.
What can I serve with apple fries?
Caramel sauce, vanilla yogurt, Greek yogurt, whipped cream, melted chocolate, maple syrup, or peanut butter all make delicious dipping options.
Can I make these without Panko?
Yes. Crushed cornflakes, finely crushed cereal, or regular breadcrumbs can be used as alternatives. Cornflakes can provide an especially crunchy coating.
Nutrition
Estimated Nutrition Per Serving
Calories: 260–320
Protein: 6–8g
Carbohydrates: 48–55g
Fat: 6–9g
Fiber: 4–5g
Sugar: 25–31g
Sodium: 220–300mg
Nutrition values are estimates and can vary depending on the apples, breadcrumbs, sugar, cooking spray, and dipping sauce used.
Conclusion
Crispy Air Fryer Apple Fries are an easy homemade treat with juicy, tender apples inside and a golden cinnamon coating outside. They are quick enough for an afternoon snack and special enough to serve as a simple dessert with caramel or yogurt.
#AirFryerRecipes #AppleFries #EasyDessert #HealthySnack #AppleRecipe
Mediterranean Grilled Shrimp Caesar Wraps
Mediterranean Grilled Shrimp Caesar Wraps combine smoky grilled shrimp, crisp lettuce, creamy Caesar dressing, Parmesan, and fresh Mediterranean flavors in a soft tortilla. They are quick to prepare, satisfying, and perfect for an easy lunch or light dinner.
Prep Time: 20 minutes
Marinating Time: 10 minutes
Cook Time: 8 minutes
Total Time: 38 minutes
Servings: 4 wraps
Ingredients
For the Grilled Shrimp
1½ pounds large shrimp, peeled and deveined
2 tablespoons extra virgin olive oil
3 garlic cloves, minced
1 tablespoon fresh lemon juice
1 teaspoon lemon zest
1 teaspoon dried oregano
½ teaspoon paprika
½ teaspoon dried thyme
½ teaspoon salt
¼ teaspoon black pepper
¼ teaspoon red pepper flakes, optional
For the Mediterranean Caesar Dressing
½ cup mayonnaise
¼ cup plain Greek yogurt
2 tablespoons grated Parmesan cheese
1 tablespoon fresh lemon juice
1 teaspoon Dijon mustard
1 small garlic clove, finely minced
1 teaspoon Worcestershire sauce
¼ teaspoon black pepper
1 to 2 tablespoons water, as needed
For the Wraps
4 large flour tortillas or whole wheat wraps
4 cups chopped romaine lettuce
½ cup cherry tomatoes, halved
¼ cup Kalamata olives, sliced
¼ cup cucumber, diced
⅓ cup Parmesan cheese, shaved or grated
¼ cup fresh parsley, chopped
2 tablespoons crumbled feta cheese, optional
¼ teaspoon black pepper
Instructions
Marinate the Shrimp
Place the peeled and deveined shrimp in a large bowl. Add olive oil, minced garlic, lemon juice, lemon zest, oregano, paprika, thyme, salt, black pepper, and optional red pepper flakes.
Toss gently until every shrimp is evenly coated. Let the shrimp marinate for about 10 minutes while preparing the dressing and vegetables. Avoid marinating shrimp for a very long time in lemon juice because the acid can begin changing the texture of the shrimp.
Prepare the Caesar Dressing
In a small bowl, combine mayonnaise, Greek yogurt, Parmesan, lemon juice, Dijon mustard, minced garlic, Worcestershire sauce, and black pepper.
Whisk until smooth and creamy. Add water one tablespoon at a time until the dressing reaches a consistency that is creamy but easy to drizzle and toss.
Taste and adjust the lemon juice, black pepper, or Parmesan according to your preference. Refrigerate the dressing until ready to assemble the wraps.
Prepare the Vegetables
Wash and dry the romaine lettuce thoroughly, then chop it into bite-sized pieces.
Cut the cherry tomatoes in half and dice the cucumber. Slice the Kalamata olives and chop the parsley.
Keeping the vegetables dry is important because excess moisture can make the tortillas soggy.
Grill the Shrimp
Preheat a grill, grill pan, or large skillet over medium-high heat.
Thread the shrimp onto skewers if using an outdoor grill, or place them directly on the hot grill pan.
Cook the shrimp for about 2 to 3 minutes per side, depending on their size. They should become opaque, lightly charred, and pink with a firm but tender texture.
Remove them from the heat immediately once cooked to prevent them from becoming rubbery.
Warm the Tortillas
Warm each tortilla briefly in a dry skillet for about 15 to 20 seconds per side. You can also warm them in the microwave for a few seconds.
Warm tortillas are softer and easier to fold without cracking.
Assemble the Caesar Filling
Place the chopped romaine in a large bowl. Add cherry tomatoes, cucumber, Kalamata olives, parsley, Parmesan, and optional feta.
Add a portion of the Caesar dressing and toss gently until the lettuce and vegetables are lightly coated.
Avoid adding too much dressing at once. You can always add more, but an overly dressed filling can make the wraps difficult to roll.
Build the Wraps
Place one warm tortilla on a flat surface. Add a generous layer of the dressed Caesar salad mixture across the center.
Arrange grilled shrimp over the salad and finish with a little extra Parmesan and black pepper.
Fold the sides of the tortilla inward, then roll it tightly from the bottom to create a secure wrap.
Slice diagonally and serve immediately with extra Caesar dressing or lemon wedges if desired.
Tips
Choose the Right Shrimp
Large or jumbo shrimp work particularly well because they remain juicy on the grill and are easy to arrange inside the wraps. Smaller shrimp can also be used, but they will cook more quickly.
Dry the Shrimp Before Marinating
Pat shrimp dry with paper towels before adding the marinade. Excess water can prevent the seasonings and oil from coating the shrimp properly and can also reduce browning during grilling.
Do Not Overcook the Shrimp
Shrimp need only a few minutes to cook. Once they turn opaque and form a gentle C shape, they are generally ready. Overcooked shrimp tend to become firm and rubbery.
Use Fresh Lemon
Fresh lemon juice and zest provide a brighter flavor than bottled lemon juice. The citrus also balances the creamy dressing and rich Parmesan.
Keep the Lettuce Crisp
Dry romaine thoroughly after washing. A salad spinner is especially useful, but you can also pat the leaves dry with clean kitchen towels.
Make the Dressing Ahead
The Caesar dressing can be prepared several hours ahead and stored in the refrigerator. Making it in advance gives the garlic, Parmesan, lemon, and Dijon time to blend together.
Do Not Overfill the Wraps
It can be tempting to add a large amount of salad and shrimp, but overfilling makes the tortilla difficult to roll and more likely to tear. Leave some space around the edges.
Add Feta for More Mediterranean Flavor
Although traditional Caesar flavors focus on Parmesan, a small amount of feta adds a salty, tangy Mediterranean touch that works beautifully with grilled shrimp.
Serve Immediately
These wraps are best assembled just before serving. If they sit for too long after adding the dressing, the lettuce and tortilla may soften.
Use a Hot Grill
A properly heated grill gives the shrimp attractive char marks and helps them cook quickly. If the grill is not hot enough, the shrimp may release moisture and steam instead of grilling.
Variations
Whole Wheat Shrimp Caesar Wraps
Use whole wheat tortillas for a more hearty wrap. The nutty flavor pairs nicely with grilled shrimp, romaine, lemon, and Parmesan.
Avocado Shrimp Caesar Wraps
Add sliced or diced avocado to the filling. Its creamy texture works especially well with the tangy Caesar dressing and smoky shrimp.
Spicy Shrimp Wraps
Increase the red pepper flakes in the shrimp marinade or add a little hot sauce to the Caesar dressing. A pinch of cayenne can also add extra heat.
Greek-Style Caesar Wraps
Add chopped cucumber, Kalamata olives, feta, red onion, and fresh dill. This creates an even stronger Mediterranean flavor while keeping the creamy Caesar element.
Chicken Caesar Variation
Replace the grilled shrimp with thinly sliced grilled chicken breast. Use the same garlic, lemon, oregano, and paprika seasoning for a Mediterranean-inspired chicken Caesar wrap.
Low-Carb Lettuce Wraps
For a lighter option, skip the tortilla and spoon the grilled shrimp and Caesar salad mixture into large romaine or butter lettuce leaves.
Extra Crunch Wraps
Add toasted whole-grain breadcrumbs, roasted chickpeas, or homemade pita chips for extra texture. Add them immediately before serving so they remain crisp.
Creamy Avocado Dressing
For a different dressing, blend avocado with Greek yogurt, lemon juice, garlic, olive oil, and a little water until smooth. Use it alongside the grilled shrimp and vegetables.
Q&A
Can I cook the shrimp without a grill?
Yes. A grill pan, cast-iron skillet, or regular nonstick skillet works well. Cook the shrimp over medium-high heat until opaque and fully cooked.
Can I use frozen shrimp?
Yes. Thaw frozen shrimp completely in the refrigerator or according to safe package directions, then drain and pat them very dry before seasoning.
Can I prepare these wraps ahead of time?
You can prepare the shrimp, vegetables, and dressing ahead of time, but it is best to assemble the wraps shortly before serving. This keeps the lettuce and tortillas fresher.
Can I use store-bought Caesar dressing?
Absolutely. A good-quality store-bought Caesar dressing can save time. You can add a little fresh lemon juice, Greek yogurt, or Parmesan to customize the flavor.
What tortillas are best for these wraps?
Large flour tortillas are soft and flexible, making them easy to roll. Whole wheat tortillas are another good option if you prefer a heartier flavor.
Can I make the Caesar dressing without mayonnaise?
Yes. Replace the mayonnaise with additional Greek yogurt and add a little extra olive oil for richness. The dressing will be lighter while remaining creamy.
How do I keep the wraps from getting soggy?
Make sure the vegetables and lettuce are completely dry, avoid adding excessive dressing, and assemble the wraps shortly before eating.
What can I serve with shrimp Caesar wraps?
They pair well with roasted potatoes, Mediterranean cucumber salad, grilled vegetables, fresh fruit, or a light tomato and feta salad.
How long can leftover grilled shrimp be stored?
Cooked shrimp should be refrigerated promptly in an airtight container and generally used within 3 to 4 days. Keep the shrimp separate from the dressed lettuce and tortillas for better texture.
Nutrition
Estimated Nutrition Per Wrap
Calories: 520–580
Protein: 38–44g
Carbohydrates: 35–42g
Fat: 25–30g
Fiber: 4–6g
Sugar: 4–6g
Sodium: 900–1100mg
Nutrition values are estimates and can vary depending on the tortillas, amount of dressing, Parmesan, feta, and exact size of the shrimp.
Conclusion
Mediterranean Grilled Shrimp Caesar Wraps are a delicious combination of smoky garlic shrimp, crunchy romaine, creamy Caesar dressing, fresh vegetables, Parmesan, and Mediterranean-inspired ingredients. They are easy enough for a quick lunch and satisfying enough for dinner.
#MediterraneanRecipes #ShrimpWraps #HealthyLunch #GrilledShrimp #EasyDinner
Mediterranean garlic chicken with broccoli tomatoes and spinach
Mediterranean Garlic Chicken with Broccoli, Tomatoes and Spinach
This Mediterranean Garlic Chicken is a fresh and satisfying one-pan meal packed with tender chicken, broccoli, juicy tomatoes, and nutritious spinach. Garlic, oregano, olive oil, and lemon give every bite a delicious Mediterranean-style flavor without making the recipe complicated.
Prep Time: 15 minutes
Cook Time: 25 minutes
Total Time: 40 minutes
Servings: 4
Ingredients
For the Chicken
4 boneless, skinless chicken breasts, about 1½ to 2 pounds
2 tablespoons extra virgin olive oil
4 garlic cloves, minced
1 teaspoon dried oregano
1 teaspoon paprika
½ teaspoon dried thyme
½ teaspoon salt
¼ teaspoon black pepper
½ teaspoon onion powder
For the Vegetables
2 cups broccoli florets
1½ cups cherry tomatoes, halved
3 cups fresh baby spinach
1 small yellow or red onion, thinly sliced
1 tablespoon extra virgin olive oil
½ teaspoon salt
¼ teaspoon black pepper
For the Mediterranean Finish
1 tablespoon fresh lemon juice
1 teaspoon lemon zest
2 tablespoons fresh parsley, chopped
2 tablespoons crumbled feta cheese, optional
½ teaspoon red pepper flakes, optional
Instructions
Prepare the Chicken
Pat the chicken dry and trim away any excess fat. If the breasts are thick, gently pound them until they have an even thickness.
Combine the chicken with olive oil, minced garlic, oregano, paprika, thyme, salt, pepper, and onion powder. Coat both sides well and allow the chicken to rest for a few minutes so the seasoning can begin to flavor the meat.
Sear the Chicken
Heat a large skillet over medium-high heat. Add the olive oil and allow it to become hot.
Place the chicken in the skillet and cook for approximately 5 to 7 minutes per side, depending on thickness. The outside should become golden and lightly caramelized while the center cooks through.
Remove the chicken from the skillet and let it rest on a plate.
Cook the Vegetables
Add the onion and broccoli to the same skillet. Cook for 4 to 5 minutes, stirring occasionally.
Add a small splash of water if necessary to help the broccoli steam slightly while still allowing it to develop some roasted flavor from the skillet.
Add Tomatoes and Garlic
Add the cherry tomatoes and remaining garlic. Stir everything together and cook for another 2 to 3 minutes.
The tomatoes should soften slightly and release some juice, creating a light natural sauce for the vegetables.
Wilt the Spinach
Add the baby spinach and gently toss it with the hot vegetables. Cook for approximately 1 to 2 minutes, just until wilted.
Keep the cooking time short so the spinach remains fresh and vibrant.
Bring Everything Together
Return the chicken to the skillet. Spoon some of the vegetables around the chicken and drizzle fresh lemon juice over the entire dish.
Finish with lemon zest, chopped parsley, and optional red pepper flakes. Sprinkle feta over the top if desired.
Serve immediately while warm.
Tips
Marinate for More Flavor
Although the chicken can be cooked immediately after seasoning, allowing it to rest for 15 to 30 minutes can give the garlic and herbs more time to flavor the surface.
Do Not Burn the Garlic
Garlic can turn bitter if cooked over very high heat for too long. Add it during the later stage of cooking when preparing the vegetables so it becomes fragrant without burning.
Use Cherry Tomatoes
Cherry tomatoes are ideal because they become juicy and slightly sweet as they cook while still maintaining their shape. Grape tomatoes are another excellent option.
Add Spinach at the End
Spinach cooks extremely quickly. Adding it at the end prevents it from becoming overly soft and keeps the dish looking colorful.
Brighten Before Serving
A final squeeze of lemon is one of the most important finishing touches. It wakes up the garlic and herbs and makes the vegetables taste fresher.
Make Extra Vegetables
If you enjoy vegetable-heavy meals, increase the broccoli, tomatoes, and spinach. The recipe is flexible and can easily accommodate more vegetables.
Slice Before Serving
For an attractive presentation, slice the rested chicken into strips and arrange it over the vegetables. Finish with parsley and feta for a colorful Mediterranean-style plate.
Store Leftovers Properly
Allow leftovers to cool slightly before transferring them to an airtight container. Refrigerate promptly and use within 3 to 4 days.
Variations
Lemon Herb Chicken
Increase the lemon zest and add fresh chopped parsley, basil, or dill to create an even brighter herb-forward version.
Mediterranean Olive Chicken
Add Kalamata olives and a few thinly sliced roasted red peppers with the tomatoes. This creates a deeper savory flavor and adds even more Mediterranean character.
Cheesy Chicken and Vegetables
Top the finished dish with mozzarella or Parmesan instead of feta. Place the skillet under a broiler briefly if the pan is oven-safe and you want a lightly melted cheese topping.
Low-Carb Version
Serve the chicken and vegetables as they are for a simple low-carb meal. Add extra spinach, broccoli, or zucchini for more volume without adding grains.
Chicken Pasta Version
Slice the cooked chicken and toss it with cooked pasta and the skillet vegetables. Add lemon juice, parsley, and a little Parmesan for a quick Mediterranean-inspired pasta dinner.
Garlic Shrimp Variation
For a seafood version, replace the chicken with peeled shrimp. Shrimp cook much faster, so add them after the vegetables have started cooking and sauté until pink and opaque.
Q&A
Can I use another leafy green instead of spinach?
Yes. Kale, Swiss chard, or baby arugula can work well. Kale will need a little more cooking time, while arugula should be added near the very end.
Can I use regular tomatoes?
Yes. Roma tomatoes or other firm tomatoes can be diced and used instead of cherry tomatoes. Remove some excess seeds if the tomatoes are particularly juicy.
Can I make this recipe dairy-free?
Yes. Simply leave out the feta cheese. The recipe remains flavorful because the main flavor comes from garlic, olive oil, herbs, and lemon.
What herbs work best with this recipe?
Oregano, thyme, parsley, basil, and dill all work beautifully. You can use a combination depending on what you have available.
Can I freeze this meal?
The cooked chicken can be frozen, but the vegetables, especially spinach and tomatoes, may become softer after thawing. For the best texture, enjoy the dish fresh or refrigerated.
Why is my chicken dry?
Chicken can become dry when it is overcooked or when very thin pieces are cooked for too long. Use evenly sized pieces and check the internal temperature rather than relying only on cooking time.
Can I cook everything in one skillet?
Yes. That is one of the best features of this recipe. The chicken is cooked first, then the vegetables are prepared in the same skillet, allowing them to absorb the flavorful browned bits left behind.
Nutrition
Estimated Nutrition Per Serving
Calories: 390–450
Protein: 45–50g
Carbohydrates: 14–18g
Fat: 18–22g
Fiber: 4–5g
Sugar: 5–7g
Sodium: 550–700mg
These values are approximate and will vary depending on the exact ingredients and quantities used, particularly the olive oil, chicken size, and optional feta.
Conclusion
With juicy garlic-seasoned chicken, tender-crisp broccoli, sweet tomatoes, fresh spinach, and a bright lemon finish, this Mediterranean skillet meal is an easy way to put a wholesome dinner on the table. It is colorful, filling, and versatile enough to customize with your favorite Mediterranean ingredients.
#HealthyChickenDinner #MediterraneanRecipes #OnePanMeal #ChickenAndVeggies #EasyHealthyRecipes
Crispy Chicken with Creamy Dijon Sauce
Tender chicken with a beautifully crisp golden crust and a silky Dijon sauce makes this recipe a family favorite. The creamy sauce combines Dijon mustard, garlic, herbs, and chicken broth for a flavorful finish that pairs perfectly with roasted vegetables, potatoes, rice, or a fresh salad.
Prep Time: 15 minutes
Cooking Time: 25 minutes
Total Time: 40 minutes
Servings: 4
Ingredients
For the Crispy Chicken
4 boneless, skinless chicken breasts
½ cup all-purpose flour
1 teaspoon garlic powder
1 teaspoon paprika
½ teaspoon dried oregano
½ teaspoon salt
½ teaspoon black pepper
2 tablespoons olive oil
1 tablespoon butter
For the Creamy Dijon Sauce
1 tablespoon butter
1 small shallot, finely chopped
3 garlic cloves, minced
1 cup chicken broth
½ cup heavy cream
2 tablespoons Dijon mustard
1 teaspoon honey, optional
½ teaspoon dried thyme
¼ teaspoon salt, or to taste
¼ teaspoon freshly cracked black pepper
2 tablespoons fresh parsley, chopped
1 teaspoon fresh lemon juice
Instructions
Prepare the Chicken
Place the chicken breasts between two sheets of parchment paper or plastic wrap. If the breasts are very thick, gently pound them to an even thickness of about ½ inch.
Pat the chicken dry with paper towels. Removing excess moisture helps the seasoning and flour coating adhere better and encourages a crisp golden crust.
Season both sides of the chicken with salt and black pepper.
Prepare the Flour Coating
In a shallow bowl, combine the flour, garlic powder, paprika, dried oregano, salt, and black pepper.
Lightly coat each chicken breast in the seasoned flour, making sure both sides are covered. Shake off any excess flour.
The coating should be thin and even rather than thick and heavy.
Sear the Chicken
Heat the olive oil and 1 tablespoon of butter in a large skillet over medium heat.
Once the butter has melted and the pan is hot, carefully add the chicken. Avoid overcrowding the skillet. If necessary, cook the chicken in batches.
Cook for approximately 4–6 minutes on the first side, depending on thickness, until deeply golden. Flip and cook for another 4–6 minutes, or until the chicken reaches an internal temperature of 165°F (74°C).
Transfer the cooked chicken to a clean plate and loosely cover it while you prepare the sauce.
Start the Dijon Sauce
Reduce the skillet heat to medium. Add 1 tablespoon butter to the same pan.
Add the chopped shallot and cook for 2–3 minutes until softened. Stir in the minced garlic and cook for about 30 seconds until fragrant.
Do not allow the garlic to become dark brown because it can turn bitter.
Deglaze the Pan
Pour in the chicken broth and use a wooden spoon or spatula to scrape up the browned bits from the bottom of the skillet.
These browned bits add extra savory flavor to the sauce and make good use of everything left in the pan after cooking the chicken.
Let the broth simmer for 2–3 minutes so it reduces slightly.
Make the Creamy Dijon Sauce
Lower the heat to medium-low and stir in the heavy cream, Dijon mustard, dried thyme, honey if using, salt, and black pepper.
Simmer gently for 3–5 minutes, stirring occasionally, until the sauce becomes creamy and slightly thickened.
Avoid boiling the sauce aggressively because high heat can cause the cream to separate.
Finish the Sauce
Stir in the fresh lemon juice and chopped parsley.
Taste the sauce and adjust the Dijon, salt, pepper, or lemon juice according to your preference.
If the sauce becomes thicker than desired, add a small splash of chicken broth or cream to loosen it.
Return the Chicken
Place the cooked chicken back into the skillet and spoon some of the creamy Dijon sauce over the top.
Allow everything to warm together for 1–2 minutes. Do not simmer the chicken for too long because the crisp coating can soften.
Serve immediately with extra parsley and a little freshly cracked black pepper.
Tips
Choose Evenly Sized Chicken Breasts
Chicken breasts often have one thick end and one thin end. Pounding them evenly helps the entire piece cook at the same rate and keeps the thinner sections from becoming dry.
Pat the Chicken Dry
Moisture on the surface can prevent the flour coating from becoming properly golden. Use paper towels to dry both sides before seasoning.
Do Not Use Too Much Flour
A light flour coating gives the chicken a delicate crisp crust without becoming heavy. Shake off excess flour before placing the chicken in the skillet.
Make Sure the Pan Is Hot
The skillet should be properly heated before the chicken goes in. A hot pan helps the flour coating begin browning immediately.
If the pan is too cool, the chicken may absorb more oil and the crust can become pale rather than crisp.
Do Not Move the Chicken Too Much
Once the chicken is placed in the skillet, let it cook undisturbed for several minutes. Moving it constantly can interfere with browning and make the crust less crisp.
Use the Same Skillet for the Sauce
The browned pieces left behind after cooking the chicken are packed with flavor. Deglazing the same skillet with chicken broth creates a much richer sauce.
Keep the Sauce at a Gentle Simmer
Cream sauces should be cooked gently. High heat can make the cream separate and may produce a greasy texture.
Adjust the Dijon to Taste
Dijon mustard has a strong, tangy flavor. Start with the recommended amount and add more if you prefer a sharper mustard taste.
Balance Richness with Lemon
A small amount of fresh lemon juice brightens the creamy sauce and keeps the dish from tasting too heavy.
Add it near the end rather than cooking it for a long time.
Serve Immediately
The chicken has its best crispy texture immediately after cooking. The longer it sits in the sauce, the softer the coating becomes.
For maximum crispness, serve the sauce alongside the chicken rather than completely covering it.
Variations
Make It Mediterranean Style
Add oregano, lemon zest, fresh parsley, and a little crumbled feta to the finished dish. Serve the chicken with cucumber, tomato, olives, and a simple lemony salad.
Add Mushrooms
Sauté 1 cup sliced mushrooms after removing the chicken and before starting the sauce. Cook them until golden, then continue with the shallot and garlic.
The mushrooms add an earthy flavor that works beautifully with Dijon.
Add Spinach
Stir 2 cups of fresh baby spinach into the finished sauce and cook for 1–2 minutes until wilted.
This makes the sauce more colorful and adds another vegetable to the meal.
Use Chicken Thighs
Boneless, skinless chicken thighs can replace chicken breasts. Pound them lightly if needed and cook until they reach 165°F (74°C).
Chicken thighs will provide a richer flavor and slightly juicier texture.
Make the Sauce Lighter
Replace half of the heavy cream with additional chicken broth. The resulting sauce will be lighter while still maintaining a creamy consistency.
You can also use half-and-half instead of heavy cream.
Add Parmesan
Stir 2–3 tablespoons of finely grated Parmesan into the finished sauce. Allow it to melt gently for a richer, cheesier flavor.
If adding Parmesan, taste before adding extra salt because Parmesan is naturally salty.
Make It Spicy
Add a pinch of cayenne pepper, red pepper flakes, or a little hot sauce to the Dijon sauce.
The heat balances the creamy sauce and creates a more intense flavor.
Add Fresh Herbs
Fresh thyme, parsley, chives, or tarragon can be added near the end. Tarragon is particularly delicious with creamy mustard sauces.
Use Whole-Grain Mustard
Replace some or all of the Dijon mustard with whole-grain mustard for a sauce with more texture and a slightly milder mustard flavor.
Make It Gluten-Free
Replace the all-purpose flour with a gluten-free flour blend or cornstarch suitable for coating chicken. Also make sure the chicken broth and mustard are certified gluten-free if required.
Make It Dairy-Free
Use olive oil instead of butter and a dairy-free cooking cream or unsweetened plant-based alternative. The sauce will have a slightly different flavor but can still be delicious.
Q&A
How do I make crispy chicken without breadcrumbs?
This recipe uses seasoned flour rather than breadcrumbs. Patting the chicken dry, coating it lightly, and cooking it in a properly heated skillet creates a simple golden crust without the need for breadcrumbs.
Can I use chicken thighs instead of chicken breasts?
Yes. Boneless, skinless chicken thighs work very well. Make sure the thickest part reaches 165°F (74°C) before serving.
Why is my chicken coating not crispy?
The pan may not have been hot enough, the chicken may have been too wet, or the skillet may have been overcrowded. Make sure the chicken is dry and allow enough space between pieces.
Can I make the Dijon sauce without heavy cream?
Yes. Half-and-half, evaporated milk, or a combination of chicken broth and a lighter cream can be used. The final sauce will vary slightly in richness.
Can I prepare the sauce ahead of time?
Yes. Prepare the sauce and refrigerate it in an airtight container. Reheat it gently over low to medium-low heat and add a small splash of broth or cream if necessary.
Can I make the chicken ahead of time?
You can cook the chicken ahead, but it is best freshly prepared for maximum crispness. If reheating, use an oven or air fryer rather than a microwave when possible.
What can I serve with creamy Dijon chicken?
This chicken pairs well with roasted potatoes, mashed potatoes, rice, couscous, quinoa, steamed green beans, roasted vegetables, or a fresh leafy salad.
How can I make the Dijon sauce thicker?
Allow the sauce to simmer gently for a few additional minutes. You can also stir in a small amount of finely grated Parmesan for additional body and flavor.
Can I use yellow mustard instead of Dijon?
You can, but the flavor will be sweeter and milder. Dijon provides the sharper, more complex flavor that works particularly well in this sauce.
How should I store leftovers?
Store cooled chicken and sauce in separate airtight containers in the refrigerator for up to 3–4 days. Reheat gently until the chicken is thoroughly warmed.
Nutrition
Estimated nutrition per serving:
Calories: 520–580
Protein: 43–48 g
Carbohydrates: 15–20 g
Fat: 31–36 g
Fiber: 1–2 g
Sugar: 3–5 g
Sodium: 650–850 mg
These values are approximate and can vary depending on the size of the chicken breasts, amount of oil absorbed during cooking, type of cream, and exact ingredients used.
Conclusion
With tender chicken, a golden crispy crust, and a silky Dijon cream sauce, this recipe delivers plenty of flavor without complicated preparation. Fresh lemon and herbs balance the richness of the sauce, making this comforting chicken dinner perfect for both busy weeknights and relaxed weekend meals.
#CreamyDijonSauce #ChickenDinner #EasyChickenRecipe #ComfortFood #HomemadeDinner
Surprising Cabbage with Eggs
Surprising Cabbage with Eggs is a simple, budget-friendly recipe that turns humble cabbage into a delicious and satisfying meal. Tender cabbage is cooked with onion, garlic, herbs, and seasonings before eggs are added to create a soft, savory skillet dish that is perfect for breakfast, lunch, or a light dinner.
Prep Time: 10 minutes
Cooking Time: 20 minutes
Total Time: 30 minutes
Servings: 4
Ingredients
For the Cabbage
1 medium green cabbage, about 1½–2 pounds, thinly shredded
1 small yellow onion, finely chopped
3 garlic cloves, minced
2 tablespoons extra virgin olive oil
1 medium carrot, grated
1 medium tomato, diced
½ teaspoon salt, or to taste
½ teaspoon black pepper
1 teaspoon paprika
½ teaspoon ground cumin
½ teaspoon dried oregano
¼ teaspoon red pepper flakes, optional
For the Eggs
5 large eggs
2 tablespoons milk or plain Greek yogurt
¼ teaspoon salt
¼ teaspoon black pepper
For Finishing
2 tablespoons fresh parsley, chopped
1 tablespoon fresh dill, chopped, optional
1 tablespoon fresh lemon juice
2 tablespoons crumbled feta cheese, optional
Instructions
Prepare the Vegetables
Remove any damaged outer leaves from the cabbage and wash it well. Cut the cabbage into quarters, remove the hard core, and slice it into thin shreds.
Finely chop the onion, mince the garlic, grate the carrot, and dice the tomato. Keeping the vegetables prepared before cooking makes this recipe come together quickly.
Prepare the Eggs
Crack the eggs into a bowl and whisk them with the milk or Greek yogurt, salt, and black pepper until smooth.
The small amount of milk or yogurt helps create softer eggs while adding a little extra richness.
Set the egg mixture aside while you cook the cabbage.
Sauté the Onion and Garlic
Heat the olive oil in a large skillet over medium heat. Add the chopped onion and cook for 3–4 minutes until softened and slightly translucent.
Add the minced garlic and cook for about 30 seconds, stirring constantly so the garlic becomes fragrant without burning.
Cook the Carrot and Tomato
Add the grated carrot and diced tomato to the skillet. Cook for another 2–3 minutes, stirring occasionally.
The tomato adds moisture and acidity while the carrot contributes natural sweetness that balances the earthy cabbage.
Add the Cabbage
Add the shredded cabbage gradually. If the skillet looks very full, add half of the cabbage first and allow it to soften for a minute before adding the remaining cabbage.
Season with salt, black pepper, paprika, cumin, oregano, and red pepper flakes if using.
Stir everything together until the cabbage is evenly coated with the oil and seasonings.
Cook Until Tender
Cover the skillet and cook the cabbage over medium-low heat for about 8–10 minutes. Stir occasionally so the vegetables cook evenly.
Remove the lid and continue cooking for another 3–5 minutes. If there is excess liquid, allow it to evaporate.
The cabbage should be tender but still have a little texture rather than becoming completely mushy.
Add the Eggs
Reduce the heat to low. Pour the beaten egg mixture evenly over the cooked cabbage.
Allow the eggs to sit undisturbed for about 20–30 seconds, then gently stir and fold the cabbage and eggs together.
Continue cooking for 2–4 minutes, stirring gently, until the eggs are cooked through but still soft and moist.
Avoid cooking the eggs over high heat because they can become dry and rubbery.
Finish the Dish
Turn off the heat and drizzle the fresh lemon juice over the cabbage and eggs.
Sprinkle with fresh parsley and dill. If using, add crumbled feta over the top.
Serve immediately while warm.
Tips
Slice the Cabbage Thinly
Thinly shredded cabbage cooks faster and blends beautifully with the eggs. Try to keep the shreds relatively even so some pieces do not become overcooked while others remain too firm.
Use a Large Skillet
Cabbage looks enormous when raw but shrinks considerably as it cooks. A large skillet gives you enough space to toss everything without vegetables spilling over the sides.
Do Not Add Too Much Water
Cabbage naturally releases moisture during cooking, especially when covered. You usually do not need much additional liquid.
If your cabbage seems dry while cooking, add only a tablespoon or two of water or broth.
Cook the Cabbage Before Adding Eggs
For the best texture, allow the cabbage to become tender before adding the eggs. Adding eggs too early can result in overcooked eggs while the cabbage is still crunchy.
Keep the Heat Low for the Eggs
Once the eggs are added, lower the heat. Gentle cooking produces softer curds that coat the cabbage instead of becoming dry chunks.
Season in Layers
Seasoning the onions and cabbage as they cook creates more flavor than adding all the seasoning at the end.
Paprika, cumin, oregano, and black pepper work especially well with cabbage.
Use Fresh Lemon at the End
A little lemon juice brightens the entire dish and cuts through the richness of the eggs and olive oil.
Add it after cooking rather than during the long cooking process to preserve its fresh flavor.
Avoid Overcooking the Cabbage
Cabbage should become tender while retaining some texture. Overcooking can make it watery and overly soft.
Keep an eye on the skillet during the final few minutes and cook uncovered if necessary.
Taste Before Serving
Cabbage can absorb seasoning as it cooks, so taste the finished dish before serving. Add a little more salt, black pepper, lemon juice, or red pepper flakes if needed.
Use Fresh Herbs
Parsley and dill add freshness and color. Add them after cooking so their flavor stays bright.
Variations
Add Feta Cheese
Crumble feta over the finished cabbage and eggs for a salty, creamy Mediterranean touch. Feta pairs especially well with lemon, dill, tomato, and paprika.
Make It Spicy
Add extra red pepper flakes, fresh chili peppers, cayenne, or a small spoonful of harissa for more heat.
The spicy version is particularly delicious served with warm flatbread.
Add Bell Peppers
Finely sliced red, yellow, or green bell peppers can be sautéed with the onions. They add sweetness, color, and extra texture.
Add Mushrooms
Sliced mushrooms can be cooked with the onion before adding the cabbage. Allow the mushrooms to brown slightly so their moisture evaporates and their flavor becomes deeper.
Add Chickpeas
For a more substantial vegetarian meal, add cooked chickpeas after the cabbage has softened. They provide extra texture and make the dish more filling.
Add Potatoes
Small cooked potato cubes can be folded into the cabbage before adding the eggs. This creates a heartier skillet meal that works especially well for breakfast or brunch.
Use Red Cabbage
Red cabbage can replace green cabbage. It creates a beautiful color and has a slightly different flavor. Keep in mind that the color may change somewhat as it cooks.
Add Cheese to the Eggs
Whisk a little grated Parmesan, cheddar, mozzarella, or feta directly into the egg mixture before adding it to the skillet.
This creates a richer and cheesier version.
Add Fresh Spinach
A handful of fresh spinach can be added during the final few minutes of cabbage cooking. Once wilted, pour in the eggs and continue with the recipe.
Make It More Mediterranean
Add chopped olives, feta, oregano, parsley, cherry tomatoes, and a little extra lemon juice. Serve with toasted whole-grain bread or warm pita.
Add Cooked Chicken
Leftover shredded chicken can be added after the cabbage becomes tender. Cook for a few minutes to warm it through before adding the eggs.
Q&A
Can I make cabbage and eggs ahead of time?
Yes. The cabbage mixture can be prepared ahead and refrigerated. For the best egg texture, gently reheat the cabbage and add freshly beaten eggs shortly before serving.
Can I use leftover cooked cabbage?
Yes. If you already have cooked cabbage, simply sauté the onion, garlic, carrot, and seasonings, add the cooked cabbage, warm everything through, and then add the beaten eggs.
Why is my cabbage watery?
Cabbage naturally releases water while cooking. Cooking it uncovered for a few additional minutes allows excess moisture to evaporate. Avoid adding unnecessary water during cooking.
Can I use red cabbage instead of green cabbage?
Absolutely. Red cabbage works well and gives the dish a beautiful color. Its texture may remain slightly firmer than green cabbage.
How can I make the eggs softer?
Cook the eggs over low heat and remove the skillet from the burner while they are just set. They will continue cooking from the residual heat.
Can I make this recipe dairy-free?
Yes. Simply use olive oil instead of butter if making variations that call for butter, skip the feta, and use water or an unsweetened dairy-free milk in the egg mixture.
Can I make this recipe vegetarian?
Yes. The basic recipe is vegetarian. Use vegetable broth instead of chicken broth if you add broth in any variation.
What can I serve with cabbage and eggs?
This dish pairs beautifully with whole-grain toast, pita bread, roasted potatoes, cucumber salad, olives, feta, or a simple tomato and cucumber salad.
Can I add other vegetables?
Yes. Bell peppers, zucchini, spinach, mushrooms, broccoli, peas, and cooked potatoes can all be added. Just make sure vegetables that require longer cooking are added before the eggs.
How should I store leftovers?
Allow the dish to cool and place it in an airtight container in the refrigerator. For best quality, enjoy within 3 days and reheat gently until warmed through.
Nutrition
Estimated nutrition per serving:
Calories: 260–300
Protein: 13–16 g
Carbohydrates: 20–24 g
Fat: 15–18 g
Fiber: 5–7 g
Sugar: 8–10 g
Sodium: 450–600 mg
These values are approximate and may vary depending on the size of the cabbage, amount of olive oil, type of milk or yogurt, and optional feta used.
Conclusion
Surprising Cabbage with Eggs is an easy and satisfying way to make a flavorful meal from simple ingredients. Tender seasoned cabbage, colorful vegetables, soft eggs, fresh herbs, and lemon create a dish that is comforting, nutritious, and easy to customize. It is a wonderful choice whenever you want something quick without complicated preparation.
#CabbageAndEggs #HealthyRecipes #EasyBreakfast #VegetarianRecipes #MediterraneanFood
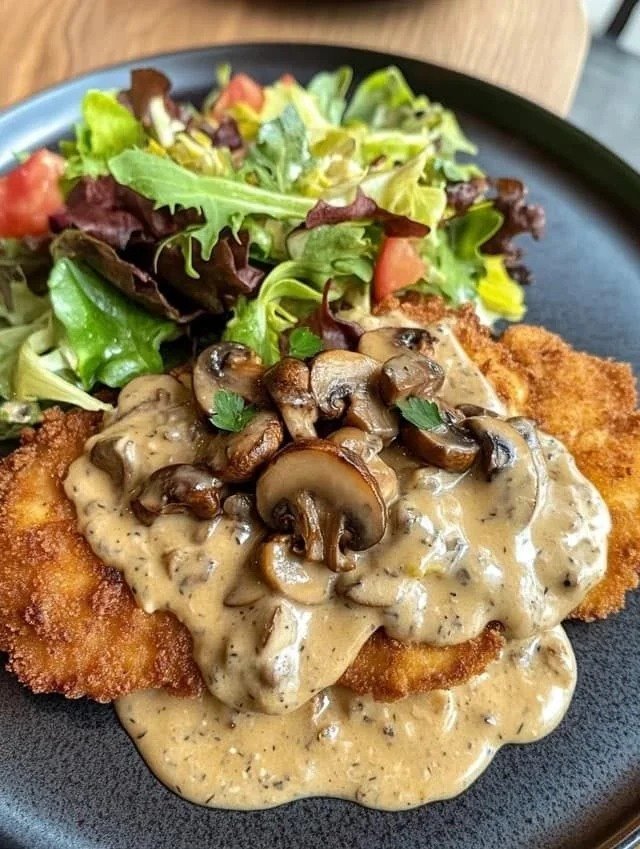
Crispy Chicken Schnitzel with Creamy Mushroom Sauce and Fresh Salad
Golden chicken schnitzel, silky mushroom sauce, and a fresh green salad come together in this delicious homemade dinner. Thin chicken breasts are coated in crunchy Panko breadcrumbs and shallow-fried until crisp, then served with a creamy garlic mushroom sauce and bright salad.
Prep Time: 20 minutes
Cooking Time: 25 minutes
Total Time: 45 minutes
Servings: 4
Ingredients
For the Chicken Schnitzel
2 large chicken breasts, halved horizontally and pounded thin
½ cup all-purpose flour
2 large eggs, beaten
1 cup Panko breadcrumbs
1 teaspoon garlic powder
1 teaspoon paprika
½ teaspoon salt
½ teaspoon black pepper
Vegetable oil, for shallow frying
For the Creamy Mushroom Sauce
1 cup cremini or button mushrooms, sliced
1 tablespoon butter
1 small shallot or small onion, finely chopped
2 garlic cloves, minced
½ cup chicken broth
½ cup heavy cream
½ teaspoon dried thyme
¼ teaspoon salt, or to taste
¼ teaspoon freshly cracked black pepper
1 tablespoon fresh parsley, chopped, optional
For the Fresh Salad
2 cups mixed leafy greens
1 medium tomato, diced
½ cucumber, diced
1 tablespoon extra virgin olive oil
1 tablespoon fresh lemon juice
Pinch of salt
Freshly cracked black pepper, to taste
Instructions
Prepare the Chicken
Place each chicken breast between two sheets of parchment paper or plastic wrap. Using a meat mallet or rolling pin, gently pound the chicken until it is evenly thin, around ¼ inch thick.
Try to pound from the center outward rather than striking aggressively in one spot. Even thickness helps the schnitzel cook quickly and prevents thinner edges from becoming dry.
Season both sides of the chicken lightly with salt, black pepper, garlic powder, and paprika.
Set Up the Breading Station
Place the flour in one shallow dish, the beaten eggs in a second dish, and the Panko breadcrumbs in a third.
Season the Panko with a little additional black pepper, paprika, or garlic powder if desired.
Coat each chicken piece first in flour, shaking off the excess. Dip it into the beaten eggs, making sure the surface is completely covered. Finally, press it gently into the Panko breadcrumbs so the crumbs adhere well.
Place the breaded chicken on a clean plate and let it rest for about 5 minutes before frying.
Shallow-Fry the Schnitzel
Heat about ¼ inch of vegetable oil in a large skillet over medium to medium-high heat. The oil should be hot enough that a breadcrumb dropped into it immediately begins to sizzle.
Carefully place the breaded chicken into the hot oil without overcrowding the pan. Cook for approximately 3–4 minutes per side, depending on thickness, until deeply golden and the chicken reaches a safe internal temperature of 165°F (74°C).
Transfer the cooked schnitzel to a wire rack or paper towel-lined plate. Avoid stacking the pieces because trapped steam can soften the crispy coating.
Cook the Mushrooms
For the sauce, carefully wipe out excess oil from the skillet and return it to medium heat.
Add the butter and allow it to melt. Add the sliced mushrooms and cook for 4–5 minutes, stirring occasionally, until they become golden and their moisture has cooked away.
Add the chopped shallot and cook for another 2 minutes. Stir in the minced garlic and cook for about 30 seconds, just until fragrant.
Make the Creamy Sauce
Pour in the chicken broth and scrape the bottom of the pan to release any flavorful browned bits.
Add the heavy cream, dried thyme, salt, and black pepper. Reduce the heat to medium-low and simmer gently for 3–5 minutes, stirring occasionally, until the sauce thickens slightly.
Do not boil the cream aggressively. Gentle simmering produces a smoother sauce and helps prevent it from becoming too thick or separating.
Taste and adjust the seasoning. Stir in fresh parsley if using.
Prepare the Salad
Place the mixed greens, diced tomato, and cucumber in a bowl.
Whisk together the olive oil, fresh lemon juice, salt, and black pepper. Drizzle the dressing over the salad just before serving and toss gently.
Keeping the dressing light allows the fresh vegetables to balance the richness of the schnitzel and mushroom sauce.
Assemble and Serve
Place one crispy schnitzel on each serving plate. Spoon some creamy mushroom sauce alongside or over part of the chicken, keeping enough of the crispy surface exposed.
Serve immediately with the fresh salad and lemon wedges for squeezing over the schnitzel.
Tips
Pound the Chicken Evenly
Thin and evenly pounded chicken is one of the secrets to excellent schnitzel. It cooks quickly and evenly while giving you a larger surface area for the crunchy coating.
If the chicken is unevenly thick, some areas may dry out while thicker sections are still cooking.
Keep the Breading Dry
After coating the chicken, avoid letting the breaded pieces sit in a damp environment. A wire rack works particularly well because air can circulate underneath and keep the coating crisp.
Press the Panko Gently
Do not simply dip the chicken into the breadcrumbs and immediately remove it. Gently press the Panko onto the chicken so the crumbs form an even coating.
For an especially crunchy crust, use coarse Panko rather than fine breadcrumbs.
Do Not Overcrowd the Pan
Frying too many pieces at once can lower the oil temperature. When that happens, the schnitzel may absorb more oil instead of becoming crisp.
Cook in batches if your skillet is not large enough.
Maintain the Right Oil Temperature
The oil should be hot enough to create an immediate sizzle when the chicken enters the pan. If the oil is smoking heavily, however, the heat is too high.
Medium to medium-high heat is generally ideal, but adjust it during cooking as needed.
Use a Wire Rack After Frying
A wire rack allows excess oil to drain while keeping air underneath the schnitzel. This helps preserve the crisp coating much better than leaving the chicken directly on a flat plate.
Do Not Pour Sauce Over Everything
The mushroom sauce is creamy and flavorful, but pouring too much directly over the schnitzel will soften the crispy coating.
Serving the sauce on the side or over only part of the chicken gives you both creamy and crunchy textures.
Brown the Mushrooms Properly
Give the mushrooms enough time to develop golden edges before adding the cream. Cooking them until lightly browned creates a deeper, richer flavor.
Avoid constantly stirring them because they need contact with the hot pan to brown.
Dress the Salad at the Last Minute
Lemon dressing can quickly soften leafy greens. Toss the salad just before serving so it remains crisp and refreshing.
Check Chicken Doneness
Because schnitzel is thin, it cooks quickly. The safest way to confirm doneness is to check that the thickest part reaches 165°F (74°C).
Variations
Make a Mediterranean Schnitzel
Add dried oregano, lemon zest, and a little garlic powder to the breadcrumb mixture. Serve the schnitzel with cucumber, tomato, olives, feta, and a lemon-herb salad for a stronger Mediterranean profile.
Use Parmesan Panko
Mix ¾ cup Panko with ¼ cup finely grated Parmesan for a savory, cheesy crust. A little dried oregano or Italian seasoning can also be added.
Make the Sauce Lighter
Replace half of the heavy cream with additional chicken broth for a lighter mushroom sauce. The sauce will be less rich but still flavorful.
Add Spinach to the Mushroom Sauce
Stir a handful of fresh baby spinach into the finished mushroom sauce. Cook for 1–2 minutes until wilted.
This adds color and makes the sauce even more substantial.
Add Dijon Mustard
Whisk 1 teaspoon Dijon mustard into the mushroom sauce for extra depth. The slight tang pairs especially well with crispy chicken.
Use Chicken Thighs
Boneless, skinless chicken thighs can be used instead of chicken breasts. Pound them thin and adjust the cooking time according to thickness.
Make It Gluten-Free
Use gluten-free flour and gluten-free Panko breadcrumbs. Check the chicken broth and seasonings as well to ensure all packaged ingredients are suitable for a gluten-free diet.
Bake the Schnitzel
For a less oily preparation, arrange the breaded chicken on a lightly greased baking rack over a sheet pan. Spray or lightly brush the coating with oil and bake at 425°F (220°C) until golden and the chicken reaches 165°F (74°C).
The baked version may not be quite as crisp as shallow-fried schnitzel but is still delicious.
Add Lemon Herb Butter
For an alternative to the mushroom sauce, serve the crispy chicken with a small amount of melted butter mixed with lemon juice, garlic, and fresh parsley.
Change the Salad
You can replace the simple salad with arugula, roasted peppers, red onion, olives, avocado, or shredded cabbage. A simple lemon and olive oil dressing keeps the meal fresh.
Q&A
What is chicken schnitzel?
Chicken schnitzel is a thin piece of chicken that is traditionally breaded and fried until crisp and golden. Pounding the chicken thin allows it to cook quickly while developing a crunchy exterior.
Can I prepare the chicken ahead of time?
Yes. You can pound and season the chicken ahead of time and keep it refrigerated. For the best crunch, bread the chicken shortly before cooking.
Why is my schnitzel not crispy?
The most common reasons are oil that is not hot enough, overcrowding the skillet, a wet breading station, or allowing the cooked chicken to sit in trapped steam. Keeping the oil hot and placing cooked schnitzel on a wire rack can help.
Can I use regular breadcrumbs instead of Panko?
Yes. Regular breadcrumbs work, but Panko generally produces a lighter and crunchier coating.
Can I make the mushroom sauce without cream?
Yes. You can make a lighter mushroom sauce using additional chicken broth and a small amount of Greek yogurt stirred in at the end. Avoid boiling after adding yogurt to reduce the chance of curdling.
Can I use different mushrooms?
Absolutely. Cremini, button, baby bella, shiitake, oyster, or a combination of mushrooms can be used. Different mushrooms will give the sauce slightly different flavors and textures.
How do I keep the schnitzel crispy when serving?
Keep the mushroom sauce separate until serving and place the fried chicken on a wire rack rather than stacking it. Serve immediately whenever possible.
Can I freeze chicken schnitzel?
Cooked schnitzel can be frozen, although the coating may lose some crispness after thawing. Reheat it in an oven or air fryer rather than a microwave for better texture.
Can I make the mushroom sauce ahead of time?
Yes. Prepare the sauce ahead and refrigerate it in an airtight container. Reheat gently over low heat, adding a small splash of broth if it becomes too thick.
What should I serve with chicken schnitzel?
The fresh salad in this recipe is an excellent pairing. You can also serve schnitzel with roasted potatoes, steamed vegetables, couscous, rice, or a simple cucumber and tomato salad.
Nutrition
Estimated nutrition per serving:
Calories: 650–730
Protein: 43–48 g
Carbohydrates: 35–42 g
Fat: 38–44 g
Fiber: 3–5 g
Sugar: 5–7 g
Sodium: 700–900 mg
These values are approximate and can vary depending on the amount of oil absorbed during frying, the size of the chicken breasts, the type of cream used, and the exact quantities of breadcrumbs and vegetables.
Conclusion
This homemade chicken schnitzel brings restaurant-style comfort food straight to your dinner table. Thin golden chicken, creamy garlic mushrooms, and a bright fresh salad create a satisfying combination that is easy enough for a weeknight meal and special enough for guests.
#CrispyChicken #MushroomSauce #ComfortFood #EasyChickenRecipe #DinnerIdeas
Mediterranean Almond Raisin Muffins
Mediterranean Almond Raisin Muffins are soft, lightly sweet, and packed with the comforting flavors of toasted almonds and juicy raisins. Made with simple pantry ingredients and a touch of warm cinnamon, these muffins are perfect for breakfast, an afternoon snack, or a homemade treat with coffee or tea.
Prep Time: 15 minutes
Cooking Time: 18–22 minutes
Total Time: 35–40 minutes
Servings: 12 muffins
Ingredients
Dry Ingredients
2 cups all-purpose flour
1 teaspoon baking powder
½ teaspoon baking soda
½ teaspoon ground cinnamon
¼ teaspoon salt
Wet Ingredients
2 large eggs
½ cup extra virgin olive oil or light olive oil
½ cup plain Greek yogurt
½ cup honey or maple syrup
1 teaspoon pure vanilla extract
Zest of 1 medium orange
2 tablespoons fresh orange juice
Mix-Ins
¾ cup raisins
½ cup almonds, finely chopped
2 tablespoons sliced almonds for topping
Instructions
Prepare the Oven
Preheat the oven to 375°F (190°C). Line a 12-cup muffin pan with paper liners or lightly grease each cup with olive oil or nonstick cooking spray.
If you prefer taller muffins, you can use slightly larger muffin liners and avoid overfilling them.
Prepare the Raisins and Almonds
Place the raisins in a small bowl and cover them with warm water. Let them soak for about 5–10 minutes, then drain and gently pat them dry.
This small step helps soften the raisins so they stay plump and tender inside the muffins.
If your almonds are raw, lightly toast them in a dry skillet over medium-low heat for a few minutes until fragrant. Allow them to cool before chopping.
Combine the Dry Ingredients
In a medium bowl, whisk together the flour, baking powder, baking soda, cinnamon, and salt.
Mixing the dry ingredients first helps distribute the leavening agents and cinnamon evenly throughout the batter.
Mix the Wet Ingredients
In a separate large bowl, whisk the eggs, olive oil, Greek yogurt, honey or maple syrup, vanilla extract, orange zest, and orange juice until smooth and well combined.
The orange zest adds a bright Mediterranean-style flavor that pairs beautifully with both raisins and almonds.
Make the Batter
Gradually add the dry ingredients to the wet mixture. Stir gently with a spatula until the flour is almost incorporated.
Do not overmix the batter. A few small streaks of flour are fine at this stage.
Fold in the softened raisins and chopped almonds until evenly distributed.
Fill the Muffin Pan
Divide the batter evenly among the 12 muffin cups, filling each one about three-quarters full.
Sprinkle the sliced almonds over the top of each muffin. Press them very lightly into the batter so they stay in place while baking.
Bake the Muffins
Place the muffin pan in the preheated oven and bake for 18–22 minutes, or until the tops are lightly golden and a toothpick inserted into the center comes out clean or with only a few moist crumbs.
Avoid overbaking because this can make the muffins dry.
Cool and Serve
Remove the muffin pan from the oven and let the muffins cool in the pan for about 5 minutes.
Transfer them to a wire rack and allow them to cool further before serving.
Enjoy them warm or at room temperature with coffee, tea, yogurt, or fresh fruit.
Tips
Do Not Overmix the Batter
Overmixing develops too much gluten and can make muffins dense or chewy. Stir just until the ingredients are combined for a soft and tender crumb.
Soak the Raisins
Soaking raisins briefly in warm water makes them softer and more enjoyable in the finished muffins. Always drain them well before adding them to the batter.
You can also soak them in warm orange juice for extra citrus flavor.
Toast the Almonds
Lightly toasted almonds have a deeper nutty flavor and add more character to the muffins. Let them cool before chopping so they do not affect the consistency of the batter.
Use Greek Yogurt for Moisture
Plain Greek yogurt adds moisture and a creamy texture while giving the muffins a subtle tang. Regular plain yogurt can also work if that is what you have available.
Measure Flour Correctly
For the best texture, avoid packing flour tightly into the measuring cup. Spoon the flour into the cup and level the top with a knife.
Too much flour can make the muffins heavy and dry.
Keep the Oven Fully Preheated
A properly preheated oven helps the muffins rise quickly and develop a lightly rounded top. Avoid opening the oven door repeatedly during the first part of baking.
Do Not Overbake
Start checking the muffins around the 18-minute mark. Once a toothpick comes out clean or with a few moist crumbs, remove them from the oven.
Add Extra Citrus Flavor
Orange zest works particularly well with almonds and raisins. For a stronger citrus note, add a little extra zest or replace some of the orange juice with fresh lemon juice.
Allow Them to Cool
Freshly baked muffins continue to set as they cool. Allowing them to rest for a few minutes gives the crumb time to become soft and stable.
Variations
Add Walnuts
Replace some or all of the almonds with chopped walnuts for a slightly richer and earthier flavor. A mixture of almonds and walnuts also gives the muffins wonderful texture.
Use Dates Instead of Raisins
Finely chopped dates can replace the raisins. They provide a naturally rich sweetness and pair especially well with orange zest and cinnamon.
Add Dried Figs
Chopped dried figs make an excellent Mediterranean-inspired addition. Remove any tough stems before chopping the figs into small pieces.
Add Coconut
For a slightly different texture, fold ¼ cup unsweetened shredded coconut into the batter. Coconut pairs nicely with almonds and raisins.
Make Them More Citrusy
Add lemon zest along with the orange zest for a brighter flavor. You can also drizzle the cooled muffins with a simple lemon glaze if you want a sweeter dessert-style version.
Add Warm Spices
Cinnamon is delicious on its own, but you can add a small pinch of nutmeg, cardamom, or ground cloves for a warmer spice profile.
Use Whole Wheat Flour
Replace up to half of the all-purpose flour with whole wheat flour. The muffins will have a slightly heartier texture and nuttier flavor.
If using more whole wheat flour, you may need a small additional splash of milk or yogurt if the batter becomes too thick.
Make Mini Muffins
Use a mini muffin pan and reduce the baking time. Start checking them after about 10–12 minutes, as smaller muffins cook much faster.
Add Dark Chocolate
For a sweeter variation, fold in a small amount of dark chocolate chips. The combination of dark chocolate, raisins, almonds, and orange zest creates a delicious bakery-style muffin.
Make Them Dairy-Free
Use a dairy-free plain yogurt alternative instead of Greek yogurt. Olive oil already works well as the fat in this recipe, making the substitution simple.
Q&A
Can I use almond flour instead of all-purpose flour?
Almond flour cannot be substituted one-for-one for all-purpose flour because it behaves differently and does not provide the same structure. For the best results, use all-purpose flour or replace only part of it with almond flour.
Can I use milk instead of Greek yogurt?
Greek yogurt contributes both moisture and structure, so milk is not a direct replacement. If needed, use plain regular yogurt or a dairy-free yogurt alternative instead.
Can I use maple syrup instead of honey?
Yes. Maple syrup can replace honey in the same general amount. It will give the muffins a slightly different but delicious flavor.
Can I make these muffins without refined sugar?
Yes. This recipe uses honey or maple syrup rather than granulated sugar, so there is no need for additional refined sugar in the basic batter.
How should I store almond raisin muffins?
Store cooled muffins in an airtight container at room temperature for up to 2–3 days. For longer storage, refrigerate them or freeze them.
Can I freeze these muffins?
Yes. Allow the muffins to cool completely, then place them in a freezer-safe container or bag. They can be frozen for up to about 2–3 months for best quality.
Thaw them at room temperature or warm them gently before serving.
Why did my muffins turn out dense?
Dense muffins are often caused by overmixing, too much flour, old baking powder or baking soda, or overbaking. Mix the batter gently and measure the ingredients carefully.
Can I make the batter ahead of time?
It is best to bake the batter soon after mixing because the leavening agents begin working once the wet and dry ingredients come together. Preparing the dry and wet ingredients separately ahead of time is a better option.
Can I use other dried fruit?
Absolutely. Dried cranberries, chopped dates, dried cherries, apricots, or figs can be used instead of some or all of the raisins.
Nutrition
Estimated nutrition per muffin:
Calories: 220–250
Protein: 5–6 g
Carbohydrates: 28–32 g
Fat: 10–12 g
Fiber: 2–3 g
Sugar: 13–16 g
Sodium: 150–190 mg
These nutrition values are approximate and can vary depending on the exact ingredients, size of the muffins, type of yogurt, amount of honey, and quantity of almonds used.
Conclusion
Mediterranean Almond Raisin Muffins are a simple homemade treat filled with warm cinnamon, juicy raisins, crunchy almonds, and bright orange flavor. They are easy enough for everyday baking and versatile enough to customize with your favorite nuts or dried fruits. Enjoy them for breakfast, snack time, or alongside your favorite hot drink.
#MediterraneanRecipes #AlmondRaisinMuffins #HealthyBaking #HomemadeMuffins #EasyBreakfast
Mediterranean Zucchini and Tomato Parmesan Bake
Fresh zucchini and ripe tomatoes come together in this easy Mediterranean-inspired bake with garlic, herbs, olive oil, and Parmesan. The vegetables become tender and flavorful while the cheesy topping adds a delicious golden finish. It is a wholesome recipe that brings bright Mediterranean flavors to the dinner table with very little effort.
Prep Time: 15 minutes
Cooking Time: 35–40 minutes
Total Time: 50–55 minutes
Servings: 6
Ingredients
Vegetables
3 medium zucchini, thinly sliced
4 medium ripe tomatoes, thinly sliced
1 small yellow or red onion, thinly sliced
3 garlic cloves, finely minced
¼ cup fresh parsley, chopped
2 tablespoons fresh basil, chopped
Cheese
¾ cup freshly grated Parmesan cheese
½ cup shredded mozzarella cheese
Seasonings and Pantry Ingredients
2 tablespoons extra virgin olive oil
1 teaspoon dried oregano
½ teaspoon dried thyme
½ teaspoon Italian seasoning
½ teaspoon salt, or to taste
¼ teaspoon freshly ground black pepper
½ teaspoon red pepper flakes, optional
1 tablespoon fresh lemon juice
Instructions
Prepare the Oven and Vegetables
Preheat the oven to 400°F (200°C). Lightly grease a medium baking dish with olive oil. Choose a baking dish that allows the zucchini and tomato slices to overlap slightly without being packed too tightly.
Wash and dry the zucchini and tomatoes thoroughly. Slice the zucchini and tomatoes into thin, fairly even rounds. Keeping the slices similar in thickness helps them cook evenly.
Season the Vegetables
Place the zucchini, tomatoes, onion, and minced garlic in a large bowl. Add the olive oil, oregano, thyme, Italian seasoning, salt, black pepper, and red pepper flakes if using.
Gently toss everything together so the vegetables are lightly coated with the olive oil and seasonings. Add the lemon juice and toss once more.
Arrange the Bake
Arrange the zucchini and tomato slices in the prepared baking dish, alternating them as you go. Scatter the sliced onion and garlic between the vegetables.
Try not to stack the vegetables too heavily. A slightly overlapping arrangement allows the edges to roast while the centers become tender.
Add the Cheese
Sprinkle the Parmesan evenly over the top. Follow with the shredded mozzarella, keeping most of the cheese toward the surface so it can become golden and lightly crisp during baking.
Bake Until Golden
Cover the dish loosely with foil and bake for about 20 minutes. Remove the foil and continue baking for another 15–20 minutes, or until the vegetables are tender and the cheese is melted and golden.
For a deeper golden top, place the dish under the broiler for 1–2 minutes at the end. Watch carefully because Parmesan can brown quickly.
Finish and Serve
Remove the bake from the oven and let it rest for 5–10 minutes. Sprinkle fresh parsley and basil over the top before serving.
Serve warm as a side dish, or enjoy a larger portion with crusty whole-grain bread, rice, quinoa, or a fresh Mediterranean salad.
Tips
Choose Firm Zucchini
Medium zucchini are ideal because they have a good balance of flavor and texture. Very large zucchini can contain more seeds and moisture, which may make the finished bake softer.
Use Ripe but Firm Tomatoes
Tomatoes should be flavorful and ripe but not overly soft. Roma tomatoes, vine tomatoes, or firm garden tomatoes work especially well because they hold their shape during baking.
Slice Everything Evenly
Uniform slices are important for even cooking. If some vegetables are very thick while others are paper-thin, the thinner pieces may become overly soft before the thicker pieces are fully tender.
Reduce Excess Moisture
Zucchini and tomatoes naturally release water as they cook. If your vegetables are particularly juicy, lightly sprinkle the zucchini with salt and let it sit for about 10 minutes. Pat it dry with paper towels before assembling the bake.
This simple step can help produce a more concentrated and less watery finished dish.
Do Not Overcrowd the Dish
A little overlap is perfect, but tightly packing the vegetables can cause them to steam instead of roast. If necessary, use a larger baking dish so the vegetables have enough room.
Fresh Parmesan Gives the Best Finish
Freshly grated Parmesan melts and browns beautifully. It also gives the dish a stronger savory flavor than many pre-shredded varieties.
Let It Rest Before Serving
Allowing the bake to rest for several minutes after cooking gives the juices time to settle. It also makes the dish easier to serve without releasing too much liquid onto the plate.
Adjust the Garlic and Herbs
Mediterranean recipes are flexible, so you can easily increase the garlic, parsley, basil, oregano, or red pepper flakes according to your taste.
Variations
Add Feta Cheese
For an even stronger Mediterranean flavor, replace part of the mozzarella with crumbled feta. Add the feta during the final 10 minutes of baking so it warms and lightly browns without becoming too dry.
Make It Extra Garlicky
If you love garlic, increase the garlic to four or five cloves. Roasted garlic becomes mellow and slightly sweet, adding wonderful depth to the vegetables.
Add Bell Peppers
Thinly sliced red, yellow, or orange bell peppers add sweetness, color, and texture. Arrange them between the zucchini and tomato slices before adding the cheese.
Include Eggplant
Thin slices of eggplant can be added for a heartier Mediterranean vegetable bake. Because eggplant absorbs oil easily, lightly brush the slices with olive oil rather than adding too much.
Add Fresh Spinach
A handful of fresh spinach can be tucked between the vegetable layers. It will wilt as the casserole bakes and adds another layer of green vegetables.
Make It Spicy
Add extra red pepper flakes, a pinch of cayenne, or thinly sliced chili peppers for a spicy version. This works particularly well with the sweetness of roasted tomatoes.
Add Breadcrumbs
For a crispier topping, combine Parmesan with ¼ cup seasoned breadcrumbs and sprinkle the mixture over the vegetables before baking. A small drizzle of olive oil over the topping will help it turn golden and crunchy.
Make It a Main Dish
To turn this vegetable bake into a more filling meal, add cooked chickpeas, white beans, or shredded chicken between the vegetable layers. You can also serve it over quinoa or couscous for a complete dinner.
Use Different Herbs
Fresh oregano, dill, rosemary, or thyme can be used instead of or alongside basil and parsley. Fresh herbs added after baking give the dish a brighter finish.
Q&A
Can I make this zucchini and tomato bake ahead of time?
Yes. You can assemble the vegetables and seasonings several hours ahead and keep the covered dish refrigerated. Add the cheese shortly before baking for the best texture.
How do I keep the bake from becoming watery?
The most important steps are using firm vegetables, avoiding excessive oil, lightly salting and drying zucchini when necessary, and giving the finished bake time to rest. Using a larger baking dish can also help moisture evaporate during cooking.
Can I use canned tomatoes?
Fresh tomatoes are recommended for this recipe because they provide the best texture. Canned tomatoes contain more liquid and may make the bake too soft.
Can I make this recipe without mozzarella?
Absolutely. Parmesan alone works beautifully. You can also use crumbled feta, Pecorino Romano, or another flavorful cheese.
Can I make it gluten-free?
Yes. The basic recipe is naturally gluten-free as long as all packaged ingredients are verified gluten-free. If you add breadcrumbs, choose certified gluten-free breadcrumbs.
Can I use yellow squash instead of zucchini?
Yes. Yellow summer squash can replace some or all of the zucchini. It has a similar cooking time and works very well with tomatoes and Parmesan.
How should I store leftovers?
Place cooled leftovers in an airtight container and refrigerate. They are best enjoyed within 3–4 days. Reheat gently in the oven or microwave until warmed through.
Can I freeze this vegetable bake?
Freezing is possible, but the texture of zucchini and tomatoes can become softer after thawing. For the best results, enjoy this recipe fresh or refrigerated rather than freezing it.
Nutrition
Estimated nutrition per serving:
Calories: 190–230
Protein: 9–11 g
Carbohydrates: 12–15 g
Fat: 11–14 g
Fiber: 3–4 g
Sugar: 6–8 g
Sodium: 350–450 mg
These values are approximate and can vary depending on the size of the vegetables, amount of cheese, olive oil, and other ingredients used.
Conclusion
This colorful vegetable bake is proof that simple ingredients can create an incredibly satisfying dish. The combination of zucchini, tomatoes, garlic, herbs, olive oil, and Parmesan delivers plenty of Mediterranean flavor with minimal preparation. Serve it warm as a side dish or make it part of a light vegetarian meal for an easy family
Mediterranean Bang Bang Salmon Bites
These Mediterranean Bang Bang Salmon Bites are crispy, tender, and packed with bright Mediterranean flavors. Bite-sized salmon is seasoned with garlic, oregano, lemon, and herbs, then cooked until golden and finished with a creamy, slightly spicy bang bang sauce. They make an easy dinner, appetizer, or protein-packed addition to a salad or grain bowl.
Prep Time: 15 minutes
Cook Time: 10 to 12 minutes
Total Time: 25 to 30 minutes
Servings: 4
Ingredients
For the Salmon Bites
Salmon fillets: 1½ pounds, skin removed and cut into bite-sized cubes
Extra virgin olive oil: 1 tablespoon
Garlic powder: 1 teaspoon
Dried oregano: 1 teaspoon
Paprika: 1 teaspoon
Onion powder: ½ teaspoon
Salt: ½ teaspoon, or to taste
Freshly ground black pepper: ¼ teaspoon
Lemon zest: 1 teaspoon
Fresh lemon juice: 1 tablespoon
For the Bang Bang Sauce
Mayonnaise: ½ cup
Greek yogurt: ¼ cup
Sweet chili sauce: 3 tablespoons
Sriracha or hot sauce: 1 to 2 tablespoons, adjusted to taste
Fresh lemon juice: 1 tablespoon
Garlic: 1 small clove, finely minced
Honey: 1 teaspoon, optional
Salt: a small pinch
For Serving
Fresh parsley: 2 tablespoons, chopped
Fresh dill: 1 tablespoon, chopped
Cherry tomatoes: 1 cup, halved
Cucumber: 1 small, diced
Feta cheese: ¼ cup, crumbled
Extra lemon wedges: for serving
Extra virgin olive oil: a light drizzle, optional
Instructions
Prepare the Salmon
Remove the skin and any visible bones from the salmon fillets. Pat the salmon dry with paper towels because removing excess moisture helps the pieces develop a better golden exterior during cooking.
Cut the salmon into approximately 1-inch bite-sized cubes. Try to keep the pieces similar in size so they cook evenly.
Season the Salmon
Place the salmon cubes in a large bowl. Add olive oil, garlic powder, oregano, paprika, onion powder, salt, black pepper, lemon zest, and lemon juice.
Gently toss everything together until the salmon pieces are evenly coated. Avoid mixing too aggressively because salmon can break apart easily.
Allow the seasoned salmon to sit for about 5 minutes while you prepare the sauce.
Make the Bang Bang Sauce
Add mayonnaise, Greek yogurt, sweet chili sauce, Sriracha, lemon juice, minced garlic, honey if using, and a small pinch of salt to a bowl.
Whisk until smooth and creamy. Taste the sauce and adjust the heat or sweetness according to your preference. Add more Sriracha for extra spice or another small spoonful of sweet chili sauce for a sweeter flavor.
Set the sauce aside until the salmon is cooked.
Cook the Salmon Bites
Heat a large nonstick skillet over medium-high heat. Add a small amount of olive oil if needed.
Place the salmon pieces in the skillet in a single layer. Avoid overcrowding the pan because too many pieces at once can cause the salmon to steam instead of developing a golden exterior.
Cook for approximately 2 to 3 minutes on the first side. Turn the pieces gently and continue cooking for another 2 to 3 minutes on the remaining sides.
The salmon should become golden on the outside and cooked through in the center. Cooking time will depend on the size of the pieces.
Coat With Bang Bang Sauce
Remove the cooked salmon from the heat. You can drizzle some of the bang bang sauce directly over the salmon or transfer the bites to a bowl and gently toss them with the sauce.
For the crispiest texture, serve the sauce on the side and drizzle only a small amount over the salmon just before eating.
Add the Mediterranean Toppings
Arrange the salmon bites on a serving plate. Scatter diced cucumber, halved cherry tomatoes, crumbled feta, fresh parsley, and dill around the salmon.
Finish with fresh lemon wedges and a light drizzle of extra virgin olive oil if desired.
Serve immediately while the salmon is warm and tender.
Tips
Choose Fresh Salmon
Fresh salmon with firm flesh works especially well for bite-sized pieces. Skinless salmon fillets make preparation easier, but you can remove the skin yourself if necessary.
Dry the Salmon First
Patting the salmon dry is a simple step that can make a noticeable difference. Excess surface moisture can prevent the salmon from browning properly in the skillet.
Keep the Pieces Similar in Size
Cutting the salmon into evenly sized cubes helps everything cook at roughly the same rate. Very small pieces may become dry before larger pieces are fully cooked.
Do Not Overcrowd the Pan
Give the salmon enough space to cook properly. If your skillet is small, cook the salmon in batches rather than placing everything in the pan at once.
Use Medium-High Heat Carefully
The goal is to develop a golden exterior without burning the seasonings. If the salmon starts browning too quickly, lower the heat slightly.
Adjust the Sauce to Your Taste
Bang bang sauce is traditionally creamy, sweet, and spicy. The amount of hot sauce can be easily adjusted. For a mild version, use a small amount of Sriracha. For a spicy version, increase it gradually.
Use Greek Yogurt for Balance
Greek yogurt adds tanginess and lightens the richness of the mayonnaise. It also pairs naturally with the Mediterranean ingredients used for serving.
Add Sauce at the Last Moment
If you want the salmon to remain crisp, avoid coating it with a large amount of sauce too early. Drizzle the sauce just before serving or offer it on the side.
Do Not Overcook the Salmon
Salmon cooks quickly when cut into small pieces. Watch the center closely and remove the salmon from the heat as soon as it is cooked through and flakes easily.
Finish With Fresh Lemon
A final squeeze of lemon brightens the rich sauce and complements the salmon. It also helps bring together the Mediterranean flavors.
Serve Immediately
These salmon bites are best served shortly after cooking. The longer they sit under a creamy sauce, the more their crisp exterior will soften.
Make It a Complete Meal
Serve the salmon over cooked quinoa, rice, couscous, or a fresh Mediterranean salad. Add cucumber, tomatoes, feta, olives, and herbs for a satisfying meal.
Variations
Air Fryer Salmon Bites
Arrange the seasoned salmon cubes in a lightly greased air fryer basket in a single layer. Air fry at approximately 400°F (200°C) for about 7 to 10 minutes, shaking or turning halfway through. Cooking times vary by air fryer and salmon cube size.
Oven-Baked Salmon Bites
Spread the seasoned salmon pieces on a parchment-lined baking sheet. Bake at 425°F (220°C) until cooked through and lightly golden, usually around 10 to 14 minutes depending on the size of the pieces.
Extra Mediterranean Version
Add chopped Kalamata olives, cucumber, tomatoes, feta, fresh parsley, dill, and a little oregano. Serve the salmon over warm couscous or quinoa for a Mediterranean-inspired bowl.
Creamy Feta Bang Bang Sauce
Add a tablespoon or two of finely crumbled feta to the finished sauce. The feta gives the creamy dressing a salty Mediterranean flavor.
Lemon Herb Salmon Bites
Increase the lemon zest and add fresh dill, parsley, and a little thyme to the salmon seasoning. This creates a brighter herb-forward flavor.
Spicy Garlic Version
Add extra minced garlic and red pepper flakes to the seasoning. Increase the Sriracha in the sauce for a stronger spicy kick.
Avocado Salmon Bowl
Serve the cooked salmon with diced avocado, cucumber, cherry tomatoes, quinoa, and feta. Drizzle with bang bang sauce and fresh lemon juice.
Lettuce Wraps
Place the salmon bites inside crisp lettuce leaves with cucumber, tomatoes, herbs, and bang bang sauce. This creates a fresh and easy handheld meal.
Pita Serving
Stuff warm pita bread with salmon bites, cucumber, tomatoes, lettuce, feta, and bang bang sauce. Add fresh herbs and lemon for extra flavor.
Q&A
What salmon is best for salmon bites?
Skinless salmon fillets are ideal because they are easy to cut into cubes and cook quickly. Fresh or properly thawed frozen salmon can both work well.
Can I make these salmon bites in the air fryer?
Yes. Air frying is an excellent option for salmon bites because it cooks the small pieces quickly while helping the outside become lightly browned. Avoid overcrowding the basket.
Can I make the bang bang sauce less spicy?
Absolutely. Reduce the Sriracha or hot sauce for a mild sauce. You can also increase the Greek yogurt or mayonnaise slightly if you want a softer flavor.
Can I prepare the sauce ahead of time?
Yes. The sauce can be mixed ahead and refrigerated until you are ready to serve the salmon. Stir it before using.
Can I use frozen salmon?
Yes. Thaw the salmon completely in the refrigerator before cutting and seasoning it. Pat it very dry before cooking.
What vegetables go well with these salmon bites?
Cucumber, cherry tomatoes, bell peppers, red onion, avocado, spinach, lettuce, and olives all pair beautifully with the Mediterranean flavors.
Can I use a different fish?
Yes. Firm fish such as cod or halibut can be used, although cooking time and texture will differ from salmon.
Can I make these salmon bites without mayonnaise?
Yes. You can replace the mayonnaise with additional Greek yogurt for a lighter, tangier sauce. The final texture will be slightly different but still creamy.
How do I store leftover salmon bites?
Place cooled salmon in an airtight container and refrigerate. For the best texture, store the sauce separately if possible.
What should I serve with bang bang salmon bites?
They pair well with Mediterranean salad, roasted vegetables, quinoa, rice, couscous, pita, or a simple cucumber and tomato salad.
Nutrition
Estimated nutrition per serving: Approximately 450 to 520 calories, depending on the amount of sauce and salmon used.
Protein: Approximately 38 to 44 g
Carbohydrates: Approximately 10 to 16 g
Fat: Approximately 27 to 33 g
Fiber: Approximately 1 to 3 g
Sugar: Approximately 5 to 8 g
Sodium: Approximately 600 to 850 mg
The nutrition values are estimates and can vary depending on the type of salmon, mayonnaise, Greek yogurt, sweet chili sauce, cheese, and other ingredients used.
Conclusion
Mediterranean Bang Bang Salmon Bites are an easy way to turn simple salmon into a flavorful meal with creamy, spicy sauce and fresh Mediterranean toppings. The tender salmon, bright lemon, herbs, cucumber, tomatoes, and feta create a delicious combination that works for weeknight dinners, appetizers, or healthy meal bowls.
#MediterraneanSalmon #SalmonBites #HealthyDinner #BangBangSalmon #EasySalmonRecipe
Lemon and Ginger in a Jar for Strong Immunity and Cold Prevention
Lemon and Ginger in a Jar
Lemon and Ginger in a Jar is a simple homemade preparation made with fresh lemon, ginger root, and raw honey. The bright citrus flavor, warming ginger, and natural sweetness of honey make this mixture a comforting addition to tea or warm water, especially during colder months. It takes only a few minutes to prepare and can be kept refrigerated for convenient use.
Prep Time: 10 minutes
Resting Time: 24 to 48 hours
Total Time: About 24 to 48 hours
Yield: Approximately 1 small jar
Ingredients
Fresh Produce
Fresh lemons: 1 to 2, preferably organic, thoroughly washed and scrubbed
Fresh ginger root: 1 thumb-sized piece, scrubbed clean, peeling optional
Sweetener
Raw unfiltered honey: 1 cup, or enough to completely cover the lemon and ginger slices
Instructions
Wash the Ingredients Thoroughly
Because the lemon peel remains on, begin by washing the lemons very well under cool running water. Scrub the peel gently to remove dirt and surface residue. Pat the lemons completely dry with a clean kitchen towel.
Scrub the fresh ginger root thoroughly as well. You can peel it with a spoon or leave the skin on if it has been cleaned well.
Slice the Lemons
Using a clean sharp knife, thinly slice the lemons into rounds. Remove any visible seeds as you go. Thin slices allow the lemon juice and flavor to mingle more easily with the honey.
Prepare the Ginger
Slice the ginger into thin pieces. You can make the slices slightly thicker than the lemon because fresh ginger has a stronger flavor and does not need to be cut extremely thin.
Layer the Jar
Use a clean, dry glass jar with a tight-fitting lid. Add a layer of lemon slices followed by a few slices of ginger. Continue layering until the ingredients are added.
Avoid packing the jar too tightly because you want the honey to flow between the slices.
Add the Honey
Slowly pour the raw honey into the jar. Make sure the lemon and ginger are completely covered. If necessary, gently press the slices down with a clean spoon so the honey can move around them.
The amount of honey needed may vary depending on the size of the jar and how tightly the ingredients are arranged.
Remove Air Pockets
Use a clean spoon or chopstick to gently move the mixture around the sides of the jar. This helps the honey settle between the lemon and ginger and reduces large air pockets.
Make sure the ingredients remain submerged under the honey as much as possible.
Seal and Refrigerate
Wipe the rim of the jar clean and close it tightly with the lid. Place the jar in the refrigerator.
Allow the lemon and ginger to infuse into the honey for at least 24 hours. The flavor will become stronger as it rests.
How to Use It
Add a spoonful of the lemon-ginger-honey mixture to a mug of warm water or tea. Stir well and enjoy.
Avoid using boiling water if you want to preserve the delicate flavor of the honey. You can also add a small amount to plain yogurt or use it as a flavorful drizzle over suitable foods.
Tips
Use Fresh Ingredients
Fresh lemons and firm ginger root provide the best flavor. Choose lemons that feel heavy for their size and have smooth, firm skin. Ginger should feel firm rather than soft or shriveled.
Clean the Lemon Peel Carefully
Since the lemon is sliced with the peel on, washing is especially important. Scrub the fruit under running water and dry it thoroughly before slicing.
Use a Completely Dry Jar
Moisture inside the jar can affect storage quality. Wash the jar and lid thoroughly and allow them to dry completely before adding the ingredients.
Keep Everything Covered
The lemon and ginger should remain submerged in honey as much as possible. If pieces are repeatedly exposed above the honey, they can deteriorate more quickly.
Slice Thinly for Better Infusion
Thin lemon and ginger slices release their flavors more efficiently than very thick pieces. They also make the mixture easier to spoon into warm drinks.
Choose Good-Quality Honey
A flavorful honey makes a noticeable difference because it is one of the main ingredients. Raw or unfiltered honey can be used if preferred, although the recipe does not require a specific type of honey.
Do Not Overfill the Jar
Leave a little space at the top of the jar rather than filling it completely to the rim. This makes the mixture easier to stir and reduces mess when opening.
Always Use a Clean Spoon
When serving, use a clean, dry spoon. Avoid repeatedly introducing wet utensils or food crumbs into the jar.
Keep It Refrigerated
For a homemade mixture containing fresh fruit and ginger, refrigeration is the safer storage choice. Do not assume that covering fresh ingredients with honey makes the mixture shelf-stable.
Use Warm Rather Than Boiling Water
A spoonful of the mixture can be stirred into warm water or tea. Very hot water is unnecessary and can make the drink less pleasant to consume.
Remember That It Is Not Medicine
Lemon, ginger, and honey can make a pleasant and soothing drink, particularly when you have a scratchy throat or simply want a warming beverage. However, this mixture should not be considered a guaranteed way to prevent colds or boost immunity.
Variations
Lemon Ginger Cinnamon Jar
Add one small cinnamon stick to the jar along with the lemon and ginger. Cinnamon provides a warm, aromatic flavor that pairs naturally with honey.
Orange and Lemon Version
Replace part of the lemon with thin slices of orange. The combination creates a sweeter citrus flavor while maintaining the bright character of the original recipe.
Ginger Lime Version
Use a small amount of lime alongside lemon for a sharper citrus flavor. Because lime can be quite tart, adjust the amount according to your preference.
Mint and Lemon Version
Fresh mint can be added when preparing a serving rather than storing it in the jar. Stir a few fresh leaves into warm lemon-ginger tea for a refreshing finish.
Turmeric Variation
A small amount of ground turmeric can be added to an individual serving of warm water. This creates a golden-colored drink with a distinctly earthy flavor.
Warm Tea Version
Instead of using plain warm water, add a spoonful of the mixture to black tea, green tea, or herbal tea. Choose a tea that complements the citrus and ginger flavors.
Q&A
Can I use bottled lemon juice?
Fresh lemons are preferable for this preparation because the sliced fruit provides both juice and citrus peel. Bottled lemon juice does not provide the same texture or flavor.
Should I peel the ginger?
Peeling is optional. If the ginger is scrubbed thoroughly, you can leave the skin on. If you prefer a cleaner texture, peel it before slicing.
How long should the mixture sit before using it?
It can be used after about 24 hours, once the honey has had time to absorb some of the lemon and ginger flavor. The flavor may become stronger with additional resting time under proper refrigeration.
Does this prevent colds?
There is no guarantee that lemon, ginger, and honey will prevent a common cold. The mixture can be enjoyed as a soothing food or beverage, but it should not replace evidence-based measures such as good hand hygiene, adequate sleep, and appropriate medical care.
Can children have this mixture?
Honey should not be given to babies under 12 months of age because of the risk of infant botulism. For older children, consider their individual dietary needs and ask a pediatrician if you have concerns.
Can I drink it every day?
For most healthy adults, a small amount used as part of food or a drink can fit into a normal diet. Keep in mind that honey is still an added sugar, so portion size matters.
Why did my mixture become watery?
Lemon naturally releases juice when it sits in honey. This is expected and creates a thinner syrup-like consistency over time.
Can I leave the jar at room temperature?
It is better to refrigerate this homemade preparation because it contains fresh lemon and ginger. Refrigeration helps slow spoilage.
Nutrition
Estimated nutrition per 1 tablespoon: Approximately 45 to 65 calories, depending primarily on the amount of honey and lemon juice present.
Carbohydrates: Approximately 12 to 17 g
Sugars: Approximately 11 to 16 g
Protein: Less than 1 g
Fat: Less than 1 g
Fiber: Less than 1 g
These values are estimates and can vary according to the exact amount of honey, lemon, and ginger used and how much liquid is taken in each serving.
Conclusion
Lemon and Ginger in a Jar is an easy homemade preparation with a bright, warming flavor and only three main ingredients. Keep it refrigerated and use a spoonful in warm water or tea whenever you want a comforting citrus-ginger drink. It is simple enough to prepare ahead and versatile enough to enjoy throughout the colder months.
#LemonGingerHoney #HealthyDrinks #HomemadeRemedies #GingerLemon #WellnessRecipe
Healthy easy cottage cheese veggies bake
Healthy Easy Cottage Cheese Veggie Bake
This Healthy Easy Cottage Cheese Veggie Bake is a simple, protein-rich meal packed with colorful vegetables, creamy cottage cheese, eggs, and melted cheese. It is easy to prepare, naturally satisfying, and perfect for breakfast, brunch, lunch, or a light dinner. The broccoli and tomatoes add freshness while garlic, onion, herbs, and Parmesan create plenty of savory flavor.
Prep Time: 15 minutes
Cook Time: 35 to 40 minutes
Total Time: 50 to 55 minutes
Servings: 6
Ingredients
Produce
Broccoli florets: 1½ to 2 cups, chopped into small pieces
Cherry tomatoes: 1 cup, halved
Garlic: 2 to 3 cloves, minced
Yellow or red onion: 1 small, finely diced
Fresh parsley or basil: a handful, chopped for garnish
Dairy & Protein
Cottage cheese: 2 cups, low-fat or regular
Large eggs: 6 to 8
Shredded mozzarella or sharp cheddar: ½ to 1 cup
Grated Parmesan cheese: ¼ cup
Pantry & Seasoning
Extra virgin olive oil: 1 to 2 tablespoons
Italian seasoning or dried oregano: 1 teaspoon
Salt: to taste
Freshly ground black pepper: to taste
Instructions
Prepare the Oven and Baking Dish
Preheat your oven to 375°F (190°C). Lightly grease a medium baking dish with a little olive oil. A baking dish around 9 x 9 inches or a similar-size casserole dish works well for this recipe.
Cook the Aromatics and Broccoli
Heat the olive oil in a large skillet over medium heat. Add the finely diced onion and cook for about 2 to 3 minutes until it begins to soften. Add the minced garlic and cook for another 30 to 60 seconds, stirring frequently so the garlic does not burn.
Add the chopped broccoli and cook for approximately 3 to 4 minutes. The broccoli does not need to become completely tender because it will continue cooking in the oven. Remove the skillet from the heat.
Prepare the Cottage Cheese Mixture
In a large mixing bowl, whisk together the eggs, cottage cheese, Italian seasoning or oregano, salt, and black pepper until well combined. The cottage cheese can remain slightly textured, or you can blend it first if you prefer a smoother, creamier consistency.
Add about half of the shredded mozzarella or cheddar and half of the Parmesan cheese to the mixture. Stir gently to distribute everything evenly.
Combine the Vegetables
Add the sautéed onion, garlic, and broccoli to the egg and cottage cheese mixture. Gently fold everything together. Add some of the halved cherry tomatoes, reserving several pieces for the top.
Fill the Baking Dish
Pour the mixture into the prepared baking dish and spread it evenly. Arrange the remaining cherry tomato halves across the surface. Sprinkle the remaining shredded cheese and Parmesan over the top for a golden, cheesy finish.
Bake Until Golden and Set
Place the baking dish in the preheated oven and bake for approximately 35 to 40 minutes, or until the center is fully set and the top is lightly golden. The exact baking time can vary depending on the size and depth of your dish.
Remove the bake from the oven and allow it to rest for about 5 to 10 minutes before slicing. Garnish with fresh parsley or basil and serve warm.
Tips
Drain Watery Cottage Cheese
Some cottage cheese varieties contain more liquid than others. If your cottage cheese looks particularly wet, drain a little of the excess liquid before adding it to the mixture. This helps the finished bake set properly instead of becoming watery.
Cut the Broccoli Small
Small broccoli pieces cook more evenly and make the bake easier to slice. Large florets can remain firm in the center, so chop the broccoli into bite-size pieces before cooking.
Do Not Overcook the Vegetables
The broccoli only needs a short sauté before baking. Keeping it slightly crisp at this stage allows it to finish cooking in the oven while maintaining some texture.
Blend the Cottage Cheese for a Smooth Texture
If you do not enjoy the curds in cottage cheese, blend it until smooth before combining it with the eggs. This creates a creamier, almost ricotta-like texture throughout the bake.
Use Room Temperature Eggs
Room temperature eggs mix more easily with the cottage cheese and other ingredients. If possible, take the eggs out of the refrigerator shortly before preparing the recipe.
Watch the Salt
Cottage cheese, cheddar, mozzarella, and Parmesan can all contain salt. Start with a modest amount of additional salt and adjust according to the cheeses you use.
Let It Rest Before Slicing
Allowing the bake to rest after removing it from the oven gives the eggs time to finish setting. This makes the slices firmer and easier to serve without falling apart.
Avoid Overbaking
The center should be set but still tender. Overbaking can make the eggs rubbery and cause the cottage cheese to release additional moisture. Start checking the bake toward the end of the suggested cooking time.
Make It Ahead
The bake can be prepared ahead of time and stored covered in the refrigerator. It is especially convenient for breakfast meal prep because individual portions can be reheated during the week.
Variations
Spinach Cottage Cheese Bake
Add 1 to 2 cups of fresh spinach to the vegetable mixture. Cook it briefly with the onion and garlic until wilted, then combine it with the eggs and cottage cheese.
Mediterranean Version
For a Mediterranean-inspired flavor, add chopped olives, crumbled feta, spinach, and a little dried oregano. You can also finish the baked casserole with fresh parsley and a squeeze of lemon juice.
Mushroom Version
Sauté sliced mushrooms with the onion and garlic before adding the broccoli. Cook until most of their moisture has evaporated so the finished bake does not become watery.
Pepper and Zucchini Version
Replace some of the broccoli with diced bell peppers and zucchini. Sauté the vegetables briefly before combining them with the cottage cheese and eggs.
Spicy Version
Add crushed red pepper flakes, diced jalapeño, or a pinch of cayenne pepper to give the bake a gentle kick.
Extra Cheesy Version
For a richer casserole, increase the shredded mozzarella or cheddar slightly. A combination of mozzarella and sharp cheddar gives both a stretchy texture and stronger cheesy flavor.
Herb-Focused Version
Fresh basil, parsley, dill, chives, or thyme can be added to the mixture or sprinkled over the top after baking. Fresh herbs are particularly good when paired with cherry tomatoes.
Q&A
Can I use low-fat cottage cheese?
Yes. Low-fat cottage cheese works very well and keeps the bake light while still providing a creamy texture and protein. Regular cottage cheese can also be used if you prefer a richer result.
Can I prepare this bake the night before?
Yes. You can assemble the ingredients in the baking dish, cover it, and refrigerate it until you are ready to bake. If the dish is very cold, it may require a few additional minutes in the oven.
Why is my cottage cheese bake watery?
Excess moisture usually comes from watery cottage cheese or vegetables. Drain the cottage cheese if needed and sauté moisture-rich vegetables before adding them to the egg mixture.
Can I freeze cottage cheese veggie bake?
Yes, although the texture may become slightly softer after thawing. For best results, cool the bake completely, portion it, wrap it well, and freeze it. Thaw overnight in the refrigerator before reheating.
How do I know when the bake is done?
The center should look set and should not jiggle heavily when the dish is gently moved. The top should be lightly golden, and a knife inserted near the center should come out mostly clean.
What can I serve with this veggie bake?
Serve it with a fresh green salad, sliced avocado, roasted vegetables, fresh fruit, or whole-grain toast. It also works well alongside a simple tomato and cucumber salad.
Can I make this recipe without Parmesan?
Absolutely. Parmesan adds a savory, salty crust, but you can leave it out or replace it with additional mozzarella, cheddar, feta, or another cheese of your choice.
Nutrition
Estimated nutrition per serving: Approximately 280 to 340 calories, depending on the cottage cheese, eggs, and amount of shredded cheese used.
Protein: Approximately 23 to 28 g
Carbohydrates: Approximately 8 to 12 g
Fat: Approximately 16 to 21 g
Fiber: Approximately 2 to 3 g
Calcium: A good source from cottage cheese and shredded cheese
Nutrition values are estimates and can vary depending on the specific ingredients and brands used.
Conclusion
This Healthy Easy Cottage Cheese Veggie Bake is a delicious way to combine protein-rich cottage cheese and eggs with fresh vegetables in one simple dish. It is filling, versatile, and easy to customize with your favorite vegetables, herbs, and cheese. Serve it warm for breakfast, brunch, lunch, or dinner, or prepare it ahead for an easy meal throughout the week.
#HealthyRecipes #CottageCheeseRecipes #HighProteinRecipes #EasyBreakfast #HealthyMeals
Mediterranean Vegetable and Chickpea Soup
This Mediterranean Vegetable and Chickpea Soup is a hearty, colorful, and nourishing meal packed with vegetables, chickpeas, herbs, and a flavorful tomato-based broth. It is naturally satisfying without being heavy, making it perfect for lunch, dinner, or a cozy meal on a cool day.
Prep Time: 15 minutes
Cook Time: 35 minutes
Total Time: 50 minutes
Servings: 6
Cuisine: Mediterranean
Course: Soup, Main Course
Calories: Approximately 260 calories per serving
Ingredients
For the Soup
2 tablespoons olive oil
1 medium yellow onion, finely chopped
3 cloves garlic, minced
2 medium carrots, peeled and diced
2 celery stalks, diced
1 medium zucchini, sliced or cut into half-moons
1 red bell pepper, diced
1 can (14–15 ounces) diced tomatoes, with juices
2 cans (15 ounces each) chickpeas, drained and rinsed
5 cups vegetable broth
1 tablespoon tomato paste
1 teaspoon dried oregano
1 teaspoon dried thyme
½ teaspoon smoked paprika
½ teaspoon ground cumin
½ teaspoon red pepper flakes, optional
1 bay leaf
¾ teaspoon salt, or to taste
¼ teaspoon freshly ground black pepper
1 cup chopped fresh spinach or kale
1 tablespoon fresh lemon juice
For Garnishing
2 tablespoons fresh parsley, finely chopped
1 tablespoon fresh dill or basil, optional
A drizzle of extra-virgin olive oil
Lemon wedges, for serving
Freshly ground black pepper
Instructions
1. Prepare the Vegetables
Wash and prepare all the vegetables before beginning. Dice the onion, carrots, celery, and bell pepper into fairly small, even pieces so they cook at the same rate. Slice the zucchini into half-moons and mince the garlic.
Having everything prepared beforehand makes the cooking process easier and helps prevent any ingredients from overcooking while you are chopping others.
2. Sauté the Onion and Aromatics
Place a large heavy-bottomed pot or Dutch oven over medium heat. Add the olive oil and allow it to warm for a few seconds.
Add the chopped onion and cook for about 3–4 minutes, stirring occasionally, until it begins to soften. Add the garlic and cook for another 30–60 seconds, just until fragrant.
Be careful not to brown or burn the garlic because burnt garlic can make the entire soup taste bitter.
3. Add the Firm Vegetables
Add the carrots, celery, and red bell pepper to the pot. Stir everything together and cook for approximately 5 minutes.
The vegetables do not need to be completely cooked at this stage. Sautéing them first helps release their natural flavors and gives the finished soup a deeper taste.
4. Add Tomato Paste and Seasonings
Add the tomato paste, dried oregano, dried thyme, smoked paprika, cumin, and red pepper flakes if using.
Stir continuously for about 1 minute. Toasting the spices briefly helps bring out their aroma, while cooking the tomato paste gives the soup a richer and more developed tomato flavor.
5. Add Tomatoes, Chickpeas, and Broth
Pour in the diced tomatoes with their juices, followed by the drained chickpeas and vegetable broth.
Add the bay leaf, salt, and black pepper. Stir well, making sure the tomato paste and seasonings are evenly distributed throughout the broth.
Increase the heat and bring the soup to a gentle boil.
6. Simmer the Soup
Once the soup begins to boil, reduce the heat to low or medium-low. Cover the pot partially with a lid and allow the soup to simmer for approximately 20 minutes.
Stir occasionally while it cooks.
The carrots and celery should become tender while still retaining a little texture. The chickpeas will absorb some of the flavorful broth, making the soup hearty and satisfying.
7. Add the Zucchini
After the soup has simmered for about 20 minutes, add the sliced zucchini.
Continue cooking for another 7–10 minutes, or until the zucchini is tender but not mushy. Adding it later prevents it from becoming overly soft.
8. Add the Greens
Stir in the chopped spinach or kale. If using spinach, it will wilt very quickly, usually within 1–2 minutes. Kale may need approximately 3–5 minutes to soften.
Taste the soup and adjust the salt and black pepper if needed.
9. Finish with Lemon Juice
Turn off the heat and remove the bay leaf.
Stir in the fresh lemon juice. This small addition makes a big difference because the acidity brightens the tomatoes, vegetables, chickpeas, and herbs.
If the soup tastes a little flat, try adding another small squeeze of lemon rather than immediately adding more salt.
10. Garnish and Serve
Ladle the hot soup into bowls and garnish with freshly chopped parsley, dill, or basil.
Add a small drizzle of extra-virgin olive oil and serve with lemon wedges on the side.
For a complete meal, serve it with crusty whole-grain bread, toasted pita, or a simple Mediterranean salad.
Tips
Use good-quality olive oil: Olive oil is an important part of Mediterranean cooking and contributes to the soup’s overall flavor.
Do not overcook the vegetables: The soup is best when the vegetables remain tender but retain some texture. Add quicker-cooking vegetables later in the cooking process.
Rinse canned chickpeas: Rinsing removes excess liquid and can reduce some of the canned flavor. It also helps keep the broth cleaner.
Adjust the consistency: For a thicker soup, simmer uncovered for several additional minutes. For a thinner soup, add a little extra vegetable broth or water.
Make it creamier: For a naturally creamy texture without adding cream, remove about 1–2 cups of the finished soup and blend it until smooth. Stir it back into the pot.
Taste before serving: Tomatoes, broth, and canned chickpeas can contain different amounts of salt, so always taste the soup at the end and adjust the seasoning.
Add lemon at the end: Lemon juice tastes fresher when added after cooking rather than being boiled for a long time.
Use fresh herbs: Parsley, dill, basil, or even fresh oregano can give the finished soup a bright Mediterranean flavor.
Variations
White Bean Vegetable Soup: Replace the chickpeas with cannellini beans, great northern beans, or another white bean. The result will be softer and creamier.
Lentil Version: Replace half or all of the chickpeas with brown or green lentils. Lentils make the soup especially hearty, although the cooking time may need to be adjusted.
Extra-Spicy Soup: Increase the red pepper flakes or add a pinch of cayenne pepper. You can also finish individual bowls with chili oil.
Greek-Inspired Version: Add extra oregano, fresh dill, spinach, and lemon. A spoonful of plain Greek yogurt on top can provide a creamy contrast.
Italian-Inspired Version: Add chopped fresh basil and a little grated Parmesan when serving. You can also add small pasta shapes during the final stage of cooking.
More Protein: Add cooked shredded chicken if you do not need the soup to remain vegetarian.
More Vegetables: Green beans, peas, potatoes, mushrooms, cabbage, or chopped leafy greens can all be added. Adjust cooking times according to how quickly each vegetable cooks.
Creamy Vegetable Soup: Blend a portion of the soup with an immersion blender while leaving some chickpeas and vegetables whole. This creates a thick, rustic texture while keeping the soup chunky.
Q&A
Q: Can I use dried chickpeas instead of canned?
Yes. Cook the dried chickpeas separately until tender before adding them to the soup. Avoid adding uncooked dried chickpeas directly unless you adjust the recipe for their much longer cooking time.
Q: Can I make this soup ahead of time?
Absolutely. In fact, the flavor often becomes even better after resting. Allow the soup to cool and refrigerate it in an airtight container.
Q: How long does it last in the refrigerator?
It can generally be stored in the refrigerator for about 3–4 days when properly refrigerated.
Q: Can I freeze the soup?
Yes. Allow it to cool completely, transfer it to freezer-safe containers, and leave a little space for expansion. Freeze for up to about 3 months for best quality.
Q: Why did my zucchini become mushy?
Zucchini cooks quickly. Adding it during the last 7–10 minutes helps it remain tender instead of becoming too soft.
Q: Can I make this soup without tomatoes?
Yes. Replace the diced tomatoes with additional vegetable broth and add a little lemon juice at the end. The flavor will be lighter but still delicious.
Q: Can I make it more filling?
Yes. Serve it with whole-grain bread, add cooked grains such as quinoa or farro, or increase the amount of chickpeas.
Q: Is this soup vegetarian?
Yes, when prepared with vegetable broth, the recipe is vegetarian. It is also vegan as written, provided the vegetable broth and any optional toppings are vegan.
Nutrition Information
Approximate values per serving; actual nutrition will vary depending on ingredients and portion sizes.
Calories: 260 kcal
Protein: 9–10 g
Carbohydrates: 38–40 g
Fiber: 9–10 g
Fat: 8–9 g
Saturated Fat: Approximately 1 g
Sodium: Approximately 550–700 mg
Sugar: Approximately 8–10 g
Vitamin A: High
Vitamin C: Good source
Iron: Moderate
Folate: Good source
The chickpeas provide plant-based protein and fiber, while the variety of vegetables contributes vitamins, minerals, and antioxidants. Olive oil adds healthy unsaturated fats, and the broth keeps the soup flavorful without requiring a heavy cream-based sauce.
Conclusion
Mediterranean Vegetable and Chickpea Soup is a simple, wholesome recipe that turns everyday vegetables and pantry staples into a comforting meal. The combination of tender vegetables, hearty chickpeas, tomatoes, herbs, and fresh lemon creates a flavorful soup that feels both nourishing and satisfying.
Vegan Cherries in the Snow Dessert
Description
Vegan Cherries in the Snow Dessert is a creamy, no-bake treat made with vegan cream cheese, fluffy whipped topping, and a bright cherry layer. It has a soft vanilla “snow” base with a sweet and slightly tart cherry topping that makes every spoonful refreshing.
This easy dessert is a great choice when you want something special without turning on the oven. It works well for holiday dinners, family gatherings, potlucks, birthdays, and simple weeknight treats. You can prepare it in one dish or serve it in individual glasses for a more elegant presentation.
The recipe takes about 15 minutes to prepare, but it needs at least 2 hours in the refrigerator to set and chill. For the best texture, keep it cold until you are ready to serve.
Time Required
- Prep time: 15 minutes
- Chilling time: 2 hours minimum
- Total time: About 2 hours 15 minutes
- Difficulty: Very easy
- Servings: 6–8
There is no baking, complicated equipment, or advanced cooking technique needed for this dessert.
Ingredients (Serves 6–8)
Snow Layer (Base)
- 1 cup vegan cream cheese, softened to room temperature
- 1 cup coconut whipped cream or soy whipping cream
- ½ cup powdered sugar
- 1 teaspoon vanilla extract
- 1 cup mini vegan marshmallows, optional
Cherry Layer (Top)
For a quick version:
- 1 can (400 g) cherry pie filling
For a homemade cherry topping:
- 2 cups pitted cherries
- ¼ cup granulated sugar
- 1 tablespoon cornstarch
- ¼ cup water
Room-temperature vegan cream cheese blends more smoothly and helps prevent lumps in the creamy layer. If using coconut whipped cream, choose a variety with a mild flavor so the vanilla and cherry flavors remain noticeable.
Instructions
Step 1: Make the Snow Layer
Place the softened vegan cream cheese in a large mixing bowl.
Beat the cream cheese until smooth and creamy. Scrape the sides of the bowl as needed so no firm pieces remain.
Add the powdered sugar and vanilla extract. Mix until the sugar is fully blended and the mixture looks smooth.
Gently fold in the coconut whipped cream or soy whipping cream. Use a spatula and fold slowly to keep the mixture light and fluffy.
Add the mini vegan marshmallows if you want the traditional soft, chewy texture. Stir gently until they are evenly distributed.
Spread the finished mixture into a glass baking dish or serving bowl. Smooth the top with a spatula so the cherry layer can sit evenly over the surface.
Step 2: Prepare the Cherry Topping
If you are using canned cherry pie filling, simply open the can and set it aside.
For homemade cherry topping, place the pitted cherries, sugar, cornstarch, and water in a saucepan.
Cook over medium heat while stirring often. Continue cooking until the mixture becomes thick and glossy.
Remove the saucepan from the heat and allow the cherry mixture to cool completely. Do not spread hot cherries over the creamy layer because the heat can soften the base.
Step 3: Assemble the Dessert
Spoon the cooled cherry topping evenly over the snow layer.
Use the back of a spoon or a spatula to spread the cherries from edge to edge.
Cover the dish tightly and place it in the refrigerator.
Chill for at least 2 hours before serving. A longer chilling time can give the dessert a firmer texture and allow the vanilla and cherry flavors to blend.
Step 4: Serve Chilled
Remove the dessert from the refrigerator just before serving.
Spoon it directly from the dish or portion it into individual dessert glasses.
For a simple finishing touch, add a fresh cherry or a small mint leaf to each serving.
Serving Suggestions
Vegan Cherries in the Snow Dessert looks especially attractive when served in clear glass cups. The white creamy layer and red cherry topping create a simple layered effect without extra decoration.
For holidays, serve it in small dessert glasses so guests can enjoy individual portions. This also makes the recipe convenient for parties and family gatherings.
Fresh cherries can add color and a slightly firmer fruit texture. A small mint leaf provides a fresh contrast and makes each serving look more polished.
This chilled dessert pairs nicely with coffee, black tea, or herbal tea. Since it is rich and creamy, small portions are usually enough after a full meal.
Storage
Cover leftover dessert tightly and keep it refrigerated.
For the best texture and flavor, enjoy it within 3 days. Keep the dessert cold between serving times and return it to the refrigerator as soon as possible.
If you are preparing it ahead for a gathering, make it the day before. The extra chilling time allows the layers to firm up and the flavors to develop.
Nutritional Information
Approximate nutrition per serving:
- Calories: 240–270 kcal
- Carbohydrates: 30 g
- Fat: 12 g
- Protein: 3 g
- Sugar: 20 g
- Fiber: 2 g
Nutrition values can change depending on the vegan cream cheese, whipped topping, marshmallows, and cherry filling used. Check individual product labels when exact nutrition information is important.
Questions & Answers
Can I make Vegan Cherries in the Snow Dessert ahead of time?
Yes. Prepare it the day before and keep it covered in the refrigerator for a convenient make-ahead dessert.
Can I skip the vegan marshmallows?
Yes. The marshmallows are optional, and the dessert will still have a creamy, fluffy texture without them.
What can I use instead of coconut whipped cream?
Soy whipping cream or oat-based whipping cream can replace coconut whipped cream while keeping the dessert dairy-free.
Can I use homemade cherry topping?
Yes. Cook pitted cherries with sugar, cornstarch, and water until thick, then cool the topping completely before assembling.
Is this dessert gluten-free?
It can be gluten-free, but check every package, especially the marshmallows, whipped topping, cream cheese, and cherry filling.
Can I use frozen cherries?
Yes. Thaw frozen pitted cherries first and drain excess liquid before cooking the homemade topping.
Can I use other fruit instead of cherries?
Yes. Blueberries, strawberries, raspberries, or mixed berries can replace the cherries for a different fruit flavor.
How long does this dessert last in the refrigerator?
Store it covered in the refrigerator and enjoy it within 3 days for the best taste and texture.
🥩 Slow Cooker Beef Tips with Mushrooms, Mashed Potatoes & Green Beans
Slow Cooker Beef Tips with Mushrooms, Mashed Potatoes & Green Beans is a cozy American-style dinner made for busy weeknights and relaxed Sunday meals. Tender beef cooks slowly with mushrooms, onions, garlic, beef broth, and simple seasonings until the meat is fork-tender and the gravy is rich and savory.
Serve the beef and mushroom gravy over creamy mashed potatoes with buttery green beans on the side. The combination gives you tender protein, hearty potatoes, and a fresh vegetable in one satisfying plate.
This easy slow cooker dinner also works well for meal prep because the beef and gravy reheat beautifully the next day.
Why You’ll Love This Slow Cooker Beef Dinner
- Easy preparation: Most of the cooking happens in the slow cooker.
- Tender beef: Long, gentle cooking helps tougher cuts become soft and flavorful.
- Rich gravy: Beef broth, Worcestershire sauce, garlic, onions, and mushrooms create a savory sauce.
- Complete meal: Mashed potatoes and green beans make the dish filling and balanced.
- Family-friendly: The mild seasoning works well for adults and children.
- Meal-prep friendly: Leftover beef and gravy can be refrigerated or frozen for later.
Ingredients You’ll Need
For the Beef Tips and Mushroom Gravy
- 2 pounds beef stew meat or sirloin tips, cut into bite-size pieces
- 1 tablespoon olive oil for optional searing
- 1 small onion, sliced
- 8 ounces mushrooms, sliced
- 3 cloves garlic, minced
- 2 cups beef broth
- 2 tablespoons Worcestershire sauce
- 1 tablespoon soy sauce, optional
- 1 teaspoon dried thyme
- 1 teaspoon paprika
- ½ teaspoon black pepper
- 1 teaspoon salt, adjusted to taste
- 2 tablespoons cornstarch
- 2 tablespoons water
For the Mashed Potatoes
- 2 pounds Yukon Gold or Russet potatoes
- 4 tablespoons butter
- ½ cup warm milk or cream
- Salt and black pepper to taste
For the Green Beans
- 12 ounces fresh green beans, trimmed
- 1 tablespoon butter
- Salt and black pepper to taste
How to Make Slow Cooker Beef Tips
Step 1: Season the Beef
Pat the beef pieces dry with paper towels before seasoning. Sprinkle them evenly with salt, black pepper, and paprika.
For deeper flavor, heat olive oil in a large skillet and sear the beef for about 2–3 minutes per side. Searing is optional, but it adds a richer browned flavor to the finished gravy.
Step 2: Add the Vegetables
Place the sliced onions, mushrooms, and minced garlic in the bottom of your slow cooker. Spread them into an even layer so the vegetables cook with the beef juices.
Step 3: Add the Beef and Liquid
Place the seasoned beef over the vegetables. Pour in the beef broth, Worcestershire sauce, and optional soy sauce.
Sprinkle the dried thyme over the top. Avoid adding too much extra liquid because the mushrooms and beef will release moisture during cooking.
Step 4: Slow Cook Until Tender
Cover the slow cooker and cook until the beef is fork-tender.
- LOW: Cook for 7–8 hours.
- HIGH: Cook for 4–5 hours.
The exact cooking time can vary depending on the size of the beef pieces and your slow cooker. The beef is ready when it becomes tender enough to break apart easily with a fork.
Step 5: Thicken the Gravy
Combine the cornstarch and water in a small bowl and stir until smooth.
Add the slurry during the final 20–30 minutes of cooking. Stir gently and allow the sauce to thicken before serving.
If the gravy remains too thin, add a small amount of additional slurry. If it becomes too thick, stir in a splash of warm beef broth.
Step 6: Prepare the Mashed Potatoes
Peel and cube the potatoes into similar-sized pieces. Place them in a pot of salted water and bring to a boil.
Cook for about 15–20 minutes, or until the potatoes are fork-tender. Drain thoroughly, then mash with butter and warm milk or cream.
Season with salt and black pepper. Avoid overmixing because excessive stirring can make mashed potatoes gummy.
Step 7: Cook the Green Beans
Trim the green beans and steam or boil them for about 4–6 minutes. Cook until they are tender but still have a slight bite.
Drain well and toss with butter, salt, and black pepper. For brighter green beans, avoid overcooking them.
Step 8: Assemble and Serve
Spoon a generous portion of mashed potatoes onto each plate. Top with tender beef, mushrooms, onions, and plenty of gravy.
Serve the buttery green beans alongside the beef and potatoes. Add a little fresh parsley if you want a simple finishing touch.
Best Beef for This Recipe
Beef stew meat is a convenient choice because it is already cut into cooking-sized pieces. Chuck roast is another excellent option because its marbling helps it become tender during slow cooking.
Sirloin tips can also be used when you prefer a leaner cut. Cut the beef into similar-sized pieces so they cook evenly.
Avoid cutting the meat too small because smaller pieces can become dry during a long cooking time.
Tips for Tender Beef and Rich Gravy
- Sear before slow cooking: Browning creates deeper flavor and improves the overall taste of the gravy.
- Use similar-sized beef pieces: Even pieces cook at a more consistent rate.
- Keep the lid closed: Opening the slow cooker repeatedly releases heat and can extend the cooking time.
- Use low-sodium broth: This gives you better control over the salt level.
- Add the slurry near the end: Early addition can reduce its thickening power during a long cook.
- Use warm dairy: Warm milk or cream blends more smoothly into mashed potatoes.
- Do not overcook green beans: Tender-crisp beans provide better texture beside the soft beef and potatoes.
Easy Variations
For a creamier gravy, stir in 2 tablespoons of sour cream after the beef has finished cooking. Add it gradually and avoid boiling the finished sauce.
Cremini mushrooms can replace standard white mushrooms when you want a deeper earthy flavor.
For extra vegetables, add sliced carrots to the slow cooker with the onions and mushrooms. You can also add celery for more savory flavor.
For a lower-sodium version, choose low-sodium beef broth and skip or reduce the soy sauce.
How to Store and Reheat
Place leftover beef and gravy in airtight containers and refrigerate for up to 4 days. Store mashed potatoes and green beans separately when possible.
Reheat the beef and gravy gently on the stovetop or in the microwave until heated through. Add a splash of broth if the gravy becomes too thick.
For freezing, freeze the beef and gravy separately from the mashed potatoes for better texture. Use the frozen beef within about 2 months for the best quality.
Frequently Asked Questions
Can I use frozen beef for slow cooker beef tips?
Thaw the beef in the refrigerator before cooking so it heats evenly and reaches a safe temperature more reliably.
Can I make this recipe without mushrooms?
Yes, simply leave out the mushrooms and add extra onions, carrots, or another vegetable you enjoy.
What is the best beef cut for this recipe?
Chuck roast, beef stew meat, and sirloin tips can all work well, with chuck and stew meat offering especially tender results.
Can I make the gravy thicker?
Yes, add a small amount of cornstarch slurry during the final 20–30 minutes and allow the sauce to thicken.
Can I prepare this meal ahead of time?
Yes, cook the beef and gravy ahead, refrigerate them, and reheat gently while preparing fresh mashed potatoes and green beans.
Can I freeze beef tips and gravy?
Yes, freeze the cooled beef and gravy in an airtight container for up to about 2 months for the best quality.
Can I make this recipe in an Instant Pot?
Yes, you can adapt the recipe for an Instant Pot by pressure cooking the beef and using a natural release before thickening the gravy.
What should I serve with beef tips?
Creamy mashed potatoes and green beans make a classic pairing, while roasted carrots, steamed broccoli, or dinner rolls are also good options.
Final Thoughts
This slow cooker beef dinner brings together tender meat, savory mushroom gravy, creamy potatoes, and buttery green beans without complicated preparation. Searing the beef adds extra flavor, while slow cooking gives the meat time to become tender.
For a comforting American-style family meal, serve the beef and gravy hot over mashed potatoes with green beans on the side. It is simple enough for a weeknight and hearty enough for a relaxed Sunday dinner.
Mediterranean Crab-Stuffed Mushrooms
Mediterranean Crab-Stuffed Mushrooms are an easy appetizer filled with tender lump crabmeat, creamy feta, garlic, fresh herbs, and bright lemon. Each mushroom cap is baked until tender with a golden, savory topping that makes every bite flavorful.
This seafood appetizer works well for dinner parties, holiday gatherings, game-day tables, and casual family meals. The filling comes together in about 15 minutes, and the mushrooms need only 18–20 minutes in the oven.
The combination of crab, feta, Parmesan, parsley, scallions, and lemon gives these stuffed mushrooms a fresh Mediterranean-inspired flavor without requiring complicated ingredients. Serve them warm with extra lemon wedges and fresh herbs for a simple appetizer that looks elegant on any table.
Why You’ll Love These Stuffed Mushrooms
These crab-stuffed mushrooms are designed to be simple, flavorful, and easy to prepare.
- Quick preparation: The filling takes about 15 minutes to mix.
- Simple ingredients: Most ingredients are easy to find at a U.S. grocery store.
- Rich seafood flavor: Lump crabmeat provides a delicate, slightly sweet taste.
- Fresh Mediterranean flavors: Lemon, herbs, garlic, and feta keep the filling bright.
- Party-friendly: The bite-sized mushrooms are easy to serve and share.
- Make-ahead option: You can stuff the mushrooms and refrigerate them before baking.
- Flexible filling: Greek yogurt or cream cheese can be used for the creamy base.
Ingredients You’ll Need
For the Mushrooms
- 18–20 medium white or cremini mushrooms
- 1 tablespoon olive oil
Choose firm mushrooms with smooth caps and no dark, soft spots. Cremini mushrooms add a deeper earthy flavor, while white mushrooms have a milder taste.
For the Crab Filling
- 1 cup lump crabmeat, drained and checked for shells
- ⅓ cup crumbled feta cheese
- ¼ cup plain Greek yogurt or cream cheese
- 2 tablespoons grated Parmesan cheese
- 1 garlic clove, minced
- 2 tablespoons chopped fresh parsley or dill
- 2 tablespoons finely chopped scallions or chives
- 1 teaspoon lemon zest
- 1 tablespoon fresh lemon juice
- Salt and black pepper to taste
- A pinch of crushed red pepper flakes, optional
- ¼ cup breadcrumbs, optional
For extra crunch, use panko breadcrumbs mixed with a small amount of olive oil as the topping.
How to Make Mediterranean Crab-Stuffed Mushrooms
Step 1: Prepare the Mushrooms
Preheat your oven to 375°F (190°C).
Clean the mushrooms gently with a damp cloth or paper towel. Avoid soaking them because excess water can make the baked mushrooms watery.
Remove the stems and place the mushroom caps on a parchment-lined baking sheet. If the caps have very little space inside, gently hollow them out with a small spoon.
Brush the mushroom caps lightly with olive oil. Arrange them with the hollow side facing upward so they are ready for the filling.
Step 2: Prepare the Crab Filling
Add the lump crabmeat, feta, Greek yogurt or cream cheese, Parmesan, minced garlic, parsley or dill, scallions, lemon zest, and lemon juice to a mixing bowl.
Season the mixture with salt and black pepper. Add crushed red pepper flakes if you prefer a little heat.
Fold the ingredients together gently so the crabmeat keeps some of its texture. Avoid overmixing because the filling can become dense.
Check the consistency before stuffing the mushrooms. If the mixture feels too loose, add breadcrumbs one tablespoon at a time until it holds together.
Step 3: Fill the Mushroom Caps
Spoon the crab mixture into each mushroom cap.
Fill each cap generously without packing the mixture too tightly. A loose filling helps the mushrooms stay tender while the top becomes lightly golden.
For extra texture, sprinkle each stuffed mushroom with a little panko. You can also add a small amount of Parmesan or feta before baking.
Step 4: Bake Until Golden
Place the baking sheet in the preheated oven.
Bake the mushrooms for 18–20 minutes, or until the caps are tender and the filling is hot with lightly browned edges.
For a deeper golden topping, switch the oven to broil for 1–2 minutes at the end. Watch the mushrooms closely during broiling because the topping can brown quickly.
Step 5: Garnish and Serve
Remove the mushrooms from the oven and let them cool for a few minutes.
Finish them with chopped parsley or dill and a small squeeze of fresh lemon juice. Serve warm as an appetizer or alongside a light salad for a simple meal.
Tips for the Best Crab-Stuffed Mushrooms
Use lump crabmeat when possible because it gives the filling larger pieces of tender crab and a better seafood texture.
Drain canned crab thoroughly before mixing it into the filling. Excess liquid can make the mixture soft and prevent the mushroom tops from browning properly.
Cremini mushrooms are a great choice when you want a stronger earthy flavor. White mushrooms work well when you prefer a mild mushroom taste.
Use fresh lemon juice and zest for the brightest flavor. Lemon balances the creamy cheese and complements the sweetness of the crab.
Do not overbake the mushrooms. Once the caps are tender and the filling is hot and lightly golden, they are ready to serve.
For a stronger Mediterranean touch, add finely chopped sun-dried tomatoes, Kalamata olives, or extra fresh herbs to the crab mixture.
Make-Ahead and Storage
You can prepare these stuffed mushrooms up to 1 day ahead. Fill the mushroom caps, cover them, and refrigerate them until you are ready to bake.
For the best texture, bake them directly from the refrigerator and allow a few extra minutes if needed.
Store leftover mushrooms in an airtight container in the refrigerator and use them within a few days. Reheat them in a 300°F oven for about 10 minutes to help maintain their texture.
Freezing is not recommended because mushrooms and creamy fillings can become watery after thawing.
Recipe Details
Prep Time: 15 minutes
Cook Time: 20 minutes
Total Time: 35 minutes
Servings: 18–20 stuffed mushrooms, about 4–6 servings
Oven Temperature: 375°F (190°C)
Approximate Nutrition Per Serving
- Calories: 120 kcal
- Protein: 9 g
- Fat: 7 g
- Carbohydrates: 6 g
- Fiber: 1 g
- Sodium: 260 mg
Nutritional values are estimates and can vary based on the specific crabmeat, cheese, and other ingredients used.
Frequently Asked Questions
Can I use imitation crab for this recipe?
Yes, imitation crab can work, but lump crabmeat provides a more natural seafood flavor and a better texture.
Can I make these mushrooms dairy-free?
Yes. Use dairy-free cream cheese and replace or omit the feta and Parmesan according to your dietary needs.
Can I prepare these stuffed mushrooms ahead of time?
Yes. Assemble the mushrooms up to one day ahead, cover them, refrigerate, and bake when ready to serve.
Can I use shrimp instead of crab?
Yes. Finely chopped cooked shrimp can replace crab in the same amount for a different seafood version.
Should I wash mushrooms before stuffing them?
Clean mushrooms gently with a damp cloth or paper towel instead of soaking them to prevent excess moisture.
Can I serve crab-stuffed mushrooms at room temperature?
Yes, but they taste best warm and can also be served slightly cooled on a party appetizer platter.
What mushrooms work best for stuffing?
Medium white or cremini mushrooms work well because their caps are sturdy and provide enough space for the crab filling.
How do I make the topping extra crispy?
Add panko breadcrumbs tossed with a little olive oil and broil the mushrooms for 1–2 minutes after baking.
Crispy Roasted Zucchini, Squash & Tomatoes with Parmesan
Crispy Roasted Zucchini, Squash & Tomatoes with Parmesan is an easy vegetable side dish that brings fresh summer produce to the table with very little effort. Zucchini, yellow squash, and juicy cherry tomatoes are coated with olive oil, garlic, and dried herbs before roasting at high heat. Parmesan melts over the vegetables and develops golden, crispy edges as they cook.
This colorful Mediterranean-inspired recipe takes about 35 minutes from start to finish. It works well with grilled chicken, baked fish, steak, pasta, or cooked grains. The vegetables become tender while the Parmesan adds a savory, salty crust that makes this simple side feel special.
Why You’ll Love This Roasted Vegetable Recipe
This recipe is a great choice when you want a healthy side without spending a lot of time in the kitchen.
- Quick preparation: The vegetables take only about 10 minutes to prepare.
- Simple ingredients: Most ingredients are everyday pantry and refrigerator staples.
- Crispy topping: Freshly grated Parmesan creates a golden crust in the oven.
- Colorful presentation: Green zucchini, yellow squash, and red tomatoes make the dish look bright and fresh.
- Versatile pairing: Serve it with chicken, seafood, pasta, rice, or quinoa.
- Easy cleanup: A parchment-lined baking sheet keeps cleanup simple.
The high oven temperature is important because it helps the vegetables roast instead of becoming watery. Giving each piece enough space on the pan also helps the edges brown properly.
Ingredients You’ll Need
Fresh Vegetables
Use one medium zucchini and one medium yellow squash. Slice both into rounds about ¼-inch thick so they cook at a similar rate.
Add 1 cup of cherry or grape tomatoes, cut in half. Smaller tomatoes roast quickly and release just enough juice without making the entire pan too wet.
Seasonings and Topping
You’ll need 2 tablespoons of olive oil, 2 minced garlic cloves, ½ teaspoon dried oregano, and ½ teaspoon dried thyme or Italian seasoning. Season with salt and black pepper according to taste.
Use ½ cup of freshly grated Parmesan cheese. Finely grated cheese melts and browns well, creating a crisp layer over the vegetables.
For extra crunch, add ¼ cup of panko breadcrumbs. Fresh basil or parsley can be used as a simple finishing garnish.
How to Make Crispy Roasted Zucchini, Squash & Tomatoes
Step 1: Preheat the Oven
Preheat your oven to 425°F (220°C). Line a large baking sheet with parchment paper or lightly coat it with cooking spray or oil.
A hot oven helps the vegetables brown quickly while keeping their centers tender.
Step 2: Prepare the Vegetables
Wash and dry the zucchini, yellow squash, and tomatoes well. Slice the zucchini and squash into even ¼-inch rounds.
Halve the cherry or grape tomatoes. Keeping the vegetable pieces close in size helps them cook evenly.
Step 3: Season the Vegetables
Place all the prepared vegetables in a large mixing bowl. Add olive oil, minced garlic, oregano, thyme or Italian seasoning, salt, and black pepper.
Toss gently until the vegetables are evenly coated. Avoid adding too much oil because excess moisture can prevent the edges from becoming crisp.
Step 4: Arrange on the Baking Sheet
Spread the seasoned vegetables across the baking sheet in a single layer.
Leave a little space between the pieces whenever possible. An overcrowded pan traps steam and can leave the vegetables soft instead of roasted.
Step 5: Add Parmesan
Sprinkle the freshly grated Parmesan evenly over the vegetables.
If you want more texture, sprinkle panko breadcrumbs over the Parmesan. Keep the layer light so the cheese and vegetables can still brown properly.
Step 6: Roast Until Golden
Place the baking sheet in the preheated oven. Roast for 20–25 minutes, or until the zucchini and squash are tender and the Parmesan is golden around the edges.
For a deeper crispy finish, broil the vegetables for about 2 minutes at the end. Watch the pan closely because Parmesan can brown quickly under the broiler.
Step 7: Garnish and Serve
Remove the pan from the oven and allow the vegetables to cool for a few minutes.
Finish with chopped fresh basil or parsley. Serve warm as a side dish or spoon the roasted vegetables over pasta, rice, quinoa, or another cooked grain.
Tips for the Best Results
Choose zucchini and yellow squash that are similar in size and firmness. This helps the slices roast at the same rate.
Dry the vegetables before seasoning them. Extra surface moisture can create steam and make the finished dish less crisp.
Use freshly grated Parmesan when possible. A fine grate creates more surface area, which helps the cheese melt and form a delicate crispy coating.
Do not overcrowd the baking sheet. If needed, use two pans instead of placing the vegetables in a thick layer.
For extra flavor, add a small pinch of crushed red pepper flakes before roasting. A light drizzle of balsamic glaze after cooking also adds a sweet and tangy contrast.
You can replace part of the zucchini or squash with sliced eggplant or mushrooms. Keep the pieces similar in size so the vegetables cook evenly.
What to Serve with This Dish
This roasted vegetable side pairs well with many everyday meals.
Serve it alongside grilled chicken for a simple weeknight dinner. It also works with baked salmon, grilled shrimp, roasted turkey, or lean steak.
For a meatless meal, spoon the vegetables over cooked pasta or quinoa. Add a little extra Parmesan and fresh herbs for a filling vegetarian option.
The combination of roasted vegetables, garlic, herbs, and cheese also works well beside Mediterranean-style dishes, making it useful for family dinners, gatherings, and summer meals.
How to Store and Reheat Leftovers
Allow leftovers to cool before transferring them to an airtight container. Refrigerate for up to 3–4 days.
For the best texture, reheat the vegetables in a 375°F oven or toaster oven for about 10 minutes. This method helps restore some of the crispness.
A microwave is faster, but it can make the vegetables softer and the Parmesan less crisp.
Can You Prepare This Recipe Ahead?
You can prepare the vegetables and seasonings several hours ahead of time. Store the prepared ingredients covered in the refrigerator until you are ready to cook.
For the best texture, wait to roast the vegetables until shortly before serving. Freshly roasted vegetables have the best color, texture, and Parmesan crust.
Frequently Asked Questions
Can I make this recipe dairy-free?
Yes. Replace Parmesan with a dairy-free Parmesan alternative or nutritional yeast for a similar savory flavor.
Can I use frozen vegetables?
Fresh zucchini, squash, and tomatoes work best because frozen vegetables contain more moisture and may not become as crisp.
Why are my roasted vegetables soggy?
Overcrowding the pan or using vegetables that are still wet can create steam and prevent proper browning.
Can I use shredded Parmesan instead of grated Parmesan?
Yes, but finely grated Parmesan usually spreads more evenly and creates a crispier topping.
Can I add other vegetables?
Yes. Eggplant, mushrooms, bell peppers, or thinly sliced onions can be added as long as the pieces are cut for similar cooking times.
How do I make the vegetables extra crispy?
Use a fully preheated oven, avoid overcrowding the pan, dry the vegetables well, and broil for about 2 minutes at the end.
Can I make this without panko?
Absolutely. Panko is optional and can be left out while the Parmesan provides the main crispy topping.
What is the best way to serve these roasted vegetables?
Serve them warm as a side dish with chicken, fish, steak, or pasta, or spoon them over rice, quinoa, or cooked grains for a meatless meal.
Nutrition Information
One serving contains approximately 140 calories, 6 grams of protein, 9 grams of fat, 10 grams of carbohydrates, 2 grams of fiber, and 220 mg of sodium.
Nutrition values can vary depending on the exact vegetables, Parmesan, oil, and seasonings used.
White Cheddar and Spinach Chicken
White Cheddar and Spinach Chicken is a creamy, flavorful dinner made with tender pan-seared chicken, fresh spinach, garlic, and sharp white cheddar cheese. The chicken is cooked until golden, then finished in a smooth cheese sauce that adds rich flavor without requiring complicated cooking techniques.
This easy chicken dinner is ready in about 30–35 minutes, making it a practical choice for busy weeknights. It also has an elegant look and rich flavor that works well for family dinners, casual gatherings, or guests.
The creamy spinach sauce pairs especially well with mashed potatoes, rice, pasta, or cauliflower mash. A simple green salad or roasted vegetables can also complete the meal.
Why You’ll Love This Recipe
- Ready in about 30–35 minutes from start to finish.
- Uses simple ingredients that are easy to find in most U.S. grocery stores.
- Pan-seared chicken adds a golden, savory crust before the sauce is added.
- Fresh spinach adds color, texture, and a mild earthy flavor.
- Sharp white cheddar creates a rich and creamy cheese sauce.
- The recipe can be made with chicken breasts or boneless chicken thighs.
- Leftovers can be refrigerated and gently reheated for another meal.
Ingredients
For the Chicken
- 4 boneless, skinless chicken breasts
- Salt and black pepper, to taste
- ½ teaspoon garlic powder
- ½ teaspoon paprika
- 2 tablespoons olive oil
For the White Cheddar Spinach Sauce
- 2 tablespoons olive oil
- 2 garlic cloves, minced
- 2 tablespoons all-purpose flour
- 1½ cups whole or 2% milk
- 1 cup freshly grated sharp white cheddar cheese
- ¼ cup grated Parmesan cheese, optional
- 2 cups fresh spinach, chopped
- ½ teaspoon Dijon mustard, optional
- Salt and black pepper, to taste
- 2 tablespoons chopped fresh parsley or basil, optional
How to Make White Cheddar and Spinach Chicken
Step 1: Prepare the Chicken
Pat the chicken breasts dry with paper towels before seasoning. Removing excess moisture helps the chicken develop a better golden-brown crust in the skillet.
Season both sides evenly with salt, black pepper, garlic powder, and paprika.
For quicker cooking, butterfly thick chicken breasts by slicing them horizontally through the center. Keep the two sides attached if preferred, or cut them into thinner portions.
Step 2: Sear the Chicken
Heat 2 tablespoons of olive oil in a large skillet over medium-high heat.
Place the seasoned chicken into the hot skillet without overcrowding the pan. Cook for about 5–6 minutes on each side, depending on thickness.
The chicken should be golden on the outside and reach an internal temperature of 165°F (74°C) in the thickest part.
Transfer the cooked chicken to a plate and cover loosely to keep it warm.
Helpful cooking points:
- Use a large skillet so the chicken browns instead of steaming.
- Avoid moving the chicken too often while it sears.
- Use a meat thermometer for the most reliable doneness check.
- Let very thick breasts cook a little longer over moderate heat.
Step 3: Start the Creamy Sauce
Reduce the heat to medium and use the same skillet. The browned bits left from the chicken add extra flavor to the sauce.
Add 2 tablespoons of olive oil, followed by the minced garlic. Cook for about 30 seconds until fragrant.
Add the flour and stir continuously for about 1 minute. This creates a simple roux that helps thicken the sauce.
Step 4: Add the Milk
Slowly pour the milk into the skillet while whisking. Adding the milk gradually helps prevent lumps.
Bring the mixture to a gentle simmer and cook for about 3–4 minutes. Stir often until the sauce becomes slightly thick and smooth.
Do not boil the sauce aggressively because high heat can make a cheese sauce separate.
Step 5: Add White Cheddar and Spinach
Lower the heat and add the grated sharp white cheddar. Stir until the cheese melts into the sauce.
Add the Parmesan cheese if using, followed by Dijon mustard for a subtle tangy flavor.
Stir in the chopped spinach and cook until it wilts, which usually takes about 1–2 minutes.
Taste the sauce and adjust the salt and black pepper as needed.
For the best sauce:
- Grate the cheddar from a block for smoother melting.
- Use sharp or aged white cheddar for stronger cheese flavor.
- Keep the heat low after adding the cheese.
- Add a small splash of milk if the sauce becomes too thick.
Step 6: Return the Chicken to the Skillet
Place the cooked chicken back into the skillet.
Spoon the creamy white cheddar and spinach sauce over each chicken breast. Let everything simmer gently for 2–3 minutes.
This short finishing step allows the chicken to warm through while the flavors blend together.
Garnish with chopped parsley or basil if desired.
What to Serve With This Chicken
The creamy sauce makes this dish especially good with simple sides that can soak up the extra sauce.
Try serving it with:
- Creamy mashed potatoes
- Steamed white or brown rice
- Buttered pasta
- Cauliflower mash
- Roasted broccoli
- Green beans
- A crisp garden salad
- Roasted carrots
For a lower-carbohydrate dinner, cauliflower mash and roasted vegetables are easy choices. For a heartier family meal, mashed potatoes, rice, or pasta work especially well.
Recipe Tips and Variations
Slicing the chicken horizontally can reduce cooking time and gives the creamy sauce more surface area to coat.
Boneless, skinless chicken thighs are a good alternative if you prefer darker meat. They stay juicy and bring a slightly richer flavor to the dish.
You can also add sautéed mushrooms for an earthy flavor or chopped sun-dried tomatoes for a sweet and tangy contrast.
If the sauce becomes too thick while reheating, stir in a small amount of milk or chicken broth until it reaches the desired consistency.
For a gluten-free version, replace the all-purpose flour with a gluten-free flour blend or use a cornstarch slurry made with 1 tablespoon cornstarch and 2 tablespoons cold water.
Storage and Reheating
Store leftover chicken and sauce in an airtight container in the refrigerator for up to 3 days.
Reheat gently on the stovetop over low to medium heat or in the microwave using short intervals. Add a splash of milk or chicken broth if the sauce thickens too much during storage.
Avoid high heat because it can cause the cheddar sauce to become oily or separate.
Nutrition Information
Approximate nutrition per serving:
- Calories: 470 kcal
- Protein: 38 g
- Fat: 28 g
- Carbohydrates: 6 g
- Fiber: 1 g
- Sodium: 420 mg
Nutrition values are estimates and can vary based on the specific chicken, cheese, milk, and other ingredients used.
Frequently Asked Questions
Can I use chicken thighs instead of chicken breasts?
Yes. Boneless, skinless chicken thighs work well and remain juicy while cooking in the creamy sauce.
Can I make this recipe ahead of time?
Yes. Cook the chicken and sauce separately, refrigerate them, then gently reheat and combine before serving.
How do I keep the cheddar sauce smooth?
Use freshly grated cheese and add it over low heat after the milk mixture has thickened.
Can I make this chicken gluten-free?
Yes. Replace the all-purpose flour with a gluten-free flour blend or use a cornstarch slurry to thicken the sauce.
What type of cheddar works best?
Sharp or aged white cheddar gives the sauce a stronger cheese flavor and melts well when freshly grated.
Can I add mushrooms to the recipe?
Yes. Sauté sliced mushrooms before making the sauce, then add them back to the skillet with the spinach.
How long does leftover chicken last?
Store leftovers in the refrigerator for up to 3 days in an airtight container and reheat them gently before serving.
What can I serve with creamy spinach chicken?
Mashed potatoes, rice, pasta, cauliflower mash, roasted vegetables, and green salad all pair well with the creamy sauce.
Final Thoughts
White Cheddar and Spinach Chicken brings together tender chicken, sharp cheese, garlic, and fresh spinach in one skillet. The recipe uses straightforward ingredients and simple cooking steps, so it can fit easily into a busy weeknight dinner routine.
For the best results, avoid overcooking the chicken, grate the cheddar yourself, and keep the sauce over gentle heat after adding the cheese. Serve it with your favorite side and spoon the extra creamy sauce over the top for a comforting, satisfying meal.
Creamy Cheese Veggies
Creamy Cheese Veggies is an easy vegetable side dish made with broccoli, cauliflower, carrots, green beans, and sweet corn in a smooth homemade cheese sauce. The vegetables stay tender while the creamy sauce adds rich flavor to every bite.
This comforting recipe takes about 25 minutes from start to finish, making it useful for busy weeknight dinners, family meals, or holiday side dishes. It pairs well with rice, pasta, roasted chicken, grilled meat, or warm crusty bread.
The sauce uses simple ingredients such as butter, flour, warm milk, and shredded cheese. You can use cheddar, mozzarella, or a blend of both for a smooth and flavorful finish.
Ingredients
For the Vegetables
- 1 cup broccoli florets
- 1 cup cauliflower florets
- ½ cup carrots, sliced
- ½ cup green beans, chopped
- ½ cup sweet corn, optional
- 1 tablespoon butter
- Salt to taste
- Water for boiling or steaming
For the Creamy Cheese Sauce
- 2 tablespoons butter
- 2 tablespoons all-purpose flour
- 1½ cups warm milk
- ½ cup grated cheddar or mozzarella cheese
- ¼ teaspoon black pepper
- ¼ teaspoon nutmeg, optional
- Salt to taste
- ½ teaspoon garlic powder, optional
- 2 tablespoons heavy cream, optional
How to Make Creamy Cheese Veggies
Step 1: Prepare the Vegetables
Wash the broccoli, cauliflower, carrots, green beans, and corn under cool running water. Cut the vegetables into similar-sized pieces so they cook evenly.
Bring a pot of lightly salted water to a boil, then add the vegetables. Cook for about 6–8 minutes, or steam them until they are tender but still slightly firm.
Avoid overcooking the vegetables because they can become soft and watery when mixed with the sauce.
Drain the vegetables well and set them aside.
Step 2: Melt the Butter
Place a medium saucepan over medium heat. Add 2 tablespoons of butter and let it melt completely.
Keep the heat moderate so the butter does not burn before the sauce begins.
Step 3: Add the Flour
Add 2 tablespoons of all-purpose flour to the melted butter. Whisk continuously for about 1–2 minutes.
The flour should become bubbly and smooth. Cooking it briefly helps remove the raw flour taste and creates the base for a thick cheese sauce.
Step 4: Add the Warm Milk
Slowly pour the warm milk into the flour mixture while whisking constantly.
Adding the milk gradually helps prevent lumps and gives the sauce a smoother texture.
Continue cooking for about 2–3 minutes, stirring often, until the mixture becomes creamy and slightly thick.
Step 5: Season the Sauce
Add black pepper, salt, and garlic powder if using. Add a small amount of nutmeg for a subtle warm flavor.
For a richer sauce, stir in 2 tablespoons of heavy cream.
Taste the sauce and adjust the seasoning before adding the cheese.
Step 6: Add the Cheese
Turn the heat to low or remove the saucepan from the burner. Add the grated cheese and stir until completely melted.
Cheddar gives the sauce a stronger flavor, while mozzarella creates a mild and stretchy texture. A combination of both gives you a balanced result.
Do not boil the sauce after adding the cheese because high heat can make the sauce greasy or grainy.
Step 7: Combine the Vegetables and Sauce
Add the cooked vegetables to the cheese sauce.
Gently stir until the broccoli, cauliflower, carrots, green beans, and corn are evenly coated.
Keep the mixture over low heat for about 2 minutes so the vegetables absorb some of the creamy flavor.
Step 8: Garnish and Serve
Transfer the finished dish to a serving bowl.
Top it with fresh chopped parsley, chili flakes, or a little extra shredded cheese.
Serve the dish immediately while the sauce is warm and creamy.
Tips for the Best Creamy Cheese Veggies
Choose fresh vegetables that are firm and brightly colored for the best texture. Frozen vegetables can also work when fresh produce is not available.
Cut larger vegetables into smaller pieces so every bite cooks at the same rate.
Drain the vegetables thoroughly before adding them to the sauce because excess water can thin the cheese mixture.
Use freshly grated cheese when possible because it melts more smoothly than many pre-shredded varieties.
Keep the heat low after adding cheese to help maintain a silky sauce.
If the sauce becomes too thick, add a small splash of warm milk and stir until it reaches the desired consistency.
For extra flavor, add a small amount of Dijon mustard, Italian seasoning, or freshly minced garlic.
Serving Ideas
Creamy Cheese Veggies works well as a side dish for many everyday meals.
Serve it alongside roasted chicken, grilled chicken, baked salmon, steak, or turkey for a complete dinner.
For a simple meatless meal, spoon the vegetables over cooked rice or pasta. Crusty bread is also useful for soaking up the extra cheese sauce.
The recipe can also fit nicely on a holiday dinner table beside roasted meats, mashed potatoes, and other vegetable sides.
Make It a Baked Vegetable Casserole
You can turn this creamy vegetable dish into a simple baked casserole.
Transfer the prepared vegetables and sauce to a lightly greased baking dish. Sprinkle extra shredded cheese over the top.
Place the dish under a broiler until the cheese becomes golden and bubbly.
Watch it closely because the cheese can brown quickly under high heat.
Easy Ingredient Swaps
You can change the vegetables based on what you have available.
Try adding zucchini, bell peppers, mushrooms, spinach, peas, or asparagus for different flavors and textures.
For a stronger cheese flavor, use sharp cheddar. For a milder taste, use mozzarella or Monterey Jack.
To make a lower-carb version, leave out the carrots and sweet corn and use more low-carb vegetables such as broccoli, cauliflower, mushrooms, or zucchini.
For a vegetarian meal, serve the vegetables with pasta, rice, quinoa, or baked potatoes.
How to Store and Reheat
Allow leftovers to cool before transferring them to an airtight container.
Store the dish in the refrigerator for up to 2 days.
Reheat it gently in a saucepan over low heat. Add a small splash of milk while stirring to loosen the sauce and restore its creamy texture.
Avoid very high heat because it can cause the cheese sauce to separate.
Prep and Cook Time
- Prep Time: 10 minutes
- Cook Time: 15 minutes
- Total Time: 25 minutes
- Serving: Approximately 4 servings
Nutrition Information
Approximate nutrition per 1-cup serving:
- Calories: 240 kcal
- Protein: 9 g
- Carbohydrates: 18 g
- Fat: 15 g
- Saturated Fat: 9 g
- Fiber: 4 g
- Calcium: 200 mg
- Sugar: 5 g
Nutrition values are estimates and can change based on the specific cheese, milk, butter, cream, and vegetable brands used.
Frequently Asked Questions
Can I make Creamy Cheese Veggies vegan?
Yes. Replace butter with plant-based butter, use unsweetened plant milk, and choose vegan cheese for a dairy-free version.
What vegetables can I use instead?
Zucchini, mushrooms, bell peppers, spinach, peas, and asparagus can replace or supplement the vegetables in this recipe.
Can I use frozen vegetables?
Yes. Frozen vegetables are convenient, but cook them just until tender and drain them well before adding them to the cheese sauce.
Can I make this recipe ahead of time?
Yes. Prepare the dish ahead, refrigerate it, and gently reheat it with a small splash of milk before serving.
Is this recipe keto-friendly?
The original recipe is not strictly keto because flour, milk, carrots, and corn add carbohydrates; omit those higher-carb ingredients for a lower-carb version.
What cheese works best for the sauce?
Cheddar provides a rich flavor, while mozzarella gives a mild and creamy texture; using a blend gives a balanced result.
Can I bake this vegetable dish?
Yes. Place the prepared vegetables in a baking dish, cover with extra cheese, and broil until the top is golden and bubbly.
How do I prevent the cheese sauce from becoming lumpy?
Add warm milk slowly while whisking the flour and butter mixture, then keep the heat moderate and stir the sauce continuously.
Chicken Salad with Grapes and Pecans Recipe
This Chicken Salad with Grapes and Pecans Recipe combines tender chicken, juicy grapes, crisp celery, and toasted pecans in a creamy, lightly tangy dressing. The mix of sweet, savory, and crunchy textures makes it a great choice for lunch, picnics, meal prep, or an easy family meal.
You can serve this creamy chicken salad in lettuce cups, croissants, wraps, or on toasted bread. It also works well as a quick no-cook meal when you use leftover or rotisserie chicken.
Why You’ll Love This Chicken Salad
This recipe is simple, flexible, and easy to prepare with everyday ingredients.
- Sweet and savory flavor: Grapes add natural sweetness while Dijon mustard and lemon juice add a mild tang.
- Great texture: Celery and toasted pecans provide a fresh crunch against the tender chicken.
- Quick preparation: Cooked chicken makes this recipe ready in about 15 minutes.
- Easy to customize: You can add apples, dried cranberries, fresh herbs, or curry powder.
- Meal-prep friendly: Store the finished salad in the refrigerator and enjoy it for up to 3 days.
- Multiple serving options: Serve it over greens, in lettuce cups, inside croissants, or as a sandwich filling.
Ingredients You’ll Need For:
Chicken Salad
- 2 cups cooked chicken breast, shredded or cut into bite-sized cubes
- 1 cup red or green grapes, halved
- 1/2 cup celery, finely chopped
- 1/2 cup pecans, toasted and roughly chopped
- 2 tablespoons red onion, finely diced, optional
- Lettuce leaves, croissants, wraps, or bread for serving
Creamy Dressing
- 1/2 cup mayonnaise
- 1 tablespoon Dijon mustard
- 1 teaspoon honey or maple syrup, optional
- 1 teaspoon fresh lemon juice or apple cider vinegar
- Salt, to taste
- Freshly ground black pepper, to taste
For a lighter dressing, replace half of the mayonnaise with plain Greek yogurt. This keeps the salad creamy while reducing some of the fat and calories.
How to Make Chicken Salad with Grapes and Pecans
Step 1: Cook the Chicken
If you are starting with raw chicken, poach or bake the chicken breasts until they reach an internal temperature of 165°F (74°C). Let the chicken cool completely before shredding or cutting it.
For a faster option, use leftover cooked chicken or skinless rotisserie chicken. Remove the skin and bones, then shred or cube the meat into small pieces.
Step 2: Toast the Pecans
Place the pecans in a dry skillet over medium heat. Toast them for about 2–3 minutes, stirring often so they do not burn.
Remove the pecans from the skillet as soon as they smell fragrant. Let them cool before roughly chopping them.
Toasted pecans add a deeper nutty flavor and a crisp texture to the finished salad.
Step 3: Prepare the Dressing
Add mayonnaise, Dijon mustard, lemon juice or apple cider vinegar, and honey or maple syrup to a small bowl.
Whisk until the dressing is smooth and evenly combined. Season with salt and freshly ground black pepper.
Taste the dressing before adding it to the salad. Add a little more lemon juice for brightness or a small amount of honey for extra sweetness.
Step 4: Combine the Ingredients
Place the cooked chicken, halved grapes, chopped celery, toasted pecans, and diced red onion in a large mixing bowl.
Pour the dressing over the ingredients. Use a large spoon or spatula to gently mix everything until evenly coated.
Avoid overmixing because it can crush the grapes and make the salad less appealing.
Step 5: Chill the Salad
Cover the bowl and refrigerate the chicken salad for at least 30 minutes.
Chilling gives the dressing time to blend with the chicken, grapes, celery, and pecans. The salad can also be prepared several hours ahead for lunch, gatherings, or picnics.
Step 6: Serve
Spoon the chilled salad into lettuce leaves for a lighter option. For a classic lunch, serve it inside a buttery croissant or between slices of toasted bread.
You can also place it inside a tortilla wrap or serve it over a bed of mixed greens. For a simple low-carb option, enjoy the salad on its own with fresh vegetables.
Tips for the Best Chicken Salad
Use fully cooled chicken before mixing it with the dressing. Warm chicken can make the mayonnaise-based mixture loose and less creamy.
Choose firm, seedless grapes and cut them in half so each bite has a balanced amount of fruit. Red grapes provide a slightly sweeter flavor, while green grapes give the salad a brighter, tangier taste.
Toast the pecans just until fragrant. Over-toasting can make them bitter and overpower the other ingredients.
For a lighter chicken salad, use half mayonnaise and half plain Greek yogurt. You can also reduce the amount of pecans or serve the salad in lettuce cups instead of bread.
If you prefer more texture, add finely diced apples or a small amount of dried cranberries. Fresh parsley or dill can add a bright herbal note without changing the basic recipe.
Make-Ahead and Storage
This recipe is convenient for meal prep because it can be prepared ahead of time. Keep the finished salad in an airtight container in the refrigerator and use it within 3 days.
For the best texture, add extra toasted pecans just before serving if you plan to store the salad overnight. The nuts can soften slightly after sitting in the creamy dressing.
Freezing is not recommended. Mayonnaise-based dressing can separate after thawing, while grapes may lose their firm texture and become watery.
Serving Ideas
There are several easy ways to turn this salad into a complete lunch.
- Croissant sandwich: Fill a fresh croissant with the chilled chicken mixture.
- Lettuce cups: Spoon the salad into crisp lettuce leaves for a lighter serving.
- Wrap: Add the chicken salad to a flour tortilla with leafy greens.
- Open-faced toast: Spread the mixture over toasted whole-grain bread.
- Green salad: Serve a scoop over mixed greens for a fresh lunch.
- Snack plate: Pair a small serving with sliced cucumbers, carrots, and crackers.
Nutrition Information
The approximate nutrition per serving is based on the mayonnaise-based version and a four-serving yield.
- Calories: 380 kcal
- Protein: 26 g
- Carbohydrates: 11 g
- Sugars: 8 g
- Fat: 26 g
- Saturated Fat: 3.5 g
- Fiber: 2 g
- Sodium: 400 mg
Nutrition values can vary depending on the chicken, mayonnaise, pecans, grapes, and serving size used.
Frequently Asked Questions
Can I use rotisserie chicken for this recipe?
Yes. Remove the skin and bones from a rotisserie chicken, then shred or cube the meat before adding it to the salad.
What can I use instead of mayonnaise?
Plain Greek yogurt, sour cream, or a mixture of Greek yogurt and mayonnaise can replace some or all of the mayonnaise.
Can I make chicken salad ahead of time?
Yes. Refrigerate it in an airtight container for up to 3 days, and chill it for at least 30 minutes before serving for the best flavor.
Can I freeze chicken salad with grapes?
Freezing is not recommended because the mayonnaise may separate and the grapes can become soft and watery after thawing.
What grapes work best in chicken salad?
Seedless red or green grapes both work well; red grapes add more sweetness, while green grapes provide a slightly sharper flavor.
Can I add apples to chicken salad?
Yes. Diced crisp apples add extra sweetness and crunch and pair especially well with the pecans and creamy dressing.
How can I make this chicken salad healthier?
Use Greek yogurt for part of the mayonnaise, reduce the pecans if needed, and serve the salad in lettuce cups instead of bread.
What is the best way to serve this chicken salad?
Serve it chilled in lettuce cups, croissants, wraps, toasted bread, or over mixed greens for a simple lunch.