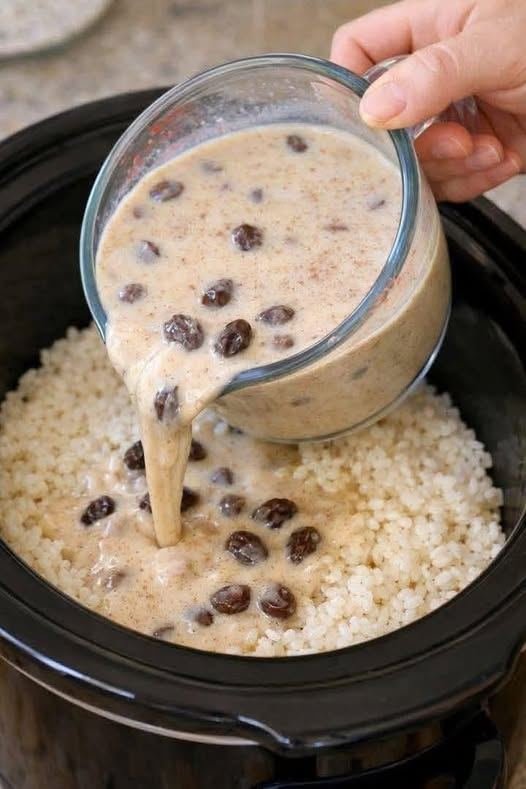
Creamy Raisin Rice Pudding (Slow Cooker Style)

Creamy Raisin Rice Pudding (Slow Cooker Style)

Description

This rich and comforting Creamy Raisin Rice Pudding is a classic dessert made with tender rice, warm cinnamon, sweet plump raisins, and a velvety milk custard. Slow-cooked to perfection, it develops a creamy texture with deep, cozy flavors. Perfect as a dessert or sweet breakfast treat.

 Ingredients

  • 1 cup uncooked white rice (or 3 cups cooked rice)

  • 2 cups water (if cooking rice first)

  • 4 cups whole milk

  • 1 cup heavy cream (optional for extra richness)

  • ¾ cup granulated sugar

  • 1 cup raisins

  • 2 large eggs (room temperature)

  • 2 teaspoons vanilla extract

  • 1 teaspoon ground cinnamon

  • ¼ teaspoon salt

  • 1 tablespoon butter

Instructions

Step 1: Cook the Rice

  • If using uncooked rice, cook with 2 cups water until tender (about 15 minutes).

  • Fluff and set aside.

Step 2: Prepare the Custard Mixture

  • In a bowl, whisk together milk, cream, sugar, eggs, vanilla, cinnamon, and salt.

Step 3: Combine in Slow Cooker

  • Add cooked rice and raisins to the slow cooker.

  • Pour custard mixture over rice.

  • Stir gently to combine.

  • Add butter on top.

Step 4: Cook

  • Cook on LOW for 2–3 hours, stirring once or twice, until thick and creamy.

  • It will thicken more as it cools.

Step 5: Serve

  • Serve warm for comfort or chilled for a firmer texture.

  • Sprinkle extra cinnamon on top if desired.

 Tips for Best Results

✔ Use whole milk for creaminess (low-fat works but less rich).
✔ Soak raisins in warm water for 10 minutes to make them extra plump.
✔ Stir gently to avoid breaking the rice grains.
✔ If too thick, add a splash of warm milk before serving.
✔ Add nutmeg for deeper flavor.

 Servings

Serves: 6–8 portions

Nutritional Information (Approx. per serving)

  • Calories: 320–380 kcal

  • Carbohydrates: 55g

  • Protein: 8g

  • Fat: 12g

  • Saturated Fat: 7g

  • Fiber: 2g

  • Sugar: 28g

(Values vary depending on ingredients used.)

Benefits

  • Provides energy from carbohydrates

  • Contains calcium from milk

  • Raisins add natural sweetness and antioxidants

  • Comfort food that supports satiety

Frequently Asked Questions

Q: Can I use brown rice?
Yes, but it will require longer cooking and slightly more liquid.

Q: Can I make this dairy-free?
Yes. Substitute almond milk or coconut milk and use dairy-free butter.

Q: How long does it last?
Store in an airtight container in the refrigerator for up to 4 days.

Q: Can I freeze rice pudding?
It can be frozen, but texture may change slightly. Stir well after thawing.

Q: Can I make it without eggs?
Yes, simply omit eggs; the pudding will be less custard-like but still creamy.
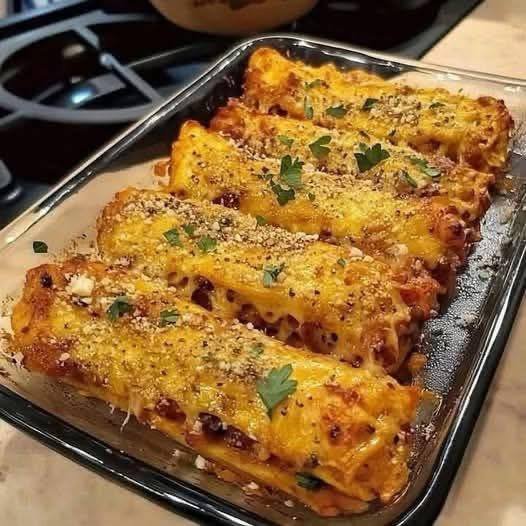
3-Ingredient Flourless Cheesy Chicken Roll-Ups

3-Ingredient Flourless Cheesy Chicken Roll-Ups

Prep time: 10 minutes | Bake time: 20 minutes | Servings: 3–4

Ingredients

  • 12–15 slices of thin-cut Deli Chicken Breast (This acts as your “flourless” wrap).

  • 2 cups shredded Mozzarella or Cheddar cheese (plus extra for the top).

  • 1 cup Sugar-free Marinara or Mild Salsa.

  • Optional: Fresh parsley or red pepper flakes for garnish (as seen in your photo).


Instructions

  1. Preheat and Prep: Preheat your oven to 400°F (200°C). Lightly grease a glass baking dish with a small amount of olive oil or cooking spray.

  2. Assemble the Rolls: Take one slice of chicken breast and place a generous tablespoon of shredded cheese at one end.

  3. Roll it Up: Carefully roll the chicken slice tightly around the cheese. Place it seam-side down in the baking dish so it doesn’t unroll. Repeat until the dish is full.

  4. Top it Off: Pour your marinara or salsa evenly over the center of the chicken rolls. Sprinkle the remaining shredded cheese over the top.

  5. Bake: Place in the oven for 15–20 minutes, or until the cheese is bubbling and starting to turn golden brown.

  6. Serve: Let it cool for 5 minutes. Garnish with fresh parsley if desired.


Why This Recipe Works

  • High Protein: Using lean chicken as the “wrapper” provides a significant protein boost compared to traditional pasta or flour tortillas.

  • Low Carb: By eliminating flour and sugar-heavy sauces, this dish is very keto-friendly and helpful for those managing blood sugar levels.

  • Versatile: You can easily add baby spinach or thinly sliced bell peppers inside the rolls for extra nutrients.

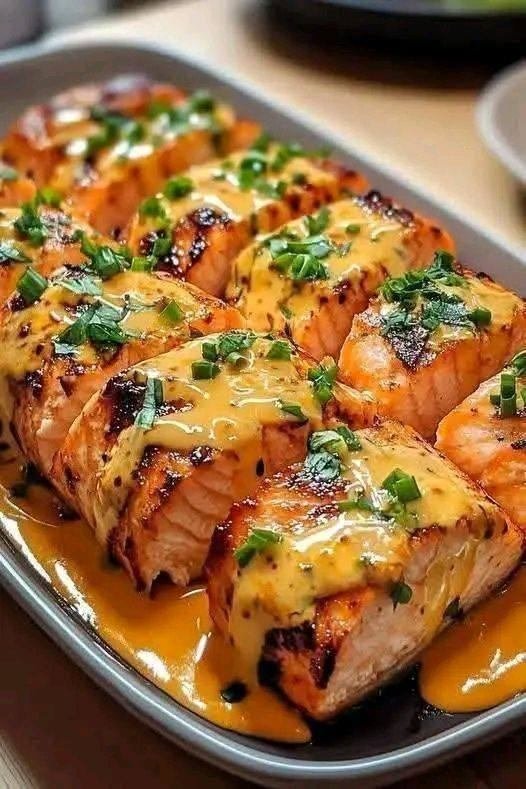
15-Minute Bang Bang Salmon

15-Minute Bang Bang Salmon

Prep time: 5 minutes | Cook time: 10 minutes | Servings: 4

Ingredients

For the Salmon:

  • 4 salmon fillets (6 oz each): Skin-on or skinless, depending on your preference.

  • 2 tablespoons olive oil: To achieve a perfect sear.

  • 1 teaspoon salt

  • 1/2 teaspoon black pepper

  • 1 tablespoon garlic powder

  • 1 teaspoon paprika: For color and a subtle smoky flavor.

For the Bang Bang Sauce:

  • 1/2 cup mayonnaise: The creamy base for the sauce.

  • 1/4 cup Thai sweet chili sauce: For sweetness and a mild kick.

  • 1-2 teaspoons Sriracha: Adjust this based on your preferred heat level.

  • 1 tablespoon honey: Adds a touch of extra sweetness.

For Garnish:

  • Chopped green onions or parsley: For a fresh finish.


Detailed Directions

1. Season the Salmon

  • Pat the salmon fillets dry with a paper towel. This ensures the seasoning sticks and helps create a better crust.

  • In a small bowl, mix the salt, black pepper, garlic powder, and paprika.

  • Rub the olive oil over the fillets, then generously coat both sides with the spice mixture.

2. Prepare the Sauce

  • While the salmon sits for a moment, whisk together the mayonnaise, sweet chili sauce, Sriracha, and honey in a small bowl until smooth.

  • Set aside about 1/4 of the sauce to use as a fresh drizzle after cooking.

3. Sear the Salmon

  • Heat a large non-stick skillet over medium-high heat.

  • Place the salmon fillets in the pan (skin-side down first if using skin-on). Cook for 4–5 minutes until the bottom is crispy and golden.

  • Carefully flip the fillets. Brush a generous layer of the Bang Bang sauce over the cooked side of the salmon.

  • Cook for another 3–4 minutes until the salmon is opaque throughout and flakes easily with a fork.

4. Finish and Serve

  • Remove the salmon from the heat.

  • Drizzle the remaining fresh sauce over the fillets and garnish with chopped green onions or parsley.


Serving Suggestions

  • Over Rice: Serve these fillets over a bed of jasmine rice or quinoa to soak up the extra sauce.

  • With Greens: Pair with steamed broccoli, roasted asparagus, or a crisp cucumber salad for a balanced meal.

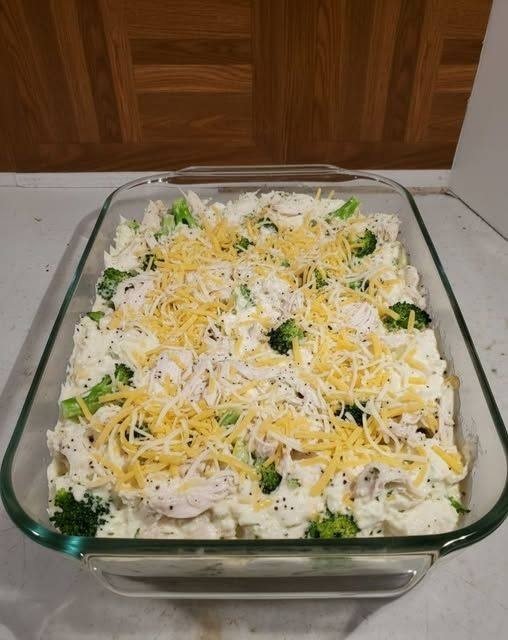
Cheesy Chicken Broccoli Protein Bake

Cheesy Chicken Broccoli Protein Bake

A comforting, one-dish meal that is high in protein and perfectly seasoned.

  • Prep time: 10 minutes

  • Bake time: 20–25 minutes

  • Servings: 4

Nutritional Profile (Per Serving)

  • Calories: 260

  • Protein: 38g

  • Net Carbs: 6g

  • Fat: 8g


Ingredients

  • 2 cups cooked chicken breast, shredded

  • 2 cups broccoli florets, steamed until tender-crisp

  • 1 cup low-fat cottage cheese (blended until completely smooth)

  • ½ cup plain Greek yogurt

  • ½ cup shredded cheddar cheese

  • ¼ cup grated Parmesan cheese

  • 1 tsp garlic powder

  • 1 tsp onion powder

  • Salt and black pepper to taste


Detailed Directions

  1. Preparation: Preheat your oven to 375°F (190°C). Lightly grease an 8×8-inch or similar-sized baking dish with non-stick spray or a touch of olive oil.

  2. Create the Creamy Base: If you haven’t already, place the cottage cheese in a blender or food processor and pulse until it reaches a smooth, sour cream-like consistency.

  3. Mix: In a large mixing bowl, combine the shredded chicken, steamed broccoli, blended cottage cheese, and Greek yogurt.

  4. Season: Stir in the garlic powder, onion powder, salt, and pepper. Ensure the chicken and broccoli are thoroughly coated in the creamy sauce.

  5. Assemble: Transfer the mixture into your prepared baking dish, spreading it out into an even layer.

  6. Top with Cheese: Sprinkle the shredded cheddar and grated Parmesan evenly over the top.

  7. Bake: Place in the oven and bake for 20–25 minutes. The edges should be bubbling, and the cheese on top should be melted and starting to turn golden brown.

  8. Serve: Let the dish stand for 5 minutes before serving to allow the sauce to set slightly.


Success Tips

  • Chicken Shortcuts: You can use a rotisserie chicken to save time; just remove the skin to keep the fat content lower.

  • Broccoli Texture: To avoid a watery bake, ensure your steamed broccoli is well-drained and patted dry before adding it to the mixture.

  • Meal Prep: This dish reheats beautifully in the microwave or oven, making it an excellent option for healthy lunches throughout the week.

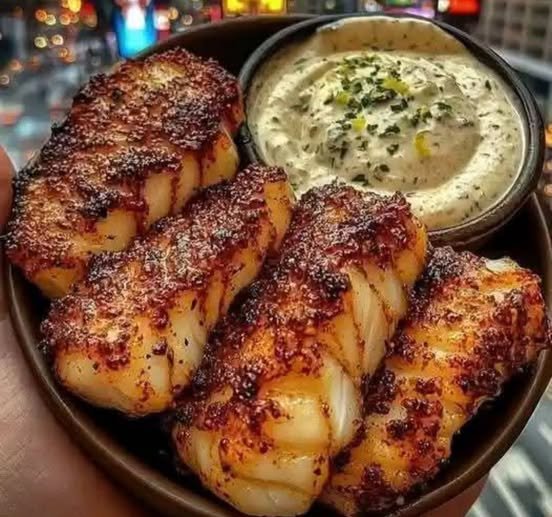
Perfectly Seared High-Protein Cod Bites

Perfectly Seared High-Protein Cod Bites

Prep time: 10 mins | Cook time: 8 mins | Servings: 2

Ingredients

The Fish:

  • 1 lb (450g) Cod Fillets (from ALDI, cut into thick bite-sized chunks)

  • 1 tbsp Olive Oil or Avocado Oil (for high-heat searing)

  • 1 tbsp Grass-fed Butter (optional, for finishing)

The “High Protein” Dry Rub:

  • 1 tsp Smoked Paprika (for that deep red color)

  • 1/2 tsp Garlic Powder

  • 1/2 tsp Onion Powder

  • 1/4 tsp Cayenne Pepper (optional, for heat)

  • 1/2 tsp Sea Salt & Black Pepper

The Protein Dipping Sauce:

  • 1/2 cup Non-fat Greek Yogurt (The high-protein secret!)

  • 1 tbsp Fresh Dill or Parsley, finely chopped

  • 1 tsp Lemon Juice

  • 1/2 tsp Garlic Salt


Instructions

  1. Prep the Fish: Pat the cod fillets extremely dry with paper towels. This is the secret to getting that dark, crispy crust shown in your photo. Cut them into thick, uniform chunks.

  2. Season: In a small bowl, mix the paprika, garlic powder, onion powder, cayenne, salt, and pepper. Dredge the cod pieces in the seasoning until they are heavily coated on all sides.

  3. The Sear: Heat a cast-iron or non-stick skillet over medium-high heat with the oil. Once the pan is shimmering hot, add the cod.

  4. Don’t Touch: Let them sear undisturbed for 3-4 minutes until a dark crust forms. Flip gently and cook for another 2-3 minutes. If using butter, toss it in during the last minute and baste the fish.

  5. Mix the Dip: While the fish rests for 60 seconds, whisk together the Greek yogurt, herbs, lemon juice, and garlic salt.

  6. Serve: Plate the cod bites hot with the cool yogurt dip on the side.


Why this works for your goals:

  • Cod is roughly 18-20g of protein per 100g with almost zero fat.

  • Greek Yogurt replaces mayo or tartar sauce, adding another 10-12g of protein to the meal while keeping calories low.

2 points Pesto Chicken Salad

If you’re looking for a flavorful, low-point meal that’s perfect for lunch, dinner, or meal prep, this Pesto Chicken Salad is your answer. Packed with protein, creamy goodness, and a zesty pesto twist, it’s a versatile dish that keeps you satisfied without breaking your Weight Watchers point budget.

This recipe uses simple, wholesome ingredients and swaps traditional heavy ingredients with lighter alternatives to bring you a flavorful, healthy salad. With only 2 SmartPoints per serving, this dish is a game-changer for those aiming to maintain a healthy lifestyle.


Ingredients

Serves 4

Discover more
flour
egg
Garlic

Salad Ingredients:

  • 2 cups cooked chicken breast, shredded or cubed
  • 1 cup cherry tomatoes, halved
  • 1/2 cup cucumber, diced
  • 1/4 cup red onion, finely diced
  • 2 cups mixed greens (arugula, spinach, or your favorite mix)

Pesto Dressing:

  • 1/4 cup plain non-fat Greek yogurt
  • 2 tbsp light mayonnaise
  • 2 tbsp prepared pesto sauce (low-fat or homemade if available)
  • 1 tbsp fresh lemon juice
  • 1 tbsp grated Parmesan cheese
  • 1/8 tsp salt
  • 1/8 tsp black pepper

Optional Garnishes:

  • 1 tbsp pine nuts, toasted (optional, adds 1 point per serving)
  • Fresh basil leaves, for garnish

Instructions

Discover more
Stevia
Bacon
Weight Watchers

Step 1: Prep the Ingredients

  1. Shred or dice your cooked chicken breast. Leftovers or rotisserie chicken work great for convenience.
  2. Wash and chop the vegetables (tomatoes, cucumber, and red onion).

Step 2: Make the Pesto Dressing

  1. In a small mixing bowl, whisk together the Greek yogurt, light mayonnaise, and pesto sauce.
  2. Add the lemon juice, Parmesan cheese, salt, and pepper, then stir until smooth.

Step 3: Assemble the Salad

Discover more
Peanut butter
Vegetable
Soup

  1. In a large mixing bowl, combine the chicken, cherry tomatoes, cucumber, and red onion.
  2. Add the pesto dressing to the bowl and toss everything until evenly coated.

Step 4: Serve Over Greens

  1. Place a portion of mixed greens on each plate or in meal prep containers.
  2. Top with the pesto chicken mixture.

Step 5: Garnish (Optional)

  1. Sprinkle with toasted pine nuts and fresh basil for an added burst of flavor and texture.

Weight Watchers SmartPoints

  • Base Salad: 2 SmartPoints per serving.
  • With Pine Nuts: Add 1 additional point per serving.

Nutritional Information (Per Serving)

  • Calories: 180
  • Protein: 28g
  • Fat: 6 g
  • Carbohydrates: 5 g
  • Fiber: 1 g
  •  Sugar: 2g

Why You’ll Love This Recipe

  1. Low in Points: At just 2 points per serving, this salad is Weight Watchers-friendly while being satisfying and full of flavor.
  2. High in Protein: Chicken breast ensures you stay full longer.
  3. Customizable: Add or swap veggies, adjust the spice level, or substitute with turkey if desired.
  4. Quick and Easy: Perfect for a busy day or quick meal prep.
  5. Meal Prep Champion: Make a big batch and enjoy throughout the week!

Tips for Success

  1. Choose Lean Protein: Stick to chicken breast for the lowest points.
  2. Lighten the Pesto: Use a low-fat pesto or make your own with fresh basil, garlic, lemon juice, and just a touch of olive oil.
  3. Don’t Skip the Yogurt: Greek yogurt adds creaminess without unnecessary fat.
  4. Fresh is Best: Use fresh vegetables and herbs for maximum flavor.

Serving Suggestions

  1. As a Sandwich: Serve the pesto chicken salad on a low-point whole wheat wrap or sandwich thin.
  2. On Crackers: Use whole-grain crackers for a snack or appetizer.
  3. Stuffed Veggies: Fill bell pepper halves or zucchini boats for a fun and healthy presentation.
  4. Meal Prep: Pack portions in containers with a side of mixed greens for a grab-and-go lunch.

Storage Instructions

  • Refrigeration: Store the chicken salad in an airtight container in the refrigerator for up to 4 days.
  • Do Not Freeze: The yogurt-based dressing may separate or become watery if frozen.

Flavor Variations

  1. Spicy Kick: Add a pinch of red pepper flakes or a dash of hot sauce to the dressing.
  2. Mediterranean Twist: Add chopped olives and feta cheese (adjust points accordingly).
  3. Nut-Free Version: Skip the pine nuts and add roasted sunflower seeds instead.
  4. Dairy-Free Option: Use dairy-free yogurt and omit Parmesan cheese for a dairy-free salad.

Conclusion

This WW 2-Point Pesto Chicken Salad proves that healthy eating doesn’t have to be boring. With its creamy pesto dressing, fresh vegetables, and tender chicken, it’s a delightful balance of flavors and textures. Perfect for lunch, dinner, or as part of your weekly meal prep, this recipe is sure to become a staple in your Weight Watchers journey. Try it today and enjoy a guilt-free, delicious meal!