Savory Golden Rounds


Savory Golden Rounds

Prep time: 10 mins | Bake time: 15–20 mins | Yields: 6–8 rounds

Ingredients

  • 3 large Eggs (separated into whites and yolks)

  • 3 tbsp Cream cheese (softened to room temperature)

  • 1/4 tsp Cream of tartar (this provides the essential lift and structure)

  • 1/2 tsp Garlic powder

  • A pinch of sea salt

  • Optional: 1 tbsp melted butter and a sprinkle of fresh parsley for a bakery-style finish.


Step-by-Step Instructions

  1. Preparation: Preheat your oven to 300°F (150°C). Line a large baking sheet with parchment paper. This step is vital because the batter is delicate and requires a non-stick surface to rise and release perfectly.

  2. Mix the Savory Base: In a medium bowl, whisk together the egg yolks, softened cream cheese, garlic powder, and salt. Continue whisking until the mixture is silky smooth with no visible lumps of cheese.

  3. Whip the Whites: In a separate, scrupulously clean glass or metal bowl, combine the egg whites and the cream of tartar. Using a hand mixer on high speed, whip the whites until stiff peaks form. They are ready when the foam stands straight up and doesn’t move when you tilt the bowl.

  4. The Gentle Fold: Carefully fold the egg yolk mixture into the whipped whites using a spatula. Use a slow “under-and-over” motion. Do not stir or whisk, as the goal is to keep the air bubbles intact so the rounds stay fluffy.

  5. Form the Rounds: Spoon the mixture onto your prepared baking sheet to form 6 to 8 even circles. You can use the back of the spoon to gently shape them into rounds.

  6. Bake to Perfection: Bake for 15–20 minutes. They are done when they have reached a beautiful golden-brown color and feel firm but springy to the touch.

  7. The Final Touch: While still warm, you can lightly brush the tops with melted butter and a sprinkle of fresh parsley. Allow them to cool for about 5 minutes to let the texture set before serving.


Why You’ll Love This Recipe:

  • Soft & Fluffy: The texture is uniquely light, making it a wonderful base for any meal.

  • Simple Ingredients: Using mainly eggs and cream cheese makes this a satisfying, protein-focused snack.

  • Endless Options: These make excellent “buns” for sandwiches or can be served alongside a bowl of soup.

Golden Cloud Bread Rounds

Golden Cloud Bread Rounds

Prep time: 10 mins | Cook time: 15–20 mins | Yields: 6–8 rounds

Ingredients

  • 3 large Eggs (separated into whites and yolks)

  • 3 tbsp Cream cheese (softened to room temperature)

  • 1/4 tsp Cream of tartar (essential for holding the “cloud” shape)

  • 1/2 tsp Garlic powder or onion powder

  • 1 pinch Sea salt

  • Optional: 1 tbsp melted butter and fresh parsley for brushing on top (as seen in your photo)


Detailed Instructions

  1. Preparation: Preheat your oven to 300°F (150°C). Line a large baking sheet with parchment paper. This is a very delicate batter, so the parchment paper is a must to prevent sticking!

  2. The Egg Yolks: In a medium bowl, whisk together the 3 egg yolks, the softened cream cheese, the garlic powder, and the salt until the mixture is completely smooth and creamy.

  3. The Egg Whites: In a separate, very clean glass or metal bowl, whip the 3 egg whites and the cream of tartar using a hand mixer or stand mixer. Whip on high speed until stiff peaks form (this means when you lift the beaters, the points of the foam stand straight up).

  4. The Folding Process: This is the most important step! Gently fold the yolk mixture into the whipped whites using a spatula. Do not stir. Use a slow “under-and-over” motion so you don’t deflate the air bubbles you just created.

  5. Form the Rounds: Spoon the mixture onto the prepared baking sheet into 6 to 8 even circles. Use the back of the spoon to lightly flatten them into a pancake shape.

  6. Bake: Place in the oven for 15–20 minutes. They are done when the edges are golden brown and the tops feel firm to the touch.

  7. The Finishing Touch: If you want that beautiful golden glow from your photo, brush the warm rounds with a tiny bit of melted butter and a sprinkle of fresh herbs. Let them cool for at least 5 minutes to allow the texture to firm up.


Why this recipe is a keeper:

  • Light & Airy: It has a unique, melt-in-your-mouth texture that is totally different from traditional bread.

  • Perfect for Sandwiches: You can use two rounds to make a gluten-free breakfast sandwich or a mini-burger.

  • Protein-Focused: Since it’s made primarily of eggs and cheese, it’s a very satisfying way to fuel your body.

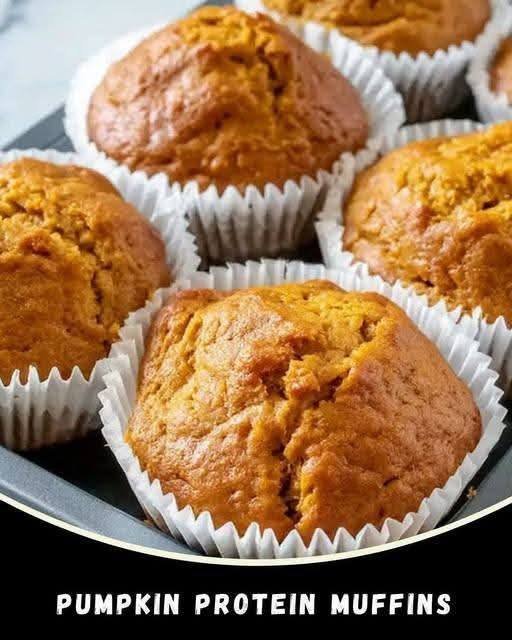
Small-Batch Pumpkin Protein Muffins

Small-Batch Pumpkin Protein Muffins

Prep time: 10 mins | Bake time: 20–23 mins | Yields: 4 Muffins

Ingredients

The Wet Base

  • 1/2 cup Pumpkin purée (ensure it is 100% pure pumpkin, not pie filling)

  • 1/2 cup Low-fat cottage cheese (blended for a smoother texture, or leave as-is for moisture)

  • 1 large Egg

  • 2 tbsp Your preferred sweetener (monk fruit, stevia, or maple syrup)

  • 1 tsp Pure vanilla extract

The Dry Ingredients

  • 1/3 cup Vanilla whey protein powder

  • 1/4 cup Blanched almond flour

  • 1 tsp Baking powder

  • 1 tsp Pumpkin pie spice (or a mix of cinnamon, nutmeg, and ginger)

  • 1 pinch Sea salt

The Topping (Optional)

  • 1 tbsp Chopped pecans or pumpkin seeds


Detailed Instructions

  1. Prep the Oven: Preheat your oven to 350°F (175°C). Line 4 cups of a standard muffin tin with paper liners or lightly grease them with non-stick cooking spray.

  2. Mix the Wet Ingredients: In a medium mixing bowl, whisk together the pumpkin purée, cottage cheese, egg, sweetener, and vanilla extract. Whisk until the mixture is well-combined and bright orange.

    • Pro Tip: If you prefer a completely smooth muffin texture, pulse the wet ingredients in a blender for 30 seconds.

  3. Add the Dry Ingredients: Gradually stir in the vanilla whey protein, almond flour, baking powder, pumpkin spice, and salt. Fold the mixture gently with a spatula until the flour streaks disappear. Avoid over-mixing, as this can make protein-based muffins a bit rubbery.

  4. Fill the Cups: Divide the batter evenly among the 4 prepared muffin cups. They should be filled about 3/4 of the way full to allow for rising.

  5. Add Texture: Sprinkle the chopped pecans on top of each muffin for a satisfying crunch.

  6. Bake: Place in the center rack of the oven and bake for 20–23 minutes. To check for doneness, insert a toothpick into the center; it should come out clean or with just a few dry crumbs.

  7. Cooling: Allow the muffins to cool in the tin for 10 minutes. This is a crucial step for protein muffins, as they “set” while cooling.


Nutritional Profile (Per Muffin)

Calories Protein Carbs Fat
~128 kcal ~12 g ~6 g ~6 g

Storage Tip

Because of the high moisture content from the cottage cheese and pumpkin, these muffins stay incredibly soft. Store them in an airtight container in the refrigerator for up to 5 days, or freeze them for a quick grab-and-go breakfast later!

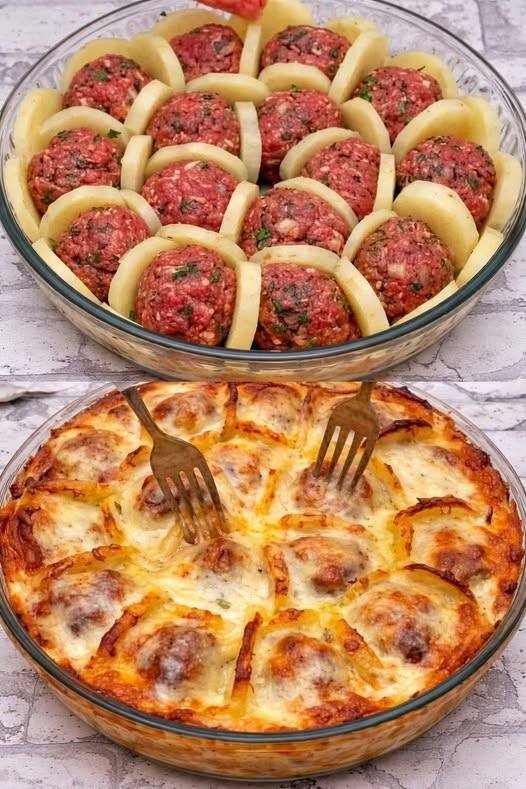
Cheesy Potato & Meatball Bake

Cheesy Potato & Meatball Bake

A hearty, protein-packed French-inspired dish that uses clever layering for a stunning presentation.

Ingredients

The Base & Meatballs:

  • 3 Large Potatoes: Boiled until tender but firm, then sliced.

  • 1 lb Lean Ground Beef or Turkey: (At least 93% lean to stay point-friendly).

  • 1 chopped White Onion: For sweetness and depth.

  • 2 cloves Garlic, minced: A fresh alternative to processed powders.

  • 1/4 cup Fresh Parsley, chopped: For brightness and color.

  • 1 Egg: To bind the meatballs.

  • Salt and Black Pepper: To taste.

The Topping:

  • 1 cup Low-Fat Mozzarella or Light Shredded Cheese: To get that melted, golden finish.

  • Optional: A pinch of nutmeg or paprika for a warm, savory aroma.


Detailed Instructions

1. Prepare the Potatoes

  • Place the whole potatoes in a pot of salted water.

  • Bring to a boil and cook for about 15–20 minutes until they are “al dente” (soft enough to slice, but not falling apart).

  • Drain, let them cool slightly, then peel and slice them into uniform rounds.

2. Mix the Meatballs

  • In a large bowl, combine the ground meat, chopped onion, garlic, parsley, and egg.

  • Season with salt and pepper.

  • Mix by hand until just combined. Roll the mixture into small, even-sized meatballs (roughly the size of a golf ball).

3. Assemble the Dish

  • Preheat your oven to 200°C (400°F).

  • In a round baking dish, begin arranging the potato slices and meatballs.

  • The Technique: Place a potato slice vertically against the edge of the dish, then a meatball, then another potato slice. Repeat this in concentric circles until the dish is full and the meatballs are “cradled” by the potatoes.

4. Bake and Melt

  • Cover the dish with foil and bake for 20 minutes.

  • Remove the foil. Top the entire dish evenly with the shredded cheese.

  • Return to the oven for another 10–15 minutes, or until the meatballs are fully cooked through and the cheese is golden and bubbly.


Serving Suggestion

This dish is quite filling on its own, but it pairs beautifully with a large green salad tossed in a light vinaigrette to keep your points low while adding volume to your meal.

Savory Green Onion & Egg Breakfast Muffins


🍳 Savory Green Onion & Egg Breakfast Muffins

Prep time: 10 minutes | Bake time: 20–25 minutes | Yield: 6 Muffins

Ingredients

  • 6 Large Eggs

  • ¼ cup Milk or heavy cream (for extra fluffiness)

  • ½ cup Green onions (scallions), finely chopped

  • ½ cup Shredded cheese (Cheddar or Mozzarella works great)

  • ¼ tsp Salt and black pepper to taste

  • Optional: Cooked turkey bacon bits or diced bell peppers for extra flavor


Instructions

  1. Preheat and Prep: Preheat your oven to 350°F (175°C). Thoroughly grease a standard 6-slot muffin tin with olive oil or non-stick spray to ensure easy removal.

  2. Layer the Fillings: Divide the chopped green onions and shredded cheese equally into the bottom of the muffin cups. (Adding the solids first ensures they are evenly distributed rather than sinking to the bottom).

  3. Whisk the Base: In a medium bowl or large measuring pitcher, whisk the eggs together with the milk, salt, and pepper until the mixture is frothy and well-combined.

  4. Pour: Carefully pour the egg mixture into each muffin cup, filling them about ¾ of the way to the top.

  5. Bake: Place in the oven and bake for 20 to 25 minutes, or until the muffins are puffed up, golden brown on top, and the centers are set (not jiggly).

  6. Cool and Serve: Let them sit in the pan for 5 minutes before using a butter knife to gently loosen the edges. Serve warm.


Why This Recipe is a Game-Changer

  • Protein-Forward: Eggs provide high-quality protein to keep you full and focused throughout the morning.

  • Meal Prep King: You can make a large batch on Sunday and keep them in the fridge for up to 4 days. Just pop them in the microwave for 30 seconds to reheat.

  • Zero Flour: Naturally gluten-free and low-carb, making them an excellent choice for a variety of nutritional needs.

Golden Garlic & Herb Butter Spread

Golden Garlic & Herb Butter Spread

Description

This rich, creamy butter spread is whipped with fresh herbs, garlic, and a hint of sweetness for balance. It’s soft enough to spread straight from the fridge and melts beautifully over warm bread, vegetables, or meats. Simple ingredients, huge flavor—this is the kind of recipe you pass down.

 Ingredients

  • 1 cup (225 g) unsalted butter, softened

  • 2–3 cloves garlic, finely minced or grated

  • 2 tbsp fresh parsley, finely chopped

  • 1 tbsp fresh chives or green onions, chopped

  • 1 tbsp fresh dill or cilantro (optional but lovely)

  • 1 tbsp olive oil (for extra smoothness)

  • ½ tsp salt (adjust to taste)

  • ¼ tsp black pepper

  • Optional flavor boosts:

    • ½ tsp paprika or chili flakes

    • 1 tsp lemon juice or zest

    • 1 tsp honey (very subtle sweetness)

 Instructions

  1. Place softened butter in a mixing bowl.

  2. Add garlic, herbs, olive oil, salt, and pepper.

  3. Mix with a spoon or hand mixer until fluffy and fully combined.

  4. Taste and adjust seasoning.

  5. Spoon into a jar or shape into a log using parchment paper.

  6. Chill for 30 minutes to firm up—or enjoy immediately.

Tips for Best Results

  • Use room-temperature butter for the creamiest texture

  • Finely chop herbs to avoid chunky bites

  • Roasted garlic = sweeter, milder flavor

  • Add a splash of cream if you want ultra-whipped butter

  • Keeps beautifully in the freezer—slice as needed

 Servings

  • Makes about 1 cup

  • Serves 8–10 as a spread

 Nutritional Info (per tablespoon, approx.)

  • Calories: ~100

  • Fat: 11 g

  • Saturated Fat: 7 g

  • Carbs: 0–1 g

  • Protein: 0 g

  • Sodium: varies by salt used

 Benefits

  • Fresh herbs provide antioxidants

  • Garlic supports heart and immune health

  • Homemade = no preservatives or additives

  • Small amount adds big flavor (less need for excess sauces)

Q & A

Q: Can I use salted butter?
Yes—just reduce or skip added salt.

Q: How long does it last?

  • Fridge: up to 2 weeks

  • Freezer: 3 months

Q: What can I use it on?
Bread, toast, corn, potatoes, pasta, steak, fish, eggs, rice, roasted veggies—anything.

Q: Can I make it vegan?
Absolutely. Use a high-quality plant-based butter.