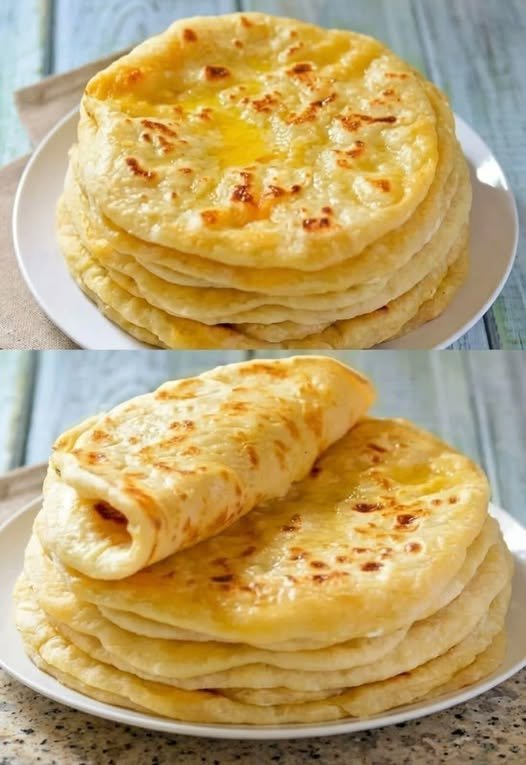
Flour-Free, Zero-Carb Flatbread

Flour-Free, Zero-Carb Flatbread

Description: This Zero-Carb Flatbread is a game-changer for those following a low-carb or ketogenic diet. Made without any flour, it’s both quick to prepare and delicious! You can enjoy this flatbread in many ways, whether rolled, stacked, or paired with your favorite dips or dishes. It’s the perfect guilt-free alternative to regular bread.

Ingredients:

  • 1 cup of shredded mozzarella cheese

  • 2 oz cream cheese

  • 1 large egg

  • 1 tablespoon of almond flour (optional, for texture)

  • 1/2 teaspoon baking powder

  • A pinch of salt (to taste)

  • 1 tablespoon of melted butter or ghee (for cooking)

Instructions:

  1. In a microwave-safe bowl, combine the mozzarella cheese and cream cheese. Microwave for 45 seconds to 1 minute until the cheeses are melted and soft.

  2. Stir the cheese mixture until smooth, then add in the egg, almond flour (optional), baking powder, and salt. Mix everything together until well combined.

  3. Heat a non-stick pan over medium heat and lightly grease with butter or ghee.

  4. Pour the cheese batter into the pan, spreading it out evenly into a flat circle or oval shape.

  5. Cook for 2-3 minutes on each side until golden brown and crispy.

  6. Remove from the pan, and serve while warm! Enjoy it rolled or with your favorite dips.

Notes:

  • If you prefer, you can make these flatbreads in the oven as well. Simply bake at 350°F (175°C) for 8-10 minutes.

  • For extra flavor, you can add garlic powder, herbs, or chili flakes to the mixture before cooking.

  • You can also add a filling like cheese or vegetables in the middle and fold it to make a simple wrap.

Tips:

  • Make sure to stir the cheese mixture well to avoid lumps.

  • Adjust the salt according to your taste preference.

  • You can store leftovers in an airtight container in the fridge for up to 2-3 days. Reheat them in a pan before serving.

Servings: 4-6 servings

Nutritional Info (per serving):

  • Calories: 160

  • Protein: 12g

  • Fat: 12g

  • Carbs: 1g (if using almond flour)

  • Fiber: 0g

  • Sugar: 1g

Benefits:

  • Zero-carb: A perfect bread substitute for those on a keto or low-carb diet.

  • High in protein and healthy fats.

  • Quick to make, satisfying, and versatile for various dishes.

  • Flour-free, making it gluten-free and suitable for those with gluten intolerance.

Q&A:

Q: Can I make this flatbread without almond flour? A: Yes! Almond flour is optional. The bread will still turn out great without it, but adding it may improve the texture.

Q: Can I freeze the flatbread? A: Yes, you can freeze it. After cooking, let the flatbreads cool completely. Wrap them in parchment paper and store them in a freezer bag. Reheat in a pan or microwave when ready to use.
🍓 3-Ingredient Sugar-Free Berry Whip

🍓 3-Ingredient Sugar-Free Berry Whip

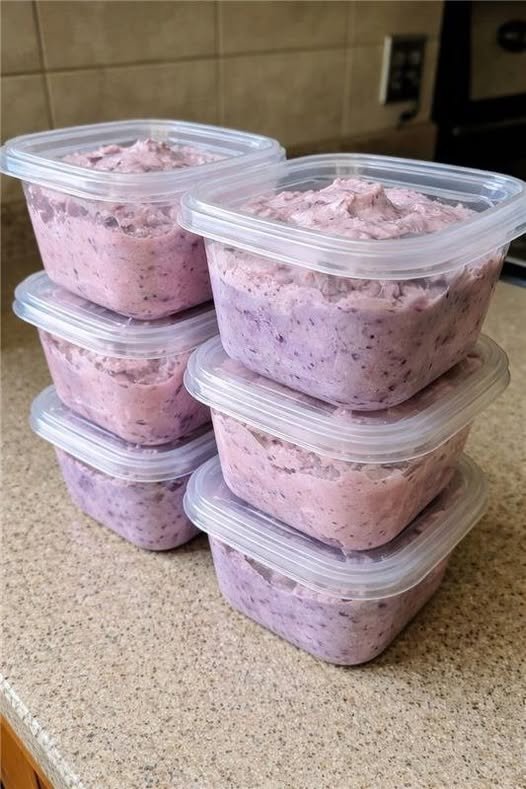
Making a sweet treat at home does not have to be hard. This 3-ingredient sugar-free berry whip is one of the easiest desserts you will ever make. It takes only two minutes from start to finish. There is no baking. There is no cooking. There is no long list of ingredients. All you need is a blender or food processor and three simple items.

The result is a light, creamy, fruity dessert that tastes like a mix between ice cream and mousse.

People love this recipe because it feels like a cheat dessert, but it is actually very healthy. It is sweet without added sugar and creamy without heavy ingredients. It is cold and refreshing, making it perfect for warm days. Kids love the bright color and soft texture, while adults love that it fits into low-carb, keto-style, and weight-loss plans.

This berry whip is perfect:

  • After a workout

  • For evening sugar cravings

  • For quick guests’ dessert

  • For anyone trying to reduce sugar


🧾 Ingredients

You only need three ingredients:

  • 1 cup frozen mixed berries
    (strawberries, blueberries, raspberries, or a mix)

  • ½ cup unsweetened heavy cream or coconut cream

  • 1–2 tablespoons powdered sugar-free sweetener
    (erythritol, stevia, or monk fruit – adjust to taste)


👩‍🍳 Step-by-Step Method

Step 1
Remove berries from the freezer but do not thaw fully. They must stay frozen for a thick, fluffy texture.

Step 2
Place frozen berries into a blender or food processor.

Step 3
Add the heavy cream or coconut cream.

Step 4
Add 1 tablespoon sweetener.

Step 5
Blend. At first it may look crumbly. Stop and scrape sides if needed.

Step 6
Blend again until smooth, thick, and fluffy (about 1–2 minutes).

Step 7
Taste and add more sweetener if needed. Blend again briefly.

Step 8
Scoop into bowls or glasses and serve immediately.


❄ Optional Step (Ice Cream Texture)

For firmer texture:
Freeze for 15–20 minutes before serving.


⭐ Why This Recipe Is Special

  • Naturally sweet from berries

  • Low in carbs when using sugar-free sweetener

  • Keto and low-carb friendly

  • Gluten-free

  • Can be dairy-free with coconut cream

  • Helps reduce sugar cravings

  • Rich in antioxidants and vitamins

The frozen berries create a soft-serve texture, while the cream adds richness without heaviness. It melts in your mouth and feels indulgent while staying light.


💡 Extra Tips for Better Taste

  • Use only frozen fruit

  • Try different berry mixes

  • Add a few drops of vanilla extract

  • Add 1 tablespoon Greek yogurt for protein

  • Top with chia seeds, coconut, or nuts

  • Serve in clear glasses for presentation

  • Freeze into popsicle molds for kids


🧮 Nutrition (Approximate)

Based on heavy cream + 1 tbsp erythritol.

Whole Recipe:

  • Calories: 320

  • Protein: 3 g

  • Fat: 30 g

  • Carbs: 12 g

  • Fiber: 4 g

  • Net Carbs: 8 g

  • Sugar: 6 g

Per Serving (2 servings):

  • Calories: 160

  • Protein: 1.5 g

  • Fat: 15 g

  • Carbs: 6 g

  • Fiber: 2 g

  • Net Carbs: 4 g

  • Sugar: 3 g

(Nutrition varies based on berries and sweetener used.)


⚠ Disclaimer

This recipe is shared for general information and healthy lifestyle ideas. Everyone’s body and health needs are different. Results such as weight loss or blood sugar control may vary. Always consult a healthcare professional if you have medical or dietary concerns.


🥄 Final Thoughts

This 3-ingredient sugar-free berry whip proves that healthy desserts can be simple, fast, and delicious. In just two minutes, you get a creamy, fruity treat that feels indulgent without guilt.

🍲 Crockpot Chicken and Dumplings

🍲 Crockpot Chicken and Dumplings

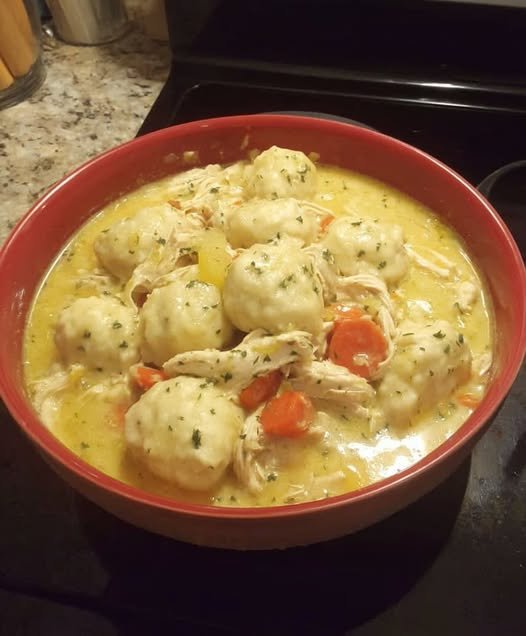
Craving comforting, homemade chicken and dumplings but short on time? This easy slow cooker recipe is the perfect solution. Tender chicken, soft pillowy dumplings, and a rich creamy broth come together for a hearty, family-friendly meal — with only 5 minutes of prep.

The slow cooker does all the work, filling your home with cozy aromas while you go about your day. It tastes like you cooked all afternoon… but it’s our little secret.


🧾 Ingredients

  • 1 medium yellow onion, finely diced

  • 1 (10 oz) can cream of mushroom soup

  • 1 (10 oz) can cheddar cheese soup

  • 2 teaspoons dried thyme

  • ½ teaspoon garlic powder

  • ¼ teaspoon black pepper

  • 3 pounds boneless, skinless chicken thighs, cut into 1-inch pieces

  • 3 cups chicken broth

  • 1 (16 oz) bag frozen mixed vegetables, thawed

  • 1 tube (10 oz) refrigerated flaky biscuit rounds


👩‍🍳 Instructions

  1. Prepare the Slow Cooker
    Spray a 6-quart slow cooker with nonstick spray. Add the diced onion, then place the chicken on top in an even layer.

  2. Make the Sauce
    In a bowl, stir together the cream of mushroom soup, cheddar cheese soup, thyme, garlic powder, and black pepper. Pour over the chicken. Add the chicken broth.

  3. Slow Cook
    Cover and cook on HIGH for 4 hours.

  4. Add Vegetables
    Stir in the thawed frozen vegetables.

  5. Prepare Dumplings
    On a lightly floured surface, roll each biscuit into an oval about ¼-inch thick. Cut each oval into 6 pieces.

  6. Cook Dumplings
    Place biscuit pieces evenly over the chicken mixture. Cover and cook 45–60 minutes, until dumplings are fully cooked.

  7. Shred Chicken
    Remove chicken with a slotted spoon and shred using two forks. Return shredded chicken to the slow cooker and gently stir to combine.


❤️ Why You’ll Love This Recipe

✔ Comfort food made easy
✔ Minimal prep time
✔ Soft, fluffy dumplings
✔ Rich and creamy sauce
✔ Family-friendly


💡 Tips for Best Results

  • Use a 6-quart slow cooker

  • Thaw frozen vegetables before adding

  • Avoid lifting the lid while dumplings cook

  • Dumplings need 60–90 minutes total to cook fully

  • Chicken thighs can be replaced with breasts


🔄 Customization Ideas

Add any of the following for extra flavor:

  • Diced carrots

  • Corn

  • Peas

  • Celery

  • Potatoes

Make it your own!


⭐ Final Thoughts

This Crockpot Chicken and Dumplings recipe gives you all the cozy comfort of a homemade meal with almost no effort. Just dump, cook, and enjoy tender chicken and fluffy dumplings in a creamy, savory broth. It’s the kind of meal that makes everyone ask for seconds.

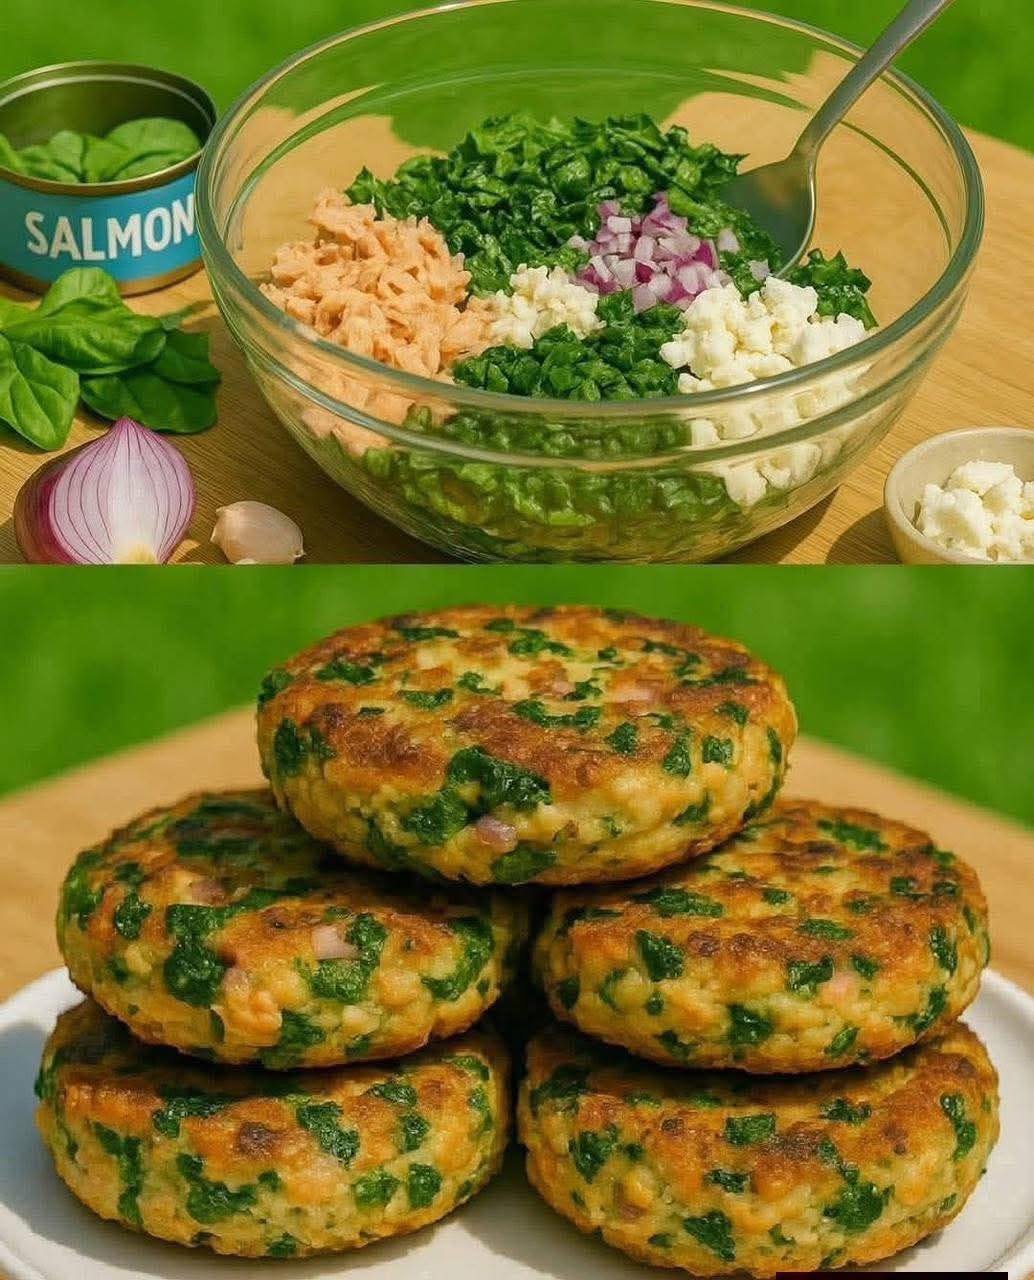
Crispy Mediterranean Salmon & Feta Patties

Crispy Mediterranean Salmon & Feta Patties

A refreshing, nutrient-dense recipe that is as beautiful to look at as it is to eat!


Ingredients

For the Patties:

  • 1 can (14.75 oz) Salmon, drained and flaked (or 2 cups cooked fresh salmon)

  • 2 cloves Garlic, minced

  • ⅓ cup Feta cheese, crumbled

  • 1 cup Fresh spinach, finely chopped

  • ¼ cup Red onion, finely diced

  • 1 Large egg, beaten (to bind the mixture)

  • ½ cup Breadcrumbs (panko or whole wheat)

  • 1 tbsp Fresh dill or parsley, chopped

  • 1 tsp Lemon zest

  • To taste: Salt and black pepper

For Cooking:

  • 2 tbsp Olive oil


Step-by-Step Instructions

  1. Prep the Base: In a large mixing bowl, combine the flaked salmon, minced garlic, crumbled feta, chopped spinach, and diced red onion.

  2. Add the Binders: Stir in the beaten egg, breadcrumbs, fresh herbs, and lemon zest. Season with a small pinch of salt (the feta is already salty!) and black pepper.

  3. Mix Thoroughly: Use a fork or your hands to mix everything together until the ingredients are evenly distributed and the mixture holds its shape when pressed.

  4. Form the Patties: Divide the mixture into 6 equal portions. Roll each into a ball and then gently flatten them into patties about 1-inch thick.

  5. The Chill (Optional): If you have time, place the patties in the refrigerator for 20 minutes. This helps them stay together perfectly during frying.

  6. Sear to Golden Perfection: Heat the olive oil in a large non-stick skillet over medium heat. Carefully place the patties in the pan and cook for 4–5 minutes per side until they are golden brown and crispy on the outside.

  7. Serve: Enjoy these warm with a squeeze of fresh lemon juice or a side of creamy tzatziki sauce.


Why You’ll Love This Recipe

  • Nutrient-Packed: Between the omega-3s in the salmon and the iron in the spinach, this is a powerhouse meal.

  • Flavor Harmony: The saltiness of the feta perfectly balances the brightness of the lemon and fresh herbs.

  • Meal-Prep Friendly: These patties reheat beautifully in an air fryer or oven, making them great for busy weekdays.

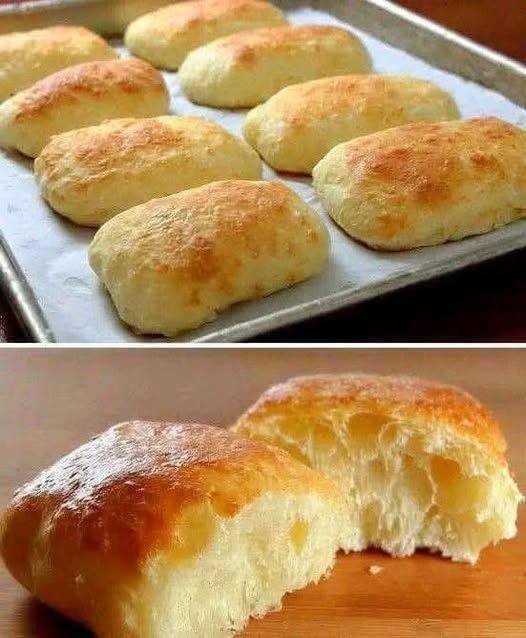
The Easiest “No-Everything” Bread

The Easiest “No-Everything” Bread

Prep time: 10 mins | Rise time: 1.5 – 2 hours | Bake time: 20 mins

Ingredients

  • 3 cups (375g) All-purpose flour or Bread flour

  • 1 ½ cups (355ml) Warm water (not hot!)

  • 1 tsp Active dry yeast

  • 1 tsp Salt

  • 1 tbsp Sugar (to help the yeast activate)

  • 2 tbsp Vegetable oil (optional, for a softer crust)


Step-by-Step Instructions

1. Mix the Dough

In a large bowl, whisk together the warm water, sugar, and yeast. Let it sit for about 5 minutes until it becomes slightly foamy. Add the salt and flour. Stir with a wooden spoon or spatula until a shaggy, sticky dough forms and no dry flour remains.

2. The First Rise

Cover the bowl with a damp cloth or plastic wrap. Let it sit in a warm, draft-free spot for 1.5 to 2 hours, or until the dough has doubled in size and looks bubbly.

3. Shape the Rolls

Don’t knead! Gently deflate the dough by folding it over itself a few times in the bowl. Heavily flour your work surface and your hands. Tip the dough out and divide it into 8 to 10 equal pieces. Gently tuck the edges under to form rectangular or oval rolls (like in your photo).

4. Second Rise

Place the rolls on a baking sheet lined with parchment paper. Cover lightly and let them rest for another 20–30 minutes while you preheat your oven to 200°C (400°F).

5. Bake

If you want a golden shine without eggs or butter, lightly brush the tops with a little water or milk right before baking. Bake for 18–22 minutes until the tops are golden brown and the rolls sound hollow when tapped on the bottom.


Tips for the Best Results

  • Steam is Key: For a professional “bakery” crust, place a small pan of water on the bottom rack of the oven while baking. The steam keeps the bread moist and helps it rise higher.

  • Don’t Over-Flour: The dough is supposed to be sticky! Use just enough flour on your hands to handle it; too much extra flour will make the bread dense.

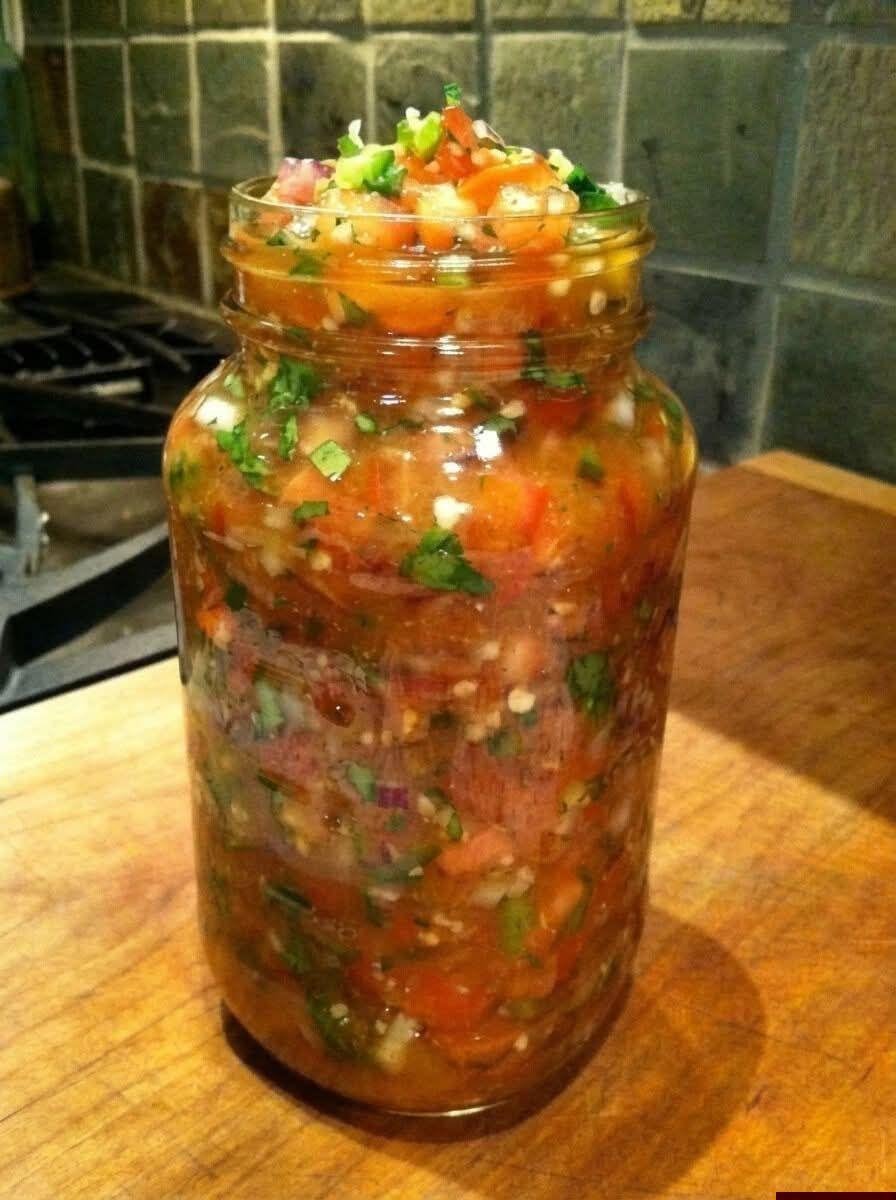
Grandmother’s Classic Garden Fresh Salsa

Grandmother’s Classic Garden Fresh Salsa

  • Prep time: 20 minutes

  • Yields: Approx. 1 quart (32 oz) jar

Ingredients

  • 6–8 Medium Roma Tomatoes: Seeded and finely diced (Roma tomatoes are preferred because they are less watery).

  • 1 Large White or Red Onion: Finely minced.

  • 2–3 Jalapeño Peppers: Finely diced (remove seeds for mild, keep them for heat).

  • 1/2 cup Fresh Cilantro: Chopped.

  • 3 cloves Garlic: Pressed or very finely minced.

  • Juice of 2 Lime: Freshly squeezed.

  • 1 tsp Salt: To taste (coarse sea salt works best).

  • 1/2 tsp Cumin: Optional, for a hint of smoky warmth.

  • 1/4 tsp Sugar: An old family secret to balance the acidity of the tomatoes.


Instructions

  1. Prep the Tomatoes: Chop your tomatoes into uniform small pieces. If they are very juicy, let them sit in a colander for 5 minutes to drain excess liquid before putting them in the jar.

  2. Combine Aromatics: In a large bowl, mix the minced onion, diced peppers, garlic, and cilantro.

  3. Season: Stir in the lime juice, salt, cumin, and sugar. Mix well so the salt begins to draw the flavors out of the aromatics.

  4. The Jarring Process: Gently fold in the diced tomatoes. Transfer the mixture into a clean glass quart jar (like the one shown in the photo).

  5. The “Marriage” Period: While you can eat this immediately, this recipe is famous for a reason—it needs time. Cover the jar and refrigerate for at least 4 hours, though overnight is best. This allows the juices to mingle and the onions to soften.

  6. Serve: Give the jar a good shake or stir before serving with your favorite tortilla chips or over grilled chicken.


A Note for Success

To keep this salsa fresh for as long as possible, always use a clean spoon when scooping from the jar. Because this uses fresh lime juice as a natural preservative, it will stay delicious in the refrigerator for up to 5–7 days.