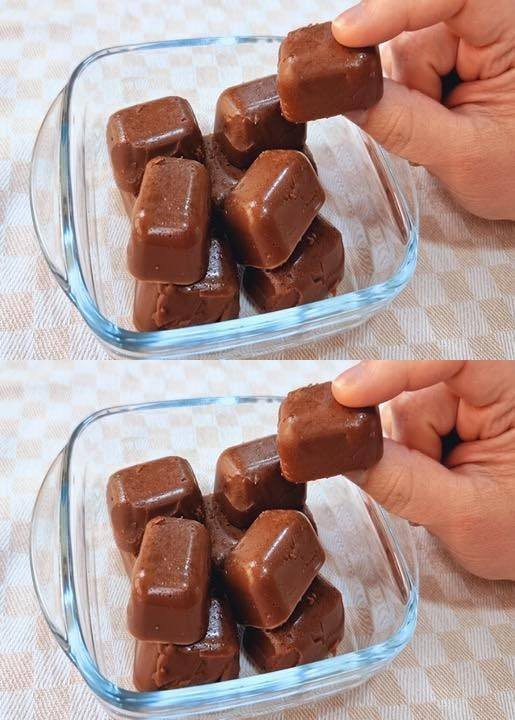
4-Ingredient Sweet: Zero-Carb, High-Protein Recipe – Simple and Delicious

Hello, everyone! Welcome back to our cooking blog, where we share delicious recipes every week. Today, we’re preparing a sweet. So, grab your pen and paper to jot down the ingredients, and let’s dive into this easy, step-by-step recipe that’s perfect for breakfast, appetizers, or even to accompany fresh salads!

How to Make 4-Ingredient Sweet

This low-carb dessert is easy to make, high in protein, and very low in carbs. A tasty option for staying on track with healthy eating without giving up sweets. You don’t need cooking classes or costly meal delivery services to prepare something delicious at home. With a bit of planning and our detailed meal prep guide, you can create amazing dishes with confidence and ease.

Recipe Ingredients:

  • 4 teaspoons of unflavored, unsweetened gelatin
  • 2 tablespoons of whey protein (or powdered milk, if preferred)
  • 1 tablespoon of unsweetened cocoa powder
  • ¾ cup hot water (6.8 fl oz or 200 ml)

Instructions:

First, in a bowl, combine the gelatin with the hot water. Stir well until the gelatin is completely dissolved.

Then, add the whey protein (or powdered milk, if you prefer) and mix until fully blended.

Next, add the unsweetened cocoa powder and stir until the mixture becomes smooth and creamy.

After that, lightly grease an ice cube tray with a bit of coconut oil and pour the mixture into the compartments.

Then, place it in the refrigerator for about 2 hours, or until the treats become firm.

Finally, gently remove them from the tray and serve as desired.

To finish, this recipe yields delicious protein-packed treats with very low carbs—ideal for a healthy snack or a light dessert.

Extra tips:

  • Add dried fruits or nuts like almonds or cashews to the mix for extra crunch and a richer flavor.
  • Want to switch things up? Replace the cocoa powder with instant coffee for a more energizing version that combines caffeine with protein.
  • For enhanced aroma and flavor, try adding a few drops of natural vanilla extract—it makes the treat even more irresistible!

Crockpot Lil Smokies, Potatoes & Green Beans

Crockpot Lil Smokies, Potatoes & Green Beans

  • ​Prep time: 10 minutes
  • ​Cook time: 4 hours (High) or 7–8 hours (Low)
  • ​Servings: 4–6

​Ingredients

  • ​1 package (12–14 oz) Lil Smokies (beef or turkey)
  • ​1 lb baby potatoes, halved (yellow or red work best)
  • ​1 can (15 oz) green beans, drained (or 1/2 lb fresh, trimmed)
  • ​1 cup BBQ sauce (Honey or Hickory flavors pair great here)
  • ​1/4 cup water or beef broth (optional, to keep it extra saucy)
  • ​1 tsp garlic powder (optional, for extra kick)
  • ​Salt & pepper to taste

​Instructions


    1. ​Layer the Crockpot: Start by placing the halved baby potatoes at the bottom of the slow cooker. They take the longest to cook, so they need to be closest to the heat source.
    2. ​Add the Proteins & Veggies: Add the Lil Smokies on top of the potatoes, then layer the green beans over the sausages.
    3. ​Sauce it Up: In a small bowl, whisk together the BBQ sauce and garlic powder (if using). Pour the mixture evenly over the top of the ingredients. ​Tip: If you prefer a thinner sauce or your BBQ sauce is very thick, add the 1/4 cup of water or broth now.

​Tip: If you prefer a thinner sauce or your BBQ sauce is very thick, add the 1/4 cup of water or broth now.


      1. ​Slow Cook: Cover and cook on Low for 7–8 hours or on High for 4 hours. You’ll know it’s ready when the potatoes are fork-tender.
      2. ​Finish & Serve: Give everything a gentle toss before serving to ensure the BBQ glaze coats every potato and bean. Season with salt and pepper to taste.

​Pro Tips for the Best Results

    • ​Fresh Beans: If using fresh green beans, add them at the very beginning. If using canned, you can actually wait until the last 30–60 minutes of cooking if you prefer them to have a bit more “bite” and not get too soft.
    • ​Crispy Finish: If you want a slightly caramelized texture, you can spread the finished meal on a baking sheet and broil it in the oven for 3–5 minutes after slow cooking.

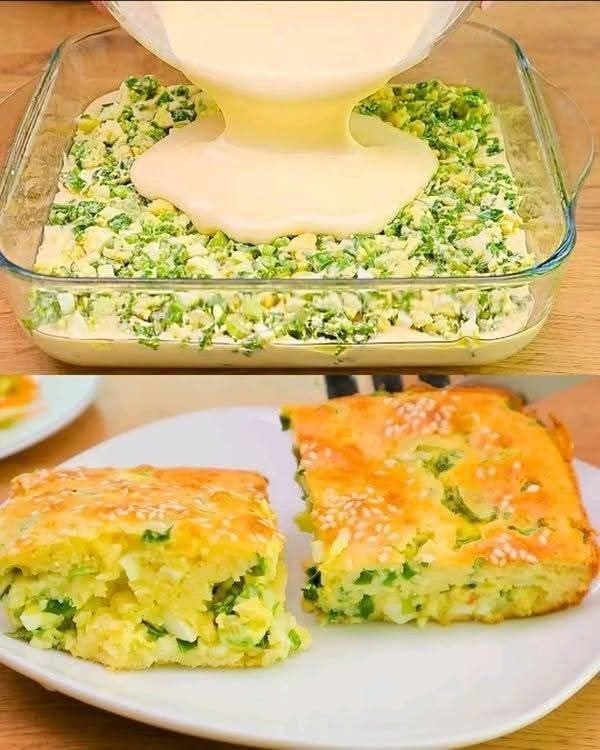
Savory Green Onion & Egg Casserole

Savory Green Onion & Egg Casserole

Prep time: 15 mins | Bake time: 30-35 mins | Servings: 4-6

Ingredients

For the Filling (Inside):

  • 4 Hard-boiled eggs, chopped

  • 150g Green onions, finely chopped

  • 100g Cheese (Mozzarella or Cheddar), grated

  • 1 tbsp Greek yogurt

  • Salt, to taste

For the Batter (Pour-over):

  • 3 Raw eggs

  • 1 cup Greek yogurt or Sour cream

  • ½ cup Mayonnaise (optional, for extra richness)

  • 1 ½ cups All-purpose flour

  • 1 tsp Baking powder

  • Pinch of Salt

  • Sesame seeds (for topping)


Step-by-Step Instructions

1. Prepare the Filling

  • In a medium bowl, combine the 4 chopped hard-boiled eggs, the 150g of chopped green onions, and the 100g of grated cheese.

  • Stir in 1 tablespoon of Greek yogurt and salt. This yogurt acts as a binder to keep the filling moist.

2. Make the Batter

  • In a separate large bowl, whisk together the 3 raw eggs and the 1 cup of Greek yogurt (and mayonnaise if using).

  • Gradually sift in the flour, baking powder, and a pinch of salt. Whisk until you have a smooth, thick batter that is pourable but not watery.

3. Layer the Casserole

  • Preheat your oven to 180°C (350°F). Grease a glass baking dish (roughly 8×8 or 9×9 inch) with butter or oil.

  • Pour half of your batter into the bottom of the dish and spread it evenly.

  • Spread the green onion and egg filling mixture in an even layer over the batter.

  • Pour the remaining half of the batter over the filling, ensuring all the green onions are covered.

4. Add the Finishing Touch

  • Sprinkle a generous amount of sesame seeds over the top of the batter. This provides the crunch and visual detail seen in your photo.

5. Bake

  • Place in the oven and bake for 30–35 minutes.

  • The casserole is done when the top is a deep golden brown and a toothpick inserted into the center comes out clean.

6. Serve

  • Allow it to cool for about 10 minutes before slicing into squares. This ensures the layers stay intact when served.


Tips for Success

  • Don’t Overbake: Keep an eye on the edges; you want them golden, not dark brown, to maintain that “melt-in-your-mouth” texture.

  • Cheese Choice: Using a cheese with good melting properties, like Gruyère or a mild white Cheddar, will improve the flavor of the center.

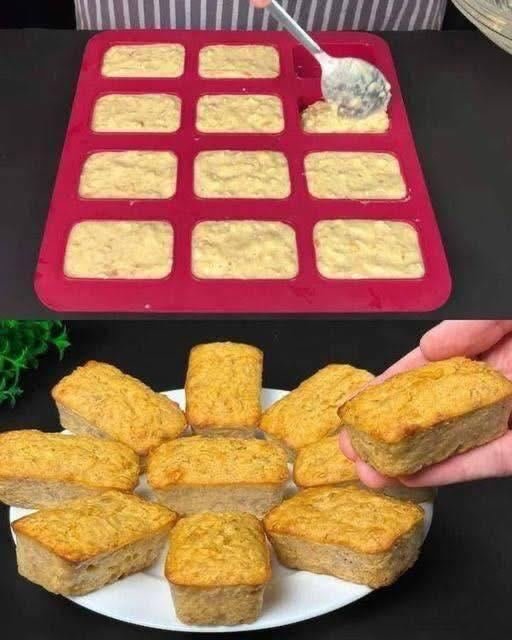
Flourless Apple Oatmeal Breakfast Bites

Flourless Apple Oatmeal Breakfast Bites

No Sugar • No Flour • Naturally Satisfying

Description

These Flourless Apple Oatmeal Breakfast Bites are soft, lightly sweet, and incredibly nourishing. Made with oats, apples, eggs, and milk, they’re naturally sweetened by fruit and perfect for weight-conscious eating. Great for breakfast, snacks, or even a light dessert—no refined sugar, no flour, and very filling.

Ingredients

  • 1 cup oatmeal (90 g)

  • 150 ml warm milk (about ⅔ cup)

  • 2 apples, peeled and diced

  • 20 g butter (1½ tbsp), melted

  • 2 large eggs

  • ½ tsp vanillin or vanilla extract

Optional additions (still healthy):

  • Cinnamon or nutmeg

  • Chopped nuts

  • Raisins or dried cranberries

Instructions

  1. Preheat Oven
    Preheat oven to 350°F (180°C). Lightly grease a muffin pan or silicone mold.

  2. Soak the Oats
    Place oatmeal in a bowl and pour warm milk over it. Let soak for 5–10 minutes until softened.

  3. Prepare the Batter
    Add eggs, melted butter, vanillin, and diced apples to the soaked oats. Mix until fully combined.

  4. Fill Molds
    Spoon the mixture evenly into the prepared molds, filling about ¾ full.

  5. Bake
    Bake for 25–30 minutes, until golden on top and set in the center.

  6. Cool & Serve
    Let cool for 5 minutes before removing. Enjoy warm or chilled.

Notes

  • Texture is soft and moist, similar to baked oatmeal

  • Apples provide natural sweetness—no sugar needed

  • Silicone molds release best

Tips for Best Results

  • Dice apples finely for even baking

  • Add cinnamon for enhanced sweetness without sugar

  • For extra protein, add 1 tbsp Greek yogurt

  • Store in fridge and reheat gently

Servings

Makes: 10–12 oatmeal bites
Serving Size: 1–2 bites

Nutritional Information (Approximate, per bite)

  • Calories: 85–95

  • Protein: 4 g

  • Carbohydrates: 12 g

  • Fiber: 2 g

  • Fat: 3 g

  • Sugar: Naturally occurring from apples only

Health Benefits

  • Oats support digestion and fullness

  • Apples provide fiber and antioxidants

  • Eggs add high-quality protein

  • No refined sugar or flour

  • Helps control hunger and cravings

Recipe Q & A

Q: Can I eat these for weight loss?
A: Yes—these are filling, low in added sugars, and portion-controlled.

Q: Can I make them dairy-free?
A: Yes—use almond, oat, or soy milk and plant-based butter.

Q: How long do they last?
A: Up to 5 days refrigerated or 2 months frozen.

Q: Can I blend the batter?
A: Yes—for a smoother, cake-like texture.

Q: Can kids eat these?
A: Absolutely—great healthy snack for all ages.

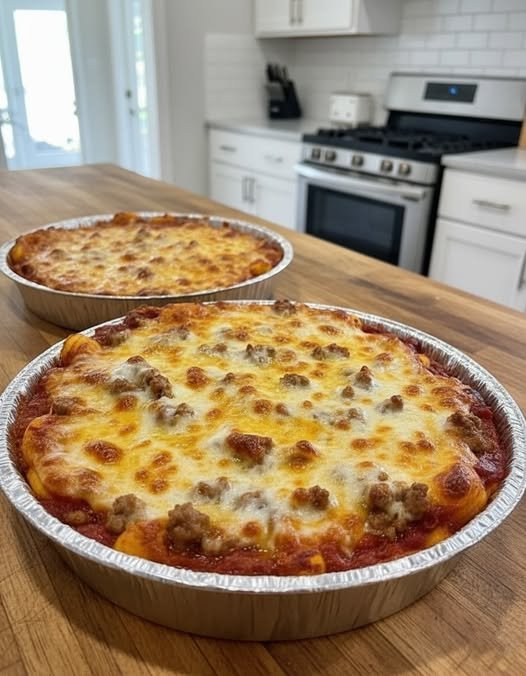
Low-Point Crustless Pizza Bowls

Low-Point Crustless Pizza Bowls

Prep time: 10 minutes | Bake time: 15–20 minutes

Ingredients

  • 1 cup Low-sugar marinara sauce (check labels for 0 or low-point options)

  • 1 cup Shredded part-skim mozzarella cheese

  • 1/2 cup Lean cooked protein (options include cooked ground turkey sausage, Canadian bacon, or turkey pepperoni)

  • 1/2 cup Mixed vegetables (chopped bell peppers, mushrooms, onions, or olives)

  • Optional: Red pepper flakes, dried oregano, or fresh basil for garnish.


Step-by-Step Instructions

1. Preheat and Prepare

Preheat your oven to 400°F (200°C). Prepare individual oven-safe bowls or small aluminum tins (as seen in your photo) by lightly spraying them with non-stick cooking spray.

2. Layer the Base

Spoon a generous layer of marinara sauce into the bottom of each bowl. This acts as the “crust” replacement and keeps everything moist.

3. Add Your Toppings

Layer your cooked lean protein and raw chopped vegetables over the sauce.

  • Pro Tip: If you are using vegetables that release a lot of water (like mushrooms or zucchini), you may want to sauté them briefly first to keep the bowl from getting watery.

4. Top with Cheese

Cover the toppings with a layer of shredded mozzarella cheese. If you like a little extra flavor, sprinkle some dried oregano or Italian seasoning over the cheese now.

5. Bake until Bubbly

Place the bowls on a baking sheet for easy handling and bake for 15–20 minutes. You are looking for the sauce to be bubbling and the cheese to be completely melted and starting to turn golden brown.

6. Broil (Optional)

If you want that extra-crispy, browned cheese look seen in your photo, turn the oven to Broil for the last 1–2 minutes. Watch closely so they don’t burn!


Weight Watchers Tip

To keep the points as low as possible, prioritize lean turkey sausage or lots of zero-point vegetables like spinach and peppers. This allows you to be more generous with the cheese!

Savory Cheese & Herb Pull-Apart Bread

Savory Cheese & Herb Pull-Apart Bread

 Description

Savory Cheese & Herb Pull-Apart Bread is a warm, buttery, crowd-pleasing appetizer made from a crusty loaf sliced in a crosshatch pattern, filled with garlic herb butter and generous amounts of melted cheese. As it bakes, the cheese melts deep into the crevices while the crust turns golden and crisp. Each piece pulls apart easily, making it perfect for sharing at gatherings, holidays, or cozy family dinners.

Ingredients

For the Bread:

  • 1 large round or oval crusty loaf (sourdough or Italian bread)

  • ½ cup (1 stick) unsalted butter, melted

  • 3 cloves garlic, minced

  • 1 tbsp fresh parsley, finely chopped

  • 1 tsp fresh thyme (or ½ tsp dried)

  • 1 tsp fresh rosemary (or ½ tsp dried)

  • 2 cups shredded mozzarella cheese

  • ½ cup freshly grated Parmesan cheese

  • ½ tsp salt

  • ¼ tsp black pepper

Optional Add-Ins:

  • ½ tsp red pepper flakes (for heat)

  • ½ cup shredded cheddar, provolone, or Gruyère

  • 1 tbsp olive oil (for extra richness)

 Instructions

1️⃣ Preheat

Preheat oven to 375°F (190°C). Line a baking sheet with foil.

2️⃣ Slice the Bread

Using a serrated knife, cut the bread diagonally in one direction, then repeat in the opposite direction to create a crosshatch pattern.
Do not cut all the way through — leave about ½ inch at the bottom intact.

3️⃣ Make the Herb Butter

In a bowl, mix melted butter, garlic, parsley, thyme, rosemary, salt, and pepper.

4️⃣ Fill the Bread

Gently open the cuts and drizzle the herb butter evenly throughout the bread.
Stuff mozzarella and Parmesan into all the crevices.

5️⃣ Bake

Wrap loosely in foil and bake for 15 minutes.
Unwrap and bake an additional 10–15 minutes until cheese is melted and golden.

6️⃣ Serve

Garnish with extra herbs and serve immediately while warm and gooey.

 Servings

  • Serves: 6–8 people

  • Prep Time: 10 minutes

  • Cook Time: 25–30 minutes

  • Total Time: ~40 minutes

 Tips for Best Results

  • ✔ Use day-old bread for better structure.

  • ✔ Don’t overcut the loaf — keep the base intact.

  • ✔ For extra crispiness, broil for 1–2 minutes at the end (watch closely).

  • ✔ Let rest 5 minutes before serving to prevent cheese from sliding out.

  • ✔ Add cooked bacon bits for a heartier version.

 Nutritional Information (Approximate per serving, based on 8 servings)

  • Calories: 320–380 kcal

  • Protein: 12g

  • Carbohydrates: 28g

  • Fat: 20g

  • Saturated Fat: 11g

  • Fiber: 1g

  • Sodium: 450–550mg

Values vary depending on bread and cheese used.

 Benefits of This Recipe

  • ✔ Great for entertaining and sharing

  • ✔ Customizable with different cheeses and herbs

  • ✔ Quick and easy to prepare

  • ✔ Comfort food that pairs well with soups, pasta, and salads

  • ✔ Can be adapted to vegetarian-friendly diets

Q & A

Q: Can I make this ahead of time?
A: Yes! Assemble the bread, wrap tightly, and refrigerate up to 24 hours. Bake when ready.

Q: Can I freeze it?
A: You can freeze it unbaked. Wrap tightly and freeze up to 1 month. Bake from frozen, adding 10–15 extra minutes.

Q: What’s the best cheese combination?
A: Mozzarella for melt + Parmesan for flavor is classic. Add Gruyère for richness.

Q: How do I reheat leftovers?
A: Wrap in foil and reheat at 350°F for 10–15 minutes.

Q: Can I make it dairy-free?
A: Yes, use plant-based butter and dairy-free shredded cheese alternatives.