Classic Golden Crispy Egg Rolls

Classic Golden Crispy Egg Rolls

Prep time: 30 mins | Cook time: 10 mins | Yields: 12-15 egg rolls


Ingredients

The Filling:

  • 1 lb Ground pork (or beef)

  • 1 tsp Ground ginger

  • 2 cloves Garlic, minced

  • 3 cups Coleslaw mix (shredded cabbage and carrots)

  • 2 tbsp Soy sauce

  • 1 tbsp Oyster sauce

  • 1 tsp Sesame oil

  • 2 Green onions, thinly sliced

Assembly:

  • 1 package Egg roll wrappers

  • 1 Egg, beaten (for sealing)

  • Neutral oil (Vegetable, Canola, or Peanut) for frying


Instructions

  1. Brown the Meat: In a large skillet or wok over medium-high heat, cook the ground meat until fully browned. Drain any excess fat.

  2. Season & Sauté: Add the ginger, garlic, and coleslaw mix to the skillet. Sauté for 3–4 minutes until the cabbage is wilted but still has a slight crunch.

  3. Finish Filling: Stir in the soy sauce, oyster sauce, and sesame oil. Remove from heat and toss in the green onions. Pro Tip: Let the filling cool completely before wrapping to prevent the wrappers from getting soggy.

  4. The Wrap: Lay an egg roll wrapper in a diamond shape. Place about 2–3 tablespoons of filling in the center.

    • Fold the bottom corner up over the filling.

    • Fold the two side corners into the center.

    • Brush the top corner with the beaten egg and roll tightly.

  5. Fry until Golden: Heat 2 inches of oil in a heavy pot to 350°F (175°C). Fry 3–4 egg rolls at a time for about 3–5 minutes, turning occasionally, until they reach that deep golden brown seen in your photo.

  6. Drain: Place on a wire rack or paper towels to remove excess oil.

🍗 Crack Chicken Pinwheels

🍗 Crack Chicken Pinwheels

Creamy, cheesy, and savory pinwheels loaded with bacon and ranch flavor.

  • Prep Time: 15 minutes

  • Cook Time: 25 minutes

  • Total Time: 40 minutes

  • Servings: 6

Ingredients

  • 2 cups cooked chicken, finely chopped or shredded (rotisserie works great)

  • 8 oz (225g) cream cheese, fully softened

  • 1 cup shredded cheddar cheese (sharp cheddar recommended)

  • ½ cup cooked bacon, finely chopped and crispy

  • 1 packet (1 oz / 28g) dry ranch seasoning mix

  • 2 large refrigerated crescent roll dough sheets (or crescent rolls with seams pressed together)

  • Optional: Chopped green onions for a pop of freshness

Instructions

1. Prep the Oven and Pan

Preheat your oven to 375°F (190°C). Line a large baking sheet with parchment paper or lightly grease it to ensure the cheese doesn’t stick.

2. Make the Filling

In a medium mixing bowl, beat the softened cream cheese until smooth and creamy. Add the ranch seasoning, shredded cheddar, chicken, and chopped bacon. Stir well until the chicken is evenly coated and the mixture is uniform.

3. Assemble the Rolls

Unroll the crescent dough sheets onto a flat, clean surface. If using standard crescent rolls, use your fingers to pinch the perforated seams together to create one solid rectangle. Spread the chicken mixture evenly over the dough, leaving about a half-inch border at the edges.

4. Roll and Slice

Starting from the long side, roll the dough tightly into a log. Using a sharp knife, slice the log into rounds roughly ½ to ¾ inch thick. Tip: Wipe your knife with a damp cloth between slices for cleaner edges.

5. Bake

Place the pinwheels cut-side up on the prepared baking sheet, leaving a little space between each one. Bake for 18–22 minutes, or until the dough is golden brown and the cheese is bubbly.

6. Rest and Serve

Allow the pinwheels to rest on the pan for 5 minutes. This helps the filling set so it doesn’t spill out when you pick them up. Serve warm.


Pro-Tips for Success

  • Tighter Rolls: If the dough is getting too soft to handle, pop the rolled log into the fridge for 10–15 minutes before slicing. This helps them keep their round shape.

  • Keto Option: To make these low-carb, swap the crescent dough for a “Fathead” dough (mozzarella and almond flour base) or spread the filling onto low-carb tortillas.

  • Storage: Leftovers can be stored in an airtight container in the fridge for up to 4 days. Reheat in the oven or air fryer at 325°F to maintain the flaky texture of the dough.

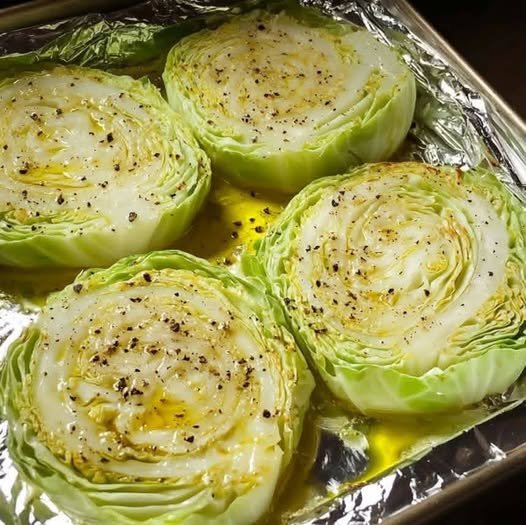
Crispy Baked Cabbage Steaks

Crispy Baked Cabbage Steaks are thick slices of fresh cabbage brushed with olive oil, seasoned simply, and oven-roasted until the edges are golden and caramelized while the centers stay tender. This easy, budget-friendly dish works beautifully as a healthy side, a vegetarian main, or a base for flavorful toppings.


⏱️ Prep & Cook Time

  • Prep Time: 10 minutes

  • Cook Time: 30–35 minutes

  • Total Time: 40–45 minutes


🍽️ Servings

Serves: 4 people
(1 cabbage yields 4 thick steaks)


🧾 Ingredients

  • 1 large green cabbage

  • 3–4 tablespoons olive oil

  • ½ teaspoon salt (or to taste)

  • ½ teaspoon black pepper

  • ½ teaspoon garlic powder (optional)

  • ½ teaspoon smoked paprika (optional)

  • Optional toppings:

    • Parmesan cheese

    • Lemon zest or juice

    • Red pepper flakes

    • Fresh herbs (parsley, thyme)


👩‍🍳 Instructions

  1. Preheat Oven
    Preheat oven to 425°F (220°C). Line a baking sheet with foil or parchment paper.

  2. Slice the Cabbage
    Remove loose outer leaves. Slice cabbage into ¾–1 inch thick steaks, keeping the core intact to hold them together.

  3. Season
    Arrange cabbage steaks on the baking sheet. Brush both sides generously with olive oil. Sprinkle with salt, pepper, and optional seasonings.

  4. Bake
    Roast for 30–35 minutes, flipping once halfway through, until edges are browned and crispy.

  5. Finish & Serve
    Add optional toppings and serve hot.


⭐ Recipe Notes

  • Thicker slices stay intact and develop better texture.

  • Don’t overcrowd the pan—space helps crisping.

  • Olive oil is key for caramelization.


🔥 Pro Tips for Extra Crispiness

  • Use high heat (425°F+)

  • Flip gently using a wide spatula

  • Add a final 2–3 minutes under the broiler

  • Sprinkle cheese during the last 5 minutes


🧮 Nutritional Information (Per Serving – Approximate)

  • Calories: 120

  • Carbohydrates: 10g

  • Protein: 2g

  • Fat: 9g

  • Fiber: 4g

  • Sodium: 230mg


💚 Health Benefits

  • Rich in fiber for digestion

  • High in vitamin C & K

  • Low-calorie and heart-healthy

  • Contains antioxidants that support immunity

  • Naturally gluten-free & vegan


❓ Q & A

Q: Can I use red cabbage?
Yes! Red cabbage works well but may need 5 extra minutes to soften.

Q: Can I make this in an air fryer?
Yes. Cook at 375°F for 12–15 minutes, flipping halfway.

Q: How do I store leftovers?
Store in an airtight container for up to 3 days in the fridge.

Q: Can I add protein?
Absolutely—top with chickpeas, tofu, or a fried egg.

Q: Why isn’t my cabbage crispy?
Likely overcrowding, low heat, or not enough oil.

🥣 Classic Homemade Chicken Noodle Soup

🥣 Classic Homemade Chicken Noodle Soup

Serves: 6–8
Prep Time: 20 minutes
Cook Time: 45–60 minutes


🧾 Ingredients

For the Soup Base

  • 2 tablespoons olive oil or butter

  • 1 medium onion, diced

  • 3 cloves garlic, minced

  • 3 medium carrots, sliced

  • 2 celery stalks, sliced

  • 1 teaspoon salt (adjust to taste)

  • ½ teaspoon black pepper

  • 1 teaspoon dried thyme

  • ½ teaspoon dried oregano

  • 1 bay leaf

Chicken & Broth

  • 1½–2 pounds chicken (bone-in thighs, drumsticks, or breasts)

  • 8–10 cups chicken broth (homemade or good-quality store-bought)

  • 2 cups water (if needed, for extra broth)

Noodles & Finish

  • 2–3 cups egg noodles (wide or homestyle)

  • 1 tablespoon fresh parsley, chopped

  • 1 teaspoon lemon juice (optional, brightens flavor)


🥄 Instructions

1️⃣ Sauté the Vegetables

Heat olive oil or butter in a large soup pot over medium heat.
Add onion and cook for 3–4 minutes until soft and fragrant.
Stir in garlic, carrots, and celery. Cook another 3–5 minutes, stirring often.

2️⃣ Build the Flavor

Season with salt, black pepper, thyme, and oregano, and add the bay leaf.
Pour in chicken broth and water. Bring to a gentle boil.

3️⃣ Cook the Chicken

Add chicken pieces directly into the pot.
Reduce heat to a simmer, cover, and cook for 25–30 minutes, until chicken is fully cooked and tender.

4️⃣ Shred the Chicken

Remove the chicken from the pot and place it on a plate.
Shred into bite-sized pieces using two forks.
Discard skin and bones. Return shredded chicken to the soup.

5️⃣ Add the Noodles

Stir in egg noodles and cook uncovered for 8–10 minutes, until noodles are tender but not mushy.

6️⃣ Final Touch

Remove bay leaf.
Stir in fresh parsley and lemon juice if using.
Taste and adjust seasoning with extra salt or pepper if needed.


🌟 Tips for the Best Soup

  • For extra-rich flavor: Use bone-in chicken and simmer a little longer

  • For leftovers: Keep noodles separate if storing more than 1 day

  • For freezer-friendly soup: Freeze without noodles; add fresh when reheating

  • Like it thicker? Add a handful of broken noodles or reduce broth slightly


🥖 Serving Ideas

  • Crusty bread or buttered toast

  • Crackers or garlic bread

  • Pickles on the side 😉 (because you said it!)

Baklava Bundt Cake

This Baklava Bundt Cake is a fusion dessert that captures the classic flavors of traditional baklava—honey, walnuts, cinnamon, and butter—in a moist, easy-to-slice cake form. Baked in a Bundt pan, it presents the rich, nutty, and syrup-soaked essence of the beloved pastry as a simple, shareable cake.

Why You’ll Love This Recipe

The recipe simplifies the labor-intensive process of layering phyllo dough while delivering the same signature taste and texture. It is designed for reliability, using common baking ingredients and pans. The cake is thoroughly soaked in a spiced honey syrup, ensuring every bite is moist and flavorful.

Ingredients

For the Cake:

  • 3 cups all-purpose flour
  • 1 teaspoon baking powder
  • 1/2 teaspoon baking soda
  • 1/2 teaspoon salt
  • 1 cup unsalted butter, softened
  • 1 3/4 cups granulated sugar
  • 4 large eggs, room temperature
  • 1 teaspoon vanilla extract
  • 1 cup plain Greek yogurt or sour cream, room temperature
  • 1 1/2 cups finely chopped walnuts
  • 1/2 cup granulated sugar (for nut mixture)
  • 2 teaspoons ground cinnamon

For the Honey Syrup:

  • 1 cup granulated sugar
  • 1 cup water
  • 1 cup honey
  • 1 cinnamon stick
  • 3 whole cloves
  • 1 strip of lemon peel

Step-by-Step Instructions

  1. Prepare: Preheat oven to 350°F (175°C). Generously grease and flour a 10-12 cup Bundt pan.
  2. Make Nut Mixture: In a bowl, combine the chopped walnuts, 1/2 cup sugar, and ground cinnamon. Set aside.
  3. Make Cake Batter: In a medium bowl, whisk together flour, baking powder, baking soda, and salt. In a large bowl, cream the softened butter and 1 3/4 cups sugar until light and fluffy. Beat in eggs one at a time, then mix in vanilla extract. Alternately add the flour mixture and the Greek yogurt to the butter mixture, beginning and ending with the flour, mixing just until combined.
  4. Layer in Pan: Spoon about one-third of the cake batter into the prepared Bundt pan and smooth the top. Sprinkle half of the walnut-cinnamon mixture evenly over the batter. Add another third of the batter, then the remaining walnut mixture. Top with the final third of the batter, smoothing gently.
  5. Bake: Bake for 50-60 minutes, or until a long skewer inserted into the center comes out clean.
  6. Make Syrup: While the cake bakes, combine the sugar, water, honey, cinnamon stick, cloves, and lemon peel in a saucepan. Bring to a boil, stirring until sugar dissolves. Reduce heat and simmer for 10-15 minutes without stirring. Remove from heat, discard the spices and peel, and let cool slightly.
  7. Soak Cake: As soon as the cake comes out of the oven, use the skewer to poke holes all over the top (which will be the bottom of the cake). Slowly and evenly pour about two-thirds of the warm syrup over the hotcake. Let the cake cool completely in the pan for at least 2 hours.
  8. Unmold and Finish: Once completely cool, invert the cake onto a serving plate. Rewarm the remaining syrup if needed and brush or drizzle it over the exterior of the cake.

FAQ

Can I use a different type of nut?  Yes. Pistachios or a blend of walnuts and pistachios are common, authentic substitutions.

Discover more
Bread
Butter
sugar
cake
honey
Honey
Sugar
flour
butter
Cake

Can I make the syrup ahead of time?  Yes. The syrup can be made up to a week in advance and stored covered in the refrigerator. Warm before using.

Why did my cake stick to the pan?  Ensure the pan is thoroughly greased and floured, including all crevices. Let the cake cool completely in the pan to allow its structure to set before inverting.

Is the cake overly sweet?  The syrup is integral, but the cake itself is not overly sweet, and the nuts provide balance. The full syrup recipe is traditional for a soaked texture.

You Must Know

It is critical to pour the honey syrup over the cake immediately after it comes out of the oven while both are still warm. This allows the cake to fully absorb the syrup, creating the signature moist, sticky texture. Cooling the cake completely in the pan is also non-negotiable for a clean release.

Storage Tips

Store the cake at room temperature, tightly covered with plastic wrap or under a cake dome, for up to 3 days. For longer storage, wrap individual slices or the whole cake securely and freeze for up to 2 months. Thaw at room temperature. Do not refrigerate, as it can dry out the cake and cause the syrup to harden.


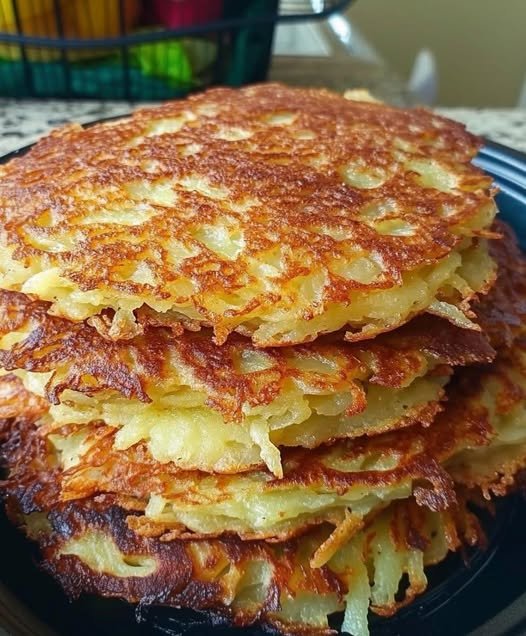
German Potato Pancakes

There are so many potato pancake recipes out there, and they are all claiming to be the original German Potato Pancakes. These are really fun to make and eat. They are crispy, slightly crunchy, and overly tasty. These cakes are truly loved worldwide. Of course, each locale has their own recipe. For instance, Swedish pancakes are also quite popular and eerily similar to the German potato pancakes.

Ingredients

  • 2 ½ pounds Russet potatoes, or any starchy potato, peeled and grated very finely
  • 1 yellow onion, grated very fine
  • 2 large eggs
  • 1 tsp salt
  • ¼ cup all-purpose flour
  • Oil for frying

How To Make German Potato Pancakes

FIRST STEP:

After grating the potatoes, using a towel, thoroughly wring out all the liquid from the potatoes

Place the drained potatoes into a large bowl with the grated onion, salt, eggs, and flour.

Mix it thoroughly with your hands; you want it to be somewhat tacky. Add a little more flour if it is too sticky

SECOND STEP:

Heat 3 tbsp oil in a skillet

Place ⅓ to ½ a cup of mixture into the hot skillet

THIRD STEP:

Fry for three to five minutes on each side, until they are golden.

Briefly drain on paper towels

FOURTH STEP:

Serve immediately, while hot, with applesauce and a sprinkle of powdered sugar, sour cream, or even yogurt.

These could also be served with meat and a gravy, using these as a side dish.

Enjoy!