Lemon Crinkle Cookies

Lemon Crinkle Cookies

Soft, bright cookies with a delicate citrus flavor and a classic cracked sugar finish

Prep Time: 15 minutes
Chill Time: 30–60 minutes
Bake Time: 10–12 minutes
Yield: About 20–24 cookies

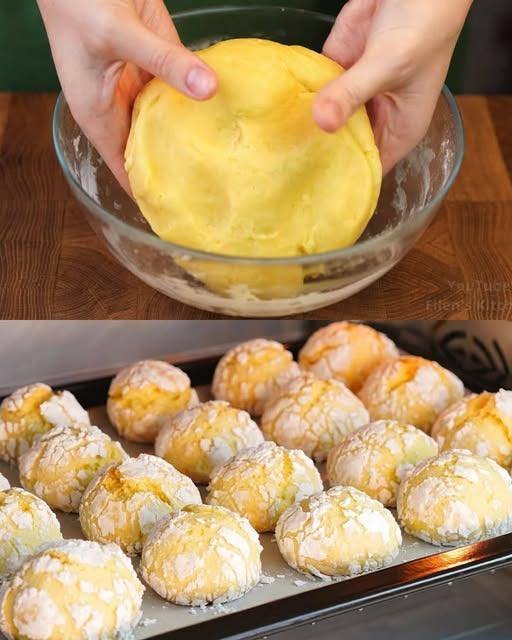
These Lemon Crinkle Cookies are tender on the inside with lightly crisp edges. Fresh lemon zest and juice give them a refreshing citrus taste, while the powdered sugar coating creates the signature crinkled appearance as they bake.


Ingredients

Cookie Dough

  • 1½ cups (180 g) all-purpose flour
    Provides structure for the cookies.

  • 1 teaspoon baking soda
    Helps the cookies spread slightly and crack on top.

  • ½ teaspoon baking powder
    Adds lightness to the texture.

  • ¼ teaspoon salt
    Balances the sweetness and enhances flavor.

  • 1 cup (227 g) unsalted butter, softened
    Creates a rich, tender cookie.

  • 1 cup (200 g) granulated sugar
    Sweetens and helps create a soft crumb.

  • 1 large egg
    Binds the dough and adds moisture.

  • 1 tablespoon fresh lemon zest
    Provides bright lemon aroma.

  • 2 tablespoons fresh lemon juice
    Adds natural citrus flavor.


For Coating

  • ½ cup powdered sugar
    Creates the classic crinkle finish.

  • Optional: 2–3 tablespoons granulated sugar
    Helps form a slight crust before rolling in powdered sugar.


Step-by-Step Instructions

1. Prepare the Dough

In a large bowl, beat the softened butter and granulated sugar together until pale, light, and fluffy. This usually takes 2–3 minutes with an electric mixer.

Add the egg and mix until fully incorporated.
Stir in the lemon zest and lemon juice until evenly combined.


2. Mix the Dry Ingredients

In a separate bowl, whisk together the flour, baking soda, baking powder, and salt.

Gradually add the dry ingredients to the wet mixture. Mix just until a soft, smooth dough forms. Avoid overmixing.


3. Chill the Dough

Cover the bowl and refrigerate the dough for 30–60 minutes.
This step firms the dough, improves texture, and helps prevent excessive spreading.


4. Shape and Coat

Preheat the oven to 175°C (350°F).
Line baking sheets with parchment paper.

Scoop the dough into tablespoon-sized portions and roll into balls.

For best results:

  1. Roll each dough ball lightly in granulated sugar (optional).

  2. Roll generously in powdered sugar, completely coating the surface.

Place the coated dough balls on the baking sheet, spacing them about 2 inches apart.


5. Bake

Bake for 10–12 minutes, until:

  • The edges are set

  • The tops are cracked and puffed

  • The centers remain soft

Do not overbake; the cookies will continue to set as they cool.


6. Cool

Let the cookies rest on the baking sheet for 5 minutes, then transfer them to a wire rack to cool completely.


Tips for Perfect Crinkle Cookies

  • Extra Cracks: Roll the dough in powdered sugar twice for a thicker white coating.

  • Strong Lemon Flavor: Add a drop of lemon extract if desired.

  • Soft Centers: Remove cookies when the centers still look slightly underbaked.

  • Storage: Store in an airtight container at room temperature for up to 4 days.

🌽🧀 Cheesy Herb Pull-Apart Bread

This golden, soft, cheesy pull-apart bread is packed with herbs, sweet corn, and melted cheese, just like the one in the image. It’s fluffy on the inside, beautifully browned on the outside, and perfect for sharing. Ideal for tea time, dinner rolls, or as a party centerpiece.


📝 Ingredients

For the Dough

  • 3½ cups all-purpose flour

  • 2¼ teaspoons instant yeast (1 packet)

  • 2 tablespoons sugar

  • 1 teaspoon salt

  • ¾ cup warm milk (not hot)

  • ¼ cup warm water

  • 3 tablespoons melted butter or oil

  • 1 large egg

For the Filling

  • 1½ cups mozzarella cheese, shredded

  • ½ cup cheddar cheese, shredded

  • ½ cup sweet corn (boiled or canned, drained well)

  • 2 tablespoons softened butter

  • 1 teaspoon garlic powder

  • 1 teaspoon dried oregano

  • 1 teaspoon dried parsley

  • ½ teaspoon black pepper

  • ½ teaspoon chili flakes (optional)

  • Salt to taste

For Topping

  • 1 tablespoon melted butter

  • ½ teaspoon dried parsley or mixed herbs


👩‍🍳 Step-by-Step Instructions

1. Prepare the Dough

  1. In a large bowl, mix warm milk, warm water, sugar, and yeast.

  2. Let it rest for 5–10 minutes until foamy.

  3. Add egg, melted butter, salt, and flour gradually.

  4. Knead for 8–10 minutes until soft, smooth, and elastic.

  5. Place in a greased bowl, cover, and let rise 1 hour or until doubled.


2. Make the Filling

In a bowl, mix:

  • Both cheeses

  • Sweet corn

  • Butter

  • Garlic powder

  • Oregano

  • Parsley

  • Black pepper

  • Chili flakes

  • Salt

Set aside.


3. Shape the Bread

  1. Punch down the risen dough.

  2. Roll into a large rectangle (about 12×16 inches).

  3. Spread the cheese-corn filling evenly.

  4. Cut into long strips.

  5. Stack strips on top of each other, then cut into squares.

  6. Arrange upright in a greased loaf pan, creating a pull-apart pattern.


4. Second Rise

  • Cover and let rest 20–30 minutes until slightly puffy.


5. Bake

  1. Preheat oven to 180°C / 350°F

  2. Brush top with melted butter and sprinkle herbs.

  3. Bake for 30–35 minutes until golden brown and fully baked.

  4. If browning too fast, loosely cover with foil.


🧈 Final Touch

Brush with more melted butter while hot for extra softness and shine.


🍞 Serving Suggestions

  • Serve warm with soup or salad

  • Perfect with tea or coffee

  • Great as a party bread or lunchbox treat


⭐ Tips

  • You can add olives, jalapeños, or cooked chicken

  • Use garlic butter instead of plain butter for extra flavor

  • Best enjoyed fresh but reheats well

Spinach Artichoke Crescent Roll Bake

🥬 Spinach Artichoke Crescent Roll Bake

Yields: 8–10 rolls
Prep Time: 20 minutes
Bake Time: 18–22 minutes

A warm, cheesy appetizer that combines creamy spinach and artichokes inside golden, buttery crescent rolls. Perfect for parties, snacks, or cozy meals.


📝 Ingredients

For the Filling:

  • 1 cup frozen chopped spinach, thawed and well-drained

  • 1 cup canned artichoke hearts, chopped and well-drained

  • 4 oz (115 g) cream cheese, softened

  • ¼ cup sour cream

  • ¼ cup mayonnaise

  • ½ cup shredded mozzarella cheese

  • ¼ cup grated Parmesan cheese

  • 1 clove garlic, minced

  • Salt & pepper, to taste

For the Rolls:

  • 1 can (8 oz / 225 g) refrigerated crescent roll dough (sheet or regular)

  • 1 egg, beaten (optional, for brushing tops)

  • Extra mozzarella or Parmesan for topping (optional)

  • Fresh parsley, chopped (for garnish, optional)


👩‍🍳 Step-by-Step Instructions

Step 1 — Preheat & Prepare the Dish

  1. Preheat oven to 375°F (190°C).

  2. Lightly grease a baking dish or oven-safe skillet with butter or cooking spray.


Step 2 — Make the Filling

  1. In a medium bowl, combine cream cheese, sour cream, and mayonnaise. Mix until smooth.

  2. Stir in mozzarella, Parmesan, and garlic.

  3. Add the spinach and artichokes, mixing until evenly combined.

  4. Season with salt and pepper to taste.

Optional: Add a pinch of red pepper flakes or Italian seasoning for extra flavor.


Step 3 — Prepare the Dough

  1. Unroll the crescent dough onto a clean surface. If using perforated crescent rolls, pinch the seams to form a solid rectangle.

  2. Spread the spinach artichoke filling evenly over the dough, leaving about ½ inch from the edges.

  3. Starting from one long edge, roll the dough into a log (like a jelly roll).

  4. Using a sharp knife or unflavored dental floss, slice the log into 1-inch rolls (about 8–10 pieces).


Step 4 — Assemble & Bake

  1. Place the rolls cut side up in the prepared baking dish.

  2. Optional: Brush tops with beaten egg for a golden finish.

  3. Optional: Sprinkle extra mozzarella or Parmesan on top.

  4. Bake for 18–22 minutes or until golden brown and puffed.


Step 5 — Garnish & Serve

  1. Remove from oven and let cool for 5 minutes.

  2. Garnish with fresh parsley if desired.

  3. Serve warm as an appetizer, snack, or side dish.


💡 Tips for Success

  • Drain Well: Squeeze out excess liquid from spinach and artichokes to avoid soggy rolls.

  • Cheese Variations: Try Monterey Jack, cheddar, or Gruyère for different flavors.

  • Make Ahead: Assemble rolls and refrigerate for up to 8 hours before baking. Add 2–3 minutes to baking time.

  • Freezing: Bake, cool, and freeze in an airtight container for up to 1 month. Reheat at 350°F until warmed through.


🍴 Serving Ideas

  • Pair with tomato soup for a cozy meal.

  • Serve alongside a fresh garden salad for lunch.

  • Offer with marinara or garlic dip for extra indulgence.


⏱ Summary Table

Step Time Key Notes
Preheat Oven 5 min Grease baking dish
Make Filling 10 min Drain spinach well
Prepare Dough 5 min Roll tightly for neat slices
Bake 18–22 min Golden brown top
Serve — Best served warm

Butter Biscuits & Soft Melting Cookies

Butter Biscuits & Soft Melting Cookies

Yields: Approximately 40–50 biscuits
Preparation Time: 20 minutes
Baking Time: 10–12 minutes

These butter-based biscuits are light, tender, and gently crisp at the edges. The same dough can be shaped in different ways to create both simple butter biscuits and soft, swirl-style cookies. They are perfect for sharing, gifting, or enjoying with tea.


📋 Ingredients

  • 500 g butter, softened at room temperature

  • 1 cup fine or granulated sugar

  • 3 large eggs

  • 3 tablespoons neutral oil

  • 1 teaspoon vanilla flavoring

  • 5 cups all-purpose flour, sifted

  • 4 teaspoons baking powder

  • ¼ teaspoon bicarbonate of soda

Optional Decorations

  • Glacé cherries, finely chopped

  • Fruit jam (such as apricot or strawberry)

  • Melted chocolate for drizzling


👩‍🍳 Step-by-Step Instructions

Step 1: Prepare the Butter Mixture

  1. Place the softened butter and sugar in a large mixing bowl.

  2. Beat together until light in color and creamy in texture.

  3. Add the oil and vanilla flavoring.

  4. Beat in the eggs one at a time, mixing well after each addition.


Step 2: Add Dry Ingredients

  1. In a separate bowl, sift together the flour, baking powder, and bicarbonate of soda.

  2. Gradually add the dry mixture to the butter mixture.

  3. Mix gently until a soft, smooth dough forms.

  4. Stop mixing once combined to keep the biscuits tender.


Step 3: Shape the Biscuits

  1. Preheat the oven to 180°C (350°F).

  2. Lightly grease or line baking trays with parchment paper.

For Swirl-Style Cookies

  • Transfer the dough to a piping bag fitted with a large star nozzle.

  • Pipe small swirls onto the tray.

  • Add a small amount of jam or a piece of cherry in the center if desired.

For Simple Butter Biscuits

  • Roll small portions of dough into balls and flatten gently with a fork,
    or

  • Roll the dough out and cut into shapes using a cutter.


Step 4: Bake

  1. Place trays in the preheated oven.

  2. Bake for 10–12 minutes, until the edges are lightly colored.

  3. The biscuits should remain pale for a soft texture.


Step 5: Cool and Finish

  1. Remove biscuits from the oven.

  2. Allow them to cool completely on a wire rack.

  3. Once cooled, drizzle with melted chocolate if desired.


🧊 Storage Tips

  • Store in an airtight container at room temperature for up to 2 weeks

  • Flavors develop further after resting for a day


💡 Helpful Notes

  • Butter should be soft, not melted, before mixing

  • Avoid overmixing to maintain a light texture

  • Use similar-sized portions for even baking

Chef’s Key to Exceptional Egg Salad: Techniques for Achieving Creamy Perfection

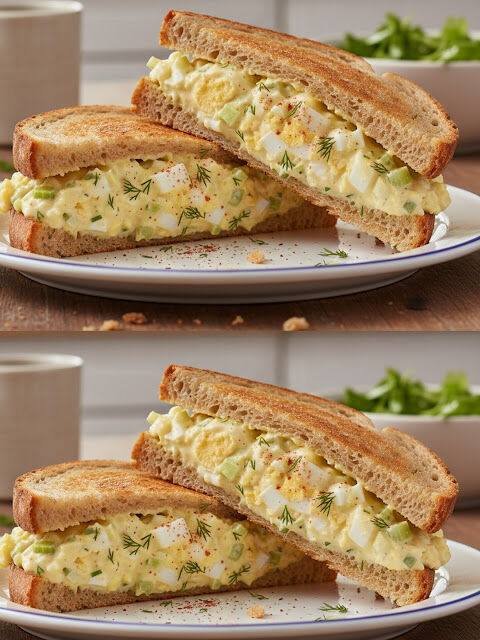
Egg salad may seem simple, but any seasoned chef will tell you: the difference between an ordinary bowl and an unforgettable one comes down to technique. This humble dish relies on a balance of texture, seasoning, and method. When done right, egg salad becomes silky, rich, and luxurious—the kind you want to eat straight from the bowl.

Here’s how chefs elevate this classic comfort food into something exceptional.

1. Start With Perfectly Cooked Eggs

The foundation of a creamy egg salad is a tender, velvety egg—never rubbery whites, never chalky yolks.

Chef’s Technique:

  • Place eggs in a pot.
  • Cover with cold water by at least one inch.
  • Bring to a boil slowly over medium heat.
  • Once the water reaches a full boil, turn off the heat, cover, and let the eggs sit for 10–11 minutes.
  • Immediately transfer to an ice bath for 5 minutes.

This prevents that gray ring around the yolk and ensures they peel beautifully.

2. Grate, Don’t Chop

Most home cooks roughly chop their eggs. Chefs often use a different method:

Use the small side of a grater or press eggs through a mesh cooling rack.

This technique creates:

  • An ultra-fine texture
  • Even distribution of yolk richness
  • That signature restaurant-level creaminess

This is the trick that transforms good egg salad into silky egg salad.

3. Build a Balanced, Creamy Base

The classic mistake is adding too much mayonnaise in an attempt to make the salad creamy. True creaminess comes from combining:

  • Mayonnaise for richness
  • Mustard for acidity
  • A touch of sour cream or Greek yogurt for extra silkiness
  • A tiny splash of pickle brine or lemon juice for brightness

This creates a layered flavor profile and prevents the salad from tasting flat.

4. Season Like a Chef

Eggs crave seasoning. Without it, even the best technique falls flat.

Chefs add:

  • A generous pinch of Kosher salt
  • Fresh black pepper
  • Smoked paprika or regular paprika for depth
  • Fresh dill or chives for fresh, aromatic notes

Optional but chef-approved:

  • A small spoon of finely minced shallot
  • Celery for crisp texture
  • A little Dijon for tang

5. Let It Rest

Texture and flavor improve dramatically after 20–30 minutes in the refrigerator.

Resting time allows:

  • Flavors to meld
  • Excess moisture to absorb
  • The salad thickens naturally

This is why restaurant egg salad always tastes “more put together.”

Restaurant-Quality Creamy Egg Salad Recipe

Ingredients (Serves 4)

For the eggs:

  • 8 large eggs

Creamy base:

  • 1/3 cup mayonnaise
  • 1 tbsp Dijon mustard
  • 1 tbsp sour cream or Greek yogurt
  • 1–2 tsp pickle brine or lemon juice

Mix-ins & seasoning:

  • 1/4 cup finely diced celery
  • 1 tbsp minced shallot (optional)
  • 1 tbsp chopped fresh dill or chives
  • 1/2 tsp salt
  • 1/4 tsp black pepper
  • Pinch of smoked or regular paprika

Instructions

1. Cook the Eggs

  1. Place eggs in a pot and cover with cold water.
  2. Heat over medium until the water comes to a full boil.
  3. Turn off heat, cover, and let sit for 10–11 minutes.
  4. Transfer eggs to an ice bath for 5 minutes.
  5. Peel once cool.

2. Prepare the Eggs

  • Grate the eggs using the small side of a box grater, OR press them through a metal rack for fluffy, even pieces.

3. Make the Creamy Dressing

In a large bowl, whisk together:

  • Mayonnaise
  • Dijon
  • Sour cream/Greek yogurt
  • Pickle brine or lemon juice
  • Salt, pepper, and paprika

4. Combine

  • Fold in the grated eggs, celery, and shallot.
  • Finish with fresh herbs.
  • Mix gently to keep the mixture airy.

5. Chill and Serve

  • Refrigerate for 20–30 minutes to enhance creaminess.
  • Serve on toasted bread, crackers, croissants, or in lettuce cups.

Final Thoughts

The secret to extraordinary egg salad isn’t a long list of ingredients—it’s professional technique. Perfectly cooked eggs, grated texture, balanced acidity, and a short resting time transform a simple, everyday recipe into something luxurious and memorable.

Master these steps, and you’ll never go back to ordinary egg salad again.

Slow-Cooker Pot Roast Recipe

Ingredients:

For the Roast:

  • 3 lbs chuck roast (well-marbled)
  • Salt and pepper (to taste)
  • 2 tbsp olive oil

Aromatics & Veggies:

  • 1 large onion, sliced
  • 4 cloves garlic, minced
  • 4 large carrots, cut into 2-inch pieces
  • 1 lb baby potatoes, halved

Braising Liquid:

  • 2 cups  beef  broth
  • 1 cup red wine (optional, but recommended)
  • 2 tbsp tomato paste
  • 1 tbsp Worcestershire sauce
  • 1 tsp dried thyme
  • 1 tsp dried rosemary
  • 2 bay leaves

 Gravy Thickener (Optional):

Keto Recipes Cookbook
  • 2 tbsp cornstarch + 2 tbsp water

Instructions: 

Discover more
garlic
Beef
Slow Cooker
Garlic
gravy
slow cooker
beef
Gravy
Slow-Cooker
cream

Sear the Roast:

  • Season the chuck roast with salt/pepper.
  • Heat olive oil in a skillet over medium-high. Sear for 3-4 mins per side until crusted.

Layer in the Slow Cooker:

  • Place onion, carrots, and potatoes in slow cooker.
  • Set the seared roast atop the veggies.

Add Braising Liquid:

  • Sprinkle garlic over the roast.
  • Whisk beef broth, wine, tomato paste, Worcestershire, thyme, rosemary, and bay leaves. Pour around roast.

Cook:

  • Cover. Low: 8-10 hrs / High: 4-5 hrs until fork-tender (203°F internal).

Optional Gravy:

  • Remove roast/veggies; cover.
  • Strain liquid into saucepan. Simmer.
  • Mix cornstarch and water; whisk into liquid. Boil for 2-3 mins until thickened.

Serve:

  • Slice the roast against the grain. Serve with veggies and gravy.