Knead Garlic Herb Bread

No-Knead Garlic Herb Dutch Oven Bread

A rustic, artisan-style loaf with a crackling crust and a soft, pillowy interior infused with fresh garlic.

  • Prep time: 10 minutes

  • Rise time: 8–12 hours (overnight)

  • Cook time: 45–50 minutes

  • Total time: ~13 hours

Ingredients

  • 500 g (approx. 4 cups) All-purpose flour

  • 1 packet (7 g) Dry active yeast

  • 2 tsp Salt

  • 3 cloves Fresh garlic, finely chopped

  • 1 tsp Dried rosemary or thyme (optional, for extra aroma)

  • 350 ml Warm water (approx. 105°F–110°F; not hot to the touch)

  • 2 tbsp Olive oil

Instructions

1. Mix the Dough

In a large mixing bowl, whisk together the flour, yeast, salt, chopped garlic, and optional herbs. Pour in the warm water and olive oil. Using a wooden spoon or spatula, mix until a shaggy, sticky dough forms and no dry flour remains. Do not be tempted to add more flour; the stickiness is what creates the airy crumb!

2. The Long Rise

Cover the bowl tightly with plastic wrap or a damp kitchen towel. Leave it on your counter at room temperature for 8 to 12 hours. The dough is ready when it has doubled in size and the surface is dotted with tiny bubbles.

3. Shape and Second Proof

Lightly flour a work surface and your hands. Gently turn the dough out. Do not knead. Simply fold the edges toward the center a few times to create a rough ball shape. Place the dough onto a sheet of parchment paper, cover loosely, and let it rest for 30–45 minutes.

4. Preheat the “Bakery.”

While the dough rests, place a Dutch oven (or a heavy-lidded pot) into the oven. Preheat the oven to 220°C (425°F) with the pot inside. Heating the pot is essential for creating the steam needed for a golden, crispy crust.

5. Bake

Carefully remove the hot pot from the oven. Using the parchment paper as a sling, lift the dough and drop it (paper and all) into the pot.

  • Step A: Cover with the lid and bake for 30 minutes.

  • Step B: Remove the lid and bake for another 15–20 minutes until the crust is a deep, burnished gold.

6. The Cool Down

Lift the bread out of the pot and transfer it to a wire rack. Wait at least 20 minutes before slicing. If you cut it too soon, the steam escapes and the bread can become gummy!


Flavor Variations to Try

  • The Cheesy Garlic: Fold in ½ cup of grated sharp cheddar or Gruyère during the initial mixing phase.

  • The Mediterranean: Swap the garlic for ¼ cup of chopped sun-dried tomatoes and a tablespoon of dried oregano.

  • The Spicy Kick: Add 1 teaspoon of red pepper flakes to the dry ingredients for a subtle heat that pairs perfectly with the garlic.

Storage Tip

Store leftovers in a paper bag at room temperature for up to 2 days for the best crust. If you need to store it longer, slice it and freeze it in a zip-top bag; it toasts up beautifully straight from the freezer!

Crispy Golden Baked Cauliflower Steaks

Crispy Golden Baked Cauliflower Steaks

A flavorful oven-baked vegetable dish with crisp edges and a tender center

These baked cauliflower steaks transform a simple vegetable into a satisfying and hearty dish. A well-seasoned coating and high-heat roasting bring out deep flavor and a beautifully golden surface, while the inside stays soft and tender. This recipe works equally well as a main dish or a side.


Recipe Overview

  • Prep Time: 10 minutes

  • Bake Time: 30–40 minutes

  • Total Time: 40–50 minutes

  • Servings: 4


Ingredients

Main Ingredient

  • 1 large head cauliflower, outer leaves removed, core intact

Seasoning & Oil

  • 3 tablespoons olive oil

  • 2 tablespoons finely grated Parmesan cheese (optional)

    • For a plant-based option, use nutritional yeast

  • 1 teaspoon smoked paprika

  • 1 teaspoon garlic powder

  • 1 teaspoon salt, or to taste

  • ½ teaspoon black pepper

Garnish

  • 1 tablespoon fresh parsley, finely chopped


Step-by-Step Instructions

1. Prepare the Oven and Cauliflower

  • Preheat the oven to 400°F (200°C).

  • Line a large baking sheet with parchment paper for easy cleanup.

  • Remove the outer leaves from the cauliflower while keeping the core intact.

  • Using a sharp knife, slice the cauliflower from top to bottom into 1-inch-thick slices.

  • You should get 3–4 full steaks; reserve any loose florets for roasting alongside.


2. Make the Seasoning Mixture

  • In a small bowl, combine:

    • Olive oil

    • Parmesan cheese (if using)

    • Smoked paprika

    • Garlic powder

    • Salt

    • Black pepper

  • Stir until well blended and smooth.


3. Season the Cauliflower

  • Arrange the cauliflower steaks and florets in a single layer on the prepared baking sheet.

  • Brush both sides generously with the seasoning mixture.

  • Make sure the coating reaches all surfaces—this helps develop a golden finish during baking.


4. Bake the First Side

  • Place the baking sheet in the oven.

  • Bake for 15–20 minutes, until the underside begins to turn golden.


5. Flip and Finish Baking

  • Carefully turn each cauliflower piece using a spatula.

  • Return to the oven and bake for another 15–20 minutes, until:

    • The cauliflower is tender when pierced with a fork

    • The edges are deeply golden and lightly crisp


6. Serve

  • Transfer the baked cauliflower to a serving platter.

  • Sprinkle with freshly chopped parsley.

  • Serve immediately while warm.


Helpful Tips & Variations

  • Extra flavor: Add onion powder, dried herbs, or a squeeze of lemon before serving.

  • Crispier finish: Use convection or broil for the last 2 minutes, watching closely.

  • Meal idea: Serve over grains, with a yogurt-based sauce, or alongside roasted vegetables.

  • Leftovers: Reheat in the oven or air fryer to restore crispness.

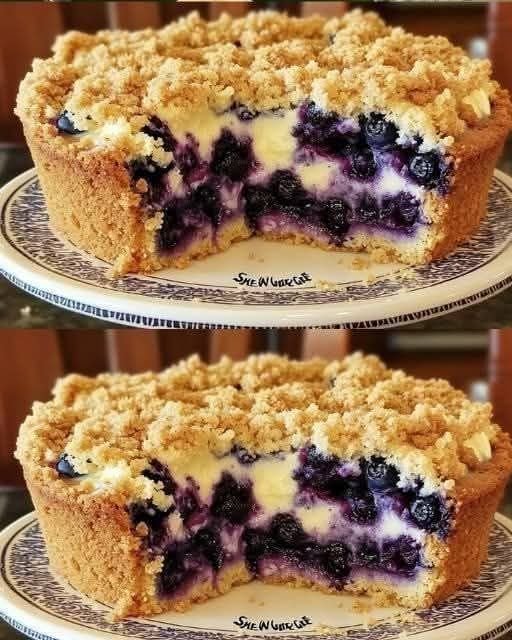
Sherry’s Blueberry Cream Cheese Crumb Cake

Sherry’s Blueberry Cream Cheese Crumb Cake

A soft vanilla cake layered with creamy filling, juicy berries, and a buttery crumb topping

Introduction

This Blueberry Cream Cheese Crumb Cake is a comforting, bakery-style dessert that’s perfect for sharing. A tender vanilla cake forms the base, topped with a smooth cream cheese layer, bursts of blueberries, and a golden cinnamon crumb topping. It’s ideal for brunch tables, afternoon coffee breaks, or as a make-ahead dessert for gatherings.


⏱️ Time & Yield

  • Preparation Time: 25 minutes

  • Baking Time: 35–50 minutes (depending on pan size)

  • Cooling Time: 1 hour

  • Total Time: About 2 hours

  • Servings: 12–15 slices


🧾 Ingredients

Cake Batter

(Fits a 9×13-inch pan or an 8-inch square dish)

  • ½ cup unsalted butter, softened

  • 1 cup granulated sugar

  • 2 large eggs

  • 1 teaspoon vanilla extract

  • 2 cups all-purpose flour

  • 2 teaspoons baking powder

  • ½ teaspoon salt

  • ½ cup milk

  • 1½ cups fresh or frozen blueberries


Cream Cheese Layer

  • 8 oz cream cheese, softened

  • ¼ cup granulated sugar

  • 1 egg

  • ½ teaspoon vanilla extract


Crumb Topping

  • ½ cup all-purpose flour

  • ¼ cup brown sugar

  • ¼ cup cold butter, cubed

  • ½ teaspoon ground cinnamon


👩‍🍳 Step-by-Step Instructions

1. Prepare the Pan and Oven

Preheat your oven to 350°F (175°C).
Grease and lightly flour a 9×13-inch baking pan or an 8-inch square dish. Set aside.


2. Make the Cake Batter

In a large mixing bowl, beat the softened butter and granulated sugar together until light and fluffy.

Add the eggs one at a time, mixing well after each addition. Stir in the vanilla extract.

In a separate bowl, whisk together the flour, baking powder, and salt.

Add the dry ingredients to the butter mixture in two additions, alternating with the milk. Mix gently just until combined.

Carefully fold in the blueberries, taking care not to crush them.

Spread the batter evenly into the prepared pan.


3. Prepare the Cream Cheese Layer

In a medium bowl, beat the cream cheese until smooth.

Add the sugar, egg, and vanilla extract. Mix until creamy and well blended.

Spoon the cream cheese mixture over the cake batter. Use a knife to gently swirl if desired, or leave it layered.


4. Make the Crumb Topping

In a small bowl, combine the flour, brown sugar, and cinnamon.

Add the cold butter cubes and work them into the mixture using your fingers or a pastry cutter until small clumps form.

Sprinkle the crumb topping evenly over the cream cheese layer.


5. Bake

Bake uncovered:

  • 45–50 minutes for a 9×13-inch pan

  • 35–40 minutes for an 8-inch square pan

The top should be lightly golden and set.

Remove from the oven and allow the cake to cool completely before slicing. This helps the layers set neatly.


🍽️ Serving Suggestions

  • Serve at room temperature or slightly chilled

  • Pair with tea or coffee

  • Dust lightly with powdered sugar before serving if desired


💡 Helpful Tips & Variations

  • Nutty crunch: Add chopped walnuts or pecans to the crumb topping

  • Citrus touch: Stir 1 teaspoon lemon zest into the batter for added brightness

  • Berry swap: Use raspberries or blackberries in place of blueberries

  • Gentle mixing: Stir just until combined for a soft, tender cake


🧊 Storage

  • Store covered in the refrigerator for up to 3 days

  • Individual slices may be wrapped and frozen for up to 3 months

  • Thaw overnight in the refrigerator before serving

Italian Lemon Yogurt Cake (Sugar-Free)

Italian Lemon Yogurt Cake (Sugar-Free)

Moist, fragrant, and naturally sweetened

Prep Time: 15 minutes
Bake Time: 45–50 minutes
Total Time: 1 hour
Yield: 1 loaf (8–10 slices)

This Italian-style lemon yogurt cake is light, moist, and full of bright citrus flavor. It’s sweetened with stevia instead of refined sugar, making it a better option for those reducing sugar intake while still enjoying a classic homemade cake.


Ingredients

Dry Ingredients

  • 1½ cups all-purpose flour

  • 2 teaspoons baking powder

  • ½ teaspoon kosher salt

Wet Ingredients

  • 1 cup plain coconut yogurt (or whole milk yogurt)

  • Stevia powder, to taste
    (use the amount equivalent to ¾–1 cup sugar, depending on brand strength)

  • 3 large eggs

  • 2 teaspoons finely grated lemon zest (from about 2 lemons)

  • ⅓ cup freshly squeezed lemon juice

  • ½ teaspoon pure vanilla extract

  • ½ cup olive oil

Lemon Soaking Syrup (Sugar-Free)

  • ¼ cup lemon juice

  • Stevia powder, equivalent to ¼ cup sugar

Sugar-Free Lemon Glaze (Optional)

  • Juice of 1 lemon

  • Powdered stevia sweetener, to taste
    (or sugar-free confectioner’s sweetener blend)


Step-by-Step Instructions

1. Prepare the Pan

Preheat oven to 350°F (180°C).
Grease an 8½ × 4¼ × 2½-inch loaf pan and line the bottom with parchment paper, or lightly coat with baking spray.


2. Mix Dry Ingredients

In a large bowl, sift together:

  • Flour

  • Baking powder

  • Salt

Set aside.


3. Mix Wet Ingredients

In a separate bowl, whisk together:

  • Yogurt

  • Stevia powder

  • Eggs

  • Lemon zest

  • Lemon juice

  • Vanilla extract

Whisk until smooth and well combined.


4. Combine Batter

Gradually whisk the dry ingredients into the wet mixture until just combined.
Do not overmix.


5. Add Oil

Gently fold in the olive oil using a spatula until fully incorporated.
The batter should be smooth and slightly thick.


6. Bake

Pour the batter into the prepared loaf pan and smooth the top.

Bake for 45–50 minutes, or until a toothpick inserted into the center comes out clean.


7. Prepare the Lemon Syrup

While the cake bakes, combine:

  • ¼ cup lemon juice

  • Stevia powder

Heat gently in a small saucepan just until dissolved. Do not boil. Set aside.


8. Soak the Cake

Allow the cake to cool in the pan for 10 minutes.
While still warm, slowly pour the lemon syrup over the cake so it absorbs evenly.

Let the cake cool completely.


9. Prepare the Sugar-Free Glaze (Optional)

Mix powdered stevia with lemon juice until a pourable glaze forms.
Drizzle over the cooled cake.

Allow glaze to set for about 1 hour before slicing.


Tips for Best Results

  • Use fine powdered stevia for smooth texture.

  • Olive oil gives authentic Italian flavor; use light olive oil if preferred.

  • For extra moisture, wrap the cooled cake and rest overnight before serving.

  • Skip the glaze for a lighter, breakfast-style cake.


Storage

  • Store covered at room temperature for 2 days

  • Refrigerate for up to 5 days

  • Freeze slices for up to 2 months

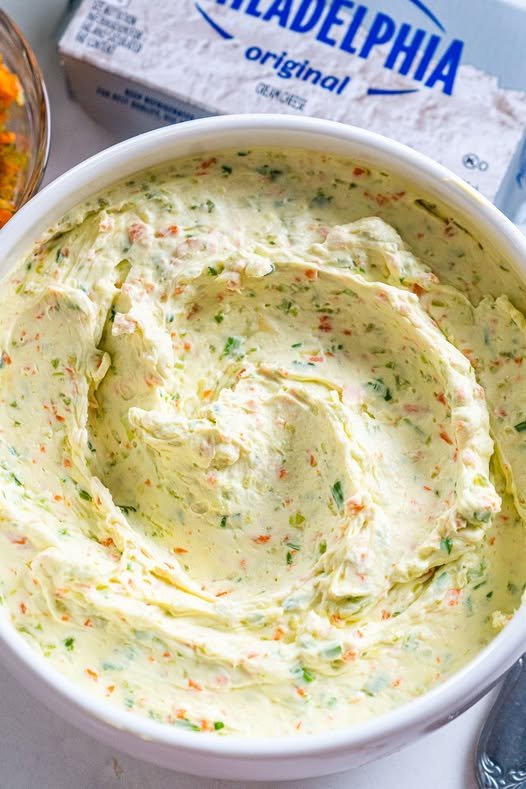
Homemade Garden Vegetable Spread

Homemade Garden Vegetable Spread

This creamy, tangy spread is packed with crunchy carrots, celery, and zesty green onions. It’s the perfect companion for toasted bagels, crackers, or even as a dip for fresh bell pepper strips.

  • Prep time: 15 minutes

  • Inactive time: 1–2 hours (chilling)

  • Yields: Serves 8

  • Dietary Info: Vegetarian, Contains Milk

Ingredients

  • 2 (8 oz) packages cream cheese, softened to room temperature

  • ¼ cup carrots, chopped

  • ½ cup celery, chopped

  • 2 green onions, chopped

  • ½ tsp salt

  • ½ tsp garlic powder

  • ¼ tsp onion powder

Preparation

  1. Prep the Veggies: Place the chopped carrots, celery, and green onions into a food processor. Pulse several times until the vegetables are broken down into very small bits.

    Tip: Be careful not to over-process; you want distinct texture, not a watery paste.

  2. Mix: In a medium-sized mixing bowl, combine the softened cream cheese, the pulsed vegetable mixture, salt, garlic powder, and onion powder. Stir vigorously until the vegetables and seasonings are evenly distributed throughout the cream cheese.

  3. Chill: Spoon the spread into an airtight container or a glass jar. Place it in the refrigerator for at least 1 to 2 hours. This allows the cream cheese to firm back up and the flavors from the onion and garlic to meld.

  4. Serve: Spread generously on toasted bagels or crusty bread.

Storage

Keep the spread refrigerated in an airtight container. It will stay fresh and delicious for 7–10 days.

Southern Corn & Cheese Pudding

Southern Corn & Cheese Pudding

  • Prep time: 10 minutes

  • Bake time: 40–50 minutes

  • Servings: 6–8 sides

Ingredients

  • 2 cups Corn kernels (canned/drained or thawed frozen)

  • 1 ½ cups Shredded cheese (Cheddar, Colby Jack, or Pepper Jack for a kick)

  • 2 cups Half-and-half (for richness) or whole milk

  • 4 large Eggs

  • ½ tsp Salt (optional)

  • ¼ tsp Black pepper (optional)

Instructions

1. Prep the Dish

Preheat your oven to 350°F (175°C). Lightly grease a 9-inch baking dish or a 2-quart casserole dish with butter or nonstick cooking spray.

2. Create the Custard Base

In a medium mixing bowl, whisk the 4 eggs until they are slightly frothy and well-combined. Pour in the 2 cups of half-and-half (or milk) and whisk again until the mixture is smooth. If you are using salt and pepper, stir them in now.

3. Mix in Textures

Gently fold in the 2 cups of corn and 1 cup of the shredded cheese. Set the remaining ½ cup of cheese aside for the topping. Stir well to ensure the corn is distributed throughout the liquid so it doesn’t all settle at the bottom.

4. Bake to Golden Perfection

Pour the mixture into your prepared baking dish. Sprinkle the reserved ½ cup of cheese evenly over the top. Place on the middle oven rack and bake for 40–50 minutes.

5. Test for Doneness

The pudding is done when the edges are firm and a deep golden brown. The center should still have a slight jiggle (wobble) when shaken gently, and a knife inserted near the center should come out mostly clean.

6. The “Carry-Over” Rest

Crucial Step: Let the pudding rest on the counter for 10–15 minutes before serving. This allows the internal heat to finish setting the custard, ensuring it isn’t runny when scooped.


Tips for the Perfect Pudding

  • Texture Control: If you prefer a creamier, thicker texture, you can pulse 1 cup of the corn in a blender before adding it to the mix; this releases the natural starches in the corn.

  • The “Wobble”: Don’t overbake! If the center is completely stiff in the oven, it may become “weepy” (release water) once it cools. A little jiggle is your friend.

  • Add-ins: For more flavor, consider adding a pinch of nutmeg or some chopped green chives to the custard.