Baked Oatmeal Apple Circles

Baked Oatmeal Apple Circles

Naturally Sweet • Soft-Baked • Simple Ingredients

These apple oatmeal circles are lightly sweet, tender, and satisfying. Made with oats, almonds, and fresh apples, they’re ideal as a breakfast bite, snack, or light dessert—and they store well for easy planning ahead.

Prep Time: 15 minutes
Bake Time: 20–25 minutes
Yield: 6–8 circles


Ingredients

  • 1 cup (90 g) rolled oats or quick oats

  • 50 g raw almonds (about ½ cup)

  • 2 large apples, peeled and cut into chunks

  • 50 ml water (about 3 tablespoons)

  • ½ teaspoon vanilla extract (or a small pinch of vanillin)

  • Optional: a light sprinkle of cinnamon


Step-by-Step Instructions

1. Make the Dry Base

Add the oats and almonds to a blender or food processor.

Blend until the mixture becomes fine and flour-like, with no large pieces remaining.

Transfer this dry mixture to a mixing bowl and set aside.


2. Prepare the Apple Purée

Without washing the blender, add the apple chunks, water, and vanilla extract.

Blend until the mixture becomes smooth and pourable, similar to applesauce.

This purée provides natural sweetness and moisture.


3. Combine and Rest

Pour the apple purée into the bowl with the oat–almond mixture.

Stir until a thick, soft dough forms.

Let the mixture rest for about 5 minutes.
This allows the oats to absorb moisture and makes the dough easier to shape.


4. Shape the Circles

Preheat the oven to 180°C (350°F).

Line a baking tray with parchment paper.

Scoop about 2 tablespoons of dough onto the tray for each piece.

Gently flatten into a round disc about ½ inch (1–1.5 cm) thick.

Using your finger or the handle of a wooden spoon, press a small hole into the center to form a ring shape.

If using cinnamon, lightly sprinkle it over the tops.


5. Bake

Place the tray in the preheated oven.

Bake for 20–25 minutes, until:

  • The circles feel set to the touch

  • The bottoms are lightly golden

Remove from the oven and let them cool completely on the tray.
They will become firmer as they cool.


Helpful Tips for Best Results

  • Apple Variety: Naturally sweet apples (such as Gala or Fuji) give the best flavor without added sweeteners.

  • Optional Sweetness: If you prefer a sweeter treat, add 1 tablespoon honey or maple syrup to the apple purée before mixing.

  • Texture Choice: For extra texture, sprinkle a few chopped almonds on top before baking.

  • Cooling Time: Allow full cooling for the best structure and easy handling.

Homemade Mussel-Shaped Butter Bread

Homemade Mussel-Shaped Butter Bread

Soft Crumb • Rich Buttery Flavor • Beautiful Golden Finish

This tender bread is light, fluffy, and delicately shaped to resemble a shell. It’s perfect for breakfast, sandwiches, or serving warm with butter and tea.

Prep Time: 20 minutes
Rising Time: About 1½ hours
Bake Time: 20–30 minutes
Yield: 2 small loaves or 10–12 rolls


Ingredients

  • 80 g butter, melted and slightly cooled

  • 500 g bread flour (about 4 cups)

  • 250 ml warm milk (comfortably warm to the touch)

  • 1 large egg, at room temperature

  • 2 tablespoons granulated sugar

  • 7 g dry yeast (1 standard packet)

  • 1 teaspoon salt

For the Topping

  • 1 egg yolk

  • 1 tablespoon milk


Step-by-Step Instructions

1. Activate the Yeast

Pour the warm milk into a large mixing bowl.

Add the sugar and dry yeast, then whisk gently to combine.

Let the mixture rest for 5–10 minutes, until it looks foamy and slightly bubbly.
This shows the yeast is active and ready.


2. Mix the Dough

Add the melted butter, egg, and salt to the yeast mixture. Stir until well blended.

Gradually add the bread flour, mixing with a spoon or spatula until a soft, shaggy dough forms.

Once the dough begins to come together, it’s ready for kneading.


3. Knead and First Rise

Transfer the dough to a lightly floured surface.

Knead for 8–10 minutes, pushing the dough away with the heel of your hand, then folding it back over itself.

The dough should become smooth, stretchy, and pleasant to handle.

Place the dough in a lightly greased bowl, turning once to coat the surface.

Cover with a clean cloth and let it rest in a warm place for about 1 hour, or until it has noticeably increased in size.


4. Shape the Bread

Gently press the dough to release excess air.

Divide it into 2 equal portions for small loaves, or into smaller pieces if making rolls.

For the mussel (shell) shape:

  • Roll each piece into a ball

  • Flatten gently into an oval

  • Fold one side over the other to create a layered shell look

Place the shaped dough on a lined baking tray or into greased pans.

Cover lightly and let rest for 30 minutes, allowing the shapes to puff slightly.


5. Bake

Preheat your oven to 180°C (350°F).

Mix the egg yolk with 1 tablespoon of milk.

Brush the tops of the bread gently with this mixture to give a glossy, golden finish.

Bake:

  • 25–30 minutes for loaves

  • 15–20 minutes for rolls

The bread is ready when the tops are golden and the loaf feels light when lifted.


6. Cool and Serve

Remove the bread from the pans promptly and place on a wire rack.

Allow it to cool slightly before slicing to keep the texture soft and even.


Helpful Tips for Best Results

  • Milk Temperature: Milk should feel warm but comfortable to the touch to support yeast activity.

  • Butter Choice: A good-quality butter adds extra richness and softness to the crumb.

  • Even Baking: If the top browns too quickly, loosely cover with foil for the final minutes.

  • Storage: Store at room temperature in a sealed container for up to 2 days, or freeze once fully cooled.


Serving Ideas

This bread is delicious:

  • Warm with butter or honey

  • As sandwich bread

  • Served alongside soups or stews

  • Lightly toasted the next day

Baked Banana, Apple & Cinnamon Oatmeal

Baked Banana, Apple & Cinnamon Oatmeal

Soft • Naturally Sweet • Comforting & Filling

This baked oatmeal brings together ripe bananas, tender apples, and warming cinnamon for a simple breakfast you can prepare ahead and enjoy throughout the week.

Prep Time: 10 minutes
Bake Time: 30–35 minutes
Servings: 2–3


Ingredients

  • 1 cup (90 g) rolled oats

  • 200 ml (¾ cup) milk (dairy or plant-based)

  • 2 eggs, at room temperature

  • 2 ripe bananas (about 200 g), mashed

  • 1 apple (about 150 g), peeled and thinly sliced

  • ½ teaspoon ground cinnamon

  • ½ teaspoon vanillin (or 1 teaspoon vanilla extract)


Step-by-Step Instructions

1. Prepare the Base

Preheat your oven to 180°C (350°F).

In a large mixing bowl, mash the ripe bananas with a fork until smooth and creamy, with few or no lumps.

Add the eggs, milk, and vanillin (or vanilla extract).
Whisk gently until the mixture looks smooth and evenly blended.


2. Add the Oats and Spice

Stir the rolled oats into the banana mixture.

Sprinkle in the cinnamon and mix again so the oats and spice are evenly distributed throughout the batter.

The mixture should look pourable but thick, similar to loose porridge.


3. Add the Apples

Lightly grease a small baking dish.

Pour the oatmeal mixture into the dish and spread it evenly.

Arrange the apple slices over the top in a neat, overlapping pattern.
If you enjoy extra warmth, lightly sprinkle a pinch of cinnamon over the apples.


4. Bake

Place the dish in the preheated oven.

Bake for 30–35 minutes, until:

  • The center feels set when gently pressed

  • The apples are soft

  • The edges turn lightly golden


5. Cool and Serve

Remove from the oven and allow the oatmeal to cool slightly.

Slice into portions and serve warm on its own, or with:

  • A spoon of yogurt

  • A light drizzle of honey

  • Extra fruit on the side


Helpful Tips for Best Results

  • Banana Choice: Bananas with brown spots are naturally sweeter and blend more smoothly.

  • Texture Preference: Rolled oats give a hearty, chewy bite. For a softer, cake-like texture, briefly blend the oats before mixing.

  • Make Ahead: This oatmeal stores well in the refrigerator for up to 4 days.

  • Reheating: Warm individual portions gently until heated through.


Why You’ll Love This Recipe

  • Naturally sweet with no added sugar

  • Easy to prepare and bake all at once

  • Great for busy mornings or meal prep

  • Comforting and satisfying without being heavy

Banana Oatmeal Pancakes

Banana Oatmeal Pancakes

Naturally Sweet • Soft & Filling • Simple Ingredients

Prep Time: 5 minutes
Cooking Time: 10 minutes
Servings: 2–3


Ingredients

  • 1 cup rolled oats or quick oats

  • 2 ripe bananas

  • 2 eggs, at room temperature

  • 100 ml water (or milk, if preferred)

  • 4 tablespoons yogurt (2 for batter, 2 for serving)

  • ¼ teaspoon baking soda

  • Oil for cooking (neutral oil or coconut oil)


Step-by-Step Instructions

1. Prepare the Oat Flour

Add the oats to a blender or food processor.

Blend until the oats turn into a fine, powder-like flour. This helps create a smooth and tender pancake texture.


2. Make the Batter

Add the bananas, eggs, water, baking soda, and 2 tablespoons of the yogurt to the blender with the oat flour.

Blend until the mixture becomes smooth, creamy, and evenly mixed.

Let the batter rest for 2–3 minutes.
This short rest allows the oats to absorb liquid, giving the pancakes a softer and fluffier texture.


3. Heat the Pan

Place a non-stick pan or griddle over medium-low heat.

Lightly grease the surface with a small amount of oil, spreading it evenly.

Allow the pan to warm gently before cooking.


4. Cook the Pancakes

Pour about ¼ cup of batter onto the pan for each pancake.

Cook for 2–3 minutes, until:

  • Small bubbles appear on the surface

  • The edges look set and no longer shiny

Carefully turn the pancake over.

Cook the second side for 1–2 minutes, until lightly golden and cooked through.

Repeat with the remaining batter, adding a little more oil if needed.


5. Serve and Enjoy

Serve the pancakes warm.

Top with the remaining yogurt and add fresh fruit, chopped nuts, or a light drizzle of honey if desired.


Helpful Tips for Best Results

  • Banana Choice: Very ripe bananas add natural sweetness and a pleasant aroma.

  • Gentle Heat: Cooking over medium-low heat helps the pancakes cook evenly.

  • Batter Consistency: If the batter thickens after resting, add a small splash of water or milk to loosen it.

  • Pan Size: Smaller pancakes are easier to flip and cook more evenly.


Serving Ideas

These pancakes pair beautifully with:

  • Sliced strawberries or berries

  • Chopped almonds or walnuts

  • A spoon of nut butter

  • Extra yogurt and banana slices

Stovetop “Boiled & Baked” Homemade Bread

Stovetop “Boiled & Baked” Homemade Bread

Soft Inside • Light Crust • Made Without an Oven

Yield: 5–6 medium loaves
Total Time: About 2 hours
(including resting and cooking time)


Ingredients

For the Dough

  • 5 cups all-purpose flour

  • 2 cups warm milk (comfortably warm to the touch)

  • 1 cup vegetable oil (or any neutral-flavored oil)

  • 1 tablespoon dry yeast

  • 1 tablespoon granulated sugar

  • 1 teaspoon salt

For the Boiling Bath

  • 2.5–3 liters water

  • 1 teaspoon salt


Step-by-Step Instructions

1. Activate the Yeast

Pour the warm milk into a large mixing bowl.

Add the sugar and dry yeast, then stir gently to combine.

Set the bowl aside for 5–10 minutes.
The surface should become foamy and bubbly—this shows the yeast is active and ready.


2. Mix the Dough

Add the vegetable oil and salt to the yeast mixture. Stir well.

Begin adding the flour one cup at a time, mixing with a spoon or spatula until a soft, slightly sticky dough forms.

Once mixing becomes difficult, transfer the dough onto a lightly floured surface.


3. Knead Until Smooth

Knead the dough for 8–10 minutes, using the heel of your hand to push it away, then fold it back over itself.

The dough should become smooth, stretchy, and easy to handle.

Place the dough in a lightly oiled bowl. Cover with a clean cloth.

Let it rest in a warm place for about 1 hour, or until it has increased in size.


4. Shape the Loaves

Gently press the dough to release trapped air.

Divide it into 5 or 6 equal portions.

Roll each portion into an oblong or small baguette-style shape.

Place the shaped dough on a tray, cover lightly, and allow it to rest for 15–20 minutes.
This helps the bread cook evenly and stay soft.


5. Boil the Dough Briefly

Bring the water and salt to a gentle boil in a wide pot.

Carefully lower 1–2 loaves at a time into the water.

Boil for 30–45 seconds per side, turning gently.

Remove the loaves with a slotted spoon and allow excess water to drain.

Using a sharp knife, make shallow diagonal cuts across the top of each loaf.
These help the bread expand nicely while cooking.


6. Stovetop “Baking”

Lightly grease a heavy-bottomed non-stick pan or Dutch oven.

Place the boiled loaves inside, leaving space between them.

Cover with a tight-fitting lid.

Cook on very low heat for 15–20 minutes.

Carefully turn the loaves over, cover again, and cook for another 10–15 minutes.

The bread is ready when:

  • Both sides are golden

  • The loaf feels light

  • It sounds hollow when tapped


Helpful Tips for Best Results

  • Low Heat Is Key: Gentle heat allows the bread to cook through without drying out.

  • Steam Control: Wrapping the pan lid with a clean kitchen towel helps absorb moisture and keep the crust pleasant in texture. Ensure the towel is safely away from direct heat.

  • Milk Temperature: Milk should feel warm, not hot, to support yeast activity.

  • Storage: Keep the bread in a sealed bag or container at room temperature. It stays soft for 2–3 days.


Serving Ideas

This bread is delicious:

  • Fresh and warm with butter

  • With tea or soup

  • As sandwich bread

  • Split and toasted lightly on a pan

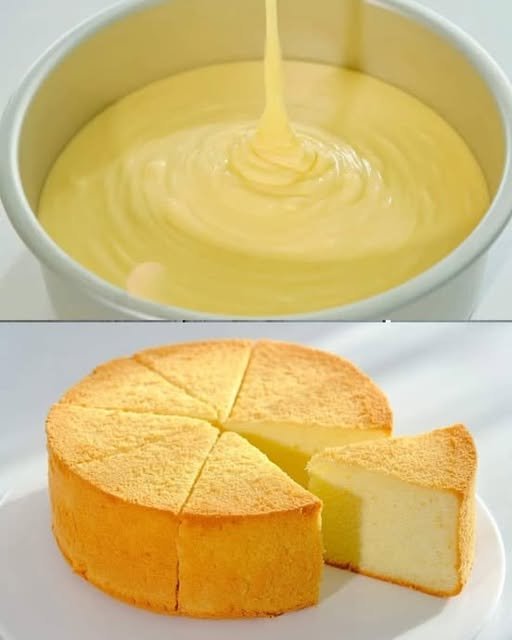
Cloud-Like Basic Chiffon Cake

Cloud-Like Basic Chiffon Cake

Ultra-Soft • Light as Air • Delicate Crumb

Prep Time: 20 minutes
Bake Time: 50–60 minutes
Pan Size: 7-inch (18 cm) chiffon tube pan or round pan
Yield: 6–8 slices


Ingredients

Egg Base

  • 5 large eggs, cold, separated into yolks and whites

  • 50 g milk, at room temperature

  • 50 g vegetable oil (or any neutral-flavored oil)

  • 84 g cake flour, sifted

  • 20 g granulated sugar (for egg yolks)

  • 2 g salt

  • 1 teaspoon vanilla extract

Meringue

  • 5 egg whites

  • 50 g granulated sugar

  • 2 ml lemon juice (or ¼ teaspoon cream of tartar)


Step-by-Step Instructions

1. Prepare the Egg Yolk Batter

Place the egg yolks into a large mixing bowl. Add the 20 g sugar, salt, and vanilla extract.

Whisk until the mixture looks smooth, pale, and well blended.

Slowly pour in the milk and vegetable oil. Whisk steadily until everything combines into a glossy, slightly thick mixture.

Sift the cake flour directly into the bowl. Using a whisk or spatula, gently mix in a zigzag or “Z” motion until the batter is smooth and free of lumps.
Mix only until combined to keep the texture light.


2. Whip the Egg Whites (Meringue)

In a separate clean bowl, add the egg whites and lemon juice.

Using an electric mixer on medium speed, beat until the whites become foamy and bubbly.

Add the sugar gradually in three portions, beating between each addition.

Increase to medium-high speed and continue beating until stiff peaks form.
When you lift the beaters, the peaks should stand upright and look glossy.


3. Combine the Batter Gently

Add about one-third of the whipped egg whites to the yolk batter. Fold gently with a spatula to loosen the mixture.

Pour the lightened yolk batter into the remaining egg whites.

Using a gentle folding motion, combine everything:

  • Cut through the center

  • Scrape the bottom

  • Lift and fold over

Continue until the batter looks evenly blended with no white streaks.


4. Bake the Cake

Pour the batter into an ungreased 7-inch chiffon pan or round pan.

Lightly tap the pan on the counter 2–3 times to release large air bubbles.

Place the pan on the middle rack of a preheated oven.

Bake at 150°C (300°F) for 50–60 minutes, until:

  • The top turns light golden

  • The surface springs back gently when touched


5. Cool the Cake Properly

Once baked, remove the pan from the oven and immediately turn it upside down on a wire rack or bottle neck.

Allow the cake to cool fully in this position for 1–2 hours.
This helps the cake keep its airy structure.

When completely cool, run a thin knife around the edges and gently release the cake.


Helpful Baking Tips

  • Pan Choice: Leave the pan ungreased so the batter can rise evenly.

  • Clean Equipment: Make sure bowls and beaters are completely clean for the best meringue volume.

  • Sugar Control: Adding sugar slowly helps create a smooth, stable foam.

  • Flour Substitute:
    If cake flour is unavailable:

    • Measure 84 g all-purpose flour

    • Remove 1½ tablespoons

    • Replace with 1½ tablespoons cornstarch

    • Sift well before using


Texture & Flavor

This chiffon cake is:

  • Soft and airy

  • Lightly sweet

  • Moist without being heavy

  • Perfect on its own or with fruit, whipped cream, or a light glaze