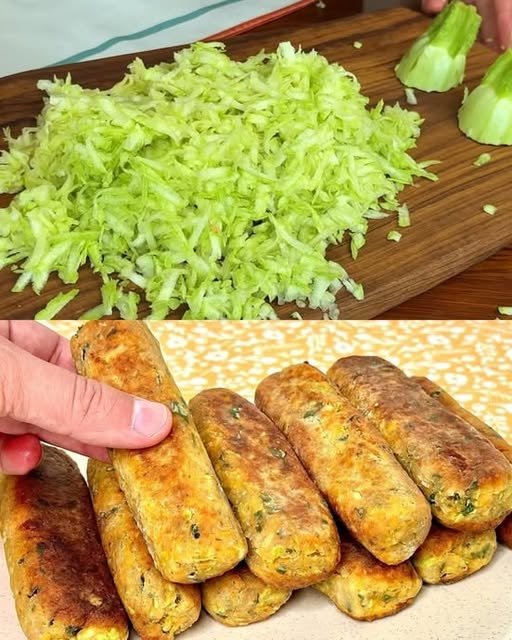
Crispy Zucchini and Oatmeal Patties

Crispy Zucchini and Oatmeal Patties

These savory vegetable patties are crisp on the outside and tender on the inside. Made with grated vegetables, oats, eggs, and cheese, they are simple to prepare and can be baked or pan-cooked depending on your preference. They work well as a snack, side dish, or light meal.

Prep Time

15 minutes

Cook Time

20–25 minutes

Yield

Makes approximately 8–10 patties


Ingredients

  • 1 large zucchini, grated

  • 1 medium potato, grated

  • 1 medium carrot, grated

  • 2 large eggs, lightly beaten

  • 5 tablespoons quick oats (rolled oats can be used but should be finely crushed)

  • 100 g (3.5 oz) cheese, grated (cheddar, mozzarella, or feta all work well)

  • 2 tablespoons fresh parsley, finely chopped

  • ½ teaspoon sweet paprika

  • ½ teaspoon dried Italian herbs

  • ½ teaspoon garlic powder

  • Salt, to taste

  • Black pepper, to taste

  • Olive oil, for brushing or light frying


Instructions

1. Prepare and Drain the Vegetables

Grate the zucchini, potato, and carrot using a box grater or food processor. Transfer the grated vegetables to a clean kitchen towel or fine-mesh strainer. Sprinkle lightly with salt and let them rest for about 5 minutes.
After resting, firmly squeeze out as much liquid as possible. Removing excess moisture helps the patties hold their shape and cook evenly.


2. Combine the Base Ingredients

Place the drained vegetables into a large mixing bowl. Add the beaten eggs and oatmeal. Stir well until everything is evenly combined.
Let the mixture rest for 5–10 minutes so the oats soften and absorb moisture, helping bind the mixture without additional flour.


3. Add Seasonings and Cheese

Add the grated cheese, chopped parsley, paprika, dried Italian herbs, and garlic powder. Season with salt and black pepper to taste.
Mix thoroughly until the ingredients are evenly distributed and the mixture holds together when pressed.


4. Shape the Patties

Using your hands or a spoon, portion the mixture evenly. Shape into short logs or flatten into round patties, depending on your preference. Press gently to ensure they are compact but not overly dense.


5. Cooking Methods

Oven Method (Most Even Cooking)

  • Preheat the oven to 200°C (400°F).

  • Line a baking tray with parchment paper.

  • Arrange the patties with space between them.

  • Lightly brush or spray the tops with olive oil.

  • Bake for 20–25 minutes, turning halfway through, until both sides are golden and firm to the touch.

Pan Method

  • Heat a small amount of olive oil in a non-stick skillet over medium heat.

  • Cook the patties for 4–5 minutes per side, turning carefully, until golden brown and cooked through.


Serving Ideas

  • Serve warm with a garlic yogurt sauce, plain yogurt, or sour cream

  • Pair with a fresh green salad

  • Enjoy as a sandwich filling or wrap component


Helpful Tips

  • If the mixture feels too loose, add 1–2 extra tablespoons of oats and rest for a few minutes

  • For extra crispness, brush both sides lightly with oil

  • These patties can be refrigerated (uncooked) for up to 24 hours

Cheesy Beef Puff Pastry Rolls – Easy Recipe

Cheesy Beef Puff Pastry Rolls—Easy Recipe

✅ Ingredients (8 pieces)

  • 2 sheets puff pastry, thawed
  • 300 g ground beef
  • 1 small onion, finely chopped
  • 2 cloves garlic, minced
  • 1 cup shredded cheese (cheddar or mozzarella)
  • 2 tbsp chopped green onions
  • 1 tsp paprika
  • ½ tsp black pepper
  • ½ tsp salt
  • ½ tsp cumin (optional)
  • 1 tbsp oil
  • 1 egg yolk + 1 tsp milk (for brushing)

✅ Instructions

  1. Cook the filling
    Heat oil in a pan, sauté onion until soft. Add garlic and beef. Cook until browned.
    Season with salt, pepper, paprika, and cumin. Let cool slightly.
  2. Prepare the pastry
    Cut each puff pastry sheet into 4 rectangles.
  3. Fill
    Add beef mixture, cheese, and green onions on one side of each rectangle.
  4. Fold & seal
    Fold over, seal edges with a fork.
  5. Brush
    Brush tops with egg wash for a shiny golden finish.
  6. Bake
    Bake at 200°C (400°F) for 18–22 minutes until golden and puffed.

✅ Serving Ideas

  • With garlic sauce
  • With ketchup or chili sauce
  • As party snacks
  • For dinner with salad

🔁 Variations

  • Add mushrooms
  • Use chicken instead of beef
  • Add jalapeños for spicy version

🥩 Steak & Creamy Mushroom Duo

🥩 Steak & Creamy Mushroom Duo

The Ultimate Comfort Plate

A satisfying trio of juicy steak in creamy mushroom sauce, fluffy mashed potatoes, and a fresh crunchy chicken salad—restaurant-style comfort made at home.


🥩 1. Juicy Steak with Creamy Mushroom Sauce

Ingredients

  • 2 steaks (sirloin, ribeye, or striploin)

  • 1 tbsp olive oil

  • 1 tbsp butter

  • 1 cup mushrooms, sliced

  • 1 garlic clove, minced

  • ½ cup beef broth

  • ¼ cup cooking cream

  • Salt & black pepper, to taste

Instructions

  1. Season steaks generously with salt and pepper.

  2. Heat olive oil and butter in a hot pan.

  3. Sear steaks for 2–4 minutes per side (depending on thickness). Remove and rest.

  4. In the same pan, sauté mushrooms until golden. Add garlic and cook briefly.

  5. Pour in beef broth and simmer for 2–3 minutes.

  6. Add cream and cook until the sauce thickens.

  7. Return steaks to the pan and coat them well in the sauce. Simmer 1 minute, then turn off heat.


🥔 2. Fluffy Mashed Potatoes

Ingredients

  • 4 medium potatoes, boiled and peeled

  • 2 tbsp butter

  • ¼ cup warm milk

  • Salt & black pepper

  • Fresh parsley, chopped

Instructions

  1. Mash potatoes while hot.

  2. Add butter and warm milk gradually.

  3. Season with salt and pepper.

  4. Finish with fresh parsley for flavor and color.


🥗 3. Crunchy Chicken Salad

Ingredients

  • 1 cup cooked chicken, diced

  • Chopped lettuce

  • Grated carrots

  • Shredded cabbage

Dressing

  • 2 tbsp mayonnaise

  • 1 tbsp yogurt

  • Salt & black pepper

Instructions

  1. Combine chicken and vegetables in a bowl.

  2. Mix dressing ingredients separately.

  3. Toss everything together until lightly coated.


🍽️ To Serve

Plate the creamy steak beside a generous scoop of mashed potatoes and a refreshing chicken salad. Serve warm and enjoy a complete comfort meal.

Classic Sponge Cake

Classic Sponge Cake

A light, airy cake made with whipped eggs and minimal fat

This sponge cake relies on properly beaten eggs to create structure and volume. The result is a soft, fine-crumb cake that can be served plain or paired with fruit, cream, or light glazes.

Prep Time: 15 minutes
Bake Time: 30–35 minutes
Cooling Time: 15 minutes
Servings: 8–10
Pan Size: 8-inch (20 cm) square or round pan
Oven Temperature: 325°F (165°C)


Ingredients

  • 4 large eggs, room temperature

  • ¾ cup (150 g) granulated sugar

  • ¾ cup (90 g) cake flour, sifted

  • ¼ teaspoon salt

  • 1 teaspoon vanilla extract

  • 2 tablespoons milk, warm (optional, for extra moisture)


Step-by-Step Instructions

1. Prepare the Pan and Oven

  • Preheat the oven to 325°F (165°C).

  • Line the bottom of the baking pan with parchment paper.

  • Do not grease the sides; this helps the cake rise evenly.


2. Whip the Eggs and Sugar

  • In a large heat-safe bowl, combine the eggs and granulated sugar.

  • Place the bowl over a pot of gently simmering water.

  • Whisk constantly until the mixture is warm to the touch (about 100–105°F / 38–40°C).
    This helps the eggs whip to a higher volume.

  • Remove from heat and beat with an electric mixer on high speed for 5–7 minutes, until:

    • The mixture becomes pale

    • It triples in volume

    • It forms thick ribbons when lifted


3. Add Flavoring

  • Gently mix in the vanilla extract.

  • If using milk, stir it in carefully at this stage.


4. Fold in Dry Ingredients

  • Sift the cake flour and salt together.

  • Add the dry ingredients in 2–3 additions, folding gently with a spatula.

  • Use a light hand and a folding motion to avoid deflating the batter.


5. Transfer to Pan

  • Pour the batter into the prepared pan.

  • Smooth the top gently.

  • Tap the pan lightly once to release large air bubbles.


6. Bake

  • Bake in the center of the oven for 30–35 minutes, or until:

    • The top is lightly golden

    • The cake springs back when touched

    • A toothpick inserted in the center comes out clean


7. Cool

  • Remove the cake from the oven.

  • Let it cool in the pan for 10–15 minutes.

  • Run a knife around the edges and turn out onto a wire rack to cool completely.


Serving Suggestions

  • Slice and serve plain with tea or coffee

  • Dust lightly with powdered sugar

  • Serve with fruit and whipped cream

  • Use as a base for layered or filled cakes


Helpful Tips

  • Room-Temperature Eggs: Essential for proper volume.

  • Gentle Folding: Prevents the batter from losing air.

  • Accurate Measuring: Use spoon-and-level method for flour.

  • Pan Size: A deeper pan may require a slightly longer bake time.

Hash Brown Breakfast Casserole

Hash Brown Breakfast Casserole

A make-ahead baked dish with potatoes, sausage, eggs, and cheese

This baked breakfast casserole combines shredded potatoes, cooked sausage, eggs, and cheese into a single dish that can be assembled ahead of time and baked when needed. It works well for family breakfasts, guests, or occasions where advance preparation is helpful.

Prep Time: 20 minutes
Bake Time: 45–55 minutes
Optional Chill Time: Up to 24 hours
Servings: 8–10
Pan Size: 9 × 13 inch (23 × 33 cm)


Ingredients

Main Ingredients

  • 1 lb (450 g) frozen hash browns, thawed
    (shredded or diced both work)

  • 1 lb (450 g) breakfast sausage

  • 8 large eggs

  • 1½ cups milk (whole or 2%)

  • 2 cups shredded cheese
    (cheddar, Colby-Jack, or a blend)

Seasonings

  • 1 teaspoon salt

  • ½ teaspoon black pepper

  • ½ teaspoon garlic powder (optional)

  • ½ teaspoon onion powder (optional)

Optional Add-Ins

  • ½ cup chopped bell peppers

  • ¼ cup finely chopped onion

  • ½ cup cooked mushrooms

  • ¼ teaspoon paprika or dried herbs


Step-by-Step Instructions

1. Prepare the Pan

  • Lightly grease a 9×13 inch baking dish with oil or butter.

  • Set aside.


2. Cook the Sausage

  • Heat a skillet over medium heat.

  • Add the sausage and cook, breaking it into small pieces.

  • Cook until fully browned and no longer pink.

  • Drain excess fat and let cool slightly.


3. Layer the Hash Browns

  • Spread the thawed hash browns evenly across the bottom of the prepared baking dish.

  • Press lightly to form an even layer.


4. Add Sausage and Cheese

  • Sprinkle the cooked sausage evenly over the potatoes.

  • Spread 1½ cups of the shredded cheese over the sausage layer.


5. Mix the Egg Custard

  • In a large bowl, whisk together:

    • Eggs

    • Milk

    • Salt

    • Pepper

    • Optional seasonings

  • Whisk until fully blended and smooth.


6. Assemble the Casserole

  • Pour the egg mixture evenly over the layered ingredients.

  • Gently tap the dish on the counter to help the mixture settle.

  • Sprinkle the remaining ½ cup cheese evenly over the top.


7. Bake or Chill

To bake immediately:

  • Preheat oven to 350°F (175°C).

  • Bake uncovered for 45–55 minutes, until:

    • Center is set

    • Top is lightly golden

    • A knife inserted in the center comes out clean

To prepare ahead:

  • Cover tightly and refrigerate for up to 24 hours.

  • When ready to bake, remove from the refrigerator 15–20 minutes before baking.

  • Bake as directed, adding 5–10 minutes if needed.


8. Rest and Serve

  • Let the casserole rest for 10 minutes before slicing.

  • Cut into squares and serve warm.


Helpful Tips

  • Even Cooking: Thaw and drain hash browns well to avoid excess moisture.

  • Cheese Choices: A mix of sharp and mild cheese adds balanced flavor.

  • Clean Slices: Use a sharp knife and wipe between cuts.

  • Pan Depth: A deeper dish may need slightly longer baking time.


Storage

  • Refrigerate leftovers in a covered container for up to 3 days.

  • Reheat individual portions in the oven or microwave.

  • Freezing is possible, though texture may soften slightly after reheating.

Texas Toast Sloppy Joes

A hearty, open-faced upgrade to the classic American sandwich. Thick, buttery garlic toast provides the perfect sturdy base for a tangy, savory beef filling.

  • Prep time: 15 minutes

  • Cook time: 20 minutes

  • Servings: 6

Ingredients

The Filling:

  • 1 lb (450g) ground beef (80/20 is recommended for flavor)

  • 1 small onion, finely diced

  • 1 small green bell pepper, diced

  • 2 cloves garlic, minced

  • 1 cup tomato sauce (or canned crushed tomatoes)

  • 1/4 cup ketchup

  • 1/4 cup tomato paste (optional, for a richer sauce)

  • 2 tbsp Worcestershire sauce

  • 1 tbsp brown sugar

  • 1 tsp mustard (yellow or Dijon)

  • 1/2 tsp salt (or to taste)

  • 1/2 tsp black pepper

  • 1/2 tsp chili powder & 1/2 tsp smoked paprika (optional spices)

The Base & Topping:

  • 6 slices frozen Texas toast garlic bread

  • 1 ½ cups shredded cheese (Cheddar, Mozzarella, or Colby Jack)

  • Optional garnish: Chopped fresh parsley or green onions


Instructions

  1. Bake the Toast: Preheat your oven according to the Texas toast package directions (usually 425°F / 220°C). Bake the bread for about 6–8 minutes per side until golden and slightly crisp.

  2. Brown the Beef: While the bread bakes, heat a large skillet over medium-high heat. Add the ground beef and cook until fully browned, breaking it up with a spoon. Drain any excess grease.

  3. Sauté the Aromatics: Add the diced onion, green pepper, and garlic to the skillet. Cook for 3–5 minutes until the vegetables are softened and the garlic is fragrant.

  4. Simmer the Sauce: Stir in the tomato sauce, ketchup (tomato paste if using), Worcestershire sauce, brown sugar, mustard, salt, and pepper. Reduce the heat to medium-low and let it simmer for 10–12 minutes, stirring occasionally, until the sauce has thickened to your liking.

  5. Assemble: Arrange the baked Texas toast slices on a baking sheet. Spoon a generous amount of the beef mixture onto each slice.

  6. Melt the Cheese: Top each slice with a handful of shredded cheese. Return the baking sheet to the oven (or under a broiler) for 2–4 minutes until the cheese is melted, bubbly, and slightly browned.

  7. Serve: Garnish with parsley or green onions and serve immediately.


Pro-Tips for Success

  • Make it Ahead: You can prepare the beef filling up to 2 days in advance. Just reheat it on the stove with a splash of water before assembling it on fresh toast.

  • Spice it Up: For a kick, add diced jalapeños with the onions or a few dashes of your favorite hot sauce into the simmering mixture.

  • Custom Proteins: This recipe works excellently with ground turkey or chicken for a lighter version, or even cooked lentils for a vegetarian option.