Creamy Cheesy Broccoli and Potato Bake

Creamy Cheesy Broccoli and Potato Bake

Soft vegetables baked in a smooth, savory sauce with a golden cheese topping

This comforting broccoli and potato bake combines tender vegetables with a creamy, well-seasoned sauce and a lightly golden cheese layer. It works beautifully as a main dish with a salad or as a satisfying side for family meals. Every step is simple, and the result is rich, balanced, and comforting without being heavy.


Ingredients

For the Vegetable Base

  • Broccoli – 1 large head, cut into small florets
    Provides freshness, color, and a mild earthy flavor.

  • Potatoes – 2 to 3 medium, peeled and thinly sliced
    Create structure and softness once baked.

  • Onion – 1 medium, finely diced
    Adds gentle sweetness and depth.

  • Olive oil or butter – 2 tablespoons
    Used for sautéing and flavor.

  • Salt and black pepper – to taste


For the Creamy Sauce

  • Large eggs – 3
    Help the bake set into neat slices once cooked.

  • Heavy cream or Greek yogurt – 200 ml (about ¾ cup)
    Cream gives richness; yogurt gives a lighter, slightly tangy finish.

  • Garlic powder – ½ teaspoon
    or fresh garlic – 2 cloves, finely minced

  • Paprika – ½ teaspoon
    Adds gentle warmth and color.

  • Dried herbs – 1 teaspoon
    Thyme or oregano work especially well.


For the Topping

  • Shredded cheese – 150 g (about 1½ cups)
    Mozzarella for stretch, cheddar for flavor, or a mix of both.


Equipment Needed

  • Saucepan

  • Frying pan

  • Mixing bowl

  • Whisk

  • Baking dish (round or rectangular)


Step-by-Step Instructions


1. Prepare the Oven and Vegetables

  • Preheat your oven to 375°F (190°C).

  • Bring a large pot of lightly salted water to a gentle boil.


2. Pre-Cook the Potatoes and Broccoli

  • Add the sliced potatoes to the boiling water and cook for about 5 minutes until just tender.

  • Add the broccoli florets to the same pot during the last 2 minutes.

  • Drain everything thoroughly and set aside.

This step ensures the vegetables finish cooking evenly in the oven.


3. Cook the Onion

  • Heat the olive oil or butter in a pan over medium heat.

  • Add the diced onion and cook gently for 4–5 minutes, stirring occasionally, until soft and lightly golden.

  • Remove from heat.


4. Layer the Vegetables

  • Lightly grease your baking dish.

  • Arrange the potatoes and broccoli evenly in the dish.

  • Scatter the cooked onions throughout the layers.

  • Season lightly with salt and black pepper.


5. Make the Creamy Sauce

  • In a medium bowl, add the eggs, cream (or yogurt), garlic, paprika, and dried herbs.

  • Whisk until smooth, well blended, and lightly airy.


6. Bake the Dish

  • Pour the sauce evenly over the vegetables.

  • Gently tap the dish on the counter to help the sauce settle.

  • Cover with foil and bake for 20 minutes.


7. Add the Cheese Topping

  • Remove the foil.

  • Sprinkle the shredded cheese evenly over the surface.

  • Return to the oven uncovered and bake for 10–15 minutes, until the cheese is melted and lightly golden.


8. Rest and Serve

  • Remove from the oven and let the bake rest for 5 minutes.

  • This helps the layers settle and makes slicing easier.

  • Cut into portions and serve warm.


Serving Suggestions

  • Serve with a fresh green salad

  • Pair with roasted vegetables or crusty bread

  • Enjoy as a main dish or hearty side


Storage Tips

  • Store covered in the refrigerator for up to 3 days

  • Reheat gently in the oven or microwave until warmed through

Pan-Cooked Cheese and Potato Bread

Pan-Cooked Cheese and Potato Bread

Soft flatbread filled with creamy potato and melted cheese, cooked gently in a frying pan

This cheese and potato bread is made with a simple milk-based dough and cooked slowly in a frying pan until soft inside and lightly golden outside. The filling is smooth, comforting, and stretchy, making this bread perfect for breakfast, snacks, or a light meal.


Ingredients

For the Soft Bread Dough

  • Strong (bread) flour – 90 g
    Gives the bread structure while keeping it tender.

  • Milk – 55 g (about 4 tablespoons)
    Adds moisture and softness.

  • Unsalted butter – 10 g, melted
    Adds richness and flavor.

  • Salt – a small pinch
    Balances the taste.


For the Filling

  • Boiled potato – 1 medium, mashed until smooth
    Creates a soft, creamy center.

  • Shredded cheese – 80–100 g
    Mozzarella, mild cheddar, or a melting cheese works best.

  • Salt – a small pinch (optional)

  • Black pepper – optional, to taste


Equipment Needed

  • Mixing bowl

  • Spoon or spatula

  • Rolling pin or bottle

  • Non-stick frying pan with lid


Step-by-Step Instructions


1. Prepare the Dough

  1. In a bowl, add the flour and salt.

  2. Pour in the milk and melted butter.

  3. Mix with a spoon until a soft dough forms.

  4. Transfer to a clean surface and knead gently for 2–3 minutes until smooth.

The dough should feel soft, pliable, and not sticky.


2. Rest the Dough

  • Cover the dough and let it rest for 10 minutes.

  • This relaxes the dough and makes it easier to roll.


3. Prepare the Filling

  1. Mash the boiled potato until completely smooth.

  2. Add the shredded cheese and mix gently.

  3. Season lightly with salt and pepper if desired.

The filling should be thick and creamy, not runny.


4. Shape the Bread

  1. Roll the dough into a thin circle (about 18–20 cm wide).

  2. Spread the potato and cheese mixture evenly over the surface.

  3. Fold the dough inward from the edges to enclose the filling, forming a flat round shape.

  4. Gently flatten with your hands.


5. Cook in the Frying Pan

  1. Heat a non-stick frying pan over low to medium heat.

  2. Place the filled bread into the pan.

  3. Cover with a lid and cook for 4–5 minutes until the bottom is lightly golden.

  4. Flip carefully, cover again, and cook the other side for another 4–5 minutes.

Cooking slowly allows the cheese to melt fully and the bread to cook evenly.


6. Serve

  • Remove from the pan and let rest for 1–2 minutes.

  • Cut into wedges and serve warm.


Serving Ideas

  • Enjoy plain as a comforting snack

  • Serve with yogurt, sour cream, or a fresh salad

  • Pair with soup or tea for a simple meal


Storage Tips

  • Best enjoyed fresh and warm

  • Can be refrigerated for 1 day

  • Reheat gently in a frying pan for best texture

Crispy Potato and Tuna Tortilla Pockets

Crispy Potato and Tuna Tortilla Pockets

Warm, comforting tortilla pockets with a creamy filling and golden exterior

These tortilla pockets are filled with a smooth potato and tuna mixture, folded with melted cheese, and cooked until lightly golden on the outside. They are easy to prepare, satisfying, and perfect for lunch, snacks, or a simple dinner. The filling is soft and flavorful, while the tortillas provide a pleasant contrast in texture.


Ingredients

For the Filling

  • 1 large potato, boiled and mashed until smooth
    Forms the soft, comforting base of the filling.

  • Cream cheese – 1 tablespoon
    Adds creaminess and helps the filling blend smoothly.

  • Canned tuna – 1 can, well drained
    Provides protein and mild flavor.

  • Hard-boiled egg – 1, finely chopped
    Adds richness and texture.

  • Canned corn – 2 to 3 tablespoons, drained
    Brings gentle sweetness and color.

  • Fresh parsley – 2 tablespoons, chopped
    Adds freshness and aroma.

  • Chopped olives and gherkins (pickles) – a small handful
    Give balance and mild tang.

  • Salt and black pepper – optional, to taste


For Assembly and Cooking

  • Small tortillas – 4 to 6 (flour or corn)
    Soft tortillas work best for folding.

  • Shredded cheese – 1 cup (mozzarella or cheddar)
    Melts smoothly and adds richness.

  • Melted butter or olive oil – 2 tablespoons
    Helps the tortillas turn golden when cooked.

  • Optional seasoning:
    A small pinch of paprika or garlic powder for added flavor.


Equipment Needed

  • Mixing bowl

  • Spoon or spatula

  • Skillet, oven, or air fryer

  • Pastry brush (or spoon)


Step-by-Step Instructions


1. Prepare the Filling

  • While the potato is still warm, place it in a medium bowl.

  • Add the cream cheese and mix until completely smooth and well combined.

  • Add the tuna, chopped egg, corn, parsley, olives, and gherkins.

  • Stir gently until everything is evenly mixed.

  • Season lightly with salt and black pepper if desired.

The filling should be creamy, soft, and easy to spread.


2. Assemble the Tortilla Pockets

  • Place a tortilla flat on a clean surface.

  • Spoon 2–3 tablespoons of the filling onto one half of the tortilla.

  • Sprinkle a generous layer of shredded cheese over the filling.


3. Fold the Tortillas

  • Fold the tortilla over to form a half-moon shape.

  • Press gently along the edges to help it stay closed during cooking.

  • Repeat with the remaining tortillas.


4. Prepare the Exterior

  • In a small bowl, mix the melted butter or olive oil with the optional paprika or garlic powder.

  • Lightly brush both sides of each folded tortilla.

  • This helps the outside cook evenly and develop a light golden color.


5. Cook the Tortilla Pockets

Stovetop Method

  • Heat a dry skillet over medium heat.

  • Place the tortillas in the pan and cook for 2–3 minutes per side, until the cheese has melted and the outside is lightly golden.

Oven or Air Fryer Method

  • Preheat oven or air fryer to 400°F (200°C).

  • Arrange tortillas in a single layer.

  • Air fry for 5–7 minutes or bake for 10 minutes, turning once halfway through.


6. Serve

  • Remove from heat and let rest for a minute before serving.

  • Serve warm with sour cream, yogurt, salsa, or a fresh green salad on the side.


Storage and Reheating Tips

  • Best enjoyed fresh and warm

  • Refrigerate leftovers in a covered container for up to 2 days

  • Reheat in a skillet or air fryer to restore texture

🍗 Chicken, Spinach, and Mushroom Oven Bake

🍗 Chicken, Spinach, and Mushroom Oven Bake

  • Servings: 6

  • Prep Time: 15 minutes

  • Cook Time: 50–55 minutes

  • Total Time: ~70 minutes


📝 Ingredients

  • 6 thinly sliced chicken breasts

  • 1 large package sliced mushrooms (cremini or button)

  • 1 small bag fresh baby spinach

  • 1 container (8 oz) green onion cream cheese, softened

  • ¼ cup olive oil

  • ½ cup chicken broth or stock

  • 8 oz shredded mozzarella cheese

  • Seasonings: Herb and garlic seasoning (e.g., Weber), black pepper, and salt to taste


👩‍🍳 Detailed Instructions

  1. Prep the Oven and Pan: Preheat your oven to 375°F (190°C) and grease a 9×13-inch baking dish.

  2. Layer the Base: Lay the chicken breasts in a single layer at the bottom of the dish. Top the chicken with a generous layer of fresh spinach followed by the sliced mushrooms.

  3. Season: Sprinkle the herb and garlic seasoning, salt, and pepper evenly over the vegetables.

  4. Make the Sauce: In a separate bowl, whisk together the softened green onion cream cheese, olive oil, and chicken broth until the mixture is smooth and creamy.

  5. Assemble: Pour the cream cheese sauce evenly over the layered chicken and vegetables.

  6. Bake (Phase 1): Cover the pan loosely with aluminum foil (do not seal tightly) and bake for 20 minutes.

  7. Bake (Phase 2): Remove the foil and continue baking uncovered for 20–25 minutes.

  8. Add Cheese: Sprinkle the shredded mozzarella over the top and bake uncovered for a final 10 minutes, or until the cheese is melted and begins to brown.

  9. Serve: Let the dish cool for 10 minutes before serving to allow the sauce to thicken slightly.


💡 Tips for Success

  • Mushroom Moisture: If you find the dish too watery, sauté the mushrooms in a pan first to release their liquid before adding them to the oven dish.

  • Chicken Texture: Ensure chicken breasts are an even thickness—you can pound them lightly if needed to ensure they cook at the same rate.

  • Storage: This dish is excellent for meal prep and will keep in the refrigerator for up to 4 days.


📊 Nutrition Facts (Approx. Per Serving)

  • Calories: 350 kcal

  • Net Carbs: 4–6g

  • Protein: ~30g

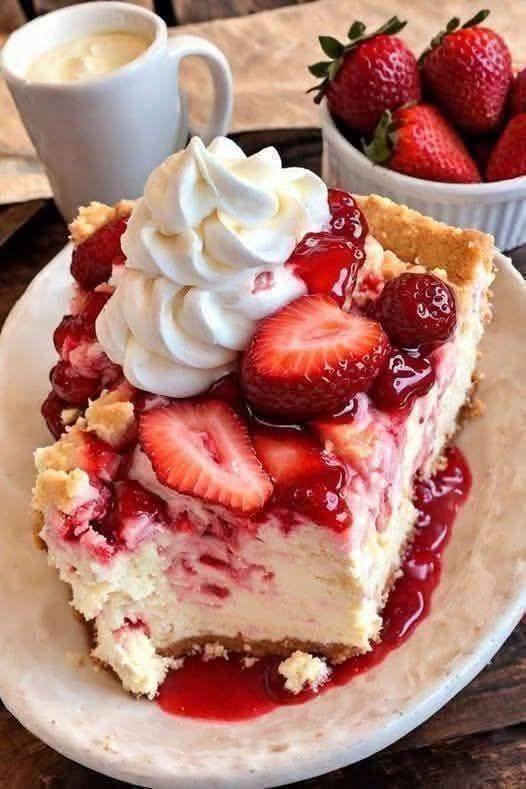
🍓 Keto No-Bake Strawberry Cheesecake Jars

This recipe is a brilliant “hack” for keto enthusiasts—using blended cottage cheese is a fantastic way to boost the protein content while maintaining that signature cheesecake creaminess.

Following your preference for full recipes, here is the complete, organized guide for your Cheesecake Jars.


🍓 Keto No-Bake Strawberry Cheesecake Jars

A high-protein, low-carb delight that layers a buttery almond crumble with a silky, citrus-kissed cheesecake filling and fresh macerated strawberries.

  • Servings: 4 jars

  • Prep Time: 15 minutes

  • Chill Time: 1 hour

  • Diet: Keto, Low-Carb, High-Protein, Sugar-Free


📝 Ingredients

For the Low-Carb “Crust” Layer

  • ½ cup almond flour

  • 1 tbsp butter, melted

  • 1 tbsp granular erythritol or allulose

  • ¼ tsp cinnamon (optional)

  • Pinch of salt

For the Cheesecake Filling

  • 1 cup cottage cheese (full fat or low fat)

  • 4 oz cream cheese, softened to room temperature

  • ½ cup Greek yogurt (0% or 2%)

  • 3–4 tbsp powdered erythritol or allulose (adjust to your sweetness preference)

  • 1 tsp vanilla extract

  • 1 tbsp lemon juice

For the Strawberry Layer

  • 1 cup fresh strawberries, diced

  • 1 tbsp powdered sweetener

  • 1 tsp lemon juice


👩‍🍳 Detailed Instructions

  1. Prepare the Crust: In a small bowl, combine the almond flour, melted butter, sweetener, cinnamon, and salt. Stir until it forms a soft, sandy crumble. Set aside.

  2. Blend the Base: Place the cottage cheese in a blender or food processor. Blend on high until it is completely silky with no visible curds.

  3. Finish the Filling: Add the softened cream cheese, Greek yogurt, sweetener, vanilla, and lemon juice to the blender. Process until the mixture is smooth, thick, and creamy.

  4. Prep the Berries: In a separate bowl, toss the diced strawberries with lemon juice and sweetener. Use a fork to gently mash a few of the berries—this creates a natural “syrup” while keeping most of the fruit chunky.

  5. Assemble: * Drop 1–2 tablespoons of the almond crust into the bottom of 4 small glass jars.

    • Spoon or pipe in a thick layer of the cheesecake cream.

    • Top with a generous spoonful of the strawberry mixture.

    • (Optional) Repeat the layers if using tall jars.

  6. Chill: Cover the jars and refrigerate for at least 1 hour. This allows the cheesecake layer to firm up and the flavors to meld.


❄️ Storage & Tips

  • Fridge: These jars are perfect for meal prep! They stay fresh for up to 4–5 days.

  • High Protein Tip: Don’t skip the cottage cheese; blending it is the secret to getting a high-protein count without a “diet” taste.

  • Texture: If the filling is too thick to blend easily, add 1 tablespoon of unsweetened almond milk to help the blades move.


📊 Quick Macros (Estimated per jar)

  • Net Carbs: ~5g

  • Protein: ~12g

  • Sugar: 0g added

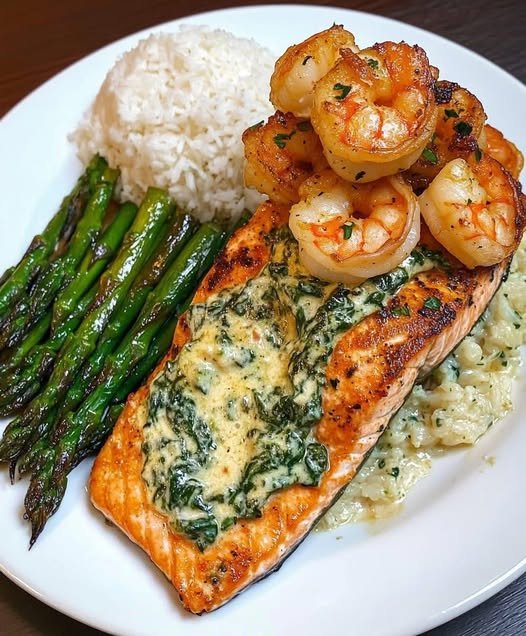
Creamed Spinach-Stuffed Salmon with Garlic Shrimp

This recipe sounds incredible—it’s essentially a high-end steakhouse meal made right in your kitchen. The combination of the rich cream cheese filling and the buttery garlic shrimp creates a perfect texture contrast with the seared salmon.

As requested, here is the full, organized recipe for your records.


🐟 Creamed Spinach-Stuffed Salmon with Garlic Shrimp

Prep time: 15 mins | Cook time: 20 mins | Servings: 2

Nutrition: ~520 Calories | ~45g Protein per serving

Ingredients

For the Salmon & Filling

  • 2 large Salmon fillets (skin-on or off)

  • 1 cup Chopped spinach (fresh or frozen, squeezed very dry)

  • 2 oz Cream cheese, softened

  • ¼ cup Shredded mozzarella or parmesan cheese

  • 1 tbsp Heavy cream

  • 1 Garlic clove, minced

  • 1 tbsp Olive oil

  • 1 tbsp Lemon juice

  • Seasonings: Salt, black pepper, and paprika (to taste)

For the Garlic Shrimp

  • ½ lb Large shrimp, peeled and deveined

  • 1 tbsp Butter

  • 1 Garlic clove, minced

  • 1 tbsp Fresh parsley, chopped

  • Optional: Red pepper flakes for heat

Recommended Sides

  • Steamed Rice: 1 cup dry, cooked according to package instructions.

  • Roasted Asparagus: 1 bunch, tossed in olive oil, salt, and pepper.


Instructions

1. Prepare the Creamed Spinach Filling

In a small saucepan over medium-low heat, combine the spinach, cream cheese, heavy cream, minced garlic, and shredded cheese. Stir continuously until the cheese is melted and the mixture is smooth and creamy. Set aside to cool slightly.

2. Prep and Stuff the Salmon

  • The Pocket: Using a sharp paring knife, cut a slit horizontally into the thickest part of the salmon fillet to create a pocket (be careful not to cut all the way through).

  • The Stuffing: Spoon the spinach mixture generously into the pocket of each fillet.

  • Season: Rub the outside of the salmon with olive oil, lemon juice, salt, pepper, and paprika.

3. Sear the Salmon

Heat a skillet over medium-high heat. Place the salmon fillets in the pan. Sear for 4–5 minutes per side until the crust is golden brown and the salmon is cooked to your preferred doneness. Remove from the pan and let rest.

4. Sizzle the Garlic Shrimp

In the same skillet (or a fresh one), melt the butter. Add the minced garlic and shrimp. Sauté for 2–3 minutes per side until the shrimp are pink and opaque. Toss in the parsley and optional red pepper flakes.

5. Prepare the Sides

  • Asparagus: While the salmon cooks, roast the asparagus at 400°F (200°C) for 10–12 minutes.

  • Rice: Prepare your steamed rice using your preferred quick-cook method.

6. Assemble and Serve

Place a bed of rice on each plate, add the roasted asparagus, and top with the stuffed salmon fillet. Pile the garlic shrimp directly on top of the salmon and drizzle any remaining garlic butter from the pan over the entire dish.


💡 Pro-Tips for Success

  • Keep it Dry: If using frozen spinach, squeeze it in a kitchen towel until no liquid remains. This prevents the filling from becoming watery inside the fish.

  • Toothpick Hack: If your salmon fillets are thin and the stuffing is falling out, use a toothpick to “stitch” the opening closed while searing.

  • The “Pan Flip”: Flip the salmon carefully using a wide spatula to ensure the stuffing stays intact.