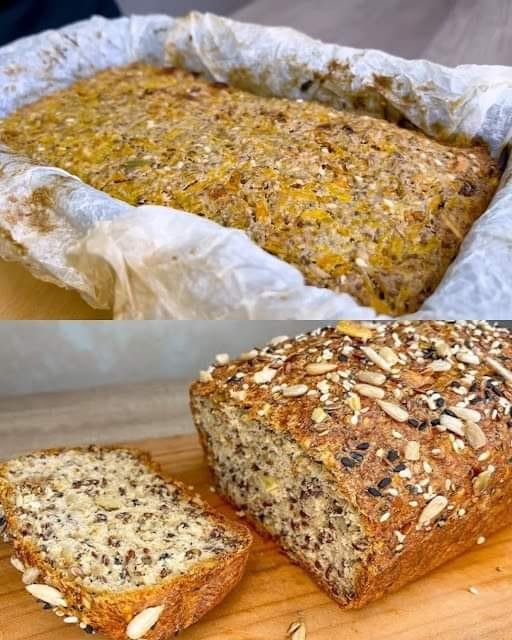
Quick Oatmeal Breakfast Bread with Pumpkin & Nuts

Quick Oatmeal Breakfast Bread with Pumpkin & Nuts

Soft • Nourishing • Naturally Flavorful

Preparation Time

  • Prep: 15 minutes

  • Bake: 40–45 minutes

  • Servings: 1 medium loaf (8–10 slices)


Ingredients

  • 1 cup oatmeal (rolled oats or quick oats)

  • 1 glass warm water (200–250 ml)

  • ½ pumpkin (about 400 g), peeled and grated or finely chopped

  • 1 tablespoon sweetener (optional, to taste)

  • 1 teaspoon cinnamon (optional)

  • A pinch of salt

  • 3 tablespoons vegetable oil (optional, for extra softness)

  • 1 tablespoon sesame seeds

  • 5–6 dried apricots, rinsed and soaked in hot water, then finely chopped

  • 1 tablespoon chia seeds

  • 1–2 tablespoons finely chopped nuts (walnuts, almonds, or pecans)

  • 2 tablespoons mixed nuts, seeds, and dried fruits (for topping or inside)

  • 1 teaspoon baking powder

  • Parchment paper for lining the pan


Step-by-Step Instructions

1. Prepare the Oats

Place the oatmeal in a mixing bowl.
Pour the warm water over the oats, stir well, and let them soak for 10 minutes until soft and slightly thick.


2. Prepare the Pumpkin

Grate or finely chop the pumpkin.
If it contains excess moisture, gently squeeze it with your hands to remove extra liquid.


3. Combine the Base

Add the pumpkin to the soaked oats.
Mix in:

  • Sweetener (if using)

  • Cinnamon (if using)

  • Salt

  • Vegetable oil (optional)

Stir until evenly combined.


4. Add Fruits, Nuts & Seeds

Fold in:

  • Chopped dried apricots

  • Chia seeds

  • Chopped nuts

  • Mixed nuts, seeds, and dried fruits

Mix gently so everything is evenly distributed.


5. Add the Leavening

Sprinkle in the baking powder and stir just until combined.
Do not overmix.


6. Prepare for Baking

Preheat oven to 180°C (350°F).
Line a loaf pan with parchment paper.

Pour the batter into the pan and smooth the top.
Sprinkle sesame seeds evenly over the surface.


7. Bake

Bake for 40–45 minutes, or until:

  • The top is golden

  • A toothpick inserted in the center comes out clean


8. Cool & Serve

Remove from oven and allow the bread to cool in the pan for 10–15 minutes.
Lift out using the parchment paper and cool completely before slicing.


Serving Suggestions

  • Enjoy warm with yogurt, honey, or nut butter

  • Perfect for breakfast, snack time, or lunchbox slices

  • Stores well in the refrigerator for up to 4 days
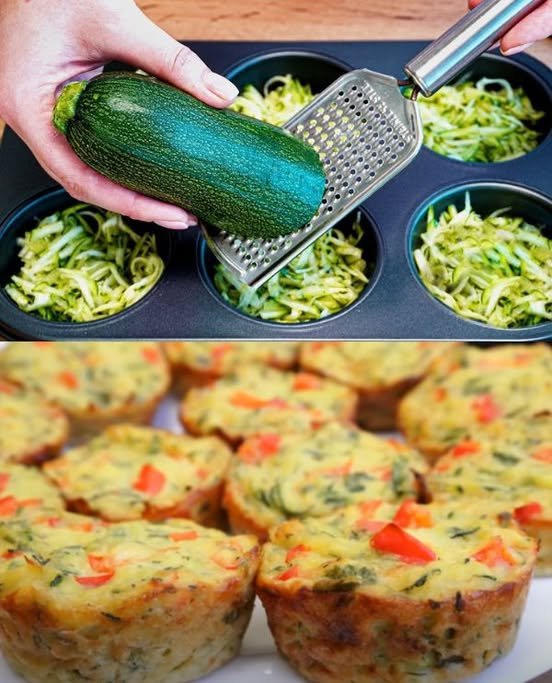
Savory Zucchini & Potato Bites

Savory Zucchini & Potato Bites

Soft Inside • Lightly Crisp Outside • Perfect for Any Meal

These baked zucchini and potato bites are flavorful, tender, and satisfying. They work beautifully as a snack, breakfast option, or side dish and pair wonderfully with a cool yogurt dip.


Ingredients

Main Vegetable Mixture

  • 2 medium zucchini (courgettes)

  • 1 medium potato, peeled

  • 2 large eggs, at room temperature

  • 1 red pepper, finely diced

  • 50 ml milk (about 3 tablespoons)

  • 2 tablespoons olive oil

  • 3 tablespoons semolina

  • 70 g all-purpose flour (about ½ cup)

  • 1 teaspoon baking powder

  • 50 g hard cheese, finely grated

  • Fresh parsley and dill, finely chopped

  • Salt and black pepper, to taste


Refreshing Yogurt Dip

  • Greek yogurt, plain and thick

  • 2 cucumbers, grated

  • 3 olives, finely chopped

  • 1 garlic clove, finely minced


Step-by-Step Instructions


1. Prepare the Vegetables

  • Grate the zucchini and potato into a large bowl

  • Sprinkle lightly with salt

  • Let them rest for about 5 minutes

  • Gently press or wrap the vegetables in a clean kitchen towel to remove excess moisture

    • This helps create a light, well-balanced texture


2. Prepare the Batter

  • In a separate bowl, whisk together the eggs, milk, and olive oil until smooth

  • Add the semolina, flour, and baking powder, mixing gently

  • Stir in the prepared zucchini and potato

  • Add the diced red pepper, grated cheese, and chopped herbs

  • Season with black pepper and adjust salt if needed

  • Mix until evenly combined


3. Fill and Bake

  • Heat the oven to 180°C (350°F)

  • Lightly grease a muffin tin or use silicone molds

  • Spoon the mixture evenly into each cup, filling nearly to the top

  • Bake for 25–30 minutes, until the tops are lightly golden and the bites feel set


4. Prepare the Yogurt Dip

  • Grate the cucumbers and gently press out excess liquid

  • In a bowl, combine:

    • Greek yogurt

    • Grated cucumbers

    • Minced garlic

    • Chopped olives

  • Stir until smooth and well blended

  • Chill until ready to serve


5. Serve

  • Allow the baked bites to rest in the pan for a few minutes

  • Carefully remove and serve warm

  • Add a spoon of the yogurt dip on the side for a refreshing contrast


Helpful Notes

  • Texture Tip: Removing extra moisture from vegetables helps maintain a soft, pleasant crumb

  • Flavor Option: Swap herbs or cheese to suit your taste

  • Make Ahead: These bites store well in the refrigerator and reheat gently in the oven


Optional Finishing Touch

For a lightly crisp surface, sprinkle a small amount of extra grated cheese on top during the final few minutes of baking.

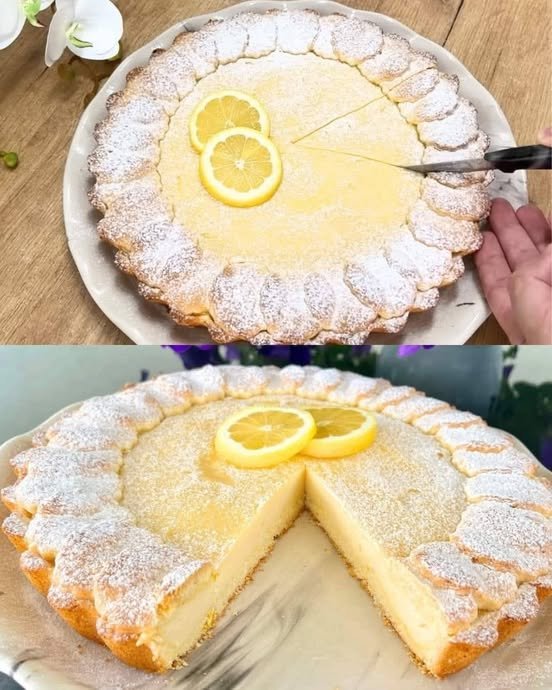
Classic Italian Creamy Lemon Cake

Classic Italian Creamy Lemon Cake

Smooth • Bright • Delicately Sweet

This traditional Italian-style lemon cake combines a tender pastry with a silky lemon cream filling. The fresh citrus flavor and soft texture make it perfect for serving chilled as a light dessert.


Ingredients

Silky Lemon Cream Filling

  • 500 ml milk (about 2 cups)

  • 2 large eggs, at room temperature

  • 6 tablespoons granulated sugar

  • 4 tablespoons cornstarch

  • 80 g mascarpone or cream cheese, softened

  • Zest of 1 lemon

  • Fresh juice of 1 lemon


Soft Shortcrust Pastry

  • 2 large eggs, at room temperature

  • 100 g granulated sugar (½ cup)

  • 100 ml vegetable oil or melted butter

  • 1 teaspoon vanilla extract

  • 350–380 g all-purpose flour, added gradually

  • 1 teaspoon baking powder


Step-by-Step Instructions


1. Prepare the Lemon Cream

  • In a medium saucepan, whisk together the eggs and sugar until smooth and pale

  • Add the cornstarch and whisk until fully blended

  • Slowly pour in the milk, whisking continuously to keep the mixture smooth

  • Place the saucepan over medium heat and stir gently until the cream thickens and becomes velvety

Once thickened:

  • Remove from heat

  • Stir in the mascarpone, lemon zest, and lemon juice until fully incorporated

  • Transfer the cream to a bowl

  • Cover the surface directly with wrap to maintain its smooth texture

  • Allow it to cool completely


2. Make the Pastry Dough

  • In a large bowl, whisk the eggs, sugar, oil (or butter), and vanilla until well combined

  • Add the flour and baking powder gradually

  • Mix gently until a soft, smooth dough forms

  • Divide the dough into two portions:

    • 2/3 for the base

    • 1/3 for the top decoration


3. Prepare the Base

  • Heat the oven to 180°C (350°F)

  • Lightly grease a tart pan or springform pan

  • Roll out the larger dough portion

  • Press it evenly into the base and up the sides of the pan

  • Pour the cooled lemon cream into the shell

  • Smooth the surface gently


4. Create the Decorative Top

  • Roll out the remaining dough

  • Cut small circles using a cookie cutter or glass rim

  • Arrange the circles slightly overlapping around the edges to form a decorative border

  • Leave the center open to showcase the lemon cream


5. Bake the Cake

  • Place the cake in the oven

  • Bake for 30–35 minutes, until the pastry turns lightly golden

  • Remove from the oven and allow it to cool at room temperature


6. Chill and Finish

  • Refrigerate the cake for at least 2 hours to allow the filling to set fully

  • Before serving, dust lightly with powdered sugar

  • Garnish with lemon slices or zest if desired


Serving Suggestions

  • Serve chilled for clean slices and best flavor

  • Pair with tea, espresso, or fresh berries

  • Ideal for special gatherings or relaxed family desserts


Helpful Notes

  • Smooth Filling: Mixing cornstarch thoroughly before heating keeps the cream silky

  • Flavor Balance: Fresh lemon zest enhances the aroma without overpowering

  • Storage: Keeps well refrigerated for up to 3 days

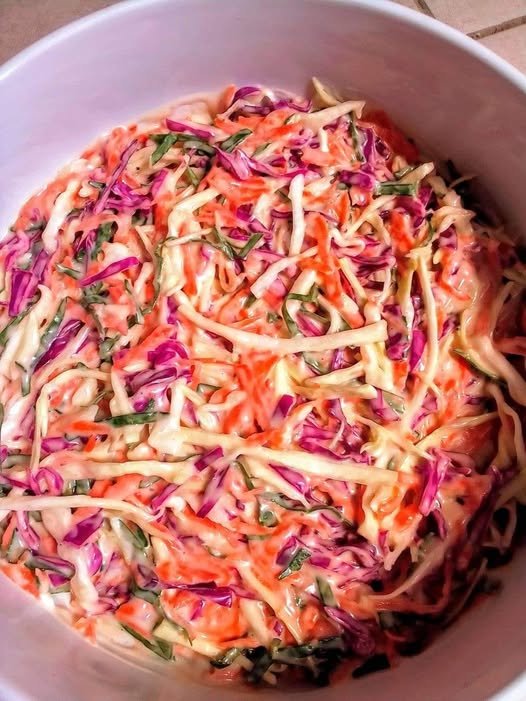
Fresh & Vibrant Coleslaw (No Added Sweeteners)

Fresh & Vibrant Coleslaw (No Added Sweeteners)

Crisp • Creamy • Refreshing

This colorful coleslaw is made with fresh vegetables and a smooth, well-balanced dressing. The natural flavors of the ingredients shine, making it a wonderful side dish for everyday meals or gatherings.


Ingredients

Vegetable Base

  • ½ small green cabbage, finely shredded

  • ½ small red cabbage, finely shredded

  • 2 large carrots, peeled and grated

  • ¼ cup fresh parsley or cilantro, finely chopped

  • Optional: 2 green onions, thinly sliced


Creamy Dressing

  • ½ cup mayonnaise (avocado-oil or olive-oil based if preferred)

  • 2 tablespoons apple cider vinegar or fresh lemon juice

  • 1 tablespoon Dijon mustard

  • ½ teaspoon celery seed

  • ¼ teaspoon sea salt, or to taste

  • ¼ teaspoon freshly ground black pepper, or to taste


Step-by-Step Instructions

1. Prepare the Vegetables

  • Remove any tough outer leaves from the cabbages

  • Slice the cabbages thinly using a sharp knife or food processor

  • Grate the carrots finely

  • Chop the fresh herbs

  • Add all prepared vegetables to a large mixing bowl


2. Make the Dressing

  • In a small bowl, add the mayonnaise, vinegar or lemon juice, Dijon mustard, celery seed, salt, and pepper

  • Whisk until the dressing becomes smooth and well blended


3. Combine

  • Pour the dressing over the vegetables

  • Use two large spoons or tongs to gently toss until everything is evenly coated

  • Take care to keep the vegetables light and crisp


4. Rest for Best Flavor

  • Cover the bowl and place it in the refrigerator for 30–60 minutes

  • This resting time allows the vegetables to soften slightly and the flavors to blend naturally


5. Serve

  • Give the coleslaw a gentle toss before serving

  • Adjust seasoning if needed

  • Serve chilled as a refreshing side dish


Helpful Notes

  • Texture Tip: Finely shredded cabbage creates a smoother, more balanced bite

  • Flavor Balance: The acidity brightens the dressing while keeping it light and refreshing

  • Make-Ahead Friendly: This coleslaw can be prepared a few hours in advance and stays fresh and crisp


Serving Suggestions

  • Pair with grilled dishes, sandwiches, or wraps

  • Serve alongside roasted vegetables or baked meals

  • Enjoy as a fresh addition to everyday lunches

Classic Soft Bread Rolls (Pide-Style)

Classic Soft Bread Rolls (Pide-Style)

Light • Soft • Beautifully Layered

These bread rolls are wonderfully soft with delicate layers and a tender crumb. They are perfect for breakfast, alongside soups, or served warm at the table for any meal.


Ingredients

Liquid Base

  • 1½ cups (300 ml) warm water
    (Comfortably warm to the touch, not hot)

  • 1 tea glass vegetable oil (about 90 g / 100 ml)

  • 1 tea glass plain yogurt (about 100 ml, room temperature)

Dry Ingredients

  • 1 packet active dry yeast (7 g or 2¼ teaspoons)

  • 1 tablespoon granulated sugar

  • 1 teaspoon salt

  • 4½–5 cups all-purpose flour, added gradually

For Layering & Finishing

  • 50 g butter, melted (for brushing between layers)

  • 1 egg yolk (for brushing the tops)


Step-by-Step Instructions

1. Prepare the Yeast Mixture

  • In a large mixing bowl, add the warm water, sugar, and yeast

  • Stir gently until combined

  • Let the mixture rest for 5–10 minutes until it becomes foamy and active

This step ensures the dough rises beautifully.


2. Combine the Dough Ingredients

  • Add the vegetable oil and yogurt to the yeast mixture

  • Whisk until smooth and well blended

  • Gradually add flour and salt, mixing with a spoon or spatula

  • Continue until a soft dough forms


3. Knead and First Rise

  • Transfer the dough to a lightly floured surface

  • Knead gently for 8–10 minutes until smooth, elastic, and soft

  • Place the dough in a lightly oiled bowl

  • Cover with a clean cloth

  • Let it rest in a warm place for about 1 hour, or until it has expanded noticeably


4. Form the Layers

  • Gently press the dough to release excess air

  • Divide it into 4 equal portions

For each portion:

  • Roll into a thin rectangle

  • Brush evenly with melted butter

Once all pieces are brushed:

  • Stack them neatly on top of each other

  • Roll the stack into a firm log, starting from the long side


5. Shape the Rolls

  • Using a sharp knife or dough scraper, cut the log into triangle shapes by slicing in a gentle zig-zag pattern

  • This shaping helps create the beautiful layered texture once baked


6. Rest and Prepare for Baking

  • Place the shaped rolls on a baking tray lined with parchment paper

  • Leave a little space between each piece

  • Cover lightly and allow them to rest for 20 minutes

Meanwhile:

  • Preheat the oven to 190°C (375°F)


7. Bake to a Golden Finish

  • Brush the tops of the rolls with egg yolk for a glossy, golden surface

  • Bake for 20–25 minutes, until evenly golden and beautifully risen

The rolls should feel light and sound crisp on the outside while remaining soft inside.


Serving Suggestions

  • Serve warm with butter, honey, or jam

  • Pair with cheese, eggs, or soup

  • Excellent for sandwiches or as a dinner side


Helpful Tips

  • Yogurt Temperature: Use room-temperature yogurt to keep the dough comfortable for rising

  • Flour Amount: Add flour gradually; the dough should feel soft and slightly elastic

  • Extra Flavor: Sprinkle sesame or nigella seeds on top before baking if desired

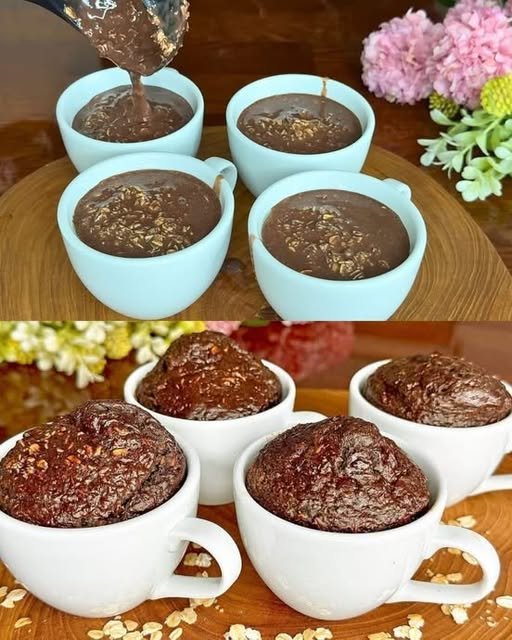
Healthy Chocolate Lava Baked Oats

Healthy Chocolate Lava Baked Oats

Naturally Sweet • Wholesome • Comforting
Serves: 2 generous portions (easily doubled)

This recipe turns simple pantry staples into a warm, chocolatey breakfast or dessert with a naturally soft center. It’s filling, balanced, and made with everyday ingredients.


Ingredients

Oat Base

  • 1 cup rolled oats (old-fashioned oats for best texture)

  • 1 medium ripe banana (naturally sweet and creamy)

  • ½ cup milk of choice (almond, oat, soy, or dairy)

  • 2 tablespoons unsweetened cocoa powder

  • 1–2 tablespoons natural liquid sweetener (maple syrup or honey, to taste)

  • 1 teaspoon baking powder

  • ½ teaspoon pure vanilla extract

  • A small pinch of sea salt (balances the chocolate flavor)

Soft Chocolate Center (Optional but Recommended)

  • 2 small pieces dark chocolate (70% cocoa or higher)
    or

  • 1 tablespoon dark chocolate chips


Step-by-Step Instructions

1. Prepare the Oven

  • Heat your oven to 180°C (350°F)

  • Lightly coat two oven-safe ramekins or ceramic mugs with a little oil or butter to prevent sticking

  • Place them on a baking tray for easy handling


2. Blend the Batter

Add the following to a blender:

  • Rolled oats

  • Banana

  • Milk

  • Cocoa powder

  • Natural sweetener

  • Baking powder

  • Vanilla extract

  • Sea salt

Blend for 30–45 seconds until the mixture is:

  • Completely smooth

  • Thick but pourable

  • Similar to cake or pancake batter

If the batter seems too thick, add 1–2 tablespoons of milk.


3. Fill the Cups

  • Pour the batter into the prepared mugs

  • Fill each about ¾ full to allow gentle rising


4. Add the Chocolate Center

  • Gently press one piece of dark chocolate into the center of each mug

  • Make sure it is fully covered with batter so it stays soft inside


5. Bake

  • Place the tray in the oven

  • Bake for 18–25 minutes, depending on your preferred texture:

    • 18–20 minutes: softer, richer texture

    • 22–25 minutes: more set and cake-like


6. Rest & Enjoy

  • Remove from the oven

  • Let sit for 5 minutes to settle

  • Enjoy warm, straight from the mug or turned out onto a plate


Optional Toppings (Wholesome Add-Ons)

  • Fresh berries or sliced banana

  • A spoon of yogurt or coconut yogurt

  • Chopped nuts or seeds

  • Light drizzle of nut butter


Helpful Notes

Air Fryer Method

  • Cook at 160°C (320°F) for 12–15 minutes

  • Check at 12 minutes and adjust as needed

No Blender Option

  • Use 1 cup oat flour instead of whole oats

  • Mash the banana very smoothly with a fork

  • Whisk all ingredients until well combined

Diet-Friendly

  • Naturally sweetened

  • Made with whole grains

  • Easily adaptable for dairy-free or gluten-free needs (use certified oats)