Golden Cabbage & Onion Fritters

Golden Cabbage & Onion Fritters

This recipe transforms simple vegetables into a hearty, savory dish that is crispy on the outside and tender on the inside.

Ingredients

  • 1 small cabbage (finely shredded)

  • 1 onion (finely diced)

  • 1 carrot (grated)

  • 2 eggs (beaten)

  • 4 tablespoons flour (all-purpose)

  • Spices: Salt, Black Pepper, Paprika, and Dried Garlic (to taste)

  • Olive oil (for frying)


Preparation Steps

  1. Prep the Vegetables: Shred the cabbage thinly and grate the carrot. Dice the onion into small pieces.

    • Tip: If the cabbage is very firm, sprinkle it with a pinch of salt and massage it for a minute to soften the fibers.

  2. Sauté (Optional but Recommended): Heat a drizzle of olive oil in a pan. Sauté the onion and carrot for 3–4 minutes until soft. Add the cabbage and cook for another 5 minutes until it wilts slightly. Let the mixture cool for a few minutes.

  3. Create the Batter: In a large bowl, whisk the 2 eggs. Stir in the 4 tablespoons of flour and all your spices (salt, pepper, paprika, and garlic) until you have a smooth paste.

  4. Combine: Fold your vegetable mixture into the egg and flour batter until everything is evenly coated.

  5. Fry: Heat olive oil in a skillet over medium heat. Scoop large spoonfuls of the mixture into the pan and flatten them slightly with a spatula.

  6. Cook to Perfection: Fry for about 3–4 minutes per side until they are a deep golden brown and crispy.

Creamy Anti-Inflammatory Mexicorn Dip

with Lime, Cilantro & Optional Sharp Cheddar

This Creamy Mexicorn Dip is a lighter, smarter twist on a classic party favorite. It keeps everything you love—sweet corn, zesty tomatoes, fresh herbs, and rich creaminess—while using anti-inflammatory swaps that don’t sacrifice flavor. Avocado-oil mayo and Greek yogurt (or coconut yogurt for dairy-free) create a luscious base, while turmeric, cumin, garlic, and lime bring warmth and brightness. The result is a bold, crave-worthy dip that feels indulgent yet nourishing, perfect for gatherings, meal prep, or snacking straight from the fridge.

🛒 Ingredients

Base

  • 2 cans Mexicorn, drained very well
  • 1 can Rotel (regular or hot), drained
  • 6–8 green onions, thinly sliced
  • 1 bunch fresh cilantro, finely chopped

Creamy Element (Anti-Inflammatory Swaps)

  • ¾ cup avocado-oil mayo (or olive-oil mayo)
  • ¾ cup full-fat Greek yogurt or cultured coconut yogurt
    • Greek yogurt adds protein and probiotics
    • Coconut yogurt keeps the dip dairy-free

Cheese (Optional but Traditional)

  • 1½ cups sharp cheddar cheese, shredded
    • Sharp cheese means more flavor with less quantity
    • Optional swap: aged goat cheese or omit entirely

Anti-Inflammatory Boosters

  • 1–2 cloves garlic, minced
  • Juice of 1 fresh lime
  • ½ teaspoon ground cumin
  • ½ teaspoon smoked paprika
  • ¼ teaspoon turmeric
  • Pinch of black pepper (activates turmeric)
  • Sea salt, to taste

 Instructions

1. Prep everything first
Drain the Mexicorn and Rotel extremely well. This step is key—excess liquid will thin the dip and mute the flavors. If needed, let them sit in a strainer for a few extra minutes or gently press with a spoon.

See also  Mediterranean Irresistible Gluten-Free Zucchini Cookies

2. Make the creamy base
In a large mixing bowl, whisk together the avocado-oil mayo and Greek (or coconut) yogurt until smooth. Add the lime juice, garlic, cumin, smoked paprika, turmeric, and black pepper. Whisk again until the mixture is evenly blended and lightly golden from the spices.

3. Fold it all together
Using a spatula, gently fold in the drained corn, Rotel, green onions, and cilantro. If using cheese, add it now and stir just until combined. The goal is a thick, scoopable dip with evenly distributed ingredients.

4. Taste & adjust
Season with sea salt to taste. Add more lime juice for brightness, cumin for warmth, or smoked paprika for depth. This dip is very forgiving, so adjust it to your personal flavor preference.

5. Chill for best flavor
Cover and refrigerate for at least 30–60 minutes. Chilling allows the flavors to meld and deepen, making the dip even more delicious.

 Serving Ideas

Serve with tortilla chips, seed crackers, cucumber slices, bell pepper strips, or as a spread in wraps and sandwiches. It also makes a fantastic topping for grilled chicken or roasted vegetables.

Creamy Coconut Pudding

Creamy Coconut Pudding

A smooth, luscious tropical dessert that’s easy to whip up.

Ingredients

  • 2 cups whole milk

  • 1 cup coconut milk (use full-fat for the best creaminess)

  • 1/2 cup granulated sugar

  • 3 tbsp cornstarch

  • 2 tbsp unsalted butter

  • 1 tsp vanilla extract

  • 1/4 cup shredded coconut (plus extra for topping)

  • A pinch of salt


Instructions

  1. Combine Bases: In a medium saucepan, whisk together the whole milk and coconut milk.

  2. Dissolve Dry Ingredients: Add the sugar, cornstarch, and salt to the pan. Whisk vigorously while cold until the cornstarch is fully dissolved and no lumps remain.

  3. Thicken: Place the saucepan over medium heat. Cook, stirring constantly with a whisk or wooden spoon to prevent burning on the bottom.

  4. Finish the Texture: Once the mixture begins to bubble and thicken, lower the heat. Stir in the butter, vanilla extract, and shredded coconut. Continue to stir for 1–2 minutes until the pudding is glossy and smooth.

  5. Portion and Cool: Remove from heat and pour the pudding into individual serving bowls or ramekins.

  6. Chill: Let the pudding cool to room temperature on the counter. Once cool, cover with plastic wrap (press it directly onto the surface of the pudding if you want to prevent a “skin” from forming) and refrigerate for at least 2 hours.

  7. Garnish: Before serving, sprinkle with extra shredded coconut. For extra flavor, toast the coconut in a dry pan for 2 minutes until golden brown first!


Variations to Try

  • Nutty Twist: Add a few drops of almond extract along with the vanilla.

  • Piña Colada Style: Stir in a handful of crushed, drained pineapple before chilling.

  • Crunchy Base: Add a layer of crushed graham crackers or digestive biscuits at the bottom of the cups before pouring in the pudding.

Pro Tip

If you want an even more indulgent dessert, drizzle a little sweetened condensed milk over the top just before serving.

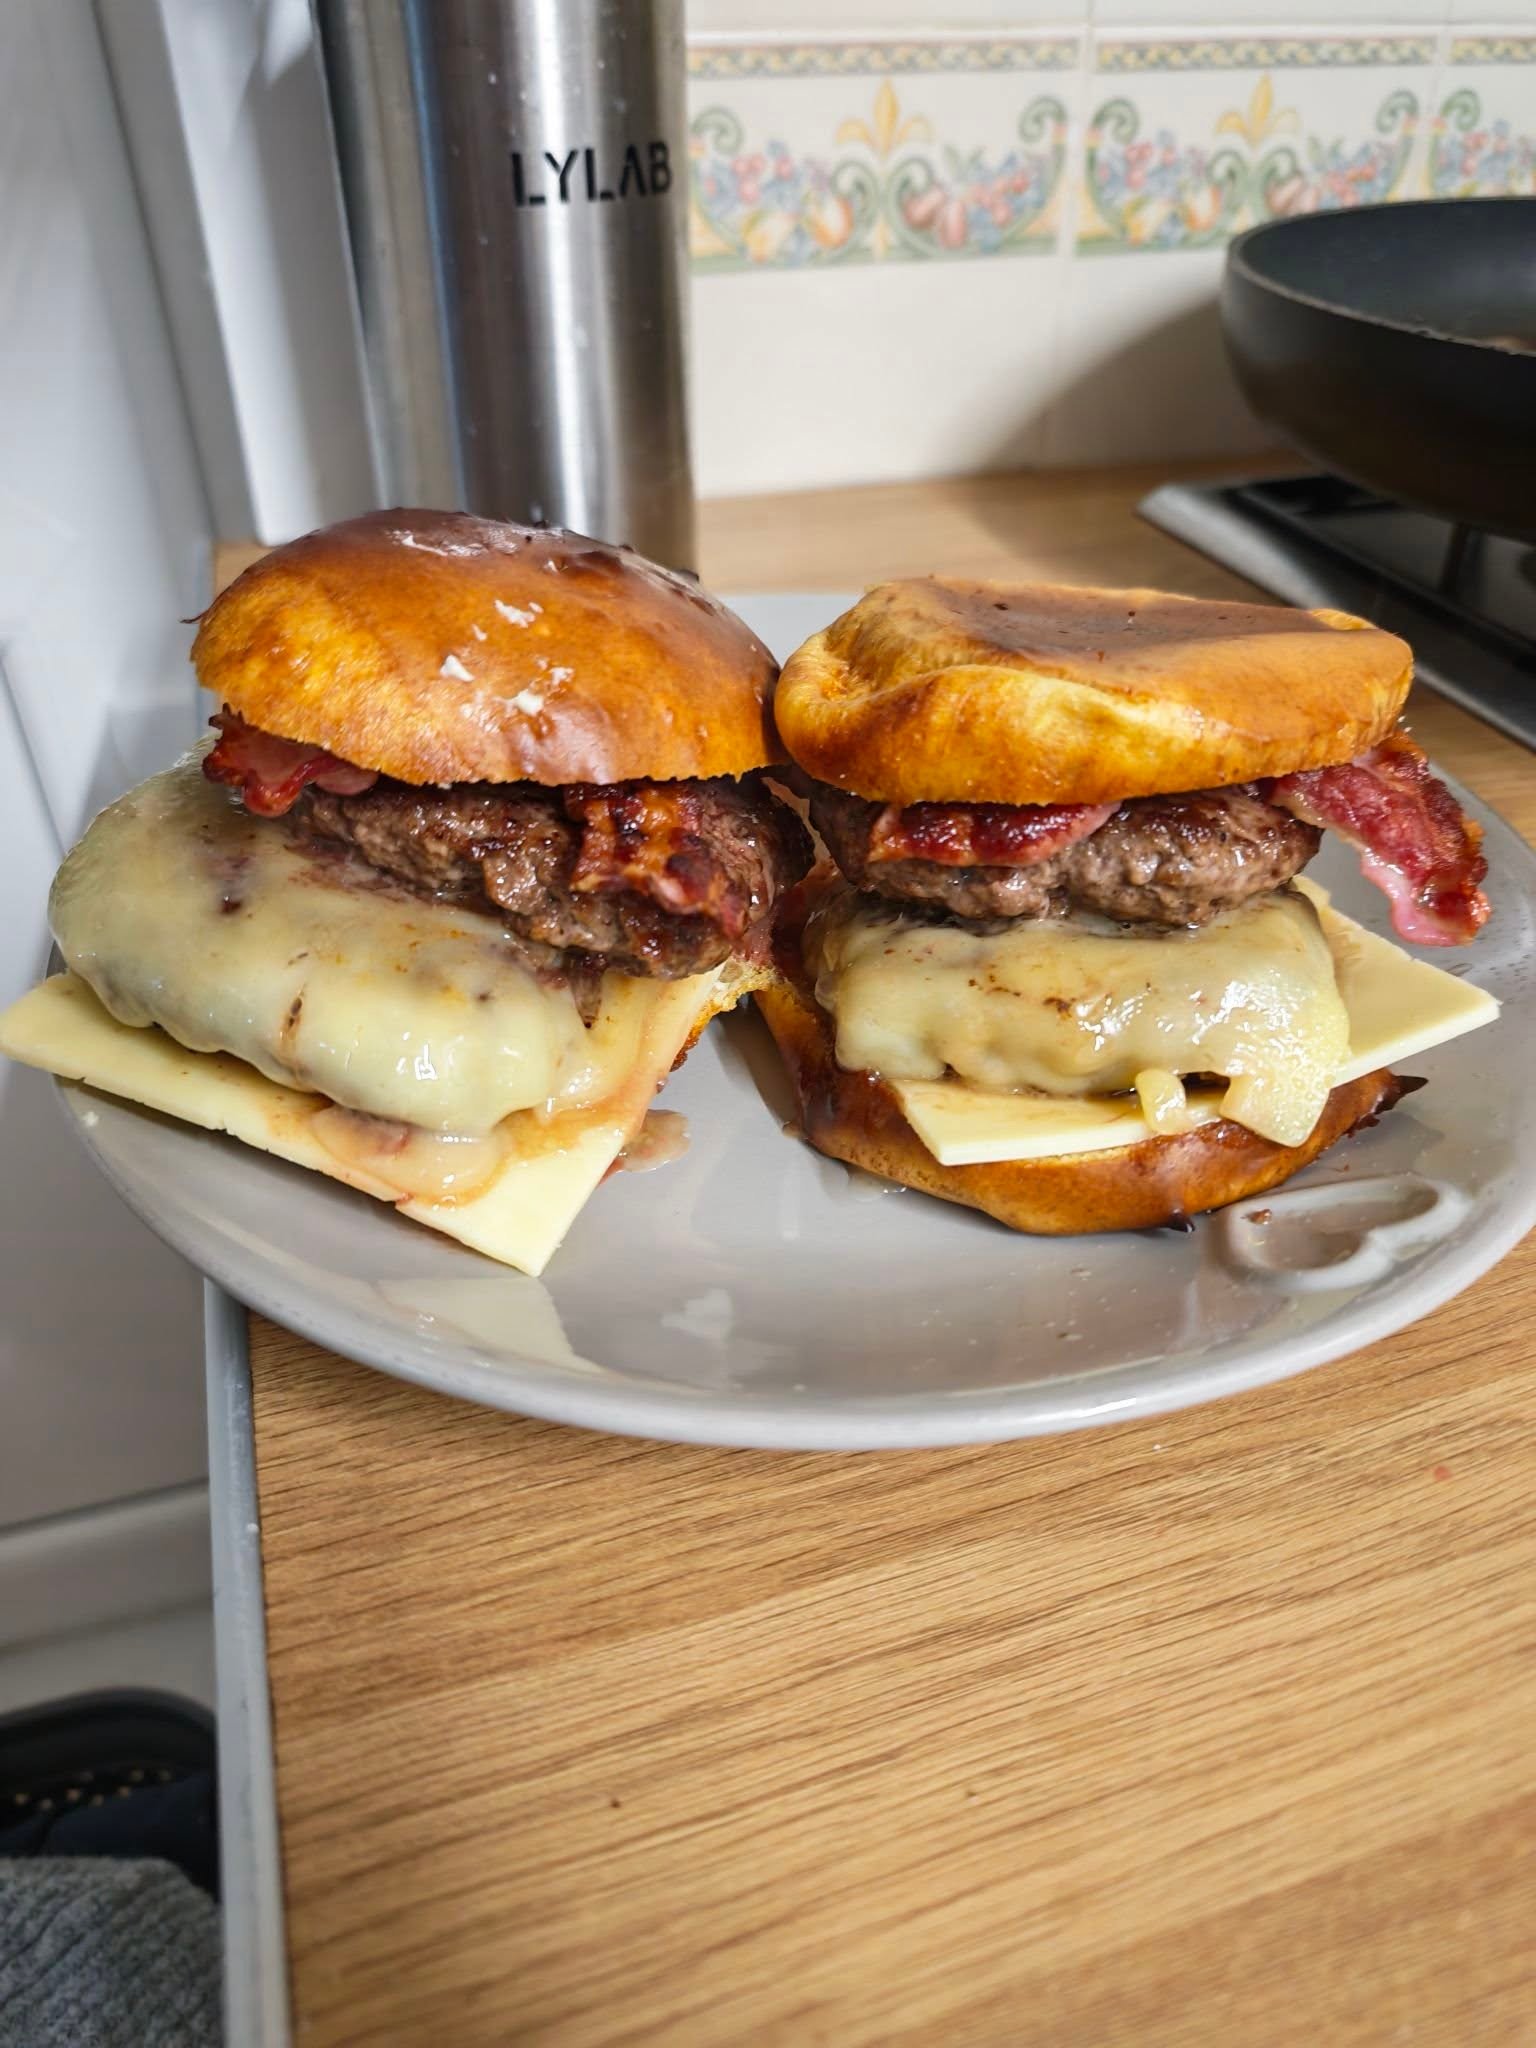
Double Bacon Cheeseburgers on Carnivore Bread

Juicy, cheesy, and stacked high—these Double Bacon Cheeseburgers are made entirely for the carnivore diet. Instead of traditional buns, we use carnivore bread made from eggs and cheese, keeping it zero-carb. Layered with crispy bacon, melty cheese, and thick beef patties, this burger is indulgent, high in protein, and perfect for anyone following a strict carnivore or keto diet.


Ingredients (Serves 2)

For the Carnivore Bread (Bun):

  • 4 large eggs

  • ½ cup shredded cheese (cheddar, mozzarella, or your favorite)

  • 1 tbsp butter, melted

  • Pinch salt

For the Burgers:

  • 1 lb (450 g) ground beef (80/20 for juiciness)

  • 4 slices bacon

  • 4 slices cheddar cheese (or your favorite)

  • ½ tsp salt

  • ¼ tsp black pepper

Optional toppings (still carnivore-friendly):

  • Fried egg

  • Extra cheese

  • Crispy bacon bits


Instructions

1. Make Carnivore Bread (Buns)

  1. Preheat oven to 350°F (175°C).

  2. In a bowl, whisk eggs, shredded cheese, melted butter, and salt.

  3. Pour batter into a greased muffin tin (makes 4 buns).

  4. Bake 15–20 minutes until golden and set. Let cool slightly before using as burger buns.

2. Cook the Bacon

  • Fry bacon in a skillet until crispy. Set aside on paper towels.

3. Form and Cook the Burger Patties

  • Divide ground beef into 4 equal patties (2 per burger).

  • Season with salt and pepper.

  • Cook in a hot skillet or grill 3–4 minutes per side for medium, or until desired doneness.

  • Add cheese slices on top of each patty in the last 1–2 minutes of cooking to melt.

4. Assemble the Burgers

  1. Place one carnivore bread bun half on the plate.

  2. Layer burger patty → cheese → bacon → patty → cheese → bacon.

  3. Top with the other carnivore bread half.

  4. Optional: add a fried egg or extra cheese on top.


Serving Suggestions

  • Serve with extra crispy bacon on the side.

  • Pair with eggs or bone broth for a full carnivore meal.

  • Add pickled eggs or cheese crisps for extra texture.


Variations

  1. Double Cheeseburger Only: Skip bacon; just stack double beef and cheese.

  2. Spicy Carnivore Burger: Add a pinch of smoked paprika or cayenne to patties.

  3. Egg-Topped Burger: Add a fried or poached egg on top for a breakfast-style burger.

  4. Fat-Rich Version: Mix extra tallow or butter into beef for juicier patties.


Related Questions

  • Q: Can I make this keto/carnivore-friendly?
    A: Yes—this is 100% carnivore-friendly if you skip veggies and use only eggs, meat, cheese, and animal fats.

  • Q: Can I make patties in advance?
    A: Yes—cook patties ahead and reheat in a skillet or oven. Assemble before serving.

  • Q: Can I freeze the carnivore buns?
    A: Yes—store baked buns in a freezer-safe bag for up to 1 month. Thaw and lightly toast before using.


Nutrition (Approximate per burger)

  • Calories: 700–800 kcal

  • Protein: 55–60 g

  • Fat: 50–55 g

  • Carbs: 1–2 g (from cheese/eggs)

  • Fiber: 0 g

(Values depend on cheese and meat fat content.)


Final Thoughts

These Double Bacon Cheeseburgers on Carnivore Bread are hearty, indulgent, and fully carnivore-friendly. Perfect for lunch, dinner, or even a weekend treat, they give you the full flavor of a burger without carbs. With crispy bacon, melty cheese, and juicy beef, you get a satisfying, protein-packed meal that fits perfectly into the carnivore or keto lifestyle.

Skillet Onion Bread

Skillet Onion Bread

Prep Time: 20–25 minutes (plus 1 hour rising)
Cook Time: 18–22 minutes
Servings: 4–6


Ingredients

For the Dough:

  • 1 egg

  • 200 ml warm milk

  • 1 tsp sugar

  • 1 tsp active dry yeast

  • 1 tbsp vegetable oil

  • 1 tsp salt

  • 250–300 g all-purpose flour (add gradually until dough forms)

For the Onion Filling:

  • 1 large onion, finely diced

  • 2 tbsp butter

  • ½ tsp dried herbs (like oregano or thyme)

  • ¼ cup shredded cheese (optional, for extra richness)

  • Fresh parsley, chopped (for garnish)


Instructions

Step 1: Prepare the Yeast Base

  1. In a large bowl, whisk together warm milk, sugar, and active dry yeast.

  2. Let it sit for 5–10 minutes until the mixture becomes frothy, indicating the yeast is active.


Step 2: Mix the Dough

  1. Add egg, vegetable oil, and salt to the yeast mixture.

  2. Gradually stir in the flour until a soft dough forms.

  3. Knead the dough on a lightly floured surface for 5–8 minutes until smooth and elastic.


Step 3: First Rise

  1. Place the dough in a lightly oiled bowl.

  2. Cover with a clean cloth and let it rise in a warm spot for about 1 hour, or until doubled in size.


Step 4: Prepare the Onion Filling

  1. Melt the butter in a small pan over medium heat.

  2. Sauté the diced onion until soft and translucent.

  3. Stir in dried herbs.

  4. Remove from heat and allow to cool slightly before spreading on the dough.

  5. Optional: Mix in shredded cheese for extra richness.


Step 5: Shape and Fill

  1. Punch down the risen dough.

  2. Roll it out into a large circle or rectangle.

  3. Spread the onion mixture evenly over the dough.

  4. Roll the dough tightly and then coil it into a spiral shape, or gently press it into a disk that fits your skillet.

  5. Optional: Use a knife to make decorative scores on top to let steam escape while cooking.


Step 6: Skillet Cooking

  1. Lightly grease a large, heavy-bottomed skillet (cast iron works best).

  2. Place the shaped dough in the skillet and cover with a lid.

  3. Cook over low heat for 10–12 minutes until the bottom is golden brown.

  4. Carefully flip the bread:

    • Slide the bread onto a large flat plate.

    • Invert the skillet over the plate and flip both together so the other side is down.

  5. Cover again and cook for 8–10 minutes until golden brown and cooked through.


Step 7: Finish and Serve

  1. Brush the top with a little melted butter.

  2. Sprinkle with fresh parsley.

  3. Slice and serve warm.


Tips for Success

  • Keep the heat low: Cooking slowly ensures the center cooks through without burning the outside.

  • Flipping safely: Using a plate to flip prevents the bread from breaking.

  • Filling variations: You can add finely chopped spinach, roasted peppers, or mushrooms for extra flavor.

  • Serving: Best enjoyed fresh, but can be reheated in a skillet or oven

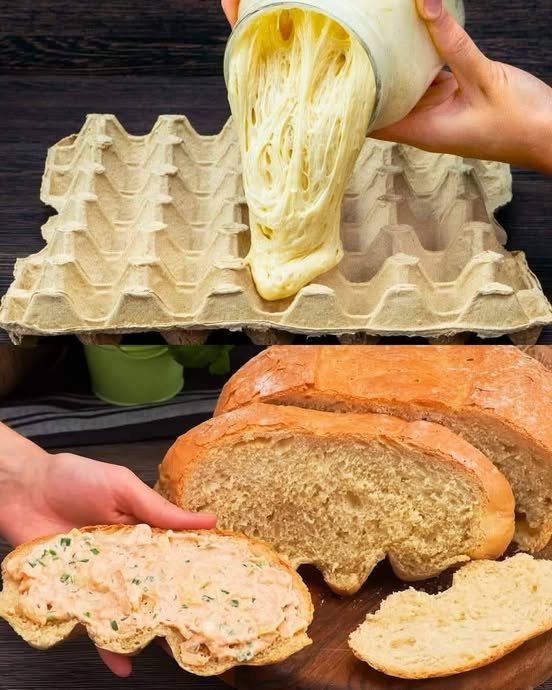
Egg-Carton Shaped Crusty Bread with Brie Dip

Egg-Carton Shaped Crusty Bread with Brie Dip

Prep Time: 20 minutes (plus 1.5 hours rising)
Bake Time: 25–30 minutes
Servings: 1 large loaf


Ingredients

For the Bread:

  • 300 ml warm water

  • 1 tsp salt

  • 7 g (1 packet) active dry yeast

  • 1 tbsp sugar

  • 450–500 g all-purpose flour, added gradually

For the Savory Brie Cheese Sauce:

  • 100 g Brie cheese, chopped (rind optional)

  • 150 g cream cheese

  • 1 small onion, finely diced

  • 2 tbsp green onions, sliced

  • ½ tsp sweet paprika

  • 50 ml beer (optional; adds a malty depth)

  • ½ tsp dill seeds


Instructions

Step 1: Prepare the Dough

  1. In a large bowl or jar, combine warm water, sugar, and yeast. Let it sit for 5 minutes until it becomes foamy, indicating the yeast is active.

  2. Stir in salt.

  3. Gradually add the flour one cup at a time, mixing after each addition.

  4. Knead the dough on a floured surface (or in a large jar) until smooth and elastic—about 8–10 minutes.

  5. Place the dough in a lightly oiled bowl, cover, and let it rise in a warm spot for about 1 hour, or until doubled in size.


Step 2: Prepare the Egg-Carton Formwork

  1. Take a clean cardboard egg carton.

  2. Line it thoroughly with parchment paper or aluminum foil brushed lightly with oil.

    • This ensures the dough does not stick and remains safe for baking.

  3. Place the lined egg carton on a metal baking sheet.


Step 3: Shape and Second Rise

  1. Gently pour or place the risen dough into the lined egg carton.

  2. The dough will naturally settle into the divots, creating the unique “bubbly” bottom shape.

  3. Let the dough rest for 20 minutes while you preheat the oven to 200°C (400°F).


Step 4: Bake the Bread

  1. Bake the bread on the baking sheet for 25–30 minutes, or until the top is golden brown and the bread sounds hollow when tapped.

  2. Remove from the oven and allow it to cool slightly before slicing.


Step 5: Make the Brie Cheese Sauce

  1. In a small saucepan over low heat, combine Brie, cream cheese, and beer.

  2. Stir constantly until fully melted and smooth.

  3. Remove from heat and stir in diced onion, green onions, paprika, and dill seeds.

  4. Keep warm until ready to serve.


Step 6: Serve

  1. Slice the bread to reveal the decorative bottom edge created by the egg carton.

  2. Spread the warm cheese sauce generously over the slices, or serve it on the side as a dipping sauce.


Tips for Success

  • Safety first: Always place the cardboard on a metal baking tray. Do not let cardboard touch the heating elements of the oven.

  • Smooth sauce: Remove the rind from the Brie before melting for a creamier texture.

  • Optional variations: Add herbs like thyme or chives to the cheese sauce for extra flavor.

  • Storage: The bread is best enjoyed fresh. The cheese sauce can be stored in the fridge for up to 2 days and reheated gently.