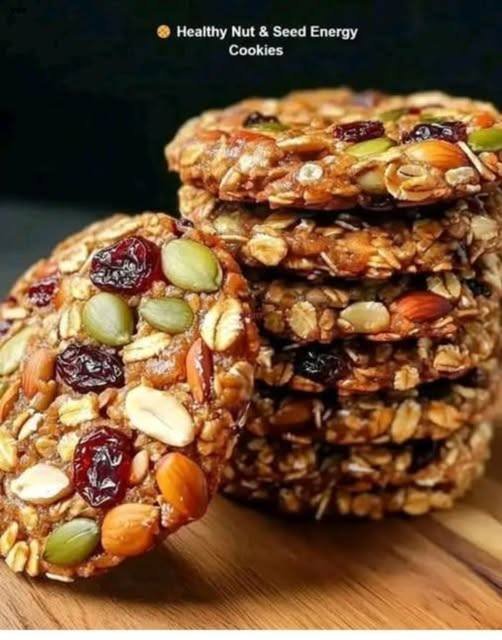
Healthy Nut & Seed Energy Cookies

Healthy Nut & Seed Energy Cookies

These cookies are naturally sweetened and provide a great balance of fiber, healthy fats, and protein. They are perfect for a pre-workout snack or a quick breakfast on the move.

  • Prep time: 10 minutes

  • Cook time: 12–15 minutes

  • Yields: 12–14 cookies


Ingredients

  • 1 ½ cups Rolled oats

  • 1 Ripe banana, mashed (acts as a natural binder)

  • ½ cup Natural peanut butter or almond butter

  • ¼ cup Honey or maple syrup

  • ¼ cup Pumpkin seeds

  • ¼ cup Sunflower seeds

  • ¼ cup Dried cranberries or raisins

  • ¼ cup Almonds, roughly chopped

  • ¼ cup Peanuts or cashews, chopped

  • 1 tsp Vanilla extract

  • ½ tsp Cinnamon

  • Pinch of salt


Instructions

  1. Preparation: Preheat your oven to 175°C (350°F). Line a large baking sheet with parchment paper to prevent sticking.

  2. Mash the Base: In a large bowl, mash the ripe banana until smooth. Stir in the peanut butter, honey (or maple syrup), and vanilla extract until well combined.

  3. Mix Dry Ingredients: Add the rolled oats, cinnamon, and salt to the wet mixture. Stir until the oats are fully coated.

  4. Fold in the Crunch: Add the pumpkin seeds, sunflower seeds, dried cranberries, chopped almonds, and chopped peanuts. Fold them in until they are evenly distributed throughout the dough.

  5. Shape the Cookies: Scoop about 2 tablespoons of dough for each cookie. Use your hands or the back of a spoon to press them into firm, flat rounds on the baking sheet.

    Note: These cookies will not spread or change shape much while baking, so form them exactly how you want them to look.

  6. Bake: Place in the oven for 12–15 minutes. The cookies should feel firm and look slightly golden around the edges.

  7. Cool and Set: Let the cookies cool on the baking sheet for at least 10 minutes before moving them. This cooling time is essential for the cookies to firm up and hold their shape.


Storage Tips

  • Room Temp: Store in an airtight container for up to 3 days.

  • Fridge/Freezer: These stay fresh in the refrigerator for a week or can be frozen for up to 3 months for a long-term snack supply.
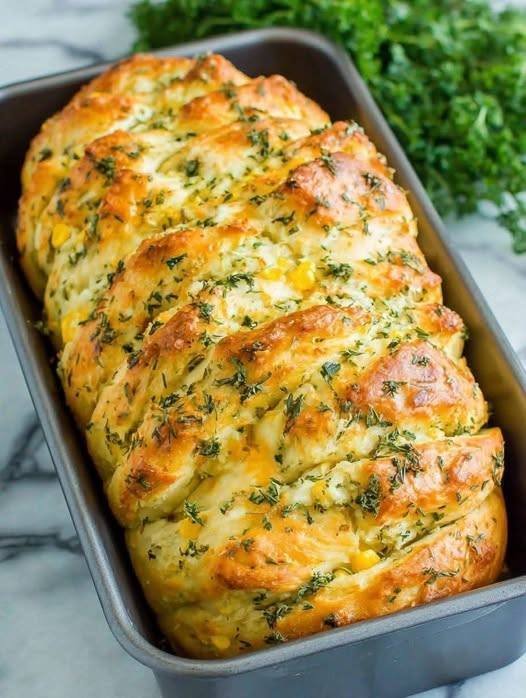

Cheesy Herb Pull-Apart Bread

Cheesy Herb Pull-Apart Bread

A soft baked loaf made from layered dough pieces coated in herb butter and melted cheese, designed to be pulled apart into warm, savory portions.

Prep Time: 10 minutes
Bake Time: 20–25 minutes
Servings: 6–8


🧾 Ingredients

• 1 loaf refrigerated biscuit dough (8–10 pieces)
or
• Pre-made pizza dough

• ½ cup unsalted butter, melted
• 2 cloves garlic, finely minced
• 1 cup shredded cheddar cheese (or cheddar blend)
• ½ cup shredded mozzarella cheese
• 2 tablespoons fresh parsley, finely chopped
• 1 tablespoon fresh chives or dill, finely chopped
• ¼ teaspoon onion powder
• Salt and black pepper, to taste


👩‍🍳 Instructions

1. Preheat and Prepare the Pan

Preheat oven to 175°C (350°F).

Grease a standard 9 × 5-inch loaf pan generously with butter or cooking spray.
Set aside.


2. Prepare the Herb Butter

In a small bowl, combine:

• Melted butter
• Minced garlic
• Chopped parsley
• Chopped chives or dill
• Onion powder
• A pinch of salt and black pepper

Stir until fully blended and fragrant.


3. Prepare the Dough

If using biscuit dough:
Separate each biscuit into individual pieces.

If using pizza dough:
Lightly flour a surface. Roll dough out and cut into 3-inch squares or circles.

Keep dough pieces loosely covered while assembling.


4. Coat the Dough

Dip each piece of dough into the herb butter mixture, coating both sides.
Allow excess butter to drip off slightly.

Set coated pieces aside on a plate.


5. Assemble the Loaf

Stand the loaf pan upright (on its short end).

Layer as follows:

  1. Place one butter-coated dough piece into the pan.

  2. Sprinkle with a small amount of cheddar and mozzarella.

  3. Add another dough piece.

  4. Sprinkle with cheese again.

Continue layering until all dough and cheese are used.

Do not compress the layers tightly — the dough needs space to expand during baking.


6. Add Remaining Butter and Cheese

Pour any remaining herb butter evenly over the top of the loaf.

Sprinkle remaining cheese over the surface.


7. Bake

Place pan in the center of the oven.

Bake for 20–25 minutes, until:
• The top is deep golden
• Cheese is melted and lightly browned
• Center dough is fully cooked

If the top browns too quickly, loosely cover with foil for the final 5 minutes.


8. Cool and Serve

Remove from oven and let rest in the pan for 5 minutes.

Carefully lift the loaf out and place on a serving plate.

Serve warm so the layers separate easily and the cheese remains soft.


⭐ Optional Flavor Variations

✔ Spicy version:
Add a pinch of red pepper flakes to the butter mixture.

✔ Sweet and savory version:
Stir 1 teaspoon honey into the butter for gentle sweetness.

✔ Extra herb version:
Add thyme, rosemary, or basil to the butter.

✔ Garlic-lover version:
Add ½ teaspoon garlic powder in addition to fresh garlic.


🧊 Storage

• Best served fresh
• Refrigerate leftovers for up to 2 days
• Reheat in oven at 160°C (325°F) for 8–10 minutes

Crispy Two-Cheese Flatbread

Crispy Two-Cheese Flatbread

A thin baked cheese flatbread with a bubbly surface and a deeply golden crust — ideal for slicing and dipping.

Prep Time: 5 minutes
Bake Time: 15–18 minutes
Yield: About 12–16 squares


🧾 Ingredients

• 1 cup shredded mozzarella cheese
• 1 cup finely grated Parmesan cheese
• 1 large egg, lightly beaten
• ½ teaspoon garlic powder
• ½ teaspoon dried oregano or Italian seasoning

Optional topping:
• Red pepper flakes
• Everything-style seasoning
• Sesame or poppy seeds


👩‍🍳 Instructions

1. Preheat the Oven

Preheat oven to 200°C (400°F).

Line a large baking sheet with:
• Parchment paper
or
• A silicone baking mat

This prevents sticking and allows the cheese to crisp evenly.


2. Combine the Cheese Mixture

In a medium mixing bowl, add:

• Shredded mozzarella
• Grated Parmesan
• Garlic powder
• Dried herbs

Stir until evenly blended.


3. Add the Egg

Pour the lightly beaten egg into the cheese mixture.

Mix thoroughly until:
• All cheese is coated
• The mixture holds together
• No dry patches remain

The egg helps the flatbread hold its shape after baking.


4. Shape the Flatbread

Transfer the mixture to the prepared baking sheet.

Using a spatula or the back of a spoon:
• Press into a thin rectangle or circle
• About ¼ inch (6 mm) thick
• Smooth the surface evenly

Compact it well so it bakes uniformly.


5. Add Optional Topping

Sprinkle your chosen seasoning lightly over the top.

Press gently so it sticks to the surface.


6. Bake

Place the tray in the center of the oven.

Bake for 15–18 minutes, watching closely near the end.

You want:
• Deep golden edges
• Bubbling surface
• Light browning across the top

Do not underbake or it will remain soft instead of crisp.


7. Rest and Slice

Remove from oven and let rest on the tray for 3–5 minutes.

This allows the cheese to firm up and become sliceable.

Transfer to a cutting board and slice into:
• Squares
or
• Thin strips

Use a sharp knife or pizza cutter.


⭐ Tips for Best Results

✔ Use firm, shredded mozzarella instead of fresh soft cheese for better browning.
✔ Spread thin for crisp texture.
✔ Let it cool slightly before cutting — it crisps as it rests.
✔ If edges brown faster, rotate the pan halfway through baking.


🍅 Serving Ideas

Serve with:
• Warm tomato sauce
• Creamy herb dip
• Chili sauce
• Yogurt-based dip
• Garlic butter

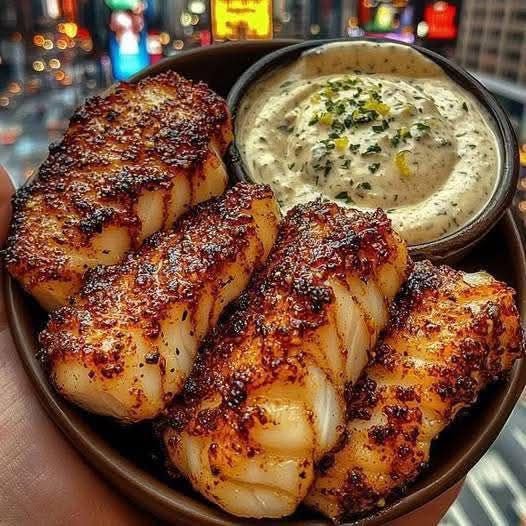
Pan-Fried Cod with Lemon Butter Sauce: A Restaurant-Quality Dish Made Simple

Ingredients:

For the Cod:
  • 4 cod fillets (150-200g each)
  • Salt and pepper, to taste
  • ½ cup all-purpose flour (for coating)
  • 2 tbsp olive oil
  • 1 tbsp unsalted butter
For the Lemon Butter Sauce:
  • 3 tbsp unsalted butter
  • 2 cloves garlic, minced
  • Juice of 1 lemon (about 3 tbsp)
  • Zest of 1 lemon (optional, for extra brightness)
  • ¼ cup chicken or vegetable broth (optional, for a thinner sauce)
  • 2 tbsp fresh parsley, chopped
  • Salt and pepper, to taste

Instructions:

Step 1: Prepare the Cod

Pat the cod fillets dry using paper towels to remove excess moisture, ensuring a nice sear. Season both sides with salt and pepper. Lightly coat each fillet in flour, shaking off any excess—this helps create a crispy, golden crust.

Step 2: Cook the Cod

In a large non-stick skillet, heat olive oil and 1 tbsp of butter over medium-high heat. Once the butter is melted and sizzling, add the cod fillets. Sear for 3–4 minutes until the bottom turns golden brown. Carefully flip and cook for another 2–3 minutes, depending on thickness. The cod is done when it flakes easily with a fork and reaches an internal temperature of 60°C (140°F). Transfer the fillets to a plate and cover with foil to keep warm.

Step 3: Make the Lemon Butter Sauce

Lower the heat to medium and add 3 tbsp of butter to the same pan. Once melted, sauté the minced garlic for about 30 seconds until fragrant, being careful not to burn it. Stir in the lemon juice, scraping up any flavorful bits from the pan. If you prefer a lighter sauce, add chicken or vegetable broth and let it simmer briefly. Finish by stirring in the lemon zest (if using) and chopped parsley. Season to taste with salt and pepper.

Step 4: Serve & Enjoy

Return the cod fillets to the pan, spoon the sauce over them, and let them absorb the flavors for about 30 seconds. Transfer to serving plates and drizzle any remaining sauce on top. Serve with your favorite sides, such as roasted vegetables, mashed potatoes, or a fresh salad.

Final Thoughts

This pan-seared cod with lemon butter sauce is simple yet elegant, offering a restaurant-quality meal with minimal effort. The crispy crust, tender flaky fish, and bright, buttery sauce make it perfect for a quick weeknight dinner or a special occasion.

Enjoy your meal!

4-Ingredient Savory Breakfast Muffins

4-Ingredient Savory Breakfast Muffins

Fluffy, golden, and perfect for a quick, healthy morning meal.

Prep time: 10 mins | Cook time: 20 mins | Yield: 12 muffins


Ingredients

  • 8 large eggs – the base for fluffy muffins.

  • 1 cup cooked ham or bacon, finely diced – or substitute with cooked turkey, chicken, or a plant-based alternative.

  • 1 cup shredded cheese – cheddar, mozzarella, or a mild Mexican blend works beautifully.

  • 1/2 cup finely diced red bell peppers – you can also use spinach, onions, or zucchini.

Optional seasoning:

  • A pinch of salt

  • A pinch of black pepper

  • Fresh herbs like parsley, chives, or oregano for garnish


Instructions

1. Preheat and prepare

  • Preheat your oven to 190°C (375°F).

  • Grease a 12-cup muffin tin with cooking spray or line it with silicone muffin liners to prevent sticking.

2. Mix the eggs

  • In a large bowl, whisk the eggs until smooth and slightly frothy.

  • If using, add a pinch of salt and black pepper and whisk lightly to combine.

3. Add the fillings

  • Evenly distribute the diced ham (or alternative protein), shredded cheese, and diced bell peppers into the bottom of each muffin cup.

Tip: Adding the solids first ensures each muffin gets a balanced mix of ingredients.

4. Pour the eggs

  • Carefully pour the whisked eggs over the fillings in each muffin cup, filling about 3/4 full.

The muffins will rise slightly while baking, so don’t fill them to the top.

5. Bake

  • Place the muffin tin on the center oven rack.

  • Bake for 18–22 minutes, or until the tops are set and lightly golden brown.

  • Test with a toothpick in the center—if it comes out clean, the muffins are ready.

6. Cool and serve

  • Let the muffins cool for about 5 minutes in the tin.

  • Gently loosen the edges with a plastic knife or spatula and remove the muffins.

  • Garnish with fresh parsley or chives if desired.


Pro Tips

  • Storage: Once cooled, store muffins in an airtight container in the fridge for up to 4 days.

  • Freezing: Freeze for up to 2 months; thaw overnight in the fridge or reheat directly from frozen.

  • Reheating: Microwave a muffin for 30–45 seconds for a quick breakfast.

  • Optional variation: For a slightly breadier texture, whisk in 1/4 cup of flour or 1/4 cup milk/almond milk into the egg mixture before pouring.


Variations to Try

  1. Veggie-packed: Add spinach, mushrooms, zucchini, or cherry tomatoes.

  2. Spicy: Include finely diced jalapeño or a dash of paprika.

  3. Cheese swap: Try feta, goat cheese, or pepper jack for different flavors.

  4. Meat-free: Skip the ham/bacon and add extra vegetables for a vegetarian version.


These muffins are nutritious, protein-rich, and incredibly versatile—perfect for breakfast, snack, or even a light lunch.

Cheesy Chicken Enchilada Pillows

Cheesy Chicken Enchilada Pillows

Soft tortilla parcels filled with creamy chicken, baked in enchilada sauce and melted cheese.

Prep Time: 15 minutes
Bake Time: 20–25 minutes
Yield: 8 pillows


📝 Ingredients

  • 8 small flour tortillas

  • 2 cups cooked shredded chicken (rotisserie or boiled chicken both work)

  • 1 cup cream cheese, softened

  • 2 cups shredded Mexican-blend cheese, divided
    (1 cup for filling, 1 cup for topping)

  • 1 can (10 oz / 300 g) enchilada sauce (red or green)

  • 1 can (4 oz / 115 g) diced green chilies, drained

  • 1 teaspoon garlic powder

  • 1 teaspoon ground cumin

  • Salt and black pepper, to taste

Optional toppings for serving:
Fresh cilantro, sour cream, diced avocado, or sliced green onions


👩‍🍳 Instructions

1️⃣ Prepare the Filling

In a large mixing bowl, combine:

  • Shredded chicken

  • Softened cream cheese

  • Diced green chilies

  • 1 cup shredded cheese

  • Garlic powder

  • Cumin

  • Salt and pepper

Mix until smooth and evenly blended.


2️⃣ Prepare the Baking Dish

Lightly grease a 9 × 13 inch (23 × 33 cm) baking dish.
Pour ¼ cup enchilada sauce into the bottom and spread it out to coat the base.
This prevents sticking and adds flavor.


3️⃣ Assemble the Pillows

Place one tortilla flat on a work surface.
Spoon a generous amount of filling into the center.

Fold:

  • Left side inward

  • Right side inward

  • Then fold top and bottom over the filling

This forms a sealed square “pillow.”


4️⃣ Arrange in Dish

Place each pillow seam-side down in the prepared dish.
Arrange them snugly so they stay closed during baking.


5️⃣ Add Sauce and Cheese

Pour the remaining enchilada sauce evenly over all pillows.
Sprinkle the remaining 1 cup shredded cheese over the top.


6️⃣ Bake

Preheat oven to 190°C / 375°F.
Bake uncovered for 20–25 minutes, until:

  • Cheese is fully melted

  • Sauce is bubbling

  • Tops are lightly golden

Optional: For deeper browning, broil for the last 1–2 minutes, watching closely.


7️⃣ Rest and Serve

Remove from oven and let rest 5 minutes before serving.
Top as desired with cilantro, sour cream, or avocado.


🧊 Storage

Store leftovers covered in the refrigerator for up to 3 days.
Reheat in oven or microwave until heated through.