🧄🍗 Baked Caesar Chicken

🧄🍗 Baked Caesar Chicken (Clean Recipe)

⏱ Time

Prep: 15 minutes
Bake: 30 minutes
Total: 45 minutes
Serves: 4


🛒 Ingredients

  • 4 boneless, skinless chicken breasts

  • ½ cup mayonnaise OR Greek yogurt

  • 2 tbsp lemon juice

  • 1 tbsp Dijon mustard

  • 1 tsp Worcestershire sauce

  • 1 clove garlic, minced

  • Salt & black pepper, to taste

  • ½ cup grated Parmesan cheese (divided)

  • 1 cup breadcrumbs or panko

  • 1 tbsp olive oil

  • 4 slices turkey bacon, cooked & crumbled

  • Optional: chopped parsley


👩‍🍳 Instructions

1️⃣ Preheat Oven

Preheat oven to 200°C (400°F).
Lightly grease a baking dish.


2️⃣ Make Caesar Sauce

In a bowl, mix:

  • Mayo (or yogurt)

  • Lemon juice

  • Dijon mustard

  • Worcestershire sauce

  • Garlic

  • Salt & pepper

  • ¼ cup Parmesan

Mix until smooth.


3️⃣ Coat Chicken

Place chicken in baking dish.
Spread Caesar mixture generously over each piece.


4️⃣ Make Crunch Topping

In another bowl, mix:

  • Breadcrumbs

  • Remaining ¼ cup Parmesan

  • Olive oil

  • Turkey bacon

Sprinkle evenly over chicken.


5️⃣ Bake

Bake uncovered for 25–30 minutes
(or until internal temp is 75°C / 165°F).

Topping should be golden and crispy.


6️⃣ Rest & Serve

Let it rest 5 minutes before serving.
Garnish with parsley if desired.


🍽 Serving Ideas

  • With roasted vegetables

  • With rice or pasta

  • With green salad

  • In wraps or sandwiches


🔁 Variations

✔ Spicy: add chili flakes
✔ Veggie: add broccoli, peppers, zucchini
✔ Low-carb: skip breadcrumbs
✔ Cheesy: add mozzarella on top


🧊 Storage

Fridge: 3 days in airtight container
Freezer: Up to 2 months
Reheat: Oven or air fryer best
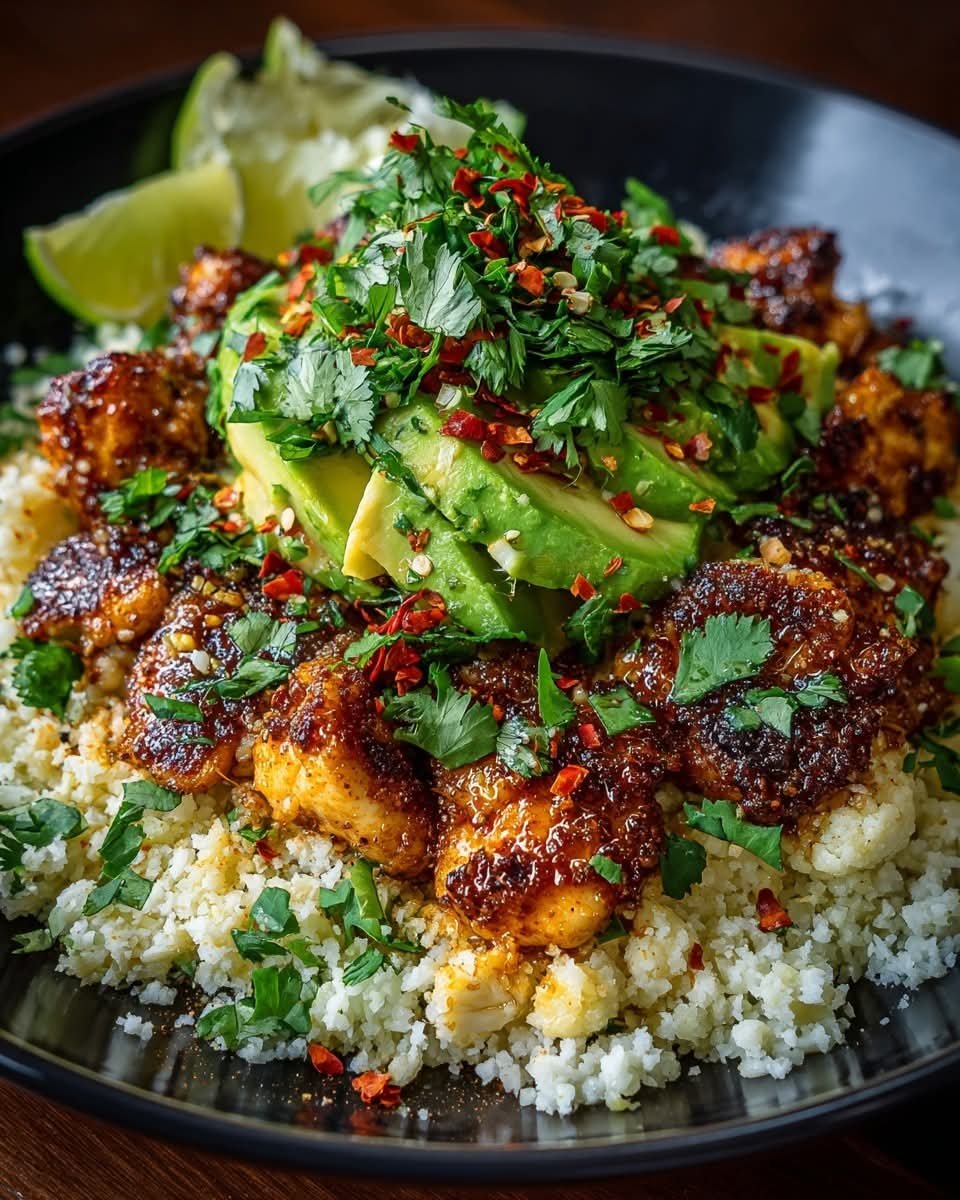
Honey Lime Chicken & Avocado Roasted Cauliflower Rice Stack

Honey Lime Chicken & Avocado Roasted Cauliflower Rice Stack

Ingredients

Honey Lime Chicken

  • 450 g (1 lb) boneless, skinless chicken breasts, cut into bite-sized pieces
  • 1 tbsp olive oil
  • Zest and juice of 1 lime
  • 2 tbsp honey
  • 1 tsp smoked paprika
  • ½ tsp chili powder
  • ½ tsp garlic powder
  • Salt and black pepper, to taste

Roasted Cauliflower Rice

  • 4 cups cauliflower rice (fresh or frozen, thawed and dried)
  • 1½ tbsp olive oil
  • ½ tsp smoked paprika
  • ½ tsp garlic powder
  • Salt and black pepper, to taste

Avocado Layer

  • 2 ripe avocados, sliced or diced
  • Juice of ½ lime
  • Pinch of salt

Optional Garnish

  • Fresh cilantro, chopped
  • Red pepper flakes

Directions

Marinate the Chicken

In a bowl, combine olive oil, lime zest, lime juice, honey, smoked paprika, chili powder, garlic powder, salt, and pepper.

Add chicken and toss well. Let marinate for 10–15 minutes.

Roast the Cauliflower Rice

Preheat oven to 220°C (425°F).

Toss cauliflower rice with olive oil, smoked paprika, garlic powder, salt, and pepper.

Spread evenly on a baking sheet and roast 18–22 minutes, stirring once, until lightly golden and slightly crisp.

Cook the Chicken

Heat a skillet over medium-high heat.

Cook chicken 5–7 minutes, stirring occasionally, until caramelized, sticky, and cooked through.

Prepare the Avocado

Toss avocado gently with lime juice and a pinch of salt.

Assemble the Stack

Layer roasted cauliflower rice at the base, followed by honey lime chicken, then avocado on top.

Serve

Garnish with cilantro and red pepper flakes if desired. Serve immediately while warm.

Nutritional Information (Approximate, per serving)

Calories: 410 kcal

Protein: 36 g

Carbohydrates: 22 g

Fat: 22 g

Fiber: 9 g

Sugar: 11 g

🍕 Keto Pizza Roll Ups

🍕 Keto Pizza Roll Ups

Prep time: 10 mins | Cook time: 10 mins | Servings: 8 Roll-ups

Ingredients

  • 8 slices Mozzarella cheese (thick-cut works best!)

  • 1 tbsp Olive oil

  • 1/4 cup Small onion, thinly sliced

  • 1/2 Green bell pepper, thinly sliced

  • 1/4 cup Mushrooms, sliced

  • 1/2 tsp Italian seasoning

  • 1 tbsp Fresh basil, chopped

  • Optional: Marinara or garlic sauce for dipping


Instructions

  1. Prep the Oven & Veggies: Preheat your oven to 400°F (200°C). Wash and thinly slice your onions, bell peppers, and mushrooms.

  2. Sauté for Flavor: In a large frying pan over medium-high heat, combine the olive oil, onions, mushrooms, and peppers. Sauté until the onions turn a beautiful golden brown. This brings out the natural sweetness!

  3. Prepare the Tray: Line a large baking sheet with parchment paper (this is key so the cheese doesn’t stick!).

  4. Assemble: Lay the mozzarella slices flat on the parchment paper. Make sure they aren’t touching so they don’t fuse into one giant sheet.

  5. Top Them Off: Evenly distribute the sautéed veggie mixture over each cheese slice. Sprinkle the Italian seasoning and fresh basil over the top.

  6. Bake: Place in the oven for 6–7 minutes. You are looking for the edges of the cheese to turn a crispy golden brown.

  7. Cool & Roll: Let the tray sit for about 2 minutes. You want the cheese to be cool enough to touch but still pliable. Carefully roll each slice up into a log.

  8. Serve: Plate them up and enjoy with your favorite keto-friendly dipping sauce!


Pro-Tip for the Chef: If she wants to experiment next time, adding a single pepperoni slice under the veggies adds a nice salty crunch!

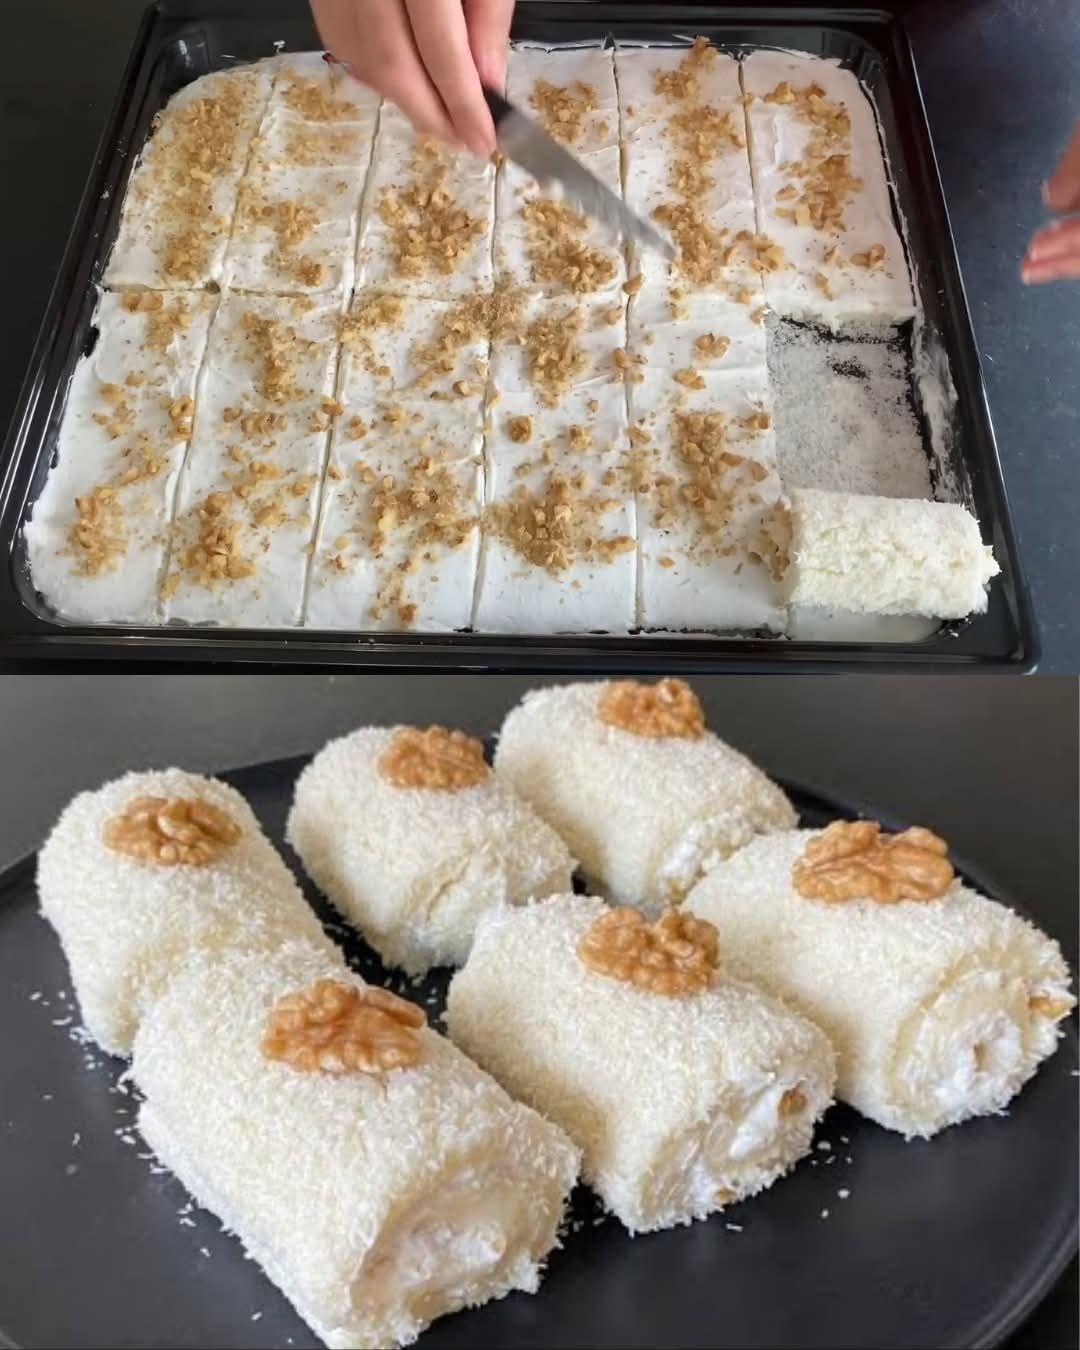
Creamy Coconut Custard Rolls

Creamy Coconut Custard Rolls

A soft milk custard dessert rolled in coconut, topped with walnuts. This is a chilled, no-bake-style dessert once the custard is cooked.


✅ Ingredients

For the Custard:

  • 1 liter (4 cups) milk

  • 1 cup sugar

  • 1 cup + 1 tablespoon all-purpose flour

  • 60 g (4 tablespoons) butter

  • 1 teaspoon vanilla extract

For Coating & Topping:

  • 1½ to 2 cups shredded coconut

  • 1 cup whipped cream (optional)

  • Walnut halves (for topping)


🥄 Instructions

1. Prepare the Tray

  • Use a large flat tray or baking sheet.

  • Spread the shredded coconut evenly over the entire surface.

  • Make sure the coconut layer is thick enough to prevent sticking.


2. Cook the Custard

  • In a large saucepan, add:

    • Milk

    • Sugar

    • Flour

  • Whisk well before heating to remove lumps.

  • Cook on medium heat, stirring constantly.

  • Continue cooking until the mixture becomes thick and smooth (about 8–10 minutes).

  • Once thick, remove from heat.

  • Add butter and vanilla extract.

  • Mix well until butter melts completely and custard becomes glossy.


3. Spread and Chill

  • Pour the hot custard evenly over the coconut layer.

  • Spread gently with a spatula to form a smooth rectangle.

  • Let cool at room temperature for 20–30 minutes.

  • Refrigerate for at least 4 hours (overnight is best) until fully set.


4. Optional Cream Layer

  • Once set, spread a thin layer of whipped cream on top (optional).

  • Sprinkle crushed walnuts over the cream layer if using.


5. Slice and Roll

  • Cut the custard into equal rectangular strips using a sharp knife.

  • Gently lift one edge of each strip and roll into a spiral shape.


6. Garnish

  • Place rolls on a serving plate.

  • Top each roll with a walnut half.


🌟 Helpful Tips

  • Always stir custard while cooking to prevent burning.

  • Chill fully before rolling or it may break.

  • If custard is too soft, refrigerate longer.

  • Store in refrigerator and consume within 2–3 days.

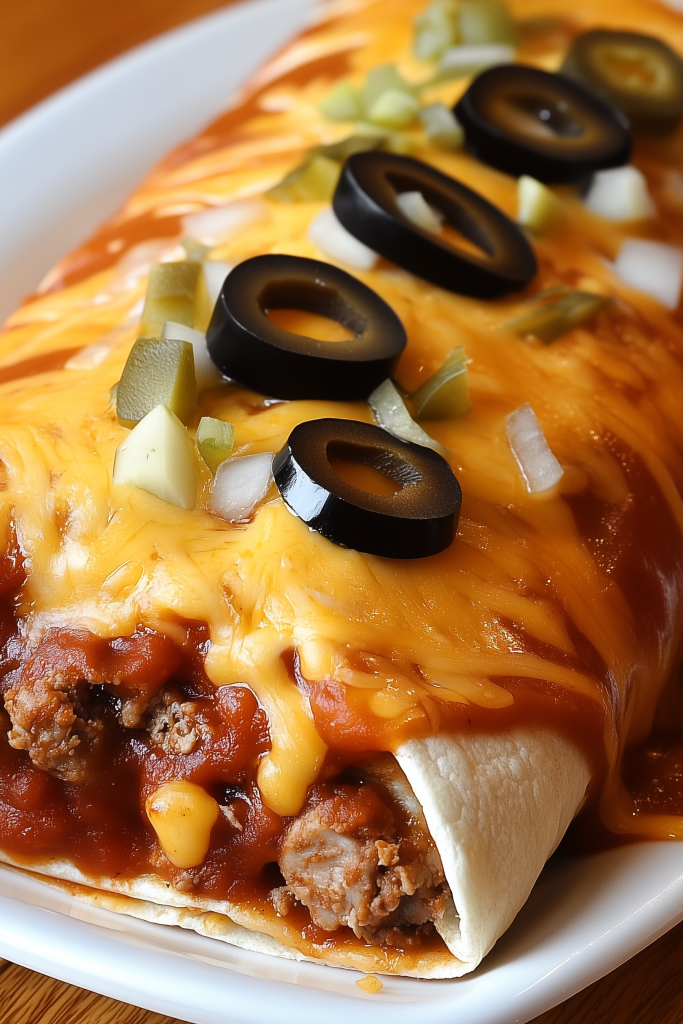
Homemade Enchirito (Taco Bell–Style)

Homemade Enchirito (Taco Bell–Style)
This dish combines the best of a burrito and enchilada: a soft tortilla filled with seasoned beef and beans, topped with flavorful sauce and melted cheese. It’s comforting, hearty, and perfect for family meals.


🧾 Ingredients (Serves 4)

🔸 Beef Filling:

  • 1⅓ lb (600 g) ground beef

  • 1½ tbsp masa harina (corn flour)

  • 4½ tsp chili powder

  • ½ tsp onion powder

  • ½ tsp garlic powder

  • ½ tsp seasoning salt

  • ½ tsp paprika

  • ¼ tsp ground cumin

  • ½ tsp garlic salt

  • ¼ tsp sugar

  • 1 tsp dried minced onion

  • ½ tsp beef bouillon powder

  • ¾ to 1 cup water


🔸 Sauce:

  • 8 oz (1 cup) tomato sauce

  • ⅓ cup water

  • ¼ tsp chili powder

  • 1½ tsp cumin

  • 1½ tsp dried minced onion

  • 1 tbsp white vinegar

  • ½ tsp garlic powder

  • ½ tsp garlic salt

  • ¼ tsp paprika

  • ¼ tsp sugar

  • ¼ tsp cayenne pepper (optional)


🔸 For Assembly:

  • 4 flour tortillas (8-inch)

  • 1 cup refried beans (heated)

  • 1 cup shredded cheddar cheese

  • ¼ cup chopped white onion

  • Sliced black olives (optional)


🍳 Equipment

  • Skillet

  • Small saucepan

  • Baking dish

  • Mixing bowls

  • Spoon or spatula


👩‍🍳 Instructions

1. Make the Seasoning Mix

In a small bowl, combine:

  • Masa harina

  • Chili powder

  • Onion powder

  • Garlic powder

  • Seasoning salt

  • Paprika

  • Cumin

  • Garlic salt

  • Sugar

  • Dried onion

  • Bouillon powder

Mix well and set aside.


2. Cook the Beef

Heat a skillet over medium heat.

Add ground beef and cook until fully browned, breaking it apart with a spoon.

Drain excess fat.


3. Season the Beef

Return beef to the skillet.

Add the seasoning mixture and ¾ to 1 cup water.

Simmer on low heat for 20 minutes, stirring occasionally, until thick and flavorful but still moist.


4. Make the Sauce

In a small saucepan, combine all sauce ingredients.

Bring to a gentle simmer over low heat.

Cook for 15–20 minutes, stirring occasionally.

Remove from heat.


5. Prepare for Baking

Preheat oven to 175°C (350°F).

Lightly grease a baking dish.


6. Assemble the Enchiritos

Warm tortillas until soft.

On each tortilla:

  • Spread ¼ cup refried beans

  • Add ¼ of the beef mixture

Roll tightly and place seam-side down in the dish.


7. Top and Bake

Pour sauce evenly over tortillas.

Sprinkle with:

  • Shredded cheese

  • Chopped onion

  • Olives (optional)

Bake uncovered for 15 minutes, until cheese is melted and bubbly.


🍽 Serving Suggestions

Serve with:

  • Mexican rice

  • Fresh salad

  • Corn on the cob

  • Sour cream or guacamole


📦 Storage

  • Refrigerate leftovers up to 3 days

  • Reheat in oven or microwave

  • Add extra sauce when reheating to keep tortillas soft


⭐ Tips

✔ Use soft tortillas for easy rolling
✔ Add jalapeños for extra heat
✔ Can use chicken or turkey instead of beef
✔ Double recipe for meal prep


🌮 Final Note

This homemade enchirito gives you all the flavor of a restaurant favorite with simple ingredients and fresh preparation. Soft tortillas, savory beef, rich sauce, and melted cheese make it a satisfying meal any day of the week.

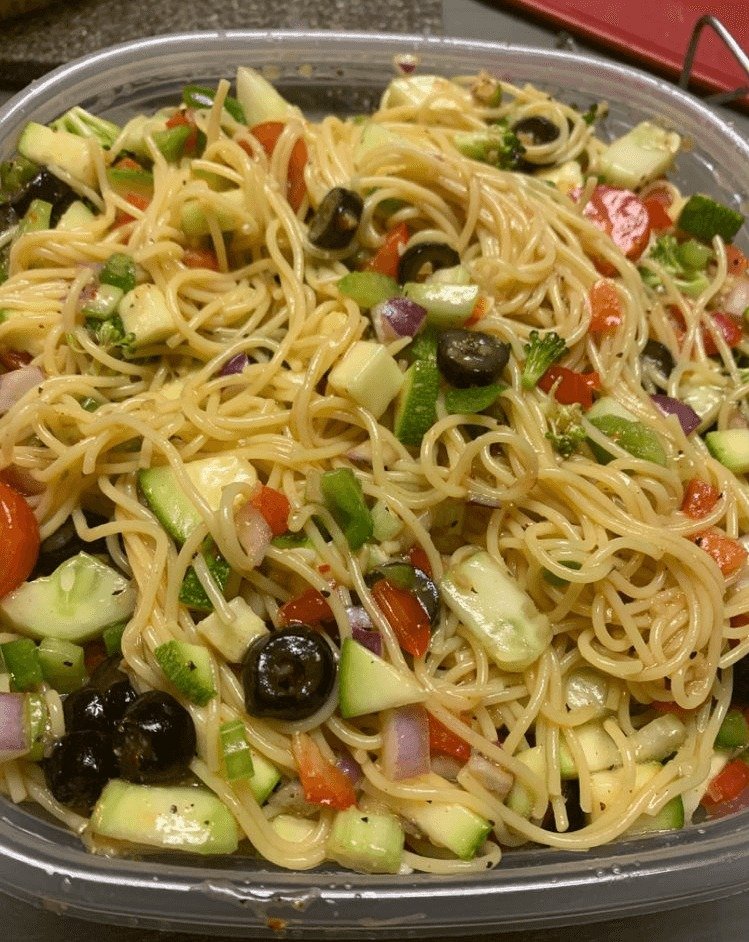
California Spaghetti Salad

🥗 California Spaghetti Salad
A refreshing pasta salad made with tender spaghetti and crisp vegetables, tossed in a flavorful dressing. Perfect for picnics, parties, or light meals.

🧾 Ingredients

For the Salad Base:

  • 1 lb (450 g) spaghetti

  • 1½ cups cherry tomatoes, halved

  • 1 cucumber, diced

  • 2 zucchini, diced

  • 1 green bell pepper, diced

  • 1 small red onion, finely chopped (optional)

  • 1 can (about 2.25 oz / 65 g) sliced black olives, drained


For the Dressing:

  • 2 cups Italian dressing (from a 16 oz bottle)

  • ½ cup grated Parmesan cheese

  • 1 tablespoon sesame seeds

  • 1 teaspoon paprika

  • ½ teaspoon celery seed


👩‍🍳 Instructions

1. Cook the Pasta

Bring a large pot of salted water to a boil.

Add spaghetti and cook according to package instructions until al dente (tender but firm).

Drain the pasta and rinse with cold water to stop the cooking and cool it completely.

Break the spaghetti into shorter pieces for easier serving.


2. Prepare the Vegetables

Wash all vegetables well.

Dice:

  • Cucumber

  • Zucchini

  • Green bell pepper

Halve the cherry tomatoes.

Finely chop the red onion (if using).


3. Combine the Salad

In a very large bowl, add:

  • Cooled spaghetti

  • Cherry tomatoes

  • Cucumber

  • Zucchini

  • Green bell pepper

  • Red onion

  • Black olives

Gently toss to mix evenly.


4. Make the Dressing

In a small bowl or jar, combine:

  • Italian dressing

  • Parmesan cheese

  • Sesame seeds

  • Paprika

  • Celery seed

Whisk or shake well until fully blended.


5. Dress the Salad

Pour the dressing over the pasta and vegetables.

Toss thoroughly until everything is evenly coated.


6. Chill

Cover the bowl and refrigerate for at least 3 hours (overnight is best).
This allows the pasta and vegetables to absorb the flavors.

Before serving, toss again.
If it looks dry, add a little extra Italian dressing.


🍽 Serving

Serve chilled as:

  • A side dish

  • A light lunch

  • A picnic or party salad

Optional garnishes:

  • Extra Parmesan cheese

  • Fresh parsley or basil


⭐ Helpful Tips

✔ Add cooked chicken, tuna, or chickpeas for protein
✔ Add sweet corn for extra color
✔ Keep tomatoes and cucumber separate and mix in 1 hour before serving for extra crunch