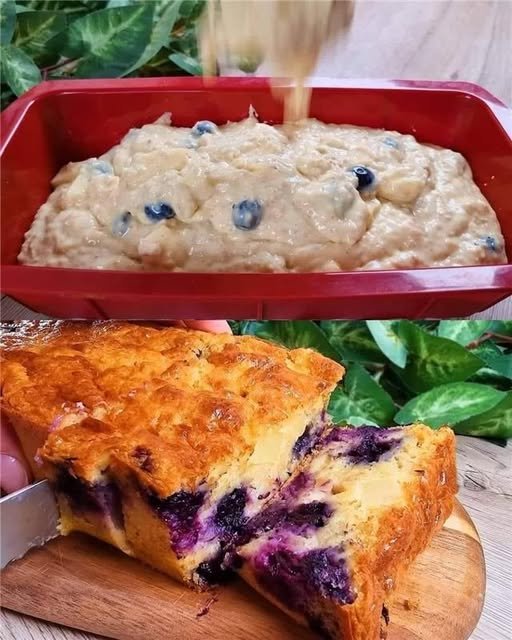
Keto Blueberry Lemon Bread

Keto Blueberry Lemon Bread

A moist, zesty, and low-carb loaf that feels like a cheat meal but fits perfectly into a ketogenic lifestyle.

  • Prep time: 15 minutes

  • Bake time: 50–60 minutes

  • Servings: 12 slices

  • Net Carbs: 6g per slice


Ingredients

The Dry Base:

  • 2 cups Finely ground almond flour

  • ¼ cup Coconut flour

  • ½ cup Erythritol or monk fruit sweetener

  • 1 tsp Baking powder

  • ½ tsp Baking soda

  • ¼ tsp Salt

The Wet Mix:

  • 3 Large eggs (room temperature)

  • ½ cup Unsweetened almond milk

  • ¼ cup Fresh lemon juice

  • 2 tbsp Fresh lemon zest

  • 1 tsp Pure vanilla extract

  • ¼ cup Coconut oil or butter, melted and cooled

The Star:

  • ½ cup Fresh blueberries


Instructions

  1. Prep the Station: Preheat your oven to 350°F (175°C). Line a standard loaf pan with parchment paper (letting the edges hang over for easy removal) or grease it well.

  2. Sift and Whisk Dry: In a large bowl, whisk together the almond flour, coconut flour, sweetener, baking powder, baking soda, and salt. Ensure there are no clumps, especially with the coconut flour.

  3. Combine Wet: In a separate medium bowl, whisk the eggs, almond milk, lemon juice, lemon zest, and vanilla until fully incorporated.

  4. Fold and Incorporate: Pour the wet ingredients into the dry. Stir gently until just combined. Fold in the melted coconut oil (or butter).

  5. Add Blueberries: Gently fold in the fresh blueberries. Chef’s Tip: Tossing the berries in a teaspoon of almond flour before adding them can help prevent them from sinking to the bottom of the loaf!

  6. The Bake: Pour the batter into the prepared pan and smooth the top. Bake for 50–60 minutes. At the 45-minute mark, check if the top is browning too quickly; if so, tent it loosely with foil. The bread is done when a toothpick comes out clean.

  7. Cooling is Key: Let the bread cool in the pan for 10 minutes, then lift it out onto a wire rack. For the best texture, wait until it is completely cool before slicing—keto breads can be fragile while warm!


Quick Nutrition Profile (Per Slice)

  • Calories: 150

  • Net Carbs: 6g (10g Total – 4g Fiber)

  • Fat: 12g

  • Protein: 5g

  • WW SmartPoints: 5


Storage Tip

Because of the moisture from the blueberries and almond flour, this bread stays freshest in the refrigerator for up to 5 days. It also freezes beautifully—just slice it before freezing so you can grab a single piece whenever the craving hits.
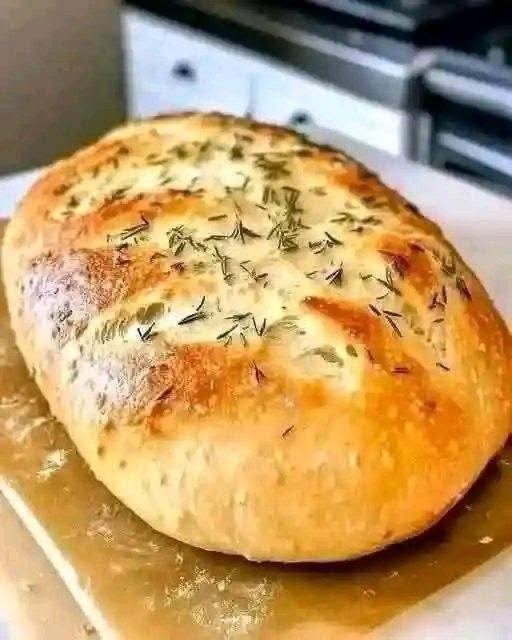

Simple No-Knead Herb Bread

Simple No-Knead Herb Bread

Prep Time: 10 minutes
Rise Time: 1½–2 hours
Bake Time: 35–40 minutes
Yields: 1 round loaf

A soft, airy bread with a lightly crisp crust and herb topping, made without kneading.


Ingredients

  • 3 cups all-purpose flour

  • 1 teaspoon salt

  • 1 tablespoon sugar

  • 1 tablespoon instant yeast

  • 1½ cups warm water (about 110°F / 43°C)

  • 1 tablespoon olive oil (for brushing)

  • 1–2 teaspoons dried herbs (rosemary, thyme, or mixed herbs)

Optional topping:

  • Coarse salt or extra herbs


Instructions

1. Mix the Dough

In a large bowl, combine:

  • Flour

  • Salt

  • Sugar

  • Yeast

Pour in the warm water and stir with a spoon until a sticky, shaggy dough forms.
Do not knead.


2. First Rise

Cover the bowl with a towel or plastic wrap.
Let rise in a warm place for 1½ to 2 hours, or until doubled in size and bubbly.


3. Shape

Line a baking tray with parchment paper.
Turn the dough out onto the tray and gently shape it into a round loaf using a spatula or lightly oiled hands.


4. Second Rest

Cover loosely and let rest for 20 minutes while the oven heats.


5. Preheat Oven

Preheat to 375°F (190°C).


6. Add Topping

Brush the loaf lightly with olive oil.
Sprinkle dried herbs evenly over the top.
Optional: add a light pinch of coarse salt.


7. Bake

Bake for 35–40 minutes, or until:

  • The top is deep golden

  • The loaf sounds hollow when tapped on the bottom


8. Cool

Transfer to a rack and cool for 15–20 minutes before slicing.


Helpful Tips

  • Crispier crust: Place a small oven-safe dish of hot water on the lower rack while baking.

  • Flavor ideas: Add garlic powder or grated cheese to the dough.

  • Storage: Wrap and store at room temperature for 2 days or freeze for longer storage.

  • Serving: Great with soups, butter, olive oil, or as sandwich bread.

Cottage Cheese & Spinach Crustless Quiche

This Cottage Cheese & Spinach Crustless Quiche looks like a fantastic addition to your family’s rotation! Since it’s packed with protein and doesn’t require a crust, it’s a great “no-fuss” meal for a busy mom.

As per your request for full recipes, here are the complete details:


Cottage Cheese & Spinach Crustless Quiche

Prep time: 10 mins | Cook time: 35–40 mins | Servings: 6–8

Ingredients

  • 1 ½ cups: Cottage cheese

  • 6: Large eggs

  • 2 cups: Fresh spinach, roughly chopped

  • 1 cup: Shredded mozzarella or cheddar cheese

  • ¼ cup: Grated Parmesan cheese

  • 1 tsp: Garlic powder

  • ½ tsp: Onion powder

  • To taste: Salt and black pepper

  • Optional: Pinch of nutmeg or crushed red pepper flakes


Instructions

  1. Preheat and Prep: Preheat your oven to 375°F (190°C). Thoroughly grease a 9-inch pie dish or springform pan with butter or non-stick cooking spray.

  2. Blend the Base: In a large bowl, whisk the eggs until smooth. Stir in the cottage cheese, garlic powder, onion powder, salt, and pepper. For a smoother, more “custardy” texture, you can blend the eggs and cottage cheese together in a blender before adding the other ingredients.

  3. Fold in Greens and Cheese: Stir in the chopped fresh spinach and the shredded mozzarella or cheddar.

  4. Bake: Pour the mixture into your prepared dish. Sprinkle the Parmesan cheese over the top for a golden crust.

  5. Cook: Bake for 35–40 minutes, or until the center is set and the top is lightly golden brown.

  6. Cool and Serve: Let the quiche rest for at least 5–10 minutes before slicing. This allows the internal structure to firm up so you get clean slices.


Why This Recipe Works

  • High Protein: The combination of eggs and cottage cheese makes this incredibly satiating.

  • Versatile: You can easily swap the spinach for sautéed mushrooms, bell peppers, or even leftover ham.

  • Meal Prep Friendly: This quiche reheats beautifully, making it perfect for quick breakfasts during the school week.

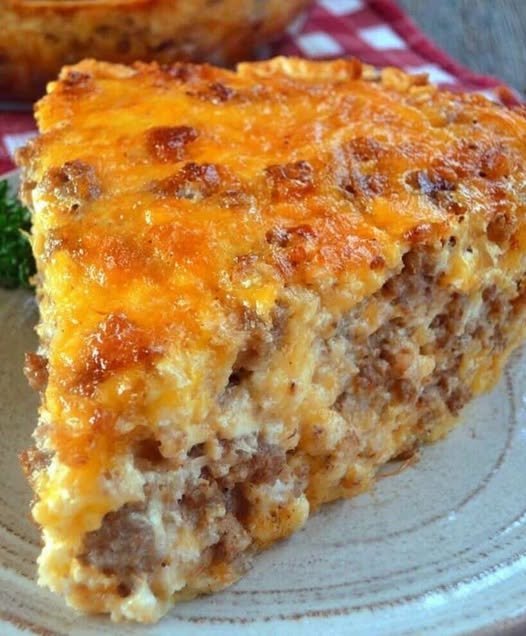
Monterey Sausage Pie

Monterey Sausage Pie

This dish is a savory, “crustless” wonder that’s as perfect for a weekend brunch as it is for a quick Tuesday night dinner. The combination of sweet Walla Walla onions and the earthy depth of sage makes it truly stand out.

  • Prep time: 15 minutes

  • Cook time: 25-30 minutes

  • Servings: 6-8

Equipment

  • Skillet

  • Mixing bowl

  • Whisk

  • 9-inch deep-dish pie plate

Ingredients

  • 1 lb ground sausage (breakfast or Italian)

  • 1 cup red pepper, diced

  • 1 sweet onion (Walla Walla or Vidalia), diced

  • 1/2 cup mushrooms (brown or white), diced

  • 3 tsp garlic, minced

  • 2 ½ cups Monterey Jack cheese, grated (divided)

  • 1⅓ cups milk

  • 3 large eggs

  • ¾ cup Bisquick (or similar baking mix)

  • ¾ tsp dried sage

  • ¼ tsp black pepper

Instructions

  1. Preheat & Prep: Heat your oven to 400°F (200°C). Lightly grease a deep-dish pie plate with non-stick cooking spray.

  2. Brown the Meat: In a large skillet over medium-high heat, brown the sausage until no longer pink.

  3. Sauté the Veggies: Add the diced onion, red pepper, and mushrooms to the skillet. Continue cooking until the vegetables are tender and the onions are translucent. Stir in the minced garlic for the last minute of cooking until fragrant. Drain any excess grease.

  4. Prepare the Batter: In a medium mixing bowl, whisk together the milk, eggs, Bisquick, sage, and black pepper until the mixture is smooth.

  5. Assemble: Transfer the sausage and vegetable mixture into the prepared pie plate. Spread it out evenly. Sprinkle 2 cups of the Monterey Jack cheese over the meat layer and toss gently to combine.

  6. Pour: Pour the Bisquick batter evenly over the sausage and cheese.

  7. Bake: Place in the oven and bake for 20–25 minutes, or until a knife inserted in the center comes out clean and the top is golden brown.

  8. Final Melt: Sprinkle the remaining ½ cup of cheese over the top. Return to the oven for 1–2 minutes until the cheese is bubbling and melted.

  9. Serve: Let the pie rest for about 5 minutes to set before slicing.


Pro-Tip

If you want a bit of a kick, try using Pepper Jack cheese instead of Monterey Jack, or add a dash of red pepper flakes to the egg mixture!

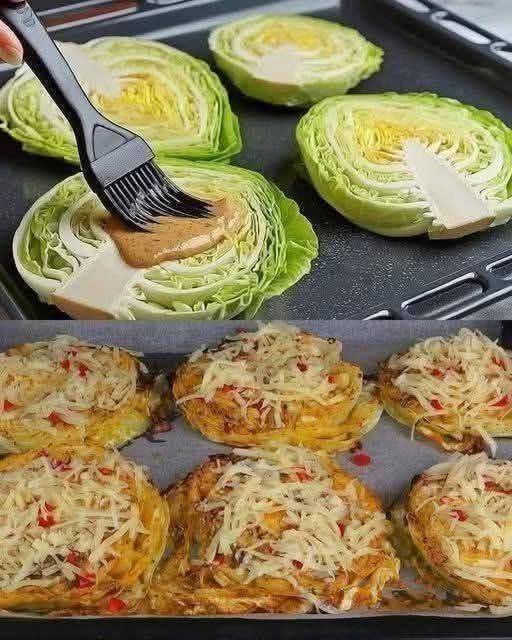
Baked Cabbage Steaks

Baked Cabbage Steaks

Oven-baked cabbage slices seasoned with oil and spices, cooked until tender inside and lightly browned on the outside.

Prep Time: 10 minutes
Bake Time: 25–30 minutes
Servings: 4


🧾 Ingredients

• 1 medium head of cabbage
• 50 ml (about 3 tablespoons) olive oil
• 1 teaspoon salt
• Ground black pepper, to taste
• Red pepper flakes or ground red pepper, to taste

Optional additions (as seen in photo style):
• Shredded cheese (mozzarella or cheddar)
• Garlic powder
• Paprika
• Dried herbs (oregano or thyme)


👩‍🍳 Instructions

1. Prepare the Oven

Preheat oven to 200°C (400°F).

Line a baking tray with parchment paper or lightly grease it with oil.


2. Slice the Cabbage

Remove any damaged outer leaves from the cabbage.

Cut the cabbage into thick round slices (about 2–3 cm / 1 inch thick).
Keep the core intact so the slices stay together.


3. Season the Cabbage

Arrange the cabbage slices in a single layer on the baking tray.

Brush both sides with olive oil.

Sprinkle evenly with:
• Salt
• Black pepper
• Red pepper

Add any optional seasonings if using.


4. Bake

Place the tray in the oven.

Bake for 20 minutes, then turn the slices carefully with a spatula.

Bake for another 10 minutes, until:
• Edges are lightly browned
• Centers are tender
• Surface is lightly crisped


5. Optional Cheese Topping

If using cheese:

Remove tray from oven.
Sprinkle shredded cheese on top of each cabbage slice.

Return to oven for 3–5 minutes until melted and lightly golden.


6. Serve

Serve warm as:
• A side dish
• A light main dish
• A vegetable snack


⭐ Helpful Tips

✔ Cut slices thick so they don’t fall apart
✔ Turn carefully using a wide spatula
✔ For softer cabbage, cover loosely with foil for the first 15 minutes
✔ For crispier edges, bake uncovered the whole time


🧊 Storage

• Store in an airtight container in the refrigerator for up to 2 days
• Reheat in oven or air fryer for best texture

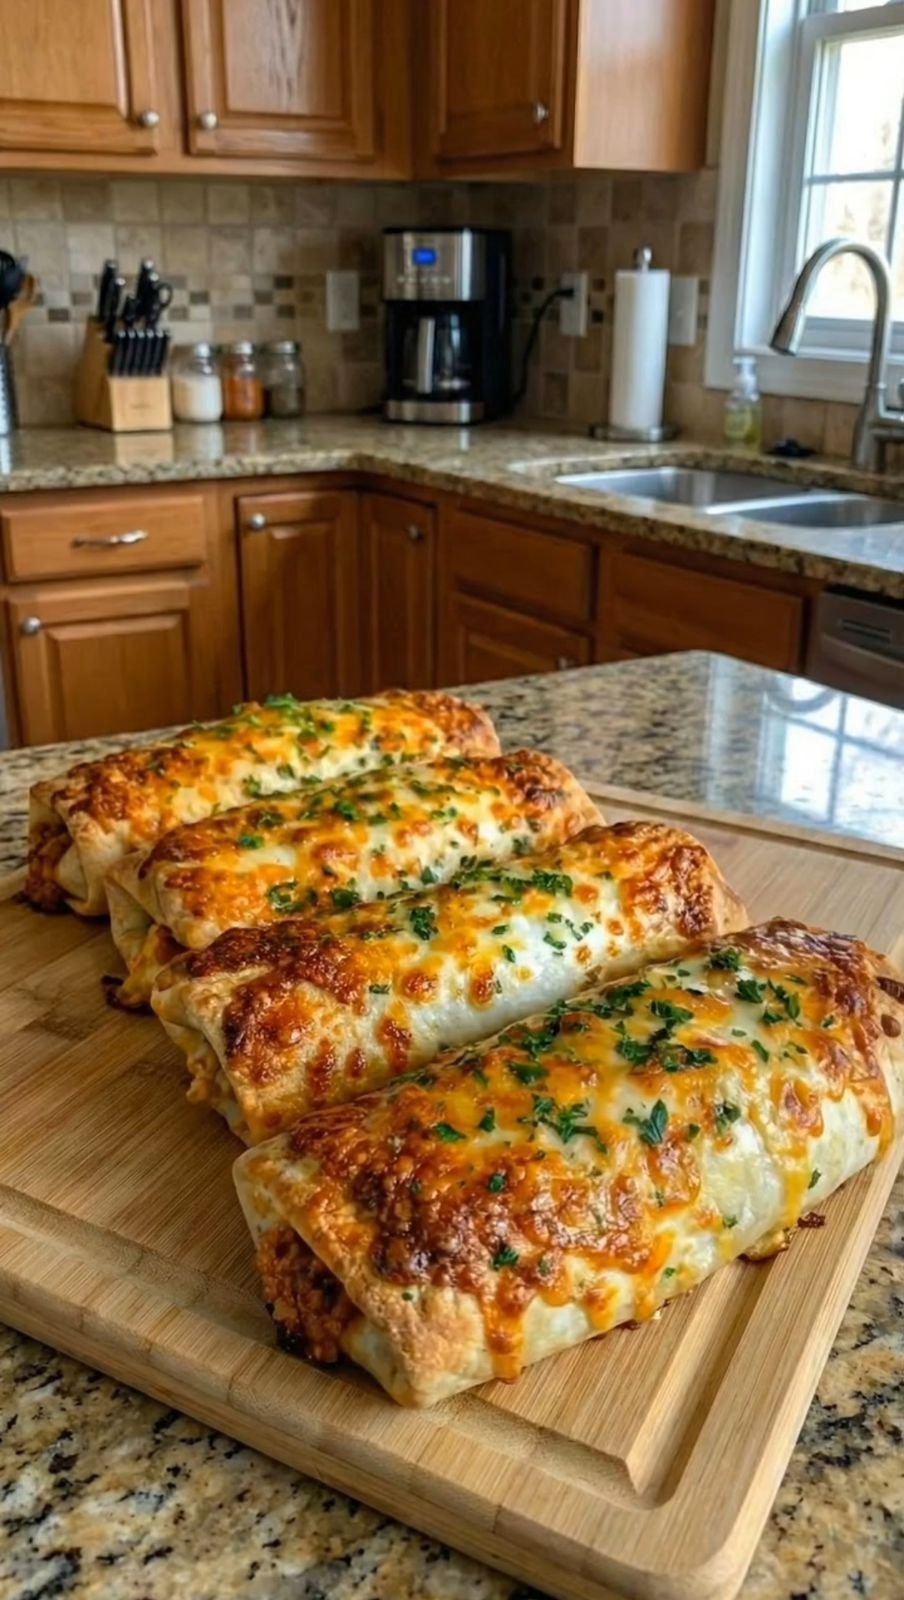
Cheesy Taco Sticks

Cheesy Taco Sticks

Baked dough sticks filled with seasoned ground beef and melted cheese, brushed with garlic butter and served with dipping sauces.

Prep Time: 12 minutes
Bake Time: 12–15 minutes
Yield: 8 sticks


🧾 Ingredients

• 1 lb (450 g) lean ground beef
• 1 packet taco seasoning (about 28 g / 1 oz)
• ¼ cup water
• 1 tube refrigerated pizza dough or classic refrigerated dough (about 13.8 oz / 390 g)
• 1½ cups shredded cheddar cheese (or cheese blend)

For topping:
• 2 tablespoons butter, melted
• ½ teaspoon garlic salt
• 1 teaspoon dried parsley

For serving (optional):
• Salsa
• Sour cream
• Guacamole
• Cheese dip


👩‍🍳 Instructions

1. Prepare the Oven and Pan

Preheat oven to 200°C (400°F).

Line a large baking sheet with parchment paper or a silicone baking mat.


2. Cook the Beef

Heat a skillet over medium-high heat.

Add ground beef and cook until fully browned, breaking it up with a spoon.

Drain excess fat from the pan.

Add taco seasoning and water.
Simmer for 3–5 minutes, stirring, until the liquid is absorbed.

Remove from heat and allow the meat to cool slightly.


3. Prepare the Dough

Unroll the dough onto a lightly floured surface.

Cut into 8 equal rectangles.


4. Fill the Dough

Place each rectangle flat on the work surface.

Add:
• A strip of shredded cheese down the center
• A spoonful of the beef mixture on top of the cheese

Do not overfill.


5. Seal the Sticks

Fold the long sides of the dough over the filling.

Pinch the seam tightly closed.

Pinch the ends shut and tuck them slightly underneath.

Place seam-side down on the prepared baking sheet.


6. Add Butter Topping

In a small bowl, mix:
• Melted butter
• Garlic salt
• Dried parsley

Brush this mixture over the tops of each stick.


7. Bake

Bake for 12–15 minutes, until:
• Dough is fully cooked
• Tops are golden
• Cheese inside is melted


8. Serve

Allow to cool for 3–5 minutes before serving.

Serve warm with dipping sauces if desired.


⭐ Helpful Tips

✔ Let beef cool before filling dough
✔ Do not overfill or the seams may open
✔ Always place seam-side down on the pan
✔ Use parchment paper for easy cleanup
✔ Bake with space between sticks for even cooking


🧊 Storage & Reheating

• Refrigerate in an airtight container for up to 3 days
• Reheat in oven or air fryer at 175°C (350°F) for 5–7 minutes
• Freezer storage: up to 1 month
• Reheat from frozen at 190°C (375°F) for 12–15 minutes